
Developmental dysplasia of the hip
Developmental dysplasia of the hip (DDH) or developmental dislocation of the hip used to be called congenital dislocation of the hip, is an abnormal development of the hip joint. The hip is a “ball-and-socket” joint. In a normal hip, the ball at the upper end of the thighbone (femur) fits firmly into the socket, which is part of the large pelvis bone. In babies and children with developmental dysplasia of the hip, the hip joint has not formed normally. The ball is loose in the socket and may be easy to dislocate. Sometimes, the hips can dislocate early in life and this may not be noticed until your child starts to walk. Pediatricians screen for developmental dysplasia of the hip at a newborn’s first examination and at every well-baby checkup thereafter.
In all cases of developmental dysplasia of the hip (developmental dislocation of the hip), the socket (acetabulum) is shallow, meaning that the ball of the thighbone (head of the femur) cannot firmly fit into the socket. Sometimes, the ligaments that help to hold the joint in place may also be loose. The degree of hip looseness, or instability, varies among children with developmental dysplasia of the hip.
- Dislocated. In the most severe cases of developmental dysplasia of the hip, the head of the femur is completely out of the socket.
- Dislocatable. In these cases, the head of the femur lies within the acetabulum, but can easily be pushed out of the socket during a physical examination.
- Subluxatable. In mild cases of developmental dysplasia of the hip, the head of the femur is simply loose in the socket. During a physical examination, the bone can be moved within the socket, but it will not dislocate.
Developmental dysplasia of the hip affects 1-7% of infants 1. In the United States, approximately 1 to 2 babies per 1,000 are born with developmental dysplasia of the hip. Well known risk factors for developmental dysplasia of the hip include family history of developmental dysplasia of the hip (parents or siblings), female sex, and breech positioning. Recent evidence suggests higher birth weight is a risk, whereas prematurity may be protective. Screening includes physical examination of all infant hips and imaging when abnormal findings or risk factors are present.
Although developmental dysplasia of the hip is most often present at birth, it may also develop during a child’s first year of life. Recent research shows that babies whose legs are swaddled tightly with the hips and knees straight are at a notably higher risk for developing developmental dysplasia of the hip after birth. As swaddling becomes increasingly popular, it is important for parents to learn how to swaddle their infants safely, and to understand that when done improperly, swaddling may lead to problems like developmental dysplasia of the hip.
It is important to check for and treat developmental dysplasia of the hip as early as possible. If developmental dysplasia of the hip is not treated, your child may develop a painless limp when walking, they may walk on their toes rather than in a heel-and-toe action, or they may develop a ‘waddling’ walk. In time, arthritis will develop in the untreated hip joint, which will become painful and may ultimately need a hip replacement.
Your doctor may ask for an ultrasound or X-ray of the hip joint to diagnose developmental dysplasia of the hip.
Developmental dysplasia of the hip treatment may involve use of a brace, a non-surgical procedure under sedation, or an operation to correct the dysplasia and hip position.
When developmental dysplasia of the hip is detected at birth, it can usually be corrected with the use of a harness or brace. If the hip is not dislocated at birth, the condition may not be noticed until the child begins walking. At this time, treatment is more complicated, with less predictable results.
Developmental dysplasia of the hip key points to remember
- Treatment for developmental dysplasia of the hip varies between children and depends on how bad the condition is.
- Treatment may include a brace, a plaster cast called a hip spica, movement of the hip into position under anaesthetic, or surgery to the ligaments around the joint.
- Children will often need to wear a brace or cast for several months.
- If developmental dysplasia of the hip is not treated, your child may develop a painless limp. Over time, painful arthritis will develop in the untreated hip joint.
Figure 1. Developmental dysplasia of the hip
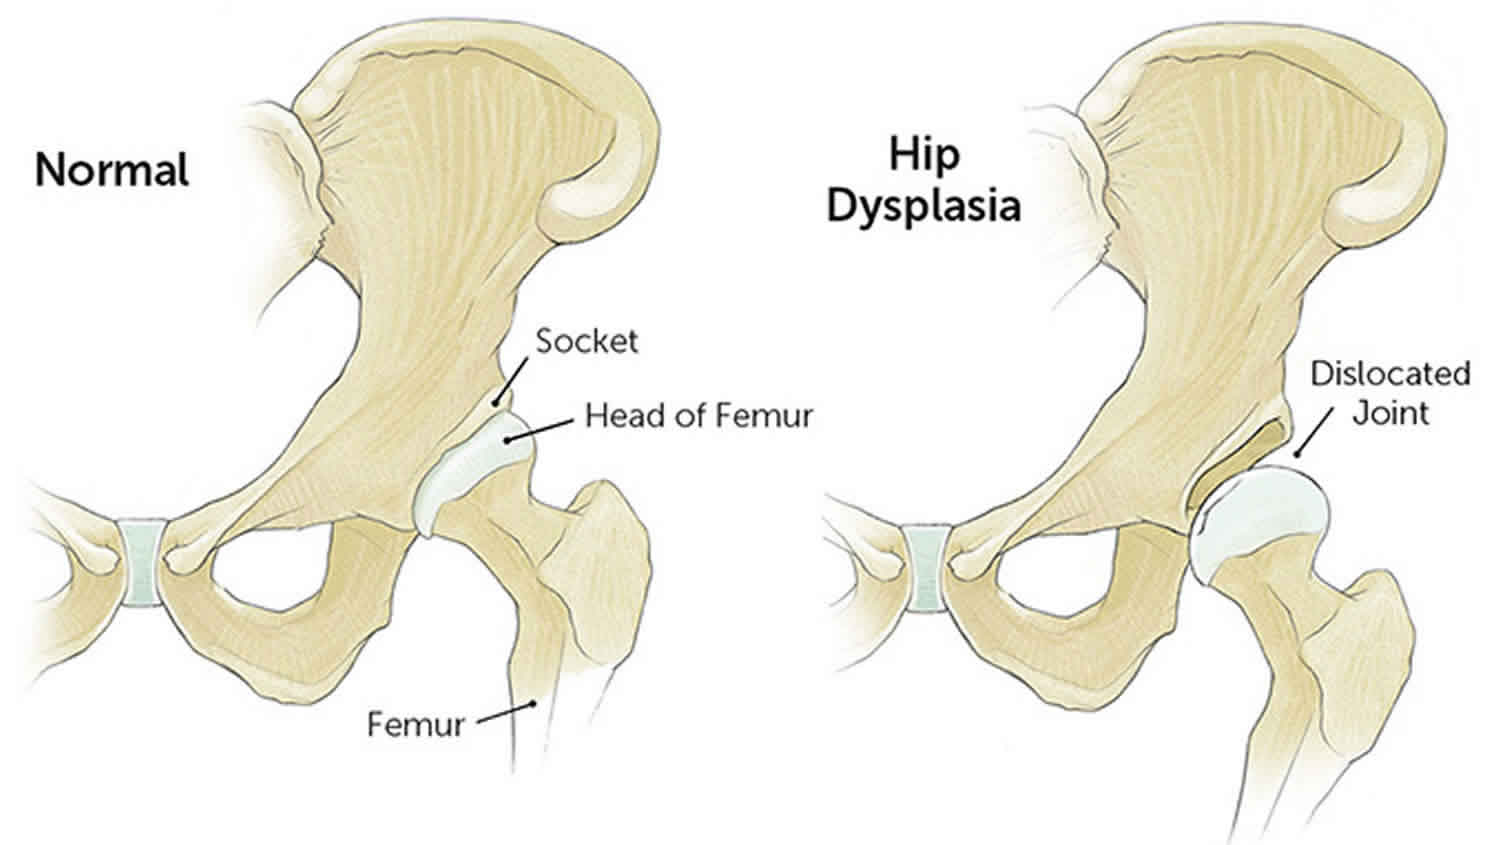
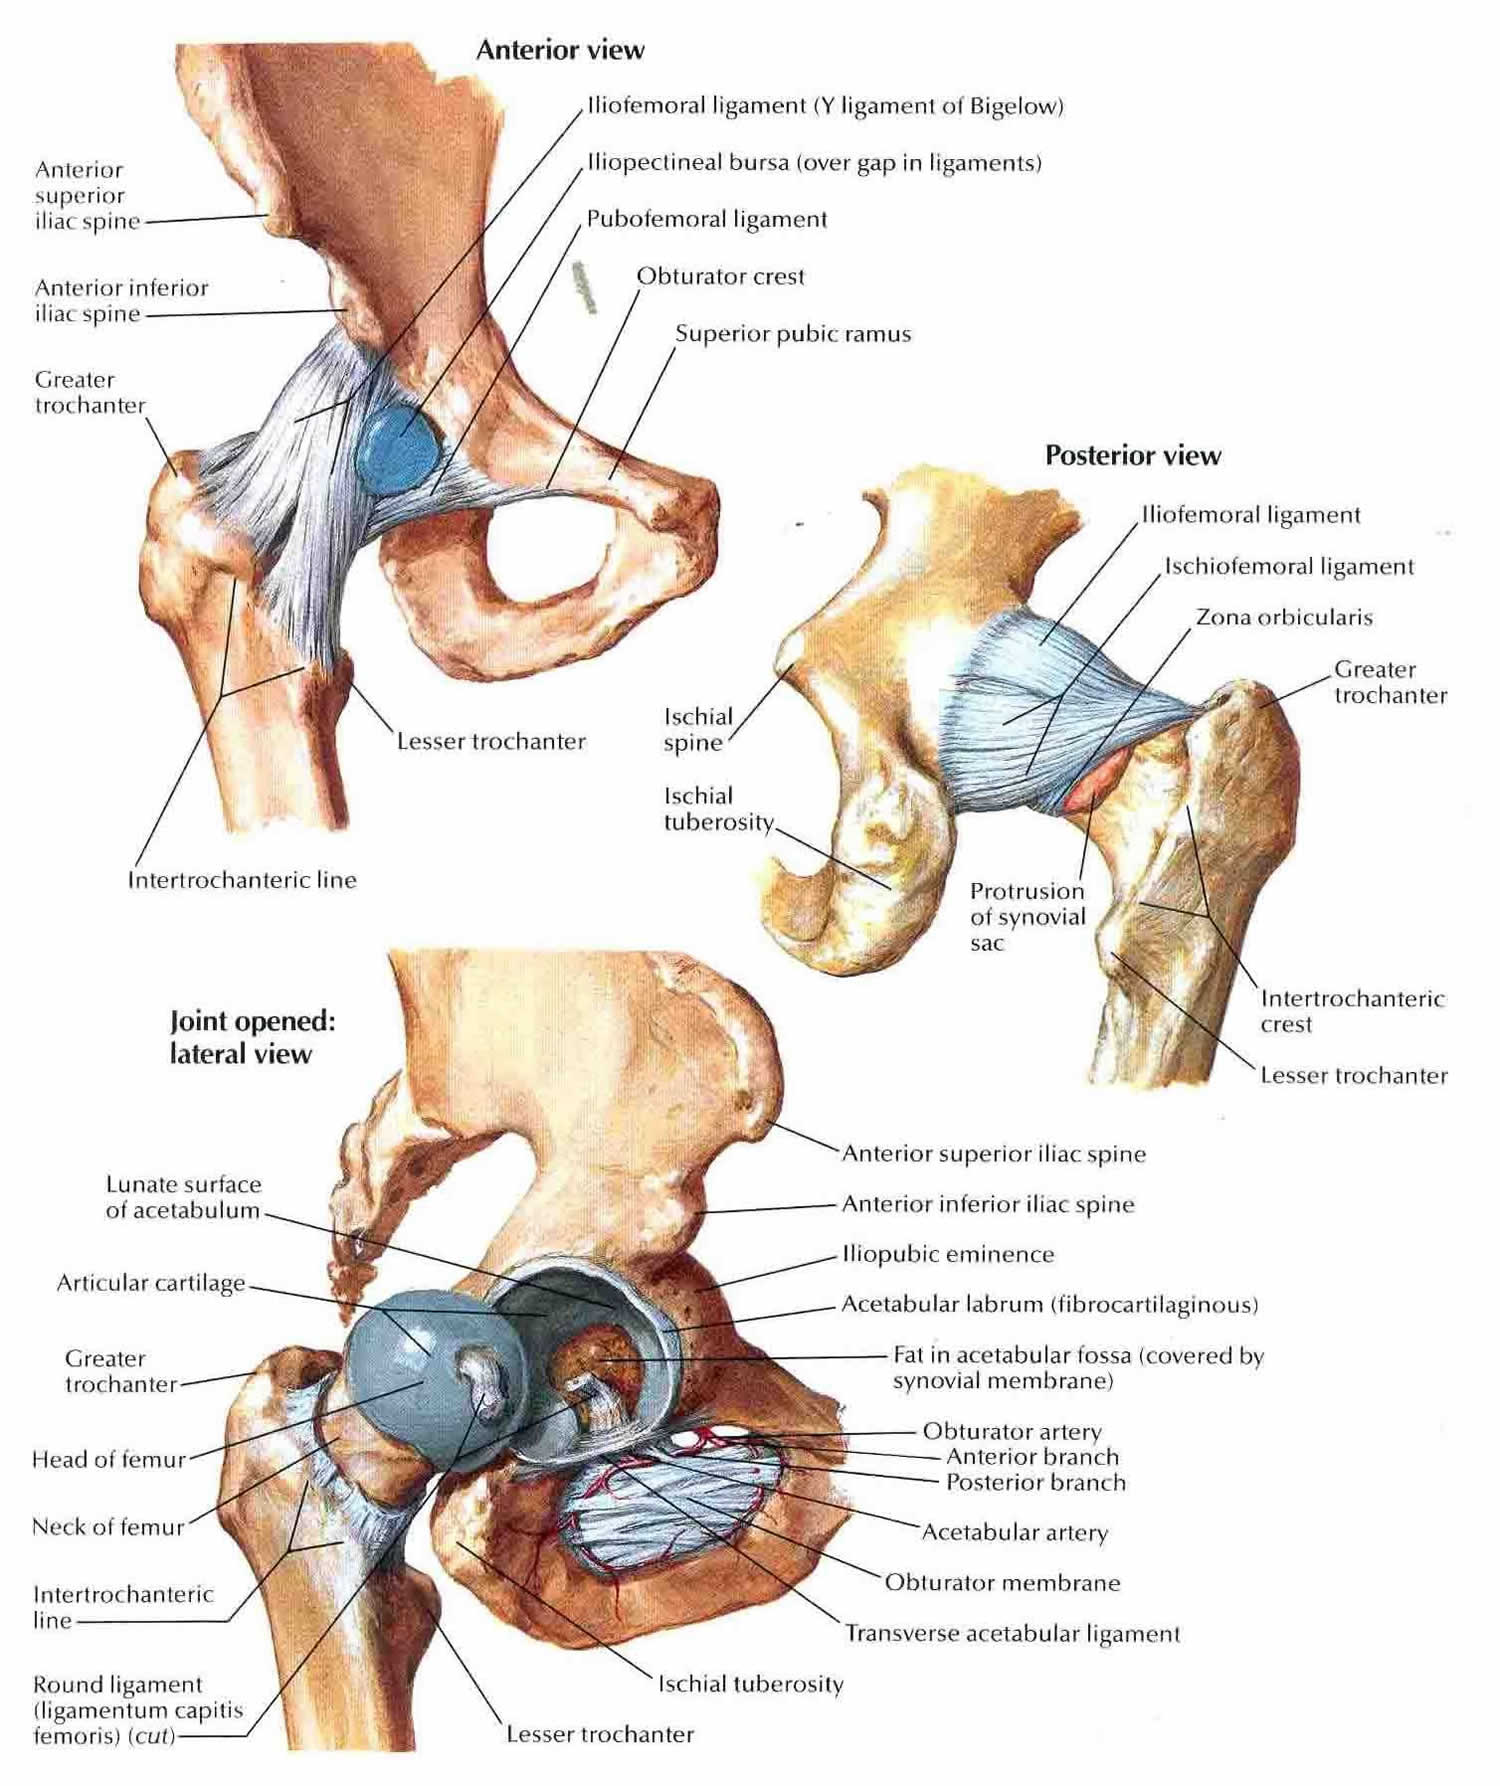
Figure 2. Hip joint anatomy
Developmental dysplasia of the hip causes
Pregnant women release hormones in their bloodstream that allow their ligaments to relax. These hormones help the delivery of the baby through the mother’s pelvis. Some of these hormones enter the baby’s blood, which can make the baby’s ligaments relaxed as well. This can make the hip joint loose in the socket. The way the baby lies in the uterus can also cause the hip joint to dislocate or become loose.
Developmental dysplasia of the hip tends to run in families where a parent/sibling has had a dislocated hip joint. It can be present in either hip and in any individual. It usually affects the left hip and is predominant in:
- Girls
- Firstborn children
- Babies born in the breech position (especially with feet up by the shoulders). The American Academy of Pediatrics now recommends ultrasound developmental dysplasia of the hip screening of all female breech babies.
- Family history of developmental dysplasia of the hip (parents or siblings)
- Oligohydramnios (low levels of amniotic fluid)
Developmental dysplasia of the hip symptoms
Some babies born with a dislocated hip will show no outward signs and sometimes the signs of developmental dysplasia of the hip are hard to see, even by a doctor.
Contact your pediatrician if your baby has:
- Legs of different lengths
- Uneven skin folds on their groin or thigh (front or back of the upper leg)
- A stiff hip joint
- Lean to the affected side when standing
- An outward-turning leg on the affected side
- Less mobility or flexibility on one side
- Limping, toe walking, or a waddling gait
Developmental dysplasia of the hip diagnosis
In addition to visual clues, your doctor will perform a careful physical examination to check for developmental dysplasia of the hip, such as listening and feeling for “clunks” as the hip is put in different positions. Your doctor will use specific maneuvers to determine if the hip can be dislocated and/or put back into proper position.
Newborns identified as at higher risk for developmental dysplasia of the hip are often tested using ultrasound, which can create images of the hip bones. For older infants and children, x-rays of the hip may be taken to provide detailed pictures of the hip joint.
Developmental dysplasia of the hip treatment
Treatment methods depend on a child’s age. Treatment in the first six months consists of a harness, with 70–95% success 1. Failure risk factors include femoral nerve palsy, static bracing, irreducible hips, initiation after seven weeks of age, right hip dislocation, Graf-IV hips, and male sex. Rigid bracing may be trialed if reduction with a harness fails and closed reduction is indicated after failed bracing. If the hip is still irreducible, nonconcentric, or unstable, open reduction may be required following closed reduction. Evidence does not support delaying hip reduction until the ossific nucleus is present.
Nonsurgical treatment
Newborns
The baby is placed in a soft positioning device, called a Pavlik harness, for 1 to 2 months to keep the thighbone in the socket (see Figure 3). This special brace is designed to hold the hip in the proper position while allowing free movement of the legs and easy diaper care. The Pavlik harness helps tighten the ligaments around the hip joint and promotes normal hip socket formation.
Parents play an essential role in ensuring the harness is effective. Your doctor and healthcare team will teach you how to safely perform daily care tasks, such as diapering, bathing, feeding, and dressing.
Figure 3. Pavlik harness

1 month to 6 months
Similar to newborn treatment, a baby’s thighbone is repositioned in the socket using a harness or similar device. This method is usually successful, even with hips that are initially dislocated.
How long the baby will require the harness varies. It is usually worn full-time for at least 6 weeks, and then part-time for an additional 6 weeks.
If the hip will not stay in position using a harness, your doctor may try an abduction brace made of firmer material that will keep your baby’s legs in position.
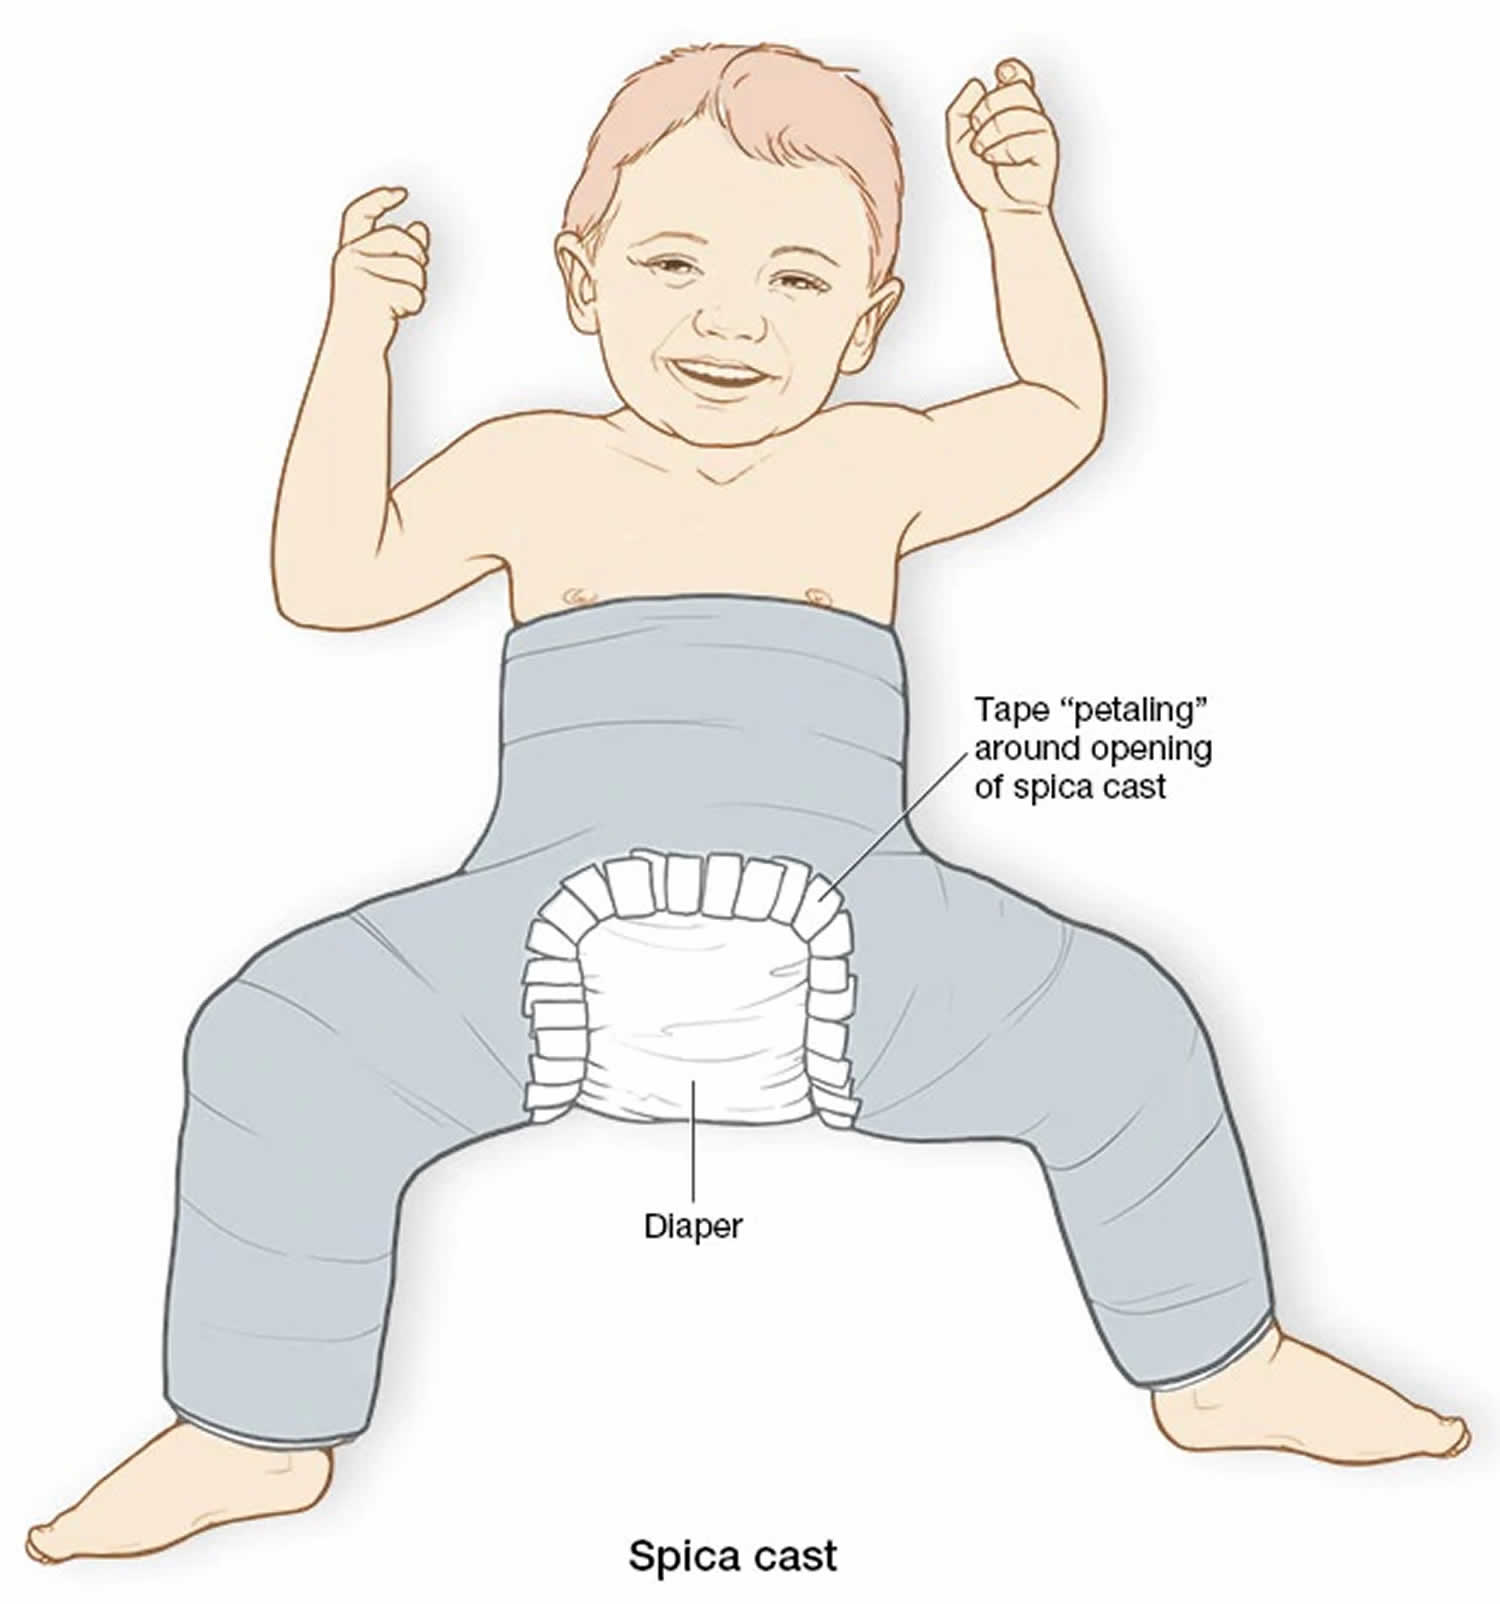
In some cases, a closed reduction procedure is required. Your doctor will gently move your baby’s thighbone into proper position, and then apply a spica cast (a plaster cast that covers your child’s body from the knees to the waist) to hold the bones in place. This procedure is done while the baby is under anesthesia.
Caring for a baby in a spica cast requires specific instruction. Your doctor and healthcare team will teach you how to perform daily activities, maintain the cast, and identify any problems.
6 months to 2 years. Older babies are also treated with closed reduction and spica casting. In most cases, skin traction may be used for a few weeks prior to repositioning the thighbone. Skin traction prepares the soft tissues around the hip for the change in bone positioning. It may be done at home or in the hospital.
Figure 4. Spica cast
Pavlik harness care
Your doctor will let you know if your baby needs to wear the Pavlik harness 24 hours a day without removing it at all, or if the harness can be removed for bathing.
Key points to remember:
- Monitor your baby’s skin daily. Take care to clean your baby’s skin and if you notice any skin irritation or redness, contact the orthotist.
- Always try to keep your baby’s legs apart, especially when bathing with the harness off.
- Babies may cry a little or seem unsettled for the first couple of nights after the harness is fitted. This should settle down within a couple of days.
- The Pavlik Harness should be washed only if absolutely necessary and do not tumble dry.
- Make sure you vary the position of your sleeping baby to avoid plagiocephaly (misshapen head).
What should I do if my baby gets a rash under the harness?
It is important to monitor your baby’s skin each day, and contact the orthotist if a rash appears. If mild skin irritation occurs, a barrier ointment (like Vaseline) can be helpful, but discuss this with your child’s orthotist.
My baby seems very reluctant to spend time on her tummy. How should I deal with this?
Tummy time is difficult to achieve when your child is placed in any kind of orthosis (e.g. harness, spica, plaster), though you can try encouraging tummy time during orthosis-free time, if allowed. Fortunately, in the long-term, your child’s developmental ability will not suffer by missing out on tummy-time for this short period in their life.
Care at home
Putting the Pavlik harness on
Your baby’s orthotist will make sure the harness fits your baby correctly, and will show you how to put it on and how to check that it is positioned properly.
- The chest strap should be firm but you should be able to fit two fingers underneath it. This allows the chest to expand properly when your child is breathing.
- The ankle and lower leg straps should be firm to hold the foot, but not too tight.
Getting used to the harness
It takes some babies a couple of days to get use to the Pavlik harness. Some babies may cry a little or seem unsettled for the first couple of nights. This should settle down after a few days.
Hygiene and skin care
Monitor your baby’s skin daily. Take care to clean your baby’s skin and if you notice any skin irritation or redness, contact the orthotist.
- Try to keep the harness dry at all times.
- If your doctor says the Pavlik harness must be on 24 hours a day, it cannot be removed for bathing. In this case, your baby will need to have sponge baths. The orthotist will show you how to do this.
- If you are allowed to remove the harness for bathing, then only undo the Velcro straps to remove it. Do not adjust or undo the metal buckles.
- When bathing your baby, pay particular attention to the creases behind the knees and hip creases. Dry the skin well with a towel before reapplying the harness.
- Always try to keep your baby’s legs apart if bathing them with the harness off.
Nappies and clothing
Your baby can wear normal nappies under the Pavlik Harness. When changing the nappy, do not hold your baby’s feet together as this will move the hips from the correct position. Loose-fitting clothes that do not pull the knees together should be worn over the harness.
Feeding
You will be able to continue breastfeeding when using the Pavlik Harness. You might need to try some different positions until you find one that is comfortable for both you and your baby.
Positioning your baby
Your baby will be sleeping on their back with the harness on.
It is important to regularly change your baby’s head’s position while they are asleep to avoid a flat spot developing on the back of the head. The skull bones are very soft and the pressure of being in one position for too long can affect the shape of their head. See our fact sheet Plagiocephaly.
Supervised tummy time for your baby will decrease the risk of developing a flat spot. It will also promote body stability, limb coordination and head control in your baby. Tummy time is important, even when your baby is wearing a Pavlik Harness.
Cleaning the harness
The Pavlik Harness should be washed only if absolutely necessary.
- Remove the soiled section of the brace (remember how it is attached), wash in cold water with soap and gently clean with a nail brush.
- Blot dry with a towel, or use a hair dryer on low heat.
- Do not tumble dry the harness (it may shrink).
Potential problems
Femoral nerve palsy is a very rare problem that can happen when using a Pavlik harness. If you notice that your baby stops kicking, contact the orthotist as soon as possible.
Follow-up
Your orthotist will usually arrange regular reviews to monitor the progress of your baby’s growth and adjust the orthosis as required. The review with the orthotist will be linked with your doctor’s appointment. If your doctor’s appointment is changed, you will also need to reschedule your orthotist’s appointment.
Contact your orthotist if you have any questions or concerns regarding your child’s treatment with a Pavlik Harness.
Hip spica plaster care
Key points to remember
- Children in hip spicas need special care. Nurses will teach you how to care for your child once they go home.
- Hip spicas are not waterproof and should be kept dry.
- Nappies need to be changed as soon as they are wet or dirty to help keep the plaster clean and dry.
- Your child’s position should be changed every two to four hours, and skin should be checked every day.
- If you notice an odor (not from urine or feces) coming from the plaster, contact your hospital or visit your nearest hospital emergency department.
See your child’s doctor if:
- you notice any sores or blisters on the skin under the edges of the cast
- your child has a high temperature that cannot be explained by a cold, ear infection or other illness
- there are cracks, breaks or softening of the plaster
- your child’s toes are bluish, reddened, swollen, very hot or very cold
- if there is an unusual odour (bad smell) coming from the plaster which cannot be explained by soiling (poo or wee)
- if the cast has become too tight.
Care at home
Toileting and nappies
Care of the toileting area of your child’s cast is important, and needed to make sure your child is comfortable and to keep the cast dry.
- Nappies need to be checked and changed often (at least every two hours during the day and every three hours during the night).
- Lift older children onto the toilet, making sure they are sitting as upright as possible.
- Older children can also use a urine bottle or pan. If your child is using a bedpan, they need to be positioned with their head elevated above hip level. This will help prevent urine and faeces coming into contact with the plaster, and urine from running back inside the plaster.
- If your child wets the bed at night, or if they have special needs, ask the nurses to show you how to protect the plaster using nappies and sanitary pads. These will need to be changed as soon as they are wet to avoid moisture being absorbed by the plaster.
- If your child has loose bowel motions or if you are having trouble keeping the urine from running under the plaster, cotton padding can be used around the toileting area to help stop this. This will also need to be changed regularly.
- If the hip spica does get wet, try leaving the toileting area uncovered so it can dry in the air, or use a hair dryer (on a cool setting). Positioning your child on their stomach with their nappy off will help to dry the back of the plaster.
- A hip spica will rarely be changed if it smells because of soiling and urine staining. A few drops of lavender or eucalyptus oil or Nil-Odour can be used on the plaster if a smell of urine or feces develops. Use only a very small amount so the plaster doesn’t soften.
Bathing and hair washing
It’s important to keep the hip spica dry when bathing and washing hair. Washing your child in a hip spica is done by using a bowl of water and a face washer (a sponge bath).
- Wash hair over the edge of a sink or bath with a jug. You will need the help of another person. One person holds the child over the bath or sink, while the other washes the hair.
- A larger child may be washed in the same way but positioned on the bed, floor or a Perthes trolley. A large dish may be placed under your child’s head to allow for hair washing with a cup or jug. Or, one adult can support the child on their knees while seated beside the bath, while the other adult washes the child’s hair.
Lifting
When lifting your child, it is important to support them and the weight of the plaster. Do not lift them under the arms without supporting the plaster as well.
- Keep your child as close as possible to your own body when picking them up. This helps prevent straining your back and helps make your child feel secure.
- Older children in hip spicas can be very heavy and an OT may be able to suggest equipment to help with lifting (e.g. a hoist). If you have any concerns about lifting your child or concerns about the amount of support you have at home, please discuss these with your child’s nurse.
- If there is a bar across the legs, this can be used for lifting after the plaster has a fibreglass outer layer applied (scotching).
Positioning
Children in a hip spica cannot move easily, so you will need to change their position often to avoid sores developing under the plaster.
- Position changes should be made every two to four hours, during the day and night. You can do the changes during nappy checks.
- Positions include laying on their back or on either side using pillows or rolled up towels for support. Children can also be positioned on their stomach, supported by pillows, for short periods of time under direct supervision of an adult.
- Every time you change your child’s position, check that the plaster is not digging in and is not too tight around the edges (tummy, ankles, groin and knees). Also check this when placing your child in the car.
- Make sure your child’s heels, feet and toes can move freely after each position change. Make sure their feet are not pressed into the mattress or chair, as this could cause pressure sores, especially when positioned on the stomach.
- If your child develops a reddened area on their spine, they may need to spend more time on their stomach.
Feeding/diet
- If your baby is breastfed, experiment with different positions to find one that suits you best.
- If your child is eating solids, you may need to feed them smaller meals more often because the plaster is tighter around the stomach.
- Sit your child as upright as possible when feeding. It is a good idea to do this in their pram or wheelchair, ensuring your child is well secured.
- Encourage your child to eat plenty of fruit and vegetables and to drink lots fluids to help prevent constipation and to promote healing.
Clothing
- Dress your child in larger clothing so it can fit over a hip spica.
- Smaller children may only need a T-shirt or jumper and socks. Pull socks up over the plaster so they are not tight around the ankles.
- Underwear for older children can be altered with Velcro, press-studs or ties on the sides. Where there is a bar between the knees, it may be easier to place the Velcro or press-studs on the inside of the legs.
Skin care
Skin around the edges of the plaster should be checked every day for redness, blisters, pressure areas or skin irritations.
- Your child will be growing, so check regularly to make sure the plaster is not too tight.
- Powders and creams should only be used on skin that you can see. Do not put any powder or cream under the plaster because this can cause skin irritation.
- Be sure your child does not poke things down the plaster, even if itchy. Items poked down the plaster can cause sores and may become stuck.
Entertainment
- Your child will adjust to being in a hip spica very quickly and should continue with their regular routines as much as possible.
- Toys should be placed within easy reach.
Follow-up
You will be advised when your child needs to have a follow-up appointment with a doctor – this is usually six weeks after surgery. At this appointment an X-ray will be taken to see if the hip spica is ready to be removed.
Surgical treatment
Closed reduction procedure
If splinting does not work, your child may need a procedure called a closed reduction. Closed reduction means the hip joint is repaired without surgery. The hip joint is moved into the correct position while your child is asleep under anesthetic.
Open reduction surgery
Sometimes, when the above treatments do not work or developmental dysplasia of the hip is diagnosed later than six months of age, your child may need open reduction surgery (when surgery is done through a cut in the body).
For developmental dysplasia of the hip open reduction surgery, the hip joint is moved into the correct position while your child is asleep under anaesthetic. The hip joint is made more stable by operating on the surrounding ligaments. This is all done through a small cut near the groin.
After open reduction surgery (and sometimes after closed reduction surgery) your child will need a hip spica – a plaster cast that covers your child’s body from the knees to the waist. Hip spicas may need to be worn for several months. Children may then need to wear different splints or braces to make sure the hip joint remains stable and in the right position.
Osteotomy
Occasionally, when developmental dysplasia of the hip is diagnosed late, more surgery to the thigh or pelvic bones may be needed to make sure the hip joint stays in place. This surgery is called an osteotomy.
6 months to 2 years
If a closed reduction procedure is not successful in putting the thighbone is proper position, open surgery is necessary. In this procedure, an incision is made at the baby’s hip that allows the surgeon to clearly see the bones and soft tissues.
In some cases, the thighbone will be shortened in order to properly fit the bone into the socket. X-rays are taken during the operation to confirm that the bones are in position. Afterwards, the child is placed in a spica cast to maintain the proper hip position.
Older than 2 years
In some children, the looseness worsens as the child grows and becomes more active. Open surgery is typically necessary to realign the hip. A spica cast is usually applied to maintain the hip in the socket.
Recovery
In many children with developmental dysplasia of the hip, a body cast and/or brace is required to keep the hip bone in the joint during healing. The cast may be needed for 2 to 3 months. Your doctor may change the cast during this time period.
X-rays and other regular follow-up monitoring are needed after developmental dysplasia of the hip treatment until the child’s growth is complete.
Complications
Children treated with spica casting may have a delay in walking. However, when the cast is removed, walking development proceeds normally.
The Pavlik harness and other positioning devices may cause skin irritation around the straps, and a difference in leg length may remain. Growth disturbances of the upper thighbone are rare, but may occur due to a disturbance in the blood supply to the growth area in the thighbone.
Even after proper treatment, a shallow hip socket may still persist, and surgery may be necessary in early childhood to restore the normal anatomy of the hip joint.
Developmental dysplasia of the hip prognosis
Developmental dysplasia of the hip if diagnosed early and treated successfully, children are able to develop a normal hip joint and should have no limitation in function. Left untreated, developmental dysplasia of the hip can lead to pain and osteoarthritis by early adulthood. It may produce a difference in leg length or decreased agility.
Even with appropriate treatment, hip deformity and osteoarthritis may develop later in life. This is especially true when treatment begins after the age of 2 years.
References


