close

Procedures

Procedures

ERCP

ERCP – Endoscopic retrograde cholangiopancreatography

What is ERCP

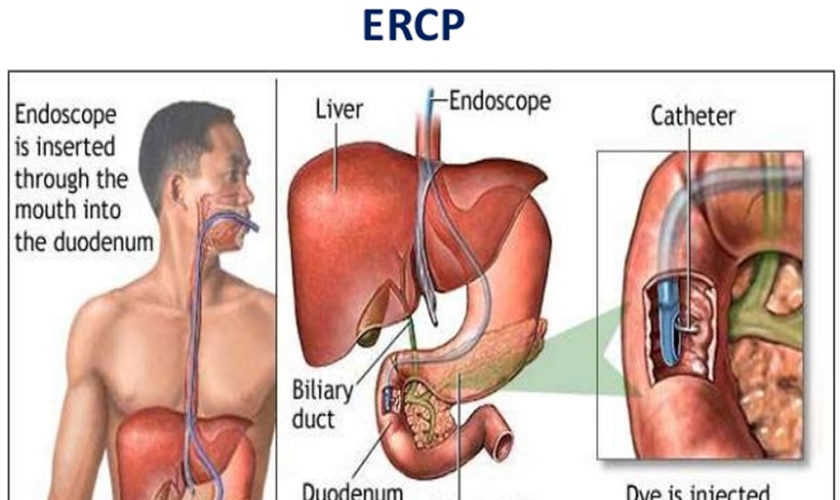
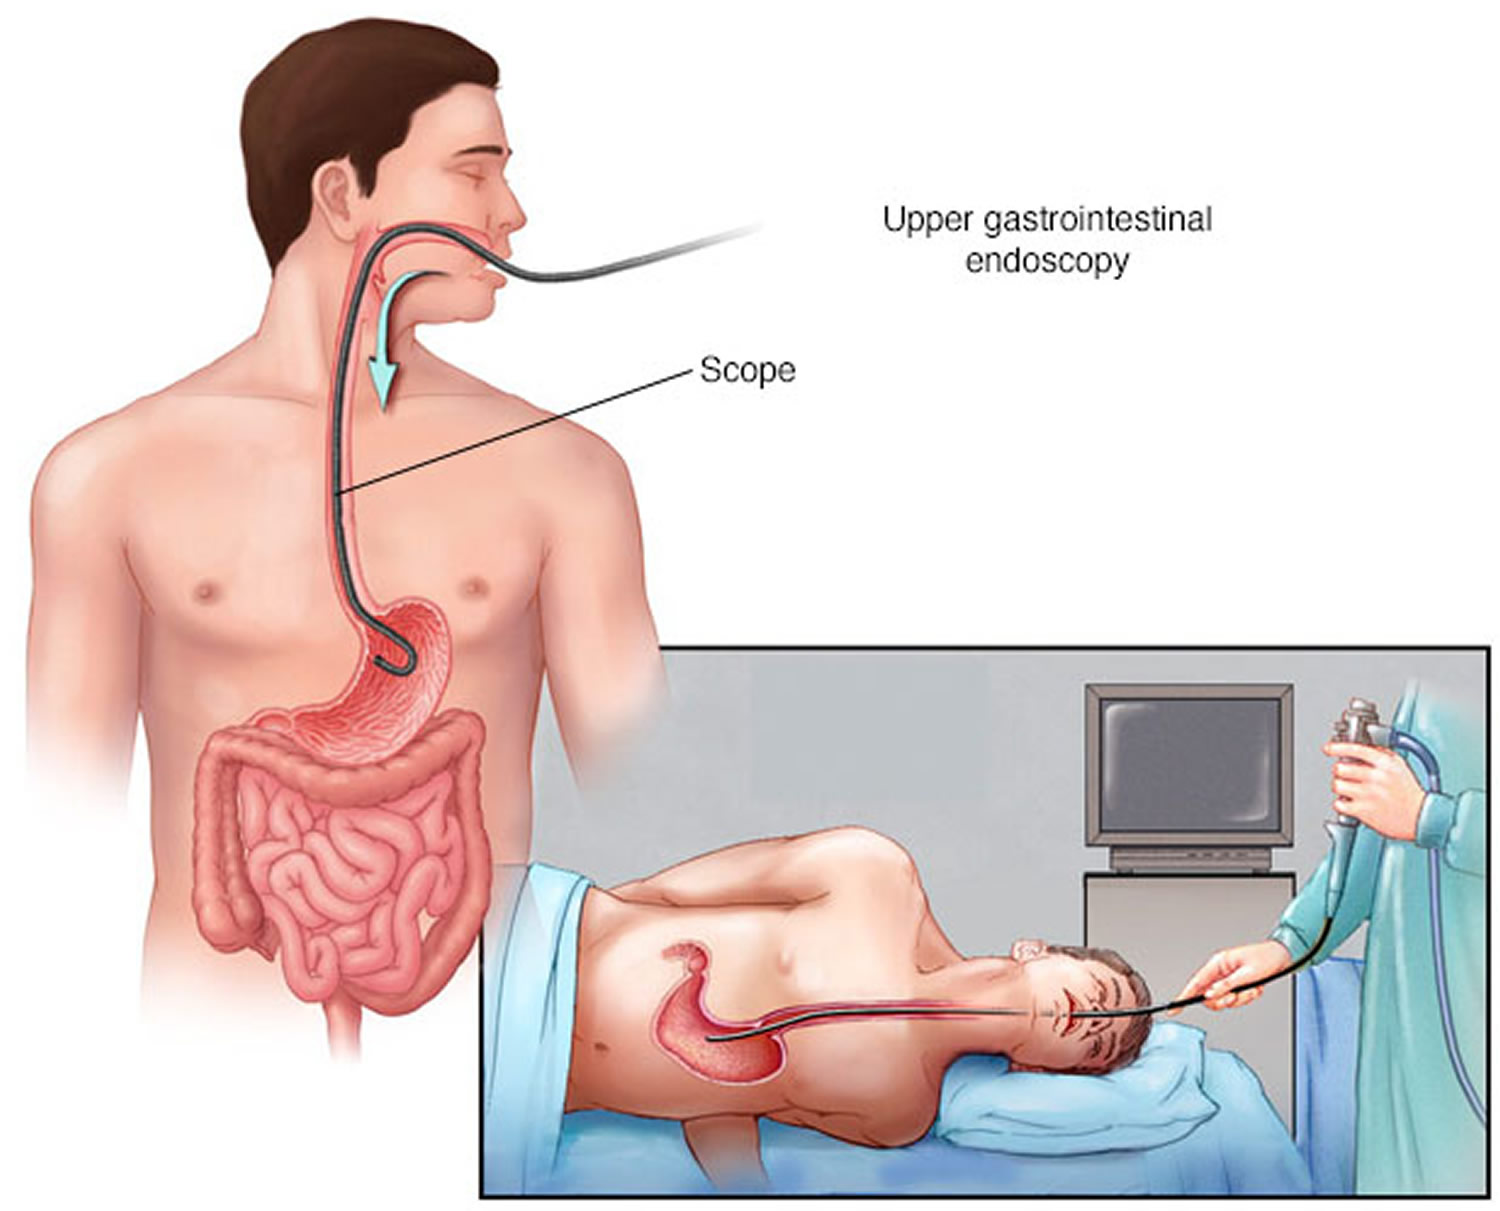
ERCP is an abbreviation for a medical procedure called Endoscopic Retrograde Cholangiopancreatography that combines upper gastrointestinal (GI) endoscopy and x-rays to to study the bile ducts, pancreatic duct and gallbladder and to treat problems of the bile and pancreatic ducts. ERCP is an advanced endoscopic procedure where a long, thin flexible tube with a camera at the end called the endoscope is passed through your mouth, esophagus and stomach into the duodenum (first part of the small intestine) down to where the bile and pancreatic duct opens into the small intestine. After your doctor sees the common opening to the ducts from the liver and pancreas, called the major duodenal papilla, your doctor will pass a narrow plastic tube called a catheter through the endoscope and into the ducts. Your doctor will inject a contrast material (dye) into the pancreatic or biliary ducts and will take X-rays.

ERCP procedure most often takes between 1 and 2 hours.

What are the bile and pancreatic ducts?

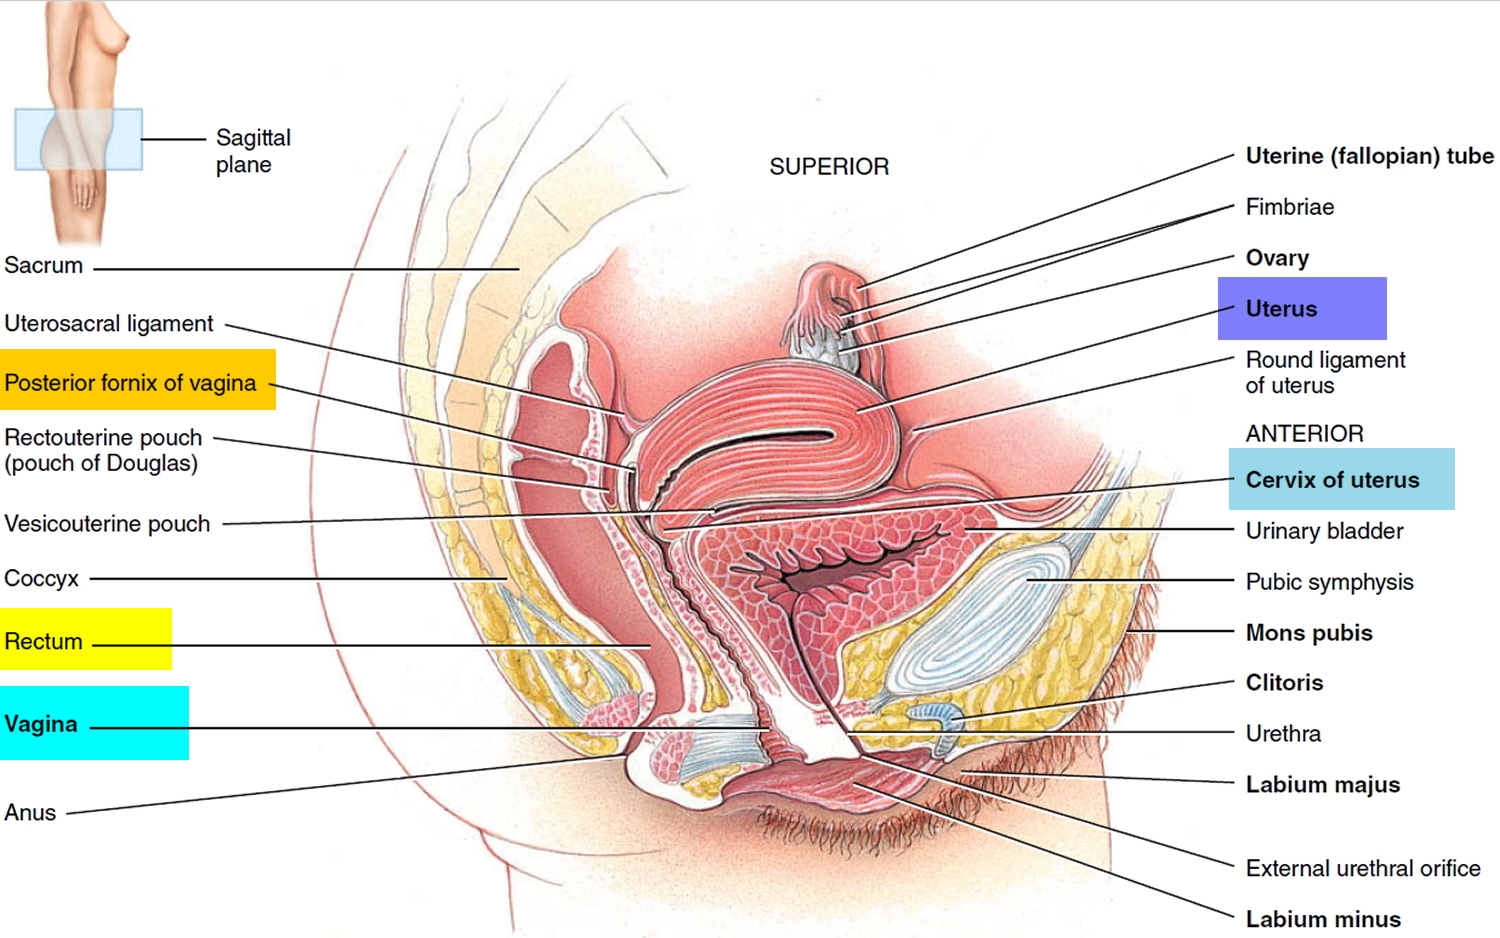
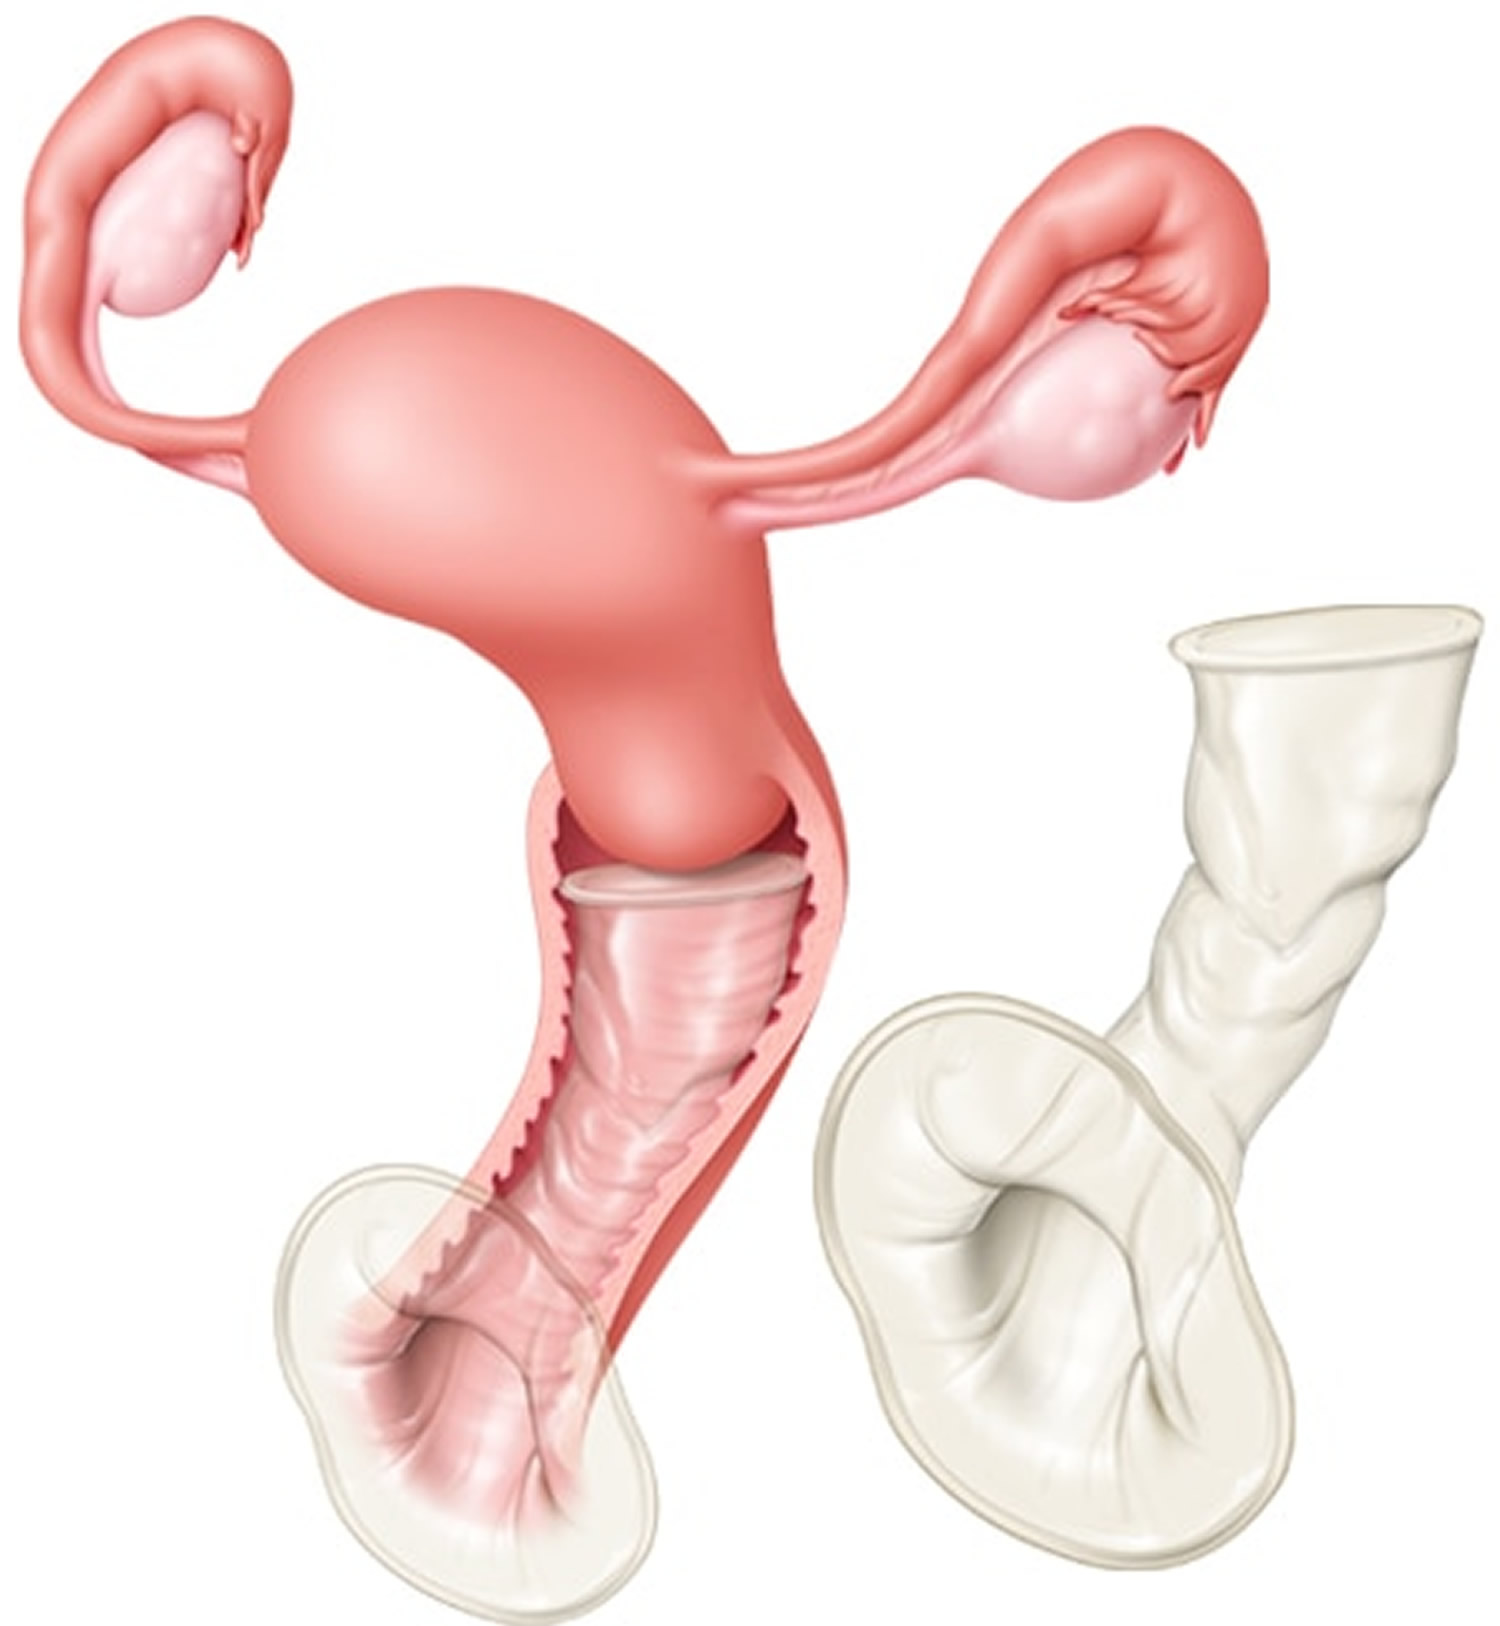
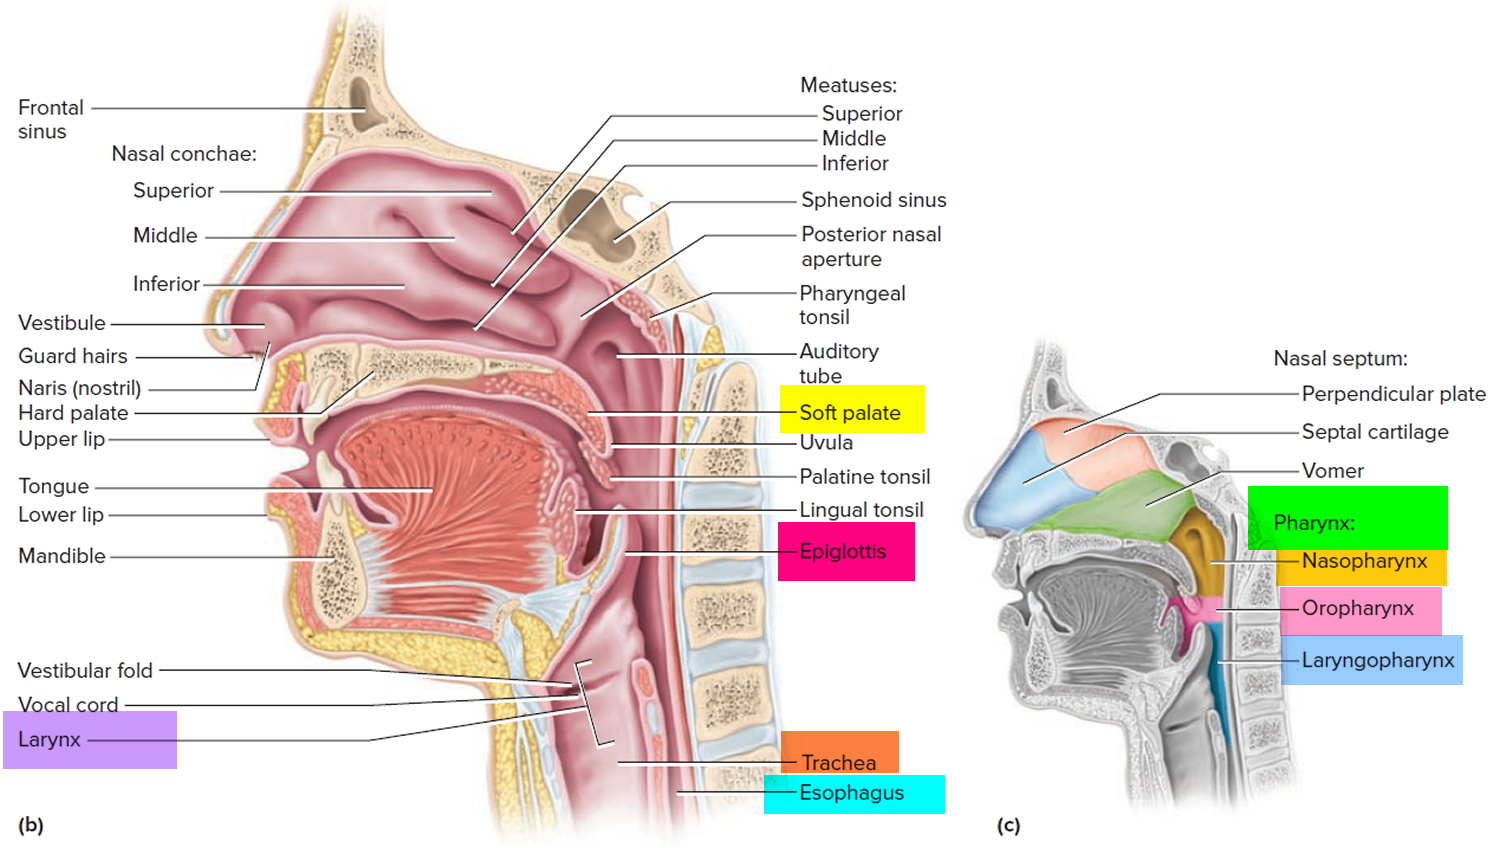
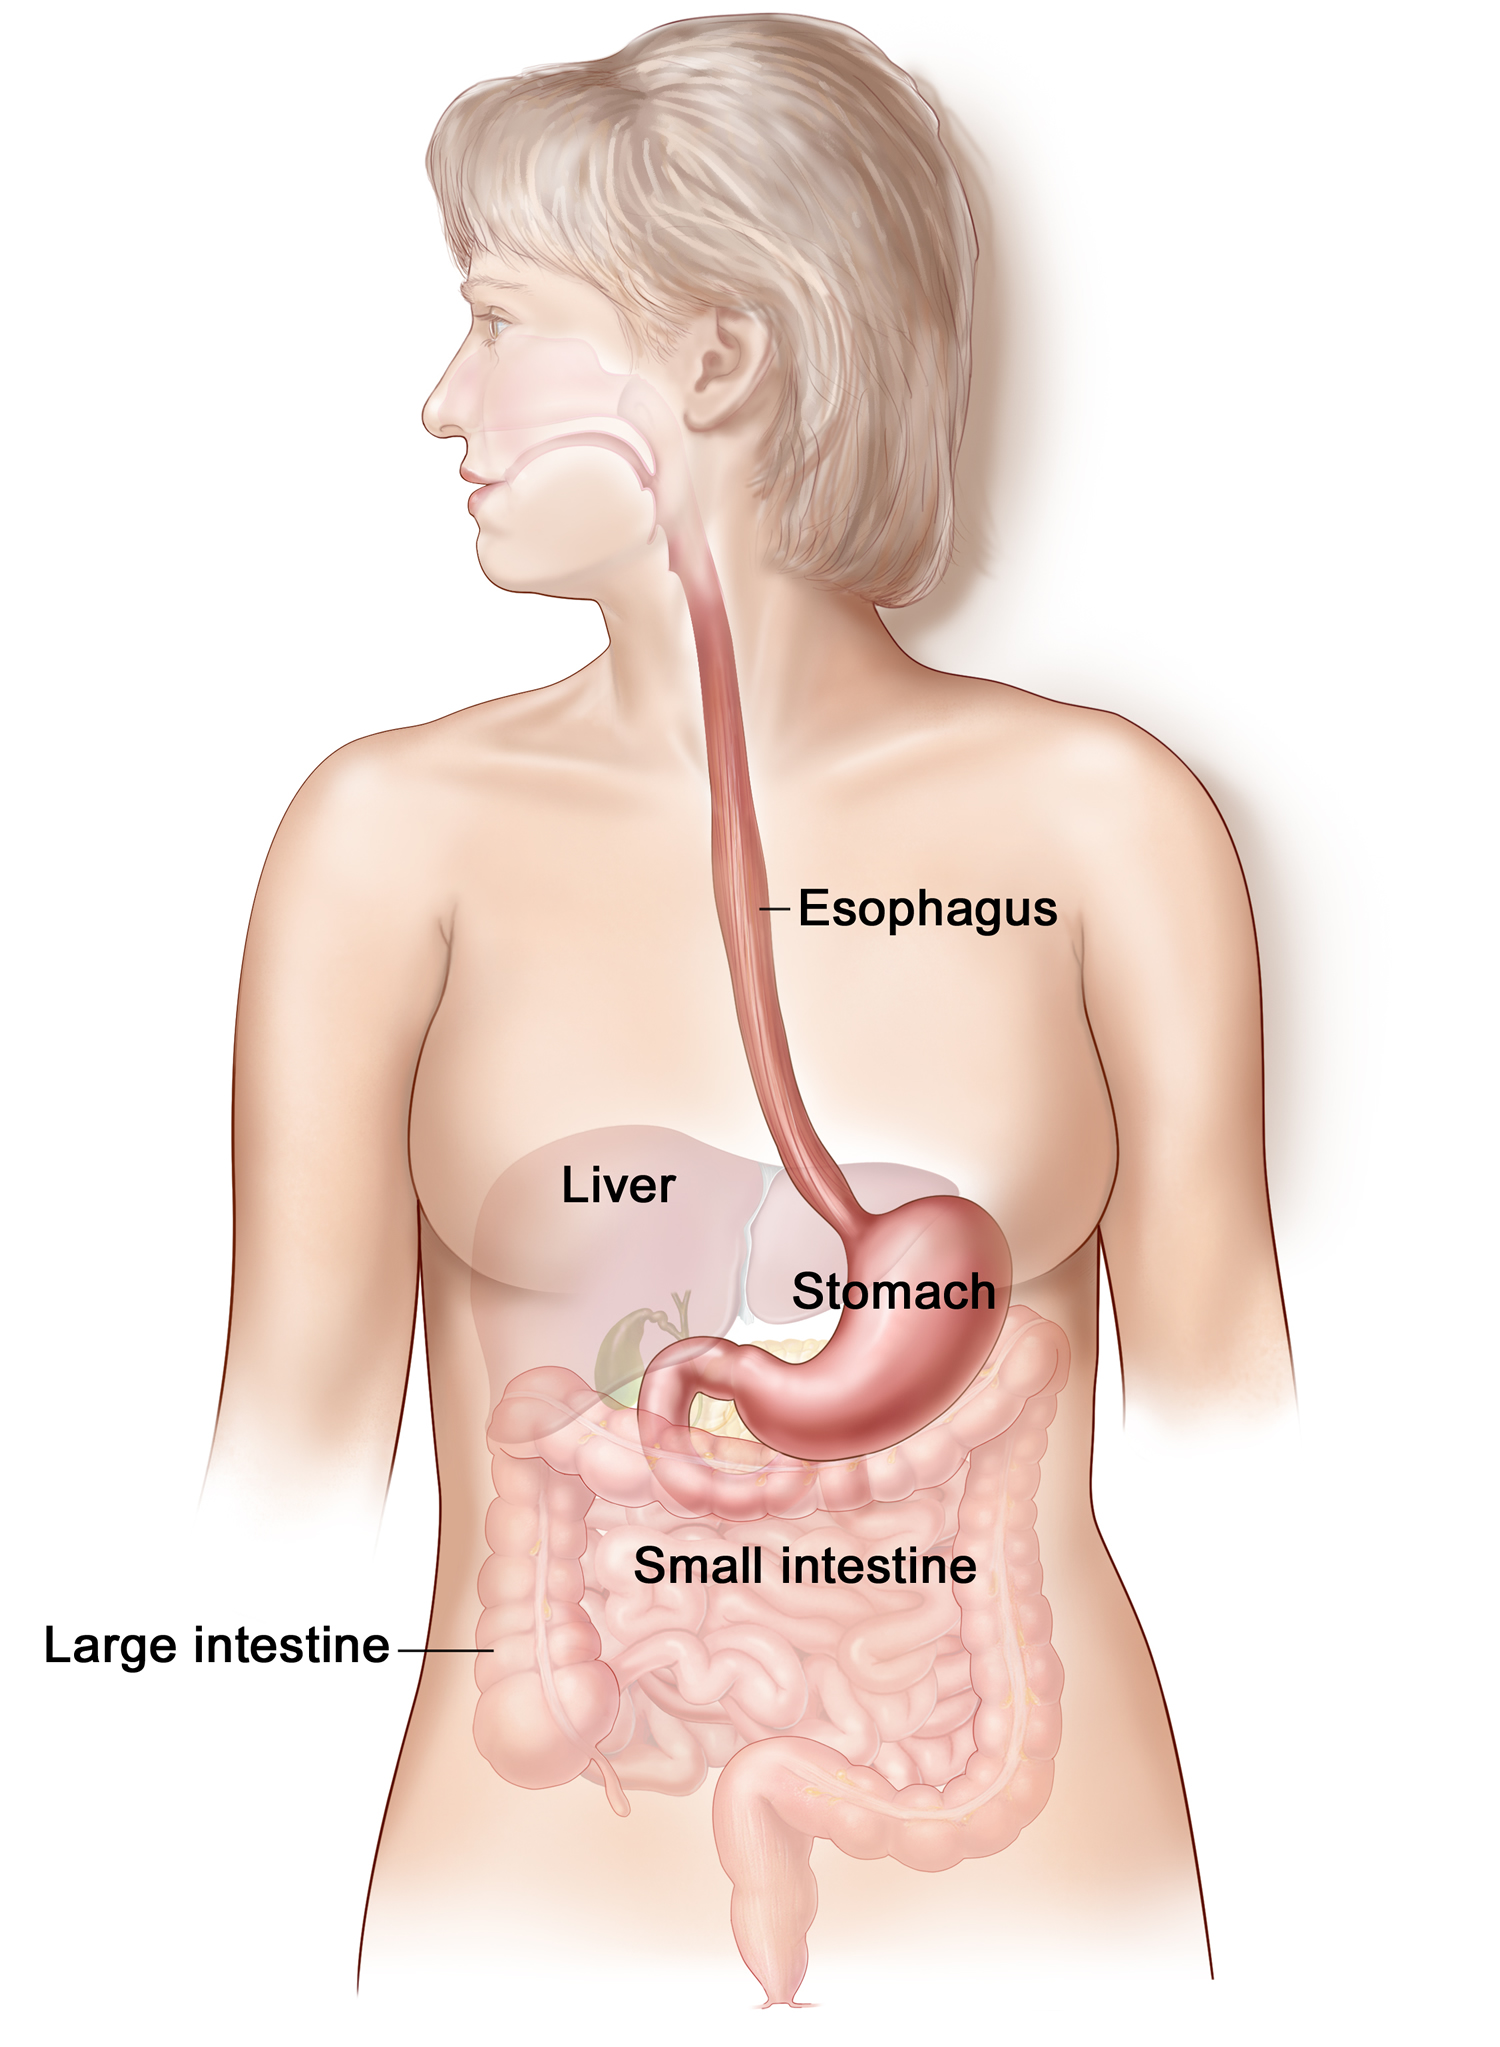
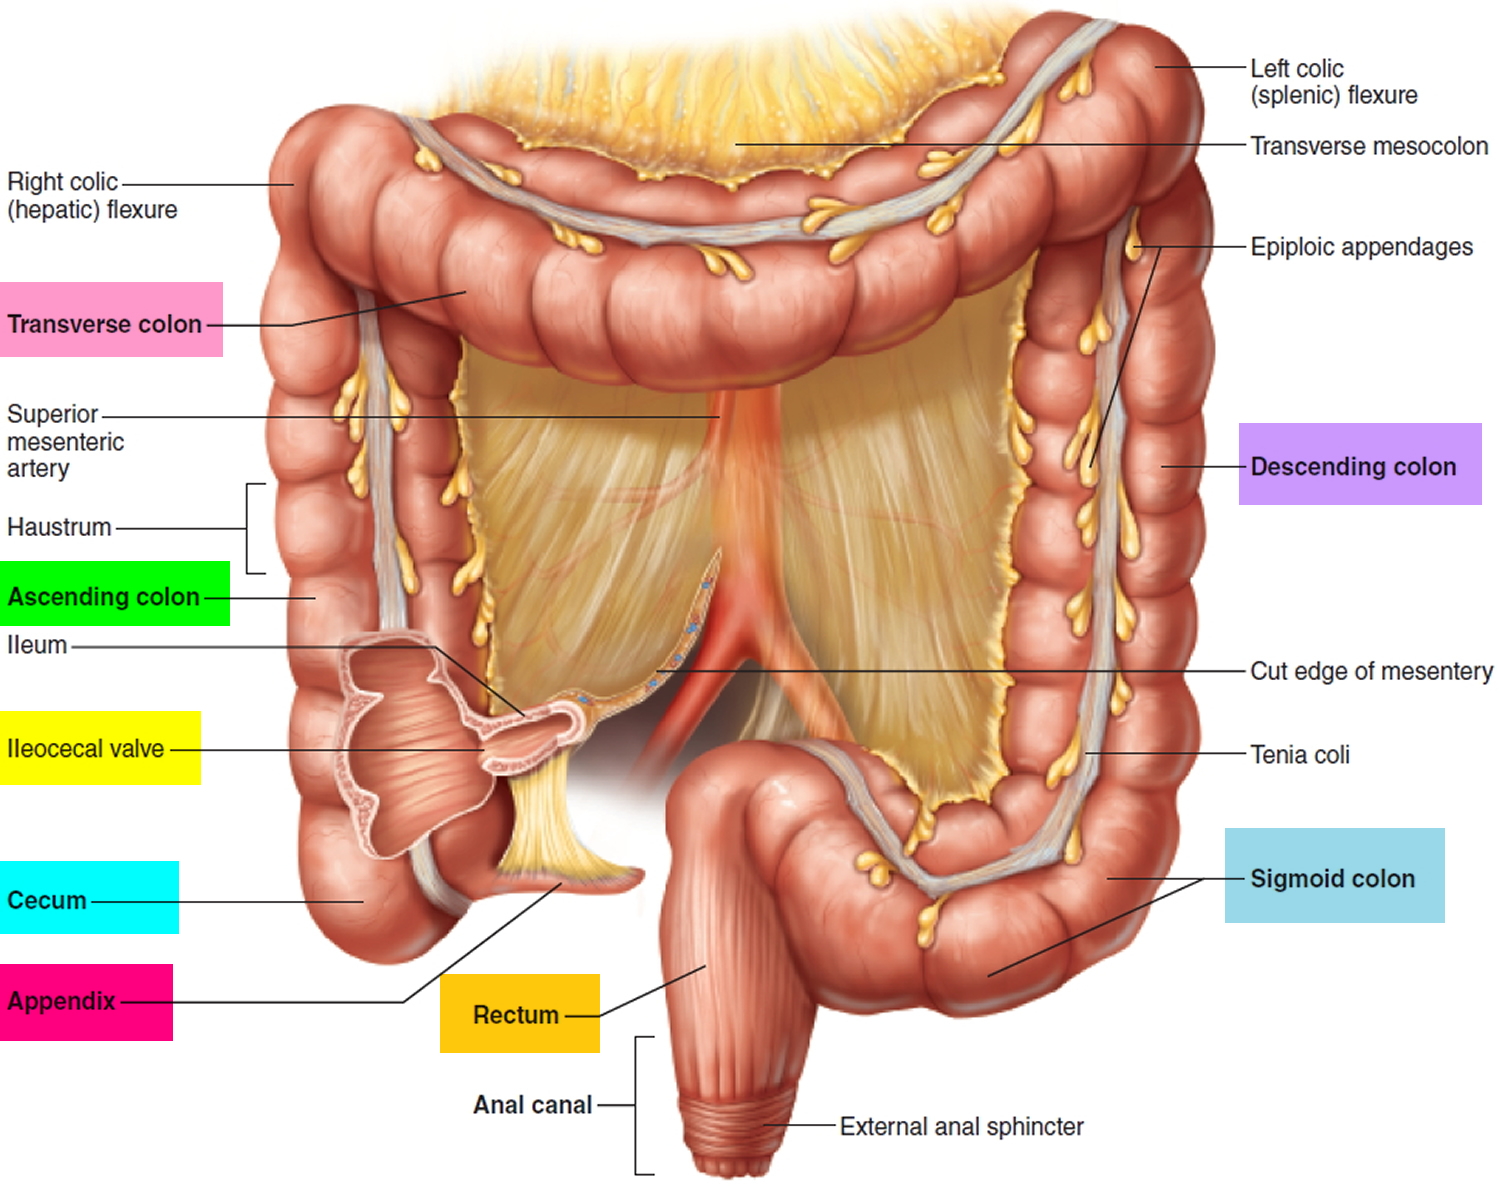
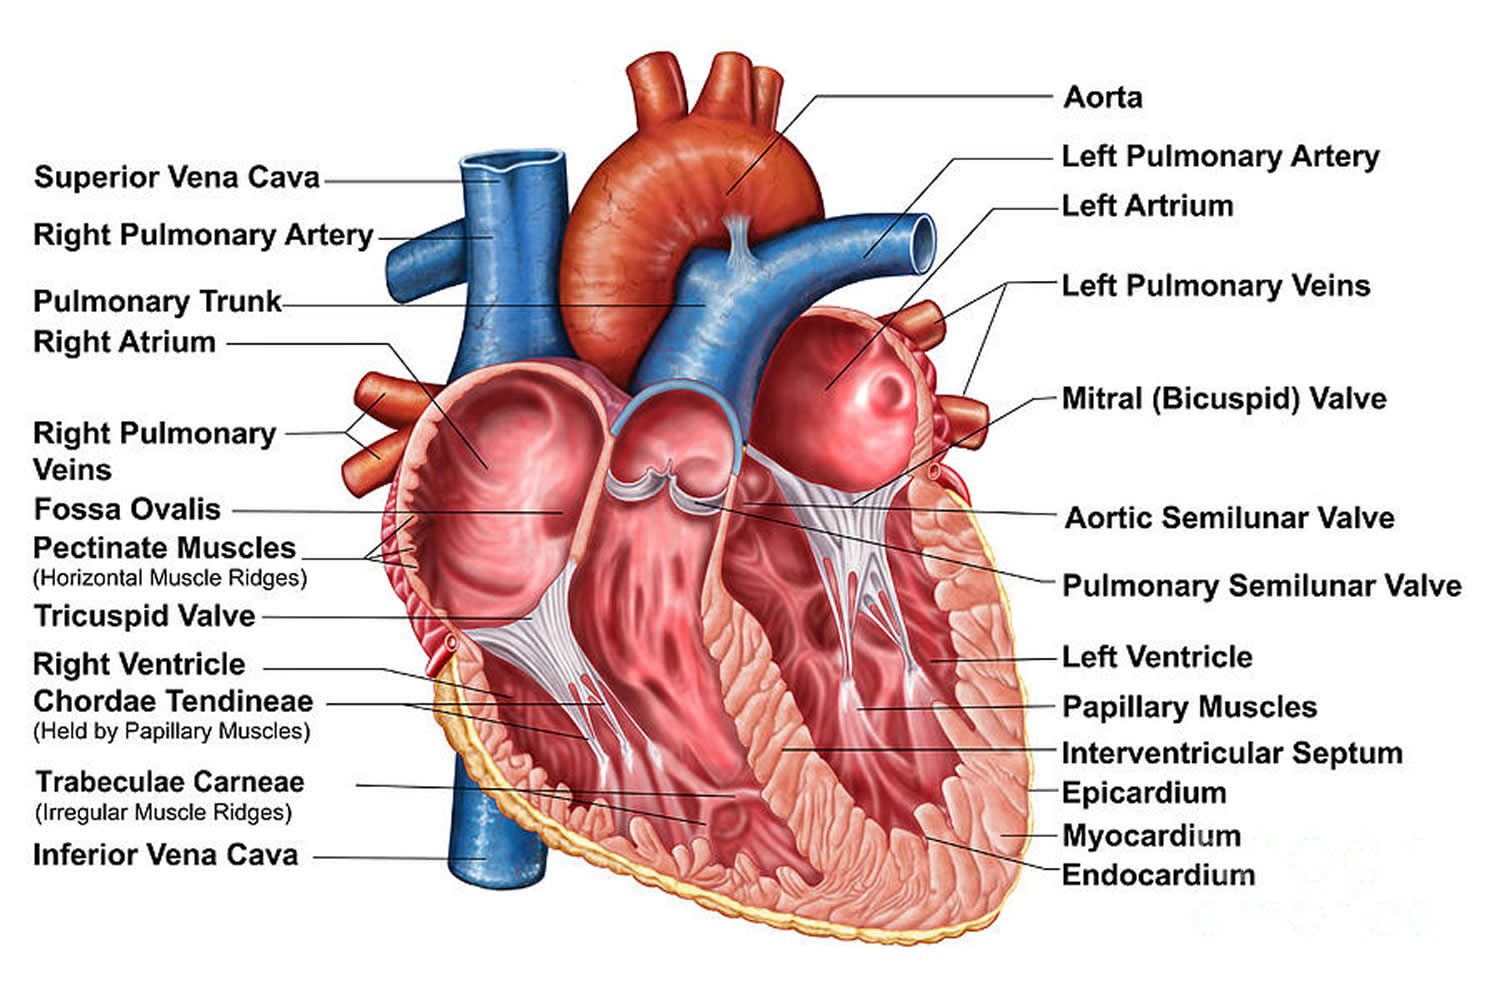
Your bile ducts are tubes that carry bile from your liver to your gallbladder and duodenum (see Figures 1 to 3). Your pancreatic ducts are tubes that carry pancreatic juice from your pancreas to your duodenum. Small pancreatic ducts empty into the main pancreatic duct. Your common bile duct and main pancreatic duct join before emptying into your duodenum (Figure 3).

Figure 1. Gallbladder location

gallbladder location

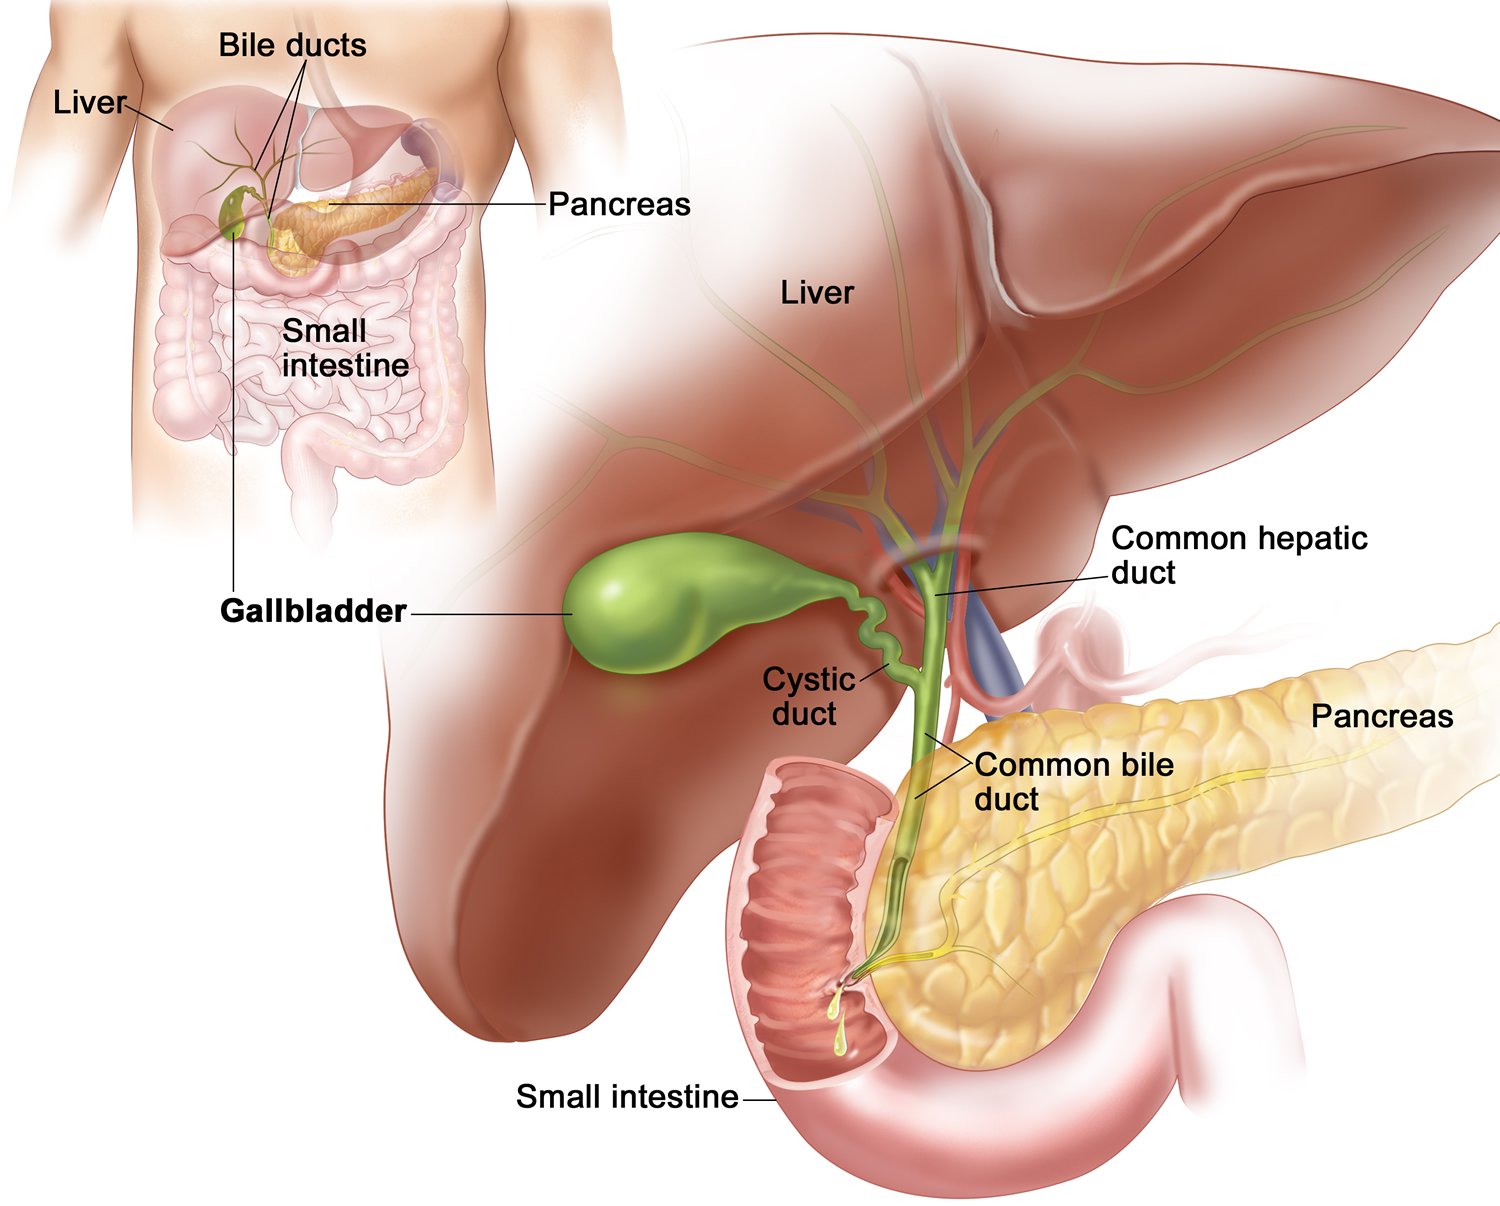
Figure 2. Gallbladder anatomy

gallbladder anatomy

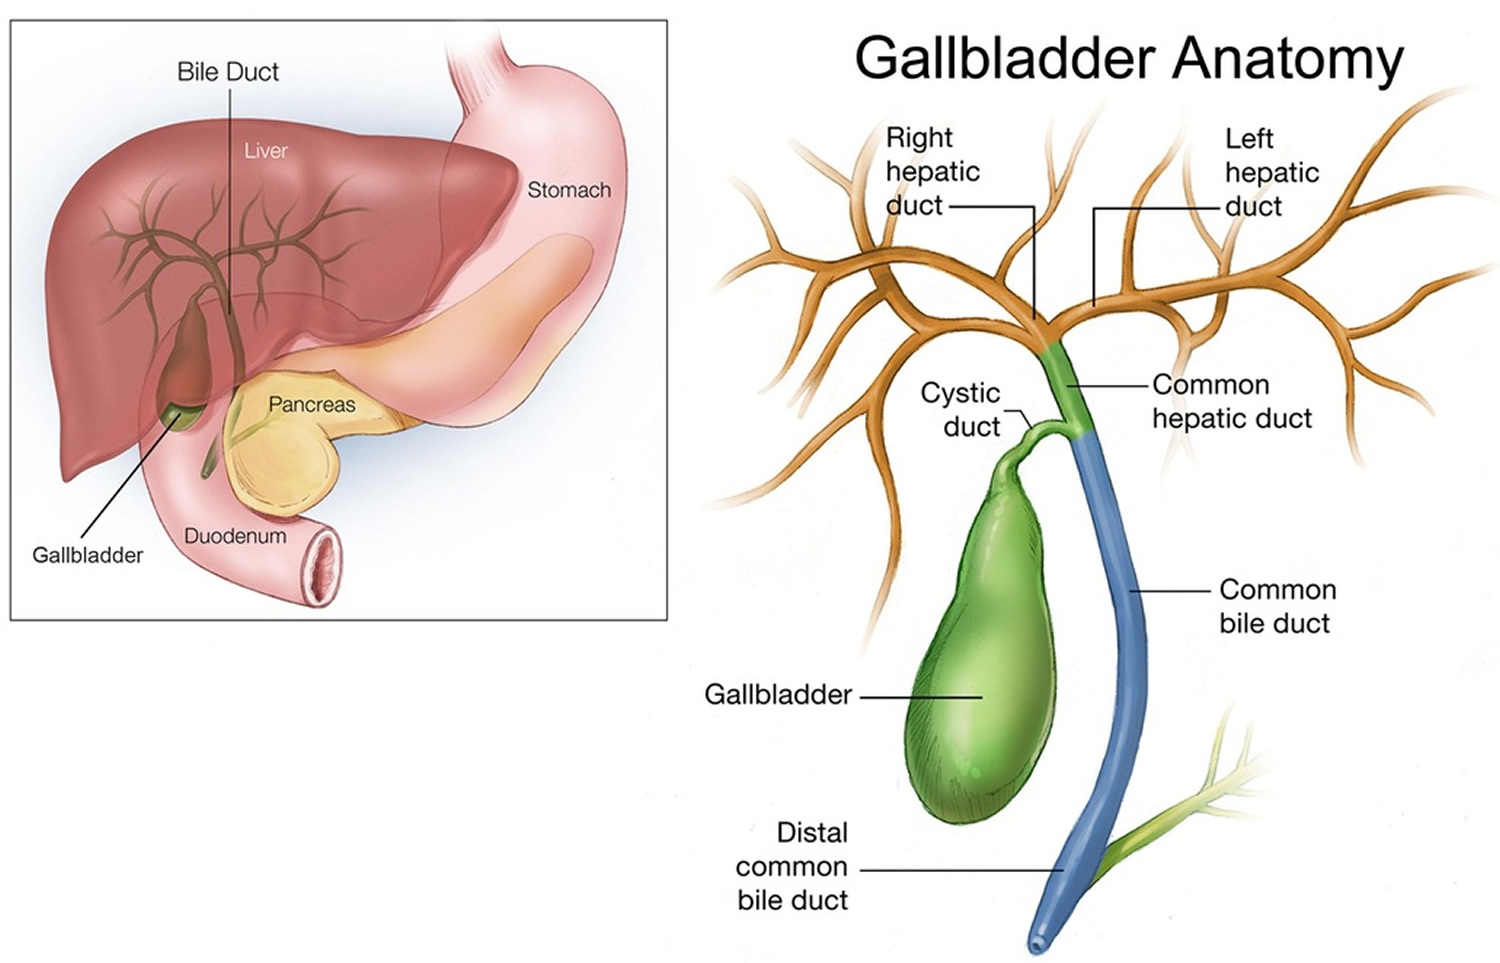
Figure 3. The common bile duct is closely associated with the pancreatic duct and the duodenum
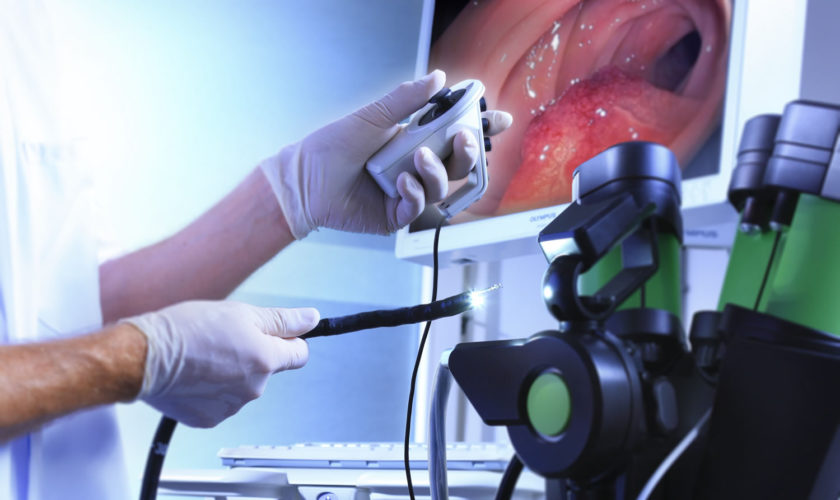
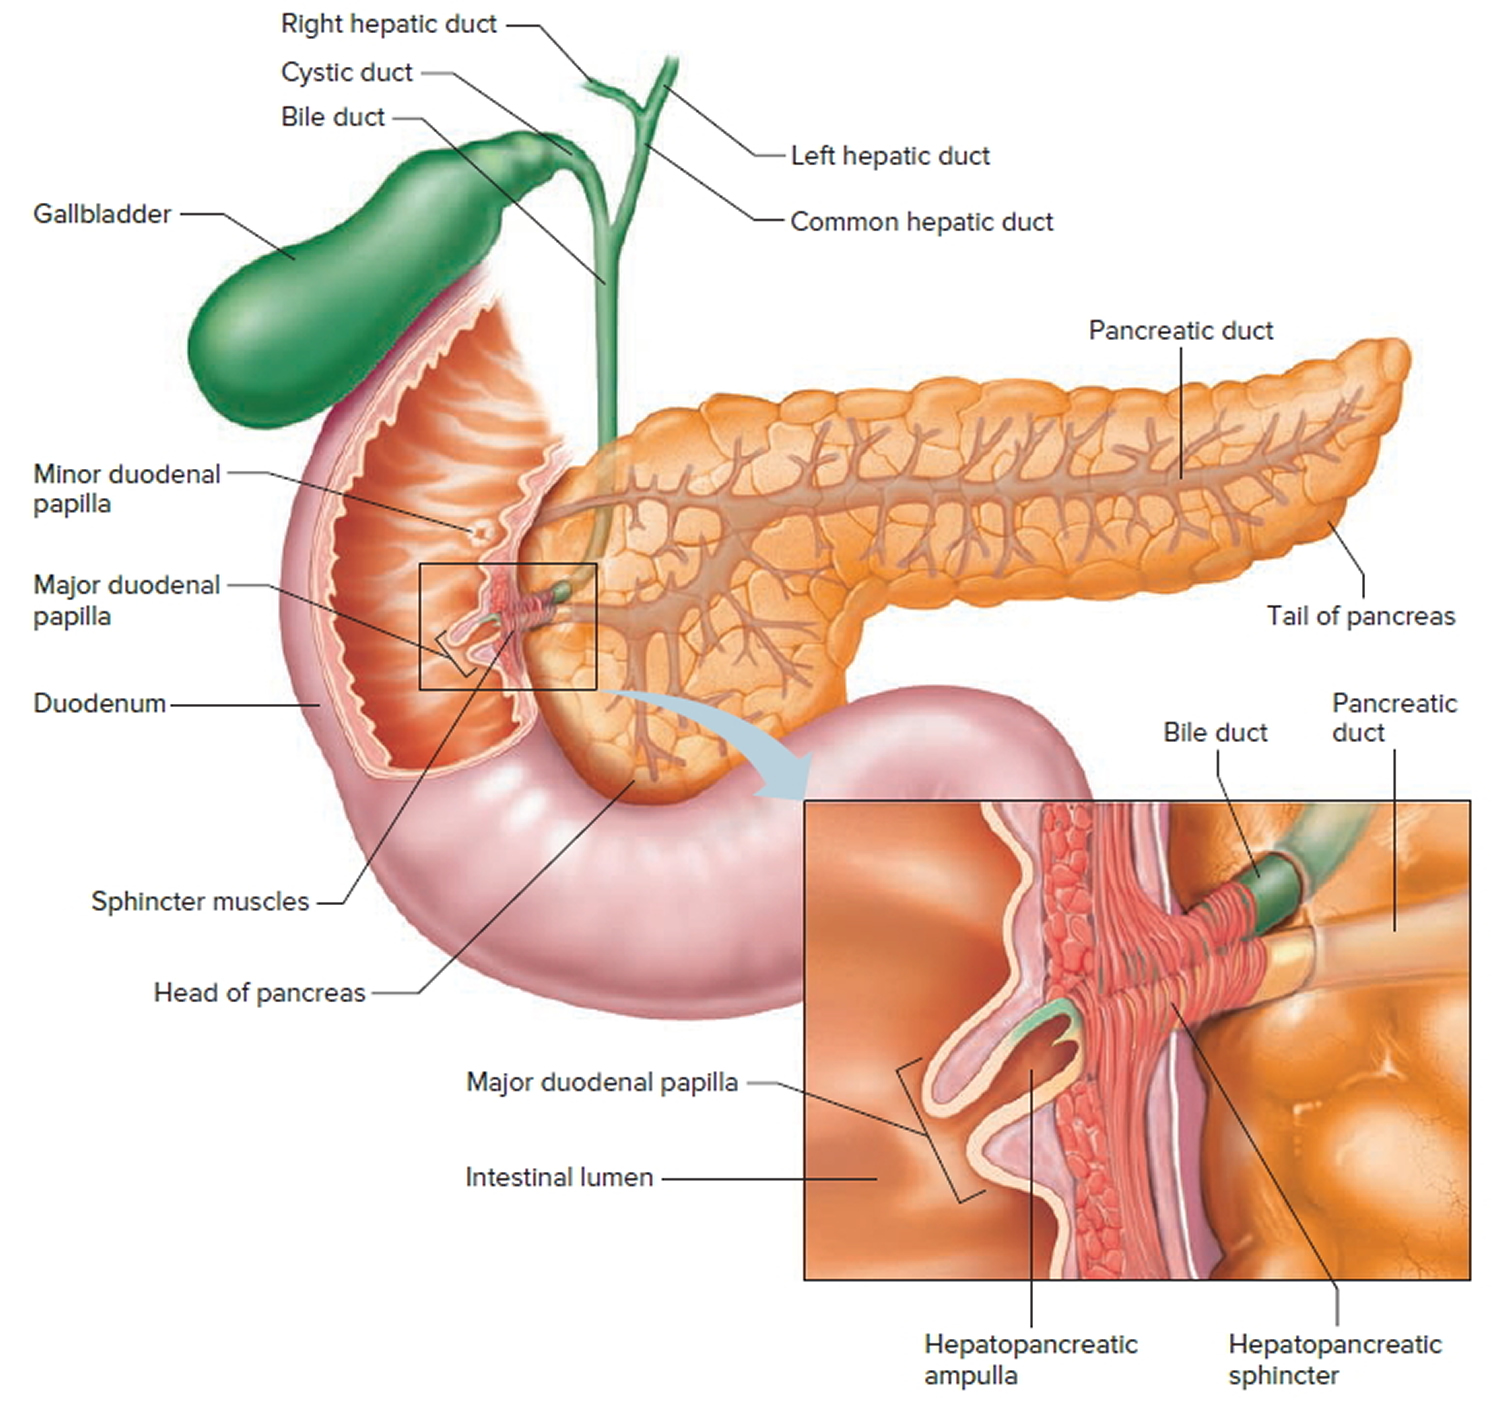
bile duct and pancreatic duct opening into the duodenumFigure 4. ERCP

ERCP

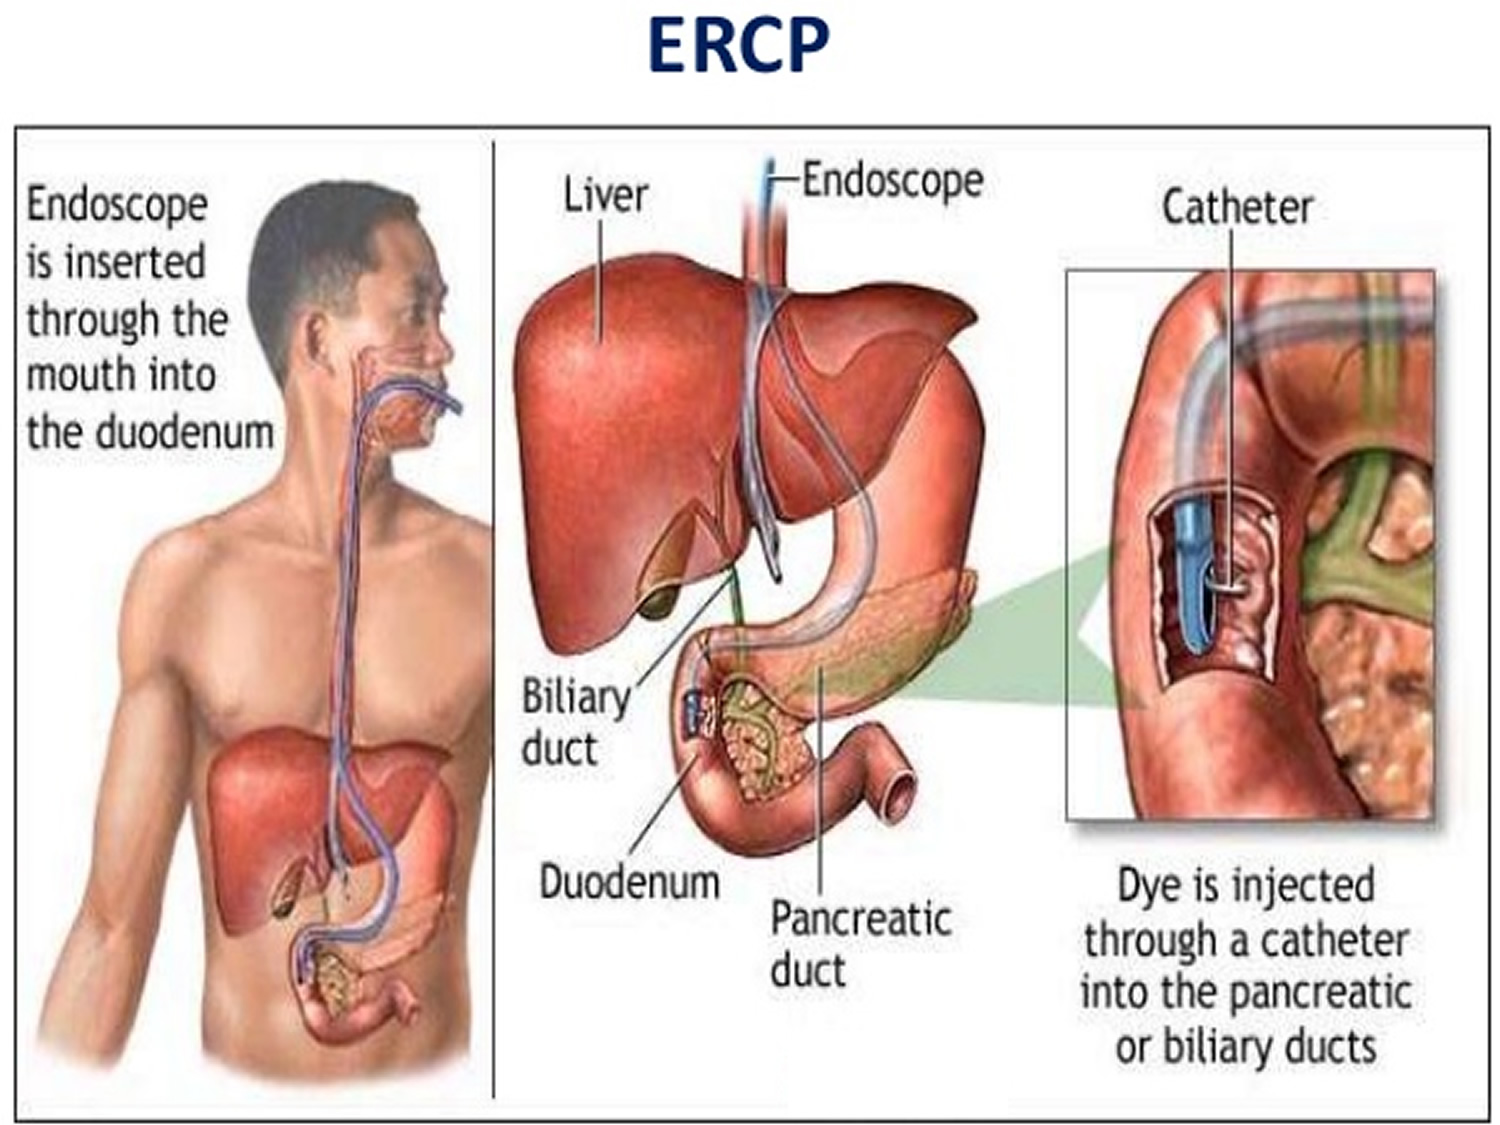
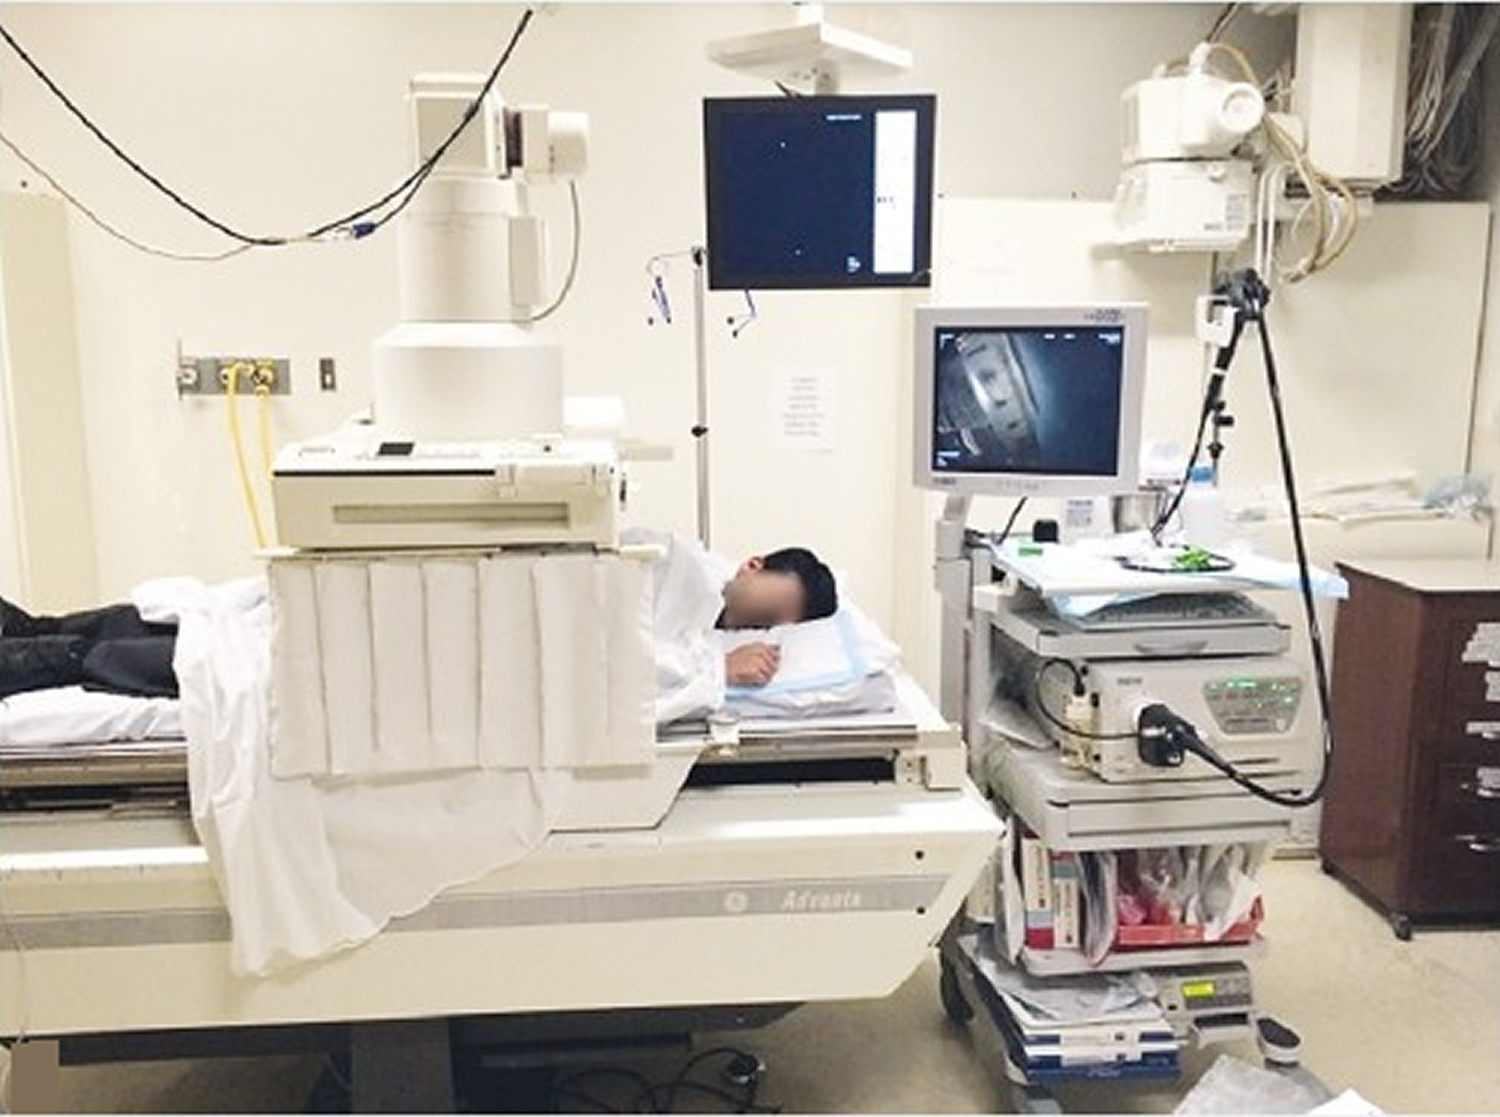
Figure 5. ERCP suite

ERCP suite

ERCP indications

Doctors use ERCP (endoscopic retrograde cholangiopancreatography) to treat problems of the bile and pancreatic ducts. Doctors also use ERCP to diagnose problems of the bile and pancreatic ducts if they expect to treat problems during the procedure. For diagnosis alone, doctors may use noninvasive tests—tests that do not physically enter the body—instead of ERCP. Noninvasive tests such as magnetic resonance cholangiopancreatography (MRCP)—a type of magnetic resonance imaging (MRI) —are safer and can also diagnose many problems of the bile and pancreatic ducts.

Doctors perform ERCP (endoscopic retrograde cholangiopancreatography) when your bile or pancreatic ducts have become narrowed or blocked because of:

  • gallstones that form in your gallbladder and become stuck in your common bile duct
  • infection
  • acute pancreatitis
  • chronic pancreatitis
  • trauma or surgical complications in your bile or pancreatic ducts
  • pancreatic pseudocysts
  • tumors or cancers of the bile ducts
  • tumors or cancers of the pancreas

How do I prepare for ERCP?

To prepare for ERCP, talk with your doctor, arrange for a ride home, and follow your doctor’s instructions.

Talk with your doctor

You should talk with your doctor about any allergies you have to medications or to intravenous contrast material (dye). Although an allergy doesn’t prevent you from having ERCP, it’s important to discuss it with your doctor prior to the procedure, as you may require specific allergy medications before the ERCP. Inform your doctor about medications you’re taking (all prescribed and over-the-counter medicines, vitamins, and supplements you take), particularly aspirin products, arthritis medications, anticoagulants (blood thinners, such as warfarin or heparin), clopidogrel or insulin. Also, be sure to tell your doctor if you have heart or lung conditions or other major diseases which might prevent or impact the decision to conduct endoscopy.

Medications list you’ll need to tell your doctor before having ERCP:

  • arthritis medicines
  • aspirin or medicines that contain aspirin
  • blood thinners
  • blood pressure medicines
  • diabetes medicines
  • nonsteroidal anti-inflammatory drugs (NSAIDs) such as ibuprofen and naproxen

Your doctor may ask you to temporarily stop taking medicines that affect blood clotting or interact with sedatives. You typically receive sedatives during ERCP to help you relax and stay comfortable.

Tell your doctor if you are, or may be, pregnant. If you are pregnant and need ERCP to treat a problem, the doctor performing the procedure may make changes to protect the fetus from x-rays. Research has found that ERCP is generally safe during pregnancy 1.

Arrange for a ride home

For safety reasons, you can’t drive for 24 hours after ERCP, as the sedatives or anesthesia used during the procedure needs time to wear off. You will need to make plans for getting a ride home after ERCP.

Don’t eat, drink, smoke, or chew gum

To see your upper GI tract clearly, you doctor will most likely ask you not to eat, drink, smoke, or chew gum for at least six hours (and preferably overnight) before the ERCP procedure to make sure you have an empty stomach, which is necessary for the best examination. Your doctor will give you precise instructions about how to prepare.

How is ERCP performed?

Doctors who have specialized training in ERCP perform this procedure at a hospital or an outpatient center. An intravenous (IV) needle will be placed in your arm to provide a sedative. Sedatives help you stay relaxed and comfortable during the procedure. A health care professional will give you a liquid anesthetic to gargle or will spray anesthetic on the back of your throat. The anesthetic numbs your throat and helps prevent gagging during the procedure. The health care staff will monitor your vital signs and keep you as comfortable as possible. Some patients also receive antibiotics before the procedure. In some cases, you may receive general anesthesia.

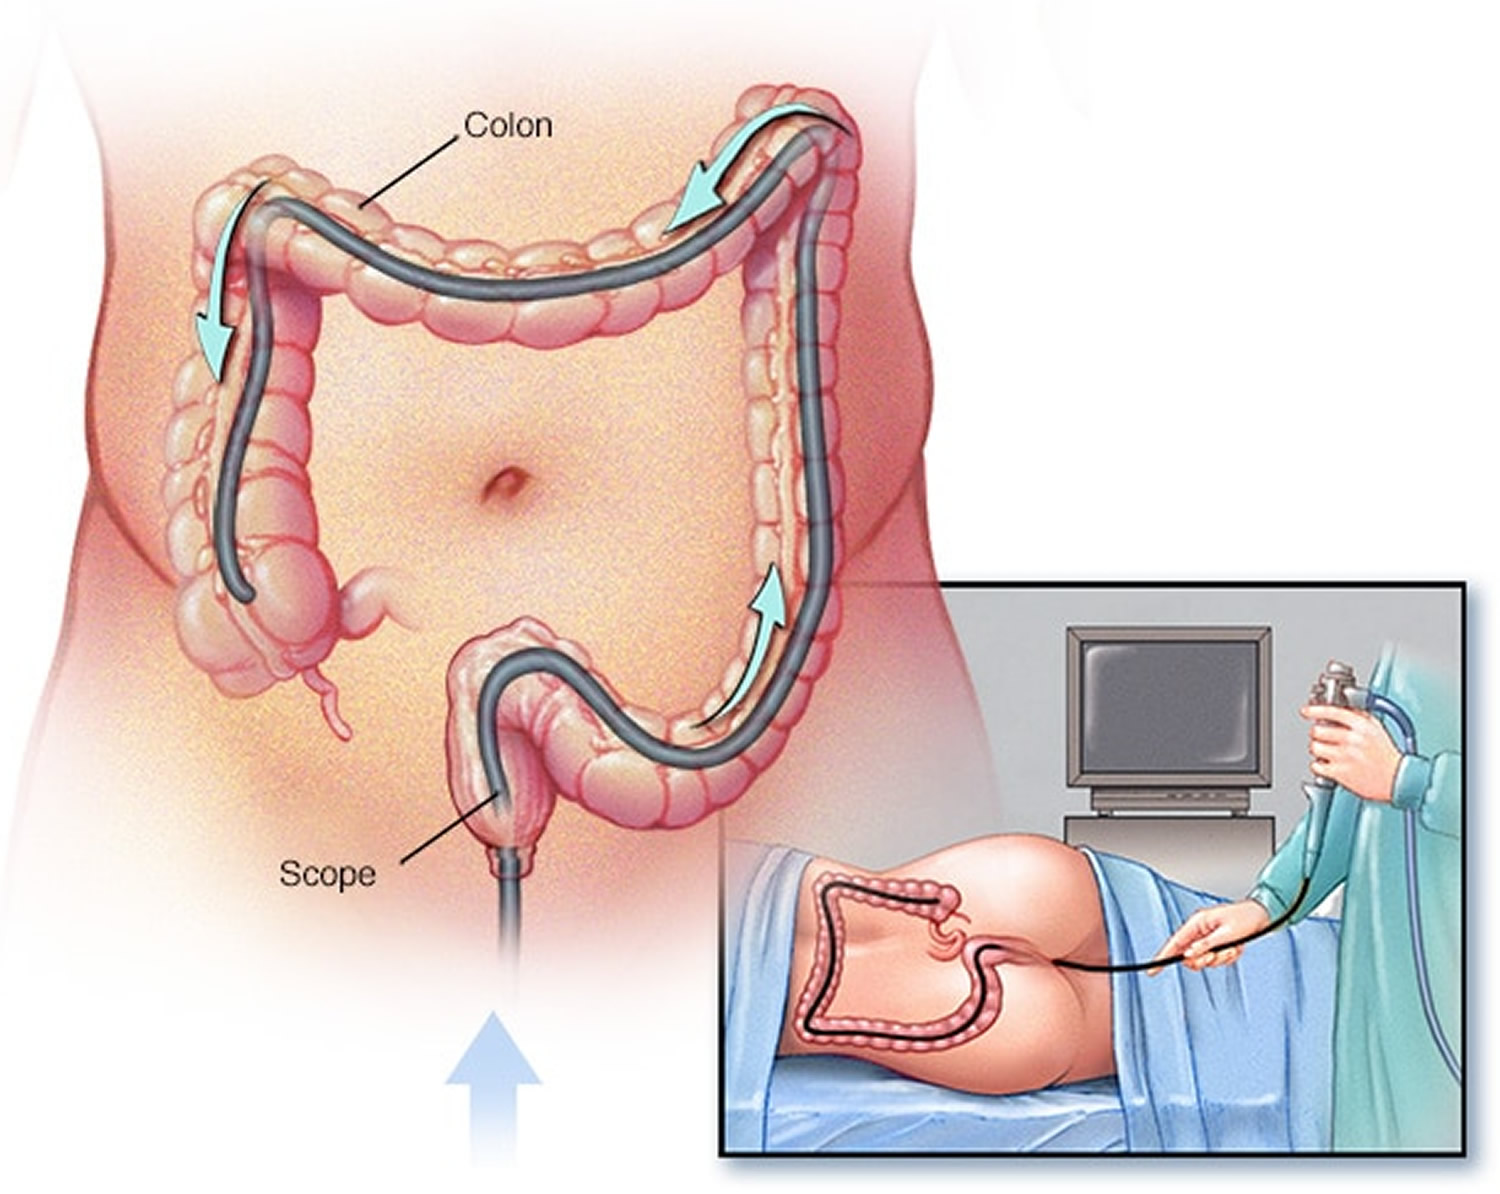
You’ll be asked to lie on your abdomen on a X-ray table. The doctor will carefully feed the endoscope down your esophagus, through your stomach, and into your duodenum. A small camera mounted on the endoscope will send a video image to a monitor. The endoscope pumps air into your stomach and duodenum, making them easier to see. The ERCP instrument does not interfere with breathing, but you might feel a bloating sensation because of the air introduced through the instrument.

During ERCP, the doctor:

  • locates the opening where the bile and pancreatic ducts empty into the duodenum
  • slides a thin, flexible tube called a catheter through the endoscope and into the ducts
  • injects a special dye, also called contrast medium, into the ducts through the catheter to make the ducts more visible on x-rays
  • uses a type of x-ray imaging, called fluoroscopy, to examine the ducts and look for narrowed areas or blockages (see Figure 5 below)

The doctor may pass tiny tools through the endoscope to:

  • open blocked or narrowed ducts.
  • break up or remove stones.
  • perform a biopsy or remove tumors in the ducts.
  • insert stents—tiny tubes that a doctor leaves in narrowed ducts to hold them open. A doctor may also insert temporary stents to stop bile leaks that can occur after gallbladder surgery.

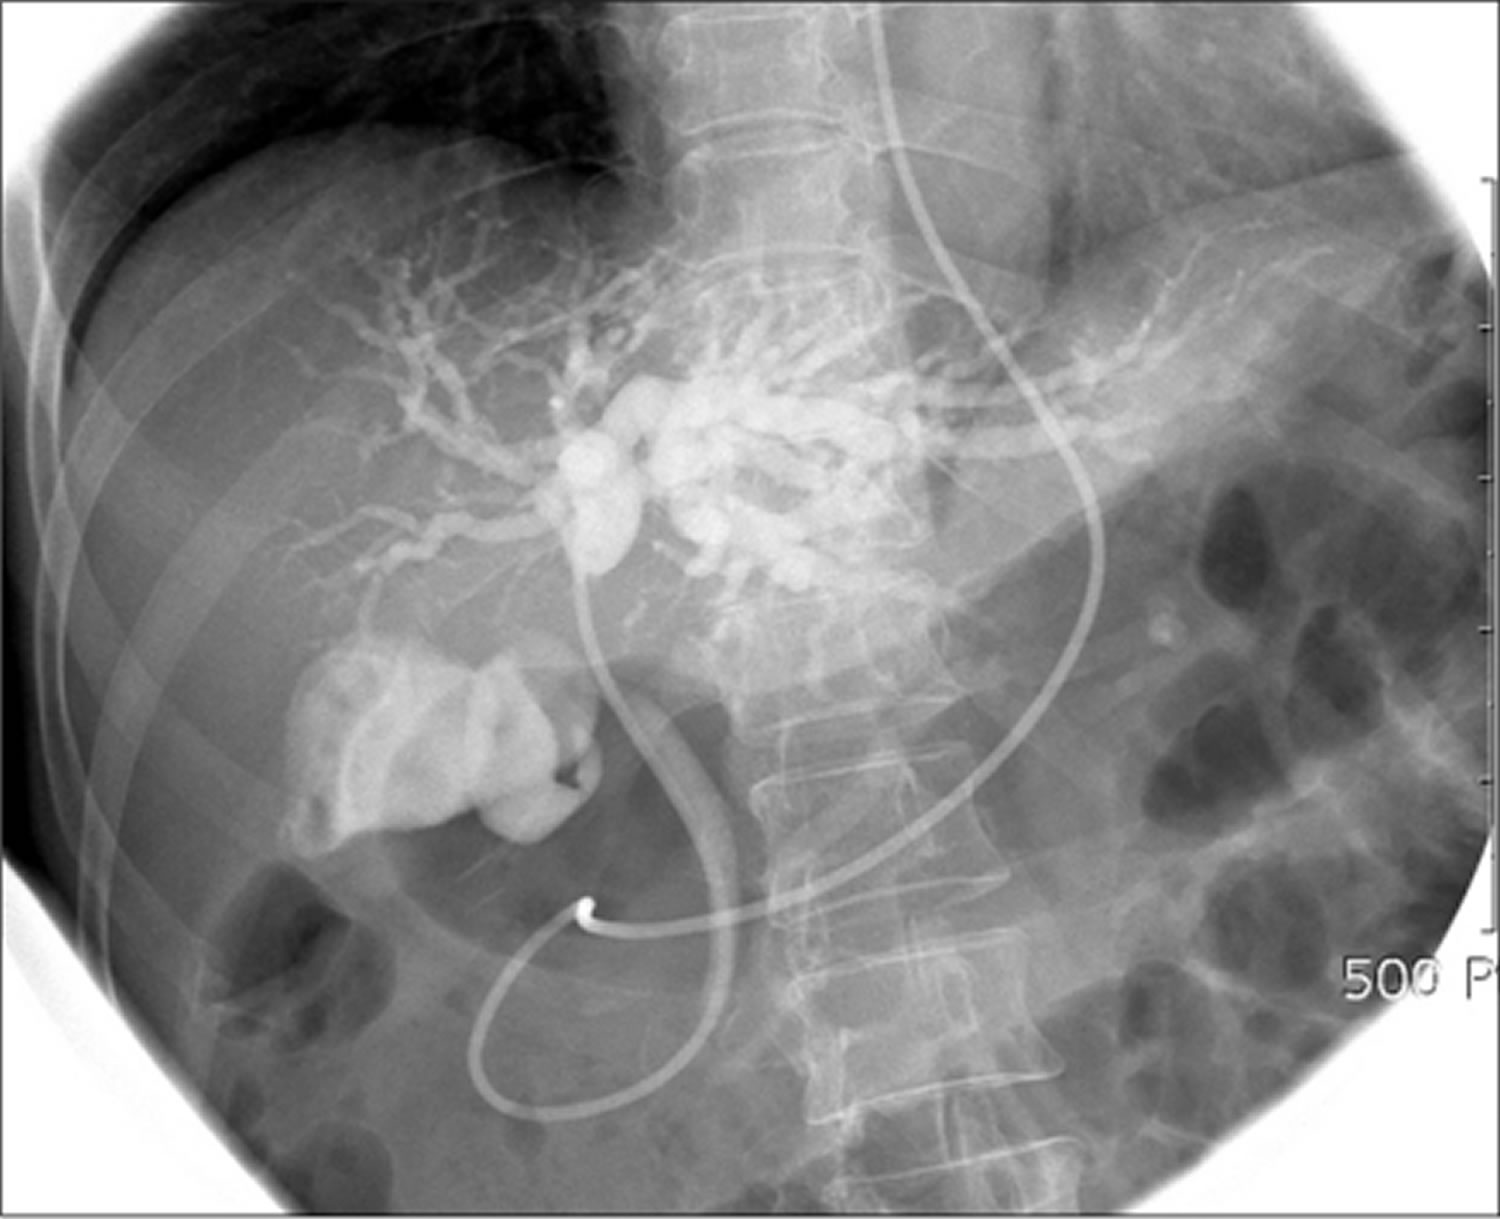
Figure 6. ERCP showing multiple gallstones – Note: multiple filling defects with the common bile duct in keeping with choledocholithiasis.

ERCP procedure for gallstone

Figure 7. ERCP showing stricture at the bifurcation of the hepatic duct, which was suggestive of a cholangiocarcinoma of the common hepatic duct. The final diagnosis was inflammatory myofibroblastic tumor of the biliary tree.

ERCP

ERCP complications

ERCP is a well-tolerated procedure when performed by doctors who are specially trained and experienced in the technique. Although complications requiring hospitalization can occur, they are uncommon. The overall ERCP complication rate requiring hospitalization is 6-10%.

Depending on your age, your other medical problems, what therapy is performed, and the indication for your procedure, your complication rate may be higher or lower than the average. Your doctor will discuss your likelihood of complications before you undergo the test.

Risks vary, depending on why the test is performed, what is found during the procedure, what therapeutic intervention is undertaken, and whether a patient has major medical problems. Patients undergoing therapeutic ERCP, such as for stone removal, face a higher risk of complications than patients undergoing diagnostic ERCP. Your doctor will discuss your likelihood of complications before you undergo the test.

The risks of ERCP include complications such as the following:

  • pancreatitis (inflammation of the pancreas)
  • infection of the bile ducts or gallbladder
  • excessive bleeding, called hemorrhage
  • an abnormal reaction to the sedative, including respiratory or cardiac problems
  • perforation in the bile or pancreatic ducts, or in the duodenum near the opening where the bile and pancreatic ducts empty into it
  • tissue damage from x-ray exposure
  • death, although this complication is rare
  • sometimes the procedure cannot be completed for technical reasons.

Research has found that these complications occur in about 5 to 10 percent of ERCP procedures 2. People with complications often need treatment at a hospital.

Seek care right away

If you have any of the following symptoms after ERCP, seek medical attention right away:

  • bloody or black, tar-colored stool
  • chest pain
  • fever
  • pain in your abdomen that gets worse
  • problems breathing
  • problems swallowing or throat pain that gets worse
  • vomiting—particularly if your vomit is bloody or looks like coffee grounds

What is a therapeutic ERCP?

ERCP (endoscopic retrograde cholangiopancreatography) is a study of the ducts that drain the liver and pancreas. Ducts are drainage routes into the bowel. The ones that drain the liver and gallbladder are called bile or biliary ducts. The one that drains the pancreas is called the pancreatic duct. The bile and pancreatic ducts join together just before they drain into the upper bowel, about 3 inches from the stomach. The drainage opening is called the papilla. The papilla is surrounded by a circular muscle, called the sphincter of Oddi.

Diagnostic ERCP is when X-ray contrast dye is injected into the bile duct, the pancreatic duct, or both. This contrast dye is squirted through a small tube called a catheter that fits through the ERCP endoscope. X-rays are taken during ERCP to get pictures of these ducts. That is called diagnostic ERCP. However, most ERCPs are actually done for treatment and not just picture taking. When an ERCP is done to allow treatment, it is called therapeutic ERCP.

What treatments can be done through an ERCP scope?

Sphincterotomy

Sphincterotomy is cutting the muscle that surrounds the opening of the ducts, or the papilla. This cut is made to enlarge the opening. The cut is made while your doctor looks through the ERCP scope at the papilla, or duct opening. A small wire on a specialized catheter uses electric current to cut the tissue. A sphincterotomy does not cause discomfort, you do not have nerve endings there. The actual cut is quite small, usually less than a 1/2 inch. This small cut, or sphincterotomy, allows various treatments in the ducts. Most commonly the cut is directed towards the bile duct, called a biliary sphincterotomy. Occasionally, the cutting is directed towards the pancreatic duct, depending on the type of treatment you need.

Stone Removal

The most common treatment through an ERCP scope is removal of bile duct stones. These stones may have formed in the gallbladder and traveled into the bile duct or may form in the duct itself years after your gallbladder has been removed. After a sphincterotomy is performed to enlarge the opening of the bile duct, stones can be pulled from the duct into the bowel. A variety of balloons and baskets attached to specialized catheters can be passed through the ERCP scope into the ducts allowing stone removal. Very large stones may require crushing in the duct with a specialized basket so the fragments can be pulled out through the sphincterotomy.

Stent Placement

Stents are placed into the bile or pancreatic ducts to bypass strictures, or narrowed parts of the duct. These narrowed areas of the bile or pancreatic duct are due to scar tissue or tumors that cause blockage of normal duct drainage. There are two types of stents that are commonly used. The first is made of plastic and looks like a small straw. A plastic stent can be pushed through the ERCP scope into a blocked duct to allow normal drainage. The second type of stent is made of metal wires that looks like the cross wires of a fence. The metal stent is flexible and springs open to a larger diameter than plastic stents. Both plastic and metal stents tend to clog up after several months and you may require another ERCP to place a new stent. Metal stents are permanent while plastic stents are easily removed at a repeat procedure. Your doctor will choose the best type of stent for your problem.

Balloon Dilation

There are ERCP catheters fitted with dilating balloons that can be placed across a narrowed area or stricture. The balloon is then inflated to stretch out the narrowing. Dilation with balloons is often performed when the cause of the narrowing is benign (not a cancer). After balloon dilation, a temporary stent may be placed for a few months to help maintain the dilation.

Tissue Sampling

One procedure that is commonly performed through the ERCP scope is to take samples of tissue from the papilla or from the bile or pancreatic ducts. There are several different sampling techniques although the most common is to brush the area with subsequent examination of the cells obtained. Tissue samples can help decide if a stricture, or narrowing, is due to a cancer. If the sample is positive for cancer it is very accurate. Unfortunately, a tissue sampling that does not show cancer may not be accurate.

ERCP recovery

After ERCP, you can expect the following:

  • You will most often stay at the hospital or outpatient center for 1 to 2 hours after the procedure so the sedation or anesthesia can wear off. In some cases, you may need to stay overnight in the hospital after ERCP.
  • You may have bloating or nausea for a short time after the procedure.
  • You may have a sore throat for 1 to 2 days.
  • You can go back to a normal diet once your swallowing has returned to normal.
  • You should rest at home for the remainder of the day.
  • You should not drive a car for the rest of the day although most patients can return to full activity the next day.

Following the procedure, you—or a friend or family member who is with you if you’re still groggy—will receive instructions on how to care for yourself after the procedure. You should follow all instructions.

Some results from ERCP are available right away after the procedure. After the sedative has worn off, the doctor will share results with you or, if you choose, with your friend or family member.

If the doctor performed a biopsy, a pathologist will examine the biopsy tissue. Biopsy results take a few days or longer to come back.

References
  1. ASGE Standard of Practice Committee, Shergill AK, Ben-Menachem T, et al. Guidelines for endoscopy in pregnant and lactating women. Gastrointestinal Endoscopy. 2012;76(1):18–24.
  2. Szary NM, Al-Kawas FH. Complications of endoscopic retrograde cholangiopancreatography: how to avoid and manage them. Gastroenterology and Hepatology. 2013;9(8):496–504.
read more
Procedures

Female condom

female condom

What is female condom

Female condoms (Femidom) are made from soft thin plastic pouch called polyurethane that is 6.5 inches in length that has flexible rings at either end. Female condom is inserted into the vagina before sex to prevent pregnancy and sexually transmitted infections (STIs). Female condoms are worn inside the vagina to prevent semen getting to the womb (uterus). Female condom is a birth control (contraceptive) device that acts as a barrier to keep sperm from entering the uterus. The most common complaint is difficulty with insertion.

Female condom side effects include irritation and allergic reactions. Female condom is the only woman-controlled method that reduces the risk of transmission of sexually transmitted infections (STIs), including HIV, and it is available over-the-counter. Female condom is used by <1% of women in the U.S.

Only two female condoms — the FC1 female condom and its replacement, the FC2 female condom — have Food and Drug Administration (FDA) approval in the U.S. The FC1 female condom, which is made of plastic (polyurethane), is no longer being produced. The FC2 female condom is made of synthetic latex — safe for those with allergies to natural rubber latex — and is pre-lubricated with a silicone-based lubricant.

According to the FC2 website, the FC2 is reimbursable if you have insurance and a prescription from a doctor. Health care organizations that offer web-based (virtual) visits also may allow you to obtain a prescription to send to a pharmacy. If you don’t have insurance, you can directly purchase the female condom from the website. FC2 may also be available through universities and community health-based organizations such as Planned Parenthood.

Unlike latex — the material used to make most male condoms — female condoms are made of polyurethane and synthetic latex, which is safe for people who are allergic to natural rubber latex. Female condoms aren’t affected by dampness or changes in temperature. In addition, some women find that the female condom’s external ring stimulates the clitoris.

Key facts about the female condom:

  • if used correctly, female condoms are 95 to 98% effective
  • they protect against pregnancy and sexually transmitted infections (STIs)
  • rarely causes allergic reactions and has minimal risk of side effects
  • is available without a prescription or special fitting
  • a female condom needs to be placed inside the vagina before there’s any contact with the penis
  • you can place the female condom inside your vagina up to eight hours before sex.
  • always buy condoms that have FDA approval, the CE mark or the BSI Kitemark on the packet – this means they’ve been tested to high safety standards
  • a female condom can get pushed too far into the vagina, but it’s easy to remove them yourself if this happens
  • female condoms may not be suitable for women who aren’t comfortable touching their genital area
  • female condoms shouldn’t be reused – open a new one each time you have sex
  • Don’t use a female condom at the same time as a male condom. They can stick together, which might cause one or both condoms to break. The female condom isn’t currently FDA-approved for anal sex.

Female condom risks

Up to 21 out of 100 women will become pregnant in a year of typical use of female condoms — possibly because they don’t use condoms every time they have sex.

The female condom has a higher failure rate than the male condom. Condom failure means it’s possible to contract sexually transmitted infections or become pregnant. The female condom may not protect you if:

  • The condom breaks
  • The condom slips out of the vagina
  • The penis slips between the vagina and the outer surface of the condom
  • The outer ring of the condom gets pushed into the vagina during sex

The female condom may also cause discomfort during insertion, a burning sensation, itching or a rash.

Who can use female condoms?

Most people can safely use female condoms. You can also use them immediately after having a baby, miscarriage or abortion.

However, they may not be suitable for women who don’t feel comfortable touching their genital area.

The female condom isn’t appropriate for everyone, however. You may want to consider another type of birth control if you:

  • Are allergic to polyurethane or synthetic latex
  • Are at high risk of pregnancy — you’re younger than age 30, you have sex three or more times a week, you’ve had previous contraceptive failure with vaginal
  • barrier methods, or you’re not likely to consistently use the female condom
  • Aren’t comfortable with the insertion technique
  • Have vaginal abnormalities that interfere with the fit, placement or retention of the female condom

Advantages and disadvantages of female condoms

Advantages of female condom

  • Female condoms help to protect both partners from sexually transmitted infections (STIs), including HIV (human immunodeficiency virus)
  • When used correctly, they are a reliable method of preventing pregnancy
  • Female condom is a form of contraception you only need to use when you have sex
  • There are no serious side effects
  • Female condoms can be put in any time before sex

Disadvantages of female condom

  • Some couples find that putting in a condom interrupts sex – to get around this, insert it in advance or try to make doing so a part of foreplay
  • Female condoms are very strong, but they may split or tear if not used properly
  • They aren’t as widely available as male condoms and can be more expensive

Can anything make female condoms less effective?

Sperm can sometimes get into the vagina during sex, even when using a female condom. This may happen if:

  • the penis touches the area around the vagina before a female condom is put in
  • the female condom gets pushed too far into the vagina
  • the penis accidentally enters between the side of the vagina and the condom
  • the condom gets damaged by sharp fingernails or jewellery

If you think sperm has got into your vagina, you may need emergency contraception. The emergency contraceptive pill (sometimes called the morning-after pill). You can use emergency contraception up to 5 days after unprotected sex.

You should also consider having an sexually transmitted infection (STI) test. This can be done at a:

  • sexual health or genitourinary clinic
  • contraception clinic
  • young people’s clinic

Where can I get female condom?

Places where you can get contraception include:

  • your doctor
  • Sexual Health or Family Planning Clinics
  • supermarkets
  • online
  • pharmacies.

Figure 1. Female condom

female condom

Figure 2. Female reproductive system

female-reproductive-system

cervix anatomy

How to use female condom

Female condoms are a barrier method of contraception, worn inside the vagina. They prevent pregnancy by stopping sperm from meeting an egg.

A female condom can be put into the vagina any time before sex – but make sure the penis doesn’t come into contact with the vagina before the condom has been put in. Semen can still come out of the penis even before a man has had an orgasm (fully ejaculated).

When used correctly, condoms are the only method of contraception that protects against both pregnancy and sexually transmitted infections (STIs).

Before using a female condom, read the instructions carefully. If the condom is past its expiration date or you notice any signs of damage — such as small tears or holes — discard the condom and choose another.

Practice inserting the female condom before the first time you use it for sex. In addition, pay close attention when you first use the female condom to make sure it stays in place during sex. Never reuse a female condom.

How to put on female condom

  1. Open the packet and remove the female condom, taking care not to tear it – DON’T open the packet with your teeth, fingernails, scissors or a knife, which could tear the condom or you could accidentally snip a piece of the condom and make it ineffective or entirely unusable.
  2. Squeeze the smaller ring at the closed end of the condom and put it into the vagina, holding the soft inner ring between your forefinger or middle finger and thumb.
  3. Use your other hand to separate the folds of skin (labia) around the vagina, then put the squeezed ring into the vagina.
  4. Put your index or middle finger or both in the open end of the condom until the inner ring can be felt and push the condom as far up the vagina as possible, with the outer ring lying against the outside of the vagina
  5. Make sure the large outer ring at the open end of the condom covers the area around the opening of the vagina.
  6. Don’t allow the condom to twist. Make sure the outer ring remains outside the vagina, extending about 1 inch (or about 2.5 centimeters) beyond the labia.
  7. The outer ring of the condom should rest closely on the outside of the vagina at all times during sex – if the outer ring gets pushed inside the vagina, stop and put it back in the right place.
  8. Guide the penis into the female condom. Make sure the penis doesn’t slip between the vagina and the outer surface of the female condom. During sex, make sure the outer ring of the condom doesn’t get pushed into the vagina.
  9. Make sure the penis goes in the female condom, not between the condom and the side of the vagina.
  10. After sex, remove the female condom immediately by gently pulling it out – you can twist the large ring to prevent semen from leaking. Taking care not to spill any sperm inside the vagina. If this happens, you will need to seek advice about emergency contraception (the morning-after pill) from your doctor or pharmacist.
  11. Throw away the condom in a bin, not the toilet.

Using lubricant

Female condoms come pre-lubricated to make them easier to use, but you may also like to use additional lube – make sure that it is water based. Oil-based lubricants, such as lotion or baby oil, can damage latex and polyisoprene condoms, and increase the likelihood that they will break.

Figure 3. How to insert female condom – Inspect the condom

how to put female condom step1 inspect-the-condomFigure 4. How to insert female condom – Hold and Squeeze with your thumb and index finger, squeeze the small, closed ring. It will become long and narrow, making it easier to insert into your vagina.

how to put female condom step 2 hold-and-squeeze the smaller ring

Figure 5. How to insert female condom – Inserting the condom into the vagina. You can squat, prop one leg up, sit, or lie down to do this – it’s completely up to you. Once in position, push the inner ring into your vaginal opening as far as it will go. The female condom can be a little slippery – just take it out and try again if you need to. When properly placed, it will be near your pubic bone, resting – not rubbing against or hitting – your cervix. If the female condom not inserted correctly, you may feel some discomfort. Simply shift the ring using your fingers until it sits comfortably. The outer ring will be visible outside of your vagina.

How to insert female condom step 3 - Inserting the condom into the vagina

how to use female condom

Note: Practice, practice, practice! Inserting the female condom can be tricky at first, but practicing before it’s time to have sex will give you the confidence you need to do it correctly.

Figure 6. How to insert female condom – Insert penis into the other end of the condom. The penis goes through the outer ring and into the sleeve. If, at this point, you feel any discomfort, have your partner remove his penis so that you can shift the inner ring until it sits in the correct position.

How to insert female condom step 4 - Insert penis into the other end of the condom

What to do if your female condom splits

If your condom splits while you are having sex, you should visit your doctor or go to your local sexual health or genitourinary medicine clinic as soon as possible.

Emergency contraception, such as the emergency pill or the intrauterine device (IUD) can be used to prevent pregnancy. Emergency contraception is available from contraception clinics, doctors that provide contraception services and sexual health clinics, but not all are able to fit the intrauterine device (IUD). The emergency contraceptive pill Levonelle and ellaOne can be bought from most pharmacies.

When can I use contraception again after having a baby?

It’s possible to become pregnant again very soon after the birth of a baby, even if you’re breastfeeding and even if your periods haven’t returned. You ovulate (release an egg) about two weeks before your period arrives, so your fertility may have returned before you realize it.

It’s important to sort out contraception from the start. If you had your baby in hospital, you should discuss contraception with your doctor or midwife before going home. You’ll also be asked about contraception at your six week postnatal check, but you can discuss it at any time with your midwife, doctor or local family planning/sexual health clinic.

You can use male and female condoms as soon as you feel ready to have sex. The combined pill, progestogen-only pill and contraceptive implants can be used from 21 days after the birth. However, the combined pill is not recommended if you are breastfeeding, as it can affect your milk supply.

You can usually have a contraceptive injection or start using a diaphragm or cap around six weeks after giving birth. If you used a diaphragm or cap before becoming pregnant, see your doctor or family planning/sexual health clinic after the birth to ensure that it still fits correctly, as childbirth and other factors such as weight loss/gain can have a significant effect. An intrauterine device (IUD) or intrauterine system (IUS) can usually be fitted 6-8 weeks after giving birth.

Alternative Contraception Options

Most types of contraception don’t protect against sexually transmitted infections (STIs). The male and female condom is the only form of contraception that protects against sexually transmitted infections (STIs) as well as preventing pregnancy. Therefore, if you’re using another type of contraception, such as the contraceptive pill, you should also use a condom to protect yourself against getting a sexually transmitted infection (STI).

Types of contraception

Condoms (male and female)

Condoms are a form of barrier contraception. They prevent pregnancy by stopping sperm from reaching and fertilizing an egg. Condoms also provide protection against sexually transmitted infections (STIs), including HIV, and stop them being passed from one sexual partner to another. Condoms are used during penetrative sex (vaginal or anal) and oral sex to protect against sexually transmitted infections (STIs).

Combined contraceptive pill

The combined contraceptive pill, usually just referred to as the pill, contains synthetic (man-made) versions of the female hormones estrogen and progesterone, which women produce naturally in their ovaries. The pill is usually taken to prevent pregnancy but it can also be used to treat:

  • painful periods
  • heavy periods
  • premenstrual syndrome
  • endometriosis.

Progestogen-only contraceptive pill

The progestogen-only pill doesn’t contain any estrogen. It is an option for women who can’t use the combined contraceptive pill, such as those over 35 years old and those who smoke.

Contraceptive implants and injections

Contraceptive implants and contraceptive injections are long-acting, effective, reversible and progestogen-only methods of contraception. They are over 99% reliable in preventing pregnancy. This means that fewer than 1 in 100 women who use the implant or injection will become pregnant each year. The injection is given every 12 weeks and the implant lasts for 3 years.

Diaphragms and caps

Diaphragms and caps are barrier methods of contraception used by women. They fit inside the vagina and prevent sperm from passing through the entrance of the womb (cervix).

Emergency contraception

A woman can use emergency contraception to prevent pregnancy after having unprotected sex, or if a method of contraception has failed. There are two types of emergency contraception:

  • the emergency contraceptive pill (sometimes called the morning-after pill)
  • the copper intrauterine device (IUD)

Intrauterine device (IUD)

An intrauterine device (IUD) is a small, T-shaped contraceptive device made from plastic and copper that fits inside the womb (uterus). The IUD used to be called a coil or a loop. It’s a long-acting and reversible method of contraception, which can stay in the womb for 5-10 years depending on the type.

It can also be an effective emergency contraception if fitted by a healthcare professional within five days (120 hours) of having unprotected sex. Some IUDs contain hormones that are gradually released to prevent pregnancy. These IUDs can also be used to manage heavy periods. IUDs are 99% effective.

Intrauterine system (IUS)

The intrauterine system (IUS) is similar to the intrauterine device (IUD), but it works in a slightly different way. Rather than releasing copper like the IUD, the IUS releases the hormone progestogen, which prevents pregnancy. It’s a long-acting, reversible method of contraception that lasts for five years. It can also be used for managing heavy periods.

Vasectomy

Vasectomy or ‘male sterilization’ is a simple and reliable method of contraception. It’s usually considered permanent and is therefore a big decision that should be fully discussed with your doctor beforehand. A vasectomy is a quick and relatively painless surgical procedure. It’s usually done under local anesthetic.

Female sterilization

Female sterilization is an effective form of contraception that permanently prevents a woman from being able to get pregnant. Like a vasectomy, female sterilization is a big decision that should be fully discussed with your doctor and / or your specialist.

The operation usually involves cutting or blocking the fallopian tubes, which carry eggs from the ovaries to the womb (uterus). This prevents the eggs from reaching the sperm and being fertilized. It’s a fairly minor operation and many women can return home the same day.

Vaginal ring

The vaginal ring is a small, soft plastic ring that’s placed inside the vagina on the first day of a woman’s period. It is removed after 21 days. Seven days later a new ring is used. A vaginal ring is about 4mm thick and 5.5cm in diameter. It contains estrogen and progestogen, so it’s not suitable for women who can’t take estrogen-containing contraception.

Natural rhythm methods (Natural family planning)

Natural rhythm methods (natural family planning) is when natural signs, such as body temperature, are used to identify when a woman is at her least and most fertile during each menstrual cycle, to help either avoid or plan pregnancy. Natural family planning is estimated to be around 75% effective – so 1 in 4 women using this method of birth control may still become pregnant.

Which types of birth control help prevent sexually transmitted infections (STIs)?

Only two types can protect you from STIs, including HIV: male condoms and female condoms.

While condoms are the best way to prevent STIs if you have sex, they are not the most effective type of birth control. If you have sex, the best way to prevent both STIs and pregnancy is to use what is called “dual protection.” Dual protection means you use a condom to prevent STIs each time you have sex, and at the same time, you use a more effective form of birth control, such as an IUD, implant, or shot.

What is the best method of birth control?

There is no “best” method of birth control for every woman. The birth control method that is right for you and your partner depends on many things, and may change over time.

Before choosing a birth control method, talk to your doctor or nurse about:

  • Whether you want to get pregnant soon, in a few years, or never
  • How well each method works to prevent pregnancy
  • Possible side effects
  • How often you have sex
  • The number of sex partners you have
  • Your overall health
  • How comfortable you are with using the method (For example, can you remember to take a pill every day? Will you have to ask your partner to put on a condom each time?)

Learn about types of birth control that you or your partner can use to prevent pregnancy.

Keep in mind that even the most effective birth control methods can fail. But your chances of getting pregnant are lower if you use a more effective method.

Table 1. Types of birth control method comparison

Birth Control Method Number of pregnancies per 100 women within their first year of typical use1Side effects and risks*

*These are not all of the possible side effects and risks. Talk to your doctor or nurse for more information.

How often you have to take or use
Abstinence (no sexual contact)Unknown

(0 for perfect use)

No medical side effectsNo action required, but it does take willpower. You may want to have a back-up birth control method, such as condoms.
Permanent sterilization surgery for women (tubal ligation, “getting your tubes tied”)Less than 1
  • Possible pain during recovery (up to 2 weeks)
  • Bleeding or other complications from surgery
  • Less common risk includes ectopic (tubal) pregnancy
No action required after surgery
Permanent sterilization implant for women (Essure®)Less than 1
  • Pain during the insertion of Essure; some pain during recovery
  • Cramping, vaginal bleeding, back pain during recovery
  • Implant may move out of place
  • Less common but serious risk includes ectopic (tubal) pregnancy
No action required after surgery
Permanent sterilization surgery for men (vasectomy)Less than 1
  • Pain during recovery
  • Complications from surgery
No action required after surgery
Implantable rod (Implanon®, Nexplanon®)Less than 1
  • Headache
  • Irregular periods
  • Weight gain
  • Sore breasts
  • Less common risk includes difficulty in removing the implant
No action required for up to 3 years before removing or replacing
Copper intrauterine device (IUD) (ParaGard®)Less than 1
  • Cramps for a few days after insertion
  • Missed periods, bleeding between periods, heavier periods
  • Less common but serious risks include pelvic inflammatory disease and the IUD being expelled from the uterus or going through the wall of the uterus.
No action required for up to 10 years before removing or replacing
Hormonal intrauterine devices (IUDs) (Liletta, Mirena®, and Skyla®)Less than 1
  • Irregular periods, lighter or missed periods
  • Ovarian cysts
  • Less common but serious risks include pelvic inflammatory disease and the IUD being expelled from the uterus or going through the wall of the uterus.
No action required for 3 to 5 years, depending on the brand, before removing or replacing
Shot/injection (Depo-Provera®)6
  • Bleeding between periods, missed periods
  • Weight gain
  • Changes in mood
  • Sore breasts
  • Headaches
  • Bone loss with long-term use (bone loss may be reversible once you stop using this type of birth control)
Get a new shot every 3 months
Oral contraceptives, combination hormones (“the pill”)9
  • Headache
  • Upset stomach
  • Sore breasts
  • Changes in your period
  • Changes in mood
  • Weight gain
  • High blood pressure
  • Less common but serious risks include blood clots, stroke and heart attack; the risk is higher in smokers and women older than 35
Take at the same time every day
Oral contraceptives, progestin-only pill (“mini-pill”)9
  • Spotting or bleeding between periods
  • Weight gain
  • Sore breasts
  • Headache
  • Nausea
Take at the same time every day
Skin patch
(Xulane®)
9

May be less effective in women weighing 198 pounds or more

  • Skin irritation
  • Upset stomach
  • Changes in your period
  • Changes in mood
  • Sore breasts
  • Headache
  • Weight gain
  • High blood pressure
  • Less common but serious risks include blood clots, stroke and heart attack; the risk is higher in smokers and women older than 35
Wear for 21 days, remove for 7 days, replace with a new patch
Vaginal ring (NuvaRing®)9
  • Headache
  • Upset stomach
  • Sore breasts
  • Vaginal irritation and discharge
  • Changes in your period
  • High blood pressure
  • Less common but serious risks include blood clots, stroke and heart attack; the risk is higher in smokers and women older than 35
Wear for 21 days, remove for 7 days, replace with a new ring
Diaphragm with spermicide (Koromex®, Ortho-Diaphragm®)12

If you gain or lose than 15 pounds, or have a baby, have your doctor check you to make sure the diaphragm still fits.

  • Irritation
  • Allergic reactions
  • Urinary tract infection (UTI)
  • Vaginal infections
  • Rarely, toxic shock if left in for more than 24 hours
  • Using a spermicide often might increase your risk of getting HIV
Insert each time you have sex
Sponge with spermicide (Today Sponge®)12

(among women who have never given birth before)

or

24

(among women who have given birth)

  • Irritation
  • Allergic reactions
  • Rarely, toxic shock if left in for more than 24 hours
  • Using a spermicide often might increase your risk of getting HIV
Insert each time you have sex
Cervical cap with spermicide (FemCap®)23
  • Vaginal irritation or odor
  • Urinary tract infections (UTIs)
  • Allergic reactions
  • Rarely, toxic shock if left in for more than 48 hours
  • Using a spermicide often might increase your risk of getting HIV
Insert each time you have sex
Male condom18
  • Irritation
  • Condom may tear, break or slip off
  • Allergic reactions to latex condoms
Use each time you have sex
Female condom21
  • Irritation
  • Condom may tear or slip out
  • Allergic reaction
Use each time you have sex
Withdrawal — when a man takes his penis out of a woman’s vagina (or “pulls out”) before he ejaculates (has an orgasm or “comes”)22
  • Sperm can be released before the man pulls out, putting you at risk for pregnancy
Use each time you have sex
Natural family planning (rhythm method)24
  • Can be hard to know the days you are most fertile (when you need to avoid having sex or use back-up birth control)
Depending on method used, takes planning each month
Spermicide alone28

Works best if used along with a barrier method, such as a diaphragm

  • Irritation
  • Allergic reactions
  • Urinary tract infection
  • Frequent use of a spermicide might increase your risk of getting HIV
Use each time you have sex
[Source 1]

Which types of birth control can I get without a prescription?

You can buy these types of birth control over the counter at a drugstore or supermarket:

  • Male condoms
  • Female condoms
  • Sponges
  • Spermicides
  • Emergency contraception pills. Plan B One-Step® and its generic versions are available in drugstores and some supermarkets to anyone, without a prescription. However you should not use Emergency contraception as your regular birth control because it does not work as well as regular birth control. Emergency contraception is meant to be used only when your regular birth control does not work for some unexpected reason.

Which types of birth control do I have to see my doctor to get?

You need a prescription for these types of birth control:

  • Oral contraceptives: the pill and the mini-pill (in some states, birth control pills are now available without a prescription, through the pharmacy)
  • Patch
  • Vaginal ring
  • Diaphragms (your doctor or nurse needs to fit one to the shape of your vagina)
  • Shot/injection (you get the shot at your doctor’s office or family planning clinic)
  • Cervical cap
  • Implantable rod (inserted by a doctor in the office or clinic)
  • IUD (inserted by a doctor in the office or clinic)

You will need surgery or a medical procedure for:

  • Female sterilization (tubal ligation)
  • Male sterilization (vasectomy)
  • Tubal implant (Essure®)
References
  1. Birth control methods. https://www.womenshealth.gov/a-z-topics/birth-control-methods
read more
Procedures

Oophorectomy

oophorectomy

What is oophorectomy

Oophorectomy also called ovariectomy is a surgical procedure to remove one or both of your ovaries. Oophorectomy is usually performed to treat an ovarian cyst, ovarian cancer or some other problem related to the ovary. When the surgery involves removing only one ovary, it’s called unilateral oophorectomy. When an oophorectomy involves removing both ovaries, it’s called bilateral oophorectomy.

Why oophorectomy is done

Oophorectomy is usually performed to treat:

  • an ovarian cyst
  • ovarian torsion — the twisting of an ovary
  • ovarian cancer
  • endometriosis
  • a tubo-ovarian abscess — a pus-filled pocket involving a fallopian tube and an ovary
  • noncancerous (benign) ovarian tumors or cysts
  • reducing the risk of ovarian cancer or breast cancer in those at increased risk

An ovarian cyst is a fluid-filled pocket in the ovary. There are different types of ovarian cysts. Most do not cause any problems, but some can turn out to be cancerous, meaning an oophorectomy may be necessary.

Large ovarian cysts can become twisted. This painful condition, known as ovarian torsion, is a surgical emergency. The cyst or entire ovary may need to be removed.

Women with ovarian torsion usually experience sudden, severe, sharp pains in the lower abdomen, often with nausea and vomiting. If you have these symptoms it is important to see a doctor immediately or call your local emergency services number and ask for an ambulance.

Ovarian cancer occurs when some cells in the ovary start to grow abnormally and develop into cancer. Ovarian cancer is usually treated with a type of surgery known as a laparotomy, which involves making a long cut in the abdomen. This allows for the ovaries, fallopian tubes and other organs, if they have been affected, to be removed.

Some women have a high family risk of developing ovarian cancer. If so, they may even choose to have their ovaries and fallopian tubes removed to reduce their risk.

Oophorectomy may also be used to treat endometriosis if other treatments have not worked. Endometriosis is a condition where the tissue lining of the uterus grows outside it. In severe cases, the uterus, ovaries and fallopian tubes may be removed.

Prophylactic oophorectomy

Preventive (prophylactic) surgery to remove the ovaries might be an option that people with a high risk of ovarian cancer and breast cancer to reduce their risk. Preventive bilateral oophorectomy (prophylactic oophorectomy) carries benefits and risks that must be carefully balanced when considering this procedure.

Prophylactic oophorectomy is usually reserved for those with:

Inherited gene mutations. People with a significantly increased risk of breast cancer and ovarian cancer due to an inherited mutation in the BRCA1 or BRCA2 gene — two genes linked to breast cancer, ovarian cancer and other cancers who have completed childbearing may consider this procedure.

  • People with other inherited gene mutations that increase the risk of ovarian cancer, including those with Lynch syndrome, might also consider this procedure.
  • Strong family history. Prophylactic oophorectomy may also be recommended if you have a strong family history of breast cancer and ovarian cancer but no known genetic alteration. It might also be recommended if you have a strong likelihood of carrying the gene mutation based on your family history but choose not to proceed with genetic testing.

Discuss your risk factors for breast cancer and ovarian cancer with your doctor. Your doctor may recommend that you see a genetic counselor to discuss your family history of cancer to help you decide whether you should consider genetic testing and which genes should be included in the testing.

How much can oophorectomy reduce the risk of cancer?

If you have a BRCA mutation, a prophylactic oophorectomy can reduce your:

  • Breast cancer risk by up to 50 percent in premenopausal women. As an example, if a woman with a high risk of breast cancer had a 60 percent chance of being diagnosed with breast cancer at some point in her lifetime, bilateral oophorectomy could reduce her risk to 30 percent. Put another way, for every 100 women just like her, 60 could be expected to be diagnosed with breast cancer without oophorectomy. And 30 would be expected to be diagnosed with breast cancer after oophorectomy.
  • Ovarian cancer risk by 80 to 90 percent. As an example, if a woman with a high risk of ovarian cancer had a 30 percent chance of being diagnosed with ovarian cancer at some point in her lifetime, oophorectomy could reduce her risk to 6 percent, assuming an 80 percent risk reduction. Put another way, for every 100 women just like her, 30 could be expected to be diagnosed with ovarian cancer without oophorectomy. And six would be expected to be diagnosed with ovarian cancer after oophorectomy.

In studies, the risk of breast cancer and ovarian cancer varies according to the particular gene mutations that you have. And your individual risk of breast cancer and ovarian cancer varies depending on many factors, including your age, your family history, your lifestyle choices and other strategies you’re using to reduce your risk of cancer.

For some, oophorectomy may offer great reduction in risk. For others, the risks of surgery and the potential side effects may not be worth the reduction in cancer risk.

Prophylactic oophorectomy might relieve much of your anxiety about developing cancer, but this type of surgery can also take an emotional toll on you. Even if you didn’t plan on having children, you might mourn the loss of your fertility.

Lingering risk of cancer

Prophylactic oophorectomy doesn’t completely eliminate your risk of breast cancer or ovarian cancer. A type of cancer that looks and acts identical to ovarian cancer can develop after the ovaries and fallopian tubes are removed. The risk of this type of cancer, called primary peritoneal cancer, is low — much lower than the lifetime risk of ovarian cancer if the ovaries remain intact.

Are there alternatives to oophorectomy for preventing ovarian cancer?

Researchers are studying other ways to reduce the risk of ovarian cancer in people who have a high risk of the disease. But these other ways of preventing ovarian cancer haven’t been proved to reduce risk as much as oophorectomy has. For this reason, most doctors recommend oophorectomy.

But oophorectomy isn’t right for everyone with a high risk of breast cancer or ovarian cancer. So talk about the alternatives with your doctor to better understand how they may affect your risk. Options include:

  • Increased screening for ovarian cancer. You may choose to have ovarian cancer screening once or twice each year to look for early signs of cancer. Screening usually includes a blood test for cancer antigen (CA) 125 and an ultrasound exam of your ovaries. In theory, increased screening should be able to help doctors catch ovarian cancer at its earliest stages, but whether that’s possible with current screening methods isn’t clear. Screening tests are noninvasive, but there’s no evidence that they save lives.

Birth control pills. Studies suggest that taking birth control pills reduces the risk of ovarian cancer in average-risk women. There is good evidence that birth control pills can also be beneficial in high-risk women, such as those with BRCA mutations. There is concern that newer birth control pill formulations are associated with a very small increase in the risk of breast cancer. However, the benefits of reducing ovarian cancer risk seem to outweigh the small risk of breast cancer.

Doesn’t mastectomy offer a greater reduction in breast cancer risk?

Yes. Surgery to remove your breasts (bilateral mastectomy) may reduce your risk of breast cancer by 90 percent. As an example, if your risk of developing breast cancer at some point in your lifetime is 50 percent, a preventive mastectomy may lower your risk to 5 percent.

Put another way, for every 100 women with that same level of risk who undergo preventive mastectomy, five could be diagnosed with breast cancer at some point in their lives.

Why might a person opt for oophorectomy over mastectomy?

Reasons you might choose oophorectomy over mastectomy include:

  • Oophorectomy reduces your risk of two cancers. For those that haven’t yet experienced menopause, oophorectomy reduces the risk of breast cancer and ovarian cancer, while mastectomy reduces only the risk of breast cancer.
  • There aren’t many options for preventing ovarian cancer. Ovarian cancer is sometimes seen as a greater threat than breast cancer because it isn’t easily detected, and it may be detected at a later stage when diagnosed. While there’s no proven method for finding ovarian cancer at an early stage, there are tests, such as mammograms and breast MRIs, to detect breast cancer at an early stage in very high-risk women.
  • Removing your ovaries doesn’t affect your appearance. Some women are concerned about how they’ll look if they have their breasts removed. Oophorectomy won’t affect your appearance.

These benefits have to be balanced against the risks of oophorectomy and the early menopause that occurs as a result.

Oophorectomy surgery risks and side effects

An oophorectomy is a relatively safe procedure. However, with any surgical procedure, there are risks involved. The risk of complications depends on how the procedure is performed.

Complications that may occur during or after an oophorectomy include:

  • bleeding
  • infection
  • damage to nearby organs such as your bowel, bladder or blood vessels
  • developing a hernia near one of the cuts
  • surgical emphysema
  • damage to a ureter
  • having a small part of the ovary left behind, which could cause problems and be painful, such as pelvic pain, in premenopausal women (ovarian remnant syndrome)
  • rupture of a tumor, spreading potentially cancerous cells
  • inability to get pregnant on your own, if both ovaries are removed

But more concerning is the impact of losing the hormones supplied by your ovaries. If you have yet to undergo menopause, oophorectomy causes early menopause. Early menopause carries many risks, including:

  • Bone thinning (osteoporosis). Removing your ovaries reduces the amount of bone-building estrogen your body produces. This may increase your risk of a broken bone.
  • Discomforts of menopause. Hot flashes, vaginal dryness, sexual problems, sleep disturbance and sometimes cognitive changes can occur during menopause. Removing your ovaries doesn’t mean you’ll immediately have these problems, but it does mean that any menopausal symptoms you develop will occur earlier and are more likely to reduce your quality of life than if they occurred during natural menopause.
  • Increased risk of heart disease. Your risk of heart disease may increase if you have your ovaries removed.

Risks of premature menopause

If you haven’t undergone menopause, you will experience premature menopause if both ovaries are removed. This deprives the body of the hormones, such as estrogen and progesterone, produced in the ovaries, leading to complications such as:

  • Menopause signs and symptoms, such as hot flashes and vaginal dryness
  • Depression or anxiety
  • Heart disease
  • Memory problems
  • Decreased sex drive
  • Osteoporosis
  • Premature death

Taking low doses of hormone replacement drugs after surgery and until about age 50 may reduce the risk of these complications. But hormone replacement therapy has risks of its own. Discuss your options with your doctor.

Do you need postmenopausal hormone therapy after oophorectomy?

Use of low-dose hormone therapy after oophorectomy is controversial. While studies have shown that use of hormone therapy after menopause may increase the risk of breast cancer, other studies suggest early menopause can cause its own serious risks.

Women who undergo prophylactic oophorectomy and don’t use hormone therapy up to age 45 have a higher rate of premature death, heart disease and neurological diseases. For this reason, doctors typically recommend that younger women who have surgically induced menopause should consider taking low-dose hormone therapy for a short time and stop around age 51.

It isn’t entirely clear what effect hormone therapy might have on your cancer risk. Several studies have found that short-term hormone therapy doesn’t increase the risk of breast cancer in those with BRCA mutations who have undergone prophylactic oophorectomy. Ask your doctor about your particular situation. If you decide to take low-dose estrogen, plan to discontinue this treatment around age 51.

You may opt to have your uterus removed during your oophorectomy surgery so that you can take a type of hormone therapy (estrogen-only hormone therapy) that may be safer for those with a high risk of breast cancer. Discuss the benefits and risks of hysterectomy with your surgeon.

What are ovaries

The ovaries are a pair of female reproductive glands in which the ova, or eggs, are formed. The two ovaries are solid, ovoid structures, each about 3.5 centimeters long, 2 centimeters wide, and 1 centimeter thick. The ovaries lie in shallow depressions in the lateral wall of the pelvic cavity one on each side of the uterus (see Figure 2).

Baby girls are born with all the egg cells in their ovaries that they will have in their lifetime 1. These egg cells lie in small pockets called follicles. Once puberty starts, different hormones ripen the first follicle so that it will release an egg cell (ovum). In addition to their role in producing ova, the ovaries also have the distinction of being an endocrine gland because they secrete hormones—primarily estrogen and progesterone—that are vital to normal reproductive development and fertility. Hormones are substances produced by the body that act as chemical transmitters. They regulate body functions like the menstrual cycle and body temperature. Hormones also trigger ovulation and promote the healthy development of female sex characteristics during puberty and to ensure fertility.

Progesterone and estrogen are necessary to prepare the uterus for menstruation, and their release is triggered by the hypothalamus.

Once you reach puberty, the ovaries release a single egg each month (the ovaries typically alternate releasing an egg)—this is called ovulation. The hypothalamus sends a signal to the pituitary gland to release gonadotrophic substances (follicle stimulating hormone [FSH] and luteinizing hormone [LH]). These hormones are essential to normal reproductive function—including regulation of the menstrual cycle.

As the egg migrates down the fallopian tube, progesterone is released. It is secreted by a temporary gland formed within the ovary after ovulation called the corpus luteum. Progesterone prepares the body for pregnancy by causing the uterine lining to thicken. If a woman is not pregnant, the corpus luteum disappears.

If a woman is pregnant, the pregnancy will trigger high levels of estrogen and progesterone, which prevent further eggs from maturing. Progesterone is secreted to prevent uterine contractions that may disturb the growing embryo. The hormone also prepares the breasts for lactation.

Increased estrogen levels near the end of pregnancy alert the pituitary gland to release oxytocin, which causes uterine contractions. Before delivery, the ovaries release relaxin, which as the name suggests, loosens the pelvic ligaments in preparation for labor.

More hormones are released during pregnancy than at any other time of a woman’s life, but during menopause—which marks the end of fertility—estrogen levels fall fast. This can lead to a range of complications.

Figure 1. Female reproductive system

normal ovary

Figure 2. The ovaries lie in shallow depressions in the lateral wall of the pelvic cavity

uterus

ovary location

Function of the ovaries

Ovarian tissues are divided into two indistinct regions—an inner medulla and an outer cortex. The ovarian medulla is mostly composed of loose connective tissue and contains many blood vessels, lymphatic vessels, and nerve fibers. The ovarian cortex consists of more compact tissue and has a granular appearance due to tiny masses of cells called ovarian follicles (see Figure 3). A layer of cuboidal epithelium covers the ovary’s free surface. Just beneath this epithelium is a layer of dense connective tissue.

Primordial Follicles

During prenatal development of a female, small groups of cells in the outer region of the ovarian cortex form several million primordial follicles. Each follicle consists of a single, large cell, called a primary oocyte, surrounded by epithelial cells called follicular cells.

Early in development, the primary oocytes begin to undergo meiosis, but the process soon halts and does not continue until the individual reaches puberty. Once the primordial follicles appear, no new ones form. Instead, the number of primary oocytes in the ovary steadily declines as many of the primary oocytes degenerate. Of the six to seven million primary oocytes that formed in the embryonic ovary, only a million or so remain at birth, and perhaps 300,000 are present at puberty. Of these, probably fewer than 300 to 400 oocytes will be released from the ovary during a female’s reproductive life.

Figure 3. Ovary anatomy

ovary anatomy

Figure 4. Ovulation

ovulation

Female Sex Hormones

The female body is reproductively immature until about ten years of age. Then, the hypothalamus begins to secrete increasing amounts of Gonadotropin-releasing hormone (GnRH), which, in turn, stimulates the anterior pituitary to release the gonadotropins follicle-stimulating hormone (FSH) and luteinizing hormone (LH). These hormones play primary roles in controlling female sex cell maturation and in producing female sex hormones (Figure 5. Pituirary gland hormones).

The ovaries produce and release two groups of sex hormones—progesterone and estrogen 2. There are actually three major estrogens, known as estradiol, estrone, and estriol. Estradiol is the most abundant of the estrogens. These substances work together to promote the healthy development of female sex characteristics during puberty and to ensure fertility.

Several other tissues, including the adrenal cortices, and the placenta (during pregnancy), secrete female sex hormones —estrogens and progesterone, also.

However, the ovaries are the primary source of estrogens (in a nonpregnant female). At puberty, under the influence of the anterior pituitary, the ovaries secrete increasing amounts of estrogens. Estrogens stimulate enlargement of reproductive organs, including the vagina, uterus, uterine tubes, ovaries, and external reproductive structures.

Estrogen (estradiol, specifically) is instrumental in breast development, fat distribution in the hips, legs, and breasts, and the development of reproductive organs 2.

To a lesser extent, the ovaries release the hormone relaxin prior to giving birth. Another minor hormone is inhibin, which is important for signaling to the pituitary to inhibit follicle-stimulating hormone (FSH) secretion.

Figure 5. The Hypothalamus controlling the anterior lobe of the pituitary and the ovaries

pituitary hormones

Note: Note: The hypothalamus controls the production of an egg cell, ovulation of the egg cell, and development of the female secondary sex characteristics. Negative feedback among the hypothalamus, the anterior lobe of the pituitary, and the ovaries helps control the concentration of estrogens in the female body.

Estrogens also develop and maintain the female secondary sex characteristics, which include (Figure 6. Pituirary gland hormones):

  1. Development of the breasts and the ductile system of the mammary glands in the breasts.
  2. Increased deposition of adipose tissue in thesubcutaneous layer generally and in the breasts, thighs and buttocks particularly.
  3. Increased vascularization of the skin.

The ovaries are also the primary source of progesterone (in a nonpregnant female). This hormone promotes changes in the uterus during the female menstrual cycle, affects the mammary glands, and helps regulate the secretion of gonadotropins from the anterior pituitary gland.

[Androgens (male sex hormone) secreted by the adrenal gland cortices produce certain other changes in females at puberty. For example, increased hair growth in the pubic and axillary regions. Conversely, development of the female skeletal configuration, which includes narrow shoulders and broad hips, is a response to a low androgen concentration.]

Figure 6. Pituitary gland hormones under the influence of the hypothalamus controlling the ovaries production of egg cell, ovulation and development of the female secondary sex characteristics

hypothalamic-pituitary-ovaries-feedback-loop

Menstrual Cycle

The menstrual cycle is characterized by regular, recurring changes in the endometrium, which culminate in menstrual bleeding (menses). Such cycles usually begin around age thirteen and continue into the early fifties, then cease.

A female’s first menstrual cycle, called menarche, occurs after the ovaries and other organs of the reproductive control system mature and begin responding
to certain hormones. Then, the hypothalamic secretion of gonadotropin-releasing hormone (GnRH) stimulates the anterior pituitary to release threshold levels of follicle-stimulating hormone (FSH) and luteinizing hormone (LH). Follicle-stimulating hormone (FSH) stimulates the final maturation of an ovarian follicle. The follicular cells produce increasing amounts of estrogens and some progesterone. Luteinizing hormone (LH) stimulates certain ovarian cells to secrete precursor molecules (such as testosterone), also used to produce estrogens.

In a young female, estrogens stimulate the development of secondary sex characteristics. Estrogens secreted during subsequent menstrual cycles continue the development and maintenance of these characteristics.

Figure 7. Ovarian activity during the Menstrual cycle

ovarian activity in menstrual cycle

Note: Major events in the female menstrual cycle. (a) Plasma hormonal concentrations of follicle-stimulating hormone (FSH) and luteinizing hormone (LH) affect follicle maturation in the ovaries. (b) Plasma hormonal concentrations of estrogen and progesterone influence changes in the uterine lining.

Increasing concentration of estrogens during the first week or so of a menstrual cycle changes the uterine lining, thickening the glandular endometrium  (proliferative phase). Meanwhile, the follicle fully matures, and by around the fourteenth day of the cycle, the antral follicle appears on the ovary surface as a blisterlike bulge. Within the follicle, the follicular cells, which surround and connect the secondary oocyte to the inner wall, loosen. Follicular fluid accumulates.
While the follicle matures, it secretes estrogens that inhibit the release of luteinizing hormone (LH) from the anterior pituitary gland but allow luteinizing hormone (LH) to be stored in the gland. Estrogens also make anterior pituitary cells more sensitive to the action of gonadotropin-releasing hormone (GnRH), which is released from the hypothalamus in rhythmic pulses about ninety minutes apart.

Near the fourteenth day of follicular development, the anterior pituitary cells finally respond to the pulses of GnRH and release the stored LH. The resulting  surge in LH concentration lasts about thirty-six hours. In response to the LH, the primary oocyte completes meiosis I. The LH also acts with FSH inducing complex interactions with prostaglandins, progesterone, plasmin, and proteolytic enzymes, leading to the weakening and rupturing of the bulging follicular wall. This event sends the secondary oocyte and follicular fluid out of the ovary (ovulation).

Following ovulation, the space containing the follicular fluid fills with blood, which soon clots. Under the influence of LH, the remnants of the follicle within the ovary form a temporary glandular structure in the ovary called a corpus luteum (“yellow body”).

Follicular cells secrete some progesterone during the first part of the menstrual cycle. During the second half of the cycle, cells of the corpus luteum secrete abundant progesterone and estrogens. Consequently, as a corpus luteum forms, the blood progesterone concentration sharply increases.

Progesterone causes the endometrium to become more vascular and glandular. It also stimulates the uterine glands to secrete more glycogen and lipids (secretory phase). The endometrial tissues fill with fluids containing nutrients and electrolytes, which provide a favorable environment for an embryo to develop.

High levels of estrogens and progesterone inhibit the anterior pituitary gland’s release of LH and FSH. Consequently, no other follicles are stimulated to complete development when the corpus luteum is active. However, if the secondary oocyte released at ovulation is not fertilized, the corpus luteum begins to degenerate (regress) on about the twenty-fourth day of the cycle. Eventually, connective tissue replaces it. The remnant of such a corpus luteum is called a corpus albicans, and is eventually absorbed.

When the corpus luteum ceases to function, concentrations of estrogens and progesterone rapidly decline, and in response, blood vessels in the endometrium constrict. This reduces the supply of oxygen and nutrients to the thickened endometrium (stratum functionalis and stratum basalis), and these lining tissues soon disintegrate and slough off. At the same time, blood leaves damaged capillaries, creating a flow of blood and cellular debris that passes through the vagina as the menstrual flow (menses). This flow usually begins about the twenty-eighth day of the cycle and continues for three to five days, while the concentrations of  estrogens are relatively low. The beginning of the menstrual flow marks the end of a menstrual cycle and the beginning of the next cycle as a new developing antral follicle becomes available.

Low blood concentrations of estrogens and progesterone at the beginning of the menstrual cycle mean that the hypothalamus and anterior pituitary gland are no longer inhibited. Consequently, FSH and LH concentrations soon increase, stimulating a new antral follicle to mature. As this follicle secretes estrogens, the  uterine lining undergoes repair, and the endometrium begins to thicken again.

Menopause

After puberty, menstrual cycles continue at regular intervals into the late forties or early fifties, when the ovaries start to produce less estrogen and progesterone. This results in the menstrual cycles becoming less predictable. Then, within a few months or years, the cycles cease. This period in life is called menopause or female climacteric.

Ovary removal surgery

How to prepare for the oophorectomy surgery

If you need to have an oophorectomy, you will probably meet with the surgeon and anesthetist before the operation to discuss the procedure. You will likely need to avoid drinking and eating for some hours before surgery. Your doctor will be able to advise you.

To prepare for an oophorectomy, your doctor may ask that you:

  • Drink a solution to clear your intestines the day before surgery
  • Stop eating the day before your surgery and limit liquids
  • Stop taking certain medications
  • Undergo imaging tests, such as ultrasound and computerized tomography (CT), to help surgeons plan for the procedure

Having both ovaries removed will result in menopause. If you were still having periods before surgery, they will stop immediately after. Knowing what will happen before an oophorectomy may help you feel more prepared to cope with the physical and emotional changes that will follow the surgery. You may also want to discuss with your doctor whether you will be able to become pregnant in the future.

Plan for a hospital stay

You may need to stay in the hospital for a few days after an oophorectomy. How long you stay depends on how the procedure is performed and the reason for your surgery. Ask your doctor what you can expect.

Plan ahead for time in the hospital by packing:

  • A robe and slippers
  • Personal items, such as your toothbrush
  • Things to help you pass the time, such as books and magazines

Plan for infertility

If you want to have children, talk with your doctor about your options. For some conditions, you may need only one ovary removed (unilateral oophorectomy). With the remaining ovary, you’ll still have a menstrual cycle and conceive naturally.

If both of your ovaries are removed (bilateral oophorectomy), but your uterus remains, you may be able to become pregnant using assisted reproductive technology. Ask your doctor to refer you to a fertility specialist who can review your options with you.

What happens during the oophorectomy surgery?

Oophorectomy is usually performed under a general anesthetic so that you are asleep during the procedure. The surgeon will make a cut in your abdomen to remove your ovary.

An oophorectomy can be performed two ways:

  • Laparotomy: In this surgical approach, the surgeon makes one long incision in your lower abdomen to access your ovaries. The surgeon separates each ovary from the blood supply and tissue that surrounds it and removes the ovary.
  • Minimally invasive laparoscopic surgery: In this surgical approach, the surgeon makes three or four very small incisions in your abdomen. The surgeon inserts a tube with a tiny camera through one incision and special surgical tools through the others. The camera transmits video to a monitor in the operating room that the surgeon uses to guide the surgical tools. Each ovary is separated from the blood supply and surrounding tissue and placed in a pouch. The pouch is pulled out of your abdomen through one of the small incisions.

Laparoscopic oophorectomy may also be robotically assisted in certain cases. During robotic surgery, the surgeon watches a 3-D monitor and uses hand controls that allow finer movement of the surgical tools.

Whether your oophorectomy is an open, laparoscopic or robotic procedure depends on your situation. Laparoscopic or robotic oophorectomy usually offers quicker recovery, less pain and a shorter hospital stay. But these procedures aren’t appropriate for everyone, and in some cases, surgery that begins as laparoscopic may need to be converted to an open procedure during the operation.

Figure 5. Laparoscopic oophorectomy

Laparoscopic oophorectomy

Oophorectomy combined with other procedures

An oophorectomy can be done alone, but it is often done as part of a more-complete surgery to remove the uterus (hysterectomy) in women who have undergone menopause.

In those with an increased risk of ovarian cancer, an oophorectomy is commonly combined with surgery to remove the nearby fallopian tubes (salpingectomy) since they share a common blood supply with the ovaries. When combined, the procedure is called a salpingo-oophorectomy.

What to expect after the oophorectomy surgery

After an oophorectomy, you can expect to:

  • Spend time in a recovery room as your anesthesia wears off
  • Move to a hospital room where you may spend a few hours to a few days, depending on your procedure
  • Get up and about as soon as you’re able in order to help your recovery

You might need to stay in hospital for a few days after an oophorectomy so you can recover. However, with laparoscopic oophorectomy you should be able to go home the same day. You may be given pain relief medication and advised on how to take care of your wound. You will probably be advised to avoid certain activities such as swimming or heavy lifting for a few weeks.

Ovary removal recovery time

How quickly you can go back to your normal activities after an oophorectomy depends on your situation, including the reason for your surgery and how it was performed.

Most people can return to full activity by six weeks after surgery. Those who undergo laparoscopic or robotic surgery may return to full activity sooner — as early as two weeks after surgery.

Discuss exercise, driving, sexual restrictions and overall activity level with your surgeon.

Call your doctor if you:

  • Have a temperature of 101° F (38.3° C) or higher
  • Have shortness of breath
  • Have pain that doesn’t get better with pain medication
  • Have increased redness around your incisions
  • Have new or increased swelling around your incision
  • Have discharge from your incision
  • Have heavy vaginal bleeding
  • Have swelling or tenderness in your calves or thighs
  • Cough up blood
  • Don’t have a bowel movement for 2 days or longer
  • Have nausea or vomiting
  • Have diarrhea (loose or watery bowel movements)
  • Have any questions or concerns

How can I prevent constipation?

  • Go to the bathroom at the same time every day. Your body will get used to going at that time. However, if you feel the urge to go, don’t put it off.
  • Try to use the bathroom 5 to 15 minutes after meals. After breakfast is a good time to move your bowels. The reflexes in your colon are strongest at this time.
  • Exercise, if you can. Walking is an excellent form of exercise.
  • Drink 8 (8-ounce) glasses (2 liters) of liquids daily, if you can. Drink water, juices, soups, ice cream shakes, and other drinks that don’t have caffeine. Drinks with caffeine, such as coffee and soda, pull fluid out of the body.
  • Slowly increase the fiber in your diet. Fruits, vegetables, whole grains, and cereals contain fiber. If you have an ostomy or have had recent bowel surgery, check with your doctor or nurse before making any changes in your diet.
  • Both over-the-counter and prescription medications are available to treat constipation. Start with 1 of the following over-the-counter medications first:
    • Docusate sodium (Colace) 100 mg. This is a stool softener that causes few side effects. Don’t take it with mineral oil.
    • Polyethylene glycol (MiraLAX) 17 grams daily.
    • Senna (Senokot) 2 tablets at bedtime. This is a stimulant laxative, which can cause cramping.
    • If you haven’t had a bowel movement in 2 days, call your doctor or nurse.

When can I resume sexual activity?

Your doctor will tell you when you can resume sexual activity during your first follow-up visit after surgery. Don’t place anything in your vagina or have sex until your doctor says it’s okay.

When is it safe for me to drive?

You can start driving again 2 weeks after surgery, as long as you aren’t taking pain medication that may make you drowsy.

What exercises can I do?

Doing aerobic exercise, such as walking and stair climbing, will help you gain strength and feel better. Gradually increase the distance you walk. Climb stairs slowly, resting or stopping as needed.

Ask your doctor or nurse before starting more demanding exercises.

Will I be able to travel?

Yes, you can travel. If you’re traveling by plane within a few weeks after your surgery, make sure you get up and walk every hour. Be sure to stretch your legs, drink plenty of liquids, and keep your feet elevated when possible.

When can I return to work?

The time it takes to return to work depends on the type of work you do, the type of surgery you had, and how fast your body heals. Most people can return to work about 2 to 4 weeks after the surgery.

When can I lift heavy objects?

Ask your doctor when it’s safe for you to lift heavy objects after your surgery. Normally, you shouldn’t lift anything heavier than 5 to 10 pounds (2.27 to 4.5 kilograms) for at least 4 weeks after your surgery.

Bilateral salpingo oophorectomy

A bilateral salpingo-oophorectomy is a surgery to remove both your fallopian tubes and ovaries. You may be having a bilateral salpingo-oophorectomy for different reasons, such as you have an ovarian cyst or have a high chance of having ovarian cancer in the future. Your doctor will explain why you’re having the surgery.

After your surgery, you will stop menstruating (getting your period). You may experience normal symptoms of menopause, including night sweats, hot flashes, and vaginal dryness. If you’re in menopause or have already gone through it, you may still notice some of these symptoms. Talk with your doctor about ways to manage these symptoms.

You will also be infertile (unable to have biological children) after your surgery. If you would like to have biological children in the future, ask your doctor for a referral to a fertility nurse specialist.

You may have a dilation and curettage (D&C) after your salpingo-oophorectomy. This is a procedure that’s done so your surgeon can check for abnormal cells in your uterus.

During your dilation and curettage (D&C), your cervix will be dilated (opened) slightly. Your surgeon will put a tool called a curette through your cervix, into your uterus. They will use the curette to remove a small amount of tissue from the inside of your uterus.

Your surgeon may also want to look at the tissue lining the inside of your uterus to see if anything looks abnormal. This is called a hysteroscopy. During a hysteroscopy, your surgeon will insert a long, thin video camera through your cervix, into your uterus to examine the area.

References
  1. National Center for Biotechnology Information, U.S. National Library of Medicine. Ovaries. https://www.ncbi.nlm.nih.gov/pubmedhealth/PMHT0022599/
  2. Vertical Health, EndocrineWeb. An Overview of the Ovaries. https://www.endocrineweb.com/endocrinology/overview-ovaries
read more
Procedures

Mohs surgery

Mohs surgery

What is Mohs surgery

Mohs surgery also called Mohs micrographic surgery, is a precise surgical procedure to remove skin cancer lesion in several steps whilst sparing the healthy tissue as much as possible 1. With Mohs micrographic surgery, the smallest amount of tissue possible is removed. You will have a smaller scar than you might have with other treatment options. First, a thin layer of cancerous tissue is removed. Then, a second thin layer of tissue is removed and viewed under a microscope to check for cancer cells. More layers are removed one at a time until the tissue viewed under a microscope shows no remaining cancer. Mohs surgery has a 99% cure rate in treating certain skin cancer. Mohs micrographic surgery is a surgical approach that offers high cure rates for the treatment of a variety of skin cancers, including basal cell carcinomas (BCC) and squamous cell carcinomas (SCC). The main advantage of Mohs surgery is that it offers precise microscopic control of the entire tumor margin while maximizing conservation of healthy tissue.

Mohs surgery is used to remove as little normal tissue as possible and is often used to remove skin cancers on the face. Mohs micrographic surgery is the treatment of choice for skin tumors in critical sites, large or recurrent tumors, tumors in sites of radiation therapy, and tumors with aggressive histologic features.

During the Mohs surgery procedure, the surgeon removes the cancer in layers until all the cancer has been removed. The surgeon will:

  • Numb your skin where cancer is so you do not feel any pain. You stay awake for the procedure.
  • Remove the visible tumor along with a thin layer of tissue next to the tumor.
  • Look at the tissue under a microscope.
  • Check for cancer. If there is still cancer in that layer, the doctor will take out another layer and look at that under the microscope.
  • Keep repeating this procedure until there is no cancer found in a layer. Each round takes about 1 hour. The surgery takes 20 to 30 minutes and looking at the layer under the microscope takes 30 minutes.
  • Do about 2 to 3 rounds to get all of the cancer. Deep tumors may need more layers.
  • Stop any bleeding by applying a pressure dressing, using a small probe to heat the skin (electrocautery), or giving you a stitch.

Mohs surgery is appropriate for skin cancers with a high risk of recurrence and when tissue conservation is essential. Mohs surgery is performed by removing a thin margin of tissue circumferentially around and deep to the clinical margins of a skin tumor. The specimen is typically removed with a 45-degree bevel to facilitate tissue processing. It is then rapidly frozen and sectioned in a cryostat microtome, allowing for quick tissue processing (about 15 to 30 minutes). Sectioning the tissue in a horizontal direction allows virtually 100% of the tissue margin (peripheral and deep margins) to be examined under the microscope. The process is repeated until the tumor has negative histologic margins.

Mohs surgery may be preferred when the skin cancer is on an area where:

  • It is important to remove as little tissue as possible, such as the eyelids, nose, ears, lips, or hands
  • Your doctor needs to be certain the entire tumor is removed before stitching you up
  • There is a scar or prior radiation treatment was used
  • There is a higher chance the tumor will come back, such as on the ears, lip, nose, eyelids, or temples

Mohs surgery may also be preferred when:

  • The skin cancer was already treated, and it was not completely removed or it came back
  • The skin cancer is large, or the edges of the skin cancer are not clear
  • Your immune system is not working well due to cancer, cancer treatments, or medicines you are taking
  • The tumor is deeper

The tissue-sparing properties of Mohs micrographic surgery make it particularly useful in areas of functional and aesthetic importance such as the head and neck area, anogenital area, hands, and feet.

In 1941, Frederick Mohs 2 described a surgical technique he had developed for the staged removal of skin cancer using in situ fixation of cutaneous tissue. After fixation, Mohs excised the cancer and cut horizontal sections from the undersurface of the tissue sample for microscopic viewing. The horizontal sectioning allowed for complete examination of the peripheral tumor margins, as opposed to the standard vertical sectioning, which did not produce continuity of a 360-degree circumferential margin.

Although many refinements have been made to Mohs’ original technique, the two main objectives are the same: to remove all of the tumor roots as accurately as possible by histologically confirming negative margins, and to create the smallest possible defect by sparing tissue uninvolved by the tumor 3. Mohs micrographic surgery minimizes tumor recurrence rates; reduces the size of surgical defects; allows for cosmesis; and preserves the function of the eyelids, the nares (nostrils), the commissure of the mouth, and the ears.

Figure 1. Mohs surgery – drawing shows a patient with skin cancer on the face. The pullout shows a block of skin with cancer in the epidermis (outer layer of the skin) and the dermis (inner layer of the skin). A visible lesion is shown on the skin’s surface. Four numbered blocks show the removal of thin layers of the skin one at a time until all the cancer is removed.

Mohs surgery

Figure 2. Skin structure

skin structure and layers

Mohs micrographic surgery procedure

Most patients who are referred for Mohs micrographic surgery are treated on an outpatient basis with local anesthetic. Occasionally, oral sedation is added.
Mohs surgery procedure requires the surgeon and at least one assistant in the surgical suite. In addition, at least one histotechnician is needed in the Mohs laboratory for tissue processing.

The Mohs surgery technique is as follows:

  1. The tumor is first outlined prior to injection with a local anesthetic. After anesthetized, any visible tumor is removed or “debulked,” with a curette, flexible blade, or scalpel.
  2. Prior to removal, the tissue layer is carefully oriented by placing small superficial etch marks with a scalpel (often at 3 o’clock, 6 o’clock, 9 o’clock, and noon) around the tissue layer and corresponding in-situ skin.
  3. A thin margin of tissue is then removed circumferentially around and deep to the debulked tumor defect. This “layer” of tissue is removed with a beveled angle of approximately 45 degrees, which facilitates tissue processing (see below).
  4. Once removed, the tissue layer is often cut into halves or quadrants and then marked with colored dyes to facilitate precise mapping of the tumor. The tissue is then pressed flat, so the epidermal edge occupies the same tissue plane as the deep margin. The “beveled” edge acquired tissue removal facilitates this flattening process.
  5. The tissue is then cut and processed in a horizontal direction so that virtually 100% of the peripheral and deep margin can be examined on the same tissue section under the microscope. This is in contrast to the traditional vertical, or “breadloafed,” tissue processing which examines only a small portion of the tumor margin.
  6. If residual tumor is identified under the microscope, then the Mohs map is marked and the corresponding in-situ tissue is precisely removed from the patient in that portion that was found to still have tumor. This process is repeated until the tumor is histologically negative, thus ensuring complete tumor removal with maximum conservation of healthy tissue.
  7. Once the tumor has been removed, a variety of techniques are used to close the defect, including primary closure, flaps, grafts, and second intention healing. A recent tabulation of Mohs stages per case for experienced Mohs surgeons showed a median of about 1.7 stages per tumor to clear. Obviously, that number can be much higher for more complicated cases. Many defects are larger and deep enough that, without repair, functional impairment may result (e.g., retraction of an eyelid, elevation of a nasal ala, distortion of a commissure of the mouth). In these cases, surgeons have many reconstructive options from which to choose, including primary closure, local flaps or grafts 3. In some cases, the defects are severe enough that the patient must be referred for reconstructive surgery performed under general anesthesia.

Tissue stains most commonly used for Mohs surgery are hematoxylin and eosin (H&E) and toluidine blue. While the majority of Mohs surgeons use hematoxylin and eosin (H&E) routinely, a significant minority prefer toluidine blue for processing basal cell carcinoma (BCC), since mucopolysaccharides and hyaluronic acid that are associated with basal cell carcinoma (BCC) stain metachromatically with a magenta coloration.

The Mohs procedure depends upon the presence of continuous tumor growth (no “skip” areas) to be maximally effective. Fortunately, this characteristic is present in most cancers that occur on the skin.

Figure 3. Mohs surgery technique

Mohs surgery technique

Mohs micrographic surgery

Notes: The process begins with curettage of any residual tumor that may have persisted after the biopsy. Residual tumor generally is soft and evokes little resistance to the curette. Preoperative borders can be better predicted with this simple initial step. The visible tumor is then excised, usually with 2-mm margins of normal skin. Any specimens are marked with colored dye to specify orientation. By convention, the 12 o’clock position usually is cephalad and the 6 o’clock position is caudad. Hemostasis is obtained with electrocautery, and a temporary dressing is applied.

Mohs micrographic surgery equipment

Mohs micrographic surgery requires equipment for the operating room as well as for the lab in which tissue is processed and examined microscopically. The operating room requires good lighting and an adjustable table to provide optimal visualization and access to the tumor. Surgical equipment is relatively simple, consisting of a scalpel, fine forceps, scissors, gauze, and an electrosurgical device for coagulation. Reconstruction can be achieved with an expanded tray that includes needle holders, scissors, fine forceps, skin hooks, and a scalpel.

The Mohs histology laboratory consists of microtomes that freeze tissue and then allow cutting of very thin slices of tissue to mount on glass slides. The slides are then placed in an automated stainer or may be stained by hand. This process may require a vent hood to minimize exposure to chemicals involved in the staining process. Completed slides are then read by the Mohs surgeon under light microscopy to determine if tumor remains in the tissue. Many Mohs labs also have special stainers and reagents to allow immunohistochemical staining of tissue.

Mohs surgery recovery

Taking proper care of your wound after surgery will help your skin look its best. Your doctor will talk with you about your options:

  • Let a small wound heal itself. Most small wounds heal well on their own.
  • Use stitches to close the wound.
  • Use skin grafts. The doctor covers the wound using skin from another part of your body.
  • Use skin flaps. The doctor covers the wound with the skin next to your wound. Skin near your wound matches in color and texture.

What is the difference between Mohs surgery and standard excision?

In standard excision, the tissue sample is sent off for histological processing while the wound is closed. The processing takes a number of days during which cross sections (or vertical sections) are created at various distances through the sample and are microscopically assessed by a pathologist. The pathologist looks for skin cancer at the margins of each section, but these are only a fraction of the actual excision margin.

In Mohs surgery, the histological processing takes place on the day of surgery and the wound is only closed after it has been confirmed that the entire cancer has been removed. The excision margin is examined by an embedding technique that allows horizontal sections to be cut involving all the deep and radial excision margins. If any tumor is visible in these sections, it means that the excision is incomplete and the patient requires a further Mohs stage.

A mapping process and color coding system is used during Mohs surgery to precisely localize any remaining cancer, and tissue is only removed if it contains cancer. This process preserves healthy tissue.

Mohs surgery yields higher clearance rates than standard excision, and smaller wounds — therefore better cosmetic results.

Mohs surgery complications

Potential complications from Mohs micrographic surgery are similar to those expected in the outpatient surgical setting (i.e., scarring, postoperative pain, bleeding, hematoma, flap or graft necrosis, and wound infection) 3. Scarring can be minimized by selecting a repair technique appropriate for the size of the wound and the anatomic site. Most pain after Mohs micrographic surgery is minimal and can be controlled with oral analgesics.

Bleeding and hematoma can occur, particularly with local flaps and grafts. Bleeding complications are minimized by assiduous intraoperative hemostasis and occasionally by the placement of a temporary drain under larger flaps. For patients receiving anticoagulants, perioperative discontinuation of these medications is not indicated 4, but patients must be counseled to restrict physical activity during the first 48 hours after surgery to minimize the risk of hematoma.

Flap necrosis is rare but can occur with poor flap design, with excessive wound tension, or as a consequence of bleeding and hematoma. Flap necrosis also can occur in persons who smoke heavily. Skin grafts often are delayed for a few weeks in smokers to allow the formation of granulation tissue at the wound bed before repair. Wound infection develops in less than 3 percent of patients 5, generally occurs about 48 hours after surgery, and usually can be managed with oral antibiotics.

Mohs surgery advantages

There are several advantages to taking a Mohs micrographic surgical approach to the treatment of skin cancer. First, Mohs micrographic surgery is the most effective method of eradicating the most common type of skin cancer, basal cell carcinoma 6, with a five-year cure rate of 99 percent 7. Having the same physician perform the dual function of surgeon and pathologist increases the accuracy of tumor localization and intraoperative interpretation of risk based on histologic subtypes encountered during surgery. Indications of more aggressive tumor behavior, such as perineural invasion, may lead the surgeon to take more generous margins at specific sites.

Another benefit is that Mohs micrographic surgery spares tissue. Because the majority of skin cancers occur on the head and neck, preserving uninvolved tissue is of paramount importance, especially around the eyes, nose, ears, and mouth.

Finally, compared with other surgical techniques involving postoperative repair, the cost of Mohs micrographic surgery is similar to that of simple excision in the office with permanent section postoperative margin control. Mohs micrographic surgery is less expensive than excisions with intraoperative margin control with frozen sections performed in a private office or in an outpatient surgical facility 8.

Mohs surgery has had a high degree of clinical success

  • Mohs surgery reports excellent 5-year cure rates for non-melanoma skin cancers, in particular basal cell carcinoma (BCC) and squamous cell carcinoma (SCC). Examples of 5-year cure rates include: Primary basal cell carcinoma (BCC) (99%), recurrent basal cell carcinoma (94.4%), primary squamous cell carcinoma (SCC) (92-99%), and recurrent squamous cell carcinoma (SCC) (90%).
  • Mohs surgery also can be used to treat other less common tumors, including dermatofibrosarcoma protuberans, microcystic adnexal carcinoma, extramammary Paget disease, Merkel cell carcinoma, and sebaceous carcinoma.

How effective and cost effective is Mohs surgery?

Mohs surgery leads to fewer tumor recurrences than standard excision of basal cell carcinoma (BCC) and squamous cell carcinoma (SCC). Recurrence rates for Mohs are typically reported to be 1–5%, depending on type of tumor and length of follow-up.

In a randomized clinical trial with 10-year follow-up, recurrence rates were 9:

  • 4.4% for Mohs surgery and 12.2% for standard excision for high risk primary basal cell carcinoma
  • 3.9% for Mohs and 13.5% for standard excision for high risk recurrent basal cell carcinoma.

Several studies have also found that Mohs is more cost effective than standard excision. The main reason for this is that there are fewer costly operations for recurrent tumors compared to standard excision 10.

Mohs surgery cost

To compare costs associated with removal of skin cancers using Mohs micrographic surgery with that using standard surgical excision with frozen or permanent margin control in the office or an ambulatory surgery center. Four hundred six tumors were included in this study on cost analysis comparing Mohs micrographic surgery with standard surgical excision 11. An average tumor was cleared in 1.6 stages. Mohs micrographic surgery was the least expensive surgical procedure evaluated, at $805 per tumor. Standard surgical excision with permanent margins ($1,026) was more expensive than Mohs micrographic surgery but less expensive than standard surgical excision with frozen margins ($1,200) and ambulatory surgery center- standard surgical excision with frozen margins ($2,507). Adjusted for inflation, the cost of Mohs micrographic surgery, inclusive of initial examination, biopsy, and 5-year follow-up, in 2009 ($1,376) was lower than in 1998 ($1,635) 11.

Mohs surgery for skin cancer guidelines

Mohs surgery is appropriate for skin cancers with a high risk of recurrence and when tissue conservation is essential. The Mohs Appropriate Use Criteria guidelines were developed to assist clinicians in determining if a specific tumor would be appropriately managed by Mohs surgery 1. A Mohs AUC mobile phone app is available for download to mobile devices. These criteria were based on areas of the body, patient characteristics, and tumor characteristics.

Mohs surgery is particularly suitable for areas of the body in the “H” area:

  • Central face, eyelids/canthi, eyebrows, nose, lips, chin, ear, and periauricular area
  • Genitalia
  • Hands, feet, ankles, and nail units
  • Nipples/areola

Higher-risk patient characteristics include:

  • Immunocompromised
  • Genetic syndromes (basal cell nevus syndrome, xeroderma pigmentosum)
  • Prior radiated skin
  • Patient with history of high-risk tumors

Tumor characteristics include:

  • Positive margin on recent excision

Aggressive features that are high risk for recurrence of basal cell carcinomas (BCC):

  • Aggressive histologic subtype: morpheaform, infiltrating, micronodular
  • Perineural involvement
  • Metatypical/keratotic

Aggressive features of squamous cell carcinomas (SCC):

  • Poorly or undifferentiated (characterized by a high degree of nuclear polymorphism, high mitotic rate, or low degree of keratinization)
  • Perineural/perivascular
  • Spindle cell
  • Breslow depth 2 mm or greater
  • Clark level IV or greater

While the Mohs Appropriate Use Criteria can be helpful in determining if a specific lesion is appropriately managed with Mohs surgery, it does not exclude the validity of alternate modalities in treating the same lesion (e.g. curettage, electrodesiccation and curettage, or excision).

Types of Skin Cancers Treated with Mohs Micrographic Surgery

Mohs surgery is widely accepted as treatment of first choice for high risk basal cell carcinoma and squamous cell carcinoma. Although different criteria are used across the globe, the main reason to perform Mohs is to minimize the risk of incomplete excision. This reduces burden to the patient and may avoid large and costly re-excisions later.

Mohs surgery has greatest benefit for a tumor at high risk of incomplete excision, such as a:

  • Recurrent or incompletely excised tumor
  • Tumor arising in skin previously exposed to radiotherapy
  • Large tumor, especially in the head and neck area
  • Tumor that has poorly defined clinical borders
  • Basal cell carcinoma with an aggressive growth pattern on histology (infiltrative, micronodular or with perineural invasion)
  • Squamous cell carcinoma at higher risk of metastasis (e.g.,, located on ear, lip; with perineural invasion; or in a patient that is immune suppressed)

Mohs may also be appropriate when a large reconstruction is needed to close the defect or when the tumor is located in a cosmetically sensitive area.

In 2012, a joint effort by various medical organizations in the USA led to the development of appropriate use criteria for Mohs surgery. These criteria may be used as guidance when considering Mohs surgery although they may not apply in all jurisdictions 12.

Mohs for other types of skin cancer

There is plenty of evidence that Mohs is the best form of surgery for high risk basal cell carcinoma (BCC) and squamous cell carcinoma (SCC). Large trials comparing Mohs to standard excision for other types of skin cancer are lacking.

In Mohs surgery, tumor cells must be accurately identified on microscopic examination of frozen sections. This can be challenging in some skin cancers, such as:

  • Atypical fibroxanthoma
  • Very poorly differentiated squamous cell carcinoma
  • Dermatofibrosarcoma protuberans
  • Microcystic adnexal carcinoma
  • Lentigo maligna/melanoma in situ
  • Extramammary Paget disease

For these tumors, variations of Mohs surgery may be applied that follow the basic principles of Mohs surgery (microscopic margin control, horizontal embedding, and mapping and colour coding of tissue) but use paraffin embedded sections instead of frozen sections. This allows the use of immunohistochemical markers to help identify tumor cells.

Such techniques are sometimes collectively referred to as slow Mohs. They include the ‘Tuebingen Cake’, and ‘Muffin’ techniques 13.

Mohs micrographic surgery is not commonly used to treat melanoma because melanocytic atypia is difficult to assess with frozen sections 3. Permanent paraffin-embedded sections yield superior histologic resolution for assessment of melanocytic atypia 3. However, more recently, with the availability of reliable immunohistochemical stains, Mohs micrographic has also shown great usefulness in treating some forms of malignant melanoma, including lentigo maligna, lentigo maligna melanoma, and thin melanomas 1.

In 2001, nonmelanoma skin cancers accounted for an estimated 1 million cancers in the United States 14. Skin cancer accounts for more than 50 percent of all cancers in the United States. Patients with basal cell carcinomas (BCCs) receive the most referrals for Mohs micrographic surgery, followed by persons with squamous cell carcinomas (SCCs). Mohs micrographic surgery is an excellent approach to the management of a variety of other less common skin tumors, including Merkel cell carcinoma and neoplasms arising from the sebaceous gland and hair follicle unit or from the sweat coils and ducts.

After a biopsy has been performed and the presence of a carcinoma has been confirmed, the physician needs to classify the tumor as low risk or high risk. Low-risk tumors usually can be treated with simple techniques such as electrodesiccation and curettage, cryosurgery, or fusiform excision.

Features of high-risk basal cell and squamous cell carcinomas that qualify for Mohs micrographic surgery can be grouped into five broad categories 15:

  1. Tumors in critical sites,
  2. Tumors of large size,
  3. Tumors with aggressive histology,
  4. Tumors in the immunosuppressed patient, and
  5. Tumors with postoperative involved margins or clinically ambiguous borders

Table 1. Indications for Mohs Micrographic Surgery in Patients with High-Risk Cancers

High-risk anatomic location (eyelids, nose, ears, lips, genitalia, fingers)

Large tumors (20 mm or more in diameter) on the torso and extremities

Recurrent tumors after previous excision or destruction

Tumors occurring in previous sites of radiation therapy

Tumors with aggressive histologic patterns (small-strand, infiltrative, or morphea-like growth in basal cell carcinomas; perineural invasion; or poorly differentiated histology or deep invasion in squamous cell carcinomas)

Tumors in immunosuppressed patients

Tumors with involved borders or vague clinical margins, or incompletely excised tumors (positive histologic margins after resection)

[Source 3]

In critical sites such as the eyelids, nose, ears, lips, fingers, and genitalia, where tissue sparing is of paramount importance, tumors generally are treated best with Mohs micrographic surgery 3. The risk of recurrence and perineural invasion increases with tumor size 16 and the more simple therapeutic approaches often are ineffective for larger tumors. The size at which a tumor is considered at high risk of recurrence is relative to its location: a tumor of 6 mm or more in diameter on the central face is considered high risk, as is a tumor measuring 20 mm or more on the back (Table 1) 17. Tumors in some locations, such as the eyelids, nose, ears, or lips, are candidates for Mohs micrographic surgery regardless of size.

Tumors with aggressive histology include sclerosing patterned basal cell carcinomas, which are characterized by thin tumor strands disseminated throughout a fibrous stroma. A sclerosing pattern arises in basal cell carcinomas from three causes: spontaneous evolution, a previous surgical or destructive procedure, and radiation fibrosis. Other features of aggressive histology are perineural or perivascular invasion, areas of squamous differentiation within a basal cell carcinoma, and poor differentiation in a squamous cell carcinoma. Immunosuppressed patients tend to develop more aggressive tumors with higher recurrence rates, particularly squamous cell carcinomas 18. Mohs micrographic surgery is always a consideration in this population.

Inadequate margin control, another feature of high-risk tumors, implies that the physician is having trouble defining the tumor borders clinically or that the tumor has been excised and the margins are histologically positive.

Figure 4. Mohs surgery for infiltrative basal cell carcinoma

Mohs surgery for infiltrative basal cell carcinomaMohs surgery for infiltrative basal cell carcinoma Mohs surgery for infiltrative basal cell carcinoma Mohs surgery for infiltrative basal cell carcinoma

[Source 19]

Mohs surgery for melanoma

Not all doctors agree on using Mohs surgery for melanoma 20. Mohs micrographic surgery is not commonly used to treat melanoma because melanocytic atypia is difficult to assess with frozen sections 3. Permanent paraffin-embedded sections yield superior histologic resolution for assessment of melanocytic atypia 3.

Melanoma Skin Cancer Stages

After someone is diagnosed with melanoma, doctors will try to figure out if it has spread, and if so, how far. This process is called staging. The stage of a cancer describes how much cancer is in the body. It helps determine how serious the cancer is and how best to treat it. Doctors also use a cancer’s stage when talking about survival statistics.

The earliest stage melanomas are called stage 0 (carcinoma in situ), and then range from stages I (1) through IV (4). As a rule, the lower the number, the less the cancer has spread. A higher number, such as stage IV, means cancer has spread more. And within a stage, an earlier letter means a lower stage. Although each person’s cancer experience is unique, cancers with similar stages tend to have a similar outlook and are often treated in much the same way.

How is the melanoma stage determined?

The staging system most often used for melanoma is the American Joint Committee on Cancer (AJCC) TNM system, which is based on 3 key pieces of information:

The extent of the tumor (T): How deep has the cancer grown into the skin? Is the cancer ulcerated?

  • Tumor thickness: The thickness of the melanoma is called the Breslow measurement. In general, melanomas less than 1 millimeter (mm) thick (about 1/25 of an inch) have a very small chance of spreading. As the melanoma becomes thicker, it has a greater chance of spreading.
  • Ulceration: Ulceration is a breakdown of the skin over the melanoma. Melanomas that are ulcerated tend to have a worse outlook.
  • The spread to nearby lymph nodes (N): Has the cancer spread to nearby lymph nodes?
  • The spread (metastasis) to distant sites (M): Has the cancer spread to distant lymph nodes or distant organs such as the lungs or brain?

Numbers or letters after T, N, and M provide more details about each of these factors. Higher numbers mean the cancer is more advanced. Once a person’s T, N, and M categories have been determined, this information is combined in a process called stage grouping to assign an overall stage.

The staging system in the table below uses the pathologic stage (also called the surgical stage). It is determined by examining tissue removed during an operation. Sometimes, if surgery is not possible right away or at all, the cancer will be given a clinical stage instead. This is based on the results of a physical exam, biopsy, and imaging tests. The clinical stage will be used to help plan treatment. Sometimes, though, the cancer has spread further than the clinical stage estimates, and may not predict the patient’s outlook as accurately as a pathologic stage.

There are both clinical and pathologic staging systems for melanoma. Since most cancers are staged with the pathologic stage, we have included that staging system below. If your cancer has been clinically staged, it is best to talk to your doctor about your specific stage.

The table below is a simplified version of the TNM system. It is based on the most recent AJCC system, effective January 2018. It’s important to know that melanoma cancer staging can be complex. If you have any questions about the stage of your cancer or what it means, please ask your doctor to explain it to you in a way you understand.

Table 2. Melanoma Stage description

AJCC StageMelanoma Stage description
0The cancer is confined to the epidermis, the outermost skin layer.

It has not spread to nearby lymph nodes or distant sites. This stage is also known as melanoma in situ.

I


The cancer is no more than 2mm (2/25 of an inch) thick and might or might not be ulcerated. It has not spread to nearby lymph nodes or to distant sites.
 

II

The cancer is at least 1.01 mm and may be thicker than 4.0 mm. It might or might not be ulcerated. It has not spread to nearby lymph nodes (N0) or to distant sites (M0).


IIIAThe cancer is no more than 2.0 mm thick. It might or might not be ulcerated. It has spread to 3 or less lymph node(s), but it is so small that it is only seen under the microscope. It has not spread to distant sites.
 

IIIB


There is no sign of the primary cancer AND:

  • Has spread to only one lymph node OR
  • Has spread to very small areas of nearby skin (satellite tumors) or to skin lymphatic channels around the tumor (without reaching the lymph nodes).

It has not spread to distant sites.

OR
The cancer is no more than 4.0 mm thick. It might or might not be ulcerated AND:

  • Has spread to only one lymph node OR
  • Has spread to very small areas of nearby skin (satellite tumors) or to skin lymphatic channels around the tumor (without reaching the lymph nodes) OR
  • Has spread to 2 or 3 lymph nodes.

It has not spread to distant sites.

IIICThere is no sign of the primary cancer AND:

  • Has spread to one or more lymph nodes OR
  • Has spread to very small areas of nearby skin (satellite tumors) or to skin lymphatic channels around the tumor (without reaching the lymph nodes) OR
  • Has spread to any lymph nodes that are clumped together.

It has not spread to distant sites.

OR
The cancer is no more than 4.0 mm thick. It might or might not be ulcerated AND:

  • Has spread to one or more lymph nodes OR
  • Has spread to very small areas of nearby skin (satellite tumors) or to skin lymphatic channels around the tumor (without reaching the lymph nodes) OR
  • Has spread to lymph nodes that are clumped together.

It has not spread to distant sites.

OR
The cancer is between 2.1 and 4.0mm OR thicker than 4.0 mm. It might or might not be ulcerated AND:

  • Has spread to one or more lymph nodes OR
  • Has spread to very small areas of nearby skin (satellite tumors) or to skin lymphatic channels around the tumor (without reaching the lymph nodes) OR
  • Has spread to lymph nodes that are clumped together.

It has not spread to distant sites.

OR
The cancer is thicker than 4.0 mm and is ulcerated AND:

  • Has spread to no more than 3 lymph nodes OR
  • Has spread to very small areas of nearby skin (satellite tumors) or to skin lymphatic channels around the tumor (without reaching the lymph nodes).

It has not spread to distant sites.

IIIDThe cancer is thicker than 4.0 mm and is ulcerated AND:

  • Has spread to 4 or more lymph nodes OR
  • Has spread to very small areas of nearby skin (satellite tumors) or to skin lymphatic channels around the tumor (without reaching the lymph nodes) OR
  • Has spread to lymph nodes that are clumped together.

It has not spread to distant sites.

IVThe cancer can be any thickness and might or might not be ulcerated. It might or might not have spread to nearby lymph nodes. It has spread to distant lymph nodes or organs such as the lungs, liver or brain.
[Source 21]

Survival rates for melanoma 22

The following survival rates are based on nearly 60,000 patients who were part of the 2008 American Joint Committee on Cancer (AJCC) Melanoma Staging Database. These survival rates include some people diagnosed with melanoma who may have died later from other causes, such as heart disease. Therefore, the percentage of people surviving the melanoma itself may be higher.

  • Stage IA: The 5-year survival rate is around 97%. The 10-year survival is around 95%.
  • Stage IB: The 5-year survival rate is around 92%. The 10-year survival is around 86%.
  • Stage IIA: The 5-year survival rate is around 81%. The 10-year survival is around 67%.
  • Stage IIB: The 5-year survival rate is around 70%. The 10-year survival is around 57%.
  • Stage IIC: The 5-year survival rate is around 53%. The 10-year survival is around 40%.
  • Stage IIIA: The 5-year survival rate is around 78%. The 10-year survival is around 68%.*
  • Stage IIIB: The 5-year survival rate is around 59%. The 10-year survival is around 43%.
  • Stage IIIC: The 5-year survival rate is around 40%. The 10-year survival is around 24%.
  • Stage IV: The 5-year survival rate is about 15% to 20%. The 10-year survival is about 10% to 15%. The outlook is better if the spread is only to distant parts of the skin or distant lymph nodes rather than to other organs, and if the blood level of lactate dehydrogenase (LDH) is normal.

*The survival rate is higher for stage IIIA cancers than for some stage II cancers. This is likely because the main (primary) tumor is often less advanced for IIIA cancers, although this is not clear.

  • Remember, these survival rates are only estimates – they can’t predict what will happen to any individual. We understand that these statistics can be confusing and might lead you to have more questions. Talk to your doctor to better understand your specific situation.

Other factors affecting survival

Factors other than stage can also affect survival. For example:

  • Older people generally have shorter survival times than younger people, regardless of stage.
  • Melanoma is uncommon among African Americans, but when it does occur, survival times tend to be shorter than when it occurs in whites. Some studies have found that melanoma tends to be more serious if it occurs on the sole of the foot or palm of the hand, or if it is in a nail bed. (Cancers in these areas make up a larger portion of melanomas in African Americans than in whites.)
  • People with melanoma who have weakened immune systems, such as people who have had organ transplants or who are infected with HIV, also are at greater risk of dying from their melanoma.

The National Comprehensive Cancer Network Guidelines for Melanoma Treatment 23

  • Stage 0 (melanoma in-situ) and Stage 1A (<0.8mm thick, no ulceration): Wide excision + follow up care
    • Wide excision: Is a fairly minor operation will cure most thin melanomas. Local anesthesia is injected into the area to numb it before the excision. The site of the tumor is then cut out, along with a small amount of normal skin at the edges. The normal, healthy skin around the edges of the cancer is called the margin. The wound is carefully stitched back together afterward. This will leave a scar. The removed sample is then viewed with a microscope to make sure that no cancer cells were left behind at the edges of the skin that was removed. Wide excision differs from an excisional biopsy. The margins are wider because the diagnosis is already known. The recommended margins vary depending on the thickness of the tumor. Thicker tumors need larger margins (both at the edges and in the depth of the excision). The margins can also vary based on where the melanoma is on the body and other factors. For example, if the melanoma is on the face, the margins may be smaller to avoid large scars or other problems. Smaller margins might increase the risk of the cancer coming back, so be sure to discuss the options with your doctor.
  • Stage 1B (T1b [<0.8mm thick with ulceration OR 0.8-1.0mm thick +/- ulceration): Wide excision + follow up care OR Wide excision with sentinel lymph node biopsy + follow up care
  • Stage 1B (T2a) or Stage 2 [>1.0mm thick, any feature, N0): Wide excision + follow up care OR Wide excision with sentinel lymph node biopsy + interferon alpha + follow up care

Treating stage 0 melanoma

Stage 0 melanomas have not grown deeper than the top layer of the skin (the epidermis). They are usually treated by surgery (wide excision) to remove the melanoma and a small margin of normal skin around it. The removed sample is then sent to a lab to be looked at with a microscope. If cancer cells are seen at the edges of the sample, a repeat excision of the area may be done.

Some doctors may consider the use of imiquimod cream (Zyclara) or radiation therapy instead of surgery, although not all doctors agree with this.

For melanomas in sensitive areas on the face, some doctors may use Mohs surgery or even imiquimod cream if surgery might be disfiguring, although not all doctors agree with these uses.

Treating stage I melanoma

Stage I melanoma is treated by wide excision (surgery to remove the melanoma as well as a margin of normal skin around it). The margin of normal skin removed depends on the thickness and location of the melanoma.

Some doctors may recommend a sentinel lymph node biopsy, especially if the melanoma is stage IB or has other characteristics that make it more likely to have spread to the lymph nodes. You and your doctor should discuss this option.

If cancer cells are found on the sentinel lymph node biopsy, a lymph node dissection (removal of all lymph nodes near the cancer) is often recommended, but it’s not clear if this improves survival. Some doctors may recommend adjuvant (additional) treatment with interferon after the lymph node surgery. Other drugs or perhaps vaccines might be options as part of a clinical trial to try to lower the chance the melanoma will come back.

Treating stage II melanoma

Wide excision (surgery to remove the melanoma and a margin of normal skin around it) is the standard treatment for stage II melanoma. The amount of normal skin removed depends on the thickness and location of the melanoma.

Because the melanoma may have spread to lymph nodes near the melanoma, many doctors recommend a sentinel lymph node biopsy as well. This is an option that you and your doctor should discuss. If it is done and the sentinel node contains cancer cells, then a lymph node dissection (where all the lymph nodes in that area are surgically removed) will probably be done at a later date.

For some patients (such as those with lymph nodes containing cancer), doctors may advise treatment with interferon after surgery (adjuvant therapy). Other drugs or perhaps vaccines may also be recommended as part of a clinical trial to try to lower the chance the melanoma will come back.

Treating stage III melanoma

These cancers have already reached the lymph nodes when the melanoma is first diagnosed. Surgical treatment for stage III melanoma usually requires wide excision of the primary tumor as in earlier stages, along with lymph node dissection.

After surgery, adjuvant treatment with immunotherapy (such as nivolumab [Opdivo], ipilimumab [Yervoy], or interferon) or targeted therapy (for cancers with BRAF gene changes) may help lower the risk of the melanoma coming back. Other drugs or perhaps vaccines may also be recommended as part of a clinical trial to try to reduce the chance the melanoma will come back. Another option is to give radiation therapy to the areas where the lymph nodes were removed, especially if many of the nodes contain cancer.

If melanomas are found in nearby lymph vessels in or just under the skin (known as in-transit tumors), they should all be removed, if possible. Other options include injections of the T-VEC vaccine (Imlygic), Bacille Calmette-Guerin (BCG) vaccine, interferon, or interleukin-2 (IL-2) directly into the melanoma; radiation therapy; or applying imiquimod cream. For melanomas on an arm or leg, another option might be isolated limb perfusion (infusing the limb with a heated solution of chemotherapy). Other possible treatments might include targeted therapy, immunotherapy, chemotherapy, or a combination of immunotherapy and chemotherapy (biochemotherapy).

Some patients might benefit from newer treatments being tested in clinical trials. Many patients with stage III melanoma might not be cured with current treatments, so they may want to think about taking part in a clinical trial.

Treating stage IV melanoma

Stage IV melanomas are often hard to cure, as they have already spread to distant lymph nodes or other areas of the body. Skin tumors or enlarged lymph nodes causing symptoms can often be removed by surgery or treated with radiation therapy.

Metastases in internal organs are sometimes removed, depending on how many there are, where they are, and how likely they are to cause symptoms. Metastases that cause symptoms but cannot be removed may be treated with radiation, immunotherapy, targeted therapy, or chemotherapy.

The treatment of widespread melanomas has changed in recent years as newer forms of immunotherapy and targeted drugs have been shown to be more effective than chemotherapy.

Immunotherapy drugs called checkpoint inhibitors such as pembrolizumab (Keytruda), nivolumab (Opdivo), and ipilimumab (Yervoy) have been shown to help some people with advanced melanoma live longer. These drugs can sometimes have serious side effects, so patients who get them need to be watched closely. Other types of immunotherapy might also help, but these are only available through clinical trials.

In about half of all melanomas, the cancer cells have changes in the BRAF gene. If this gene change is found, treatment with newer targeted therapy drugs such as vemurafenib (Zelboraf), dabrafenib (Tafinlar), trametinib (Mekinist), and cobimetinib (Cotellic) might be helpful. They might be tried before or after the newer immunotherapy drugs, but they aren’t used at the same time. Like the checkpoint inhibitors, these drugs can help some people live longer, although they haven’t been shown to cure these melanomas.

A small portion of melanomas have changes in the C-KIT gene. These melanomas might be helped by targeted drugs such as imatinib (Gleevec) and nilotinib (Tasigna), although, again, these drugs aren’t known to cure these melanomas.

Immunotherapy using interferon or interleukin-2 can help a small number of people with stage IV melanoma live longer. Higher doses of these drugs seem to be more effective, but they can also have more severe side effects, so they might need to be given in the hospital.

Chemotherapy can help some people with stage IV melanoma, but other treatments are usually tried first. Dacarbazine (DTIC) and temozolomide (Temodar) are the chemo drugs used most often, either by themselves or combined with other drugs. Even when chemotherapy shrinks these cancers, the cancer usually starts growing again within several months.

Some doctors may recommend biochemotherapy, which is a combination of chemotherapy and either interleukin-2, interferon, or both. This can often shrink tumors, which might make patients feel better, although it has not been shown to help patients live longer.

It’s important to carefully consider the possible benefits and side effects of any recommended treatment before starting it.

Because stage IV melanoma is hard to cure with current treatments, patients may want to think about taking part in a clinical trial. Many studies are now looking at new targeted drugs, immunotherapies, chemotherapy drugs, and combinations of different types of treatments.

Even though stage IV melanoma is often hard to cure, a small portion of people respond very well to treatment and survive for many years after diagnosis.

Treating recurrent melanoma

Treatment of melanoma that comes back after initial treatment depends on the stage of the original melanoma, what treatments a person has already had, where the melanoma comes back, and other factors.

Melanoma might come back in the skin near the site of the original tumor, sometimes even in the scar from the surgery. In general, these local (skin) recurrences are treated with surgery similar to what would be recommended for a primary melanoma. This might include a sentinel lymph node biopsy. Depending on the thickness and location of the tumor, other treatments may be considered, such as isolated limb perfusion chemotherapy; radiation therapy; or local immunotherapy treatments such as tumor injection with the T-VEC vaccine (Imlygic), BCG vaccine, interferon, or interleukin-2. Systemic treatments such as immunotherapy, targeted therapy, or chemotherapy might also be options.

If nearby lymph nodes weren’t removed during the initial treatment, the melanoma might come back in these lymph nodes. Lymph node recurrence is treated by lymph node dissection if it can be done, sometimes followed by treatments such as interferon or radiation therapy. If surgery is not an option, radiation therapy or systemic treatment (immunotherapy, targeted therapy, or chemo) can be used.

Melanoma can also come back in distant parts of the body. Almost any organ can be affected. Most often, the melanoma will come back in the lungs, bones, liver, or brain. Treatment for these recurrences is generally the same as for stage IV melanoma (see above). Melanomas that recur on an arm or leg may be treated with isolated limb perfusion chemotherapy.

Melanoma that comes back in the brain can be hard to treat. Single tumors can sometimes be removed by surgery. Radiation therapy to the brain (stereotactic radiosurgery or whole brain radiation therapy) may help as well. Systemic treatments (immunotherapy, targeted therapy, or chemo) might also be tried.

As with other stages of melanoma, people with recurrent melanoma may want to think about taking part in a clinical trial.

References
  1. Prickett KA, Ramsey ML. Mohs Micrographic Surgery. [Updated 2017 Oct 6]. In: StatPearls [Internet]. Treasure Island (FL): StatPearls Publishing; 2018 Jan-. Available from: https://www.ncbi.nlm.nih.gov/books/NBK441833
  2. Mohs FE. Chemosurgery: a microscopically controlled method of cancer excision. Arch Surg. 1941;42:279–95.
  3. Mohs Micrographic Surgery. Am Fam Physician. 2005 Sep 1;72(5):845-848. https://www.aafp.org/afp/2005/0901/p845.html
  4. Kovich O, Otley CC. Thrombotic complications related to discontinuation of warfarin and aspirin therapy perioperatively for cutaneous operation. J Am Acad Dermatol. 2003;48:233–7.
  5. Griego RD, Zitelli JA. Intra-incisional prophylactic antibiotics for dermatologic surgery. Arch Dermatol. 1998;134:688–92.
  6. Thissen MR, Neumann MH, Schouten LJ. A systematic review of treatment modalities for primary basal cell carcinomas. Arch Dermatol. 1999;135:1177–83.
  7. Rowe DE, Carroll RJ, Day CL Jr. Long-term recurrence rates in previously untreated (primary) basal cell carcinoma: implications for patient follow-up. J Dermatol Surg Oncol. 1989;15:315–28.
  8. Cook J, Zitelli JA. Mohs micrographic surgery: a cost analysis. J Am Acad Dermatol. 1998;39(5 pt 1):698–703.
  9. Van Loo, Mosterd K, Krekels GA. Surgical excision versus Mohs’ micrographic surgery for basal cell carcinoma of the face. Eur J Cancer. 2014; 50(17):3011-20. https://www.ejcancer.com/article/S0959-8049(14)00913-7/fulltext
  10. Kauvar AN, Cronin T Jr, Roenigk R. Consensus for nonmelanoma skin cancer treatment: basal cell carcinoma, including a cost analysis of treatment methods. Dermatol Surg. 2015; 41(5):550-71. https://www.ncbi.nlm.nih.gov/pubmed/25868035
  11. Cost analysis: Mohs micrographic surgery. Dermatol Surg. 2012 Apr;38(4):585-94. doi: 10.1111/j.1524-4725.2012.02341.x. Epub 2012 Mar 22. https://www.ncbi.nlm.nih.gov/pubmed/22443180
  12. Ad Hoc Task Force1 Connolly SM, Baker DR. AAD/ACMS/ASDSA/ASMS 2012 appropriate use criteria for Mohs micrographic surgery. J Am Acad Dermatol. 2012; 67(4):531-50. https://www.jaad.org/article/S0190-9622(12)00667-6/fulltext
  13. Möhrle M, Breuninger H. The Muffin technique-an alternative to Mohs’ micrographic surgery. J Dtsch Dermatol Ges. 2006; 4: 1080-4. http://esms-mohs.cap-partner.eu/skin-cancer-information/treatments/tuebingen-torte-and-muffin-technique/
  14. Greenlee RT, Hill-Harmon MB, Murray T, Thun M. Cancer statistics, 2001 [published correction appears in CA Cancer J Clin 2001;51:144]. CA Cancer J Clin. 2001;51:15–36.
  15. Shriner DL, McCoy DK, Goldberg DJ, Wagner RF Jr. Mohs micrographic surgery. J Am Acad Dermatol. 1998;39:79–97.
  16. Lang PG Jr, Osguthorpe JD. Indications and limitations of Mohs micrographic surgery. Dermatol Clin. 1989;7:627–44.
  17. The complete library of NCCN clinical practice guidelines in oncology. Rockledge, Pa.: National Comprehensive Cancer Network
  18. Bordea C, Wojnarowska F, Millard PR, Doll H, Welsh K, Morris PJ. Skin cancers in renal-transplant recipients occur more frequently than previously recognized in a temperate climate. Transplantation. 2004;77:574–9.
  19. Mohs surgery images. https://www.dermnetnz.org/topics/mohs-surgery-images/
  20. Surgery for Melanoma Skin Cancer. https://www.cancer.org/cancer/melanoma-skin-cancer/treating/surgery.html
  21. Melanoma Skin Cancer Stages. https://www.cancer.org/cancer/melanoma-skin-cancer/detection-diagnosis-staging/melanoma-skin-cancer-stages.html
  22. Survival Rates for Melanoma Skin Cancer, by Stage. https://www.cancer.org/cancer/melanoma-skin-cancer/detection-diagnosis-staging/survival-rates-for-melanoma-skin-cancer-by-stage.html
  23. National Comprehensive Cancer Network https://www.nccn.org/patients/guidelines/melanoma/index.html
read more
Procedures

Mammogram

mammogram

What is a mammogram

A mammogram is a low-dose x-ray that allows doctors called radiologists to look for changes in breast tissue that may be signs of breast cancer. The results are recorded on x-ray film or directly into a computer for a doctor called a radiologist to examine.

A mammogram can find breast changes that could be cancer years before physical symptoms develop. Results from many decades of research clearly show that women who have regular mammograms are more likely to have breast cancer found early, are less likely to need aggressive treatment like surgery to remove the breast (mastectomy) and chemotherapy, and are more likely to be cured.

Women ages 50 to 74 years should get a mammogram every 2 years. Women younger than age 50 should talk to a doctor about when to start and how often to have a mammogram.

Mammograms are not perfect. They miss some cancers. And sometimes a woman will need more tests to find out if something found on a mammogram is or is not cancer. There’s also a small possibility of being diagnosed with a cancer that never would have caused any problems had it not been found during screening. It’s important that women getting mammograms know what to expect and understand the benefits and limitations of screening.

Why do I need mammograms ?

A mammogram can often find or detect breast cancer at an early stage, when it’s small and even before a lump can be felt. This is when treatment is most successful.

A mammogram allows the doctor to have a closer look for changes in breast tissue that cannot be felt during a breast exam. It is used for women who have no breast complaints and for women who have breast symptoms, such as a change in the shape or size of a breast, a lump, nipple discharge, or pain. Breast changes occur in almost all women. In fact, most of these changes are not cancer and are called “benign,” but only a doctor can know for sure. Breast changes can also happen monthly, due to your menstrual period.

What is the best method of screening for breast cancer?

Regular high-quality screening mammograms and clinical breast exams are the most sensitive ways to screen for breast cancer.

Research has not shown a clear benefit of regular physical breast exams done by either a health professional (clinical breast exams) or by yourself (breast self-exams). There is very little evidence that these tests help find breast cancer early when women also get screening mammograms. Most often when breast cancer is detected because of symptoms (such as a lump), a woman discovers the symptom during usual activities such as bathing or dressing. Women should be familiar with how their breasts normally look and feel and report any changes to a health care provider right away.

Regular breast self-exam — that is, checking your own breasts for lumps or other unusual changes—is not specifically recommended for breast cancer screening. In clinical trials, breast self-exam alone was not found to help reduce the number of deaths from breast cancer.

However, many women choose to examine their own breasts. Women who do so should remember that breast changes can occur because of pregnancy, aging, or menopause; during menstrual cycles; or when taking birth control pills or other hormones. It is normal for breasts to feel a little lumpy and uneven. Also, it is common for breasts to be swollen and tender right before or during a menstrual period. Whenever you notices any unusual changes in your breasts, you should contact your health care provider.

What do mammograms show?

Mammograms can often show abnormal areas in the breast. They can’t prove that an abnormal area is cancer, but they can help health care providers decide whether more testing is needed. The 2 main types of breast changes found with a mammogram are calcifications and masses.

How much does a mammogram cost?

Insurance plans governed by the federal Affordable Care Act must cover screening mammography as a preventive benefit every 1–2 years for women age 40 and over without requiring copayments, coinsurance, or deductibles. In addition, many states require that Medicaid and public employee health plans cover screening mammography. Women should contact their mammography facility or health insurance company for confirmation of the cost and coverage.

Medicare pays for annual screening mammograms for all female Medicare beneficiaries who are age 40 or older. Medicare will also pay for one baseline mammogram for female beneficiaries between the ages of 35 and 39. There is no deductible requirement for this benefit. Information about coverage of mammograms is available on the Medicare website or through the Medicare Hotline at 1–800–MEDICARE (1–800–633–4227). For the hearing impaired, the telephone number is 1–877–486–2048.

Women who need a diagnostic mammogram should check with their health insurance provider about coverage.

How can uninsured or low-income women obtain a free or low-cost screening mammogram?

Some state and local health programs and employers provide mammograms free or at low cost. For example, the Centers for Disease Control and Prevention (CDC) coordinates the National Breast and Cervical Cancer Early Detection Program. This program provides screening services, including clinical breast exams and mammograms, to low-income, uninsured women throughout the United States and in several U.S. territories. Contact information for local programs is available on the CDC website or by calling 1–800–CDC–INFO (1–800–232–4636).

Information about free or low-cost mammography screening programs is also available from National Cancer Institute’s Cancer Information Service at 1–800–4–CANCER (1–800–422–6237) and from local hospitals, health departments, women’s centers, or other community groups.

Where can I get a high-quality mammogram?

Women can get high-quality mammograms in breast clinics, hospital radiology departments, mobile vans, private radiology offices, and doctors’ offices. The Food and Drug Administration (FDA) certifies mammography facilities that meet strict quality standards for their x-ray machines and staff and are inspected every year. You can ask your doctor or the staff at the mammography center about FDA certification before making your appointment. A list of FDA-certified facilities can be found on the Internet.

Your doctor, local medical clinic, or local or state health department can tell you where to get no-cost or low-cost mammograms. You can also call the National Cancer Institute’s Cancer Information Service toll free at 1-800-422-6237.

How do mammograms work?

A mammogram uses a machine designed to look only at breast tissue. You stand in front of a special x-ray machine. The machine takes x-rays at lower doses than usual x-rays. Because these x-rays don’t go through tissue easily, the machine has 2 plates that compress or flatten the breast to spread the tissue apart. This gives a better picture and allows less radiation to be used.

The person who takes the x-rays, called a radiologic technician, places your breasts, one at a time, between an x-ray plate and a plastic plate. These plates are attached to the x-ray machine and compress the breasts to flatten them. This spreads the breast tissue out to obtain a clearer picture. You will feel pressure on your breast for a few seconds. It may cause you some discomfort; you might feel squeezed or pinched. This feeling only lasts for a few seconds, and the flatter your breast, the better the picture. Most often, two pictures are taken of each breast — one from the side and one from above. A screening mammogram takes about 20 minutes from start to finish.

In the past, mammograms were typically printed on large sheets of film. Today, digital mammograms (also known as full-field digital mammography or FFDM) are much more common. Digital images are recorded and saved as files in a computer.

A newer type of mammogram is known as breast tomosynthesis or 3D mammography also known as digital breast tomosynthesis (DBT). For this, the breast is compressed once, and a machine takes many low-dose x-rays as it moves over the breast. A computer then puts the images together into a 3-dimensional picture. In some cases, this uses more radiation than standard 2-view mammograms, but it may allow doctors to see the breast tissues more clearly. Some studies have suggested it might lower the chance of being called back for follow-up testing. It may also be able to find more cancers. But not all health insurance providers may cover tomosynthesis. Furthermore, digital breast tomosynthesis (DBT) has not yet been determined conclusively whether it is superior to 2-D mammography at identifying early cancers and avoiding false-positive results.

Digital 3D mammography or digital breast tomosynthesis (DBT) may offer these benefits:

  • Long-distance consultations with other doctors may be easier because the images can be shared by computer.
  • Slight differences between normal and abnormal tissues may be more easily noted.
  • The number of follow-up tests needed may be fewer.
  • Fewer repeat images may be needed, reducing exposure to radiation.

The United States Preventive Services Task Force concludes that the current evidence is insufficient to assess the benefits and harms of digital breast tomosynthesis (DBT) as a primary screening method for breast cancer 1.

A large-scale randomized breast screening trial expected to open in mid-2017 will compare 3-D mammography with 2-D mammography. The Tomosynthesis Mammography Imaging Screening Trial (TMIST) will compare the number of advanced cancers detected in women screened for 4 years with DBT with that detected in women screened with standard digital mammography.

What other technologies or strategies are being developed for breast cancer screening?

National Cancer Institute is supporting the development of several new technologies to detect breast tumors. This research ranges from methods being developed in research labs to those that are being studied in clinical trials. Efforts to improve conventional mammography include digital mammography, magnetic resonance imaging (MRI), positron emission tomography (PET) scanning, and diffuse optical tomography, which uses light instead of x-rays to create pictures of the breast.

The Women Informed to Screen Depending on Measures of Risk (https://wisdom.secure.force.com/portal/WsdSiteHome) study is a randomized trial that is testing a personalized approach to breast cancer screening. This 5-year study, which will involve about 100,000 women in California and the Midwest, aims to determine if risk-based screening—that is, screening at intervals that are based on each woman’s risk as determined by her genetic makeup, family history, and other risk factors—is as safe, effective, and accepted as annual screening.

Are mammograms safe?

Mammograms expose the breasts to small amounts of radiation. But the benefits of mammography outweigh any possible harm from the radiation exposure. Modern machines use low radiation doses to get breast x-rays that are high in image quality. On average the total dose for a typical mammogram with 2 views of each breast is about 0.4 millisieverts, or mSv. A millisievert (mSv) is a measure of radiation dose.

To put the dose into perspective, people in the US are normally exposed to an average of about 3 millisievert (mSv) of radiation each year just from their natural surroundings. This is called background radiation. The dose of radiation used for a screening mammogram of both breasts is about the same amount of radiation a woman would get from her natural surroundings over about 7 weeks.

If there’s any chance you might be pregnant, let your health care provider and x-ray technologist know. Although the risk to the fetus is likely very small, screening mammograms aren’t routinely done in pregnant women.

What are the types of mammograms?

Screening mammograms

A screening mammogram is used to look for signs of breast cancer in women who don’t have any breast symptoms or problems of the disease. Screening mammograms usually involve two or more x-ray pictures, or images, of each breast. The x-ray images often make it possible to detect tumors that cannot be felt. Screening mammograms can also find microcalcifications (tiny deposits of calcium) that sometimes indicate the presence of breast cancer.

Radiologists prefer the Mediolateral Oblique (MLO) view from an angle or oblique view view or ‘from the side-at an angle‘, view to a 90 degree projection. This is because the Mediolateral Oblique (MLO) view allows imaging of more of the breast in the upper-outer quadrant, and also the axilla (armpit area).

With the top-down or Cranial Caudal (CC) view, the entire breast is depicted. Fat tissue closest to the breast muscle should appear as a dark strip on the X-ray. Also, the Cranial Caudal (CC) view also tends to clearly depict the nipple.

The Mediolateral (ML) view is very important because the lateral side of the breast is probably the most common place for pathological changes to occur. The view from the center of the chest, outward to the side, Mediolateral (ML) view gives the best view of the lateral side of the breast. In this view the chest muscle (pectoral) shows on mammogram as a narrow light band on about half of the picture. Again, imaging of the nipple is also clear in profile.

With the Latero-Medial view (LM) the breast is X-rayed from the side towards the middle, and this gives the best view of the medial (mid-body) side of the breast.

What if my screening mammogram shows a problem?

If you have a screening test result that suggests cancer, your doctor must find out whether it is due to cancer or to some other cause. Your doctor may ask about your personal and family medical history. You may have a physical exam. Your doctor also may order some of these tests:

  • Diagnostic mammogram, to focus on a specific area of the breast
  • Ultrasound, an imaging test that uses sound waves to create a picture of your breast. The pictures may show whether a lump is solid or filled with fluid. A cyst is a fluid-filled sac. Cysts are not cancer. But a solid mass may be cancer. After the test, your doctor can store the pictures on video or print them out. This exam may be used along with a mammogram.
  • Magnetic resonance imaging (MRI), which uses a powerful magnet linked to a computer. MRI makes detailed pictures of breast tissue. Your doctor can view these pictures on a monitor or print them on film. MRI may be used along with a mammogram.
  • Biopsy, a test in which fluid or tissue is removed from your breast to help find out if there is cancer. Your doctor may refer you to a surgeon or to a doctor who is an expert in breast disease for a biopsy.

Diagnostic mammograms

Mammograms can also be used to look at a woman’s breast for breast cancer after a lump or other sign or symptom of the disease has been found or if she has breast symptoms or if a change is seen on a screening mammogram. When used in this way, they are called diagnostic mammograms. They may include extra views (images) of the breast that aren’t part of screening mammograms. Sometimes diagnostic mammograms are used to screen women who were treated for breast cancer in the past.

Besides a lump, signs of breast cancer can include breast pain, thickening of the skin of the breast, nipple discharge, or a change in breast size or shape; however, these signs may also be signs of benign conditions. A diagnostic mammogram can also be used to evaluate changes found during a screening mammogram or to view breast tissue when it is difficult to obtain a screening mammogram because of special circumstances, such as the presence of breast implants.

Figure 1. Normal breast (female)

Breast

normal breast

Figure 2. Normal mammograms – Note screening mammogram with Mediolateral oblique (MLO) view from an angle or oblique view and Cranial-Caudal (CC) view from above the breast. Fat, being relatively radiolucent, appears as black on the film. ‘Radiolucent’ refers to anything that permits the penetration and passage of X-rays whereas ‘radiopaque’ refers to anything that blocks the penetration of X-rays.

normal mammogram

normal mammogram

Having a Mammogram After You’ve Had Breast Cancer Surgery

There are many different kinds of breast cancer surgery. The type of surgery you have had will determine whether you need to get mammograms in the future. If you have had breast-conserving surgery (BCS), you need to continue to get mammograms. If you have had a mastectomy, you may not need a mammogram.

If you had surgery (of any type) on only one breast, you will still need to get mammograms of the unaffected breast. This is very important, because women who have had one breast cancer are at higher risk of developing a new cancer in the other breast.

Mammograms after breast-conserving surgery

Most experts recommend that women who have had breast-conserving surgery or BCS (sometimes called a partial mastectomy or lumpectomy) get a mammogram of the treated breast 6 to 12 months after radiation treatment ends. Surgery and radiation both cause changes in the skin and breast tissues that will show up on the mammogram, making it harder to read. The mammogram done at this time serves as a new baseline for the affected breast. Future mammograms will be compared with this one, to help the doctor check on healing and look for signs that the cancer has come back (recurred).

You should have follow-up mammograms of the treated breast at least yearly after that, but some doctors may recommend that you have mammograms more often. You will still need to have routine mammograms on the opposite (untreated) breast as well.

Mammograms after mastectomy

Women who have had a mastectomy (including simple mastectomy, modified radical mastectomy, and radical mastectomy) to treat breast cancer need no further routine screening mammograms on the affected side. If both breasts are removed (a double or bilateral mastectomy), they don’t need mammograms at all. There isn’t enough tissue remaining after these kinds of mastectomies to do a mammogram. Cancer can come back in the skin or chest wall on that side, but it can be found on a physical exam.

It’s possible for women with reconstructed breasts to get mammograms, but experts agree that women who have breast reconstruction after a simple, modified radical, or radical mastectomy don’t need routine mammograms. Still, if an area of concern is found during a physical exam on a woman who has had breast reconstruction, a diagnostic mammogram may be done. Breast ultrasound or MRI may also be used to look at the area closely.

Women who have had a subcutaneous mastectomy, also called skin-sparing mastectomy, still need follow-up mammograms. In this surgery, the woman keeps her nipple and the tissue just under the skin. Often, an implant is put under the skin. This surgery leaves behind enough breast tissue to require yearly screening mammograms in these women.

Any woman who’s not sure what type of mastectomy she has had or whether she needs to get mammograms should ask her doctor.

Mammograms for Women with Breast Implants

If you have breast implants, you should still get regular screening mammograms as recommended.

It’s important to tell the technologist you have implants before your mammogram is started. In fact, it’s best to mention this when you make the appointment to have your mammogram done. This way you can find out if the facility has experience doing mammograms in women with breast implants.

You should be aware that it might be hard for the doctor to see certain parts of your breast. The x-rays used in mammograms cannot go through silicone or saline implants well enough to show the breast tissue under them. This means that part of the breast tissue can be hard to see on a mammogram.

To help the doctor can see as much breast tissue as possible, women with implants have 4 extra pictures done (2 on each breast), as well as the 4 standard pictures taken during a screening mammogram. In these extra pictures, called implant displacement (ID) views, the implant is pushed back against the chest wall and the breast is pulled forward over it. This allows better imaging of the front part of each breast.

Implant displacement views are harder to do and can be uncomfortable if the woman has had a lot of scar tissue (called contractures) form around the implants. implant displacement (ID) views are easier in women whose implants were placed underneath (behind) the chest muscles.

Very rarely, mammograms can rupture an implant. This is another important reason to make sure the mammography facility knows you have implants.

Mammogram prep

How to prepare for your mammogram

  • If you have a choice, use a facility that specializes in mammograms and does many mammograms a day.
  • Try to go to the same facility every time so that your mammograms can easily be compared from year to year.
  • If you’re going to a facility for the first time, bring a list of the places and dates of mammograms, biopsies, or other breast treatments you’ve had before.
  • If you’ve had mammograms at another facility, try to get those records to bring with you to the new facility (or have them sent there) so the old pictures can be compared to the new ones.
  • Schedule your mammogram when your breasts are not tender or swollen to help reduce discomfort and get good pictures. Try to avoid the week just before your period.
  • If you have breast implants, be sure to tell your mammography facility that you have them when you make your appointment.
  • On the day of the exam, don’t wear deodorant, antiperspirant, perfume, lotion, or powder under your arms or on your breasts. Some of these contain substances that can show up on the x-ray as white spots. If you’re not going home afterward, you might want to take your deodorant with you to put on after your exam.
  • You might find it easier to wear a skirt or pants, so that you’ll only need to remove your top and bra for the mammogram.
  • Discuss any recent changes or problems in your breasts with your health care provider before getting the mammogram.

Don’t be afraid of mammograms. Remember that only 2 to 4 screening mammograms in 1,000 lead to a diagnosis of breast cancer. Moreover, breast cancer that’s found early, when it’s small and has not spread, is easier to treat successfully. Getting regular screening mammograms is the most reliable way to find breast cancer early.

Tips for getting a mammogram

These tips can help you have a good quality mammogram:

  • Always describe any breast changes or problems you’re having to the technologist doing the mammogram. Also describe any medical history that could affect your breast cancer risk—such as surgery, hormone use, breast cancer in your family, or if you’ve had breast cancer before.
  • Before getting any type of imaging test, tell the technologist if you’re breastfeeding or if you think you might be pregnant.

What to expect when getting a screening mammogram

  • You’ll have to undress above the waist to get a mammogram. The facility will give you a wrap to wear.
  • A technologist will position your breasts for the mammogram. You and the technologist are the only ones in the room during the mammogram.
  • To get a high-quality picture, your breast must be flattened. The technologist places your breast on the machine’s plate. The plastic upper plate is lowered to compress your breast for a few seconds while the technologist takes a picture.
  • The whole procedure takes about 20 minutes. The actual breast compression only lasts a few seconds.
  • You might feel some discomfort when your breasts are compressed, and for some women it can be painful. Tell the technologist if it hurts.
  • Two views of each breast are taken for a screening mammogram. But for some women, such as those with breast implants or large breasts, more pictures may be needed.

What to expect when getting a diagnostic mammogram

A diagnostic mammogram is often done if a woman has breast symptoms or if a change is seen on a screening mammogram.

  • More pictures are taken during a diagnostic mammogram with a focus on the area that looked different on the screening mammogram.
  • During a diagnostic mammogram, the images are checked by the radiologist while you’re there so that more pictures can be taken if needed to look more closely at any area of concern.
  • In some cases, special images known as spot views or magnification views are used to make a small area of concern easier to see.

What doctors look for on a mammogram

A radiologist will look at your mammogram. Radiologists are doctors who diagnose diseases and injuries using imaging tests such as x-rays.

When possible, the doctor reading your mammogram will compare it to your old mammograms. This can help show if any findings are new, or if they were already there on previous mammograms. Findings that haven’t changed from older mammograms aren’t likely to be cancer, which might mean you won’t need further tests.

The doctor reading your mammogram will be looking for different types of breast changes, such as small white spots called calcifications, lumps or tumors called masses, and other suspicious areas that could be signs of cancer.

Calcifications

Calcifications are tiny calcium deposits within the breast tissue. They look like small white spots on a mammogram. They may or may not be caused by cancer.

There are 2 types of calcifications

Macrocalcifications

Macrocalcifications are larger calcium deposits that are most likely due to changes caused by aging of the breast arteries, old injuries, or inflammation. These deposits are typically related to non-cancerous conditions and don’t need to be checked for cancer with a biopsy. Macrocalcifications become more common as women get older (especially after age 50).

Microcalcifications

Microcalcifications are tiny specks of calcium in the breast. When seen on a mammogram, they are more of a concern than macrocalcifications, but they don’t always mean that cancer is present. The shape and layout of microcalcifications help the radiologist judge how likely it is that the change is due to cancer.

In most cases, microcalcifications don’t need to be checked with a biopsy. But if they have a suspicious look and pattern, a biopsy will be recommended to check for cancer.

A mass

A mass is the same as a lump or a tumor. With or without calcifications, it’s another important change seen on a mammogram. Masses can be many things, including cysts (non-cancerous, fluid-filled sacs) and non-cancerous solid tumors (such as fibroadenomas), but they may also be a sign of cancer.

Cysts are fluid-filled sacs. Simple cysts (fluid-filled sacs with thin walls) are not cancer and don’t need to be checked with a biopsy. If a mass is not a simple cyst, it’s of more concern, so a biopsy might be needed to be sure it isn’t cancer.

Solid tumors can be more concerning, but most breast tumors are not cancer.

A cyst and a solid tumor can feel the same. They can also look the same on a mammogram. The doctor must be sure it’s a cyst to know it’s not cancer. To be sure, a breast ultrasound is often done because it is a better tool to see fluid-filled sacs. Another option is to use a thin needle to remove (aspirate) fluid from the area.

If a mass is not a simple cyst (that is, if it’s at least partly solid), more imaging tests might be needed to decide if it could be cancer. Some masses can be watched over time with regular mammograms or ultrasound to see if they change, but others may need to be checked with a biopsy. The size, shape, and margins (edges) of the mass may help the radiologist decide how likely it is to be cancer.

Breast density

Your mammogram report will also contain an assessment of your breast density. Breast density is based on how fibrous and glandular tissues are distributed in your breast, as opposed to how much of your breast is made up of fatty tissue.

Dense breasts are not abnormal, but they are linked to a higher risk of breast cancer. Dense breast tissue can also make it harder to find cancers on a mammogram. Still, experts don’t agree what other tests, if any, should be done along with mammograms in women with dense breasts who aren’t in a breast cancer high-risk group (based on gene mutations, breast cancer in the family, or other factors).

Why is breast density important?

Women who have dense breast tissue seem to have a slightly higher risk of breast cancer compared to women with less dense breast tissue. It’s unclear at this time why dense breast tissue is linked to breast cancer risk.

Scientists do know that dense breast tissue makes it harder for radiologists to see cancer. On mammograms, dense breast tissue looks white. Breast masses or tumors also look white, so the dense tissue can hide some tumors. In contrast, fatty tissue looks almost black. On a black background it’s easier to see a tumor that looks white. So, mammograms can be less accurate in women with dense breasts.

How do I know if I have dense breasts?

Breast density is seen only on mammograms. Some women think that because their breasts feel firm, they are dense. But breast density isn’t based on how your breasts feel. It’s not related to breast size or firmness.

If I have dense breasts, do I still need mammograms?

Yes. Most breast cancers can be seen on a mammogram even in women who have dense breast tissue, so it’s still important to get regular mammograms. Mammograms can help save women’s lives.

Even if you have a normal mammogram result (regardless of how dense your breasts are), you should know how your breasts normally look and feel. Anytime there’s a change, you should report it to a health care provider right away.

Should I have any other screening tests if I have dense breast tissue?

At this time, experts do not agree what other tests, if any, women with dense breasts should get in addition to mammograms.

Studies have shown that breast ultrasound and magnetic resonance imaging (MRI) can help find some breast cancers that can’t be seen on mammograms. But MRI and ultrasound both show more findings that turn out not to be cancer. This can lead to more tests and unnecessary biopsies. And the cost of ultrasound and MRI may not be covered by insurance.

Talk to your health care provider about whether you should have other tests.

What should I do if I have dense breast tissue?

If your mammogram report says that you have dense breast tissue, talk with your provider about what this means for you. Be sure that your doctor or nurse knows your medical history and if there’s anything else in your history that increases your risk for breast cancer.

Any woman who’s already in a high-risk group (based on gene mutations, a strong family history of breast cancer, or other factors) should have an MRI along with her yearly mammogram.

Figure 3. Spiculated breast cancer mammogram – Note standard mammographic mediolateral oblique (MLO) view of a left breast demonstrating a large spiculated mass in the upper outer quadrant consistent with a breast cancer is present.

Spiculated breast cancer mammogram

Figure 4. Multifocal breast cancer mammogram

Multifocal breast cancer mammogram

Note: The density far lateral in the left breast was a palpable infiltrating ductal carcinoma. A second smaller infiltrating ductal carcinoma is visible deeper to the first. Also demonstrated are multiple foci of ductal carcinoma in situ (DCIS) calcification at sites in the breast. Typical ductal carcinoma in situ (DCIS) calcifications.

Figure 5. Metaplastic carcinoma of the breast

Metaplastic carcinoma of the breast

Figure 6. Locally advanced breast cancer

Locally advanced breast cancer

Figure 7. Intraductal carcinoma

Intraductal carcinoma of the breast

Figure 8. Malignant epithelial neoplasm of breast – Note: Well defined radio-opacity with microlobulation in the upper outer quadrant of right breast, compressing the surrounding tissue resulting in a lucent halo around.

Malignant epithelial neoplasm of breast

Figure 9. Tubular carcinoma of the breast – a subtype of of invasive ductal carcinoma (IDC).

Tubular carcinoma of the breast

How are screening and diagnostic mammograms different?

The same machines are used for both types of mammograms. However, diagnostic mammogram takes longer to perform than screening mammogram and the total dose of radiation is higher because more x-ray images are needed to obtain views of the breast from several angles. The technologist may magnify a suspicious area to produce a detailed picture that can help the doctor make an accurate diagnosis.

What are the benefits and potential harms of screening mammograms?

Early detection of breast cancer with screening mammogram means that treatment can be started earlier in the course of the disease, possibly before it has spread. Results from randomized clinical trials and other studies show that screening mammogram can help reduce the number of deaths from breast cancer among women ages 40 to 74, especially for those over age 50 2. However, studies to date have not shown a benefit from regular screening mammogram in women under age 40 or from baseline screening mammograms (mammograms used for comparison) taken before age 40.

The benefits of screening mammogram need to be balanced against its harms, which include:

  • False-positive results. False-positive results occur when radiologists see an abnormality (that is, a potential “positive”) on a mammogram but no breast cancer is actually present. All abnormal mammograms should be followed up with additional testing (diagnostic mammograms, ultrasound, and/or biopsy) to determine whether cancer is present. False-positive mammogram results can lead to anxiety and other forms of psychological distress in affected women. The additional testing required to rule out cancer can also be costly and time consuming and can cause physical discomfort. False-positive results are more common for younger women, women with dense breasts, women who have had previous breast biopsies, women with a family history of breast cancer, and women who are taking estrogen (for example, menopausal hormone therapy). The chance of having a false-positive result increases with the number of mammograms a woman has. More than 50% of women screened annually for 10 years in the United States will experience a false-positive result, and many of these women will have a biopsy.
  • Overdiagnosis and overtreatment. Screening mammograms can find breast cancers and cases of ductal carcinoma in situ (DCIS, a noninvasive tumor in which abnormal cells that may become cancerous build up in the lining of breast ducts) that need to be treated. However, they can also find cases of ductal carcinoma in situ (DCIS) and small breast cancers that would never cause symptoms or threaten a woman’s life. This phenomenon is called “overdiagnosis.” Treatment of overdiagnosed breast cancers and overdiagnosed cases of DCIS is not needed and results in “overtreatment.” Because doctors cannot easily distinguish cancers and cases of ductal carcinoma in situ (DCIS) that need to be treated from those that do not, they are all treated.
  • False-negative results. In breast cancer screening, a negative result means no abnormality is present. False-negative results occur when mammograms appear normal even though breast cancer is present. Overall, screening mammograms miss about 20% of breast cancers that are present at the time of screening. False-negative results can lead to delays in treatment and a false sense of security for affected women. One cause of false-negative results is high breast density. Breasts contain both dense tissue (i.e., glandular tissue and connective tissue, together known as fibroglandular tissue) and fatty tissue. Fatty tissue appears dark on a mammogram, whereas fibroglandular tissue appears as white areas. Because fibroglandular tissue and tumors have similar density, tumors can be harder to detect in women with denser breasts. False-negative results occur more often among younger women than among older women because younger women are more likely to have dense breasts. As a woman ages, her breasts usually become more fatty, and false-negative results become less likely. Some breast cancers grow so quickly that they appear within months of a normal (negative) screening mammogram. This situation does not represent a false-negative result, because the negative result of the screening was correct. But it means that a negative result can give a false sense of security. Some of the cancers missed by screening mammograms can be detected by clinical breast exams (physical exams of the breast done by a health care provider).
  • Finding breast cancer early may not reduce a woman’s chance of dying from the disease. Even though mammograms can detect malignant tumors that cannot be felt, treating a small tumor does not always mean that the woman will not die from the cancer. A fast-growing or aggressive cancer may have already spread to other parts of the body before it is detected. Instead, women with such tumors live a longer period of time knowing that they likely have a potentially fatal disease. In addition, finding breast cancer early may not help prolong the life of a woman who is suffering from other, more life-threatening health conditions.
  • Radiation exposure. Mammograms require very small doses of radiation. The risk of harm from this radiation exposure is low, but repeated x-rays have the potential to cause cancer. Although the potential benefits of mammography nearly always outweigh the potential harm from the radiation exposure, women should talk with their health care providers about the need for each x-ray. In addition, they should always let their health care provider and the x-ray technologist know if there is any possibility that they are pregnant, because radiation can harm a growing fetus.

Limitations of Mammograms

Mammograms are the best breast cancer screening tests we have at this time. But mammograms have their limits. For example, they aren’t 100% accurate in showing if a woman has breast cancer:

  • A false-negative mammogram looks normal even though breast cancer is present.
  • A false-positive mammogram looks abnormal even though there’s no cancer in the breast.

False-negative results

A false-negative mammogram looks normal even though breast cancer is present. Overall, screening mammograms do not find about 1 in 5 breast cancers.

  • Women with dense breasts have more false-negative results.
  • Breasts often become less dense as women age, so false negatives are more common in younger women.
  • False-negative mammograms can give women a false sense of security, thinking that they don’t have breast cancer when in fact they do.

False-positive results

A false-positive mammogram looks abnormal even though no cancer is actually present. Abnormal mammograms require extra testing (diagnostic mammograms, ultrasound, and sometimes MRI or even a breast biopsy) to find out if the change is cancer.

  • False-positive results are more common in women who are younger, have dense breasts, have had breast biopsies, have breast cancer in the family, or are taking estrogen.
  • About half of the women getting annual mammograms over a 10-year period will have a false-positive finding.
  • The odds of a false-positive finding are highest for the first mammogram. Women who have past mammograms available for comparison reduce their odds of a false-positive finding by about 50%.
  • False-positive mammograms can cause anxiety. They can also lead to extra tests to be sure cancer isn’t there, which cost time and money and maybe even physical discomfort.

Mammograms might not be helpful for all women

The value of a screening mammogram depends on a woman’s overall health. Finding breast cancer early may not help her live longer if she has other serious or life-threatening health problems, such as serious heart disease, or severe kidney, liver, or lung disease. The American Cancer Society breast cancer screening guidelines emphasize that women with serious health problems or short life expectancies should discuss with their doctors whether they should continue having mammograms. Our guidelines also stress that age alone should not be the reason to stop having regular mammograms.

It’s important to know that even though mammograms can often find breast cancers that are too small to be felt, treating a small tumor does not always mean it can be cured. A fast-growing or aggressive cancer might have already spread.

Overdiagnosis and overtreatment

Screening mammograms can find invasive breast cancer and ductal carcinoma in situ (DCIS, cancer cells in the lining of breast ducts) that need to be treated. But it’s possible that some of the invasive cancers and ductal carcinoma in situ (DCIS) found on mammograms would never grow or spread. (Finding and treating cancers that would never cause problems is called overdiagnosis.) These cancers are not life-threatening, and never would have been found or treated if the woman had not gotten a mammogram. The problem is that doctors can’t tell these cancers from those that will grow and spread.

Overdiagnosis leads to some women getting treatment that’s not really needed (overtreatment), because the cancer never would have caused any problems. Doctors don’t know which women fall into this group when the cancer is found because they can’t tell which cancers will be life-threatening and which won’t ever cause problems. Because of this, all cases are treated. This exposes some women to the adverse effects of cancer treatment that’s really not needed.

Still, overdiagnosis is not thought to happen that often. There’s a wide range of estimates of the percentage of breast cancers that might be overdiagnosed by mammography, but the most credible estimates range from 1% to 10%.

Radiation exposure

Because mammograms are x-ray tests, they expose the breasts to radiation. The amount of radiation from each mammogram is low, but it can still add up over time.

Mammogram screening

Benefit of Screening

The results of the meta-analysis of clinical trials from the systematic evidence review commissioned by the United States Preventive Services Task Force are summarized in Table 1. Over a 10-year period, screening 10,000 women aged 60 to 69 years will result in 21 (95% CI, 11 to 32) fewer breast cancer deaths. The benefit is smaller in younger women: screening 10,000 women aged 50 to 59 years will result in 8 (CI, 2 to 17) fewer breast cancer deaths, and screening 10,000 women aged 40 to 49 years will result in 3 (CI, 0 to 9) fewer breast cancer deaths.2, 3 Most of these trials began enrollment more than 30 years ago, and these estimates may not reflect the current likelihood of avoiding a breast cancer death with contemporary screening mammography technology. Mammography imaging has since improved, which may result in more tumors being detected at a curable stage today than at the time of these trials. However, breast cancer treatments have also improved, and as treatment improves, the advantage of earlier detection decreases, so that some of the women who died of breast cancer in the nonscreened groups in these trials would survive today.

Table 1. Breast Cancer Deaths Avoided per 10,000 Women Screened by Repeat Screening Mammography Over 10 Years: Data From Randomized, Controlled Trials*

Ages 40–49 yAges 50–59 yAges 60–69 yAges 70–74 y
Breast cancer deaths avoided3 (0–9)8 (2–17)21 (11–32)13 (0–32)

* All women did not have 100% adherence to all rounds of screening offered in the randomized, controlled trials.

[Source 1]

Harms of Screening

The most important harm of screening is the detection and treatment of invasive and noninvasive cancer that would never have been detected, or threaten health, in the absence of screening (overdiagnosis and overtreatment). Existing science does not allow for the ability to determine precisely what proportion of cancer diagnosed by mammography today reflects overdiagnosis, and estimates vary widely depending on the data source and method of calculation used 3. In the United States, the rate of diagnosis of invasive plus noninvasive breast cancer increased by 50% during the era of mammography screening 4. It is not possible to know with certainty what proportion of that increase is due to overdiagnosis and what proportion reflects other reasons for a rising incidence. If overdiagnosis is the only explanation for the increase, 1 in 3 women diagnosed with breast cancer today is being treated for cancer that would never have been discovered or caused her health problems in the absence of screening. The best estimates from randomized, controlled trials (RCTs) evaluating the effect of mammography screening on breast cancer mortality suggest that 1 in 5 women diagnosed with breast cancer over approximately 10 years will be overdiagnosed 5. Modeling studies conducted in support of this recommendation by the Cancer Intervention and Surveillance Modeling Network (CISNET) provide a range of estimates that reflect different underlying assumptions; the median estimate is that 1 in 8 women diagnosed with breast cancer with biennial screening from ages 50 to 74 years will be overdiagnosed. The rate increases with an earlier start age or with annual mammography 6. Even with the conservative estimate of 1 in 8 breast cancer cases being overdiagnosed, for every woman who avoids a death from breast cancer through screening, 2 to 3 women will be treated unnecessarily.

The other principal harms of screening are false-positive results, which require further imaging and often breast biopsy, and false-negative results. Table 2 summarizes the rates of these harms per screening round using registry data for digital mammography from the Breast Cancer Surveillance Consortium, a collaborative network of 5 mammography registries and 2 affiliated sites with linkages to tumor registries across the United States 7. (Note that Table 2 describes a different time horizon than Table 1 [per screening round rather than per decade]).

Table 2. Harms of One-Time Mammography Screening per 10,000 Women Screened: Breast Cancer Surveillance Consortium Registry Data

Ages 40–49 yAges 50–59 yAges 60–69 yAges 70–74 y
False-positive mammograms (false alarms), n1212932808696
Breast biopsies, n164159165175
False-negative mammograms (missed cancers), n10111215
[Source 1]

When to Start Screening

Clinical trials, observational studies, and modeling studies all demonstrate that the likelihood of avoiding a breast cancer death with regular screening mammography increases with age, and this increase in benefit likely occurs gradually rather than abruptly at any particular age. In contrast, the harms of screening mammography either remain constant or decrease with age. For example, about the same number of breast biopsies are performed as a result of screening mammography in women aged 40 to 49 years as in those aged 60 to 69 years, but many more of these biopsies will result in a diagnosis of invasive cancer in the older age group. Thus, the balance of benefit and harms improves with age (Table 3).

Table 3. Lifetime Benefits and Harms of Biennial Screening Mammography per 1000 Women Screened: Model Results Compared With No Screening*

VariableAges 40–74 yAges 50–74 y
Fewer breast cancer deaths, n8 (5–10)7 (4–9)
Life-years gained, n152 (99–195)122 (75–154)
False-positive tests, n1529 (1100–1976)953 (830–1325)
Unnecessary breast biopsies, n213 (153–276)146 (121–205)
Overdiagnosed breast tumors, n21 (12–38)19 (11–34)

* Values reported are medians (ranges).

[Source 1]

The United States Preventive Services Task Force concludes that while there are harms of mammography, the benefit of screening mammography outweighs the harms by at least a moderate amount from age 50 to 74 years and is greatest for women in their 60s. For women in their 40s, the number who benefit from starting regular screening mammography is smaller and the number experiencing harm is larger compared with older women. For women in their 40s, the benefit still outweighs the harms, but to a smaller degree; this balance may therefore be more subject to individual values and preferences than it is in older women. Women in their 40s must weigh a very important but infrequent benefit (reduction in breast cancer deaths) against a group of meaningful and more common harms (overdiagnosis and overtreatment, unnecessary and sometimes invasive follow-up testing and psychological harms associated with false-positive test results, and false reassurance from false-negative test results). Women who value the possible benefit of screening mammography more than they value avoiding its harms can make an informed decision to begin screening.

Neither clinical trials nor models can precisely predict the potential benefits and harms that an individual woman can expect from beginning screening at age 40 rather than 50 years, as these data represent population effects. However, model results may be the easiest way for women to visualize the relative tradeoffs of beginning screening at age 40 versus 50 years. Cancer Intervention and Surveillance Modeling Network (CISNET) conducted modeling studies to predict the lifetime benefits and harms of screening with contemporary digital mammography at different starting and stopping ages and screening intervals. The models varied their assumptions about the natural history of invasive and noninvasive breast cancer and the effect of detection by digital mammography on survival. The models assumed the ideal circumstances of perfect adherence to screening and current best practices for therapy across the life span. Table 3 compares the median and range across the models for predicted lifetime benefits and harms of screening biennially from ages 50 to 74 years with screening biennially from ages 40 to 74 years. (Note that Table 3 differs from Tables 1 and 2 in terms of population metrics [per 1000 vs. 10,000 women] and time horizon considered [lifetime vs. 10-year or single event]).

It is, however, a false dichotomy to assume that the only options are to begin screening at age 40 or to wait until age 50 years. As women advance through their 40s, the incidence of breast cancer rises. The balance of benefit and harms may also shift accordingly over this decade, such that women in the latter half of the decade likely have a more favorable balance than women in the first half. Indeed, the Cancer Intervention and Surveillance Modeling Network (CISNET) models suggest that most of the benefit of screening women aged 40 to 49 years would be realized by starting screening at age 45 6.

Risk Factors That May Influence When to Start Screening

Advancing age is the most important risk factor for breast cancer in most women, but epidemiologic data from the Breast Cancer Surveillance Consortium suggest that having a first-degree relative with breast cancer is associated with an approximately 2-fold increased risk for breast cancer in women aged 40 to 49 years 3. Further, the Cancer Intervention and Surveillance Modeling Network (CISNET) models suggest that for women with about a 2-fold increased risk for breast cancer, starting annual digital screening at age 40 years results in a similar harm-to-benefit ratio (based on number of false-positive results or overdiagnosed cases per 1000 breast cancer deaths avoided) as beginning biennial digital screening at age 50 years in average-risk women 6. This approach has not been formally tested in a clinical trial; therefore, there is no direct evidence that it would result in net benefit similar to that of women aged 50 to 74 years. However, given the increased burden of disease and potential likelihood of benefit, women aged 40 to 49 years who have a known first-degree relative (parent, child, or sibling) with breast cancer may consider initiating screening earlier than age 50 years. Many other risk factors have been associated with breast cancer in epidemiologic studies, but most of these relationships are weak or inconsistent and would not likely influence how women value the tradeoffs of the potential benefits and harms of screening. Risk calculators, such as the National Cancer Institute’s Breast Cancer Risk Assessment Tool (available at https://www.cancer.gov/BCRISKTOOL/Default.aspx), have good calibration between predicted and actual outcomes in groups of women but are not accurate at predicting an individual woman’s risk for breast cancer 8.

How Often to Screen

Once a woman has decided to begin screening, the next decision is how often to undergo screening. No clinical trials compared annual mammography with a longer interval in women of any age. In the randomized trials that demonstrated the effectiveness of mammography in reducing breast cancer deaths in women aged 40 to 74 years, screening intervals ranged from 12 to 33 months 3. There was no clear trend for greater benefit in trials of annual mammography, but other differences between the trials preclude certainty that no difference in benefit exists. Available observational evidence evaluating the effects of varying mammography intervals found no difference in the number of breast cancer deaths between women aged 50 years or older who were screened biennially versus annually 3.

Regardless of the starting age for screening, the models consistently predict a small incremental increase in the number of breast cancer deaths averted when moving from biennial to annual mammography, but also a large increase in the number of harms (Table 4) 6. The United States Preventive Services Task Force concludes that for most women, biennial mammography screening provides the best overall balance of benefit and harms.

Table 4. Lifetime Benefits and Harms of Annual Versus Biennial Screening Mammography per 1000 Women Screened: Model Results Compared With No Screening*

VariableAges 50–74 y, Annual ScreeningAges 50–74 y, Biennial Screening
Fewer breast cancer deaths, n9 (5–10)7 (4–9)
Life-years gained, n145 (104–180)122 (75–154)
False-positive tests, n1798 (1706–2445)953 (830–1325)
Unnecessary breast biopsies, n228 (219–317)146 (121–205)
Overdiagnosed breast tumors, n25 (12–68)19 (11–34)

* Values reported are medians (ranges).

[Source 1]

When to Consider Stopping Screening

Clinical trial data for women aged 70 to 74 years are inconclusive. In its 2009 recommendation 9, the United States Preventive Services Task Force extended the recommendation for screening mammography to age 74 years based on the extrapolation that much of the benefit seen in women aged 60 to 69 years should continue in this age range, and modeling done at the time supported this assumption. Current Cancer Intervention and Surveillance Modeling Network (CISNET) models suggest that women aged 70 to 74 years with moderate to severe comorbid conditions that negatively affect their life expectancy are unlikely to benefit from mammography 6. Moderate comorbid conditions include cardiovascular disease, paralysis, and diabetes. Severe comorbid conditions include (but are not limited to) AIDS, chronic obstructive pulmonary disease, liver disease, chronic renal failure, dementia, congestive heart failure, and combinations of moderate comorbid conditions, as well as myocardial infarction, ulcer, and rheumatologic disease 10.

Screening in Women Aged 75 Years or Older

The United States Preventive Services Task Force found insufficient evidence to assess the balance of benefits and harms of screening mammography in women aged 75 years or older. Current Cancer Intervention and Surveillance Modeling Network (CISNET) models suggest that biennial mammography screening may potentially continue to offer a net benefit after age 74 years among women with no or low comorbidity 6, but no randomized trials of screening included women in this age group 3.

Mammogram screening guidelines

Many organizations and professional societies, including the United States Preventive Services Task Force (which is convened by the Agency for Healthcare Research and Quality, a federal agency), have developed guidelines for mammography screening. All recommend that women talk with their doctor about the benefits and harms of mammography, when to start screening, and how often to be screened.

United States Preventive Services Task Force screenings recommendations for women

Women aged 50 to 74 years

The United States Preventive Services Task Force recommends biennial (every 2 years) screening mammography for women aged 50 to 74 years 1.

Women aged 40 to 49 years

The decision to start screening mammography in women prior to age 50 years should be an individual one 1. Women who place a higher value on the potential benefit than the potential harms may choose to begin biennial screening between the ages of 40 and 49 years.

  • For women who are at average risk for breast cancer, most of the benefit of mammography results from biennial screening during ages 50 to 74 years. Of all of the age groups, women aged 60 to 69 years are most likely to avoid breast cancer death through mammography screening. While screening mammography in women aged 40 to 49 years may reduce the risk for breast cancer death, the number of deaths averted is smaller than that in older women and the number of false-positive results and unnecessary biopsies is larger. The balance of benefits and harms is likely to improve as women move from their early to late 40s.
  • In addition to false-positive results and unnecessary biopsies, all women undergoing regular screening mammography are at risk for the diagnosis and treatment of noninvasive and invasive breast cancer that would otherwise not have become a threat to their health, or even apparent, during their lifetime (known as “overdiagnosis”). Beginning mammography screening at a younger age and screening more frequently may increase the risk for overdiagnosis and subsequent overtreatment.
  • Women with a parent, sibling, or child with breast cancer are at higher risk for breast cancer and thus may benefit more than average-risk women from beginning screening in their 40s.

Women aged 75 years or older

The United States Preventive Services Task Force concludes that the current evidence is insufficient to assess the balance of benefits and harms of screening mammography in women aged 75 years or older.

Women with dense breasts

The United States Preventive Services Task Force concludes that the current evidence is insufficient to assess the balance of benefits and harms of adjunctive screening for breast cancer using breast ultrasonography, magnetic resonance imaging (MRI), Digital Breast Tomosynthesis (DBT), or other methods in women identified to have dense breasts on an otherwise negative screening mammogram.

All women

The United States Preventive Services Task Force concludes that the current evidence is insufficient to assess the benefits and harms of digital breast tomosynthesis (DBT) as a primary screening method for breast cancer.

American Cancer Society screenings recommendations for women at average breast cancer risk

These guidelines are for women at average risk for breast cancer 11. For screening purposes, a woman is considered to be at average risk if she doesn’t have a personal history of breast cancer, a strong family history of breast cancer, or a genetic mutation known to increase risk of breast cancer (such as in a BRCA gene), and has not had chest radiation therapy before the age of 30. (See below for guidelines for women at high risk.)

  • Women between 40 and 44 have the option to start screening with a mammogram every year.
  • Women 45 to 54 should get mammograms every year.
  • Women 55 and older can switch to a mammogram every other year, or they can choose to continue yearly mammograms. Screening should continue as long as a woman is in good health and is expected to live 10 more years or longer.

All women should understand what to expect when getting a mammogram for breast cancer screening – what the test can and cannot do.

American Cancer Society screening recommendations for women at high risk

Women who are at high risk for breast cancer based on certain factors should get an MRI and a mammogram every year, typically starting at age 30. This includes women who:

  • Have a lifetime risk of breast cancer of about 20% to 25% or greater, according to risk assessment tools that are based mainly on family history (see below)
  • Have a known BRCA1 or BRCA2 gene mutation (based on having had genetic testing)
  • Have a first-degree relative (parent, brother, sister, or child) with a BRCA1 or BRCA2 gene mutation, and have not had genetic testing themselves
  • Had radiation therapy to the chest when they were between the ages of 10 and 30 years
  • Have Li-Fraumeni syndrome, Cowden syndrome, or Bannayan-Riley-Ruvalcaba syndrome, or have first-degree relatives with one of these syndromes

The American Cancer Society recommends against MRI screening for women whose lifetime risk of breast cancer is less than 15%.

There’s not enough evidence to make a recommendation for or against yearly MRI screening for women who have a higher lifetime risk based on certain factors , such as:

  • Having a personal history of breast cancer, ductal carcinoma in situ (DCIS), lobular carcinoma in situ (LCIS), atypical ductal hyperplasia (ADH), or atypical lobular hyperplasia (ALH)
  • Having “extremely” or “heterogeneously” dense breasts as seen on a mammogram

If MRI is used, it should be in addition to, not instead of, a screening mammogram. This is because although an MRI is more likely to detect cancer than a mammogram, it may still miss some cancers that a mammogram would detect.

Most women at high risk should begin screening with MRI and mammograms when they are 30 and continue for as long as they are in good health. But a woman at high risk should make the decision to start with her health care providers, taking into account her personal circumstances and preferences.

Tools used to assess breast cancer risk

Several risk assessment tools are available to help health professionals estimate a woman’s breast cancer risk. These tools give approximate, rather than precise, estimates of breast cancer risk based on different combinations of risk factors and different data sets.

Because the different tools use different factors to estimate risk, they may give different risk estimates for the same woman. Two models could easily give different estimates for the same person.

Risk assessment tools that include family history in first-degree relatives (parents, siblings, and children) and second-degree relatives (such as aunts and cousins) on both sides of the family should be used with the American Cancer Society guidelines to decide if a woman should have MRI screening. The use of any of the risk assessment tools and its results should be discussed by a woman with her health care provider.

Mammogram results

How will I get my mammogram results?

If you don’t hear from your health care provider within 10 days, do not assume that your mammogram was normal. Call your provider or the facility where the mammogram was done.

A full report of the results of your mammogram will be sent to your health care provider. Mammography clinics also must mail women an easy-to-understand summary of their mammogram results within 30 days—or “as quickly as possible” if the results suggest cancer is present. This means you could get the results before your provider calls you. If you want the full written mammogram report as well as the summary, you’ll need to ask for it.

A doctor called a radiologist will categorize your mammogram results using a number system of 0 through 6. You should talk to your doctor about your mammogram’s category and what you need to do next.

Breast Imaging Reporting and Data System Assessment Category

Doctors use a standard system to describe mammogram findings and results. This system (called the Breast Imaging Reporting and Data System or BI-RADS) sorts the results into categories numbered 0 through 6.

By sorting the results into these categories, doctors can describe what they find on a mammogram using the same words and terms. This makes accurately communicating about these test results and following up after the tests much easier.

Table 5. Breast Imaging Reporting and Data System Categories

Category DefinitionWhat it means
0Additional imaging evaluation and/or comparison to prior mammograms is needed.This means the radiologist may have seen a possible abnormality, but it was not clear and you will need more tests, such as another mammogram with the use of spot compression (applying compression to a smaller area when doing the mammogram), magnified views, special mammogram views, or ultrasound. This may also suggest that the radiologist wants to compare your new mammogram with older ones to see if there have been changes in the area over time.


1Negative


There’s no significant abnormality to report. Your breasts look the same (they are symmetrical) with no masses (lumps), distorted structures, or suspicious calcifications. In this case, negative means nothing bad was found.
2Benign (non-cancerous) findingThis is also a negative mammogram result (there’s no sign of cancer), but the radiologist chooses to describe a finding known to be benign, such as benign calcifications, lymph nodes in the breast, or calcified fibroadenomas. This ensures that others who look at the mammogram will not misinterpret the benign finding as suspicious. This finding is recorded in your mammogram report to help when comparing to future mammograms.
3Probably benign finding – Follow-up in a short time frame is suggested


The findings in this category have a very high chance (greater than 98%) of being benign (not cancer). The findings are not expected to change over time. But since it’s not proven to be benign, it’s helpful to see if the area in question does change over time.

You will likely need follow-up with repeat imaging in 6 months and regularly after that until the finding is known to be stable (usually at least 2 years). This approach helps avoid unnecessary biopsies, but if the area does change over time, it still allows for early diagnosis.

4Suspicious abnormality – Biopsy should be consideredFindings do not definitely look like cancer but could be cancer. The radiologist is concerned enough to recommend a biopsy. The findings in this category can have a wide range of suspicion levels. For this reason, some, but not all, doctors divide this category further:

4A: Finding with a low suspicion of being cancer

4B: Finding with an intermediate suspicion of being cancer

4C: Finding of moderate concern of being cancer, but not as high as Category 5

5Highly suggestive of malignancy – Appropriate action should be takenThe findings look like cancer and have a high chance (at least 95%) of being cancer. Biopsy is very strongly recommended.
6Known biopsy-proven malignancy – Appropriate action should be takenThis category is only used for findings on a mammogram that have already been shown to be cancer by a previous biopsy. Mammograms may be used in this way to see how well the cancer is responding to treatment.
[Source 12]

Your mammogram report will also include an assessment of your breast density, which is a description of how much fibrous and glandular tissue is in your breasts, as opposed to fatty tissue. The denser your breasts, the harder it can be to see abnormal areas on mammograms.

Breast Imaging Reporting and Data System (BI-RADS) classifies breast density into 4 groups. Regular mammograms are the best way to find breast cancer early. But if your mammogram report says that you have dense breast tissue, you may be wondering what that means. Having dense breasts is very common and is not abnormal.

Breast density categories

Radiologists use the Breast Imaging Reporting and Data System (BI-RADS), to classify breast density into 4 categories. They go from almost all fatty tissue to extremely dense tissue with very little fat.

Some mammogram reports sent to women mention breast density. Your health care provider can also tell you if your mammogram shows that you have dense breasts.

In some states, women whose mammograms show heterogenously dense or extremely dense breasts must be told that they have dense breasts in the summary of the mammogram report that is sent to patients (sometimes called the lay summary).

The radiologist who reads the mammogram chooses the category that best describes the level of breast density seen on the mammogram film. The categories, from the least amount of breast density to the highest, are as follows:

  1. The breasts are almost entirely fatty
  2. There are scattered areas of dense glandular tissue and fibrous connective tissue (together known as fibroglandular density)
  3. The breasts are heterogeneously dense, which means they have more of these areas of fibroglandular density. This may make it hard to see small masses in the breast tissue on a mammogram.
  4. The breasts are extremely dense, which makes it hard to see tumors in the breast tissue on a mammogram.

Figure 10. Breasts are almost all fatty tissue

Breasts are almost all fatty tissue

Figure 11. Scattered areas of dense glandular and fibrous tissue

scattered areas of dense glandular and fibrous breast tissue

Figure 12. Heterogenously dense – Note: More of the breast is made of dense glandular and fibrous tissue. This can make it hard to see small tumors in or around the dense tissue.

heterogenously dense

Figure 13. Breasts are extremely dense making it hard to see tumors in the breast tissue

Breasts are extremely dense

Getting Called Back After a Mammogram

Getting called back after a screening mammogram is fairly common and doesn’t mean you have breast cancer. In fact, fewer than 1 in 10 women called back for more tests are found to have breast cancer. Often, it just means more x-rays or an ultrasound needs to be done to get a closer look at an area of concern.

Getting called back is more common after a first mammogram, or when there’s no previous mammogram to compare the new mammogram with. It’s also more common in women who haven’t gone through menopause.

What else could it be?

You could be called back after your mammogram because:

  • The pictures weren’t clear or didn’t show some of your breast tissue and need to be retaken.
  • You have dense breast tissue, which can make it hard to see some parts of your breasts.
  • The radiologist sees calcifications or a mass (a cyst or solid tumor).
  • The radiologist sees an area that just looks different from other parts of the breast.

Sometimes when more x-rays are taken of the area or mass, or the area is compressed more, it no longer looks suspicious. In fact, most repeat mammograms do not find cancer.

What will happen at the follow-up appointment?

  • You’ll likely have another mammogram called a diagnostic mammogram. (Your previous mammogram was called a screening mammogram.) A diagnostic mammogram is done just like a screening mammogram, but more pictures are taken so that any areas of concern can be carefully studied. A radiologist is on hand to advise the technologist (the person who operates the mammogram machine) to be sure they have all the images that are needed.
  • You may also have an ultrasound test, which uses sound waves to make pictures of the inside of your breast at the area of concern.
  • Some women may need a breast MRI. For this test, you’ll lie face down inside a narrow tube for up to an hour while the machine creates more detailed images of the breast tissues. MRI is painless, but it can be uncomfortable for people who don’t like small, tight spaces.

You can expect to learn the results of your tests during the visit. You are likely to be told one of the following:

  • The suspicious area turned out to be nothing to worry about and you can return to your normal mammogram schedule.
  • The area is probably nothing to worry about, but you should have your next mammogram sooner than normal – usually in 6 months – to watch it closely and make sure it’s not changing over time.
  • The changed area could be cancer, so you will need to have a biopsy to know for sure.

You’ll also get a letter with a summary of the findings that will tell you if you need more tests and/or when you should schedule your next mammogram.

What if I need a biopsy?

During a breast biopsy, a small piece of breast tissue is removed and checked for cancer under a microscope. Even if you need a biopsy, it doesn’t mean you have cancer. Most biopsy results are not cancer, but a biopsy is the only way to find out.

There are several different types of biopsies, some of which are done using a needle and some that are done through a cut in the skin. The type you have depends on things like how suspicious the tumor looks, how big it is, where it is in the breast, how many tumors there are, other medical problems you might have, and your personal preferences.

How can I stay calm while waiting?

Waiting for appointments and the results of tests can be frightening. Many women have strong emotions including disbelief, anxiety, fear, anger, and sadness during this time. Here are some things to remember:

  • It’s normal to have these feelings.
  • Most breast changes are not cancer and are not life-threatening.
  • Talking with a loved one or a counselor about your feelings may help.
  • Talking with other women who have been through a breast biopsy may help.
  • The American Cancer Society is available at https://www.cancer.org/ or the National Cancer Institute at https://www.cancer.gov/ around the clock to answer your questions and provide support.

What if it’s cancer?

If you do have cancer and you’re referred to a breast specialist, use these tips to make your appointment as useful as possible:

  • Make a list of questions to ask.
  • Take a family member or friend with you. They can serve as an extra pair of ears, take notes, help you remember things later, and give you support.
  • Ask if you can record the conversations.
  • Take notes. If someone uses a word you don’t know, ask them to spell it and explain it.
  • Ask the doctors or nurses to explain anything you don’t understand.

Coping with the shock, fear and sadness that come with a cancer diagnosis can take time. You may feel overwhelmed just when you need to make crucial decisions. With time, each person finds a way of coping and coming to terms with the diagnosis.

Until you find what brings you the most comfort, consider trying to:

  • Find out enough about the cancer to make decisions about your care. Ask your doctor for the specifics about your cancer, such as its type and stage. And ask for recommended sources of information where you can learn more about your treatment options. The National Cancer Institute at https://www.cancer.gov/ and the American Cancer Society at https://www.cancer.org/ are good places to start.
  • Stay connected to friends and family. Your friends and family can provide a crucial support network for you during your cancer treatment. As you begin telling people about your cancer diagnosis, you’ll likely get offers for help. Think ahead about things you may like help with, whether it’s having someone to talk to if you’re feeling low or getting help preparing meals.
  • Find someone to talk to. You might have a close friend or family member who’s a good listener. Or talk to a counselor, medical social worker, or pastoral or religious counselor.

Consider joining a support group for people with cancer. You may find strength and encouragement in being with people who are facing the same challenges you are. Ask your doctor, nurse or social worker about groups in your area. Or try online message boards, such as those available through the American Cancer Society 13.

References
  1. Breast Cancer: Screening. Final Recommendation Statement. https://www.uspreventiveservicestaskforce.org/Page/Document/RecommendationStatementFinal/breast-cancer-screening1
  2. Mandelblatt JS, Cronin KA, Bailey S, et al. Effects of mammography screening under different screening schedules: model estimates of potential benefits and harms. Annals of Internal Medicine 2009;151(10):738-747. https://www.ncbi.nlm.nih.gov/pmc/articles/PMC3515682/
  3. Nelson HD, Cantor A, Humphrey L, Fu R, Pappas M, Daeges M, Griffin J. Screening for Breast Cancer: A Systematic Review to Update the 2009 U.S. Preventive Services Task Force Recommendation. Evidence Synthesis No. 124. AHRQ Publication No. 14-05201-EF-1. Rockville, MD: Agency for Healthcare Research and Quality; 2016.
  4. Howlader N, Noone AM, Krapcho M, Garshell J, Miller D, Altekruse SF, et al, eds. SEER Cancer Statistics Review, 1975-2011. Bethesda, MD: National Cancer Institute; 2014 https://seer.cancer.gov/archive/csr/1975_2011/
  5. Marmot MG, Altman DG, Cameron DA, Dewar JA, Thompson SG, Wilcox M. The benefits and harms of breast cancer screening: an independent review. Br J Cancer. 2013;108:2205-40.
  6. Mandelblatt JS, Stout NK, Schechter CB, van den Broek JJ, Miglioretti DL, Krapcho M, et al. Collaborative modeling of the benefits and harms associated with different U.S. breast cancer screening strategies. Ann Intern Med. 2016. [Epub ahead of print]
  7. Nelson HD, O’Meara ES, Kerlikowske K, Balch S, Miglioretti D. Factors associated with rates of false-positive and false-negative results from digital mammography screening: an analysis of registry data. Ann Intern Med. 2016. [Epub ahead of print].
  8. Nelson HD, Smith ME, Griffin JC, Fu R. Use of medications to reduce risk for primary breast cancer: a systematic review for the U.S. Preventive Services Task Force. Ann Intern Med. 2013;158(8):604-14.
  9. U.S. Preventive Services Task Force. Screening for breast cancer: U.S. Preventive Services Task Force recommendation statement. Ann Intern Med. 2009;151(10):716-26.
  10. Lansdorp-Vogelaar I, Gulati R, Mariotto AB, Schechter CB, de Carvalho TM, Knudsen AB, et al. Personalizing age of cancer screening cessation based on comorbid conditions: model estimates of harms and benefits. Ann Intern Med. 2014;161(2):104-12.
  11. American Cancer Society Recommendations for the Early Detection of Breast Cancer. https://www.cancer.org/cancer/breast-cancer/screening-tests-and-early-detection/american-cancer-society-recommendations-for-the-early-detection-of-breast-cancer.html
  12. Understanding Your Mammogram Report. https://www.cancer.org/cancer/breast-cancer/screening-tests-and-early-detection/mammograms/understanding-your-mammogram-report.html
  13. American Cancer Society. https://www.cancer.org/
read more
Procedures

Endoscopy

endoscopy

What is endoscopy

Endoscopy is a medical procedure where a doctor puts a tube-like instrument (an endoscope) into your body to look inside. There are many types of endoscopy, each type is specially designed for looking at a certain part of the body and is sometimes used for certain kinds of surgery or procedure.

There are many different kinds of endoscopes, or “scopes.” Most are like thin, hollow tubes that a doctor uses to look right into the body. Most are lighted, and some have a small video camera on the end that puts pictures on a computer screen. Endoscopes are different lengths and shapes. Some are stiff, while others are flexible. There’s a new one called capsule endoscopy, which is small enough to be swallowed, which can send images wirelessly. Capsule endoscopy is often used to help your doctor see inside your small intestine. Your small intestine, which is composed of three sections, runs from your stomach to your colon (see Figure 3).

Depending on the area of the body being looked at, the endoscope may be put in the mouth, anus, or urethra (the tube that carries urine out of the bladder). Sometimes, it’s put through a small incision (cut) made in the skin.

Table 1. Some types of endoscopes and the areas of the body they view

Type of endoscopePut in throughBody part or area(s) looked atName(s) of procedure
ArthroscopeCuts in the skinJointsArthroscopy
BronchoscopeMouth or noseTrachea (windpipe) and bronchi (tubes going to the lungs)Bronchoscopy, flexible bronchoscopy
ColonoscopeAnusColon and large intestineColonoscopy, lower endoscopy
CystoscopeUrethraBladderCystoscopy, cystourethroscopy
EnteroscopeMouth or anusSmall intestineEnteroscopy
Esophagogastro-duodenoscopeMouthEsophagus (swallowing tube), stomach, and duodenum (first part of small intestine)Esophagogastro-duodenoscopy (EGD), upper endoscopy, panendoscopy, gastroscopy
HysteroscopeVaginaInside of uterusHysteroscopy
LaparoscopeCut(s) in the abdomen (belly)Space inside abdomen and pelvisLaparoscopy, peritoneal endoscopy
LaryngoscopeMouth or noseLarynx (voice box)Laryngoscopy
MediastinoscopeCut(s) above the sternum (breastbone)Mediastinum (space between the lungs)Mediastinoscopy
Sigmoidoscope, flexible sigmoidoscopeAnusRectum and sigmoid colon (lower part of large intestine)Sigmoidoscopy, flexible sigmoidoscopy, proctosigmoidoscopy
ThoracoscopeCut(s) in the chestSpace between lungs and chest wallThoracoscopy,
pleuroscopy

When is endoscopy used?

Endoscopes were first developed to look at parts of the body that couldn’t be seen any other way. This is still a common reason to use them, but endoscopy now has many other uses too. It’s often used in the prevention, early detection, diagnosis, staging, and treatment of cancer.

To prevent and screen for cancer

Some types of endoscopes are used to look for cancer in people who have no symptoms. For example, colonoscopy and sigmoidoscopy are used to screen for colon and rectal cancer. These procedures can also help prevent cancer because they let doctors find and remove polyps (growths) that might become cancer if left alone.

To find cancer early

Endoscopy can sometimes be used to find cancer early, before it has had a chance to grow or spread.

Looking for causes of symptoms

When people go to the doctor with certain symptoms, endoscopy can sometimes be used to help find a cause. For instance:

  • Laryngoscopy to look at the vocal cords in people with long-term hoarseness
  • Upper endoscopy in people having trouble swallowing
  • Colonoscopy in people with anemia (low red blood cell counts) with an unknown cause
  • Colonoscopy in people with blood in their stool

Looking at problems found on imaging tests

Imaging tests such as x-rays and CT scans can sometimes show physical changes within the body. But these tests may only give information about the size, shape, and location of the problem. Doctors use endoscopes to see more details, like color and surface texture, when trying to find out what’s going on. Newer methods of endoscopy that include high magnification are being tested to find out whether they are more useful in detecting cancer and other abnormal cells on the inner surfaces of the body.

To diagnose and find out the stage (extent) of cancer

To get a tissue sample

Going one step further, most types of endoscopes have tools on the end that the doctor can use to take out small tissue samples. This procedure is called a biopsy. Samples can be taken from suspicious areas and then looked at under a microscope or tested in other ways to see if cancer is there. A biopsy is usually the best way to find out if a growth or change is cancer or something else.

Getting a closer look

In some cases endoscopes are used to help find out how far a cancer has spread. Thoracoscopy and laparoscopy can be very useful in finding out if cancer has spread into the thorax (chest) or abdomen (belly). The surgeon can look into these places making only a small incision (cut) in the skin.

To get better pictures

Endoscopes can get pictures of the body parts they can get to. But some types of endoscopy can also be used to help get better, more detailed ultrasounds and x-rays in areas the scopes can’t quite reach. This can be especially useful when trying to find how much cancer is in the body (in other words, staging the cancer).

  • Endoscopic ultrasound: Ultrasound is an imaging test in which a wand-like instrument (called a transducer) is moved over the skin. The transducer sends sound waves into the body. The waves bounce back in a pattern a computer uses to make a picture. Endoscopic ultrasound is a procedure in which a small transducer on the tip of an endoscope is put in through either the mouth or rectum. By putting the transducer on the tip of the endoscope, it can get closer to an organ or tumor to take more detailed ultrasound pictures. Endoscopic ultrasound is used to get information about problems in the digestive tract and nearby organs. It can be used to see how deep a tumor might have grown into the rectum or esophagus, or into a nearby organ like the pancreas. It can also help show if lymph nodes are swollen, which could mean they have cancer in them. Endoscopic ultrasound is proving useful in staging some lung, digestive tract (esophagus, stomach, pancreas, etc.), and other cancers. Endoscopic ultrasound can also help a doctor guide a needle to take a biopsy.
  • Endoscopic retrograde cholangiopancreatography (ERCP): Endoscopic retrograde cholangiopancreatography (ERCP) is a complex procedure that helps doctors diagnose problems in the ducts of the pancreas, gall bladder, or liver. In this procedure, an endoscope is passed down the throat, through the stomach, and into the first part of the small intestine. The doctor then guides a tiny tube at the end of the endoscope into the common bile duct, which connects the intestine with the pancreas. A small amount of contrast material (dye) is pushed in, and x-rays are taken. The dye helps outline the bile ducts and pancreatic duct. The x-rays can show whether the ducts are narrowed or blocked, which could be caused by a gallstone or a cancer. The doctor doing this test can also put a small brush through the tube to take out some cells for biopsy.

To treat cancer

Destroying or removing cancer cells

Endoscopes can be used to take out or destroy small cancers. Small instruments passed through an endoscope can be used to cut out small growths. Doctors also can use tools like a cautery or laser through the tips of some endoscopes to burn or vaporize growths.

Surgery to take out cancer

Many types of endoscopic tools have been developed to let doctors perform minimally invasive surgery. This is sometimes called keyhole surgery. When it’s used for the abdomen (belly), it is called laparoscopic surgery. Instead of making one long surgical incision (cut), several small cuts are made in the skin, usually in the chest or abdomen. Long, thin instruments are then put through the cuts or holes to reach the inside of the body. A video endoscope – a thoracoscope or laparoscope – is put through one of the holes so that the surgeon can see inside during the operation.

This type of surgery is sometimes used to treat small lung cancers. This is called video-assisted thoracoscopic surgery It can also be used for the colon (called laparoscopic colectomy), prostate (called laparoscopic radical prostatectomy), and some other organs, but not all doctors agree keyhole surgery is better than open surgery.

  • There are some benefits to keyhole surgery: Generally, less blood is lost during the operation and patients often recover faster and with less pain because the cuts are small. Some forms of keyhole surgery use robotic arms, which a surgeon controls from a console. This better magnifies the area so more precise work can be done with tiny, delicate surgical instruments.
  • Keyhole surgery also has some drawbacks: It usually means more time in the operating room and more drugs to keep the patient asleep (more time under anesthesia). It also takes away the surgeon’s ability to feel organs for problems that they may not be able to see.

Most studies have not found keyhole surgery to be any less effective than open surgery, at least in the short term. But as of yet there are no studies to show that the long-term outcomes are the same.

If you are thinking about some type of minimally invasive or keyhole surgery, it’s important to understand the known benefits and risks. It’s also important to find out what’s not yet known about the procedure. If you decide on keyhole surgery, be sure your doctor has a lot of experience with the procedure and is skilled with the technique.

To relieve symptoms of advanced cancer

Endoscopes can also be used for palliative treatment (treatment given to reduce or control symptoms) in some cancers that can’t be cured by surgery. For example, instruments passed through endoscopes can be used to remove blockages in the lungs or digestive tract. If a tumor is narrowing an airway by pressing on its outside, endoscopy can be used to place a stent (a small, rigid tube) inside the airway to keep it open.

What is an endoscopy procedure like?

There are many different types of endoscopy procedures, and the experience of having one can vary a lot from one type to the next.

It’s important to keep in mind that some procedures might be done in more than one way. For example, bronchoscopy and laryngoscopy can be done with either a flexible or rigid scope. Local anesthesia (numbing the area) is generally used for flexible scopes, while rigid scopes often require general anesthesia (where you are given drugs to put you into a deep sleep).

People’s experiences may also vary depending on their health and what needs to be done, such as whether biopsy samples are going to be taken.

If you are going to have an endoscopy, your medical team will explain to you what will be done and what to expect before, during, and after the test. They will also tell you what you need to do to prepare for the procedure. The preparation could mean that you must fast (not eat anything) for a certain amount of time, follow a liquid diet for a certain amount of time, and/or use laxatives or enemas.

Table 2 shows some of the key facts of the more common forms of endoscopy.

Table 2. Common endoscopy and their procedures

Type of endoscopySpecial preparation*
(usually starting the night before)
Is it usually done in an operating room?Usual type of anesthesia†How long it takes (estimate)
ArthroscopyFastingYesLocal and sedation30 to 45 minutes
BronchoscopyFastingNoLocal and sedation or general30 min to 2 hours
EnteroscopyFasting, liquid diet and laxative/ enema if using anal entryNoSedation or general45 to 90 minutes
LaryngoscopyFastingNoLocal or general15 min to 1 hour
Upper endoscopyFastingNoLocal and sedation15 to 30 min
Flexible sigmoidoscopyLiquid diet, laxative/enemaNoUsually none15 to 30 min
ColonoscopyLiquid diet, laxative/enemaNoMild sedation30 to 60 min
CystoscopyFastingSometimesLocal or general15 to 30 min
MediastinoscopyFastingYesGeneral1 to 2 hours
ThoracoscopyFastingYesGeneral2 to 3 hours
LaparoscopyFastingYesGeneral20 min to 1 hour

Notes:
* Fasting means not eating for a certain amount of time before the procedure
† Anesthesia is the use of drugs to make you not feel pain during a procedure. There are different kinds of anesthesia:

  • Local means the area the scope is passed through is numbed but you are awake.
  • Sedation means you are awake, but drugs are used to make you sleepy and relaxed.
  • General means drugs are used to put you into a deep sleep.

Nasal endoscopy

A nasal endoscopy is also called rhinoscopy, where a long, thin, flexible tube attached to a light source is inserted into your nose to examine the inside of your nose and sinuses to check for problems.

Why is nasal endoscopy performed

You may have a nasal endoscopy to figure out what is causing problems in your nose and sinuses.

Your ear, nose and throat (ENT) doctor may recommend nasal endoscopy if you are having:

  • A lot of sinus infections
  • Lots of drainage from your nose
  • Face pain or pressure
  • Sinus headaches
  • A hard time breathing through your nose
  • Nose bleeds
  • Loss of sense of smell

During the nasal endoscopy procedure, your ear, nose and throat (ENT) doctor may:

  • Look at the inside of your nose and sinuses
  • Take a sample of tissue for a biopsy
  • Do small surgeries to remove polyps, excess mucus, or other masses

Nasal endoscopy risks

There is very little risk with a nasal endoscopy for most people.

  • If you have a bleeding disorder or take blood-thinning medicine, let your provider know so they are extra careful to decrease bleeding.
  • If you have heart disease, there is a small risk that you could feel lightheaded or faint.

Nasal endoscopy prep

You do NOT need to do anything to prepare for the nasal endoscopy test.

How nasal endoscopy will feel

Nasal endoscopy test does not hurt.

  • You may feel discomfort or pressure as the tube is put into your nose.
  • The spray numbs your nose. It can numb your mouth and throat, and you may feel like you cannot swallow. This numbness goes away in 20 to 30 minutes.
  • You might sneeze during the nasal endoscopy test. If you feel a sneeze coming on, let your provider know.

What is the procedure for a nasal endoscopy – what you can expect

How nasal endoscopy is performed

The test takes about 5 to 10 minutes. Your health care provider will:

  • Spray your nose with a medicine to reduce swelling and numb the area.
  • Insert the nasal endoscope into your nose. This is a long flexible or rigid tube with a camera at the end to look inside the nose and sinuses. Pictures may be projected onto a screen.
  • Examine the inside of your nose and sinuses.
  • Remove polyps, mucus, or other masses from the nose or sinuses.

Nasal endoscopy results

Normal Results

  • The inside of the nose and bones look normal.

What Abnormal Results Mean

Nasal endoscopy helps with the diagnosis of:

  • Polyps
  • Blockages
  • Sinusitis
  • Swollen and runny nose that will not go away
  • Nasal masses or tumors
  • A foreign object (like a marble) in the nose or sinus
  • Deviated septum (many insurance plans require a nasal endoscopy prior to surgery to correct it)

Figure 1. Pharynx and larynx anatomy

anatomy of the pharynx and larynx

Upper endoscopy

An upper endoscopy is a procedure used to visually examine your upper digestive system with a tiny camera on the end of a long, flexible tube. A specialist in diseases of the digestive system (gastroenterologist) uses an endoscopy to diagnose and sometimes, treat conditions that affect the esophagus, stomach and beginning of the small intestine (duodenum).

The medical term for an upper endoscopy is esophago-gastroduodenoscopy or upper GI (gastrointestinal) endoscopy. You may have an upper endoscopy done in your doctor’s office, an outpatient surgery center or a hospital.

Why is upper endoscopy done

An upper endoscopy is used to diagnose and, sometimes, treat conditions that affect the upper part of your digestive system, including the esophagus, stomach and beginning of the small intestine (duodenum).

Upper GI endoscopy can help find the cause of unexplained symptoms, such as:

  • persistent heartburn
  • bleeding
  • nausea and vomiting
  • pain
  • problems swallowing
  • unexplained weight loss

Upper GI endoscopy can be used to identify many different diseases:

  • gastroesophageal reflux disease (GERD)
  • ulcers
  • cancer
  • inflammation, or swelling
  • precancerous abnormalities such as Barrett’s esophagus
  • celiac disease
  • strictures or narrowing of the esophagus
  • blockages

Upper GI endoscopy can check for damage after a person eats or drinks harmful chemicals.

During upper GI endoscopy, a doctor obtains biopsies by passing an instrument through the endoscope to obtain a small piece of tissue for testing. Biopsies are needed to diagnose conditions such as:

  • cancer
  • celiac disease
  • gastritis

Your doctor may recommend an upper GI endoscopy procedure to:

  • Investigate symptoms. An upper endoscopy may help your doctor determine what’s causing digestive signs and symptoms, such as nausea, vomiting, abdominal pain, difficulty swallowing and gastrointestinal bleeding.
  • Diagnose. Your doctor may use an upper endoscopy to collect tissue samples (biopsy) to test for diseases and conditions, such as anemia, bleeding, inflammation, diarrhea or cancers of the digestive system.
  • Treat. Your doctor can pass special tools through the endoscope to treat problems in your digestive system, such as burning a bleeding vessel to stop bleeding, widening a narrow esophagus, clipping off a polyp or removing a foreign object.
    • treat conditions such as bleeding from ulcers, esophageal varices, or other conditions
    • dilate or open up strictures with a small balloon passed through the endoscope
    • remove objects, including food, that may be stuck in the upper GI tract
    • remove polyps or other growths
    • place feeding tubes or drainage tubes

An upper endoscopy is sometimes combined with other procedures, such as an ultrasound. An ultrasound probe may be attached to the endoscope to create specialized images of the wall of your esophagus or stomach. An endoscopic ultrasound (EUS) may also help your doctor create images of hard-to-reach organs, such as your pancreas. Newer endoscopes use high-definition video to provide clearer images.

Many endoscopes allow your doctor to use technology called narrow band imaging, which uses special light to help better detect precancerous conditions, such as Barrett’s esophagus.

Doctors are also starting to use upper GI endoscopy to perform weight loss procedures for some people with obesity.

Figure 2. Esophagus

esophagusFigure 3. Upper endoscopy

Upper endoscopy

Notes: Upper endoscopy involves inserting a long, flexible tube (endoscope) down your throat and into your esophagus. A tiny camera on the end of the endoscope lets your doctor examine your esophagus, stomach and the beginning of your small intestine (duodenum).

Upper endoscopy risks

An upper endoscopy is a very safe procedure. Rare complications include:

  • Bleeding. Your risk of bleeding complications after an endoscopy is increased if the procedure involves removing a piece of tissue for testing (biopsy) or treating a digestive system problem. In rare cases, such bleeding may require a blood transfusion.
  • Infection. Most upper endoscopies consist of an examination and biopsy, and risk of infection is low. The risk of infection increases when additional procedures are performed as part of your endoscopy. Most infections are minor and can be treated with antibiotics. Your doctor may give you preventive antibiotics before your procedure if you are at higher risk of infection.
  • Tearing of the gastrointestinal tract. A tear in your esophagus or another part of your upper digestive tract may require hospitalization, and sometimes surgery to repair it. The risk of this complication is very low — it occurs in an estimated 1 of every 2,500 to 11,000 diagnostic upper endoscopies. The risk increases if additional procedures, such as dilation to widen your esophagus, are performed.

Bleeding caused by the procedure often is minor and stops without treatment. Serious complications such as perforation are uncommon. Your doctor may need to perform surgery to treat some complications. Your doctor can also treat an abnormal reaction to a sedative with medicines or IV fluids during or after the procedure.

You can reduce your risk of complications by carefully following your doctor’s instructions for preparing for an endoscopy, such as fasting and stopping certain medications.

Signs and symptoms that could indicate a complication – Seek Care Right Away!

Signs and symptoms to watch for after your upper endoscopy include:

  • Fever
  • Chest pain
  • Shortness of breath
  • Bloody, black or very dark colored stool
  • Difficulty swallowing
  • Severe or persistent abdominal pain
  • Vomiting, especially if your vomit is bloody or looks like coffee grounds

Call your doctor immediately or go to an emergency room if you experience any of these signs or symptoms.

Upper endoscopy prep

Your doctor will give you specific instructions to prepare for your upper endoscopy. In some cases your doctor may ask that you:

  • Fast before the upper endoscopy. You will need to stop drinking and eating four to eight hours before your upper endoscopy to ensure your stomach is empty for the procedure.
  • Stop taking certain medications. You will need to stop taking certain blood-thinning medications in the days before your upper endoscopy. Blood thinners may increase your risk of bleeding if certain procedures are performed during the upper endoscopy. If you have chronic conditions, such as diabetes, heart disease or high blood pressure, your doctor will give you specific instructions regarding your medications.

Tell your doctor about all the medications and supplements you’re taking before your upper GI endoscopy.

Plan ahead for your recovery

Most people undergoing an upper endoscopy will receive a sedative to relax them and make them more comfortable during the procedure. Plan ahead for your recovery while the sedative wears off. You may feel mentally alert, but your memory, reaction times and judgment may be impaired. Find someone to drive you home. You may also need to take the day off from work. Don’t make any important personal or financial decisions for 24 hours.

What is the procedure for an upper endoscopy – what you can expect

During an upper endoscopy

During an upper endoscopy procedure, you’ll be asked to lie down on a table on your back or on your side. As the procedure gets underway:

  • Monitors often will be attached to your body. This will allow your health care team to monitor your breathing, blood pressure and heart rate.
  • You may receive a sedative medication. This medication, given through a vein in your forearm, helps you relax during the upper endoscopy.
  • Your doctor may spray an anesthetic in your mouth. This medication will numb your throat in preparation for insertion of the long, flexible tube (endoscope). You may be asked to wear a plastic mouth guard to hold your mouth open.
  • Then the endoscope is inserted in your mouth. Your doctor may ask you to swallow as the scope passes down your throat. You may feel some pressure in your throat, but you shouldn’t feel pain.

You can’t talk after the endoscope passes down your throat, though you can make noises. The endoscope doesn’t interfere with your breathing.

As your doctor passes the endoscope down your esophagus:

  • A tiny camera at the tip transmits images to a video monitor in the exam room. Your doctor watches this monitor to look for abnormalities in your upper digestive tract. If abnormalities are found in your digestive tract, your doctor may record images for later examination.
  • Gentle air pressure may be fed into your esophagus to inflate your digestive tract. This allows the endoscope to move freely. And it allows your doctor to more easily examine the folds of your digestive tract. You may feel pressure or fullness from the added air.
  • Your doctor will pass special surgical tools through the endoscope to collect a tissue sample or remove a polyp. Your doctor watches the video monitor to guide the tools.

When your doctor has finished the exam, the endoscope is slowly retracted through your mouth. An upper endoscopy typically takes 15 to 30 minutes, depending on your situation.

After the upper endoscopy

You’ll be taken to a recovery area to sit or lie quietly after your upper endoscopy. You may stay for an hour or so. This allows your health care team to monitor you as the sedative begins to wear off.

Once you’re at home, you may experience some mildly uncomfortable signs and symptoms after upper endoscopy, such as:

  • Bloating and gas for a short time after the procedure
  • Cramping
  • Sore throat for 1 to 2 days

These signs and symptoms will improve with time. If you’re concerned or quite uncomfortable, call your doctor.

Take it easy for the rest of the day after your upper endoscopy. After receiving a sedative, you may feel alert, but your reaction times are affected and judgment is delayed.

A friend or family member who is with you if you’re still groggy—will receive instructions on how to care for yourself when you are home. You should follow all instructions.

You can go back to your normal diet once your swallowing returns to normal.

Upper endoscopy results

When you receive the results of your upper endoscopy will depend on your situation. If, for instance, your doctor performed the upper endoscopy to look for an ulcer, you may learn the findings right after your procedure. If he or she collected a tissue sample (biopsy), you may need to wait a few days to get results from the testing laboratory. Ask your doctor when you can expect the results of your upper GI endoscopy.

Capsule endoscopy

Doctors can see a lot of the digestive tract using upper endoscopy or colonoscopy. But it’s harder for the 20 feet or so of small intestine to be seen this way, although enteroscopy can be used. Cancers in this area of the small intestine are rare, but tumors and other problems such as ulcers can develop here.

One way to look at this area is to use capsule endoscopy. Capsule endoscopy is a procedure that uses a tiny wireless camera that sits inside a vitamin-size capsule (it’s about the size of a large vitamin pill) you swallow to take pictures of your digestive tract.

To do this, a person swallows a capsule that contains a light source and a tiny camera. Like any other pill, the capsule goes through the stomach and into the small intestine. It travels through the small intestine, which usually takes about 8 hours, and takes thousands of pictures. These pictures are transmitted to a recorder worn around the person’s waist, while he or she goes on with normal daily activities. The pictures can then be downloaded onto a computer, where the doctor can look at them as a video. The camera capsule passes out of the body during a normal bowel movement and is flushed away.

Capsule endoscopy helps doctors see inside your small intestine — an area that isn’t easily reached with more-traditional endoscopy procedures. Capsule endoscopy may help find the source of bleeding, pain, or other symptoms that may be coming from the small intestine. But it’s not useful for looking closely at the colon or other parts of the body. Capsule endoscopy costs a lot, so you will need to find out if your insurance company will cover it before having it.

Traditional endoscopy involves passing a long, flexible tube equipped with a video camera down your throat or through your rectum.

Capsule endoscopy has also been approved for the screening of the colon for colon polyps for those for whom a colonoscopy couldn’t be completed. But how and on whom it will be used is still being determined because better alternatives are available. As technology improves, capsule endoscopy of the colon may be used more in the future.

Capsule endoscopy has also been approved to evaluate the muscular tube that connects your mouth and your stomach (esophagus) to look for abnormal, enlarged veins (varices). It’s rarely used because experience with it is limited and traditional upper endoscopy is widely available.

Figure 4. Capsule endoscopy

Capsule endoscopyhow capsule endoscopy works

Notes: During a capsule endoscopy procedure, you swallow a tiny camera that’s about the size of a large vitamin pill. The capsule contains lights to illuminate your digestive system, a camera to take images and an antenna that sends those images to a recorder you wear on a belt.

Why is capsule endoscopy done

Your doctor might recommend a capsule endoscopy procedure to:

  • Find the cause of gastrointestinal bleeding. If you have unexplained bleeding in your digestive tract, capsule endoscopy can help find the cause.
  • Diagnose inflammatory bowel diseases, such as Crohn’s disease and ulcerative colitis. Capsule endoscopy can reveal areas of inflammation in the small intestine.
  • Diagnose cancer. Capsule endoscopy can show tumors in the small intestine or other parts of the digestive tract.
  • Diagnose Celiac disease. Capsule endoscopy is sometimes used in diagnosing and monitoring this immune reaction to eating gluten.
  • Screen for polyps. People who have inherited syndromes that can cause polyps in the small intestine might occasionally undergo capsule endoscopy.
  • Do follow-up testing after X-rays or other imaging tests. If results of an imaging test are unclear or inconclusive, your doctor might recommend a capsule endoscopy to get more information.

Figure 5. Small intestine

small intestine

Capsule endoscopy risks

Capsule endoscopy is a safe procedure that carries few risks. However, it’s possible for a capsule to become lodged in the digestive tract rather than leaving your body in a bowel movement within several days.

The risk, which is small, might be higher in people who have a condition — such as a tumor, Crohn’s disease or previous surgery in the area — that causes a narrowing (stricture) in the digestive tract. If you have abdominal pain or are at risk of a narrowing of your intestine, your doctor likely will get a CT scan to look for a narrowing before using capsule endoscopy. Even if the imaging study is negative, there’s still a small chance that the capsule could get stuck.

If the capsule hasn’t passed in a bowel movement but isn’t causing signs and symptoms, your doctor might give the capsule more time to leave your body. However, a capsule causing signs and symptoms that indicate bowel obstruction must be removed, either by surgery or through a traditional endoscopy procedure, depending on where the capsule is stuck.

Capsule endoscopy prep

To prepare for your capsule endoscopy, your doctor is likely to ask that you:

  • Stop eating and drinking at least 12 hours before the procedure. This will ensure that the camera captures clear images of your digestive tract.
  • Stop or delay taking certain medications. To keep medication from interfering with the camera, your doctor might ask you not to take certain medications before the procedure. In other cases, your doctor will want you to take your medication two hours before or after you swallow the camera capsule that contains the camera.
  • Plan to take it easy for the day. In most cases, you’ll be able to go about your day after you swallow the camera capsule. But you’ll likely be asked not to do strenuous exercise or heavy lifting. If you have an active job, ask your doctor whether you can go back to work the day of your capsule endoscopy.

In some cases, your doctor may ask you to take a laxative before your capsule endoscopy to flush out your small intestine. This has been shown to improve the quality of the pictures collected by the capsule’s camera.

Follow your doctor’s instructions in preparing for your capsule endoscopy. Failure to follow the directions may mean your capsule endoscopy may need to be rescheduled.

What is the procedure for an capsule endoscopy – what you can expect

During capsule endoscopy

On the day of your capsule endoscopy, your health care team will review the procedure. You might be asked to remove your shirt so that adhesive patches can be attached to your abdomen. Each patch contains an antenna with wires that connect to a recorder. Some devices don’t require the patches.

You wear the recorder on a special belt around your waist. The camera sends images to an antenna on your abdomen, which feeds the data to the recorder. The recorder collects and stores the images.

Once the recorder is connected and ready, you swallow the camera capsule with water. A slippery coating makes it easier to swallow. Once you swallow it, you shouldn’t be able to feel it.

You’ll then go about your day. You can drive, and you might be able to go to work, depending on your job. Your doctor will discuss restrictions, such as avoiding strenuous activity, such as running and jumping.

After the capsule endoscopy

Wait two hours after you swallow the capsule to resume drinking clear liquids. After four hours, you can have a light lunch or a snack unless your doctor tells you otherwise.

The capsule endoscopy procedure is complete after eight hours or when you see the camera capsule in the toilet after a bowel movement, whichever comes first. Remove the patches and the recorder from your body, pack them in a bag and follow your doctor’s instructions for returning the equipment. You can flush the camera capsule down the toilet.

Your body might expel the camera capsule within hours or after several days. Each person’s digestive system is different. If you don’t see the capsule in the toilet within two weeks, contact your doctor. Your doctor might order an X-ray to see if the capsule is still in your body.

Capsule endoscopy results

The camera used in capsule endoscopy takes thousands of color photos as it passes through your digestive tract. The images saved on the recorder are transferred to a computer with special software that strings the images together to create a video. Your doctor watches the video to look for abnormalities within your digestive tract.

It might take a few days to a week or longer to receive the results of your capsule endoscopy. Your doctor will then share the results with you.

Colonoscopy

Colonoscopy is a procedure that lets your doctor look inside your entire large intestine (colon) to detect changes or abnormalities in the large intestine and rectum. Doctors (gastroenterologists) use an instrument called colonoscope that have a tiny video camera and light source attached to a long, thin flexible tube, so that the large intestine (colon) can be viewed in detail. During a colonoscopy, a long, flexible tube (colonoscope) is inserted into your rectum/anus. The colonoscope is flexible and can be turned around corners so it can travel along the length of the large bowel. The colonoscopy procedures let your doctor see things such as inflamed tissue, abnormal growths (e.g. polyps, cancers) and ulcers. And if necessary, polyps or other types of abnormal tissue can be removed through the colonoscope during a colonoscopy. Tissue samples (biopsies) can be taken during a colonoscopy as well.

How long does a colonoscopy take?

A colonoscopy typically takes about 30 to 60 minutes.

Why is colonoscopy done

Your doctor may recommend a colonoscopy:

  • To look for early signs of cancer in the colon and rectum. It may be part of a routine colon cancer screening, which usually starts at age 50. If you’re age 50 or older and at average risk of colon cancer — you have no colon cancer risk factors other than age — your doctor may recommend a colonoscopy every 10 years or sometimes sooner to screen for colon cancer. Colonoscopy is one option for colon cancer screening. Talk with your doctor about your options.
  • To look for causes of unexplained changes in bowel habits
  • To evaluate symptoms like abdominal pain, rectal bleeding, and weight loss
  • Investigate intestinal signs and symptoms. A colonoscopy can help your doctor explore possible causes of abdominal pain, rectal bleeding, chronic constipation, chronic diarrhea and other intestinal problems.
  • Look for more colon polyps. If you have had colon polyps before, your doctor may recommend a follow-up colonoscopy to look for and remove any additional polyps. This is done to reduce your risk of colon cancer.

You will get written bowel prep instructions to follow at home before the colonoscopy procedure. The bowel prep cleans out your intestine so your doctor can see everything clearly. During a colonoscopy, you get medicines to keep you relaxed.

Afterwards, you may feel drowsy, and it is best to arrange somebody to help you get home.

Your doctor may give you a brief report on what they saw, but you probably won’t get full results and further advice until later at a follow up appointment.

Colonoscopy risks and side effects

A colonoscopy poses few risks. Rarely, complications of a colonoscopy may include:

  • Adverse reaction to the sedative used during the colonoscopy, including breathing or heart problems
  • Bleeding from the site where a tissue sample (biopsy) was taken or a polyp or other abnormal tissue was removed
  • A tear in the colon or rectum wall (perforation)
  • Severe pain in your abdomen
  • Death, although this risk is rare

A study of screening colonoscopies found roughly 4 to 8 serious complications for every 10,000 procedures 1.

Bleeding and perforation are the most common complications from colonoscopy. Most cases of bleeding occur in patients who have polyps removed. The doctor can treat bleeding that happens during the colonoscopy right away.

You may have delayed bleeding up to 2 weeks after the procedure. The doctor can diagnose and treat delayed bleeding with a repeat colonoscopy. The doctor may need to treat perforation with surgery.

After discussing the risks of colonoscopy with you, your doctor will ask you to sign a consent form authorizing the procedure.

Seek Care Right Away

If you have any of the following symptoms after a colonoscopy, seek medical care right away:

  • severe pain in your abdomen
  • fever
  • bloody bowel movements that do not get better
  • bleeding from the anus that does not stop
  • dizziness
  • weakness

Colonoscopy prep

If you are having a colonoscopy, there are a number of steps that need to be followed to get the best result.

Before a colonoscopy, you’ll need to clean out (empty) your colon. Any fecal residue in your colon may obscure the view of your colon and rectum during the colonoscopy procedure.

The preparations vary between clinics but the aim is to clear the colon of feces so the doctor can get the best view on examination.

Arrange for a ride home

For safety reasons, you can’t drive for 24 hours after the procedure, as the sedatives or anesthesia need time to wear off. You will need to make plans for getting a ride home after the procedure.

Colonoscopy prep instructions

You should talk with your doctor about any health problems you have and all prescribed and over-the-counter medicines, vitamins, and supplements you take, including:

  • arthritis medicines
  • aspirin or medicines that contain aspirin
  • blood thinners
  • diabetes medicines
  • nonsteroidal anti-inflammatory drugs (NSAIDs) such as ibuprofen or naproxen
  • vitamins that contain iron or iron supplements

Colonoscopy Diet

Your doctor will give you written bowel prep instructions to follow at home before the procedure so that little or no stool remains in your intestine. A complete bowel prep lets you pass stool that is clear and liquid. Stool inside your intestine can prevent your doctor from clearly seeing the lining.

Follow a special diet the day before the exam. Typically, you won’t be able to eat solid food the day before the exam. Drinks may be limited to clear liquids — plain water, tea and coffee without milk or cream, broth, and carbonated beverages. Avoid red liquids, which can be confused with blood during the colonoscopy. You may not be able to eat or drink anything after midnight the night before the exam.

You may need to follow a clear liquid diet for 1 to 3 days before the procedure. You should avoid red and purple-colored drinks or gelatin. The instructions will include details about when to start and stop the clear liquid diet. In most cases, you may drink or eat the following:

  • fat-free bouillon or broth
  • gelatin in flavors such as lemon, lime, or orange
  • plain coffee or tea, without cream or milk
  • sports drinks in flavors such as lemon, lime, or orange
  • strained fruit juice, such as apple or white grape—avoid orange juice
  • water

To empty your colon

Different bowel preps may contain different combinations of laxatives—pills that you swallow or powders that you dissolve in water or clear liquids. Some people will need to drink a large amount, often a gallon, of liquid laxative over a scheduled amount of time—most often the night before and the morning of the procedure. Your doctor may also prescribe an enema.

The bowel prep will cause diarrhea, so you should stay close to a bathroom. You may find this part of the bowel prep hard; however, finishing the prep is very important. Call a health care professional if you have side effects that keep you from finishing the prep.

Your doctor will tell you how long before the procedure you should have nothing by mouth.

  • The day before the colonoscopy, you may be asked to drink a bowel preparation, a laxative. This is a flavored powder that is mixed with water. It causes diarrhea to empty the colon. Your doctor will usually recommend you take a laxative, in either pill form or liquid form. You may be instructed to take the laxative the night before your colonoscopy, or you may be asked to use the laxative both the night before and the morning of the procedure. It’s best to do the bowel preparation at home. The area around your anus may become irritated from diarrhea. Showering, and using moist wipes instead of toilet paper, may ease this discomfort. It is important to drink only clear fluids on the day before, and not eat solid foods or dairy products like milk. You will be allowed to have fluids like water, clear fruit juice, clear carbonated drinks and clear soup. You will probably be told to have no fluids in the 6 hours before the colonoscopy.
  • Use an enema kit. In some cases, you may need to use an over-the-counter enema kit — either the night before the exam or a few hours before the exam — to empty your colon. This is generally only effective in emptying the lower colon and is usually not recommended as a primary way of emptying your colon.
  • If you take regular medication, talk to your doctor. Some medications should be taken and some can be delayed. It is particularly important to talk to your doctor if you take blood-thinning medications.
  • Adjust your medications. Remind your doctor of your medications at least a week before the exam — especially if you have diabetes, high blood pressure or heart problems or if you take medications or supplements that contain iron.
  • Also tell your doctor if you take aspirin or other medications that thin the blood, such as warfarin (Coumadin, Jantoven); newer anticoagulants, such as dabigatran (Pradaxa) or rivaroxaban (Xarelto), used to reduce risk of blot clots or stroke; or heart medications that affect platelets, such as clopidogrel (Plavix). You may need to adjust your dosages or stop taking the medications temporarily.

Split Dose Regimen for colonoscopy preparation

“Splitting” implies that roughly half of the bowel cleansing dose is given on the day of the colonoscopy. Overwhelmingly consistent data show superior efficacy with a split dose compared with the traditional regimen of administering the preparation the day before the procedure 2. Split dosing leads to higher adenoma detection rates 3. Four guidelines have endorsed split dosing of preparations for colonoscopy 4, 5, 6, 7.

To make bowel preparation more tolerable, many doctors recommend splitting the dose of bowel preparation. This regimen may not be possible if your colonoscopy is scheduled for early in the morning, because you should consume the morning dose four to six hours prior to the procedure.

If your procedure is scheduled at a time that allows you to split the dose, take the recommended amount of the bowel cleansing liquid the night before the exam, and the remainder in the morning before the test. Depending on the type of preparation, your doctor may recommend splitting the dose 1-to-1 or 3-to-1.

The biggest reason for poor colonoscopy preparation is people’s distaste for having to drink large quantities of bowel cleaning solution. The most common colonoscopy preparation calls for drinking 1 gallon (4 liters) of a polyethylene glycol solution. Some studies have shown that more than a third of people don’t complete the full preparation.

Studies have shown that the split-dose approach not only is more tolerable, but also does a better job of cleaning the colon. Better cleaning will lead to better results. One study found that doctors detected more benign tumors (adenomas) in people who prepared with split doses than in people who prepared with single doses.

Cleaning as much waste material as possible from your large intestine (colon) is crucial to a successful colonoscopy exam. Poor colonoscopy preparation can keep your doctor from finding polyps, tumors and other problems. It also increases the length of the exam and the risk of complications. In many cases, the exam has to be redone.

Ask your doctor about split-dose preparation for your next colonoscopy.

During the colonoscopy procedure

A doctor performs a colonoscopy in a hospital or an outpatient center. The colonoscopy procedure is painless and lasts about 30 to 60 minutes. Most people have a mild anesthetic/sedation and can remember nothing or very little. A health care professional will place an intravenous (IV) needle in a vein in your arm or hand to give you sedatives, anesthesia, or pain medicine, so you won’t be aware or feel pain during the procedure. The health care staff will check your vital signs and keep you as comfortable as possible.

During a colonoscopy, you’ll wear a gown, but likely nothing else. Sedation is usually recommended. Sometimes a mild sedative is given in pill form. In other cases, the sedative is combined with an intravenous pain medication to minimize any discomfort.

For the procedure, you’ll lie on your side on the exam table, usually with your knees drawn toward your chest while the doctor inserts a colonoscope through your anus and into your rectum and colon. The scope inflates your large intestine with air for a better view.

The colonoscope — which is long enough to reach the entire length of your colon — contains a light and a tube (channel) that allows the doctor to pump air or carbon dioxide into your colon. The air or carbon dioxide inflates the colon, which provides a better view of the lining of the colon.

When the colonoscope is moved or air is introduced, you may feel abdominal cramping or the urge to have a bowel movement.

The colonoscope also contains a tiny video camera at its tip. The camera sends images to an external monitor so that the doctor can study the inside of your colon.

The doctor can also insert instruments through the channel to take tissue samples (biopsies) or remove polyps or other areas of abnormal tissue.

The doctor may move you several times on the table to adjust the scope for better viewing. Once the colonoscope reaches the opening to your small intestine, the doctor slowly removes the colonoscope and examines the lining of your large intestine again.

During the procedure, the doctor may remove polyps and will send them to a lab for testing. You will not feel the polyp removal. Colon polyps are common in adults and are harmless in most cases. However, most colon cancer begins as a polyp, so removing polyps early helps to prevent cancer.

If your doctor finds abnormal tissue, he or she may perform a biopsy. You won’t feel the biopsy.

Colonoscopy recovery

After the colonoscopy procedure, it takes about an hour for you to begin to recover from the sedative. You’ll need someone to take you home because it can take up to a day for the full effects of the sedative to wear off. Don’t drive or make important decisions or go back to work for the rest of the day.

If your doctor removed a polyp during your colonoscopy, you may be advised to eat a special diet temporarily.

You may feel bloated or pass gas for a few hours after the exam, as you clear the air from your colon. Walking may help relieve any discomfort.

You may also notice a small amount of blood with your first bowel movement after the exam. Usually this isn’t cause for alarm. Consult your doctor if you continue to pass blood or blood clots or if you have persistent abdominal pain or a fever. While unlikely, this may occur immediately or in the first few days after the procedure, but may be delayed for up to one to two weeks.

Figure 6. Large intestine

large intestine

Figure 7. Colonoscopy

colonoscopy

What should I expect after a colonoscopy?

After a colonoscopy, you can expect the following:

  • The anesthesia takes time to wear off completely. You’ll stay at the hospital or outpatient center for 1 to 2 hours after the procedure.
  • You may feel cramping in your abdomen or bloating during the first hour after the procedure.
  • After the procedure, you—or a friend or family member—will receive instructions on how to care for yourself after the procedure. You should follow all instructions.
  • You’ll need your pre-arranged ride home, since you won’t be able to drive after the procedure.
  • You should expect a full recovery and return to your normal diet by the next day.

After the sedatives or anesthesia wear off, your doctor may share what was found during the procedure with you or, if you choose, with a friend or family member.

If the doctor removed polyps or performed a biopsy, you may have light bleeding from your anus. This bleeding is normal. A pathologist will examine the biopsy tissue, and results take a few days or longer to come back. A health care professional will call you or schedule an appointment to go over the results.

Colonoscopy Results

Your doctor will review the results of the colonoscopy and then share the results with you.

Negative result

A colonoscopy is considered negative if the doctor doesn’t find any abnormalities in the colon.

Your doctor may recommend that you have another colonoscopy:

  • In 10 years, if you’re at average risk of colon cancer — you have no colon cancer risk factors other than age
  • In five years, if you have a history of polyps in previous colonoscopy procedures
  • In one year, if there was residual stool in the colon that prevented complete examination of your colon

Positive result

A colonoscopy is considered positive if the doctor finds any polyps or abnormal tissue in the colon.

Most polyps aren’t cancerous, but some can be precancerous. Polyps removed during colonoscopy are sent to a laboratory for analysis to determine whether they are cancerous, precancerous or noncancerous.

Depending on the size and number of polyps, you may need to follow a more rigorous surveillance schedule in the future to look for more polyps.

If your doctor finds one or two polyps less than 0.4 inch (1 centimeter) in diameter, he or she may recommend a repeat colonoscopy in five to 10 years, depending on your other risk factors for colon cancer.

Your doctor will recommend another colonoscopy sooner if you have:

  • More than two polyps
  • A large polyp — larger than 0.4 inch (1 centimeter)
  • Polyps and also residual stool in the colon that prevents complete examination of the colon
  • Polyps with certain cell characteristics that indicate a higher risk of future cancer
  • Cancerous polyps

If you have a polyp or other abnormal tissue that couldn’t be removed during the colonoscopy, your doctor may recommend a repeat exam with a gastroenterologist who has special expertise in removing large polyps, or surgery.

Problems with your exam

If your doctor is concerned about the quality of the view through the scope, he or she may recommend a repeat colonoscopy or a shorter time until your next colonoscopy. If your doctor wasn’t able to advance the scope through your entire colon, a barium enema or virtual colonoscopy may be recommended to examine the rest of your colon.

Virtual endoscopy

Virtual endoscopy is really an imaging test, not an endoscopy procedure per se. Virtual endoscopy uses a special CT scan to look at the inside surfaces of organs such as the lungs (virtual bronchoscopy) or colon (virtual colonoscopy or CT colonography).

Patients have this procedure just as they would any other CT scan — they lie still on a table while a large ring (the CT scanner) passes over the part of the body being imaged.

Unlike the usual CT scans, which make pictures in 2 dimensions, virtual endoscopy uses a computer to combine many images to create a 3-dimensional (3-D) picture. Doctors can even use the images to create a black and white “fly-through” view on the screen, which looks a lot like it would if they were doing an actual endoscopy.

Virtual endoscopy has some advantages over standard endoscopy — nothing is put into your body and no drugs are needed for the test. The doctor can change the angle or magnify the image, which can help with diagnosis.

But there are some disadvantages, too. Virtual endoscopy does show good detail, but it’s not quite as good at showing fine surface detail as standard endoscopy. For example, it can’t show color differences. Virtual endoscopy also exposes the patient to about the same amount of radiation as a standard CT. And because nothing is put into the body, the doctor can’t take biopsy samples or remove growths. This means that if something abnormal is found, the patient may still need a standard endoscopy. To get good pictures on a virtual colonoscopy, the patient must still take medicines (laxatives and/or enemas) to clean out the colon.

Virtual endoscopy is a fairly new procedure, and doctors aren’t yet sure how best to use it. It will likely be used more in the future as the technology improves.

References
  1. Lin JS, Piper MA, Perdue LA, et al. Screening for colorectal cancer: updated evidence report and systematic review for the US Preventive Services Task Force. JAMA. 2016;315(23):2576–2594.
  2. Menard C, Barkun A, Martel M et al. A meta-analysis of colon cleansing with PEG compared to other bowel preparations. Gastrointest Endosc (2014). In press.
  3. Jover R, Zapater P, Polania E et al. Modifiable endoscopic factors that influence the adenoma detection rate in colorectal cancer screening colonoscopies. Gastrointest Endosc 2013;77:381–389.
  4. Wexner SD, Beck DE, Baron TH et al. A consensus document on bowel preparation before colonoscopy: prepared by a task force from the American Society of Colon and Rectal Surgeons (ASCRS), the American Society for Gastrointestinal Endoscopy (ASGE), and the Society of American Gastrointestinal and Endoscopic Surgeons (SAGES). Gastrointest Endosc 2006;63:894–909.
  5. Lieberman DA, Rex DK, Winawer SJ et al. Guidelines for colonoscopy surveillance after screening and polypectomy: a consensus update by the US Multi-Society Task Force on Colorectal Cancer. Gastroenterology 2012;143:844–857.
  6. Rex DK, Johnson DA, Anderson JC et al. American College of Gastroenterology guidelines for colorectal cancer screening 2008. Am J Gastroenterol 2009;104:739–750.
  7. Hassan C, Bretthauer M, Kaminski MF et al. Bowel preparation for colonoscopy: European Society of Gastrointestinal Endoscopy (ESGE) guideline. Endoscopy 2013;45:142–150.
read more
Procedures

Pregnancy test

pregnancy-test

What is pregnancy test

Pregnancy is the period of time when a fetus develops inside a woman’s uterus and ends with the birth of the infant. Human chorionic gonadotropin (hCG) is a hormone produced by the placenta (when a fertilized egg implants in the uterus) of a pregnant woman. This usually happens about 10 days after conception (when the man’s sperm fertilizes the woman’s egg). The amount of human chorionic gonadotropin (hCG) builds up quickly in your body with each passing day you are pregnant. Early in pregnancy, the level of human chorionic gonadotropin (hCG) increases in the blood and is eliminated in the urine. A pregnancy test detects human chorionic gonadotropin (hCG) in the blood or urine and confirms or rules out pregnancy.

  • All pregnancy tests work by detecting the pregnancy hormone, human chorionic gonadotropin (hCG), in the urine or blood. Human chorionic gonadotropin (hCG) hormone is present only when a woman is pregnant. If the pregnancy test detects human chorionic gonadotropin (hCG), it will say you are pregnant.

During the early weeks of pregnancy, human chorionic gonadotropin (hCG) is important in maintaining function of the corpus luteum. Production of human chorionic gonadotropin (hCG) increases steadily during the first trimester (8-10 weeks) of a normal pregnancy, peaking around the 10th week after the last menstrual cycle. Levels then fall slowly during the remainder of the pregnancy. Human chorionic gonadotropin (hCG) is no longer detectable within a few weeks after delivery.

Typically, human chorionic gonadotropin (hCG) levels double about every two days for the first four weeks of a normal pregnancy, then slow to every 31/2 days by six weeks.

When a pregnancy occurs outside of the uterus (ectopic pregnancy), the level of human chorionic gonadotropin (hCG) in the blood increases at a slower rate. When an ectopic pregnancy is suspected, measuring the level of human chorionic gonadotropin (hCG) in the blood (quantitative test) over time may be useful in helping to make a diagnosis of ectopic pregnancy.

Similarly, the human chorionic gonadotropin (hCG) blood level may be abnormal when the developing baby (fetus) has a chromosome defect such as Down syndrome. An human chorionic gonadotropin (hCG) test is used routinely in conjunction with a few other tests as part of screening for fetal abnormalities.

Quantitative human chorionic gonadotropin (hCG) testing, often called beta human chorionic gonadotropin (β-hCG), measures the amount of human chorionic gonadotropin (hCG) present in the blood. It may be used to confirm a pregnancy. Quantitative human chorionic gonadotropin (hCG) testing may also be used, along with a progesterone test, to help diagnose an ectopic pregnancy, to help diagnose and monitor a pregnancy that may be failing, and/or to monitor a woman after a miscarriage.

Blood measurements of human chorionic gonadotropin (hCG) may also be used, along with a few other tests, as part of screening for fetal abnormalities.

Occasionally, a human chorionic gonadotropin (hCG) test is used to screen for pregnancy if a woman is to undergo a medical treatment, be placed on certain drugs, or have other testing, such as x-rays, that might harm the developing baby. This is usually done to help confirm that the woman is not pregnant. It has become standard practice at most institutions to screen all female patients for pregnancy using a urine or blood human chorionic gonadotropin (hCG) test before a medical intervention, such as an operation, that could potentially harm a fetus.

How is the pregnancy test performed?

A pregnancy test check for the human chorionic gonadotropin (hCG) hormone in two ways – using blood or urine:

  1. Urine pregnancy test. This type of pregnancy test can be done at home or at a doctor’s office.
  2. Blood pregnancy test. This type of pregnancy test can only be done at a doctor’s office. It takes longer than a urine pregnancy test to get results, but it can detect a pregnancy earlier than a urine test (about 10 days after conception, compared to typically 2 weeks or more for a urine pregnancy test). Your doctor may use one or both types of blood tests:
    • A quantitative human chorionic gonadotropin (hCG) blood test (also called a beta hCG test) that measures the exact amount of hCG in your blood. It can find even tiny amounts of hCG. It can also tell you and your doctor how many weeks you are pregnant.
    • A qualitative human chorionic gonadotropin (hCG) blood test checks to see whether the pregnancy hormone is present or not. The qualitative human chorionic gonadotropin (hCG) blood test is about as accurate as a urine pregnancy test.

The blood pregnancy test is done by drawing a single tube of blood and sending it to a laboratory. You may wait anywhere from a few hours to more than a day to get the results. For the blood test, the health care provider uses a needle and syringe to draw blood from your vein into a tube. Any discomfort you might feel from the blood draw will only last a few seconds.

All home pregnancy tests come with written instructions. Depending on the brand you buy, the instructions may vary:

  • You hold a stick in your urine stream.
  • You pee into a cup and dip the stick into it.
  • You pee into a cup and then use a dropper to put a few drops of the urine into a special container.

Different brands tell you to wait different amounts of time, although most are around 2 minutes. Depending on the brand of the test, you may see a line or a plus symbol, or the words “pregnant” or “not pregnant.” A line or plus symbol, no matter how faint, means the result is positive.

Most tests also have a “control indicator” in the result window. This control line or symbol shows whether the test is working properly. If the control line or symbol does not appear, the test is not working properly.

Look for the toll-free phone number on the package to call in case of questions about use or results.

When is hCG pregnancy test ordered?

For confirming pregnancy, the timing of testing depends on how accurate a woman is about the day she expects her menstrual period as well as the method used for testing. In general, blood human chorionic gonadotropin (hCG) tests are more sensitive than urine human chorionic gonadotropin (hCG) tests and can be done two days before a woman would expect her period to start. A urine or blood human chorionic gonadotropin (hCG) test can be done reliably by 10 days after a missed menstrual period. Even using a urine test, a woman may be able to determine whether she is pregnant the day she misses her period, but the result could be falsely negative. A false negative  pregnancy test means the test result inappropriately indicating negative result when, in fact, you’re pregnant. Testing may be repeated at a later date if the first test is negative but pregnancy is still suspected.

Quantitative blood human chorionic gonadotropin (hCG) tests may be ordered over several days when a health practitioner wants to identify or rule out an ectopic pregnancy or to monitor a woman after a miscarriage. In these cases, a woman may experience the normal signs and symptoms of pregnancy at first but then may develop others that indicate that the pregnancy is not progressing as expected.

Some signs and symptoms of ectopic pregnancy include:

  • Abnormal vaginal bleeding—because a woman is pregnant, she may not have a regular period but then may have light bleeding or spotting with an ectopic pregnancy
  • Low back pain
  • Pain or cramping in the lower abdomen or on one side of the pelvis

If ectopic pregnancy is untreated, signs and symptoms may get worse and may include:

  • Dizziness, weakness
  • Feeling faint or fainting
  • Low blood pressure
  • Pain in the shoulder area
  • Sudden, sharp pain in the pelvic area
  • Fever, flu-like symptoms
  • Vomiting

The area around an ectopic pregnancy may rupture and start to bleed, and, if undiagnosed, can lead to cardiac arrest and death.

An human chorionic gonadotropin (hCG) test may be ordered prior to a medical procedure or treatment that might be harmful during pregnancy.

How do you know when you’re pregnant?

You may be pregnant if:

  • You miss your period.
  • Your breasts are big and sore. The area around your nipples gets darker.
  • You have to urinate (pee) a lot.
  • You feel sick to your stomach or throw up.
  • You feel tired all the time.
  • You feel moody.
  • You feel bloated. This means your body feels full or like it’s swollen.

If you have any of these signs and symptoms and you think you may be pregnant, take a home pregnancy test and call your health care provider. Your provider can give you a blood test and a physical exam to confirm that you’re pregnant. Home pregnancy tests can give you a false-positive result — this means the test says you’re pregnant but you’re really not. This is why it’s a good idea to see your provider to make sure you really are pregnant.

How does pregnancy happen?

Each month your ovaries release an egg about 14 days before the first day of your period. This is called ovulation. When you and your partner have unprotected sex around the time of ovulation, his sperm swim to meet your egg. Unprotected sex means you don’t use any kind of birth control to help prevent pregnancy.

When the egg and sperm meet, it’s called fertilization. The fertilized egg (also called an embryo) moves through your fallopian tubes and attaches to the wall of your uterus where it grows and develops into a baby. When the embryo attaches to the uterus, it’s called implantation.

You can get pregnant if you have unprotected sex any time from 5 days before and the day of ovulation. The more often you have sex during this time, the more likely you are to get pregnant. Your egg is fertile (can become an embryo) for 12 to 24 hours after ovulation. Your partner’s sperm can live inside you for up to 72 hours after you have sex.

How long does it usually take to get pregnant?

It’s impossible to say how long it takes to get pregnant because it’s different for each woman.

Many factors can affect a couple’s chances of conceiving, such as:

  • your age
  • your general health
  • your reproductive health
  • how often you have sex

Some women become pregnant quickly, while others take longer. This may be upsetting, but it’s normal.

Fertility

Most couples (about 84 out of every 100) will get pregnant within a year if they have regular sex and don’t use contraception. However, women become less fertile as they get older. One study found that among couples having regular unprotected sex:

  • aged 19-26 – 92% will conceive after one year and 98% after two years
  • aged 35-39 – 82% will conceive after one year and 90% after two years

The effect of age on men’s fertility is less clear.

What does ‘have regular sex’ mean?

Having regular sex means having sex every two to three days throughout the month.

Some couples may try to time having sex with when the woman ovulates (releases an egg). However, guidance from the National Institute for Health and Care Excellence advises that this can be stressful and is not recommended.

Fertility problems

Fertility problems affect ten to 15 percent of couples in the United States.

Lots of factors can cause fertility problems, including:

  • hormonal (endocrine) disorders, such as polycystic ovary syndrome (PCOS) and problems with the thyroid or pituitary glands
  • physical disorders such as obesity, anorexia nervosa or excessive exercise
  • disorders of the reproductive system, such as infections, blocked fallopian tubes, endometriosis or a low sperm count

Some of these factors affect either women or men. In around 40% of infertile couples, there is a problem with both the man and woman.

The most common cause is ovulation failure (which can be caused by lots of different things) and sperm disorders. In 25% of couples, fertility problems cannot be explained.

pregnancy test

How soon can you take a pregnancy test?

All pregnancy tests detect the hormone human chorionic gonadotrophin (hCG), which starts to be produced around six days after fertilization. When you suspect that you are pregnant, pregnancy tests are can be done reliably from the first day up to 10 days of your missed menstrual period, although some tests can detect human chorionic gonadotropin (hCG) as early as four or five days before your menstrual period is due. A urine sample collected first thing in the morning or a blood sample drawn from a vein in your arm is usually done to detect early pregnancy.

Check the packaging of your home pregnancy test kit to find out when it can be used.

If you have regular periods, you’ll probably know when your next period is due. If you’re not sure, it’s a good idea to wait at least three weeks after you think you may have conceived before doing a pregnancy test.

Pregnancy Test Preparation Needed

No test preparation is needed. However, do not drink large amounts of fluid before collecting a morning urine sample for a pregnancy test because overly diluted urine may result in a false negative; however, no preparation is needed if you’re having a pregnancy test through a blood sample drawn from a vein in your arm. A false negative pregnancy test means the test result inappropriately indicating negative pregnancy result when, in fact, you’re pregnant.

When can I take a pregnancy test?

You can carry out most pregnancy tests from the first day of a missed menstrual period. If you don’t know when your next menstrual period is due, do the test at least 21 days after you last had unprotected sex.

Some very sensitive pregnancy tests can be used even before you miss a period, from as early as eight days after conception.

You can do a pregnancy test on a sample of urine collected at any time of the day. It doesn’t have to be in the morning. However, you can improve your chances for an accurate result by using your first morning urine for the pregnancy test, because it will have more human chorionic gonadotropin (hCG) in it than in urines collected later in the day. Make sure you carefully follow the home pregnancy test kit directions. If the home pregnancy test is negative, it is often repeated several days later. Since human chorionic gonadotropin (hCG) rises rapidly, an initial negative test can turn positive within this time period. Some home pregnancy test kits come with more than one test in them to allow you to repeat the test.

I have irregular periods and don’t know when my next period will start. When should I take a pregnancy test?

Most pregnancy tests claim to be the most accurate after a missed period. But irregular periods can make it hard to predict when to take the test.

Menstrual periods are considered irregular if:

  • The number of days between periods is either shorter than 21 days or longer than 35 days
  • The number of days in the menstrual cycle varies from month to month. For example, your cycle may be 22 days one month and 33 days the next month.

If you have irregular periods, try counting 36 days from the start of your last menstrual cycle or four weeks from the time you had sex. At this point, if you are pregnant, your levels of human chorionic gonadotropin (hCG) should be high enough to detect the pregnancy.

If your test says you are not pregnant, but you still think you may be pregnant, wait a few more days and take another pregnancy test. Or, see your doctor for a blood test.

Home pregnancy test

A home pregnancy test kit detects the presence of human chorionic gonadotropin (hCG) and is routinely used to screen for a pregnancy. This test may be performed by a laboratory, at a doctor’s office, or at home. Methods will vary slightly but for most, a test strip is dipped into a collected cup of urine or exposed to a woman’s urine stream. A colored line (or other color change) appears within the time allotted per instructions, usually about 5 minutes. For accurate test results, it is important to carefully follow the test directions. If the home pregnancy test is negative, it is often repeated several days later. Since human chorionic gonadotropin (hCG) rises rapidly, an initial negative test can turn positive within this time period.

About home pregnancy testing

Errors can arise with any type of home test because of a number of possible mistakes people make in performing the test. These range from using an expired home pregnancy test kit to improper storage to errors in how you perform the home pregnancy test. Mistakes in the testing procedure often involve how you collect the urine sample, the time of day you collect it, or how precisely you time the test (not waiting long enough or waiting too long before reading the result). Even the impact of medications you may be taking may interfere with the home pregnancy test results and may be a source of error to be considered.

Many times, results from pregnancy tests may be invalid. Studies have found that one in four women misread traditional, line-based home pregnancy tests, where the user evaluates the appearance of a colored line to determine whether the test is positive or negative.

With the possibility of these various errors, your healthcare practitioner will most likely want to confirm the result of a home pregnancy test to ensure its validity before proceeding with any course of action or treatment. While some follow-up procedures from erroneous home pregnancy test results can be viewed simply as inconvenient, others may be costly or have serious implications. That’s why a healthcare provider will often choose to repeat even a seemingly straight-forward home pregnancy test.

How accurate are home pregnancy tests?

Most home pregnancy tests claim to be up to 99% accurate. But the accuracy depends on:

  • How you use them. Be sure to check the expiration date and follow the instructions. Wait up to 10 minutes after taking the test to check the results window. Research suggests that waiting 10 minutes will give the most accurate result.
  • When you use them. The amount of human chorionic gonadotropin (hCG) or pregnancy hormone in your urine increases with time. The earlier you take the test, the harder it is for the test to detect the hCG. Most home pregnancy tests can accurately detect pregnancy after a missed period. Also, testing your urine first thing in the morning can boost the accuracy.
  • Who uses them. Each woman ovulates at a different time in her menstrual cycle. Plus, the fertilized egg can implant in a woman’s uterus at different times. Your body makes human chorionic gonadotropin (hCG) after implantation occurs. In up to 10% of women, implantation does not occur until after the first day of a missed period. This means home pregnancy tests can be accurate as soon as 1 day after a missed period for some women but not for others.
  • The brand of the home pregnancy test kit. Some home pregnancy tests are more sensitive than others. For that reason, some tests are better than others at detecting human chorionic gonadotropin (hCG) early on. Talk to your pharmacist about which brand may be best for you.

What should I consider when buying a pregnancy test?

Make sure that the pregnancy test you are purchasing is U.S. Food and Drug Administration (FDA)-approved.

The FDA requires manufacturers to meet stringent controls for quality, precision, and accuracy. Approved pregnancy test tests must also meet U.S. Food and Drug Administration (FDA) labeling requirements.

According to the U.S. Food and Drug Administration (FDA) 1, the accuracy of home pregnancy test depends on how well you follow the instructions and interpret the results. “If you mishandle or misunderstand the home pregnancy test kit, you may get poor results. Most pregnancy tests have about the same ability to detect hCG, but their ability to show whether or not you are pregnant depends on how much hCG you are producing. If you test too early in your cycle or too close to the time you became pregnant, your placenta may not have had enough time to produce hCG. This would mean that you are pregnant but you got a negative test result. Because many women have irregular periods, and women may miscalculate when their period is due, 10 to 20 pregnant women out of every 100 will not detect their pregnancy on the first day of their missed period”.

Other things to consider when buying a home pregnancy test kit:

  • Cost. Home pregnancy tests come in many different types. Most stores sell them over the counter (without a doctor’s prescription). The cost varies depending on the brand and how many tests come in the box.
  • Accuracy. Most tests can be taken as soon as you miss your period. Some newer, more expensive tests say they can be used 4 or 5 days before your period. Even so, they claim the best accuracy only after the date of your expected period.

When should I take a home pregnancy test?

Many home pregnancy tests claim to be accurate as early as the first day of a missed period — or even before. You’re likely to get more accurate results, however, if you wait until after the first day of your missed period or, better yet, one week after your missed period.

Why wait?

Shortly after a fertilized egg attaches to your uterine lining (implantation), the placenta forms and produces the hormone human chorionic gonadotropin (HCG). This hormone enters your bloodstream and urine. During early pregnancy, the human chorionic gonadotropin (hCG) concentration increases rapidly — doubling every two to three days. The earlier you take the home pregnancy test, the harder it might be for the test to detect human chorionic gonadotropin (hCG). Keep in mind that the exact timing of ovulation might vary among women or even from month to month, and the fertilized egg can implant in the uterus at different times. This can affect when human chorionic gonadotropin (hCG) production begins and becomes detectable.

If it’s important to confirm your pregnancy right away, depending on how far along you are in your pregnancy, your health care provider might recommend that you have an ultrasound, repeat a urine test in the hospital or clinic lab, or have a blood test to measure your human chorionic gonadotropin (hCG).

How do you do home pregnancy test?

For most home pregnancy tests, you either hold a test strip in your urine stream or you collect your urine in a cup and dip your test strip into the cup. If you are pregnant, most test strips produce a colored line, but this will depend on the brand you purchased. Read the instructions for the test you bought and follow them carefully. Make sure you know how to get good results. The test usually takes only about 5 minutes.

The different tests for sale vary in their abilities to detect low levels of human chorionic gonadotropin (hCG). For the most reliable results, test 1-2 weeks after you miss your period. There are some tests for sale that are sensitive enough to show you are pregnant before you miss your period.

You can improve your chances for an accurate result by using your first morning urine for the test. If you are pregnant, it will have more human chorionic gonadotropin (hCG) in it than later urines. If you think you are pregnant, but your first test was negative, you can take the test again after several days. Since the amount of human chorionic gonadotropin (hCG) increases rapidly when you are pregnant, you may get a positive test on later days. Some test kits come with more than one test in them to allow you to repeat the test.

Are there different types of home pregnancy tests?

With most tests, you place the end of a dipstick in your urine stream or immerse the dipstick in a container of collected urine. A few minutes later, the dipstick reveals the test result — often as a plus or minus sign, one line or two lines, or the words “pregnant” or “not pregnant” on a strip or screen.

However, some home pregnancy tests are more sensitive than others. In other words, in some tests the amount of human chorionic gonadotropin (hCG) needed to be detected in the urine to produce a positive test result is lower.

Always check the test’s expiration date and read the instructions carefully before you take the test.

How accurate are home pregnancy tests?

Many home pregnancy tests claim to be 99 percent accurate. However, research suggests that many home pregnancy tests are not sensitive enough to diagnose pregnancy in women who have recently missed a period. For the most reliable results, wait to take the test until one week after your missed period.

Can anything affect home pregnancy test results?

Yes. If you take medicine with the pregnancy hormone human chorionic gonadotropin (hCG) as an active ingredient, you may get a false-positive test result. A false positive is when a test says you are pregnant when you are not.

Some examples of medicines with human chorionic gonadotropin (hCG) include certain medicines for infertility. If you are taking medicine to help you get pregnant, you may want to see your doctor for a pregnancy test.

Most medicines should not affect the results of a home pregnancy test. This includes over-the-counter and prescription medicines such as birth control and antibiotics. Also, alcohol and illegal drugs do not affect pregnancy test results.

Could medications interfere with pregnancy test results?

Fertility drugs or other medications that contain human chorionic gonadotropin (hCG) might interfere with home pregnancy test results. However, most medications, including antibiotics and birth control pills, don’t affect the accuracy of home pregnancy tests.

Some medications can affect home pregnancy test results, including:

  • promethazine – used to treat conditions such as allergies
  • medicines used to treat Parkinson’s disease
  • sleeping tablets (hypnotics)
  • tranquillizers
  • diuretics (medicines that increase the amount of urine produced) – used to treat conditions such as heart failure
  • anticonvulsants (medicines that prevent seizures or fits) – used to treat conditions such as epilepsy
  • medicines used for infertility

If you’re taking any medication, the patient information leaflet that comes with it will tell you if it affects test results. You can also ask a pharmacist.

What does the home pregnancy test result mean?

A negative human chorionic gonadotropin (hCG) result means that it is unlikely that a woman is pregnant. However, pregnancy tests performed too early in a pregnancy, before there is a significant human chorionic gonadotropin (hCG) level, may give false-negative results. The pregnancy test may be repeated a few days later if there is a strong possibility of pregnancy.

  • A positive human chorionic gonadotropin (hCG) means that a woman is likely pregnant. A home pregnancy test can tell whether you are pregnant with almost 99% accuracy, depending on how you use it. If a pregnancy test says you are pregnant, you should see your doctor for another test to confirm the pregnancy and talk about next steps.
  • If you get a positive home pregnancy test result on the first day of your missed period, it’s probably about two weeks since you conceived.

Although rare, it’s possible to get a positive result from a home pregnancy test when you’re not actually pregnant. This is known as a false-positive.

A false-positive might happen if you had a pregnancy loss soon after the fertilized egg attached to your uterine lining (biochemical pregnancy) or you take a pregnancy test too soon after taking a fertility drug that contains human chorionic gonadotropin (hCG). An ectopic pregnancy, menopause or problems with your ovaries also might contribute to misleading test results.

The blood level of human chorionic gonadotropin (hCG) in a woman with an ectopic pregnancy usually rises at a slower rate than normal. Those with failing pregnancies will also frequently have a longer doubling time early on or may even show falling human chorionic gonadotropin (hCG) concentrations during the doubling period. Human chorionic gonadotropin (hCG) concentrations will drop rapidly following a miscarriage. If human chorionic gonadotropin (hCG) does not fall to undetectable levels, it may indicate remaining human chorionic gonadotropin (hCG)-producing tissue that will need to be removed (dilation and curettage – D&C).

Do negative test results mean that you are not pregnant?

No. It’s possible to get a negative result from a home pregnancy test when you’re actually pregnant. This is known as a false-negative and it’s much more likely to occur than is a false-positive. You might get a false-negative if you:

  • Take the home pregnancy test too early. If you tested too early in your cycle, your placenta may not have had time to produce enough human chorionic gonadotropin (hCG) for the test to detect. Or, you may not have waited long enough before you took this test. The earlier after a missed period that you take a home pregnancy test, the harder it is for the test to detect human chorionic gonadotropin (hCG). For the most accurate results, take the test one week after a missed period — when the level of human chorionic gonadotropin (hCG) in your urine is most likely to be detectable. If you can’t wait that long, ask your health care provider for a blood test.
  • Check home pregnancy test results too soon. Be sure to give the test time to work. Consider setting a timer according to the package instructions.
  • Use diluted urine. For the most accurate results, take the test first thing in the morning — when your urine is the most concentrated.

If you have a negative result, you would be wise to consider this a tentative finding. You should not use medications and should consider avoiding potentially harmful behaviors, such as smoking or drinking alcohol, until you have greater certainty that you are not pregnant.

You will probably recognize incorrect results with the passage of time. You may detect false negatives by the unexpected onset of menses (regular vaginal bleeding associated with “periods”.) Repeat testing and/or other investigations such as ultrasound may provide corrected results.

My pregnancy test says I am not pregnant. Could I still be pregnant?

Yes, it is possible you could still be pregnant. It’s possible to be pregnant and to have a pregnancy test show that you are not pregnant.

The accuracy of home pregnancy test results varies from woman to woman because:

  • Each woman ovulates at a different time in her menstrual cycle.
  • The fertilized egg can implant in a woman’s uterus at different times.
  • Sometimes women get false-negative results when they test too early in the pregnancy. False negative means the test says you are not pregnant when you are.
  • Problems with the pregnancy can affect the amount of human chorionic gonadotropin (hCG) in the urine.

If a test says you are not pregnant, take another pregnancy test in a few days. If you are pregnant, your human chorionic gonadotropin (hCG) levels should double every 48 hours. If you think you are pregnant but more tests say you are not, see your doctor.

What if I can’t tell whether my pregnancy test is positive or negative?

Sometimes it can be hard to tell whether the pregnancy test is positive or negative. The line may be faint, or you may worry whether you peed too much or too little on the stick.

No matter how faint the line or plus sign, if you see it, you are most likely pregnant. The faintness of the line can mean you are early in your pregnancy and your human chorionic gonadotropin (hCG) levels are still low.

Also, the pregnancy test should have a control line that tells you whether the test was done correctly. If the control line is blank, then the test did not work and you should take another test.

Is there anything else I should know about home pregnancy test?

Blood or protein in the urine may cause false-positive pregnancy results. A false-positive pregnancy test means the test result inappropriately indicating a positive pregnancy test when, in fact, you’re not pregnant.

Urine human chorionic gonadotropin (hCG) tests may give a false-negative result if the urine is too diluted or if testing is done too soon in the pregnancy. A false negative pregnancy test means the test result inappropriately indicating negative pregnancy result when, in fact, you’re pregnant.

Certain drugs such as diuretics and promethazine (an antihistamine) may cause false-negative urine pregnancy test results. Other drugs such as anti-convulsants, anti-parkinson drugs, hypnotics, and tranquilizers may cause false-positive pregnancy test results. The presence of protein in the urine (proteinuria), blood in the urine (hematuria), or excess pituitary gonadotropin may also cause a false positive pregnancy test.

Furthermore, there are reports of false-positive blood human chorionic gonadotropin (hCG) results due to the presence of certain types of antibodies that some individuals produce or fragments of the human chorionic gonadotropin (hCG) molecule. Generally, if results are questionable, they may be confirmed by testing with a different method.

How does the pregnancy test that I do at home myself compare with the results of a pregnancy test done in a lab?

Home pregnancy testing is very similar to qualitative urine human chorionic gonadotropin (hCG) testing performed in the laboratory, but there are factors surrounding its use that are important to note.

  • Home pregnancy test kits come with very specific directions that must be followed explicitly. If you are using a home pregnancy test kits, follow the directions extremely carefully. There can also be variability in sensitivity to detecting the presence of human chorionic gonadotropin (hCG) with different brands of home pregnancy test kits.
  • Home pregnancy tests are sometimes done too soon after the missed menstrual cycle to result in a positive test. It typically takes 10 days after a missed menstrual period before the presence of human chorionic gonadotropin (hCG) can be detected by the urine pregnancy test.
  • All urine human chorionic gonadotropin (hCG) tests should be done on a first morning urine sample, if possible. Urine becomes more dilute after ingestion of liquids (coffee, juice, water, etc.) and urine human chorionic gonadotropin (hCG) concentrations may become too low to register as positive.

Generally, when used correctly, the home pregnancy test should produce the same result as the urine human chorionic gonadotropin (hCG) test done by your health practitioner. Blood testing for human chorionic gonadotropin (hCG) is more sensitive than urine human chorionic gonadotropin (hCG) testing, so sometimes a blood test will indicate pregnancy when the urine test is negative.

My pregnancy test says I am pregnant. What should I do next?

If a home pregnancy test shows that you are pregnant, you should call your doctor to schedule an appointment.

Your doctor can use a blood test to tell for sure whether you are pregnant. Seeing your doctor early in your pregnancy also means you can begin prenatal care to help you and your baby stay healthy.

What happens next?

Based on your home pregnancy test results, consider taking the following steps:

  • Your home pregnancy test is positive, or you’ve taken a few home pregnancy tests and gotten mixed results. Make an appointment with your health care provider. You might need a blood test or ultrasound to confirm your pregnancy. The sooner your pregnancy is confirmed, the sooner you can begin prenatal care.
  • Your home pregnancy test is negative. If your period doesn’t begin, repeat the test in a few days or one week — especially if you took the test before or shortly after a missed period.
  • You continue to get negative test results, but your period doesn’t begin or you still think you might be pregnant. Check with your health care provider. Many factors can lead to missed menstrual periods (amenorrhea), including thyroid disorders, low body weight, problems with your ovaries, excessive exercise and stress. If you’re not pregnant, your health care provider can help you get your menstrual cycle back on track.

Continuing with the pregnancy

If you’re pregnant and want to continue with the pregnancy, contact your doctor or a midwife to start your prenatal care. Prenatal care is the health care you get while you are pregnant. It includes medical care, education, and counseling. The earlier you get prenatal care, the better your chances are for a healthy pregnancy and baby.

Urine and blood samples will be taken on the first visit and again at later visits. Urine tests check for bacteria, high sugar levels (which can be a sign of diabetes), and high protein levels (which can be a sign for preeclampsia, a type of high blood pressure during pregnancy). Blood tests check for blood cell count, blood type, low iron levels (anemia) and infectious diseases (such as syphilis, HIV, and hepatitis).

The doctor may do other tests at your first visit. These may vary based on your background and risk for problems. Tests can include:

  • A pelvic exam to check the size and shape of your uterus (womb).
  • A Pap smear to screen for cervical cancer.
  • An ultrasound to view your baby’s growth and position. An ultrasound uses sound waves to create an image of your baby on a video screen.

After your first visit, you will have a prenatal visit every 4 weeks. In months 7 and 8, you will have a visit every 2 weeks. In your last month of pregnancy, the visits will occur each week until you deliver your baby. At each visit, the doctor will check your weight and blood pressure and test your urine. The doctor will listen to your baby’s heartbeat and measure the height of your uterus in your abdomen after the 20th week. You should always discuss any issues or concerns you have with your doctor.

Things to consider

There are several things you should avoid while you are pregnant. Take notice to follow this list of warnings. Talk to your doctor if you need help.

  • Do not smoke. Smoking raises your risk for miscarriage, preterm birth, low birth weight, and other health problems.
  • Do not use drugs. Cocaine, heroin, marijuana, and other drugs increase your risk of miscarriage, preterm birth, and birth defects. Your baby could be born addicted to the drug you’ve been abusing. This is called neonatal abstinence syndrome. It can can cause severe health problems for your baby.
  • Do not drink alcohol. Drinking alcohol is the major cause of preventable birth defects, including fetal alcohol disorder.
  • Do not clean your cat’s litter box or eat raw or undercooked red meat. You could get toxoplasmosis, a disease that can cause birth defects.
  • Do not douche. Your vagina doesn’t require cleansing in addition to normal bathing. Douching disrupts the helpful bacteria that keep your vagina clean.

When to see a doctor

See your doctor if you have:

  • blood or fluid coming from your vagina
  • sudden or extreme swelling of your face or fingers
  • headaches that are severe or won’t go away
  • nausea and vomiting that won’t go away
  • dizziness
  • dim or blurry vision
  • severe pain or cramps in your lower abdomen
  • chills or fever
  • a change in your baby’s movements
  • less urine or burning when you urinate
  • an illness or infection
  • any other symptoms that bother you.

Questions to ask your doctor:

  • What medicines can I take during pregnancy?
  • When should I start taking a prenatal vitamin? What kind is best?
  • How much folic acid do I need to take each day?
  • How can I prevent or reduce swelling?
  • How much weight should I gain while pregnant?

How much weight should I gain during pregnancy?

Talk to your doctor about how much weight you should gain. It is different for everyone, but most women should gain about 25 to 30 pounds. If you are underweight when you get pregnant, you may need to gain more. If you are overweight, you may need to gain less.

What should I eat?

Eating a balanced diet is one of the best things you can do for yourself and your baby. Be careful of the following foods and drinks during pregnancy.

  • Meat, eggs, and fish. Food that is not fully cooked can put you at risk for an Do not eat more than 2 or 3 servings of fish per week (including canned fish).
  • Do not eat shark, swordfish, king mackerel, or tilefish. These fish have high levels of mercury, which can harm your baby. If you eat tuna, make sure it is light tuna. Do not eat more than 6 ounces of albacore tuna and tuna steaks per week. It is safe to have 12 ounces of canned light tuna per week.
  • Fruit and vegetables. Wash all produce before eating it. Keep cutting boards and dishes clean.
  • Dairy. Eat 4 or more servings of dairy each day. This will give you enough calcium for you and your baby. Do not drink unpasteurized milk or eat unpasteurized milk products. These may have bacteria that can cause infections. This includes soft cheeses such as Brie, feta, Camembert, and blue cheese, or Mexican-style cheeses, such as queso fresco.
  • Sugar substitutes. Some artificial sweeteners are okay in moderation. These include aspartame (brand names: Equal or NutraSweet) and sucralose (brand name: Splenda). If you have phenylketonuria (PKU), do not use aspartame at all.
  • Caffeine. Do not drink more than 1 or 2 cups of coffee or other drinks with caffeine each day.

Can I take medicine?

Check with your doctor before taking any medicine. This includes prescriptions, pain relievers, and over-the-counter medicines. Some medicines can cause birth defects, especially if taken during the first 3 months of pregnancy.

Can I take vitamins?

Pregnant women should take at least 400 micrograms (mcg) of folic acid (folate) each day. It can help prevent problems with your baby’s brain and spinal cord. Ask your doctor if you need more than 400 mcg.

It is best to start taking folic acid before you get pregnant. You can get folic acid from taking a prenatal vitamin. You should take this every day. Do not take other vitamins or supplements without your doctor’s approval.

How long can I keep working?

How late you work in pregnancy varies for each person. Your job and work environment play a big role. For instance, radiation, lead and other materials, such as copper and mercury, can be harmful to your baby. If your job is active, you may not be able to work as late. Desk jobs are not thought to cause harm to your baby. However, you should not rest a computer on your stomach or uterus.

Your overall health also plays a part in how late you work. If you are at risk of certain issues or preterm labor, you may be on bed rest.

What about exercise?

Unless you have issues during pregnancy, you should get regular exercise. Exercise promotes a healthy lifestyle and can help ease discomfort. Try to get at least 30 minutes of exercise each day. Talk to your doctor about any conditions that may prevent exercise.

Some women say exercising while you are pregnant makes labor and delivery easier. Walking and swimming are great choices. If you were not active before pregnancy, start slowly. Listen to your body and do not overdo it. Drink plenty of water to prevent overheating or dehydration. It is best to avoid exercises that may cause you to fall. This includes skiing and rock climbing. You also should avoid contact sports, such as soccer or basketball. If you were active before pregnancy, it is probably safe to continue. Ask your doctor if you have any concerns.

See your doctor if you have symptoms with exercise, such as:

  • blurred vision
  • dizziness
  • chest pain
  • stomach pain.

Can I have sex?

It is safe to have sex while you are pregnant. However, talk to your doctor if you have concerns or are at risk for problems. Some women’s level of interest in sex changes when they are pregnant. As you grow, you may need to try different positions, such as lying on your side or being on top.

What can I do to feel better?

Below are common side effects of pregnancy with tips on how to manage them.

  • Morning sickness

Nausea or vomiting may strike anytime during the day (or night). Try eating frequent, small meals. Avoid foods that are greasy, spicy or acidic. Some women are more nauseous when their stomach is empty. Keep crackers nearby to prevent an empty stomach. Talk to your doctor if morning sickness causes you to lose weight or lasts past the first 3 months of pregnancy.

  • Tiredness

Fatigue is very common when you are pregnant. Try to get enough rest or take a nap if possible. Talk to your doctor if you have symptoms with fatigue. You may have anemia.

  • Leg cramps

Being active can help reduce leg cramps. Stretch the calf of your leg by flexing your foot toward your knee.

  • Constipation

Drink plenty of fluids. Eat foods with lots of fiber, such as fruits, vegetables, and bran cereal. Do not take laxatives without talking to your doctor first. Stool softeners may be safer than laxatives.

  • Hemorrhoids

Try to avoid becoming constipated. Do not strain during bowel movements. Clean yourself well after a bowel movement. Wet wipes may feel better than toilet paper. Take warm soaks (sitz baths) if necessary.

  • Urinating more often

You may need to urinate more often when you are pregnant. Changing hormones can be a factor. As your baby grows, they will put pressure on your bladder.

  • Varicose veins

Avoid clothing that fits tightly around your waist or legs. Rest and put your feet up as much as you can. Avoid sitting or standing still for long periods. Ask your doctor about support or compression hose. These can help prevent or ease varicose veins.

  • Moodiness

Your hormones are on a roller coaster ride during pregnancy. Plus, your whole life is changing. Don’t be too hard on yourself. Get help right away if you feel sad or think about suicide.

  • Heartburn

Eat frequent, small meals. Avoid spicy, greasy or acidic foods. Do not lie down right after eating. Ask your doctor about taking antacids.

  • Yeast infections

The amount of discharge from your vagina can increase during pregnancy. Yeast (Candida) infections, which can cause discharge, are common as well. Talk to your doctor if you see any unusual discharge or if it smells.

  • Bleeding gums

Brush and floss regularly, and see your dentist for cleanings. Do not avoid dental visits because you are pregnant. Be sure to tell your dentist you’re pregnant.

  • Stuffy nose

Changes in the levels of the female hormone estrogen can cause a stuffy nose. You may also have nosebleeds.

  • Edema (retaining fluid)

Rest with your legs up as much as you can. Lie on your left side while sleeping. This position helps blood flow from your legs back to your heart better. Do not use diuretics (water pills).

  • Skin changes

Stretch marks appear as red marks on your skin. Lotion with shea butter can help keep your skin moist and reduce itchy, dry skin. Stretch marks cannot be avoided. They do often fade after pregnancy.

You may have other skin changes. These can include darkening of the skin on your face or around your nipples. Some women get a dark line below their belly button. Try to stay out of the sun or use sunscreen to help lessen these marks. Most marks will fade after pregnancy.

If you’re not sure you want to be pregnant

If you’re not sure about continuing with the pregnancy, you can discuss this confidentially with a healthcare professional. Your options are:

  • continuing with the pregnancy and keeping the baby
  • having an abortion
  • continuing with the pregnancy and having the baby adopted

As well as a doctor or a nurse, you can also get accurate, confidential information – even if you’re under 16 – from the following:

References
  1. Pregnancy. https://www.fda.gov/medicaldevices/productsandmedicalprocedures/invitrodiagnostics/homeusetests/ucm126067.htm
read more
Procedures

Hip replacement

hip replacement

What is hip replacement

Hip replacement surgery is a procedure for people with severely damaged hip joint to replace it with an artificial one (known as a prosthesis). The most common reason for hip replacement is damaged hip caused by osteoarthritis. Osteoarthritis causes pain, swelling, and reduced motion in your joints. It can interfere with your daily activities. If your hip has been damaged by arthritis, a fracture, or other conditions, common activities such as walking or getting in and out of a chair may be painful and difficult. Your hip may be stiff, and it may be hard to put on your shoes and socks. You may even feel uncomfortable while resting.

If other treatments such as physical therapy, pain medicines, changes in your everyday activities, exercise and the use of walking supports do not adequately help your symptoms, you may consider hip replacement surgery.

Adults of any age can be considered for a hip replacement, although most are carried out on people between the ages of 60 and 80.

Hip replacement surgery is a safe and effective procedure that can relieve your pain, increase motion, and help you get back to enjoying normal, everyday activities.

Hip replacement surgery was first performed in 1960, hip replacement surgery is one of the most successful operations in all of medicine. Since 1960, improvements in joint replacement surgical techniques and technology have greatly increased the effectiveness of total hip replacement. According to the Agency for Healthcare Research and Quality, more than 300,000 total hip replacements are performed each year in the United States.

During a hip replacement operation, the surgeon removes damaged cartilage and bone from your hip joint and replaces them with new, man-made parts.

A modern artificial hip joint is designed to last for at least 15 years. Most people experience a significant reduction in pain and some improvement in their range of movement.

A hip replacement can:

  • Relieve pain
  • Help your hip joint work better
  • Improve walking and other movements

The most common problem after a hip replacement surgery is hip dislocation. Because a man-made hip is smaller than the original joint, the ball can come out of its socket. The surgery can also cause blood clots and infections. With a hip replacement, you might need to avoid certain activities, such as jogging and high-impact sports.

Common causes of hip pain

The most common cause of chronic hip pain and disability is arthritis. Osteoarthritis, rheumatoid arthritis, and traumatic arthritis are the most common forms of this disease.

  • Osteoarthritis. This is an age-related “wear and tear” type of arthritis. It usually occurs in people 50 years of age and older and often in individuals with a family history of arthritis. The cartilage cushioning the bones of the hip wears away. The bones then rub against each other, causing hip pain and stiffness. Osteoarthritis may also be caused or accelerated by subtle irregularities in how the hip developed in childhood.
  • Rheumatoid arthritis. This is an autoimmune disease in which the synovial membrane becomes inflamed and thickened. This chronic inflammation can damage the cartilage, leading to pain and stiffness. Rheumatoid arthritis is the most common type of a group of disorders termed “inflammatory arthritis.”
  • Post-traumatic arthritis. This can follow a serious hip injury or fracture. The cartilage may become damaged and lead to hip pain and stiffness over time.
  • Avascular necrosis. An injury to the hip, such as a dislocation or fracture, may limit the blood supply to the femoral head. This is called avascular necrosis (also commonly referred to as “osteonecrosis”). The lack of blood may cause the surface of the bone to collapse, and arthritis will result. Some diseases can also cause avascular necrosis.
  • Childhood hip disease. Some infants and children have hip problems. Even though the problems are successfully treated during childhood, they may still cause arthritis later on in life. This happens because the hip may not grow normally, and the joint surfaces are affected.

Figure 1. Hip replacement (total hip replacement) – Note: (Left) The individual components of a total hip replacement. (Center) The components merged into an implant. (Right) The implant as it fits into the hip.

total hip replacement

Hip Joint Anatomy

The hip is one of the body’s largest joints. The hip joint (coxal joint) is a ball-and-socket joint formed by the head of the femur and the acetabulum of the hip bone. The socket is formed by the acetabulum, which is part of the large pelvis bone. The ball is the femoral head, which is the upper end of the femur (thighbone). The bone surfaces of the ball and socket are covered with articular cartilage, a smooth tissue that cushions the ends of the bones and enables them to move easily.

A thin tissue called synovial membrane surrounds the hip joint. In a healthy hip, this membrane makes a small amount of fluid that lubricates the cartilage and eliminates almost all friction during hip movement.

Bands of tissue called ligaments (the hip capsule) connect the ball to the socket and provide stability to the joint.

The hip joint allows flexion, extension, abduction, adduction, lateral rotation medial rotation, and circumduction of the thigh. The extreme stability of the hip joint is related to the very strong articular capsule and its accessory ligaments, the manner in which the femur fits into the acetabulum, and the muscles surrounding the joint.

Figure 2. Hip joint anatomy

hip joint anatomyhip joint lateral view

Hip joint anatomy

hip joint posterior viewHip joint anatomical components

1. Articular capsule

Very dense and strong capsule that extends from the rim of the acetabulum to the neck of the femur (Figure 2). With its accessory ligaments, this is one of the strongest structures of the body. The articular capsule consists of circular and longitudinal fibers. The circular fibers, called the zona orbicularis, form a collar around the neck of the femur. Accessory ligaments known as the iliofemoral ligament, pubofemoral ligament, and ischiofemoral ligament reinforce the longitudinal fibers of the articular capsule.

2. Iliofemoral ligament

Thickened portion of the articular capsule that extends from the anterior inferior iliac spine of the hip bone to the intertrochanteric line of the femur (Figure 2). This ligament is said to be the body’s strongest and prevents hyperextension of the femur at the hip joint during standing.

3. Pubofemoral ligament

Thickened portion of the articular capsule that extends from the pubic part of the rim of the acetabulum to the neck of the femur. This ligament prevents overabduction of the femur at the hip joint and strengthens the articular capsule.

4. Ischiofemoral ligament

Thickened portion of the articular capsule that extends from the ischial wall bordering the acetabulum to the neck of the femur. This ligament slackens during adduction, tenses during abduction, and strengthens the articular capsule.

5. Ligament of the head of the femur

Flat, triangular band (primarily a synovial fold) that extends from the fossa of the acetabulum to the fovea capitis of the head of the femur. The ligament usually contains a small artery that supplies the head of the femur.

6. Acetabular labrum

Fibrocartilage rim attached to the margin of the acetabulum that enhances the depth of the acetabulum. As a result, dislocation of the femur is rare.

7. Transverse ligament of the acetabulum

Strong ligament that crosses over the acetabular notch. It supports part of the acetabular labrum and is connected with the ligament of the head of the femur and the articular capsule.

Partial hip replacement

Partial hip replacement also called hemiarthroplasty replaces only the ball part (the head of femur or femoral head) of your hip joint. Partial hip replacement is generally considered to be the treatment of choice in the most elderly patients with a displaced fracture of the femoral neck.

In elderly patients suffering from a displaced femoral neck fracture, a cemented hip arthroplasty, compared to internal fixation, partial hip replacement (hemiarthroplasty) has been shown to reduce the reoperation rate and give better hip function and health-related quality of life 1. In the healthy, active elderly with a long life expectancy, a total hip replacement is probably the best treatment 2 while a partial hip replacement (Hemiarthroplasty) is generally considered to be sufficient for the most elderly patients with lower functional demands and a shorter life expectancy.

There are two different types of partial hip replacement (hemiarthroplasty): unipolar and bipolar. The theoretical advantage of the bipolar partial hip replacement (Hemiarthroplasty) is a reduction of acetabular wear due to the dual-bearing system 3. On the other hand, a potential disadvantage is the risk of polyethylene wear that may contribute to mechanical loosening over time and there is also a risk of inter-prosthetic dissociation in certain bipolar partial hip replacements necessitating open reduction 4. However, dissociation appears to be rare in modern bipolar surgical systems.

Based on the results of numerous studies 5, 6, 7, 89, there does not appear to be any clinical disadvantage with the bipolar design. On the contrary, the results of this study 5 showed that the rate of acetabular erosion was significantly lower after the bipolar partial hip replacement, which in turn may indicate an advantage in the longer term. However, there is one frequently cited disadvantage associated with the bipolar partial hip replacement, i.e. the higher cost, the magnitude of which probably differs between countries. Since there were no differences in duration of surgery, need for blood transfusions, hospital stay and complications during the first year, this difference probably represents the total difference in primary costs for the two treatment modalities. This investment may well be justified in order to reduce the risk of future problems owing to acetabular erosion.

Figure 3. Partial hip replacement (Unipolar)

Partial hip replacement

Figure 4. Partial hip replacement (Bipolar)

Partial hip replacement - bipolar

Total hip replacement

In a total hip replacement (also called total hip arthroplasty), the damaged bone and cartilage is removed and replaced with prosthetic components (see Figure 1 above).

  • The damaged femoral head is removed and replaced with a metal stem that is placed into the hollow center of the femur. The femoral stem may be either cemented or “press fit” into the bone.
  • A metal or ceramic ball is placed on the upper part of the stem. This ball replaces the damaged femoral head that was removed.
  • The damaged cartilage surface of the socket (acetabulum) is removed and replaced with a metal socket. Screws or cement are sometimes used to hold the socket in place.
  • A plastic, ceramic, or metal spacer is inserted between the new ball and the socket to allow for a smooth gliding surface.

Hip replacement alternatives

There is an alternative type of surgery to hip replacement, known as hip resurfacing. This involves removing the damaged surfaces of the bones inside the hip joint and replacing them with a metal surface.

An advantage to this approach is that it removes less bone. However, it may not be suitable for:

  • adults over the age of 65 years – bones tend to weaken as a person becomes older
  • women who have gone through the menopause – one of the side effects of the menopause is that the bones can become weakened and brittle (osteoporosis)

Resurfacing is much less popular now due to concerns about the metal surface causing damage to soft tissues around the hip.

Your surgeon should be able to tell you if you could be a suitable candidate for hip resurfacing.

Is Hip Replacement Surgery for You?

The decision to have hip replacement surgery should be a cooperative one made by you, your family, your primary care doctor, and your orthopaedic surgeon. The process of making this decision typically begins with a referral by your doctor to an orthopedic surgeon for an initial evaluation.

Hip replacement surgery is usually necessary when the hip joint is worn or damaged to the extent that your mobility is reduced and you experience pain even while resting.

The most common reason for hip replacement surgery is osteoarthritis. Other conditions that can cause hip joint damage include:

  • rheumatoid arthritis
  • a hip fracture
  • septic arthritis
  • ankylosing spondylitis
  • disorders that cause unusual bone growth (bone dysplasias)

Candidates for hip replacement surgery

There are no absolute age or weight restrictions for total hip replacements. However, a hip replacement is major surgery, so is normally only recommended if other treatments, such as physiotherapy or steroid injections, haven’t helped reduce pain or improve mobility.

Recommendations for surgery are based on a patient’s pain and disability, not age. Most patients who undergo total hip replacement are age 50 to 80, but orthopedic surgeons evaluate patients individually. Total hip replacements have been performed successfully at all ages, from the young teenager with juvenile arthritis to the elderly patient with degenerative arthritis.

You may be offered hip replacement surgery if:

  • you have severe pain, swelling and stiffness in your hip joint and your mobility is reduced
  • your hip pain is so severe that it interferes with your quality of life and sleep
  • everyday tasks, such as shopping or getting out of the bath, are difficult or impossible
  • you’re feeling depressed because of the pain and lack of mobility
  • you can’t work or have a normal social life

You’ll also need to be well enough to cope with both a major operation and the rehabilitation afterwards.

When hip replacement surgery is recommended

There are several reasons why your doctor may recommend hip replacement surgery. People who benefit from hip replacement surgery often have:

  • Hip pain that limits everyday activities, such as walking or bending
  • Hip pain that continues while resting, either day or night
  • Stiffness in a hip that limits the ability to move or lift the leg
  • Inadequate pain relief from anti-inflammatory drugs, physical therapy, or walking supports

The Orthopedic Evaluation

An evaluation with an orthopedic surgeon consists of several components.

  • Medical history. Your orthopedic surgeon will gather information about your general health and ask questions about the extent of your hip pain and how it affects your ability to perform everyday activities.
  • Physical examination. This will assess hip mobility, strength, and alignment.
  • X-rays. These images help to determine the extent of damage or deformity in your hip.
  • Other tests. Occasionally other tests, such as a magnetic resonance imaging (MRI) scan, may be needed to determine the condition of the bone and soft tissues of your hip.

Figure 5. Hip osteoarthritis – note the smooth articular cartilage wears away and becomes frayed and rough

hip osteoarthritis

Hip osteoarthritis

Figure 6. Hip osteoarthritis (X-ray)

hip osteoarthritis x-ray

Note: Dysplastic acetabulum with insufficient covering of the femoral head. Joint space narrowing, subchondral sclerosis and osteophytes at the femoroacetabular joint. Prominent bump at the antero-superior head-neck junction of the femur (cam deformity, also known as pistol grip deformity of the proximal femur).

Figure 7. Hip osteoarthritis (X-ray)

left hip osteoarthritis x-ray

Note: Advanced left hip osteoarthritis with severe loss of joint space, subchondral sclerosis and marginal osteophytes.

Figure 8. Total hip replacement (right hip – green arrow) and left hip osteoarthritis (red arrow) X-ray

total hip replacement x-ray

Deciding to Have Hip Replacement Surgery

Talk with your doctor

Your orthopedic surgeon will review the results of your evaluation with you and discuss whether hip replacement surgery is the best method to relieve your pain and improve your mobility. Other treatment options — such as medications, physical therapy, or other types of surgery — also may be considered.

In addition, your orthopedic surgeon will explain the potential risks and complications of hip replacement surgery, including those related to the surgery itself and those that can occur over time after your surgery.

Never hesitate to ask your doctor questions when you do not understand. The more you know, the better you will be able to manage the changes that hip replacement surgery will make in your life.

Realistic expectations

An important factor in deciding whether to have hip replacement surgery is understanding what the procedure can and cannot do. Most people who undergo hip replacement surgery experience a dramatic reduction of hip pain and a significant improvement in their ability to perform the common activities of daily living.

With normal use and activity, the material between the head and the socket of every hip replacement implant begins to wear. Excessive activity or being overweight may speed up this normal wear and cause the hip replacement to loosen and become painful. Therefore, most surgeons advise against high-impact activities such as running, jogging, jumping, or other high-impact sports.

Realistic activities following total hip replacement include unlimited walking, swimming, golf, driving, hiking, biking, dancing, and other low-impact sports.

With appropriate activity modification, hip replacements can last for many years.

Possible complications of hip replacement surgery

The complication rate following hip replacement surgery is low. Serious complications, such as joint infection, occur in less than 2% of patients. Major medical complications, such as heart attack or stroke, occur even less frequently. However, chronic illnesses may increase the potential for complications. Although uncommon, when these complications occur they can prolong or limit full recovery.

Infection

A small percentage of patients undergoing hip replacement (roughly about 1 in 100) may develop an infection after the operation.

Infection may occur superficially in the wound or deep around the artificial implants. An infection may develop while in the hospital or after you go home. It may even occur years later.

Minor infections of the wound are generally treated with antibiotics. Major or deep infections may require more surgery and removal of the artificial implants. Any infection in your body can spread to your joint replacement.

Infections are caused by bacteria. Although bacteria are abundant in your gastrointestinal tract and on your skin, they are usually kept in check by your immune system. For example, if bacteria make it into your bloodstream, your immune system rapidly responds and kills the invading bacteria.

However, because joint replacements are made of metal and plastic, it is difficult for the immune system to attack bacteria that make it to these implants. If bacteria gain access to the implants, they may multiply and cause an infection.

Despite antibiotics and preventive treatments, patients with infected joint replacements often require surgery to cure the infection.

The most common ways bacteria enter the body include:

  • Through breaks or cuts in the skin
  • During major dental procedures (such as a tooth extraction or root canal)
  • Through wounds from other surgical procedures

Some people are at a higher risk for developing infections after a joint replacement procedure. Factors that increase the risk for infection include:

  • Immune deficiencies (such as HIV or lymphoma)
  • Diabetes mellitus
  • Peripheral vascular disease (poor circulation to the hands and feet)
  • Immunosuppressive treatments (such as chemotherapy or corticosteroids)
  • Obesity

Prevention

At the time of original joint replacement surgery, there are several measures taken to minimize the risk of infection. Some of the steps have been proven to lower the risk of infection, and some are thought to help but have not been scientifically proven. The most important known measures to lower the risk of infection after total joint replacement include:

  • Antibiotics before and after surgery. Antibiotics are given within one hour of the start of surgery (usually once in the operating room) and continued at intervals for 24 hours following the procedure.
  • Short operating time and minimal operating room traffic. Efficiency in the operation by your surgeon helps to lower the risk of infection by limiting the time the joint is exposed. Limiting the number of operating room personnel entering and leaving the room is thought to the decrease risk of infection.
  • Use of strict sterile technique and sterilization instruments. Care is taken to ensure the operating site is sterile, the instruments have been autoclaved (sterilized) and not exposed to any contamination, and the implants are packaged to ensure their sterility.
  • Preoperative nasal screening for bacterial colonization. There is some evidence that testing for the presence of bacteria (particularly the Staphylococcus species) in the nasal passages several weeks prior to surgery may help prevent joint infection. In institutions where this is performed, those patients that are found to have Staphylococcus in their nasal passages are given an intranasal antibacterial ointment prior to surgery. The type of bacteria that is found in the nasal passages may help your doctors determine which antibiotic you are given at the time of your surgery.
  • Preoperative chlorhexidine wash. There is also evidence that home washing with a chlorhexidine solution (often in the form of soaked cloths) in the days leading up to surgery may help prevent infection. This may be particularly important if patients are known to have certain types of antibiotic-resistant bacteria on their skin or in their nasal passages (see above). Your surgeon will talk with you about this option.
  • Long-term prophylaxis. Surgeons sometimes prescribe antibiotics for patients who have had joint replacements before they undergo dental work. This is done to protect the implants from bacteria that might enter the bloodstream during the dental procedure and cause infection. The American Academy of Orthopaedic Surgeons has developed recommendations for when antibiotics should be given before dental work and for which patients would benefit. In general, most people do not require antibiotics before dental procedures. There is little evidence that taking antibiotics before dental procedures is effective at preventing infection.

Antibiotics may also be considered before major surgical procedures; however, most patients do not require this.

Your orthopedic surgeon will talk with you about the risks and benefits of prophylactic antibiotics in your specific situation.

Symptoms of infection

Signs and symptoms of an infected joint replacement include:

  • A high temperature (fever) of 38 °C (100.4 °F) or above
  • Hip pain that can persist even when resting
  • Increased pain or stiffness in a previously well-functioning joint
  • Swelling
  • Warmth and redness around the wound
  • A discharge of liquid from the site of the surgery
  • Wound drainage
  • Fevers, chills and night sweats
  • Fatigue

Blood Clots

There’s a small risk of developing a blood clot in the first few weeks after surgery – either deep vein thrombosis (DVT) in the leg or pulmonary embolism in the lung. Blood clots in the leg veins or pelvis are one of the most common complications of hip replacement surgery. These clots can be life-threatening if they break free and travel to your lungs. Your orthopedic surgeon will outline a prevention program which may include blood thinning medications, support hose, inflatable leg coverings, ankle pump exercises, and early mobilization.

Symptoms of DVT include:

  • pain, swelling and tenderness in one of your legs (usually your calf)
  • a heavy ache in the affected area
  • warm skin in the area of the clot

Symptoms of pulmonary embolism include:

  • breathlessness, which may come on suddenly or gradually
  • chest pain, which may be worse when you breathe in
  • coughing

If you suspect either of these types of blood clots you should seek immediate medical advice from your doctor or the doctor in charge of your care.

To reduce your risk of blood clots you may be given blood thinning medication such as warfarin, or asked to wear compression stockings.

Leg-length Inequality

Sometimes after a hip replacement, one leg may feel longer or shorter than the other. Your orthopedic surgeon will make every effort to make your leg lengths even, but may lengthen or shorten your leg slightly in order to maximize the stability and biomechanics of the hip. Some patients may feel more comfortable with a shoe lift after surgery.

Hip replacement dislocation

This occurs when the ball comes out of the socket. The risk for hip replacement dislocation is greatest in the first few months after surgery while the tissues are healing. Hip replacement dislocation is uncommon. If the ball does come out of the socket, a closed reduction usually can put it back into place without the need for more surgery. In situations in which the hip continues to dislocate, further surgery may be necessary.

Loosening and Implant Wear

Over years, the hip prosthesis may wear out or loosen. This is most often due to everyday activity. It can also result from a biologic thinning of the bone called osteolysis. If loosening is painful, a second surgery called a revision may be necessary.

Joint stiffening

The soft tissues can harden around the implant, causing reduced mobility.

This isn’t usually painful and can be prevented using medication or radiation therapy (a quick and painless procedure during which controlled doses of radiation are directed at your hip joint).

Other complications

Nerve and blood vessel injury, bleeding, fracture, and stiffness can occur. In a small number of patients, some pain can continue or new pain can occur after surgery.

Preparing for hip replacement surgery

Medical Evaluation

If you decide to have hip replacement surgery, your orthopedic surgeon may ask you to have a complete physical examination by your primary care doctor before your surgical procedure. This is needed to make sure you are healthy enough to have the surgery and complete the recovery process. Many patients with chronic medical conditions, like heart disease, may also be evaluated by a specialist, such a cardiologist, before the surgery.

Tests

Several tests, such as blood and urine samples, an electrocardiogram (EKG), and chest x-rays, may be needed to help plan your surgery.

Preparing your skin

Your skin should not have any infections or irritations before surgery. If either is present, contact your orthopedic surgeon for treatment to improve your skin before surgery.

Blood donations

You may be advised to donate your own blood prior to surgery. It will be stored in the event you need blood after surgery.

Medications

Tell your orthopedic surgeon about the medications you are taking. He or she or your primary care doctor will advise you which medications you should stop taking and which you can continue to take before surgery.

Weight Loss

If you are overweight, your doctor may ask you to lose some weight before surgery to minimize the stress on your new hip and possibly decrease the risks of surgery.

Dental evaluation

Although infections after hip replacement are not common, an infection can occur if bacteria enter your bloodstream. Because bacteria can enter the bloodstream during dental procedures, major dental procedures (such as tooth extractions and periodontal work) should be completed before your hip replacement surgery. Routine cleaning of your teeth should be delayed for several weeks after surgery.

Urinary evaluation

Individuals with a history of recent or frequent urinary infections should have a urological evaluation before surgery. Older men with prostate disease should consider completing required treatment before having surgery.

Social planning

Although you will be able to walk with crutches or a walker soon after surgery, you will need some help for several weeks with such tasks as cooking, shopping, bathing, and laundry.

If you live alone, your orthopedic surgeon’s office, a social worker, or a discharge planner at the hospital can help you make advance arrangements to have someone assist you at your home. A short stay in an extended care facility during your recovery after surgery also may be arranged.

Home planning

Several modifications can make your home easier to navigate during your recovery. The following items may help with daily activities:

  • Securely fastened safety bars or handrails in your shower or bath
  • Secure handrails along all stairways
  • A stable chair for your early recovery with a firm seat cushion (that allows your knees to remain lower than your hips), a firm back, and two arms
  • A raised toilet seat
  • A stable shower bench or chair for bathing
  • A long-handled sponge and shower hose
  • A dressing stick, a sock aid, and a long-handled shoe horn for putting on and taking off shoes and socks without excessively bending your new hip
  • A reacher that will allow you to grab objects without excessive bending of your hips
  • Firm pillows for your chairs, sofas, and car that enable you to sit with your knees lower than your hips
  • Removal of all loose carpets and electrical cords from the areas where you walk in your home

Hip replacement surgery

You will most likely be admitted to the hospital on the day of your surgery.

Anesthesia

After admission, you will be evaluated by a member of the anesthesia team. The most common types of anesthesia are general anesthesia (you are put to sleep) or spinal, epidural, or regional nerve block anesthesia (you are awake but your body is numb from the waist down). The anesthesia team, with your input, will determine which type of anesthesia will be best for you.

Implant Components

After you and your orthopedic surgeon have determined you are a candidate for hip replacement surgery, your surgeon will select a hip replacement device for you based on your body structure, medical history, and lifestyle.

There are more than 60 different types of implant or prosthesis. However, the options are usually limited to around four or five. Your surgeon can advise you on the type they think would suit you best.

Many different types of designs and materials are currently used in artificial hip joints. All of them consist of two basic components: the ball component (made of a highly polished strong metal or ceramic material) and the socket component (a durable cup of plastic/polyethylene, ceramic, or metal, which may have an outer metal shell). Sometimes, the socket is made of a different material than the ball, or is lined with a different material, and sometimes the ball and socket are made of the same material. Your orthopedic surgeon will recommend the best combination for you.

The prosthetic components may be “press fit” into the bone to allow your bone to grow onto the components or they may be cemented into place. The decision to press fit or to cement the components is based on a number of factors, such as the quality and strength of your bone. A combination of a cemented stem and a non-cemented socket may also be used.

Your orthopedic surgeon will choose the type of prosthesis that best meets your needs.

Figure 9. Femoral component of hip replacement – Note: (Left) A standard non-cemented femoral component. (Center) A close-up of this component showing the porous surface for bone ingrowth. (Right) The femoral component and the acetabular component working together.

femoral component of hip replacement

Figure 10. Acetabular component of hip replacement – Note: (Left) The acetabular component shows the plastic (polyethylene) liner inside the metal shell. (Right) The porous surface of this acetabular component allows for bone ingrowth. The holes around the cup are used if screws are needed to hold the cup in place.

Acetabular component of hip replacement

Metal-on-Metal Implants Precautions

In metal-on-metal devices both the ball and socket components are made of metal. These metal implants have been used in total hip replacement surgeries and hip resurfacing procedures.

Metal-on-metal implants feature a joint made of two metal surfaces:

  • a metal “ball” that replaces the ball found at the top of the thigh bone (femur)
  • a metal “cup” that acts like the socket found in the pelvis

Because of metal’s durability, metal-on-metal devices were expected to last longer than other hip implants. In addition, the ball in a metal-on-metal device is larger, making the hip joint more stable and less likely to dislocate.

Metal-on-metal implants have also been used because they avoid the complication of debris wear from implants made of plastic/polyethylene. However, recent information about the wear of certain metal-on-metal devices has raised concerns about their use. Like polyethylene, metal surfaces give off small particles of debris. In addition, metal surfaces can corrode, giving off metal ions. Metal debris (ions and particles) can enter the space around the implant, as well as enter the bloodstream. This can cause a reaction in some patients, such as pain or swelling around the hip, osteolysis, and very rarely symptoms in other parts of the body.

Although the vast majority of patients have not had any problems with metal-on-metal implants, orthopedic surgeons and the U.S. Food and Drug Administration 10 are concerned because cases have been reported in the peer-reviewed literature and through a British database in which patients have local hip symptoms (pain and swelling). In addition, there have been a very small number of cases that have had other medical concerns seemingly unrelated to the hip.

  • Patients who have metal-on-metal implants should be monitored regularly for the life of the implant, and have tests to measure levels of metal particles (ions) in their blood.

Patients with these implants who have symptoms may be investigated with MRI or ultrasound scans, and patients without symptoms should have a scan if the level of metal ions in their blood is rising.

If after a joint replacement surgery you experience pain or have other, new medical concerns or issues, please talk to your doctor or orthopedic surgeon.

You should also be aware of the warning signs that could signal a problem.

What are the warning signs?

You should contact your doctor if you have:

  • pain in the groin, hip or leg
  • swelling at or near the hip joint
  • a limp or problems walking
  • grinding or clunking from the joint

These symptoms don’t necessarily mean your device is failing, but they do need investigating.

Any changes in general health should also be reported, including:

  • chest pain or shortness of breath
  • numbness or weakness
  • changes in vision or hearing
  • fatigue
  • feeling cold
  • weight gain

What exactly is the problem with metal-on-metal implants?

Wear and tear

All hip implants wear down over time as the ball and cup slide against each other during movements, including walking and running.

Although many people live the rest of their lives without needing a replacement implant, some people may eventually need surgery to remove or replace its components.

Data suggests that certain types of metal-on-metal implant wear down at a faster rate than other types.

As friction acts upon their surfaces, it can cause tiny metal particles to break off and enter the space around the implant.

People are thought to react differently to the presence of these metal particles, but they can trigger inflammation and discomfort in the area around the implant in some people.

If not caught early, this can cause damage and deterioration in the bone and tissue surrounding the implant and joint over time. This in turn may cause the implant to become loose and cause painful symptoms, meaning further surgery is required.

Metal ions in the bloodstream

Some news coverage has focused on the Medicines and Healthcare products Regulatory Agency’s recommendation to check for the presence of metal ions in the bloodstream.

Ions are electrically charged molecules. Levels of ions in the bloodstream, particularly of the cobalt and chromium used in the surface of the implants, may therefore indicate how much wear there is to the artificial hip.

These ions in the blood are not blood poisoning and don’t lead to sepsis, which is an entirely different type of illness. Talk of this in some of the news reports is very misleading and completely wrong.

There has been no definitive link between ions from metal-on-metal implants and illness, although there has been a small number of cases in which high levels of metal ions in the bloodstream have been associated with symptoms or illnesses elsewhere in the body, including effects on the heart, nervous system and thyroid gland.

Is there a way to determine ahead of time if I might have a reaction to the metal in the metal-on-metal hip implant system?

Currently there is no widely accepted test to predict if you will develop a reaction to the metal from a hip system, and there is insufficient evidence to support using a skin patch test to determine your sensitivity to a metal-on-metal hip implant. If, however, you have a known sensitivity to metal, it is important to share that information with your surgeon.

Are there any ways to prevent the metal from reaching the joint and bloodstream if I get a metal-on-metal hip implant?

No. All artificial hips require one component to slide against another component and it is inevitable that material at the surfaces will wear as they interact. In metal-on-metal hip implants, some tiny metal particles and metal ions are released into the joint space and metal ions can potentially enter the bloodstream. Certain characteristics may place patients at risk for increased wear and metal ion production, and these patients will need closer follow-up after implantation. However, how a patient reacts to the metal is variable.

Which patients should not have a metal-on-metal hip implant system implanted?

Each type of hip implant system has its own set of benefits and risks. Metal-on-metal hip implant systems are not for everyone. You should discuss your situation with your orthopedic surgeon to determine whether you are a candidate or not. In general, metal-on-metal hip systems are not meant to be implanted in patients:

  • Who have kidney problems
  • Who have a known allergy or sensitivity to metals
  • Who have a suppressed immune system
  • Who are currently receiving high doses of corticosteroids such as prednisone
  • Who are women of childbearing age

In addition, people with smaller body frames may be at increased risk for adverse events and device failure.

Why are women of child-bearing age not good candidates for metal-on-metal hip implants?

As discussed above, recent information shows that metal ions can leave the artificial joint and enter the bloodstream. It is not known how long they remain in blood or other organs of the body.

Some metallic ions may cross the barrier from mother to fetus through the placenta. It is not known if the amount of ions is great enough to have any effect on the growing fetus or if the presence of metal ions in the mother’s bloodstream will have any effect on future pregnancies.

For this reason, it is recommended that younger women who need hip replacement surgery consider implant options other than metal-on-metal.

With the risk of adverse reactions to metal-on-metal hip implant systems, why are these devices still being offered to patients?

It is known that every different type of hip implant system has its own set of risks as well as its own set of benefits. FDA’s assessment of medical devices such as metal-on-metal hip implants is based on a risk-benefit ratio with the data available. Metal-on-metal hip implants overall have been shown to provide significant benefits (e.g., high survivorship) in certain patient populations. Although the exact prevalence of adverse reactions to metal debris is not known, current experience leads us to consider the adverse outcomes to be relatively low or equal (with some designs) to other types of hip implants. Thus, for many patients, currently available information supports a favorable risk-benefit ratio.

The orthopedic surgeon should assess the patient’s individual needs and should avoid using metal-on-metal hip implants in patients where the risks outweigh the benefits.

What symptoms might a metal-on-metal hip implant cause?

Symptoms may include hip/groin pain, local swelling, numbness or changes in your ability to walk. There are many reasons a patient with a metal-on-metal hip implant may experience such symptoms and it is important that you contact your surgeon to help determine why you are having them.

Are there other medical effects that can occur with my metal-on-metal hip implant system?

Metal-on-metal hip implants, like other types of hip implants, are known to have adverse events, including infection and joint dislocation. There are some case reports of the metal particles causing a reaction around the joint, leading to deterioration of the tissue around the joint, loosening of the implant, and failure of the device, as well as some of the symptoms described above. In addition, some metal ions from the implant may enter into the bloodstream. There have been a few recent case reports of patients with metal-on-metal hip implants developing a reaction to these ions and experiencing medical problems that might have been related to their implants, including effects on the nervous system, heart, and thyroid gland.

What are my chances of developing a reaction to my metal-on-metal hip implant and having these types of medical problems?

Although current data suggests that these events are rare, it is currently unknown how often they occur in patients with metal-on-metal hip implants.

Part of the difficulty in answering this question is that individuals vary in how they react to metal ions in their bodies. For example, a reaction may develop in Patient A in response to a very small amount of metal, whereas Patient B may be able to tolerate a much larger amount before a reaction develops.

What should I do if I am experiencing adverse events associated with my metal-on-metal hip implant?

If you are experiencing hip/groin pain, difficulty walking or a worsening of your previous symptoms, you should make an appointment to see your orthopedic surgeon for further evaluation of your implant. Your orthopedic surgeon may wish to perform a physical exam and an evaluation based on your symptoms.
If you experience any new symptoms or medical conditions in your body other than at your hip, you should report these to your primary physician and remind them that you have a metal-on-metal hip implant system during their evaluation.

What should I do if I am not experiencing adverse events associated with my metal-on-metal hip implant?

If you are not having any symptoms and your orthopedic surgeon believes the metal-on-metal hip implant is functioning appropriately, there are no data to support the need for additional tests. You should continue to follow-up with your orthopedic surgeon for periodic examinations.

What should I discuss with my other healthcare providers including my general internist or family practice doctor?

There are rare case reports of patients with metal-on-metal hip implants who experienced medical problems in areas of the body away from their hip implant. This may have resulted from the metal ions released by the metal-on-metal hip implant.

If you see a healthcare provider for the evaluation of any new or worsening symptoms outside the hip/groin area, including symptoms related to your heart, nervous system, or thyroid gland, it is important that you tell that clinician of your metal-on-metal hip implant. This information may affect the types of tests that are ordered to further evaluate the cause of your symptoms.

When would a hip revision surgery be needed?

There are multiple reasons why a surgeon may recommend a device revision (a surgical procedure where your implant is removed and another put in its place). Many of these reasons, including infection, dislocation, and device fracture, apply to any type of hip implant. Your surgeon might also consider revision if you develop evidence of local or systemic reactions to the metal from your hip implant. In that case, the surgeon will take several factors into account in considering if and when a revision surgery is advisable.

What are the risks of revision surgery?

Any surgical procedure, including revision surgery, has risks associated with it, including reaction to the anesthesia, infection, bleeding, and blood clots. The revision surgery may be more difficult if you had a local reaction to the implant that may have affected your soft tissue and/or bone quality.

What does it mean when I see that a hip implant system has been “recalled?”

A hip system may be recalled by the manufacturer for a number of reasons. If your device is recalled, this does not necessarily mean that the device needs to be removed and replaced. In some cases, the recall just calls for different or more frequent monitoring. It is important to discuss the reason for the recall with your surgeon to determine the most appropriate course of action. If you are unsure if your hip implant was recalled, consult with your orthopedic surgeon. Additional information on the recall can be obtained from the manufacturer.

Hip replacement procedure

The traditional surgical approach to total hip replacement uses a single, long incision to view and access the hip joint. A variation of this approach is a minimally invasive procedure in which one or two shorter incisions are used. In minimally invasive surgery, a smaller surgical incision is used and fewer muscles around the hip are cut or detached. The goal of using shorter incisions is to reduce pain and speed recovery. Unlike traditional total hip replacement, the minimally invasive technique is not suitable for all patients. Despite this difference, however, both traditional hip replacement surgery and minimally invasive surgery are technically demanding and have better outcomes if the surgeon and operating team have considerable experience.

Your orthopedic surgeon will discuss different surgical options with you.

The surgical procedure takes a few hours. During any hip replacement surgery, the damaged bone is cut and removed, along with some soft tissues.

Your orthopedic surgeon will remove the damaged cartilage and bone and then position new metal, plastic, or ceramic implants to restore the alignment and function of your hip.

After surgery, you will be moved to the recovery room where you will remain for several hours while your recovery from anesthesia is monitored. After you wake up, you will be taken to your hospital room.

How the operation is carried out

Once you’ve been anaesthetised, the surgeon removes the existing hip joint completely. The upper part of the thigh bone (femur) is removed and the natural socket for the head of the femur is hollowed out.

A socket is fitted into the hollow in the pelvis. A short, angled metal shaft (the stem) with a smooth ball on its upper end (to fit into the socket) is placed into the hollow of the thigh bone. The cup and the stem may be pressed into place or fixed with acrylic cement.

Metal-on-metal hip resurfacing is carried out in a similar way. The main difference is that less of the bone is removed from the femur as only the joint surfaces are replaced with metal inserts.

Materials

The prosthetic parts can be cemented or uncemented:

  • cemented parts are secured to healthy bone using acrylic cement
  • uncemented parts are made from material that has a rough surface; this allows the bone to grow on to it, holding it in place

Most prosthetic parts are produced using high-density polythene for the socket, titanium alloys for the shaft and sometimes a separate ball made of an alloy of cobalt, chromium and molybdenum.

Some surgeons use a metal ball and socket and in some cases ceramic parts are used, which don’t wear as quickly as plastic.

Traditional Hip Replacement

To perform a traditional hip replacement:

  • A 10- to 12-inch incision is made on the side of the hip. The muscles are split or detached from the hip, allowing the hip to be dislocated and fully viewed by the surgical team.
  • The damaged femoral head is removed and replaced with a metal stem that is placed into the hollow center of the femur, then a metal or ceramic ball is placed on the upper part of the stem. This ball replaces the damaged femoral head that was removed.
  • The damaged cartilage surface of the socket (acetabulum) is removed and replaced with a metal socket. Screws or cement are sometimes used to hold the socket in place.
  • A plastic, ceramic or metal spacer is inserted between the new ball and the socket to allow for a smooth gliding surface.

Figure 11. X-rays before and after total hip replacement – Note: In this case, non-cemented components were used.

X-rays before and after total hip replacement

Minimally Invasive Total Hip Replacement

In minimally invasive total hip replacement, the surgical procedure is similar, but there is less cutting of the tissue surrounding the hip. The artificial implants used are the same as those used for traditional hip replacement. However, specially designed surgical instruments are needed to prepare the socket and femur and to place the implants properly.

Minimally invasive total hip replacement can be performed with either one or two small incisions. Smaller incisions allow for less tissue disturbance.

  • Single-incision surgery. In this type of minimally invasive hip replacement, the surgeon makes a single incision that usually measures from 3 to 6 inches. The length of the incision depends on the size of the patient and the difficulty of the procedure.
    • The incision is usually placed over the outside of the hip. The muscles and tendons are split or detached from the hip, but to a lesser extent than in traditional hip replacement surgery. They are routinely repaired after the surgeon places the implants. This encourages healing and helps prevent dislocation of the hip.
  • Two-incision surgery. In this type of minimally invasive hip replacement, the surgeon makes two small incisions:
    • A 2- to 3-inch incision over the groin for placement of the socket, and
    • A 1- to 2-inch incision over the buttock for placement of the femoral stem.
    • To perform the two-incision procedure, the surgeon may need guidance from x-rays. It may take longer to perform the two-incision surgery than it does to perform traditional hip replacement surgery.

The hospital stay after minimally invasive surgery is similar in length to the stay after traditional hip replacement surgery–ranging from 1 to 4 days. Physical rehabilitation is a critical component of recovery. Your surgeon or a physical therapist will provide you with specific exercises to help increase your range of motion and restore your strength.

Candidates for Minimally Invasive Total Hip Replacement

Minimally invasive total hip replacement is not suitable for all patients. Your doctor will conduct a comprehensive evaluation and consider several factors before determining if the procedure is an option for you.

In general, candidates for minimal incision procedures are thinner, younger, healthier, and more motivated to participate in the rehabilitation process, compared with patients who undergo the traditional surgery.

Minimally invasive techniques are less suitable for patients who are overweight or who have already undergone other hip surgeries. In addition, patients who have a significant deformity of the hip joint, those who are very muscular, and those with health problems that may slow wound healing may be at a higher risk for problems from minimally invasive total hip replacement.

Summary of Minimally invasive total hip replacement

Minimally invasive and small incision total hip replacement surgery is an evolving area and more research is needed on the long-term function and durability of the implants.

The benefits of minimally invasive hip replacement have been reported to include less damage to soft tissues, leading to a quicker, less painful recovery and more rapid return to normal activities. Current evidence suggests that the long-term benefits of minimally invasive surgery do not differ from those of hip replacement performed with the traditional approach.

Like all surgery, minimally invasive surgery has a risk of complications. These complications include nerve and artery injuries, wound healing problems, infection, fracture of the femur, and errors in positioning the prosthetic hip implants.

Like traditional hip replacement surgery, minimally invasive surgery should be performed by a well-trained, highly experienced orthopedic surgeon. Your orthopaedic surgeon can talk to you about his or her experience with minimally invasive hip replacement surgery, and the possible risks and benefits of the techniques for your individual treatment.

How long does hip replacement surgery take?

The duration of a hip replacement varies a lot between patients and the orthopedic surgeon skills and experience. In general, the surgery usually takes around 60-90 minutes to complete.

It’s vitally important you choose a specialist who performs hip replacement regularly and can discuss their results with you.

This is even more important if you’re having a second or subsequent hip replacement (revision surgery), which is more difficult to perform.

Revision Total Hip Replacement

Total hip replacement is one of the most successful procedures in all of medicine. In the vast majority of cases, total hip replacement enables people to live more active lives without debilitating hip pain. Over time, however, a hip replacement can fail for a variety of reasons.

When this occurs, your doctor may recommend that you have a second operation to remove some or all of the parts of the original prosthesis and replace them with new ones. This procedure is called revision total hip replacement.

Although both procedures have the same goals—to relieve pain and improve function and quality of life—revision surgery is different than primary total hip replacement. Revision hip replacement is a longer, more complex procedure. It requires extensive planning, as well as the use of specialized implants and tools, in order to achieve a good result.

There are different types of revision surgery. In some cases, only some components of the prosthesis need to be revised. In other cases, the whole prosthesis needs to be removed or replaced and the bone around the hip needs to be rebuilt with augments (metal pieces that substitute for missing bone) or bone graft.

Damage to bone and soft tissue around the hip may make it difficult for the doctor to use standard primary hip implants for revision hip replacement. In most revisions, the doctor will use specialized implants that are designed to compensate for the damaged bone and soft tissue.

When revision total hip replacement is recommended

Hip replacement Loosening

The most common problem that can arise as a result of a hip replacement is loosening of the joint, which causes pain and feeling that the joint is unstable. This happens in around 10% of cases. Loosening of the joint can occur at any time, but it normally occurs 10-15 years after the original surgery was performed.

In order for a total hip replacement to function properly, an implant must remain firmly attached to the bone. During the initial surgery, the hip replacement components were either cemented into place or were “press fit” into the bone to allow bone to grow onto them. Sometimes, however, bone may fail to grow onto press-fit components. In addition, cemented or press-fit components that were once firmly fixed to the bone can eventually loosen, resulting in a painful hip.

The cause of loosening is not always clear, but repetitive high-impact activities, excessive body weight, and wear of the plastic liner between the ball and the metal cup are all factors that may contribute.

Implant Wear and Tear

Another common complication of hip replacement surgery is wear and tear of the artificial sockets. Particles that have worn off the artificial joint surfaces can be absorbed by surrounding tissue, causing loosening of the joint.

If wear or loosening is noticed on X-ray, your surgeon may request regular X-rays. Depending on the severity of the problem, you may be advised to have further surgery.

There have been reports about metal-on-metal implants wearing sooner than expected and causing complications. See Metal-on-Metal Implants Precautions above.

In addition, patients who are younger when they undergo the initial hip replacement may “outlive” the life expectancy of their artificial hip. For these patients, there is a higher long-term risk that revision surgery will be needed due to loosening or wear.

In some cases, tiny particles that wear off the cup’s plastic liner accumulate around the hip joint and are attacked by the body’s immune system. This immune response also attacks the healthy bone around the implant, leading to a condition called osteolysis. In osteolysis, the bone around the implant deteriorates, making the implant loose or unstable.

Fortunately, plastics have improved greatly over the years, so plastic wear and osteolysis occur less frequently today than they did with earlier generations of implants.

Infection

Infection is a potential complication of any surgical procedure, including total hip replacement. Infection occurs when bacteria attach in and around the surface of the prosthesis. Infection may occur while you are in the hospital or after you go home. It may even occur years later.

If a total hip replacement becomes infected, it can be painful and the implant may begin to lose its attachment to the bone. Even if the implant remains properly fixed to the bone, there may still be pain, instability, and drainage from the infection. Because bacteria cannot be easily eliminated from a joint replacement with antibiotics alone, revision surgery is usually necessary.

Revision surgery for infection can be done in different ways. To determine which procedure is best for you, your doctor will consider a number of factors, including:

  • The type of bacteria
  • The duration and severity of the infection
  • Your preference for a specific treatment

Debridement. In this procedure, your doctor will open up your hip, wash out the bacteria, and exchange the ball and plastic liner. The metal implants that are firmly attached to the bone are left in place. After debridement, you will receive intravenous antibiotics for several weeks to help cure the infection.

Staged surgery. In some cases, the implants must be completely removed. If the implants are removed to treat the infection, your doctor will usually perform the revision in two separate surgeries.

In the first surgery, your doctor will remove the implants and place a temporary cement spacer in your hip. This spacer is treated with antibiotics to help fight the infection and will remain in your hip for several weeks. During this time, you will also receive intravenous antibiotics.

When the infection has been cleared, your doctor will perform a second surgery to remove the antibiotic spacer and insert a new prosthesis. In general, removing the implant leads to a higher chance of curing the infection, but is associated with a longer recovery.

In some cases, your doctor may be able to remove the implants, wash out the hip, and place a new prosthesis all in the same operation. This procedure, which is called a one-stage exchange, may be appropriate in limited situations.

Recurrent Dislocation

In around 3% of cases the hip joint can come out of its socket. This is most likely to occur in the first few months after surgery when the hip is still healing.

A hip replacement has a ball-and-socket structure like that of your natural hip. For a hip replacement to work well, the ball must remain inside the socket. Trauma or certain hip positions can sometimes cause the ball to become dislodged from the socket. This is called a “hip dislocation.” If you experience recurrent hip dislocations, you may need revision surgery to better align your hip joint or to insert a special implant designed to prevent dislocations.

Fracture

A periprosthetic fracture is a broken bone that occurs around the components of an implant. These fractures are most often the result of a fall, and often require revision surgery. To determine whether a revision is needed, your doctor will consider several factors, including the amount of remaining bone, whether your implant is loose, and the location of the fracture.

In rare circumstances, an implant itself can break. This also requires revision surgery.

Reaction to Metal Ions and Allergy to Metal

Over time, the metals used in implants can break down or wear, causing tiny particles to fall off the device into the space around the implant. This is more common with “metal-on-metal” devices, in which both the ball and socket components are made of metal. In some patients, sensitivity to the metal ions in these particles can result in damage to the bone and soft tissues around the hip and lead to the need for revision surgery.

In very rare cases, a patient allergy to the metal used in implants may cause pain around the site of the implant. There is no definitive agreement among doctors regarding metal allergy in this setting, however, and more studies are needed.

Other Factors

The likelihood of needing revision hip replacement is also impacted by individual differences among patients. For example, patients who are younger and more active are more likely to experience issues related to implant wear. Patients who have certain medical conditions, such as obesity or diabetes, and those who have had certain surgical procedures in the past, are more likely to experience infection or implant failure.

Long-Term Outcomes

The vast majority of patients who undergo revision surgery experience favorable long-term outcomes. This includes relief from pain, increased stability, and better function. Complete pain relief and restoration of function are not always achievable, however, and some patients may still experience some pain or dysfunction following revision surgery.

Hip replacement surgery recovery

The success of your hip replacement surgery will depend in large measure on how well you follow your orthopedic surgeon’s instructions regarding home care during the first few weeks after surgery.

Your hospital stay will typically last from 1 to 4 days, depending on the speed of your recovery. Before you are discharged from the hospital, you will need to accomplish several goals, such as:

  • Getting in and out of bed by yourself.
  • Having acceptable pain control.
  • Being able to eat, drink, and use the bathroom.
  • Walking with an assistive device (a cane, walker, or crutches) on a level surface and being able to climb up and down two or three stairs.
  • Being able to perform the prescribed home exercises.
  • Understanding any hip precautions you may have been given to prevent injury and ensure proper healing.

If you are not yet able to accomplish these goals, it may be unsafe for you to go directly home after discharge. If this is the case, you may be temporarily transferred to a rehabilitation or skilled nursing center.

When you are discharged, your healthcare team will provide you with information to support your recovery at home. Although the complication rate after total hip replacement is low, when complications occur they can prolong or limit full recovery. Hospital staff will discuss possible complications, and review with you the warning signs of an infection or a blood clot.

Wound Care

You may have stitches or staples running along your wound or a suture beneath your skin. The stitches or staples will be removed approximately 2 weeks after surgery.

Avoid getting the wound wet until it has thoroughly sealed and dried. You may continue to bandage the wound to prevent irritation from clothing or support stockings.

Diet

Some loss of appetite is common for several weeks after surgery. A balanced diet, often with an iron supplement, is important to promote proper tissue healing and restore muscle strength. Be sure to drink plenty of fluids.

Activity

Exercise is a critical component of home care, particularly during the first few weeks after surgery. You should be able to resume most normal light activities of daily living within 3 to 6 weeks following surgery. Some discomfort with activity and at night is common for several weeks.

Your activity program should include:

  • A graduated walking program to slowly increase your mobility, initially in your home and later outside
  • Resuming other normal household activities, such as sitting, standing, and climbing stairs
  • Specific exercises several times a day to restore movement and strengthen your hip. You probably will be able to perform the exercises without help, but you may have a physical therapist help you at home or in a therapy center the first few weeks after surgery.

How your new hip is different

You may feel some numbness in the skin around your incision. You also may feel some stiffness, particularly with excessive bending. These differences often diminish with time, and most patients find these are minor compared with the pain and limited function they experienced prior to surgery.

Your new hip may activate metal detectors required for security in airports and some buildings. Tell the security agent about your hip replacement if the alarm is activated. You may ask your orthopedic surgeon for a card confirming that you have an artificial hip.

Protecting your hip replacement

There are many things you can do to protect your hip replacement and extend the life of your hip implant.

  • Participate in a regular light exercise program to maintain proper strength and mobility of your new hip.
  • Take special precautions to avoid falls and injuries. If you break a bone in your leg, you may require more surgery.
  • Make sure your dentist knows that you have a hip replacement. Talk with your orthopedic surgeon about whether you need to take antibiotics prior to dental procedures.
  • See your orthopedic surgeon periodically for routine follow-up examinations and x-rays, even if your hip replacement seems to be doing fine.

Hip replacement recovery time

Recovery times can vary depending on the individual and type of surgery carried out. It’s important to follow the advice your doctor gives you on looking after your hip. In general, your doctor will encourage you to use your “new” joint shortly after your operation. Although it may be challenging at times, following your doctor’s instructions will speed your recovery.

The rehabilitation process after surgery can be a demanding time and requires commitment. You may also be enrolled on an exercise programme that’s designed to help you regain and then improve the use of your new hip joint.

Most patients will experience some temporary pain in the replaced joint because the surrounding muscles are weak from inactivity, the body is adjusting to the new joint, and the tissues are healing. This pain should resolve in a few months.

Exercise is an important part of the recovery process. Your doctor or physical therapist will provide you with specific exercises to help restore movement and strengthen the joint.

The majority of patients are able to perform daily activities more easily after joint replacement surgery. Most people can expect their joint replacement to last for many years, providing them with an improved quality of life that includes less pain, along with improved motion and strength that would not have been possible otherwise.

For the first four to six weeks after the operation you’ll need a walking aid, such as crutches, to help support you.

Most people are able to resume normal activities within two to three months but it can take up to a year before you experience the full benefits of your new hip.

If you have any questions about limitations on your activities after total joint replacement, please consult your doctor.

After surgery

After the operation, you’ll be lying flat on your back and may have a pillow between your legs to keep your hip in the correct position. You may feel hazy or groggy as you come round from the general anaesthetic. A nurse may give you oxygen (through tubes in your nose or a mask) to help you feel better.

It’s common to feel sick or vomit after you’ve been given general anesthesia. Your nurse may offer you medicine to help with sickness. You may also have a sore throat and dry mouth.

The nursing staff will monitor your condition and you’ll have a large dressing on your leg to protect the wound.

You may be allowed to have a drink about an hour after you return to the ward and, depending on your condition, you may be allowed to have something to eat.

How soon will I be up and about?

The staff will help you to get up and walk about as quickly as possible after surgery. If you’ve had minimally invasive surgery or are on an enhanced recovery programme, you may be able to walk on the same day as your operation.

Initially, you’ll feel discomfort while walking and exercising, and your legs and feet may be swollen. You may be given an injection into your abdomen to help prevent blood clots forming in your legs, and possibly a short course of antibiotics to help prevent infection.

A physiotherapist may teach you exercises to help strengthen the hip and explain what should and shouldn’t be done after the operation. They’ll teach you how to bend and sit to avoid damaging your new hip.

Going home

You’ll usually be in hospital for around three to five days, depending on the progress you make and what type of surgery you have.

If you’re generally fit and well, the surgeon may suggest an enhanced recovery programme, where you start walking on the day of the operation and are discharged within one to three days.

Recovering at home

Don’t be surprised if you feel very tired at first. You’ve had a major operation and muscles and tissues surrounding your new hip will take time to heal. Follow the advice of the surgical team and call your doctor if you have any particular worries or queries.

You may be eligible for home help and there may be aids that can help you. You may want to arrange to have someone to help you for a week or so.

The exercises your physiotherapist gives you are an important part of your recovery. It’s essential you continue with them once you’re at home. Your rehabilitation will be monitored by a physiotherapist.

How soon will the pain go away?

The pain you may have experienced before the operation should go immediately. You can expect to feel some pain as a result of the operation itself, but this won’t last for long.

How long will it be before I feel back to normal?

Generally, you should be able to stop using your crutches within four to six weeks and feel more or less normal after three months, by which time you should be able to perform all your normal activities.

It’s best to avoid extreme movements or sports where there’s a risk of falling, such as skiing or riding. Your doctor or a physiotherapist can advise you about this.

When can I drive again?

You can usually drive a car after about six weeks, subject to advice from your surgeon. It can be tricky getting in and out of your car at first. It’s best to ease yourself in backwards and swing both legs round together.

When can I go back to work?

This depends on your job, but you can usually return to work 6-12 weeks after your operation.

How will it affect my sex life?

If you were finding sex difficult before because of pain, you may find that having the operation gives your sex life a boost. Your surgeon can advise when it’s OK to have sex again.

As long as you’re careful, you should be able to have sex after six to eight weeks. Avoid vigorous sex and more extreme positions.

Will I need another new hip?

Nowadays, most hip implants last for 15 years or more. If you’re older, your new hip may last your lifetime. If you’re younger, you may need another new hip at some point.

Revision surgery is more complicated and time-consuming for the surgeon to perform than a first hip replacement and complication rates are usually higher.

It can’t be performed in every patient, but most people who can have it report success for 10 years or more.

Avoiding problems after hip replacement surgery

Recognizing the Signs of a Blood Clot

Follow your orthopedic surgeon’s instructions carefully to reduce the risk of blood clots developing during the first several weeks of your recovery. He or she may recommend that you continue taking the blood thinning medication you started in the hospital. Notify your doctor immediately if you develop any of the following warning signs.

Warning signs of blood clots. The warning signs of possible blood clot in your leg include:

  • Pain in your calf and leg that is unrelated to your incision
  • Tenderness or redness of your calf
  • New or increasing swelling of your thigh, calf, ankle, or foot

Warning signs of pulmonary embolism. The warning signs that a blood clot has traveled to your lung include:

  • Sudden shortness of breath
  • Sudden onset of chest pain
  • Localized chest pain with coughing

Preventing Infection

A common cause of infection following hip replacement surgery is from bacteria that enter the bloodstream during dental procedures, urinary tract infections, or skin infections.

Following surgery, patients with certain risk factors may need to take antibiotics prior to dental work, including dental cleanings, or before any surgical procedure that could allow bacteria to enter your bloodstream. Your orthopedic surgeon will discuss with you whether taking preventive antibiotics before dental procedures is needed in your situation.

Warning signs of infection. Notify your doctor immediately if you develop any of the following signs of a possible hip replacement infection:

  • Persistent fever (higher than 100°F or 37.8 °C orally)
  • Shaking chills
  • Increasing redness, tenderness, or swelling of the hip wound
  • Drainage from the hip wound
  • Increasing hip pain with both activity and rest

Looking after your new hip

With care, your new hip should last well. The following advice may be given by the hospital to help you care for your new hip. However, the advice may vary based on your doctors recommendations:

  • avoid bending your hip more than 90° (a right angle) during any activity
  • avoid twisting your hip
  • don’t swivel on the ball of your foot
  • when you turn around, take small steps
  • don’t apply pressure to the wound in the early stages (so try to avoid lying on your side)
  • don’t cross your legs over each other
  • don’t force the hip or do anything that makes your hip feel uncomfortable
  • avoid low chairs and toilet seats (raised toilet seats are available)

Avoiding Falls

A fall during the first few weeks after surgery can damage your new hip and may result in a need for more surgery. Stairs are a particular hazard until your hip is strong and mobile. You should use a cane, crutches, a walker, or handrails or have someone help you until you improve your balance, flexibility, and strength.

Your orthopedic surgeon and physical therapist will help you decide which assistive aides will be required following surgery, and when those aides can safely be discontinued.

Other precautions

To assure proper recovery and prevent dislocation of the prosthesis, you may be asked to take special precautions when sitting, bending, or sleeping — usually for the first 6 weeks after surgery. These precautions will vary from patient to patient, depending on the surgical approach your surgeon used to perform your hip replacement.

Prior to discharge from the hospital, your surgeon and physical therapist will provide you with any specific precautions you should follow.

Total Hip Replacement Exercise Guide

Regular exercise to restore strength and mobility to your hip and a gradual return to everyday activities are important for your full recovery after hip replacement. Your orthopedic surgeon and physical therapist may recommend that you exercise for 20 to 30 minutes, 2 or 3 times a day during your early recovery. They may suggest some of the exercises shown below.

This guide can help you better understand your exercise and activity program, supervised by your physical therapist and orthopedic surgeon. To ensure your safe recovery, be sure to check with your therapist or surgeon before performing any of the exercises shown.

Early Hip Replacement Postoperative Exercises

The following exercises will help increase circulation to your legs and feet, which is important for preventing blood clots. They will also help strengthen your muscles and improve hip movement.

Start the exercises as soon as you are able. You can begin them in the recovery room shortly after surgery. You may feel uncomfortable at first, but these exercises will help speed your recovery and actually diminish your postoperative pain.

Ankle Pumps

Slowly push your foot up and down. Repeat this exercise several times, as often as every 5 or 10 minutes.

Begin this exercise immediately after surgery and continue it until you are fully recovered.

Figure 12.  Ankle pumps exercise after a hip replacement

Ankle pumps exercise after a hip replacement

Ankle Rotations

Move your ankle inward toward your other foot and then outward away from your other foot.

Repeat 5 times in each direction.

Do 3 or 4 sessions a day.

Figure 13. Ankle Rotations after a hip replacement

Ankle Rotations after a hip replacement

Bed-Supported Knee Bends

Slide your foot toward your buttocks, bending your knee and keeping your heel on the bed. Do not let your knee roll inward. Hold your knee in a maximally bent position for 5 to 10 seconds and then straighten.

Repeat 10 times.

Do 3 or 4 sessions a day.

Figure 14. Bed-Supported Knee Bends exercise after a hip replacement

Bed-Supported Knee Bends exercise after a hip replacement

Buttock Contractions

Tighten your buttock muscles and hold to a count of 5.

Repeat 10 times.

Do 3 or 4 sessions a day.

Figure 15. Buttock contractions after a hip replacement

Buttock contractions after a hip replacement

Abduction Exercise

Slide your leg out to the side as far as you can and then back.

Repeat 10 times.

Do 3 or 4 sessions a day.

Figure 16. Abduction exercise after a hip replacement

Abduction exercise after a hip replacement

Quadriceps Set

Tighten your thigh muscle. Try to straighten your knee. Hold for 5 to 10 seconds.

Repeat this exercise 10 times during a 10-minute period, rest one minute and repeat.

Continue until your thigh feels fatigued.

Figure 17. Quadriceps exercise after a hip replacement

Quadriceps exercise after a hip replacement

Straight Leg Raises

Tighten your thigh muscle with your knee fully straightened on the bed. Lift your leg several inches. Hold for 5 to 10 seconds. Slowly lower.

Repeat until your thigh feels fatigued.

Figure 18. Straight Leg Raises exercise after hip replacement

Straight Leg Raises exercise after hip replacement

Standing Exercises

Soon after your hip replacement surgery, you will be out of bed and able to stand. You will require help at first but, as you regain your strength, you will be able to stand independently. While doing these standing exercises, make sure you are holding on to a firm surface such as a bar attached to your bed or a wall.

Standing Knee Raises

Lift your operated leg toward your chest. Do not lift your knee higher than your waist. Hold for 2 or 3 counts and put your leg down.

Repeat 10 times.

Do 3 or 4 sessions a day.

Figure 19. Standing Knee Raises exercise after hip replacement

Standing Knee Raises exercise after hip replacement

Standing Hip Abduction

Be sure your hip, knee and foot are pointing straight forward. Keep your body straight. With your knee straight, lift your leg out to the side. Slowly lower your leg so your foot is back on the floor.

Repeat 10 times.

Do 3 or 4 sessions a day.

Figure 20. Standing Hip Abduction exercise after hip replacement

Standing Hip Abduction exercise after hip replacement

Standing Hip Extensions

Lift your operated leg backward slowly. Try to keep your back straight. Hold for 2 or 3 counts. Return your foot to the floor.

Repeat 10 times.

Do 3 or 4 sessions a day.

Figure 21. Standing Hip Extensions exercise after hip replacement

Standing Hip Extensions exercise after hip replacement

Early Activity

Soon after surgery, you will begin to walk short distances in your hospital room and perform light everyday activities. This early activity aids your recovery and helps your hip regain its strength and movement.

Walking

Early on, walking will help you regain movement in your hip.

Proper walking is the best way to help your hip recover. At first, you will walk with a walker or crutches. Your surgeon or therapist will tell you how much weight to put on your leg.

Stand comfortably and erect with your weight evenly balanced on your walker or crutches. Advance your walker or crutches a short distance; then reach forward with your operated leg with your knee straightened so the heel of your foot touches the floor first. As you move forward, your knee and ankle will bend and your entire foot will rest evenly on the floor. As you complete the step, your toe will lift off the floor and your and knee and hip will bend so that you can reach forward for your next step. Remember, touch your heel first, then flatten your foot, then lift your toes off the floor.

Walk as rhythmically and smoothly as you can. Don’t hurry. Adjust the length of your step and speed as necessary to walk with an even pattern. As your muscle strength and endurance improve, you may spend more time walking. You will gradually put more weight on your leg. You may use a cane in the hand opposite your surgery and, eventually, walk without an aid.

Walk with a cane until you have regained your balance skills. In the beginning, walk for 5 or 10 minutes, 3 or 4 times a day. As your strength and endurance improve, you can walk for 20 to 30 minutes, 2 or 3 times a day. Once you have fully recovered, regular walks of 20 to 30 minutes, 3 or 4 times a week, will help maintain your strength.

When you can walk and stand for more than 10 minutes and your leg is strong enough so that you are not carrying any weight on your walker or crutches, you can begin using a single crutch or cane. Hold the aid in the hand opposite the side of your surgery.

Stair Climbing and Descending

The ability to go up and down stairs requires both strength and flexibility. At first, you will need a handrail for support and will be able to go only one step at a time. Always lead up the stairs with your good leg and down the stairs with your operated leg. Remember, “up with the good” and “down with the bad.” You may want to have someone help you until you have regained most of your strength and mobility.

Stair climbing is an excellent strengthening and endurance activity. Do not try to climb steps higher than the standard height (7 inches) and always use a handrail for balance. As you become stronger and more mobile, you can begin to climb stairs foot over foot.

Advanced Exercises and Activities

The pain from your hip problems before your surgery and the pain and swelling after surgery have weakened your hip muscles. A full recovery will take many months. The following exercises and activities will help your hip muscles recover fully.

These exercises should be done in 10 repetitions, 4 times a day. Place one end of the tubing around the ankle of your operated leg and attach the opposite end of the tubing to a stationary object such as a locked door or heavy furniture. Hold on to a chair or bar for balance.

Elastic Tube Exercises

Resistive Hip Flexion

Stand with your feet slightly apart. Bring your operated leg forward keeping the knee straight. Allow your leg to return to its previous position.

Figure 22. Resistive Hip Flexion exercise after a hip replacement

Resistive Hip Flexion exercise after a hip replacement

Resistive Hip Abduction

Stand sideways from the door to which the tubing is attached and extend your operated leg out to the side. Allow your leg to return to its previous position.

Figure 23. Resistive Hip Abduction exercise after hip replacement

Resistive Hip Abduction exercise after hip replacement

Resistive Hip Extensions

Face the door to which the tubing is attached and pull your leg straight back. Allow your leg to return to its previous position.

Figure 24. Resistive Hip Extensions exercise after hip replacement

Resistive Hip Extensions exercise after hip replacement

Exercycling

Exercycling is an excellent activity to help you regain muscle strength and hip mobility.

At first, adjust the seat height so that the bottom of your foot just touches the pedal with your knee almost straight. Pedal backwards at first. Ride forward only after a comfortable cycling motion is possible backwards.

As you become stronger (at about 4 to 6 weeks) slowly increase the tension on the exercycle. Exercycle for 10 to 15 minutes twice a day, gradually building up to 20 to 30 minutes, 3 or 4 times a week.

References
  1. Keating JF, Grant A, Masson M, Scott NW, Forbes JF. Randomized comparison of reduction and fixation, bipolar hemiarthroplasty, and total hip arthroplasty Treatment of displaced intracapsular hip fractures in healthy older patients. J Bone Joint Surg Am. 2006;88:249–260. doi: 10.2106/JBJS.E.00215
  2. Baker RP, Squires B, Gargan MF, Bannister GC. Total hip arthroplasty and hemiarthroplasty in mobile, independent patients with a displaced intracapsular fracture of the femoral neck. A randomized, controlled trial. J Bone Joint Surg Am. 2006;88:2583–2589. doi: 10.2106/JBJS.E.01373
  3. Hedbeck CJ, Blomfeldt R, Lapidus G, Törnkvist H, Ponzer S, Tidermark J. Unipolar hemiarthroplasty versus bipolar hemiarthroplasty in the most elderly patients with displaced femoral neck fractures: a randomised, controlled trial. International Orthopaedics. 2011;35(11):1703-1711. doi:10.1007/s00264-011-1213-y. https://www.ncbi.nlm.nih.gov/pmc/articles/PMC3193971/
  4. Stability of hip hemiarthroplasties. Varley J, Parker MJ. https://www.ncbi.nlm.nih.gov/pmc/articles/PMC3456984/pdf/264_2004_Article_572.pdfInt Orthop. 2004 Oct; 28(5):274-7.
  5. Hedbeck CJ, Blomfeldt R, Lapidus G, Törnkvist H, Ponzer S, Tidermark J. Unipolar hemiarthroplasty versus bipolar hemiarthroplasty in the most elderly patients with displaced femoral neck fractures: a randomised, controlled trial. International Orthopaedics. 2011;35(11):1703-1711. doi:10.1007/s00264-011-1213-y https://www.ncbi.nlm.nih.gov/pmc/articles/PMC3193971/
  6. Cornell CN, Levine D, O’Doherty J, Lyden J (1998) Unipolar versus bipolar hemiarthroplasty for the treatment of femoral neck fractures in the elderly. Clin Orthop Relat Res 348:67–71
  7. Davison JN, Calder SJ, Anderson GH, Ward G, Jagger C, Harper WM, Gregg PJ. Treatment for displaced intracapsular fracture of the proximal femur. A prospective, randomised trial in patients aged 65 to 79 years. J Bone Joint Surg Br. 2001;83:206–212. doi: 10.1302/0301-620X.83B2.11128
  8. Raia FJ, Chapman CB, Herrera MF, Schweppe MW, Michelsen CB, Rosenwasser MP (2003) Unipolar or bipolar hemiarthroplasty for femoral neck fractures in the elderly? Clin Orthop Relat Res 259–265
  9. Calder SJ, Anderson GH, Jagger C, Harper WM, Gregg PJ. Unipolar or bipolar prosthesis for displaced intracapsular hip fracture in octogenarians: a randomised prospective study [see comments] J Bone Joint Surg Br. 1996;78:391–394
  10. Concerns about Metal-on-Metal Hip Implants. https://www.fda.gov/MedicalDevices/ProductsandMedicalProcedures/ImplantsandProsthetics/MetalonMetalHipImplants/ucm241604.htm
read more
Procedures

Echocardiogram

echocardiogram

What is an echocardiogram

Echocardiogram also called heart ultrasound or “echo”, is a painless test that uses sound waves (ultrasound) to create moving pictures of your heart. An echocardiogram is a type of ultrasound scan, which means a small probe is used to send out high-frequency sound waves that create echoes when they bounce off different parts of the body. These echoes are picked up by the probe and turned into a moving image that’s displayed on a monitor while the scan is carried out. The pictures show the size and shape of your heart and how well the heart chambers and valves are working. They also show how well your heart’s chambers and valves are working. The picture and information an echocardiogram produces is more detailed than a standard x-ray image and an echocardiogram does not expose you to harmful x-ray radiation.

Echocardiogram is the cheapest and least invasive method available for screening cardiac anatomy.

Echocardiogram also can pinpoint areas of heart muscle that aren’t contracting well because of poor blood flow or injury from a previous heart attack. A type of echocardiogram called Doppler ultrasound shows how well blood flows through your heart’s chambers and valves.

Echocardiogram can detect possible blood clots inside the heart, fluid buildup in the pericardium (the sac around the heart), and problems with the aorta. The aorta is the main artery that carries oxygen-rich blood from your heart to your body.

Doctors also use echocardiogram to detect heart problems in infants and children.

An echocardiogram may be requested by a heart specialist (cardiologist) or any doctor who thinks you might have a problem with your heart, including your family physician.

Echocardiogram is usually be carried out at a hospital or clinic by a cardiologist or a trained specialist called a cardiac physiologist.

Although it has a similar name, an echocardiogram isn’t the same as an electrocardiogram (ECG or EKG), which is a test used to check your heart’s rhythm and electrical activity.

Abnormal echocardiogram results may indicate:

  • Heart valve disease
  • Cardiomyopathy
  • Pericardial effusion
  • Other heart abnormalities

Echocardiogram test is used to evaluate and monitor many different heart conditions.

Figure 1. The anatomy of the heart

Heart-Anatomy

Figure 2. The anatomy of the heart chambers

Heart-Anatomy-Cut-Section

Figure 3. Top view of the 4 heart valves

The-Four-Valves-of-the-Heart

Figure 4. Heart valves function

heart valves function

What does echocardiogram show?

Echocardiogram shows the size, structure, and movement of various parts of your heart. These parts include the heart valves, the septum (the wall separating the right and left heart chambers), and the walls of the heart chambers. Doppler ultrasound shows the movement of blood through your heart.

Your doctor may use echocardiogram to:

  • Diagnose heart problems
  • Guide or determine next steps for treatment
  • Monitor changes and improvement
  • Determine the need for more tests

Echocardiogram can detect many heart problems. Some might be minor and pose no risk to you. Others can be signs of serious heart disease or other heart conditions. Your doctor may use echocardiogram to learn about:

  • The size of your heart. An enlarged heart might be the result of high blood pressure, leaky heart valves, or heart failure. Echo also can detect increased thickness of the ventricles (the heart’s lower chambers). Increased thickness may be due to high blood pressure, heart valve disease, or congenital heart defects.
  • Heart muscles that are weak and aren’t pumping well. Damage from a heart attack may cause weak areas of heart muscle. Weakening also might mean that the area isn’t getting enough blood supply, a sign of coronary heart disease.
  • Heart valve problems. Echo can show whether any of your heart valves don’t open normally or close tightly.
  • Problems with your heart’s structure. Echo can detect congenital heart defects, such as holes in the heart. Congenital heart defects are structural problems present at birth. Infants and children may have echo to detect these heart defects.
  • Blood clots or tumors. If you’ve had a stroke, you may have echo to check for blood clots or tumors that could have caused the stroke.

Echocardiogram with abnormal results

Tetralogy of Fallot with pulmonary atresia: Fetal echocardiogram

3VT view demonstrates reverse filling of the duct, a key feature differentiating this subtype from the more common Tetralogy of Fallot with pulmonary stenosis.

Note that the duct is on the right side of the image, as the fetus is in breech position.

There are a number of different subtypes of tetralogy of Fallot: Tetralogy of Fallot with pulmonary stenosis (75%), Tetralogy of Fallot with pulmonary atresia (20%) and Dysplastic (absent/ring) pumonary valve syndrome (5%).

This case demonstrates the typical findings on the standard fetal echo views in a case of tetralogy of Fallot with pulmonary atresia. The key features that differentiate this from the more common pulmonary stenosis subtype are the absence of the pulmonary trunk on the RVOT view and reverse flow in the ductus appreciated on the 3VT view.

Tetralogy of Fallot with absent pulmonary valve syndrome: fetal echocardiogram. Age: Second trimester

Who needs an echocardiogram?

Your doctor may recommend echocardiogram (echo) if you have signs or symptoms of heart problems.

For example, shortness of breath and swelling in the legs are possible signs of heart failure. Heart failure is a condition in which your heart can’t pump enough oxygen-rich blood to meet your body’s needs. Echo can show how well your heart is pumping blood.

Echocardiogram also can help your doctor find the cause of abnormal heart sounds, such as heart murmurs. Heart murmurs are extra or unusual sounds heard during the heartbeat. Some heart murmurs are harmless, while others are signs of heart problems.

Your doctor also may use echocardiogram to learn about:

  • The size of your heart. An enlarged heart might be the result of high blood pressure, leaky heart valves, or heart failure. Echo also can detect increased thickness of the ventricles (the heart’s lower chambers). Increased thickness may be due to high blood pressure, heart valve disease, or congenital heart defects.
  • Heart muscles that are weak and aren’t pumping well. Damage from a heart attack may cause weak areas of heart muscle. Weakening also might mean that the area isn’t getting enough blood supply, a sign of coronary heart disease.
  • Heart valve problems. Echo can show whether any of your heart valves don’t open normally or close tightly.
  • Problems with your heart’s structure. Echo can detect congenital heart defects, such as holes in the heart. Congenital heart defects are structural problems present at birth. Infants and children may have echo to detect these heart defects.
  • Blood clots or tumors. If you’ve had a stroke, you may have echo to check for blood clots or tumors that could have caused the stroke.

Your doctor also might recommend echo to see how well your heart responds to certain heart treatments, such as those used for heart failure.

When an echocardiogram is used

An echocardiogram can help diagnose and monitor certain heart conditions by checking the structure of the heart and surrounding blood vessels, analyzing how blood flows through them, and assessing the pumping chambers of the heart.

An echocardiogram can help detect:

  • Damage from a heart attack – where the supply of blood to the heart was suddenly blocked
  • Heart failure – where the heart fails to pump enough blood around the body at the right pressure
  • Congenital heart disease – birth defects that affect the normal workings of the heart
  • Problems with the heart valves – problems affecting the valves that control the flow of blood within the heart
  • Cardiomyopathy – where the heart walls become thickened or enlarged
  • Endocarditis – an infection of the heart valves

An echocardiogram can also help your doctors decide on the best treatment for these conditions.

How an echocardiogram is carried out

There are several different ways an echocardiogram can be carried out, but most people will have what’s known as a transthoracic echocardiogram (TTE). This procedure is outlined below.

You won’t usually need to do anything to prepare for the test, unless you’re having a transesophageal echocardiogram (TEE).

The type of echocardiogram you will have depends on the heart condition being assessed and how detailed the images need to be.

For example, a stress echocardiogram may be recommended if your heart problem is triggered by physical activity, while the more detailed images produced by a transesophageal echocardiogram (TEE) may be more useful in helping plan heart surgery.

Echocardiogram types

There are several types of echocardiography (echo)—all use sound waves to create moving pictures of your heart. This is the same technology that allows doctors to see an unborn baby inside a pregnant woman.

Unlike x rays and some other tests, echocardiogram doesn’t involve radiation.

Stress echocardiogram

Stress echocardiogram uses an ultrasound to detect differences in your heart’s chambers and valves and how strongly your heart beats when exercised – during or just after a period of exercise on a treadmill or exercise bike or when stressed using a medicine (e.g. dobutamine) that is given via an injection to make your heart work harder. A radioactive substance (a tracer) is usually injected into your bloodstream as well. Stress echocardiogram will show how your heart works during exercise or stress.

Stress testing provides information about how your heart works during physical stress. Some heart problems are easier to diagnose when your heart is working hard and beating fast.

During stress testing, you exercise (walk or run on a treadmill or pedal a stationary bike) to make your heart work hard and beat fast. Tests are done on your heart while you exercise.

You might have arthritis or another medical problem that prevents you from exercising during a stress test. If so, your doctor may give you medicine to make your heart work hard, as it would during exercise. This is called a pharmacological stress test.

Doctors usually use stress testing to help diagnose coronary heart disease (coronary artery disease). They also use stress testing to find out the severity of coronary heart disease (coronary artery disease).

Coronary heart disease (coronary artery disease) is a disease in which a waxy substance called plaque builds up in the coronary arteries. These arteries supply oxygen-rich blood to your heart.

Plaque narrows the arteries and reduces blood flow to your heart muscle. The buildup of plaque also makes it more likely that blood clots will form in your arteries. Blood clots can mostly or completely block blood flow through an artery. This can lead to chest pain called angina (an-JI-nuh or AN-juh-nuh) or a heart attack.

You may not have any signs or symptoms of coronary heart disease (coronary artery disease) when your heart is at rest. But when your heart has to work harder during exercise, it needs more blood and oxygen. Narrow arteries can’t supply enough blood for your heart to work well. As a result, signs and symptoms of coronary heart disease (coronary artery disease) may occur only during exercise.

A stress test can detect the following problems, which may suggest that your heart isn’t getting enough blood during exercise:

  • Abnormal changes in your heart rate or blood pressure
  • Symptoms such as shortness of breath or chest pain, especially if they occur at low levels of exercise
  • Abnormal changes in your heart’s rhythm or electrical activity

During a stress test, if you can’t exercise for as long as what is considered normal for someone your age, it may be a sign that not enough blood is flowing to your heart. However, other factors besides coronary heart disease (coronary artery disease) can prevent you from exercising long enough (for example, lung disease, anemia, or poor general fitness).

Doctors also may use stress testing to assess other problems, such as heart valve disease or heart failure.

A stress echocardiogram also can show areas of poor blood flow to your heart, dead heart muscle tissue, and areas of the heart muscle wall that aren’t contracting well. These areas may have been damaged during a heart attack, or they may not be getting enough blood.

Other imaging stress tests use radioactive dye to create pictures of blood flow to your heart. The dye is injected into your bloodstream before the pictures are taken. The pictures show how much of the dye has reached various parts of your heart during exercise and while you’re at rest.

Tests that use radioactive dye include a thallium or sestamibi stress test and a positron emission tomography (PET) stress test. The amount of radiation in the dye is considered safe for you and those around you. However, if you’re pregnant, you shouldn’t have this test because of risks it might pose to your unborn child.

Imaging stress tests tend to detect coronary artery disease better than standard (nonimaging) stress tests. Imaging stress tests also can predict the risk of a future heart attack or premature death.

An imaging stress echocardiogram might be done first (as opposed to a standard exercise stress test) if you:

  • Can’t exercise for enough time to get your heart working at its hardest. (Medical problems, such as arthritis or leg arteries clogged by plaque, might prevent you from exercising long enough.)
  • Have abnormal heartbeats or other problems that prevent a standard exercise stress test from giving correct results.
  • Had a heart procedure in the past, such as coronary artery bypass grafting or percutaneous coronary intervention, also known as coronary angioplasty, and stent placement.

What does stress testing show?

Stress testing shows how your heart works during physical stress (exercise) and how healthy your heart is.

A standard exercise stress test uses an EKG (electrocardiogram) to monitor changes in your heart’s electrical activity. Imaging stress tests take pictures of blood flow throughout your heart. They also show your heart valves and the movement of your heart muscle.

Doctors use both types of stress tests to look for signs that your heart isn’t getting enough blood flow during exercise. Abnormal test results may be due to coronary heart disease (coronary artery disease) or other factors, such as poor physical fitness.

If you have a standard exercise stress test and the results are normal, you may not need further testing or treatment. But if your test results are abnormal, or if you’re physically unable to exercise, your doctor may want you to have an imaging stress test or other tests.

Even if your standard exercise stress test results are normal, your doctor may want you to have an imaging stress echocardiogram if you continue having symptoms (such as shortness of breath or chest pain).

Imaging stress echocardiogram is more accurate than standard exercise stress tests, but they’re much more expensive.

Imaging stress echocardiogram shows how well blood is flowing in the heart muscle and reveal parts of the heart that aren’t contracting strongly. They also can show the parts of the heart that aren’t getting enough blood, as well as dead tissue in the heart, where no blood flows. (A heart attack can cause heart tissue to die.)

If your imaging stress echocardiogram suggests significant coronary heart disease (coronary artery disease), your doctor may want you to have more testing and treatment.

Who Needs Stress Testing?

You may need stress testing if you’ve had chest pains, shortness of breath, or other symptoms of limited blood flow to your heart.

Imaging stress tests, especially, can show whether you have coronary heart disease or a heart valve problem. (Heart valves are like doors; they open and shut to let blood flow between the heart’s chambers and into the heart’s arteries. So, like coronary heart disease, faulty heart valves can limit the amount of blood reaching your heart.)

If you’ve been diagnosed with coronary heart disease or recently had a heart attack, a stress test can show whether you can handle an exercise program. If you’ve had percutaneous coronary intervention, also known as coronary angioplasty, (with or without stent placement) or coronary artery bypass grafting, a stress test can show how well the treatment relieves your coronary heart disease symptoms.

You also may need a stress test if, during exercise, you feel faint, have a rapid heartbeat or a fluttering feeling in your chest, or have other symptoms of an arrhythmia (an irregular heartbeat).

If you don’t have chest pain when you exercise but still get short of breath, your doctor may recommend a stress test. The test can help show whether a heart problem, rather than a lung problem or being out of shape, is causing your breathing problems.

For such testing, you breathe into a special tube. This allows a technician to measure the gases you breathe out. Breathing into the tube during stress testing also is done before a heart transplant to help assess whether you’re a candidate for the surgery.

Stress testing shouldn’t be used as a routine screening test for coronary heart disease. Usually, you have to have symptoms of coronary heart disease before a doctor will recommend stress testing.

However, your doctor may want to use a stress test to screen for coronary heart disease if you have diabetes. This disease increases your risk of coronary heart disease. Currently, though, no evidence shows that having a stress test will improve your outcome if you have diabetes.

Stress testing risks

Stress tests pose little risk of serious harm. The chance of these tests causing a heart attack or death is about 1 in 5,000. More common, but less serious side effects linked to stress testing include:

  • An arrhythmia (irregular heartbeat). Often, an arrhythmia will go away quickly once you’re at rest. But if it persists, you may need monitoring or treatment in a hospital.
  • Low blood pressure, which can cause you to feel dizzy or faint. This problem may go away once your heart stops working hard; it usually doesn’t require treatment.
  • Jitteriness or discomfort while getting medicine to make your heart work hard and beat fast (you may be given medicine if you can’t exercise). These side effects usually go away shortly after you stop getting the medicine. Sometimes the symptoms may last a few hours.

Also, some of the medicines used for pharmacological stress tests can cause wheezing, shortness of breath, and other asthma-like symptoms. Sometimes these symptoms are severe and require treatment.

What to expect before stress testing

Stress testing is done in a doctor’s office or at a medical center or hospital. You should wear shoes and clothes in which you can exercise comfortably. Sometimes you’re given a gown to wear during the test.

Your doctor might ask you to fast (not eat or drink anything but water) for a short time before the test. If you’re diabetic, ask your doctor whether you need to adjust your medicines on the day of the test.

For some stress tests, you can’t drink coffee or other caffeinated drinks for a day before the test. Certain over-the-counter or prescription medicines also may interfere with some stress tests. Ask your doctor whether you need to avoid certain drinks or food or change how you take your medicine before the test.

If you use an inhaler for asthma or other breathing problems, bring it to the test. Make sure you let the doctor know that you use it.

What to expect during stress testing

During all types of stress testing, a doctor, nurse, or technician will always be with you to closely check your health status.

Before you start the “stress” part of a stress test, the nurse will put sticky patches called electrodes on the skin of your chest, arms, and legs. To help an electrode stick to the skin, the nurse may have to shave a patch of hair where the electrode will be attached.

The electrodes will be connected to an EKG (electrocardiogram) machine. This machine records your heart’s electrical activity. It shows how fast your heart is beating and the heart’s rhythm (steady or irregular). An EKG also records the strength and timing of electrical signals as they pass through your heart.

The nurse will put a blood pressure cuff on your arm to check your blood pressure during the stress test. (The cuff will feel tight on your arm when it expands every few minutes.) Also, you might have to breathe into a special tube so the gases you breathe out can be measured.

Next, you’ll exercise on a treadmill or stationary bike. If such exercise poses a problem for you, you might turn a crank with your arms instead. During the test, the exercise level will get harder. You can stop whenever you feel the exercise is too much for you.

If you can’t exercise, medicine might be injected into a vein in your arm or hand. The medicine will increase blood flow through your coronary arteries and make your heart beat fast, as it would during exercise. You can then have the stress test.

The medicine may make you flushed and anxious, but the effects go away as soon as the test is over. The medicine also may give you a headache.

While you’re exercising or getting medicine to make your heart work harder, the nurse will ask you how you’re feeling. You should tell him or her if you feel chest pain, short of breath, or dizzy.

Figure 5. Exercise stress test – the image shows a patient having a stress test. Electrodes are attached to the patient&#039;s chest and connected to an EKG (electrocardiogram) machine. The EKG records the heart’s electrical activity. A blood pressure cuff is used to record the patient’s blood pressure while he walks on a treadmill. 

Exercise stress test

The exercise or medicine infusion will continue until you reach a target heart rate, or until you:

  • Feel moderate to severe chest pain
  • Get too out of breath to continue
  • Develop abnormally high or low blood pressure or an arrhythmia (an irregular heartbeat)
  • Become dizzy

The nurse will continue to check your heart functions and blood pressure after the test until they return to normal levels.

The “stress” part of a stress test (when your heart is working hard) usually lasts about 15 minutes or less.

However, there’s prep time before the test and monitoring time afterward. Both extend the total test time to about an hour for a standard stress test, and up to 3 hours or more for some imaging stress tests.

For an exercise stress echocardiogram test, the nurse will take pictures of your heart using echocardiography before you exercise and as soon as you finish.

A sonographer (a person who specializes in using ultrasound techniques) will apply gel to your chest. Then, he or she will briefly put a transducer (a wand-like device) against your chest and move it around.

The transducer sends and receives high-pitched sounds that you probably won’t hear. The echoes from the sound waves are converted into moving pictures of your heart on a screen.

You might be asked to lie on your side on an exam table for this test. Some stress echocardiogram tests also use dye to improve imaging. The dye is injected into your bloodstream while the test occurs.

Sestamibi or Other Imaging Stress Tests Involving Radioactive Dye

For a sestamibi stress test or other imaging stress test that uses radioactive dye, the nurse will inject a small amount of dye into your bloodstream. This is done through a needle placed in a vein in your arm or hand.

You’ll get the dye about a half-hour before you start exercising or take medicine to make your heart work hard. The amount of radiation in the dye is considered safe for you and those around you. However, if you’re pregnant, you shouldn’t have this test because of risks it might pose to your unborn child.

Pictures will be taken of your heart at least two times: when it’s at rest and when it’s working its hardest. You’ll lie down on a table, and a special camera or scanner that can detect the dye in your bloodstream will take pictures of your heart.

Some pictures may not be taken until you lie quietly for a few hours after the stress test. Some patients may even be asked to return in a day or so for more pictures.

What to expect after stress testing

After stress testing, you’ll be able to return to your normal activities. If you had a test that involved radioactive dye, your doctor may ask you to drink plenty of fluids to flush it out of your body. You shouldn’t have certain other imaging tests until the dye is no longer in your body. Your doctor can advise you further.

Contrast echocardiogram

In contrast echocardiogram a harmless substance called a contrast agent is injected into your bloodstream before an echocardiogram is carried out; this substance shows up clearly on the scan and can help create a better image of your heart.

Fetal echocardiogram

Fetal echo is used to look at an unborn baby’s heart. A doctor may recommend this test to check a baby for heart problems. When recommended, the test is commonly done at about 18 to 22 weeks of pregnancy. For this test, the transducer is moved over the pregnant woman’s belly.

Three-Dimensional echocardiogram

A three-dimensional (3D) echocardiogram creates 3D images of your heart. These detailed images show how your heart looks and works.

During transthoracic echocardiogram or transesophageal echocardiogram, 3D images can be taken as part of the process used to do these types of echo.

Doctors may use 3D echocardiogram to diagnose heart problems in children. They also may use 3D echocardiogram for planning and overseeing heart valve surgery.

Researchers continue to study new ways to use 3D echocardiogram.

Echocardiogram risks or side effects

A standard echocardiogram is a simple, painless and safe procedure. There are no side effects from the scan, although the lubricating gel may feel cold and you may experience some minor discomfort when the electrodes are removed from your skin at the end of the test.

Unlike some other tests and scans, such as X-rays and computerised tomography (CT) scans, no radiation is used during an echocardiogram. However, there are some risks associated with the less common types of echocardiogram.

You may find the transesophageal echocardiogram (TEE) procedure uncomfortable and your throat may feel sore for a few hours afterwards. You won’t be able to drive for 24 hours after the test as you may still feel drowsy from the sedative. There’s also a small chance of the probe damaging your throat.

During a stress echocardiogram, you may feel sick and dizzy and you may experience some chest pain. There’s also a small chance of the procedure triggering an irregular heartbeat or heart attack, but you’ll be monitored carefully during the test and it will be stopped if there are signs of any problems.

Some people have a reaction to the contrast agent used during a contrast echocardiogram. This will often only cause mild symptoms such as itching, but in rare cases a serious allergic reaction can occur.

Transthoracic echocardiogram

When an echocardiogram is done with the transducer placed on the chestwall, outside of your body it’s called transthoracic echocardiogram (TTE) or “surface echocardiogram”. Transthoracic echocardiogram (TTE) is painless and noninvasive. “Noninvasive” means that no surgery is done and no instruments are inserted into your body.

Transthoracic echocardiogram (TTE) is the most commonly performed cardiac ultrasound examination. A high quality transthoracic echocardiogram (TTE) can be performed quickly at the bedside and has the potential to comprehensively evaluate left and right ventricular systolic and diastolic function, regional wall motion, valvular heart disease, and diseases of the pericardium.

Transthoracic echocardiogram is the type of echocardiogram that most people will have.

  • A trained sonographer performs the test. A heart doctor (cardiologist) interprets the results.
  • An instrument called a transducer is placed on various locations on your chest and upper abdomen and directed toward the heart. This device releases high-frequency sound waves.
  • The transducer picks up the echoes of sound waves and transmits them as electrical impulses. The echocardiography machine converts these impulses into moving pictures of the heart. Still pictures are also taken.
  • Pictures can be two-dimensional or three-dimensional. The type of picture will depend on the part of the heart being evaluated and the type of machine.
  • A Doppler echocardiogram evaluates the motion of blood through the heart.

An echocardiogram shows the heart while it is beating. It also shows the heart valves and other structures.

The transthoracic echocardiogram (TTE) has been largely standardized across institutions, such that images are generally obtained from at least 4 separate standard transducer positions which allow for different portions of the heart to be visualized in detail. These standard positions are the parasternal position (which has both long axis and short axis views), apical position , subcostal position and the suprasternal notch position.

In addition to appreciating the power of a transthoracic echocardiogram, after performing transthoracic echocardiograms you will also come to realize the limitations of this technique. Many patients will have suboptimal or in some cases minimal acoustic windows for ultrasound examination and this has been a source of much frustration for technologists and cardiology fellows. In some cases, your lungs, ribs, or body tissue may prevent the sound waves and echoes from providing a clear picture of heart function. For example, patients who are obese, those who have chronic lung disease, who are imaged supine or on a ventilator, or those who are recently post-op from cardiac or thoracic surgery will often have limited windows and possibly uninterpretable images no matter how skilled the sonographer. If this is a problem, the health care provider may inject a small amount of liquid (contrast) through an IV (intravenously) to better see the inside of the heart. Some of these limitations can be overcome with off axis imaging or with transesophageal echocardiogram (TEE) imaging if needed.

Figure 6. Transthoracic echocardiogram – the illustration shows a patient having echocardiography. The patient lies on his left side. A sonographer moves the transducer on the patient’s chest, while viewing the echo pictures on a computer.

Transthoracic echocardiogram

Figure 7. Transthoracic echocardiogram – As one can see, the most anterior structure is the right ventricular outflow tract (RVOT), just below the pulmonary artery and in the far field you have the left ventricle (LV), left atrium (LA) and descending aorta (desc. aorta). 

Figure 8. Transthoracic echocardiogram standard parasternal long axis view

transthoracic echocardiogram standard-parasternal-long-axis-view

Notes: In the appropriate standard view shown above, the apex should not be visible. The left ventricle should be oriented almost horizontally. The right ventricular outflow tract [RVOT], left ventricular anteroseptum and inferolateral wall are visualized here as shown above with other key structures labeled. Note the RVOT is seen, and not the right ventricle. Posterior to the left atrium one can sometimes see the proximal descending thoracic aorta. RVOT – right ventricular outflow tract, AML – anterior mitral valve leaflet, PML – posterior mitral valve leaflet, LA – left atrium, LV – left ventricle, AV – aortic valve, and DA – descending aorta.

For a transthoracic echocardiogram, you’ll be asked to remove any clothing covering your upper half before lying down on a bed. You may be offered a hospital gown to cover yourself during the test.

When you’re lying down, several small sticky sensors called electrodes will be attached to your chest to allow an EKG (electrocardiogram) to be done. An EKG is a test that records the heart’s electrical activity. These will be connected to a machine that monitors your heart rhythm during the test.

A doctor or sonographer (a person specially trained to do ultrasounds) will apply lubricating gel to your chest or directly to the ultrasound probe. The gel helps the sound waves reach your heart. You’ll be asked to lie on your left side and the probe called a transducer will be moved across your chest. The transducer transmits ultrasound waves into your chest. A computer will convert echoes from the sound waves into pictures of your heart on a screen. During the test, the lights in the room will be dimmed so the computer screen is easier to see.

The transducer is attached by a cable to a nearby machine that will display and record the images produced.

You won’t hear the sound waves produced by the probe, but you may hear a swishing noise during the scan. This is normal and is just the sound of the blood flow through your heart being picked up by the probe.

The sonographer will record pictures of various parts of your heart. He or she will put the recordings on a computer disc for a cardiologist (heart specialist) to review.

During the test, you may be asked to change positions or hold your breath for a short time. This allows the sonographer to get better pictures of your heart.

At times, the sonographer may apply a bit of pressure to your chest with the transducer. You may find this pressure a little uncomfortable, but it helps get the best picture of your heart. You should let the sonographer know if you feel too uncomfortable.

The process described above is similar to the process for fetal echocardiogram. For that test, however, the transducer is placed over the pregnant woman’s belly at the location of the baby’s heart.

How long does an transthoracic echocardiogram take?

The whole procedure will usually take between 15 and 60 minutes, and you’ll normally be able to go home shortly afterwards.

Transthoracic echocardiogram results

In some cases, it may be possible for the person carrying out the scan to discuss the results with you soon after it’s finished.

However, the images from the scan will usually need to be analyzed before the results are sent to the doctor who requested the test. Your doctor will then discuss the results with you during your next appointment.

Content of transthoracic echocardiogram reports

  • 1) Date of procedure

Before studying a transthoracic echocardiogram (TTE) report, check its date. Even recent studies can convey outdated impressions. Change is expected when a patient’s clinical status changes as a result of worsening disease or in response to treatment.

  • 2) Reason for the test

Explaining why transthoracic echocardiogram (TTE) was ordered directs the laboratory to specific techniques that can best answer a referring physician’s question. Sometimes the referring physician must provide data before a conclusion can be reached. Knowing the type and diameter of a prosthetic valve is prerequisite to quantifying its function. If trends in improvement or deterioration are of interest, consultants need results of previous studies.

  • 3) Image quality

With excellent, good, or satisfactory images, measurements in transthoracic echocardiogram are presumed accurate. Images characterized as technically difficult, fair, or poor can lead to erroneous conclusions. An error of only 1 mm in measuring wall thickness for the left ventricle (LV) translates into a 15-g difference in the estimate of left ventricle (LV) mass 1. A report stating honestly that accurate data could not be obtained is preferable to a seemingly more “complete” analysis based on inaccurate measurements.

Qualitative conclusions also depend on image quality. A statement that “no intracardiac mass or thrombus was seen” implies no more than it states. It cannot be inferred with certainty from technically difficult transthoracic echocardiogram reports that no such lesion exists.

When image quality is unsatisfactory, the reason should be indicated. Referring physicians can decide whether invasive and more costly transesophageal echocardiography would be justified to obtain betransthoracic echocardiogramr images.

  • 4) Rate and rhythm

Correct identification of common dysrhythmias has important implications for transthoracic echocardiogram. Mild (grade II) left ventricle (LV) systolic dysfunction with global hypokinesis is often consistent with a normal myocardium in atrial fibrillation, when the observation has no other meaning unless specific segmental wall motion defects are also identified. In atrial fibrillation, marked bradycardia or tachycardia (data commonly used to assess diastolic function of the LV) are often abnormal—not necessarily because of LV diastolic dysfunction.

During transthoracic echocardiogram a rhythm strip is obtained. Sometimes cardiac rhythm is uninterpretable from a low-voltage rhythm strip, and a consultant might recommend a full electrocardiogram.

  • 5) Chamber sizes

A table often lists the measured chamber sizes (diameters) and compares them with normal values. Increased values indicate chamber dilation.

  • 6) Hypertrophy

The thicknesses of the interventricular septum and posterior left ventricle (LV) wall are used to determine the presence of concentric left ventricle (LV) hypertrophy or asymmetric septal hypertrophy. This practice can be misleading. Elderly patients often have a sigmoid-shaped septum that looks abnormally thick in most views 2. When asymmetric septal hypertrophy is identified, evaluation for dynamic left ventricle (LV) outflow tract obstruction is required; specific comment regarding presence or absence of systolic anterior motion of the anterior mitral valve leaflet is expected.

Because the mass of a normal heart correlates with the size of the patient, the left ventricle (LV) mass index in g/m2 is useful, because it relates LV mass to body surface area. Did laboratory staff measure the patient’s height and weight, or did they merely ask the patient to estimate them? Inaccurate self-reporting leads to inaccurate calculations.

  • 7) Left ventricular systolic function

Left ventricular systolic performance has long been known to indicate severity of heart disease and to predict cardiovascular morbidity and mortality. Left ventricular systolic dysfunction is assessed using the ejection fraction (the percentage of the end diastolic volume ejected during systole). In most cases, this is estimated by eye from all the available echo views. A normal ejection fraction is 50%–80%, but values as low as 5% are compatible with life (end-stage heart failure) 3. A transthoracic echocardiogram report usually classifies LV ejection fraction (LVEF) from normal (grade 1) through severely decreased (grade 4). Most laboratories quantify LV ejection fraction (LVEF). For normal hearts, the Teicholz equation is reasonably accurate 4. When infarction has caused regional wall motion abnormalities, the “disc method” using Simpson’s rule is preferred 5. Reports should indicate which method was employed.

How LV ejection fraction (LVEF) should be interpreted depends on a patient’s clinical status and cardiac condition. While LV ejection fraction (LVEF) in the range of 40% to 55% is abnormal, it often has little clinical significance 6. In moderate or severe mitral regurgitation, however, even a nominally “normal” LVEF of 60% can indicate inadequate left ventricle (LV) performance.

Left ventricular ejection fraction is a misleading indicator of left ventricle (LV) function. It neither reflects myocardial contractility nor measures cardiac performance. Most importantly, LV ejection fraction (LVEF) depends on preload and afterload, both of which can change dramatically within hours.

Stroke volume, cardiac output, cardiac index, and the LV index of myocardial performance, also known as the “Tei Index,” are increasingly reported as more reliable quantifiers of LV systolic function 7. Higher values on the index of myocardial performance are associated with more severe LV disease and poorer prognosis 8.

When LV systolic function is impaired, the report will indicate whether the chamber was globally hypokinetic, typical of cardiomyopathy, or whether regional wall-motion abnormalities were seen, the result of myocardial infarction. To localize and classify LV regional wall motion, the American Society of Echocardiography divides the LV into 16 segments 9. The LV wall motion score index might be reported. Higher scores indicate more dysfunction.

In many US laboratories, intravenous “bubble” contrast is used routinely to outline the LV chamber when the endocardium is poorly outlined. In Canada, financial constraints often preclude this approach.

  • 8) Left ventricular diastolic function

Diastolic dysfunction is an important factor in clinical heart failure 10. Left ventricular diastolic dysfunction usually precedes development of LV systolic dysfunction. Where LV systolic dysfunction exists, diastolic function is inevitably abnormal. The presence and severity of diastolic dysfunction are strong predictors of future nonvalvular atrial fibrillation in the elderly 11. Independent of systolic function, diastolic dysfunction of any degree is a strong predictor of all-cause mortality 12.

Modern echocardiography either reports diastolic function as normal or grades diastolic dysfunction by class (1 through 4) 13. Class 1 diastolic dysfunction (impaired myocardial relaxation) was formerly called “mild diastolic dysfunction,” an expression that is obsolete and misleading. In one series, class 1 diastolic dysfunction was associated with an 8-fold increase in all-cause mortality within 5 years 12. Mortality increases with the severity of diastolic dysfunction.

Increased left atrial (LA) volume is a morphologic expression of diastolic dysfunction, reflecting LV end diastolic pressure 14. It predicts development of atrial fibrillation 15. Size of the left atrium is usually represented by the transverse diameter of the chamber, although this measurement often underestimates the volume of an enlarged left atrium.

  • 9) Right ventricle

When there is no comment on function of the right ventricle, it is presumed normal by visual assessment. A few laboratories report the right-sided index of myocardial performance. This ratio is analogous to the Tei Index for LV performance.

  • 10) Valvular regurgitation

Most reports of valvular insufficiency are based on visual assessment. This common method of classifying regurgitation as trivial (or trace), mild, moderate, or severe is subjective, imprecise, and frequently misleading. Visualization by color Doppler depends on the velocity of the jet, not the volume of blood. A small, high-velocity jet through a small orifice could thus appear to be more severe than a much larger, but slower, blood volume regurgitating through a larger orifice 16.

An increasing number of laboratories quantify valvular regurgitation using the effective regurgitant orifice and the regurgitant volume of blood 17. Some reports refer to this as the “PISA” method (proximal isovelocity surface area) 18.

  • 11) Valvular stenosis

Mitral and aortic stenoses are graded as mild, moderate, or severe, based on the maximum velocity, peak gradient across the valve, and estimated cross-sectional area of the orifice. These data are usually reported. Pulmonary stenosis can be indicated by an increased pressure gradient across the valve.
Intracardiac mass or thrombus.

Aortic stenosis

The etiology of aortic stenosis (AS) can be confirmed by the visualization of either a bicuspid valve or calcification. The severity of the stenosis can be estimated by measuring high-velocity flow across the valve by Doppler. This can be converted to an estimation of the pressure drop. In addition, the effective orifice area can be measured (see Table 1).

Table 1. Echo characteristics of aortic stenosis

Mild or no aortic stenosisSevere aortic stenosis
Area of effective orifice (cm2)>1<0.6
Velocity across valve (m/s)<3>4
Gradient of pressure drop (mm Hg)0–60>60
[Source 3]

Mitral stenosis

With mitral stenosis, as with aortic stenosis, calcified, immobile mitral valve leaflets can be demonstrated with 2D and M-mode echo. Anterior motion of the posterior mitral valve leaflet in diastole (caused by commissural fusion) is characteristic in mitral stenosis. Doppler demonstrates increased flow velocity and can be used to estimate the effective orifice area (see Table 2).

Table 3. Echo characteristics of mitral stenosis

Mild mitral stenosisSevere mitral stenosis
Area of effective orifice (cm2)>1.5<1
Velocity across valve (m/s)<2.5>3
[Source 3]

Clots and masses in the LV are seen best by transthoracic echocardiogram 19. The left atrial appendage is poorly visualized. Transesophageal echocardiography has betransthoracic echocardiogramr sensitivity than transthoracic echocardiogram for detecting an intra-atrial embolic source in stroke 20.

Suspect echogenic features that could represent anatomic structures, unusual artifacts, primary or secondary cardiac tumours, thrombi, or vegetations will also be reported. Technically difficult transthoracic echocardiogram images often cannot differentiate between lesions and artifacts. Reporting physicians will point out any concerns, possibly recommending transesophageal echocardiography for clarification.

  • 12) Septal defects

The location and size of atrial and ventricular septal defects will be reported. Unless the sonographer is specifically looking for a suspected atrial septal defect, images might not be obtained from the subcostal window, the best view for detecting it 21. Contrast echocardiography can be helpful when a septal defect is suspected on clinical grounds but is not visible via transthoracic echocardiogram.

  • 13) Right ventricular systolic pressure

When failure on the right side of the heart is suspected, it is helpful to estimate the right ventricular systolic pressure or pulmonary systolic pressure. Measurements are often elevated by obesity and hypertension, not just by pulmonary hypertension.

  • 14) The E/A ratio

When flow across the mitral valve is assessed with pulsed-wave (PW) Doppler , two waves are characteristically seen. These represent passive filling of the ventricle (early [E] wave) and active filling with atrial systole (atrial [A] wave). Classically, the E-wave velocity is slightly greater than that of the A wave (see Figure 7). However, in conditions that limit the compliance of the LV, two abnormalities are possible:

  • reversal – in which the A wave is greater than the E wave. This indicates slow filling caused by older age, hypertension, left ventricular hypertrophy (LVH), or diastolic dysfunction
  • exaggeration of normal – a tall, thin E wave with a small or absent A wave. This indicates restrictive cardiomyopathy, constrictive pericarditis, or infiltrative cardiac disease (eg, amyloidosis)

Figure 9. Pulsed-wave Doppler – E and A waves representing mitral flow in a healthy heart (E>A)

[Source 3]
  • 15) Wall-motion abnormality

When ischemia occurs, contractile abnormalities of segments of the myocardium can be detected by echo prior to the appearance of electrocardiogram (ECG) changes or symptoms. Therefore, echo can be a valuable tool in the diagnosis of both stable coronary artery disease (via stress echo) and acute myocardial infarction. In the former situation, it offers localization of the ischemic region where the ECG cannot; in the latter, it offers some measure of the extent of the infarct and a screen for complications, such as ventricular septal defect (VSD).

  • 16) Pericardium

The location of pericardial effusion and its size (trace, small, medium, or large) will be reported. Small pericardial effusions are often physiologic. If an effusion is reported, referring physicians want to know whether there is evidence of tamponade, although this is ultimately a clinical diagnosis, not an echocardiographic one. Patients with uncomplicated viral pericarditis have normal echocardiogram results 19.

  • 17) Aorta

The diameter of the aortic root is measured routinely. Sometimes it is possible to identify dilation of the ascending aorta, the arch, or the descending aorta. Aortic dissection is an emergency requiring immediate contact between reporting and referring physicians.

  • 18) Incidental findings

Unsuspected congenital cardiac abnormalities are discovered occasionally. Incidental findings might require investigation using other imaging modalities. Pleural effusions are often seen on the left. Intrahepatic lesions are sometimes identified and extrinsic masses compressing the heart are sometimes revealed.

  • 19) Summary of findings

The limitations of transthoracic echocardiogram are implicit, but they might be stated in the conclusions if the questions asked by referring physicians are known. For example, if a laboratory is asked to rule out cardiac embolism in a patient with atrial fibrillation and a recent stroke, the report might remind the referring physician that the left atrial appendage is not visible on transthoracic echocardiogram and that transesophageal echocardiography is recommended. When myocardial ischemia is suspected in a patient scheduled for surgery, a technician might suggest a nuclear medicine study or stress echocardiography.

Follow-up echocardiography could be suggested. Advice concerning treatment exceeds the mandate of a laboratory report, but many referring physicians appreciate recommendations for prophylactic antibiotics, when indicated.

When transthoracic echocardiogram report conclusions fail to address the reason the procedure was ordered, chances are high that the reason was never stated on the requisition. Physician-to-physician discussion can answer many queries and concerns often raised about transthoracic echocardiogram procedure.

Table 3. The approximate normal values for various cardiac structures. IV: interventricular; LV: left ventricular

Normal ranges for measures of systolic and diastolic function
Echocardiography
 Fractional shortening (%)28–44
Doppler
 Systolic velocity integral (cm)15–35
 Mitral valve E (cm/s)44–100
 Mitral valve A (cm/s)20–60
 E:A ratio0.7–3.1
 Tricuspid valve E (cm/s)20–50
 Tricuspid valve A (cm/s)12–36
 E:A ratio0.8–2.9
Time intervals
 Mitral E deceleration time (ms)139–219
 Mitral A deceleration time (ms)>70
 Isovolumic relaxation time (ms)54–98
Normal intracardiac dimensions (cm)
MenWomen
Left atrium3.0–4.52.7–4.0
LV diastolic diameter4.3–5.94.0–5.2
LV systolic diameter2.6–4.02.3–3.5
IV septum (diastole)0.6–1.30.5–1.2
Posterior wall (diastole)0.6–1.20.5–1.1
[Source 3]

Table 4. Checklist and practice points for Transthoracic Echocardiogram Report

Checklist and practice points for Transthoracic Echocardiogram Report

[Source 22]

Transesophageal echocardiogram

Transesophageal echocardiogram (TEE) is a test that uses sound waves to create high-quality moving pictures of the heart and its blood vessels. During an echocardiogram, a device called a transducer is used to send sound waves (called ultrasound) to the heart. As the ultrasound waves bounce off the structures of the heart, a computer in the echo machine converts them into pictures on a screen.

Transesophageal echocardiogram involves a flexible tube (probe) with a transducer at its tip. Your doctor will guide the probe down your throat and into your esophagus (the passage leading from your mouth to your stomach). This approach allows your doctor to get more detailed pictures of your heart because the esophagus is directly behind the heart.

Transesophageal echocardiogram can help doctors diagnose heart and blood vessel diseases and conditions in adults and children. Doctors also may use TEE to guide cardiac catheterization, help prepare for surgery, or assess a patient’s status during or after surgery.

Doctors may use transesophageal echocardiogram in addition to transthoracic echocardiogram (TTE), the most common type of echo. If transthoracic echocardiogram (TTE) pictures don’t give doctors enough information, they may recommend transesophageal echocardiogram to get more detailed pictures.
Outlook

Transesophageal echocardiogram has a low risk of complications in both adults and children. Even newborns can have transesophageal echocardiogram.

Types of Transesophageal Echocardiogram

Standard transesophageal echocardiography (TEE) pictures are two-dimensional (2D). It’s also possible to get three-dimensional (3D) pictures from transesophageal echocardiogram. These pictures provide even more details about the structure and function of the heart and its blood vessels.

Doctors can use 3D transesophageal echocardiogram to help diagnose heart problems, such as congenital heart disease and heart valve disease. Doctors also may use this technology to assist with heart surgery.

What does Transesophageal Echocardiogram show?

Transesophageal echocardiogram provides high-quality moving pictures of your heart and blood vessels. These pictures help doctors detect and treat heart and blood vessel diseases and conditions.

Transesophageal echocardiogram creates pictures from inside the esophagus (the passage leading from the mouth to the stomach) or, sometimes, from inside the stomach. Because the esophagus lies directly behind the heart, transesophageal echocardiogram provides closeup pictures of the heart.

Transesophageal echocardiogram also offers different views and may provide more detailed pictures than transthoracic echocardiography (TTE), the most common type of echo.

Your doctor may recommend transesophageal echocardiogram if he or she needs more information than transthoracic echocardiography (TTE) can provide. transesophageal echocardiogram can help diagnose and assess heart and blood vessel diseases and conditions in adults and children. Examples of these diseases and conditions include:

  • Coronary heart disease
  • Congenital heart disease
  • Heart attack
  • Aortic aneurysm
  • Endocarditis
  • Cardiomyopathy
  • Heart valve disease
  • Injury to the heart or aorta (the main artery that carries oxygen-rich blood from your heart to your body)

Transesophageal echocardiogram also can show blood clots that may have caused a stroke or that may affect treatment for atrial fibrillation, a type of arrhythmia.

Doctors also may use transesophageal echocardiogram during cardiac catheterization. Transesophageal echocardiogram can help doctors guide the catheter (thin, flexible tube) through the blood vessels. Transesophageal echocardiogram also can help doctors prepare for surgery or assess a patient’s status during or after surgery.

Who Needs Transesophageal Echocardiography

Doctors may recommend transesophageal echocardiography (TEE) to help diagnose a heart or blood vessel disease or condition. Transesophageal echocardiogram can be used for adults and children.

Doctors also may use transesophageal echocardiogram to guide cardiac catheterization, help prepare for surgery, or assess a patient’s status during or after surgery.

Transesophageal Echocardiography as a Diagnostic Tool

Transesophageal echocardiogram helps doctors detect problems with the structure and function of the heart and its blood vessels.

In general, transthoracic echocardiogram (TTE) is the first echocardiogram test used to diagnose heart and blood vessel problems. However, you might have transesophageal echocardiogram if your doctor needs more information or more detailed pictures than transthoracic echocardiogram (TTE) can provide.

For transthoracic echocardiogram (TTE), the transducer (the device that sends the sound waves) is placed on the chest, outside of the body. This means the sound waves may not always have a clear path to the heart and blood vessels. For example, obesity, scarring from previous heart surgery, or certain lung problems (such as a collapsed lung) may block the sound waves.

For transesophageal echocardiogram, the transducer is at the tip of a flexible tube (probe). Your doctor will guide the probe down your throat and into your esophagus (the passage leading from your mouth to your stomach).

Your healthcare provider may recommend a transesophageal echocardiogram (TEE) if:

  • The regular (or transthoracic echocardiogram) is unclear. Unclear results may be due to the shape of your chest, lung disease, or excess body fat.
  • An area of the heart needs to be looked at in more detail.

This approach allows your doctor to get more detailed pictures of your heart because the esophagus is directly behind the heart.

Doctors may use transesophageal echocardiogram to help diagnose:

  • Coronary heart disease
  • Congenital heart disease
  • Heart attack
  • Aortic aneurysm
  • Endocarditis
  • Cardiomyopathy
  • Heart valve disease/abnormal heart valves
  • Injury to the heart or aorta (the main artery that carries oxygen-rich blood from your heart to your body)
  • Abnormal heart rhythms
  • Damage to the heart muscle from a heart attack
  • Heart murmurs
  • Inflammation (pericarditis) or fluid in the sac around the heart (pericardial effusion)
  • Infection on or around the heart valves (infectious endocarditis)
  • Pulmonary hypertension
  • Ability of the heart to pump (for people with heart failure)
  • Source of a blood clot after a stroke or TIA (transient ichemic attack or mini stroke)

Transesophageal echocardiogram also can show blood clots that may have caused a stroke or that may affect treatment for atrial fibrillation, a type of arrhythmia.

Transesophageal Echocardiography and Cardiac Catheterization

Cardiac catheterization is a medical procedure used to diagnose and/or treat certain heart conditions. During this procedure, a long, thin, flexible tube called a catheter is put into a blood vessel in your arm, groin (upper thigh), or neck and threaded to your heart.

Doctors may use transesophageal echocardiogram to help guide the catheter while they’re doing the procedure.

Through the catheter, doctors can do tests and treatments on your heart. For example, cardiac catheterization might be used to repair holes in the heart, heart valve disease, and abnormal heart rhythms.

Transesophageal Echocardiography and Surgery

Doctors may use transesophageal echocardiogram to prepare for a patient’s surgery and identify possible risks. For example, they may use transesophageal echocardiogram to look for possible sources of blood clots in the heart or aorta. Blood clots can cause a stroke during surgery.

Transesophageal echocardiogram might be used in the operating room after a patient receives medicine to make him or her sleep during the surgery. The test can show the heart’s structure and function and help guide the surgery.

Transesophageal echocardiogram also helps doctors assess a patient’s status during surgery. For example, transesophageal echocardiogram can help check for blood flow and blood pressure problems.

At the end of surgery, transesophageal echocardiogram might be used again to check how well the surgery worked. For example, transesophageal echocardiogram can show whether heart valves are working well. Transesophageal echocardiogram also can show how well the heart is pumping.

People having surgery that isn’t related to the heart also may have transesophageal echocardiogram to check their heart function if they have known heart disease or a critical illness.

Transesophageal echocardiogram risks

Transesophageal echocardiogram (TEE) has a very low risk of serious complications in both adults and children. To reduce your risk, your medical team will carefully check your heart rate and other vital signs during and after the transesophageal echocardiogram procedure.

Some risks are associated with the medicine that might be used to help you relax during transesophageal echocardiogram. You may have a bad reaction to the medicine, problems breathing, or nausea (feeling sick to your stomach). Usually, these problems go away without treatment.

Your throat also might be sore for a few hours after the test. Although rare, the probe used during transesophageal echocardiogram can damage the esophagus (the passage leading from your mouth to your stomach).

Talk with your medical provider about the risks associated with this test.

Transesophageal echocardiogram prep

Transesophageal echocardiogram most often is done in a hospital. You usually will need to fast (not eat or drink) for 4 to 8 hours prior to the test, but your doctor will let you know exactly how long you should fast.

You should let your doctor know whether you’re taking any blood-thinning medicines, have trouble swallowing, or are allergic to any medicines. If you have dentures or oral prostheses, you’ll need to remove them before the test.

You may be given medicine to help you relax during transesophageal echocardiogram. If so, you’ll have to arrange for a ride home after the test because the medicine can make you sleepy.

Talk with your doctor about whether you need to take any special steps before having transesophageal echocardiogram. Your doctor can tell you whether you need to change how you take your regular medicines on the day of the test or whether you need to make other changes.

What to expect during transesophageal echocardiogram procedure

During transesophageal echocardiography, your doctor or your child’s doctor will use a probe with a transducer at its tip. The transducer sends sound waves (ultrasound) to the heart. Probes come in many sizes; smaller probes are used for children and newborns.

The back of your mouth will be numbed with gel or spray before the probe is put down your throat. You may feel some discomfort as the probe is guided into your esophagus (the passage leading from your mouth to your stomach).

Adults having transesophageal echocardiogram may get medicine to help them relax during the test. The medicine will be injected into a vein.

Children always receive medicine to help them relax or sleep if they’re having transesophageal echocardiogram. This helps them remain still so the doctor can safely insert the probe and take good pictures of the heart and blood vessels.

Your doctor will insert the probe into your mouth or nose. He or she will then gently guide it down your throat into your esophagus. Your esophagus lies directly behind your heart. During this process, your doctor will take care to protect your transesophageal echocardiogramth and mouth from injury.

Your blood pressure, blood oxygen level, and other vital signs will be checked during the test. You may be given oxygen through a tube in your nose.

During the transesophageal echocardiogram:

  • You will need to take off your clothes from the waist up and lie on an exam table on your back.
  • Electrodes will be placed on your chest to monitor your heart beat.
  • A gel is spread on your chest and the transducer will be moved over your skin. You will feel a slight pressure on your chest from the transducer.
  • You may be asked to breathe in a certain way or to roll over onto your left side. Sometimes, a special bed is used to help you stay in the proper position.
  • If you are having a transesophageal echocardiogram, you will receive some sedating (relaxing) medicines prior to having the probe inserted.

Figure 10. Esophagus

esophagus

Figure 11. Transesophageal echocardiogram – Figure A shows a transesophageal echocardiography probe in the esophagus, which is located behind the heart. Sound waves from the probe create high-quality pictures of the heart. Figure B shows an echocardiogram of the heart’s lower and upper chambers (ventricles and atrium, respectively). 

Transesophageal echocardiogramHow long does an transesophageal echocardiogram take?

Transesophageal echocardiogram takes less than an hour. However, if you received medicine to help you relax, you might be watched for a few hours after the test for side effects from the medicine.

After Transesophageal Echocardiogram – Recovery

After having transesophageal echocardiogram, your or your child’s blood pressure, blood oxygen level, and other vital signs will continue to be closely watched. You can likely go home a few hours after having the test.

After the transesophageal echocardiogram, you may have a sore throat for a few hours. You shouldn’t eat or drink for 30–60 minutes after having transesophageal echocardiogram. Most people can return to their normal activities within about 24 hours of the test.

Talk with your doctor or your child’s doctor to learn more about what to expect after having transesophageal echocardiogram.

References
  1. King DL. Three-dimensional echocardiography: use of additional spatial data for measuring left ventricular mass. Mayo Clin Proc. 1994;69:293–295 https://www.ncbi.nlm.nih.gov/pubmed/8133671
  2. Krasnow N. Subaortic septal bulge simulates hypertrophic cardiomyopathy by angulation of the septum with age, independent of focal hypertrophy: an echocardiographic study. J Am Soc Echocardiogr. 1997;10:545–555. https://www.ncbi.nlm.nih.gov/pubmed/9203495
  3. Ashley EA, Niebauer J. Cardiology Explained. London: Remedica; 2004. Chapter 4, Understanding the echocardiogram. Available from: https://www.ncbi.nlm.nih.gov/books/NBK2215
  4. Kronik G, Slany J, Mosslacher H. Comparative value of eight M-mode echocardiographic formulas for determining left ventricular stroke volume. Circulation. 1979;60:1308–1316. https://www.ncbi.nlm.nih.gov/pubmed/498456
  5. Weyman AE. Principles and practice of echocardiography. 2nd ed. Philadelphia, Pa: Lea and Febiger; 1994.
  6. Edwards WD, Tajik AJ, Seward JB. Standardized nomenclature and anatomic basis for regional tomographic analysis of the heart. Mayo Clin Proc. 1981;56:479–497 https://www.ncbi.nlm.nih.gov/pubmed/7266059
  7. Tei C, Ling LH, Hodge DO, Bailey KR, Oh JK, Rodeheffer RJ, et al. New index of combined systolic and diastolic myocardial performance: a simple and reproducible measure of cardiac function—a study in normals and dilated cardiomyopathy. J Cardiol. 1995;26(6):357–366. https://www.ncbi.nlm.nih.gov/pubmed/8558414
  8. Harjai KJ, Scott L, Vivekananthan K, Nunez E, Edupuganti R. The Tei Index: a new prognostic index for patients with symptomatic heart failure. J Am Soc Echocardiogr. 2002;15:864–868. https://www.ncbi.nlm.nih.gov/pubmed/12221401
  9. Schiller NB, Shah PM, Crawford M, DeMaria A, Devereaux R, Feigenbaum H, et al. Recommendations for quantitation of the left ventricle by two-dimensional echocardiography. American Society of Echocardiography Committee on Standards, Subcommittee on Quantitation of Two-dimensional Echocardiograms. J Am Soc Echocardiogr. 1989;2:358–367. https://www.ncbi.nlm.nih.gov/pubmed/2698218
  10. Vasan RS, Benjamin EJ, Levy D. Prevalence, clinical features and prognosis of diastolic heart failure: an epidemiologic perspective. J Am Coll Cardiol. 1995;26:1565–1574. https://ac.els-cdn.com/0735109795003819/1-s2.0-0735109795003819-main.pdf?_tid=c6722420-5e9d-4b1c-81ed-7375141c6e7e&acdnat=1527864935_22907da6e34fb48f16341dfb35f87143
  11. Tsang TSM, Gersh BJ, Appleton CP, Tajik AJ, Barnes ME, Bailey KR, et al. Left ventricular diastolic dysfunction as a predictor of the first diagnosed nonvalvular atrial fibrillation in 840 elderly men and women. J Am Coll Cardiol. 2002;40:1636–1644. https://www.sciencedirect.com/science/article/pii/S0735109702023732
  12. Redfield MM, Jacobsen SJ, Burnett JC, Jr, Mahoney DW, Bailey KR, Rodeheffer RJ. Burden of systolic and diastolic ventricular dysfunction in the community. JAMA. 2003;289(2):194–202. https://www.ncbi.nlm.nih.gov/pubmed/12517230
  13. Rakowski H, Appelton CP, Chan KL, Dumesnil JG, Honos G, Jue J, et al. Recommendations for the measurement and reporting of diastolic function by echocardiography. J Am Soc Echocardiogr. 1996;9:736–760. https://www.ncbi.nlm.nih.gov/pubmed/8887883
  14. Tsang TSM, Barnes ME, Gersh BJ, Bailey KR, Seward JB. Left atrial volume as a morphophysiological expression of left ventricular diastolic dysfunction and relation to cardiovascular risk burden. Am J Cardiol. 2002;90:1284–1289. https://www.ncbi.nlm.nih.gov/pubmed/12480035
  15. Tsang TS, Barnes ME, Bailey KR, Leibson CL, Montgomery SC, Takemoto Y, et al. Left atrial volume: important risk marker of incident atrial fibrillation in 1655 older men and women. Mayo Clin Proc. 2001;76:467–475. https://www.ncbi.nlm.nih.gov/pubmed/11357793
  16. McCully RB, Enriquez-Sarano M, Tajik AJ, Seward JB. Overestimation of severity of ischemic/functional mitral regurgitation by color Doppler jet arm. Am J Cardiol. 1994;74:790–793. https://www.ncbi.nlm.nih.gov/pubmed/7942551
  17. Enriquez-Sarano M, Seward JB, Bailey KR, Tajik AJ. Effective regurgitant orifice area: a noninvasive Doppler development of an old hemodynamic concept. J Am Coll Cardiol. 1994;23:443–451. https://ac.els-cdn.com/0735109794904324/1-s2.0-0735109794904324-main.pdf?_tid=4351f52a-2170-4152-9e38-bf8202aa3548&acdnat=1527865439_0699d25dc55d0ffd31be8a075b1e613a
  18. Yamachika S, Reid CL, Savani D, Meckel C, Paynter J, Knoll M, et al. Usefulness of color Doppler proximal isovelocity surface area in quantitating valvular regurgitation. J Am Soc Echocardiogr. 1997;10:159–168. https://www.ncbi.nlm.nih.gov/pubmed/9083972
  19. Otto CM. The practice of clinical echocardiography. 2nd ed. Philadelphia, Pa: WB Saunders Co; 2002.
  20. Lee RJ, Bartzokis T, Yeoh TK, Grogin HR, Choi D, Schnitther I. Enhanced detection of intracardiac sources of cerebral emboli by transthoracic echocardiography. Stroke. 1991;22:734–739 http://stroke.ahajournals.org/content/22/6/734.long
  21. Schub C, Dimopoulos IN, Seward JB, Callahan JA, Tancredi RG, Schattenberg TT, et al. Sensitivity of two-dimensional echocardiography in the direct visualization of atrial septal defect utilizing the subcostal approach: experience with 154 patients. J Am Coll Cardiol. 1983;2:127–135. https://ac.els-cdn.com/S0735109783803854/1-s2.0-S0735109783803854-main.pdf?_tid=c4b95043-e126-4c5d-9fa8-42a2697497f5&acdnat=1527865641_0b1a512457ba618a44014d536c83bf4e
  22. McAlister NH, McAlister NK, Buttoo K. Understanding cardiac “echo” reports: Practical guide for referring physicians. Canadian Family Physician. 2006;52(7):869-874. https://www.ncbi.nlm.nih.gov/pmc/articles/PMC1781094/
read more
Procedures

Circumcision

circumcision

What is circumcision

Male circumcision is the surgical procedure for the complete removal of the foreskin, the skin that covers the tip of the penis. The foreskin is the retractable fold of skin that covers the end of the penis. It’s a continuation of the skin that covers the whole penis (see Figure 2 below). Male circumcision procedure is fairly common for newborn boys in certain parts of the world, including the United States. Circumcision after the newborn period is possible, but it’s a more complex procedure.

For some families, male circumcision is a religious ritual. Male circumcision procedure can also be a matter of family tradition, personal hygiene or preventive health care. For others, however, circumcision seems unnecessary or disfiguring.

Contraindications of male circumcision procedure include congenital abnormalities of the penis such as hypospadias, epispadias, megalourethra, webbed penis, and any other condition in which prior circumcision renders treatment more difficult 1. Others are prematurity, bleeding problems, myelomeningocele, and anorectal anomaly 2.

Religious, cultural, medical, and recently public health reasons 3 are known to be the major indications of the procedure. Usually, male circumcision is done in neonatal period but can be performed at any age. To maximize its health benefits 3, to reduce procedural risks and cost 4, however, it is advocated to be offered in neonatal period. Surgical approaches to circumcision are extremely varied 5.

About 25-33% of the total world male population is circumcised 6. In the US, an average of a million newborn males are circumcised yearly 7. Circumcision rate in US is as high as 70%, while in Britain it is 6% 7. In Nigeria, circumcision rate is estimated to be 87% 8. Approximately, 1.2 million circumcisions were performed in the USA in 2009 alone 9 and the incidence of this procedure appears to be decreasing.

According to the American Academy of Pediatrics 10, there are medical benefits and risks to circumcision. Possible benefits include a lower risk of urinary tract infections, penile cancer, and sexually transmitted diseases or acquisition of HIV. There is a low risk of bleeding or infection. The baby might also feel some pain.

The American Academy of Pediatrics 10 said that because of the possible benefits, parents should have the option to circumcise their sons. They recommend that parents discuss circumcision with their baby’s health care provider. Parents should make their decision based on the benefits and risks, as well as their own religious, cultural, and personal preferences.

Circumcision might have various health benefits, including:

  • Easier hygiene. Circumcision makes it simpler to wash the penis. However, boys with uncircumcised penises can be taught to wash regularly beneath the foreskin.
  • Decreased risk of urinary tract infections. The risk of urinary tract infections in males is low, but these infections are more common in uncircumcised males. Severe infections early in life can lead to kidney problems later.
  • Decreased risk of sexually transmitted infections. Circumcised men might have a lower risk of certain sexually transmitted infections, including HIV. Still, safe sexual practices remain essential.
  • Prevention of penile problems. Occasionally, the foreskin on an uncircumcised penis can be difficult or impossible to retract (phimosis). This can lead to inflammation of the foreskin or head of the penis.
  • Decreased risk of penile cancer. Although cancer of the penis is rare, it’s less common in circumcised men. In addition, cervical cancer is less common in the female sexual partners of circumcised men.

The risks of not being circumcised, however, are not only rare, but avoidable with proper care of the penis.

Key points

  • It is imperative that those providing circumcision are adequately trained and that both sterile techniques and effective pain management are used. In general, untrained providers who perform circumcisions have more complications than well-trained providers who perform the procedure, regardless of whether the former are physicians, nurses, or traditional religious providers.
  • Circumcision might not be an option if certain blood-clotting disorders are present. Also, circumcision might not be appropriate for premature babies who still require medical care in the hospital nursery or for babies born with abnormalities of the penis.
  • Circumcision doesn’t affect fertility, nor is circumcision generally thought to enhance or detract from sexual pleasure for men or their partners.
  • Circumcision is usually performed as a short-stay procedure under local or general anesthetic
  • The entire foreskin is removed to leave the head of the penis exposed
  • As well as looking different, your penis may feel different at first after the procedure
  • The average length of a hospital stay during which circumcision was performed was 3.2 days in 2009, which was similar to 2005. This compares to an average length of a hospital stay of 3.8 for male newborn stays without circumcision in 2009 9
  • Circumcision rates were higher in the top income quartiles 9. In 2005, the circumcision rate for the highest income areas (66.1 percent) was 38 percent higher than the lowest income areas (47.8 percent). However, in 2009, the circumcision rate was only 17 percent higher in the highest income areas compared to the lowest (60.4 percent compared to 51.5 percent).
  • Circumcision rates were lowest in large central metropolitan areas (41.2 percent). The highest rate was in rural areas (66.9 percent) 9.
  • The lowest rate of male newborn circumcisions in 2009 occurred in the West (24.6 percent in 2009) compared to 75.2 percent in the Midwest, 67.0 percent in the Northeast, and 55.7 percent in the South 9.
  • Among privately insured male newborns, 66.6 percent received a circumcision in 2009. This was 55 percent higher than for male newborns covered by Medicaid (42.9 percent received a circumcision) and 67 higher than for uninsured male newborns (39.8 percent received a circumcision). There were no significant changes since 2005 9.

Figure 1. Percentage of male circumcisions in newborns 1993-2009 United Statesmale circumcision newborns 1993-2009[Source 11]

Table 1. Characteristics of male newborn stays involving a circumcision, U.S. hospitals, 2005 and 2009
Male newborn stays with a circumcisionMale newborn stays without a circumcision, 2009
20052009
Number of hospital stays1,208,0701,157,510965,280
Mean length of hospital stay, days3.13.23.8
Average total cost per hospital stay*$2,220$2,310$3,760
Aggregate total hospital cost* (billions)$2.7$2.7$3.6
*2005 costs have been inflation-adjusted to 2009 dollars. Costs include the costs for the entire hospital stay, including room and board, laboratory tests, procedures, and all other services.
Source: Agency for Healthcare Research and Quality, Center for Delivery, Organization, and Markets, Healthcare Cost and Utilization Project, Nationwide Inpatient Sample, 2005 and 2009.
[Source 9]
Table 2. Percentage of male newborn stays involving a circumcision by region, U.S. hospitals, 2005 and 2009
20052009
All male newborn hospitals stays55.954.5
Region
Northeast64.5*67.0§
Midwest74.9*75.2§
South56.3*55.7§
West31.1*24.6§
*The proportion of males with a circumcision in this region is significantly different from that in all other regions at p<0.05 in 2005.
§ The proportion of male newborns with a circumcision in this region is significantly different from that in all other regions at p<0.05 in 2009.
Source: Agency for Healthcare Research and Quality, Center for Delivery, Organization, and Markets, Healthcare Cost and Utilization Project, Nationwide Inpatient Sample, 2005 and 2009.
[Source 9]
Table 3. Percentage of male newborn stays involving a circumcision by location of patient residence, 2005 and 2009
20052009
All male newborn hospitals stays55.954.5
Location of patient residence
Large central metro43.0*41.2a, b, c
Large fringe metro (suburbs)†68.8*62.3a
Medium and small metro57.2*55.9b,d
Micropolitan and noncore (rural)64.6*66.9c,d
†Differences between 2005 and 2009 are statistically significant at p<0.05.
* The proportion of male newborns with a circumcision in this location of patient residence is significantly different from that in all other locations at p<0.05 in 2005.
The following comparisons of the proportion of male newborns with a circumcision are significantly different at p<0.05 in 2009: a = large central metro and large fringe metro, b = large central metro and medium-small metro, c = large central metro and micropolitan-noncore, d = medium-small metro and micropolitan-noncore.
Source: Agency for Healthcare Research and Quality, Center for Delivery, Organization, and Markets, Healthcare Cost and Utilization Project, Nationwide Inpatient Sample, 2005 and 2009.
[Source 9]

I’m not planning to have my newborn circumcised. How should I care for his uncircumcised penis?

In an uncircumcised penis, a fold of skin (foreskin) covers the head of the penis. If your baby isn’t circumcised, simply wash his penis with nonirritating soap and water during each bath. There’s no need to use cotton swabs or special cleansers.

At birth, the foreskin of most male babies doesn’t yet pull back (retract) fully. Treat the foreskin gently, being careful not to force it back. Forcing it could cause pain, tearing and bleeding.

Consult the doctor if your baby seems to have discomfort while urinating — especially if the foreskin fills with urine or balloons out during urination — or the foreskin becomes red, itchy or swollen.

As your child gets older, the foreskin of his uncircumcised penis will begin to separate from the tip of the penis. This allows the foreskin to be retracted. As soon as the foreskin can be retracted, it’s important to clean beneath it regularly. Teach him to:

  • Gently pull back the foreskin
  • Clean beneath the foreskin with mild soap and water
  • Rinse and dry beneath the foreskin thoroughly
  • Pull the foreskin back over the head of the penis

Encourage your child to follow the same procedure through adulthood as part of his daily bathing routine.

How the foreskin develops

It’s normal for a baby boy’s foreskin not to pull back (retract) for the first few years of life.

Around the age of two – or later, in some cases – the foreskin should start to separate naturally from the head of the penis (glans). Full separation occurs in most boys by the age of five years.

For some boys, the foreskin can take longer to separate, but this doesn’t mean there’s a problem, it will usually just detach at a later stage.

  • Never try to force your son’s foreskin back, as it may be painful and damage the foreskin.

As the foreskin starts to separate from the head of the penis, you may see the foreskin “ballooning out” when your son passes urine. This can occasionally lead to infection (balanitis), but this ballooning usually settles down with time.

Figure 2. Penis and foreskin anatomy

Penis and foreskin anatomy

Penis and foreskin anatomymale circumcision

Timing of circumcision

It has been widely reported that circumcision complications occur more frequently with increasing age of the patient 12. Bleeding becomes more common during the “minipuberty” of infancy that begins at 4 weeks of age and extends to 3 months of age. This is thought to be due to hormonally mediated increase in penile and prepuce size and vascularity 13. In a recent prospective observation-based study of 583 neonatal circumcisions, Banieghbal reported only two minor bleeding complications requiring sutures. Both occurred in infants aged 3 weeks. Based on use of the Neonatal Infant Pain Scale, he further reported that the ideal timeframe for a “pain free” circumcision is during the first week of life 14. This is further supported by Horowitz and Gershbein who reported zero complications in 98 infants circumcised with a Gomco clamp (see Figure 3 below) in their first month of life versus a 12/32 or a 30% bleeding complication rate requiring sutures or fulguration in those aged 3–8 months 15.

What is the purpose of circumcision

Why circumcision is carried out in men

Circumcision in men may be carried out for:

  • medical reasons – in men, circumcision is most commonly carried out when the foreskin is tight and won’t pull back (retract), which is known as phimosis; however, alternative treatments, such as topical steroids, are sometimes preferred
  • religious and cultural reasons – circumcision is a common practice in the Jewish and Islamic communities, and it’s also practised by many African communities; most cultural circumcisions are carried out on children
  • HIV prevention – there’s evidence that circumcision reduces the risk of heterosexual men acquiring HIV, and it’s encouraged as part of HIV prevention programmes in some African countries with high rates of HIV

Medical reasons for men to have a circumcision

In men, circumcision is sometimes considered a possible treatment option for the following conditions:

  • tight foreskin (phimosis) – where the foreskin is too tight to be pulled back over the head of the penis (glans); this can sometimes cause pain when the penis is erect and, in rare cases, passing urine may be difficult
  • recurrent balanitis – where the foreskin and head of the penis become inflamed and infected
  • paraphimosis – where the foreskin can’t be returned to its original position after being pulled back, causing the head of the penis to become swollen and painful; immediate treatment is needed to avoid serious complications, such as restricted blood flow to the penis
  • balanitis xerotica obliterans (BXO)– a condition that causes phimosis and, in some cases, also affects the head of the penis, which can become scarred and inflamed
  • cancer of the penis – a very rare type of cancer that can occur in men, where a red patch, wart-like growth or ulcer appears on the end of the penis or under the foreskin

In most cases, circumcision will only be recommended when other, less invasive and less risky treatments have been tried and haven’t worked.

Mild cases of phimosis can be treated with topical steroids to help soften the skin and make it easier for the foreskin to retract.

In paraphimosis, a healthcare professional may rub a local anesthetic gel on to the glans to help reduce pain and inflammation. They may then apply pressure to the head of the penis while pushing the foreskin forward.

In severe cases of paraphimosis, local anesthetic gel can be applied to the penis and a small slit is made in the foreskin to help relieve the pressure.

Balanitis and balanitis xerotica obliterans can sometimes be successfully treated using corticosteroid ointment, gel or cream, antibiotic creams or antifungal creams.

The three main treatment options for penile cancer are:

  1. surgery to remove the cancerous cells, and sometimes the surrounding tissue
  2. radiotherapy
  3. chemotherapy

If you’re considering circumcision for a medical reason, it’s worth discussing alternative treatment options with your GP or specialist.

HIV prevention

There’s evidence from several trials 16, 17 carried out in Africa that circumcised men have a lower risk of acquiring HIV from infected women.

The association of circumcision and the decreased likelihood of HIV acquisition applies to heterosexual males. Circumcision seems to be less likely to protect men who have sex with men, however, and has not been associated with decreased acquisition of HIV among men who have sex with men 18. There is fair evidence from 1 study that there is a protective effect of circumcision from HIV infection in men who have sex with men; however, this study used self-report to establish circumcision status 19. One study with fair evidence is neutral regarding the relationship between circumcision and HIV infection in men who have sex with men 18. It is probable that the differences found in the level of protection (or lack of protection) by studies of men who have sex with men are confounded by the fact that men who have sex with men commonly perform both receptive and insertive sex. It is not known to what extent circumcision may be protective against HIV transmission for men who have sex with men who practice insertive sex versus for those who engage in receptive sex.

However, it’s unclear whether male circumcision can help prevent other sexually transmitted infections (STIs).

There have been several studies into male circumcision and the risk of other sexually transmitted infections (STIs), but the evidence to date has been inconclusive and conflicting.

Reasons for circumcision is carried out in boys

Circumcision in boys may be carried out for:

  • medical reasons – for example, as a treatment of last resort for conditions such as a tight foreskin (phimosis) and recurrent infection of the foreskin and head of the penis (balanitis)
  • religious or cultural reasons – it’s a common practice in Jewish and Islamic communities, and it’s also practiced by many African communities; most cultural circumcisions are carried out in young boys

Medical reasons for a boy to have a circumcision

It’s rare for circumcision to be recommended for medical reasons in boys. This is because other less invasive and less risky treatments are usually available.

The following conditions affect the penis and, in rare cases, may require a circumcision:

  • tight foreskin (phimosis) – where the foreskin is too tight to be pulled back over the head of the penis; this can sometimes cause pain when the penis is erect and, in rare cases, passing urine may be difficult
  • recurrent infection (balanitis) – where the foreskin and head of the penis become inflamed and infected
  • paraphimosis – where the foreskin can’t be returned to its original position after being pulled back, causing the head of the penis to become swollen and painful; immediate treatment is needed to avoid serious complications, such as restricted blood flow to the penis
  • balanitis xerotica obliterans (BXO) – a condition that causes phimosis and, in some cases, also affects the head of the penis, which can become scarred and inflamed
  • repeated urinary tract infections (UTIs) – in very rare cases, circumcision may be recommended as a treatment of last resort if a boy has repeated urinary tract infections (UTIs)

These conditions can often be treated successfully with non-surgical treatments, which will often be tried first before circumcision is considered.

Mild cases of phimosis can be treated with topical steroids to help soften the skin and make it easier for the foreskin to retract.

However, circumcision may be necessary if the foreskin is damaged and won’t slide back over the head of the penis. This is very rare before the age of five.

In paraphimosis, a healthcare professional may rub a local anesthetic gel on to the head of the penis (glans) to help reduce pain and inflammation. They may then apply pressure to the glans while pushing the foreskin forward.

In severe cases of paraphimosis, local anesthetic gel can be applied and a small slit made in the foreskin to help relieve the pressure.

Balanitis and balanitis xerotica obliterans can sometimes be successfully treated using corticosteroid ointment, gel or cream, antibiotic creams or antifungal creams.

Most urinary tract infections (UTIs) are mild and can be treated with antibiotics. However, repeated urinary tract infections (UTIs) can occasionally cause kidney damage.

For example, if a boy has a birth defect that causes urine to leak back up into the kidney, bacteria can spread from the foreskin, through the urine, and infect the kidney. Circumcision may be recommended in these cases.

Circumcision procedure

Circumcision surgery for men

Circumcision is usually carried out on a day patient basis. This means you’ll be admitted to hospital on the same day you have surgery and you won’t have to stay overnight.

You’ll be asked not to eat and drink for six hours before surgery if you’re having a general anesthetic.

After you’ve been admitted to hospital, you’ll be seen by the members of the medical team carrying out the procedure, including your surgeon and anesthetist.

This is a good opportunity to discuss any concerns you have and ask questions about anything you’re not sure about. You’ll be asked to sign a consent form to confirm you agree to the surgery.

You’ll usually either have a general anesthetic, which means you’ll be unconscious throughout the procedure, or a local anesthetic injection, which will numb your penis and the surrounding area.

In some cases, a spinal anesthetic, where you’re unable to feel anything below your waist, will be used.

Circumcision is a relatively simple procedure. The foreskin is removed just behind the head of the penis using a scalpel or surgical scissors.

Any bleeding can be stopped using heat (cauterised), and the remaining edges of skin will be stitched together using dissolvable stitches.

Circumcision surgery for boys

Circumcision is similar for older boys and adults. However, the procedure might need to be done under general anesthesia, recovery might take longer and the risk of complications might be greater when done later in life.

Circumcision is usually carried out on a day patient basis. This means your child will be admitted to hospital on the same day he has surgery and won’t need to stay overnight.

He won’t be able to eat or drink before having surgery – you’ll receive detailed information in a letter.

After being admitted to hospital, your child will be seen by the surgeon who will carry out the procedure. They’ll explain the operation in more detail, discuss any concerns and answer any questions you have.

They’ll also ask you to sign a consent form, giving your permission for the operation.

The anesthetist will also visit your child before the operation. They will usually have a general anesthetic, so they’ll be unconscious throughout the procedure and unable to feel any pain or discomfort.

Circumcision is a relatively simple procedure. The foreskin is removed just behind the head of the penis using a scalpel or surgical scissors.

Any bleeding can be stopped using heat (cauterised). The remaining edges of skin are stitched together using dissolvable stitches. It will take up to six weeks for your son’s penis to fully heal.

Newborn circumcision the procedure

Newborn circumcision is often done in the hospital nursery, usually within 10 days after birth.

For newborn circumcision, your son will lie on his back with his arms and legs restrained. After the penis and surrounding area are cleansed, an anesthetic will be injected into the base of the penis or applied to the penis as a cream. A special clamp or plastic ring will be attached to the penis, and the foreskin will be removed.

Afterward, the penis will be covered with an ointment, such as a topical antibiotic or petroleum jelly, and wrapped loosely with gauze. The procedure generally takes about 10 minutes.

Circumcision healing

Recovering after male circumcision in men

When you’re discharged from hospital, you’ll be given advice about your recovery at home, including when you can drive, return to work and have sex.

It usually takes at least 10 days for your penis to heal after circumcision. You’ll probably be advised to take at least one week off work to recover.

You should avoid having sex for at least four weeks after your operation.

Your medical team will give you a contact number to call in case you experience any problems or have any concerns. You should also be given details about your follow-up appointment, which may be at the hospital or with your doctor.

For three or four days after your operation, it’s likely you’ll experience some discomfort and swelling around the head of your penis. Before leaving hospital, you’ll be given painkilling medication, such as paracetamol or ibuprofen, to help ease this.

However, contact your doctor if you have a temperature, increased redness, bleeding, persistent pain or throbbing of your penis, as it could be a sign of infection.

Applying petroleum jelly (Vaseline) around the tip of your penis will stop it sticking to your underwear. Wearing light, loose-fitting clothing for two or three days after your operation will also help avoid irritation to your penis while it heals.

You shouldn’t feel any pain or discomfort while passing urine, but contact your medical team if you do.

Recovering after male circumcision in boys

After the operation, a dressing will be put over the penis to protect the wound. It will be removed before your child goes home.

He will be allowed home after he’s passed urine, which may be slightly uncomfortable at first.

The penis will be sore and inflamed for a few days after the operation. Ointment may be prescribed to use for a few days to help the area heal.

Your child will also need regular pain relief, in the form of paracetamol or ibuprofen, for at least three days.

It may be more comfortable to wear loose clothing – or no clothing at all – on his bottom half for a few days after the operation. Passing urine in the bath or shower may also be more comfortable.

Your child will be able to have a bath the day after the operation. He should avoid riding a bicycle or other toys you sit on until any swelling has gone down.

He should be able to return to school or nursery about a week after the operation. Make sure you tell the school or nursery about the operation.

In most cases, a follow-up appointment won’t be necessary.

However, you should contact your doctor or hospital care team if:

  • the penis is bleeding
  • the penis is still swollen two weeks after the operation
  • passing urine is still painful a few days after the operation

Recovering after male circumcision in newborn / baby

It usually takes seven to 10 days for the penis to heal. The tip of the penis is likely to be sore at first, and the penis might look red, swollen or bruised. You might notice a small amount of yellow fluid on the tip of the penis as well.

If your newborn is fussy as the anesthetic wears off, hold him gently — being careful to avoid putting pressure on the penis.

It’s okay to wash the penis as it heals. For newborns, change the bandage with each diaper change, and apply a dab of petroleum jelly to the tip of the penis to keep it from sticking to the diaper. Change your baby’s diaper often, and make sure the diaper is loosely fastened.

If there’s a plastic ring instead of a bandage, it will drop off on its own — usually within about a week. Once the penis heals, wash it with soap and water during normal bathing.

Problems after circumcision are uncommon. Contact the doctor if:

  • Normal urination doesn’t resume within 12 hours of the circumcision
  • There’s persistent bleeding
  • There’s foul-smelling drainage from the tip of the penis
  • The plastic ring remains in place two weeks after the circumcision

Male circumcision risks

Adult male circumcision risks

In the US, complications after circumcisions carried out for medical reasons are rare and most men don’t experience any significant problems.

Apart from the initial swelling, bleeding and infection are the two most common problems associated with circumcision.

  • There’s between a 1 in 10 and a 1 in 50 chance that you’ll experience bleeding or infection.

Other possible complications of circumcision can include:

  • permanent reduction in sensation in the head of the penis, particularly during sex
  • tenderness around the scar
  • the need to remove stitches that haven’t dissolved
  • occasionally, another operation is needed to remove some more skin from around the head of the penis

Boys circumcision risks

The risks associated with circumcisions when carried out by qualified and experienced doctors are small.

The main risk is bleeding, both during and after the operation. The surgeon will seal off any bleeding during the procedure, and the dressing applied afterwards will absorb any further bleeding.

However, seek medical advice if your child’s penis continues to bleed after they return home.

There are also risks associated with general anesthetic, such as having a serious allergic reaction (anaphylaxis). However, these risks are small.

The anesthetist will explain the risks to you before the operation. You can also read more about the complications and risks of general anesthetic.

You can also have a headache or feel sick or dizzy after having a general anesthetic. However, these side effects should pass quickly.

There’s also a small risk of infection after having a circumcision.

How is circumcision done

Various methods of circumcision are commonly used in the United States today. The choice of circumcision method depends on the physician’s level of comfort and training 20. The most commonly utilized techniques used in the newborn nursery setting are the Gomco clamp, the Mogen clamp, and the Plastibell 20. While all of these can be used in the operating room, the “free-hand circumcision” using either the sleeve technique or the dorsal-ventral slit technique is most commonly used. Each instrument and technique carries its own benefits and complication risks.

The Gomco clamp is a suture-less technique that utilizes a 4-piece device that protects the glans, provides hemostasis and a platform for resecting the prepuce (Figure 3). The circumcision starts by retracting the foreskin to free the adhesions and allow exposure and inspection of the glans for any abnormalities. The metal bell is placed completely over glans shielding it from damage, followed by placement of the platform over the bell and prepuce caring not to draw the skin up too much (the goal is to maintain the penoscrotal junction), placement of the crimping part which will provide hemostatic compression of the skin after tightening down the screw, excision of the prepuce, disassembly of the apparatus without unsealing the skin edges, and, finally, dressing the wound.

Complications from a Gomco circumcision are mainly related to technical factors. It is important to assure that the metal bell completely covers the glans, otherwise insufficient skin will be removed and accidental incision into the glans is possible. A bell which is too large will result in removal of too much skin. As mentioned, overly aggressive retraction of the skin through the platform can lead to excessive skin removal and subsequent corrective surgery; conversely, insufficient drawing up of the skin will lead to an incomplete circumcision, which may also require corrective surgery. Insufficient tightening of the screw results in inadequate compression of the skin and subsequent bleeding. One may consider keeping the screw tightened for several minutes of hemostatic compression before excising the skin.

Figure 3. The Gomco clamp technique for newborn circumcision

Notes: (a) The Gomco clamp consists of 4 pieces: the bell, platform, hooking arm, and screw. These are assembled after placing the bell completely over the glans (b) and the skin drawn through the hole in the platform. Hemostasis is obtained by tightening the screw (c) and the skin excised.

[Source 21]

The Mogen clamp (Figure 4) is a device used for Jewish ritual circumcisions and commonly used by obstetricians, that also serves to provide hemostasis and a platform for adequate skin removal. After lysis of adhesions and inspection of the glans, the edges of the prepuce are elevated and the V-shaped clamp is placed across the prepuce at the desired location assuring that the glans is positioned below the clamp. The clamp is then tightened to provide hemostasis and the skin is amputated. The complications specific to this techniques include injury to the glans if it is not below the inferior edge of the clamp, and an asymmetric incomplete circumcision due to mal-positioning of the clamp (typically more redundancy ventrally). The possible complications include insufficient or excessive skin removal or asymmetric redundancy and glans amputation all due to improper clamp placement.

Figure 4. Mogen clamp male circumcision technique for newborn

Mogen clamp male circumcision technique for newborn

Note: The Mogen clamp is used by drawing the skin to be removed into the V and then providing hemostasis followed by amputation.

[Source 21]

The Plastibell (Figure 5) technique was developed in the 1950s and is a variation of the Gomco clamp. After lysis of penile adhesions, the plastic bell, similar in appearance to the metal Gomco bell, is placed completely over the glans. Hemostasis is then insured by placing a strangulating suture at the level of the corona and this is all left in place. The skin will slough after a few days and the Plastibell falls off 22. The associated complications include incomplete circumcision due to inadequate bell placement or slippage of the Plastibell while tying the hemostatic suture, and glans injury or bleeding due to inadequate hemostatic suture placement 22.

Figure 5. Plastibell male circumcision technique for newborn

Plastibell male circumcision technique for newborn

correctly-positioned-PlastiBell-ring

Note: The Plastibell is placed over the glans and a suture is secured over the skin. After several days, the skin will slough and the Plastibell falls off.

[Source 21]

The “free-hand circumcision” (Figure 6) is accomplished in the operating room and involves excising the skin as marked, hemostasis using electrocautery and then reapproximation of the skin edges using absorbable sutures or octyl-2-cyanoacrylate 23. The lines of incision for the “sleeve technique” are circumferential at the same distance from the corona on the inner and outer preputial surfaces (Figure 6 A). The sleeve of skin is removed and the procedure completed. For the dorsal-ventral slit technique (Figure 7), these incisions are made as their names infer down to the predetermined distance from the coronal edge, and then the incisions are connected leaving the two circumferential free-edges which are then closed after achieving hemostasis.

Figure 6. Free-hand male circumcision technique

Free-hand male circumcision technique

Note: The “sleeve” technique involves incising the inner preputial skin (a) and then the overlying outer preputial skin (b). Sutures are most commonly used to approximate the skin edges (c).

[Source 21]

Figure 7. Dorsal-ventral slit male circumcision technique

Dorsal-ventral slit male circumcision technique

Note: (a) The dorsal-ventral slit technique of circumcision involves making these incisions and then (b) removal of the skin between them. Sutures are most commonly used to approximate the skin edges.

[Source 21]

Male circumcision complications

The rate of adverse events varies widely across reports, depending on the definition chosen for a postoperative complication. In a large meta-analysis of prospective and retrospective series, Weiss et al. reported a frequency of adverse events of and for serious adverse events 24. This can represent a significant cost in terms of utilization resources and healthcare dollars. During a five-year period at the Massachusetts General Hospital, 7.4% of all visits to a pediatric urologist were for circumcision complications. This translated to an average total cost per patient for redo procedures of $1,617 and an estimated annual cost of $137,122 to the institution 25.

For ease of discussion, adverse events following circumcision can be categorized as either early or late complications.

Early complications such as:

  • bleeding,
  • pain,
  • inadequate skin removal, and
  • surgical site infection tend to be minor and quite treatable.

However, postcircumcision bleeding in patients with coagulation disorders can be significant and sometimes even fatal. Other serious early complications include chordee, iatrogenic hypospadias, glanular necrosis, and glanular amputation. The latter, of course, requires prompt surgical intervention.

Late complications include:

  • epidermal inclusion cysts,
  • suture sinus tracts,
  • chordee,
  • inadequate skin removal resulting in redundant foreskin,
  • penile adhesions,
  • phimosis,
  • buried penis,
  • urethrocutaneous fistulae,
  • meatitis, and meatal stenosis.

These are commonly treated in an outpatient setting. Most of the aforementioned conditions are avoidable giving attention to detail and proper technique. Mayer et al. found that some subtle anatomic variations are significantly associated with late circumcision complications, including penoscrotal webbing, suprapubic fat pads, and prematurity 26.

Death

Fortunately, death from neonatal circumcision is fortunately an extremely rare occurrence. King reported a period when 500,000 consecutive circumcisions were performed in New York city without a single fatality 27. However, a case of a misplaced Plastibell ring (see Figure 5) which caused complete meatal obstruction resulted in acute venous stasis and subsequent death from sepsis reported by the Ontario Pediatric Death Review Committee in 2007. In this situation, prompt recognition of the obstruction is critical and primary management should be immediate removal of the Plastibell ring and catheter placement 28. There are other reports in the international literature that describe mortalities from tetanus as a result of circumcisions performed under nonsterile conditions. Bennett et al. reported that topical antibiotics could decrease this risk of neonatal tetanus 4-fold 29.

Bleeding

Bleeding is the most common complication of circumcision, with an incidence of 1% in a large retrospective review 30. Bleeding may occur along the skin edges between sutures or from a discrete blood vessel, most commonly at the frenulum. Meticulous attention to hemostasis during an open procedure and adequate time for skin edge compression during newborn circumcisions should prevent the majority of cases although dislodging of a clot or cautery eschar can occur. The majority of postcircumcision bleeding can be controlled with application of direct pressure or careful application of silver nitrate. Rarely is wound exploration and suturing necessary. A hematologic workup is warranted only in patients who persistently bleed, or bleed significantly. In a retrospective review of the Mayo Clinic Pediatric Hemophilia database, 48 patients with a range of coagulopathies were circumcised. 21 patients had known coagulation disorders, while the remaining 27 patients were diagnosed after prolonged bleeding from their circumcision. There were 11 bleeding complications, three of which were severe and required transfusion of red blood cells for severe anemia despite preoperative factor replacement 31. In those patients with hemophilia who must undergo circumcision, preoperative and perioperative factor replacement is a definite requirement. Fibrin glue has also been shown to decrease the amount of recombinant factor replacement needed (and the cost of treatment, as well) without significantly altering bleeding complications 32.

Infection

Due to the good dual blood supply of the penis, wound infection occurs infrequently. In a series of 5,521 circumcisions comparing the Plastibell technique to the Gomco clamp, Gee and Ansell reported only 23 (0.4%) infections. Of those, the Plastibell group had significantly more infections, 19 versus four 30. All responded to a combination of topical treatment and oral antibiotic therapy. Causative organisms are usually skin flora, but due to the uniquely dirty environment of the diaper, colonic flora has also been reported. Most infections can be prevented with proper patient preparation, glove wearing and good local wound care including cleaning the penis, and application of antibiotic ointment with diaper changes 33

Severe infections following Plastibell circumcision, including necrotizing fasciitis, have been reported as well. Several authors describe presenting signs and symptoms as erythema, induration, pain out of proportion to physical findings, coupled with tachycardia, leucocytosis, or bandemia. As in adults, this is usually a polymicrobial infection. Empiric broad spectrum antibiotics to cover Gram-negative, Gram-positive, and anaerobic organisms are essential. A suggested regimen is an aminoglycoside, nafcillin, or vancomycin and clindamycin. Prompt surgical evaluation and aggressive debridement of necrotic tissue is required 34.

Loss of Skin/Wound Dehiscence

Wound dehiscence and degloving injuries of the shaft are possible following using any of the techniques described above for neonatal circumcision. De-gloving injuries result from excess skin being drawn up into the clamp and then amputated. While, less likely, improper determination of the amount of skin to remove during free-hand circumcision may occur. Often these injuries are treated with local wound care and allowed to heal by secondary intention. There are reports of autografting the excised skin with good cosmetic result 35.

Trapped/Concealed Penis

Similarly, a concealed penis can result from overzealous removal of shaft skin coupled with a prominent suprapubic fat pad resulting in healing within the fat pad. Another consequence of this configuration is a secondary phimosis from the progressive closure of the skin over the glans penis. This can be avoided by firmly compressing the fat pad to the abdominal wall to best determine how much skin should be removed 26. In addition, the suprapubic fat should be compressed regularly after the procedure to allow the penis to be protrude. Corrective surgery may be necessary if there is absence or significant laxity of the penoscrotal angle or penoscrotal webbing that precludes adequate protrusion of the penis.

Redundant Foreskin/Circumcision Revision

Inadequate circumcision, or excess foreskin, is a fairly common indication for referral to a pediatric urologist. In a retrospective review of 476 late circumcision complications treated at Massachusetts General Hospital, 40% were for inadequate circumcision and another 5% were for phimosis requiring revision. The criteria for treatment are purely subjective and mainly cosmetic excepting those with phimosis, of course 25. Repair is scheduled electively under general anesthesia and is best accomplished using the “free-hand” skin sleeve technique removing the redundant skin.

Figure 8. Redundant foreskin following male circumcision

Redundant foreskin post male circumcision

Note: Examples of redundant skin following circumcision (a,b,c).

[Source 21]

Preputial Adhesions/Skin Bridges

Preputial adhesions often result from either inadequate lysis of natural adhesions prior to circumcision or from distal migration of the skin from a prominent suprapubic fat pad. Williams et al. report that 63% of patients presenting for circumcision revision were found to have prominent suprapubic fat pads 36. The majority of adhesions should lyse spontaneously as the penis grows, suprapubic fat recedes, and erections become more frequent and firmer. Otherwise, lysis of preputial adhesions can be performed in the office by gently pushing away the adhesions from the glans after administering a topical anesthetic cream such as EMLA. EMLA is a mixture of two local anesthetics, lignocaine and prilocaine. Recurrence of these adhesions can be limited by regular compression of the suprapubic area to make the penis protrude and placement of petroleum jelly or any other such ointment. During healing, the circumferential incision can adhere to the glans and in some cases heal into an epithelialized skin bridge 33. If thin and transparent, they can be divided in the office. However, extensive adhesions and thick skin bridges require surgical intervention. These can be divided sharply after a period of compression with a hemostat. Skin bridges accounted for nearly 30% of the late complications reported by the Massachusetts General Hospital group 25.

Figure 9. Preputial Adhesions/Skin Bridges

penile adhesions post male-circumcision

Note: Penile adhesions (a) between the shaft skin and the glans can be manually separated while penile skin bridges (b) cannot be manually separated and need to be excised—skin bridge.

[Source 21]

Meatitis/Meatal Stenosis

In the absence of the prepuce, the erythema of the meatus commonly occurs after circumcision as a result of irritation. Meatitis is commonly a self-limited problem but can be treated by application of an antibiotic ointment and keeping the area dry. Meatal stenosis has been postulated to be a result of ligation of the frenular artery or from ammoniacal meatitis 33 and account for 26% of the late complications 25. While the meatus may appear small, it can open adequately during voiding; this explains why most children with meatal stenosis do not present until after toilet training. Surgical treatment is indicated in the presence of symptoms such as deflection of the urine stream, dripping, dysuria, or urgency frequency from inadequate emptying. The treatment is meatotomy or meatoplasty, which can be accomplished under local anesthesia in the office or in the operating room.

Figure 10. Meatitis/Meatal Stenosis

meatal stenosis post male-circumcision

Note: Meatal stenosis in a 3 year old circumcised male who presented with a narrow stream.

[Source 21]

Urethrocutaneous Fistula

Urethrocutaneous fistula is a rare complication, but nonetheless has been reported after both Plastibell and Gomco circumcisions 37. Fistulae may present as an obvious fistulous tract or as a split urine stream. Often this is a result of compression necrosis from a retained Plastibell ring or a direct injury from incorrect placement of the Gomco clamp. Injury to the urethra during any ventral dissection can occur during a “free-hand” circumcision. Delayed flap repair can be done electively after the child’s penis has grown enough for good tissue handling.

Glanular Necrosis/Glanular Amputation

Necrosis of the glans can occur as a result of cautery injury during a Gomco circumcision or from distal migration of an incorrectly sized Plastibell ring 37. Management of glans necrosis depends on its severity. Mild cases can be managed with local wound care and topical antibiotic ointment and allowing the necrotic skin to slough. Some authors report management of severe cases with suprapubic diversion and delayed urethroplasty 37. There are rare case reports of complete necrosis of the glans and phallus in which gender reassignment was performed after multiple attempts at staged repair 30. For this reason, the use of electrocautery is contraindicated in clamp circumcision.

Amputation of the glans occurs extremely rarely, but is a devastating complication of Mogen clamp circumcision. The Mogen clamp or shield seems uniquely susceptible to this particular injury given the surgeon’s inability to directly visualize the glans prior to incising the foreskin. Sherman et al. 38 report seven glanular reconstructions after traumatic amputations. The authors reported that minimal debridement and recovery of the amputated tissue were critical to the repair. Simple primary reanastomosis of glanular tissue was possible in 6 of 7 patients, the last patient required urethral reconstruction. The patient’s own tissue can remain viable up to 8 hours and used successfully for repair if adequately preserved by wrapping the tissue in moist saline gauze placed in a plastic bag and transported on ice 38.

Hypospadias

Isolated cases of iatrogenic hypospadias have been reported after the surgeon performed a ventral rather than a dorsal slit prior to initiation of circumcision 39. It is important that the proper plane be entered for the initial lysis of adhesions so that the meatus is not inadvertently entered and then damaged.

While not technically a complication, failure to recognize a hypospadias prior to circumcision may be problematic if there is insufficient skin for subsequent repair. While most cases of hypospadias are associated with a dorsally hooded prepuce, the megameatus with intact prepuce variant will have a configuration as described in its name. Thorough physical examination is imperative prior to circumcision regardless of the method employed.

References
  1. Abdulwahab-Ahmed A, Mungadi IA. Techniques of Male Circumcision. Journal of Surgical Technique and Case Report. 2013;5(1):1-7. doi:10.4103/2006-8808.118588. https://www.ncbi.nlm.nih.gov/pmc/articles/PMC3888996/
  2. The first cut is the deepest? Medicolegal aspects of male circumcision. Gerharz EW, Haarmann C. BJU Int. 2000 Aug; 86(3):332-8. https://www.ncbi.nlm.nih.gov/pubmed/10930942/
  3. Blank S, Brady M, Buerk E, Carlo W, Diekema D, Freedman A, et al. American Academy of Pediatrics, Task force on Circumcision: Male circumcision. Pediatrics. 2012;130:e756–85 http://pediatrics.aappublications.org/content/130/3/e756.long
  4. Wiswell TE. The prepuce, urinary tract infections, and the consequences. Pediatrics. 2000;105:860–2. http://pediatrics.aappublications.org/content/105/4/860
  5. Tucker SC, Cerqueiro J, Sterne GD, Bracka A. Circumcision: A refined technique and 5 year review. Ann R Coll Surg Engl. 2001;83:121–5. https://www.ncbi.nlm.nih.gov/pmc/articles/PMC2503341/pdf/annrcse01630-0055.pdf
  6. Weiss H, Polonsky J, Bailey R, Hankins C, Halperin D, Schmid G. Male circumcision: Global trends and determinants of prevalence, safety and acceptability. World Health Organization and the Joint United Nations Programme on HIV/AIDS (UNAIDS) 2007 http://data.unaids.org/pub/report/2007/jc1360_male_circumcision_en.pdf
  7. Gerharz EW, Haarmann C. The first cut is the deepest? Medicolegal aspects of male circumcision. BJU Int. 2000;86:332–8. https://onlinelibrary.wiley.com/doi/pdf/10.1046/j.1464-410x.2000.00103.x
  8. Okeke LI, Asinobi AA, Ikuerowo OS. Epidemiology of complications of male circumcision in Ibadan, Nigeria. BMC Urol. 2006;6:21 https://www.ncbi.nlm.nih.gov/pmc/articles/PMC1560152/
  9. Circumcisions Performed in U.S. Community Hospitals, 2009. https://hcup-us.ahrq.gov/reports/statbriefs/sb126.jsp
  10. Male Circumcision. Pediatrics September 2012, VOLUME 130 / ISSUE 3. http://pediatrics.aappublications.org/content/130/3/e756.long
  11. Circumcisions Performed in U.S. Community Hospitals, 2009. Agency for Healthcare Research and Quality. https://hcup-us.ahrq.gov/reports/statbriefs/sb126.jsp
  12. Krill AJ, Palmer LS, Palmer JS. Complications of Circumcision. The Scientific World Journal. 2011;11:2458-2468. doi:10.1100/2011/373829 https://www.ncbi.nlm.nih.gov/pmc/articles/PMC3253617
  13. Damassa DA, Cates JM. Sex hormone-binding globulin and male sexual development. Neuroscience and Biobehavioral Reviews. 1995;19(2):165–175. https://www.ncbi.nlm.nih.gov/pubmed/7630573
  14. Banieghbal B. Optimal time for neonatal circumcision: an observation-based study. Journal of Pediatric Urology. 2009;5(5):359–362. https://www.ncbi.nlm.nih.gov/pubmed/19223238
  15. Horowitz M, Gershbein AB. Gomco circumcision: when is it safe? Journal of Pediatric Surgery. 2001;36(7):1047–1049. https://www.ncbi.nlm.nih.gov/pubmed/11431774
  16. Male Circumcision for the Prevention of HSV-2 and HPV Infections and Syphilis. NEJM 2009; 360:1298-1309 https://www.nejm.org/doi/full/10.1056/NEJMoa0802556
  17. Siegfried N, Muller M, Deeks JJ, Volmink J. Male circumcision for prevention of heterosexual acquisition of HIV in men. Cochrane Database of Systematic Reviews 2009, Issue 2. Art. No.: CD003362. DOI: 10.1002/14651858.CD003362.pub2 http://cochranelibrary-wiley.com/doi/10.1002/14651858.CD003362.pub2/full
  18. Millett GA, Flores SA, Marks G, Reed JB, Herbst JH. Circumcision status and risk of HIV and sexually transmitted infections among men who have sex with men: a meta-analysis. JAMA. 2008;300(14):1674–1684
  19. Buchbinder SP, Vittinghoff E, Heagerty PJ, et al. Sexual risk, nitrite inhalant use, and lack of circumcision associated with HIV seroconversion in men who have sex with men in the United States. J Acquir Immune Defic Syndr. 2005;39(1):82–89
  20. Krill AJ, Palmer LS, Palmer JS. Complications of Circumcision. The Scientific World Journal. 2011;11:2458-2468. doi:10.1100/2011/373829. https://www.ncbi.nlm.nih.gov/pmc/articles/PMC3253617
  21. Krill AJ, Palmer LS, Palmer JS. Complications of Circumcision. The Scientific World Journal. 2011;11:2458-2468. doi:10.1100/2011/373829. https://www.ncbi.nlm.nih.gov/pmc/articles/PMC3253617/
  22. Penile injuries from proximal migration of the Plastibell circumcision ring. Bode CO, Ikhisemojie S, Ademuyiwa AO. J Pediatr Urol. 2010 Feb; 6(1):23-7. https://www.ncbi.nlm.nih.gov/pubmed/19570722/
  23. Sutureless circumcision using 2-octyl cyanoacrylate (Dermabond): appraisal after 18-month experience. Elmore JM, Smith EA, Kirsch AJ. Urology. 2007 Oct; 70(4):803-6. https://www.ncbi.nlm.nih.gov/pubmed/17991565/
  24. Weiss HA, Larke N, Halperin D, Schenker I. Complications of circumcision in male neonates, infants and children: a systematic review. BMC Urology. 2010;10, article 2 https://www.ncbi.nlm.nih.gov/pmc/articles/PMC2835667/
  25. Pieretti RV, Goldstein AM, Pieretti-Vanmarcke R. Late complications of newborn circumcision: a common and avoidable problem. Pediatric Surgery International. 2010;26(5):515–518. https://www.ncbi.nlm.nih.gov/pubmed/20155423
  26. Mayer E, Caruso DJ, Ankem M, Fisher MC, Cummings KB, Barone JG. Anatomic variants associated with newborn circumcision complications. The Canadian Journal of Urology. 2003;10(5):2013–2016. https://www.ncbi.nlm.nih.gov/pubmed/14633330
  27. King LR. Neonatal circumcision in the United States in 1982. Journal of Urology. 1982;128(5):1135–1136. https://www.ncbi.nlm.nih.gov/pubmed/7176044
  28. Cairns J. Circumcision: a minor procedure? Paediatrics and Child Health. 2007;12(4):311–312. https://www.ncbi.nlm.nih.gov/pmc/articles/PMC2528673/
  29. Bennett J, Breen C, Traverso H, Bano Agha S, Macia J, Boring J. Circumcision and neonatal tetanus: disclosure of risk and its reduction by topical antibiotics. International Journal of Epidemiology. 1999;28(2):263–266. https://www.ncbi.nlm.nih.gov/pubmed/10342689
  30. Gee WF, Ansell JS. Neonatal circumcision: a ten year overview: with comparison of the Gomco clamp and the Plastibell device. Pediatrics. 1976;58(6):824–827. http://pediatrics.aappublications.org/content/58/6/824.long
  31. Rodriguez V, Titapiwatanakun R, Moir C, Schmidt KA, Pruthi RK. To circumcise or not to circumcise? Circumcision in patients with bleeding disorders. Haemophilia. 2010;16(2):272–276. https://www.ncbi.nlm.nih.gov/pubmed/19845777
  32. Avanoglu A, Çelik A, Ulman I, et al. Safer circumcision in patients with haemophilia: the use of fibrin glue for local haemostasis. BJU International. 1999;83(1):91–94. https://www.ncbi.nlm.nih.gov/pubmed/10233459
  33. Hutcheson JC. Male neonatal circumcision: indications, controversies and complications. Urologic Clinics of North America. 2004;31(3):461–467. https://www.ncbi.nlm.nih.gov/pubmed/15313055
  34. Bliss DP, Healey PJ, Waldhausen JHT. Necrotizing fasciitis after Plastibell circumcision. Journal of Pediatrics. 1997;131(3):459–462. https://www.ncbi.nlm.nih.gov/pubmed/9329429
  35. Patel HI, Moriarty KP, Brisson PA, Feins NR. Genitourinary injuries in the newborn. Journal of Pediatric Surgery. 2001;36(1):235–239. https://www.ncbi.nlm.nih.gov/pubmed/11150473
  36. Williams CP, Richardson BG, Bukowski TP. Importance of identifying the inconspicuous penis: prevention of circumcision complications. Urology. 2000;56(1):140–143. https://www.ncbi.nlm.nih.gov/pubmed/10869643
  37. Bode CO, Ikhisemojie S, Ademuyiwa AO. Penile injuries from proximal migration of the Plastibell circumcision ring. Journal of Pediatric Urology. 2010;6(1):23–27. https://www.ncbi.nlm.nih.gov/pubmed/19570722
  38. Sherman J, Borer JG, Horowitz M, Glassberg KI. Circumcision: successful glanular reconstruction and survival following traumatic amputation. Journal of Urology. 1996;156(2):842–844. https://www.ncbi.nlm.nih.gov/pubmed/8683798
  39. Niku SD, Stock JA, Kaplan GW. Neonatal circumcision. Urologic Clinics of North America. 1995;22(1):57–65. https://www.ncbi.nlm.nih.gov/pubmed/7855960
read more
1 9 10 11 12
Page 11 of 12
Health Jade