close

Procedures

EarsProcedures

Myringoplasty

Myringoplasty

Myringoplasty

Myringoplasty also called tympanoplasty is microsurgical technique to reconstruct a ruptured or perforated eardrum (tympanic membrane) with the placement of a graft, either medial or lateral to the tympanic membrane annulus, often using the patient’s own tissues. The goal of this surgical procedure is not only to close the perforation but also to improve hearing. The success of the operation depends on the ability to eradicate disease from the middle ear (eg, inflamed granulation tissue and cholesteatoma). Various techniques have been developed and refined, and a number of grafting materials are available. Both the lateral and medial grafting techniques are detailed below.

Myringoplasty can be used for small perforations, such as nonhealing tympanic membranes after pressure-equalizing tube extrusion or traumatic perforations. The technique involves freshening the edges of the perforation to promote healing and placing a carefully trimmed graft lateral to the defect 1. Grafting materials for myringoplasty include fat, Gelfilm, Gelfoam, AlloDerm, and cigarette paper. Gelfoam can also be placed as packing in the middle ear to support the graft.

Myringoplasty is a safe and effective outpatient procedure used to both eradicate disease from the middle ear and restore hearing and middle ear function 2. Your child will need to stay in the hospital overnight. A number of surgical approaches and grafting techniques are available for use by the surgeon. Paramount to success are the preoperative assessment, good hemostasis intraoperatively, and thoughtful surgical planning with careful placement of the graft.

When planning myringoplasty, the surgeon must consider the location of the perforation (marginal versus central), and size (total versus subtotal). Areas of myringosclerosis and tympanosclerosis should be noted. Important comorbidities worth noting include craniofacial disorders and underlying environmental allergies or chronic allergic rhinitis. Critical factors that make myringoplasty less successful include adhesive otitis media, severe eustachian tube dysfunction with either perforation of the contralateral ear or ongoing intermittent otorrhea, cholesteatoma, and previous surgical repair 3.

Myringoplasty key points

  • A myringoplasty is an operation to fix a hole in the eardrum.
  • The operation usually takes about two to three hours.
  • Your child will sleep and feel no pain during the operation.
  • After the operation, your child will have to stay overnight in the hospital.
  • While your child gets better at home, there are some things your child should not do.

Tympanic membrane anatomy

The eardrum also called tympanic membrane is a thin layer of tissue that vibrates in response to sound. An understanding of the tympanic membrane anatomy is critical to successful repair. Myringoplasty (tympanoplasty) procedure mandates an understanding of the layers. The tympanic membrane typically consists of the following 3 layers:

  1. Lateral epithelial layer
  2. Middle fibrous layer
  3. Medial mucosal layer

The outer epithelial layer is composed of stratified squamous epithelium, which is continuous with the skin of the external auditory canal. This is significant because in-growth of this outer epithelial portion through the perforation can result in an epithelial cyst called an acquired cholesteatoma. Untreated, this cyst then releases destructive enzymes that can enlarge the size of the perforation and ultimately cause ossicular erosion. The lateral grafting technique that is discussed later in this text requires that this entire epithelial layer be stripped from the drum remnant prior to placement of the graft so as to avoid iatrogenic cholesteatoma formation.

The middle fibrous layer is composed of connective tissue consisting of outer radial fibers and inner circular fibers. It provides strength to the drum. A healed perforation is also commonly deficient of this middle fibrous layer. The epithelial and endothelial layers regenerate creating a “dimeric” membrane. This miscalculation can be corrected when carefully examined under binocular microscopy. Because this middle layer is absent in the pars flaccida superiorly, the posterior-superior aspect of the drum can be drawn inward toward the middle ear as a retraction pocket.

The inner layer of the tympanic membrane consists of simple cuboidal and columnar epithelium cells. This layer is identical to the mucosal lining of the rest of the middle ear mucosal tissue and is considered to be critical to ensure healing of tympanic membrane perforations, and the surgeon often abrades or rasps the undersurface of the tympanic membrane remnant to stimulate regrowth.

Annulus

The peripheral edge of the tympanic membrane is rimmed by a dense fibrous layer called the annulus, which is essentially a thickening of the pars tensa. Successful elevation of the annulus is critical for medial grafting technique. The annulus is deficient superiorly at the “12 o’clock” location. This area is the notch of Rivinus and can guide the surgeon to a natural plane to elevate the annulus.

Ear canal

The ear canal has bone in the medial component (inner one-third). The lateral portion, which extends into the pinna, is composed of cartilage. The boney/cartilaginous interface is located at the medial two-thirds junction. Most incisions that are made to raise a tympanomeatal flap or perform either an endaural or transcanal approaches are made at this location as well. The superiorly placed vascular strip is another critical area within the ear canal. This region is demarcated by the tympanosquamous suture line superiorly and the tympanomastoid junction line inferiorly. Canal incisions are often made along these junctions.

Middle ear

The middle ear is an air-filled space bordered by the bony labyrinth of the inner ear medially, the tympanic membrane laterally, and the cranium superiorly. This space contains the ossicles, nerves (facial nerve, chorda tympani, Jacobsen nerve), small muscles (stapedius and tensor tympani), ligaments, and blood vessels. The petrous portion of the internal carotid artery and the internal jugular vein, which are both in proximity to the middle ear space, can be dehiscent and should be noted on any preoperative imaging. Rarely, middle ear pathology can involve these structures.

In order for successful grafting of the tympanic membrane to improve hearing, an intact ossicular chain must be present. The malleus transmits energy from the tympanic membrane to the incus, which itself is connected to the stapes superstructure resting on the oval window. Diarthrodial joints connect the 3 ossicles and allow the transmission of acoustic energy from the tympanic membrane to the inner ear. The incudostapedial joint is the most fragile and, hence, has the highest likelihood to require repair.

Mastoid

The middle ear communicates with the mastoid air cells via the mastoid antrum. The temporal bone air cells are usually pneumatized by 3 years of age. However, the air cells can remain underdeveloped and sclerotic in patients with persistent eustachian tube dysfunction. A poorly pneumatized or fluid-filled mastoid bone predisposes a patient to require a more extensive tympanomastoidectomy to improve the chances of successful graft placement.

Eustachian tube

The eustachian tube connects the middle ear with the nasopharynx and allows pressure equilibration in the middle ear. Enlarged adenoids or biofilms within this lymphoid tissue are hypothesized to predispose a patient to persistent middle ear disease. This bony-cartilaginous tube is approximately 45° from the horizontal in adults but only 10° from horizontal in infants. In addition, the infant eustachian tube is about 50% of the adult length.

Inner ear

The inner ear is composed of the cochlea, which is the end-organ for hearing, and the vestibular organs. The vestibular organs include the utricle, saccule, and the 3 semicircular canals and are involved in balance.

Figure 1. Ear anatomy

Ear anatomy

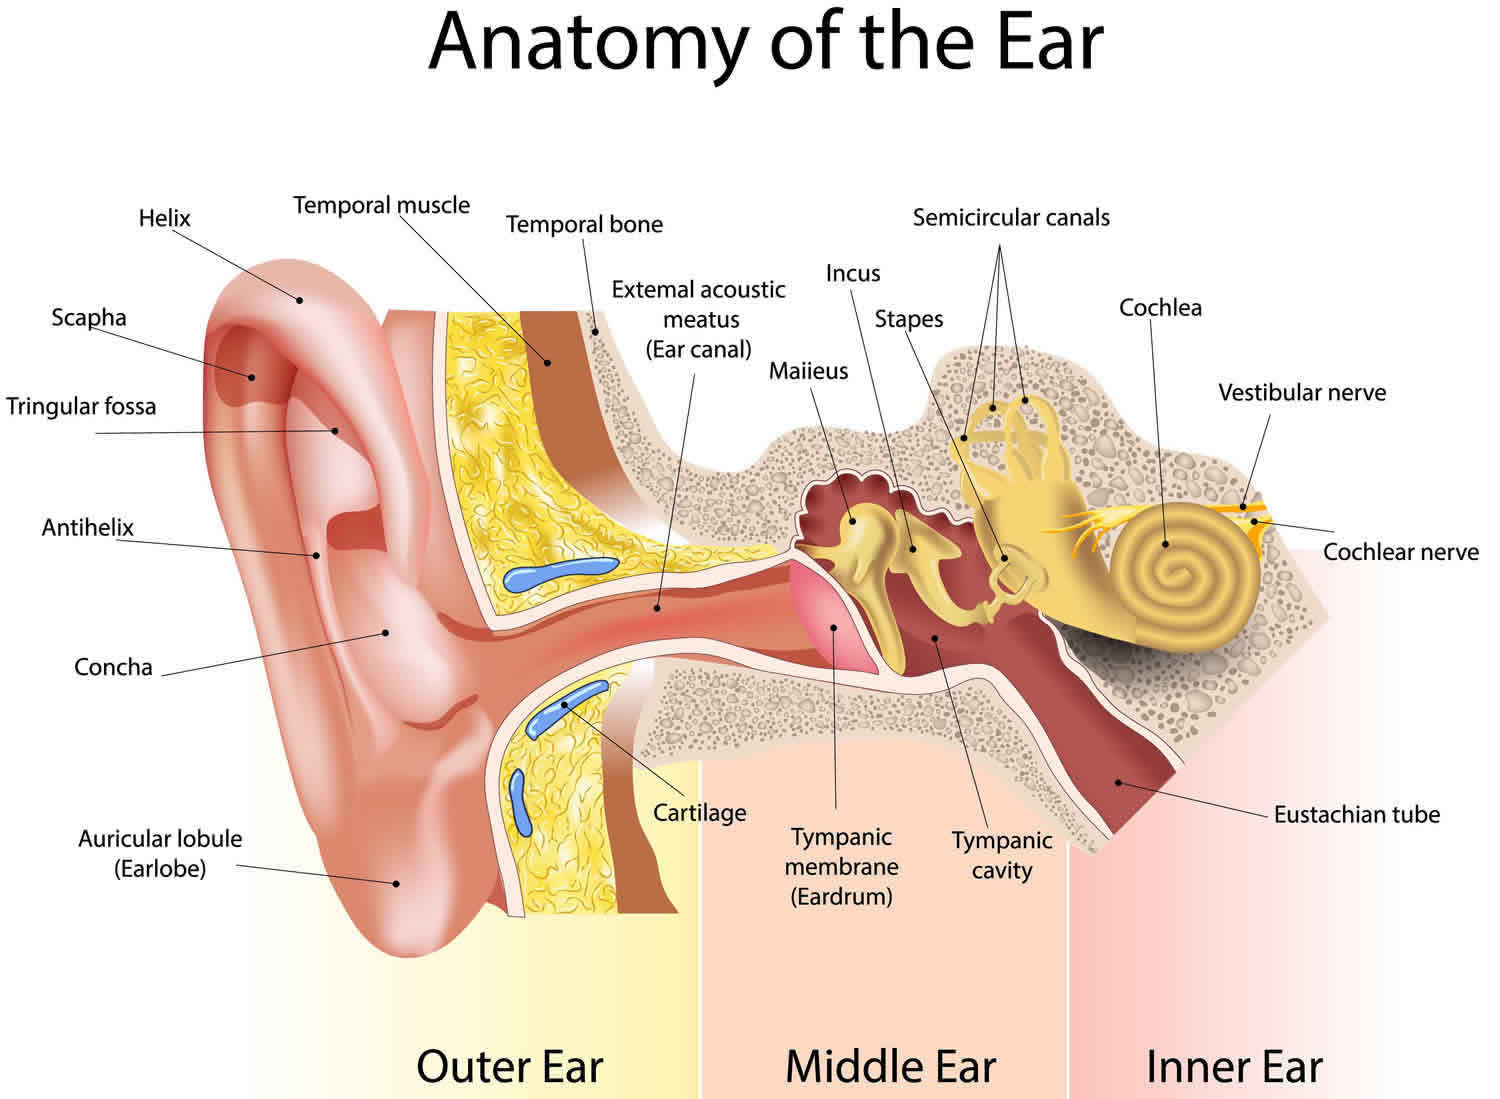
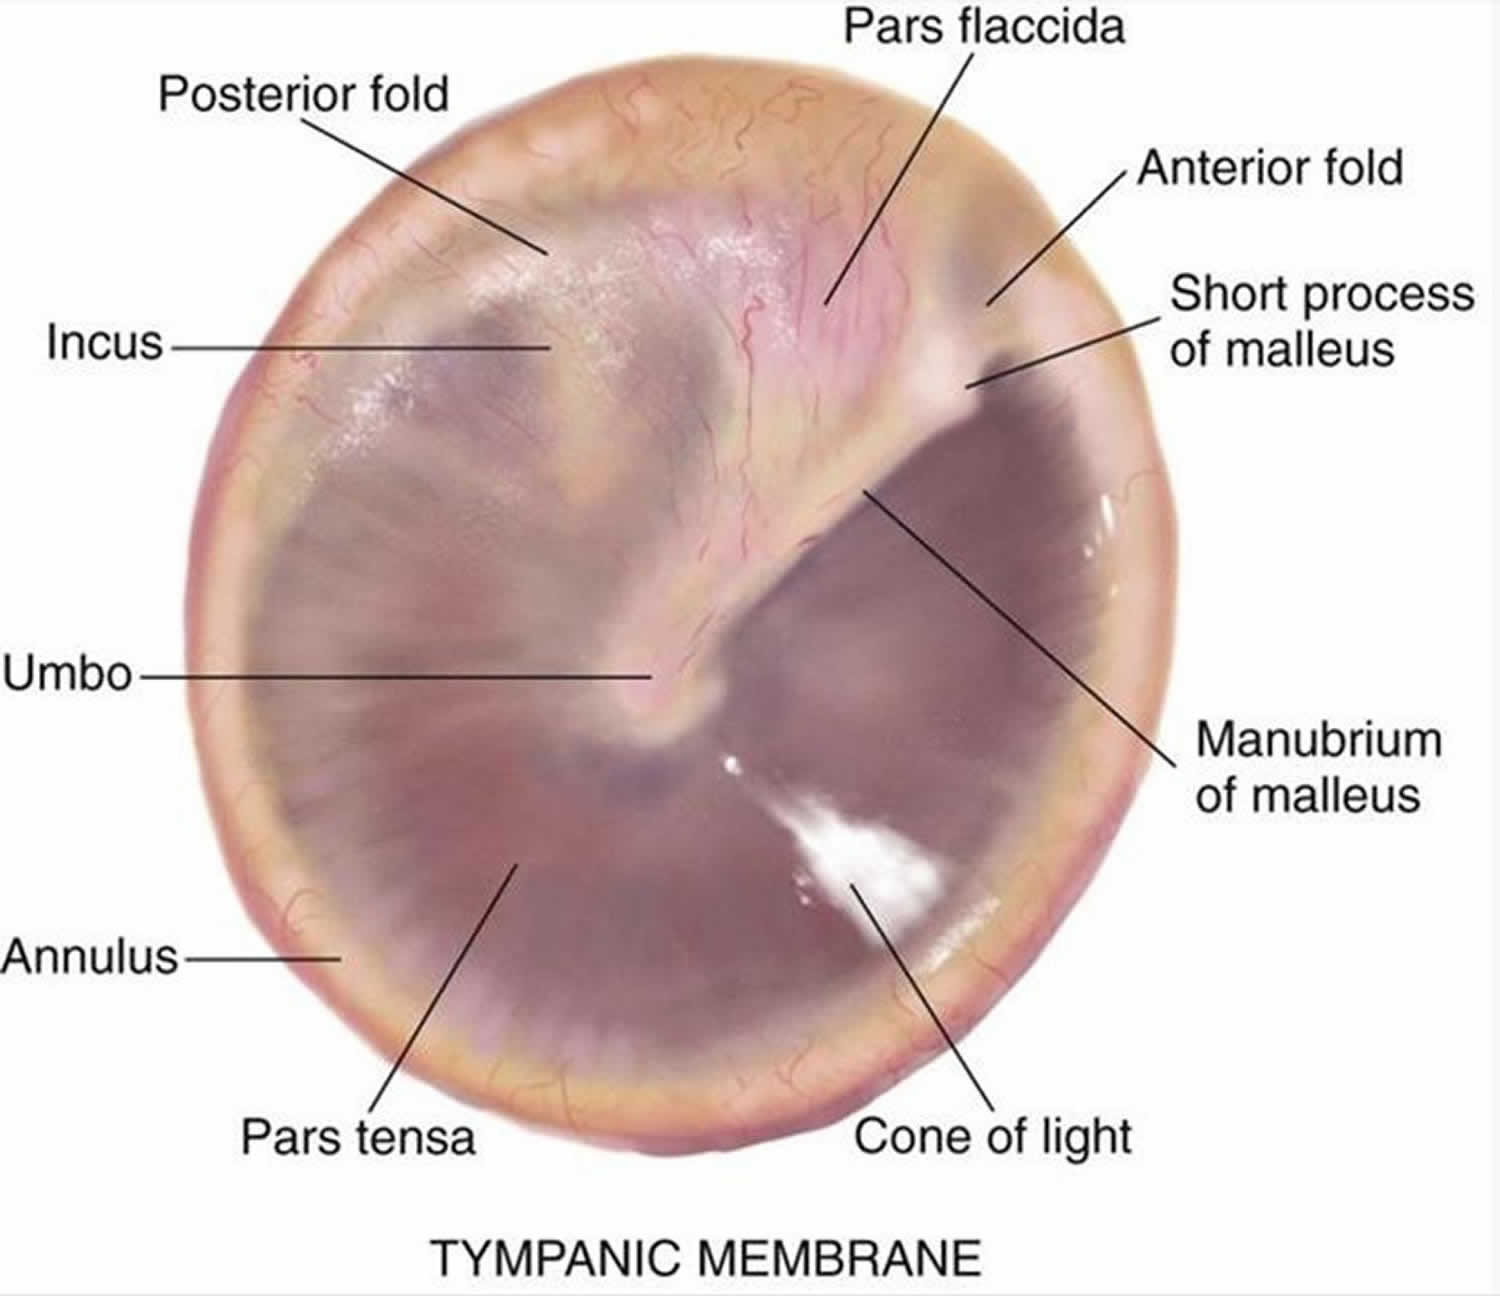
Figure 2. Tympanic membrane anatomy (right ear)

Tympanic membrane anatomy

Ear drum anatomy

Myringoplasty surgery

Myringoplasty (tympanoplasty) is an outpatient procedure for adults and for most children. The operation takes about two to three hours. Your child will need to stay in the hospital overnight.

Your child will sleep and feel no pain during the operation. Just before your child has the operation, they will be given a sleep medicine. This is called a general anesthetic. This means that your child will sleep and feel no pain during the operation.

The ear nose and throat (ENT) doctor will take a tiny piece of tissue from an area around the ear. This is done by making a cut behind your child’s ear. The piece of ear tissue is then used to fix the hole in your child’s eardrum. Your child will have dissolvable stitches behind the ear and gauze packing in the ear to absorb any fluid.

Various techniques and grafting materials can be used. Which approach is used depends on the size and location of the perforation, the presence or absence of cholesteatoma or granulation tissue, the status of the ossicles and mastoid, other anatomical considerations (eg, narrow external auditory canals), as well as the surgeon’s preference and expertise 4.

Examining the middle ear and ossicles and removing any elements of adhesions or cholesteatoma is critical. The chosen approach should provide optimal visualization of the perforation and tympanic membrane. One should be careful not to disrupt an intact and mobile ossicular chain if the hearing loss is only low-frequency conductive, as is often the case with hearing loss secondary to a perforation 5.

Before the operation

Evaluation of the patient for myringoplasty involves a detailed history and physical examination. Important aspects of the history include the duration of the perforation, severity of otalgia, otorrhea, hearing loss, vertigo, previous attempts at repair, otitis media, and otitis externa. The number and frequency of infections (including time of most recent infection) provide insight into the severity of disease. Past otologic surgical history is critical and should include any history of tympanostomy tubes (also called myringotomy tubes, ventilation tubes, or pressure equalization (PE) tubes) and details of any prior tympanoplasties (including approaches, grafts used, outcomes).

Prior to considering surgery in any patient, acute and chronic infections should be controlled using ototopical, oral, and/or intravenous antibiotics or antifungals, if indicated. Ototopical drops with steroids may also be needed if granulation tissue or aural polyps are visualized to improve inflammation. Ideally, an ear should be “dry” for 3-4 months before surgery is performed to enhance the chance of success. Individuals who undergo surgery must keep the operated ear dry for a period of several weeks or until the graft has healed. Operating on an actively infected ear is contraindicated.

Physical examination

The physical examination should focus on pneumatic otoscopy and otomicroscopy. In the office, tuning forks can give an important assessment of hearing; in older patients, tuning forks can be used to confirm audiometric findings. Additional assessments include documentation of facial nerve functionality and inspection for previous incisions. Although a small amount of cerumen is tolerated in the routine otoscopic examination, obstructive cerumen should be removed when evaluating a patient for myringoplasty in order to provide an unimpeded view of the entire tympanic membrane.

Monomeric (or more accurately, dimeric) areas may appear as perforations until inspected more closely under microscopy. Retraction pockets should be closely inspected for accumulation of squamous debris. Considering the status of the contralateral ear when considering repair of a tympanic membrane perforation is essential. The ear with more significant hearing loss is usually operated on first if bilateral perforations exist.

Audiometric testing

Audiometry should be performed preoperatively in all surgical candidates. Tympanometry can add useful information in younger children who are difficult to properly examine. The primary reason for audiometric analysis is to establish the degree of conductive hearing loss. Perforations usually cause low-frequency conductive loss 6. If underlying ossicular discontinuity exists and is not addressed during surgery, then postoperative hearing can be worse despite an intact neo-tympanum. One should consider ossicular involvement if the conductive hearing loss is flat across all frequencies or greater than 35 db. Finally, the presence and degree of any sensorineural hearing loss should be documented preoperatively.

Radiographic testing

Computed tomography (CT) and magnetic resonance imaging (MRI) is not essential but may be indicated in patients in whom a concern for cochlear, labyrinthine, or intracranial pathology exists. Other patients who might be considered for preoperative imaging include patients with a history of facial palsy, children with craniofacial abnormalities, and revision cases in which the anatomy may be distorted.

Pre-operative imaging assists the surgeon in preoperatively identifying pathology and planning surgery. CT scan should be ordered when concern exists for cholesteatoma and in patients with previous mastoid surgery, otalgia, or vertigo. MRI is beneficial for delineating the integrity of the dura as well as detecting small retrocochlear lesions such as acoustic neuromas.

Grafting materials

Various materials exist for use for tympanic membrane grafting. True temporalis fascia is the most common graft because of its ease of harvest and its abundant availability, even in revision cases. Some surgeons prefers loose areolar fascia (also known as “fool’s fascia”) and prefer to save the true fascia for revision cases. Also, the “fool’s fascia” is considered by some to be more pliable, have less donor site morbidity, and to be more transparent after healing. It is available via the same postauricular incision that can be used for tympanoplasty, or a separate incision can be made in or beyond the postauricular hairline if a transcanal or endaural technique is used. A mild amount of donor site morbidity occurs, with postoperative pain over the temporalis muscle being the most common symptom.

  • The postauricular incision is marked and injected with lidocaine with epinephrine.
  • Dissection is carried down onto the fascia (loose areolar /true temporalis).
  • The graft is harvested.
  • Muscle is removed from the fascia graft, and the graft is then set on the back table for later use.

Cartilage is available to be harvested easily from either the tragus or the conchal bowl, if a post-auricular approach is being used. Tragal cartilage is harvested with perichondrium attached via a small incision on the internal surface of the tragus 7. This graft is an appropriate size and carries very little donor site morbidity. In addition, the perichondrium can be reflected to stabilize the graft. Conchal cartilage also carries no additional significant morbidity. Other grafting materials include lobular fat, periosteum, perichondrium, vein, and AlloDerm.

Myringoplasty procedure

Transcanal approach

The transcanal approach is especially good for small posterior perforations, but can be used for medium-sized perforations if the anterior tympanic membrane is easily visualized. This technique can be challenging for significant anterior perforations, narrow/stenotic ear canals, or individuals with a significant anterior canal bulge. Inspecting the perforation prior to preparing the patient and determining that at least a 5-mm speculum can be placed is important. Canalplasty can be used to improve visualization if slightly limited.

Medial graft

When performing a transcanal medial tympanoplasty procedure, the following steps are followed:

  1. The ear canal is suctioned and surgical Betadine used during the surgical prep is removed.
  2. The external auditory canal is cleaned and injected with 1% lidocaine with 1:100,000 epinephrine or 0.5% lidocaine with 1:200,000 epinephrine, primarily for vasoconstriction to optimize visualization during the procedure.
  3. The edge of the perforation is dissected and removed using a sharp pick and cup forceps; this “postage-stamping” and “freshening” of the perforation is critical to ensure that the graft incorporates into the native tympanic membrane remnant.
  4. Next, a tympanomeatal flap is created. It is customized based on the location of the perforation and surgeon’s preference. The flap design should be such that it can be easily and atraumatically raised and the undersurface of tympanic membrane perforation can be readily accessed. A medially-based tympanomeatal flap is usually created with radial incisions at 12 o’clock and 6 o’clock (ie, superiorly and inferiorly) that either connect directly or via a semilunar incision in the posterior canal just medial to the bony-cartilaginous junction.
  5. The tympanomeatal flap is raised medially with a round knife. To avoid traumatic tearing, take great care not to suction on the flap.
  6. When the annulus is reached, the tympanotomy is made such that the instrument of choice (eg, round knife, gimmick, sickle knife, pick) lifts the annulus while hugging the bony groove from which the fibrous annulus can be dissected. The fibrous annulus is then dissected circumferentially with care not to injure the ossicles, the chorda tympani nerve, or residual drum. The flap is then positioned, usually anteriorly, such that the perforation is exposed.
  7. A canalplasty of the posterior or anterior external auditory canal can be performed to optimize visualization. Take care not to injure the facial nerve or temporomandibular joint.
  8. If indicated, the middle ear and ossicles are inspected and palpated to confirm ossicular continuity. Middle ear disease (granulation tissue, tympanosclerosis, adhesions, cholesteatoma) is completely removed. Removing hypertrophic middle ear mucosa with either a McCabe dissector or Duckbill elevator, particularly mucosa abutting the fibrous annulus in anterior tympanic membrane perforations, is important.
  9. Ossicular reconstruction can be performed if necessary, followed by grafting of the perforation. Elevating the tympanic membrane remnant off the long process of the malleus with a sickle knife may be necessary. This allows both closer inspection of the ossicles and better placement of the graft.
  10. The middle ear must be carefully packed with the surgeon’s preferred material – either Gelfilm, Gelfoam, or Surgicel. This is often soaked in either oxymetazoline, antibiotic ear drops, or diluted epinephrine (1:10,000). Packing the mesotympanum and hypotympanum is important, although excess packing should be avoided near the ossicles so as to prevent adhesions.
  11. The graft is trimmed on the back table. The graft should adequately cover the entire defect. Hemostasis is critical to intraoperative visualization and successful placement of the graft. The graft should be well supported so as to avoid shifting or displacement.
  12. Some surgeons advocate that nitrous oxide anesthetic be switched off at this point because this particular agent has a tendency to accumulate in spaces such as the middle ear and can potentially dislodge the graft.
  13. The tympanomeatal flap is laid back down over the graft, and the posterior canal skin edges are laid flat. Pieces of Gelfoam, Surgicel, or antibiotic ointment are placed along the tympanic membrane and graft and layered laterally to cover the canal incisions.
  14. Antibiotic ointment is placed in the lateral canal, and either Vaseline-coated or antibiotic-coated sculpted cotton ball is placed in the external auditory meatus.
  15. An optional Glasscock or mastoid pressure dressing is placed at the end of the case, particularly if a mastoidectomy has been performed.

Endaural approach

The endaural technique is useful with many perforations, especially when a small atticotomy is anticipated (when improved access to and visualization of the epitympanum is needed). Many of the steps involved in the transcanal technique are similarly performed in the endaural tympanoplasty as well. When performing an endaural medial tympanoplasty procedure, the following steps are followed:

  1. The canal is prepared as detailed above, but the injection may continue laterally to the lateral external auditory canal and tragus.
  2. An incision is made at 12 o’clock and extended superolaterally between the tragus and helical root.
  3. A medially-based tympanomeatal flap is raised, and the middle ear is entered with the same care as described previously. The tympanic membrane is freed superiorly and inferiorly.
  4. Middle ear work is carried out as indicated. Atticotomy can be performed using a small curette or drill if access into the epitympanum is needed.
  5. Grafting is performed and the tympanomeatal flap is laid back down. Gelfoam is placed along the tympanic membrane and fills the canal. Antibiotic ointment and a cotton ball are used laterally.

Postauricular approach

The postauricular technique is the most commonly performed approach for either revision tympanoplasties or those in which a mastoidectomy is anticipated. This technique offers the best visualization of the anterior tympanic membrane and is preferred for large anterior perforations. In addition, it can be combined with mastoidectomy if disease is found in the mastoid that requires the surgeon’s attention. A basic outline of the procedure follows:

  1. The canal is prepared in a similar fashion to the transcanal technique.
  2. Radial and horizontal canal incisions are made as described previously, and the canal is packed with cotton soaked in oxymetazoline or epinephrine.
  3. A postauricular incision is marked 5 mm posterior to the auricular crease in a curvilinear fashion, extending form the mastoid tip to the temporal line. The incision is injected with 1% lidocaine with either 1:100,000 epinephrine or 0.5% lidocaine with 1:200,000 epinephrine. The incision is carried down through the skin and subcutaneous tissue with care not to enter the ear canal. When the temporalis fascia is reached, a graft can be harvested using a Freer elevator and scissors. If multiple previous grafts have been harvested, either tissue from the contralateral ear or AlloDerm can be used as well.
  4. A periosteal incision is made in a “T” or “7” fashion, and the periosteum is raised into the lateral ear canal until the previously-made canal incisions are reached. The cotton in the ear canal is removed.
  5. A rubber Penrose drain can be inserted to retract the lateral canal and auricle anteriorly. Self-retaining retractors such as Weitlaner or Perkins retractors are used to provide further exposure. The perforation is visualized and prepared.
  6. The tympanomeatal flap is raised medially and the middle ear is entered as described previously. Do not suction on the flap.
  7. Canalplasty can be performed and middle ear work is carried out as indicated, including ossicular reconstruction. The perforation is grafted, and the tympanomeatal flap is laid back down with Gelfoam layered lateral to the tympanic membrane.
  8. The auricle and lateral ear canal are relaxed and the postauricular incision is closed in a layered fashion. The remainder of the ear canal is packed with Gelfoam and antibiotic ointment. A pressure dressing is applied to prevent a postauricular hematoma.

Grafting technique

Although variations exist, 2 primary grafting techniques exist: medial grafting (or underlay) and lateral grafting (or overlay). These terms refer to the position of the graft in relation to the fibrous annulus, not to the malleus or tympanic remnant.

The medial grafting technique is performed as described previously. The primary advantage of the medial graft technique is that it is quicker and easier to perform than lateral grafting. It also carries a high success rate (approximately 90% in experienced hands). The biggest disadvantage is its limited exposure and poor utility for larger perforations and its difficulty with repair of near-total perforations.

Advantages of the lateral graft technique include wide exposure and versatility for larger perforations and for any needed ossicular reconstruction. Disadvantages include the requirement of a higher technical skill level, a longer operative time, slower healing rate, and the risk of blunting and lateralization of the graft. The lateral graft technique is championed by the some doctors as a technique more suited for total drum replacement. The basic steps involved in lateral grafting are described as follows:

  1. Lateral (overlay) tympanoplasty is performed through the previously-described postauricular incision. Important differences exist in the canal incisions. In this procedure, a vascular strip is created by making radial incisions at about 2 o’clock and 5 o’clock. These incisions are connected medially just lateral to the annulus on the posterior canal wall and laterally just medial to the bony-cartilaginous junction along the anterior canal wall.
  2. The skin of the anterior external auditory canal is raised medially. When the annulus is reached, squamous epithelium is raised off of the tympanic remnant, and the canal skin is removed in continuity with the remnant skin and stored in saline solution. This maneuver is done with a cupped forceps.
  3. Bony canalplasty can be performed anteriorly to ensure visualization of the entire annulus. Protecting the flap with a portion of trimmed Silastic as a shield is helpful. Care must be taken not to enter the glenoid fossa, which risks injuring the temporomandibular joint (TMJ) and causing prolapse into the ear canal.
  4. Antibiotic-soaked Gelfoam is packed into the middle ear to support the tympanic remnant. The fascia graft is placed medial to the malleus and draped onto the posterior canal wall for stabilization. If possible, the graft should not extend onto the anterior canal wall in an effort to prevent blunting of the graft.
  5. The canal skin/tympanic remnant is returned and placed lateral to the graft and carefully positioned. Gelfoam is then packed tightly into the anterior aspect of the medial canal to prevent blunting, and the vascular strip is laid back down, covering the lateral extension of the fascia graft to improve its blood supply. Antibiotic-soaked Gelfoam is then packed into the rest of the external auditory canal.
  6. The postauricular incision is closed in layers, and antibiotic ointment is placed on the incision and in the lateral canal. A cotton ball is placed in the external auditory meatus, and a mastoid pressure dressing is applied.

Myringoplasty recovery

After the operation, your child’s surgical team will take your child to the recovery room, also called the Post Anesthetic Care Unit (PACU). This is where your child will wake up. Your child will stay in PACU for about one hour. Your child’s surgical team will then move your child to a room on the nursing unit.

Your child’s surgical team will give your child fluids through a tube in their arm, called an IV, until they are able to drink easily. Your child will have a gauze bandage around their head, which will be taken off the day after the operation.

Postoperative hearing should be immediately assessed in the recovery room with a tuning fork. If a pressure dressing is applied, it should be removed on the first or second postoperative day depending on surgeon preference.

Although the ear must be kept otherwise dry, patients are allowed to wash their hair, while keeping a cotton ball with Vaseline in the canal for dry ear measures. Pain is usually managed with acetaminophen and/or ibuprofen. Narcotics such as hydrocodone (Vicodin or Norco) are usually prescribed when a post-auricular approach is used. Oral antibiotics are the surgeon’s preference and can be given for 5-7 days. A cotton ball is replaced in the external auditory meatus as needed for bleeding or drainage. Ototopical drops are typically administered postoperatively for 7-21 days after surgery and continued until the first postoperative visit.

At the first postoperative visit (3-4 weeks after surgery), the ear is examined under the microscope, and any canal packing or residual antibiotic is removed. At this time, a good assessment can be made as to the healing and neovascularization of the graft. Granulation tissue at the tympanomeatal flap is addressed. Ototopical drops are continued as the graft continues to heal. Postoperative audiometric testing is delayed until healing is complete (typically 6-12 weeks). Follow-up visits are scheduled to ensure complete proper healing and restoration of hearing.

Medications that may be prescribed after surgery

  • Pain control: Acetaminophen (Tylenol) liquid solution may be given. Some children will requireprescription pain medication. Pain may be worse during evening; some children should be given medication at night.
  • NO ibuprofen (Motrin or Advil) or aspirin for twoweeks after surgeryunless otherwiseinstructed by physician.
  • Antibiotic eardrops may be prescribed twoweeks after surgery. Give drops at room temperature.
  • Antibiotics may be prescribed for 7 to 10 days.
When to see a doctor

Call your child’s ENT doctor, your family doctor or your local medical clinic right away if your child has any of these signs after going home:

  • Fever greater than 101º F (38.5 °C)
  • Severe ear pain, pain that gets worse or pain noted more than 7 days after surgery
  • Excessive drainage or blood leaking from the ear
  • Swelling, redness or drainage from incision site
  • Dizziness that lasts for more than one week
  • Vomiting (throwing up) that does not stop
  • The packing falls out of the ear

If it is an emergency or if you are concerned about your child’s condition, do not wait. Take your child to the closest emergency department.

Special precautions after ear surgery

  1. No nose blowing for two weeks. Sneeze with an open mouth.
  2. Water precautions: Keep ear canal dry for the first twoweeks;place cotton ball coated with Vaseline in the ear(s) when bathing. Hair may be washed twodays after surgery. The sutures may get wet but the ear canal should stay dry. No swimming for usually 4 to 6 weeks. The physician will advise you when the ear can get wet.
  3. Wound and suture line care: A large dressing is usually applied after surgery and should be left in place for one-twodays. After the dressing is removed (at your appointment or at home as instructed by your doctor), clean the incisionwith hydrogen peroxide and apply bacitracin ointment. Use Q-tips or cotton balls to clean the incision. Wash your hands before and after cleaning the incision. Apply a cotton ball to the outside of the ear canal if drainage is present.
  4. Keep the incision protected from the sun for 6 to 12 months, keep covered or apply sunscreen.

Taking care of your child at home

Please follow these steps at home to help your child get better:

  • Your child may have a small gauze bandage over their ear. Please keep this bandage on for one or two days after going home.
  • Do not let the cut behind your child’s ear get wet. Do not get any water in the ear. Your child can have a bath, but take care not to pull on the ear or get it wet if you need to wash their hair.
  • Do not let your child play contact sports like hockey or soccer until the ENT doctor says it is OK.
  • Do not let your child go swimming until the ENT doctor says it is OK.
  • Do not let your child play a musical instrument that you blow in until the ENT doctor says it is OK.
  • Do not let your child blow their nose. Have them cough or sneeze with their mouth open.
  • Your child may return to school or day care when your ENT doctor says it is OK. Usually, this will be one week after the operation.

Pain management at home

Follow these instructions when your child goes home after the procedure.

You may give your child medicine for pain.

You may receive a prescription for pain medication before you leave the hospital. Follow the dosage instructions given to you by the pharmacist. Although these prescription pain medications can be beneficial, they are also potentially very dangerous if not used properly.

When using these medications, if you notice any changes in either breathing or level of drowsiness that concern you, stop the medication and seek medical attention. If your child is unresponsive, call your local emergency services number immediately.

Do not give your child over-the-counter medicine that may have a sedative effect (makes people sleepy) while giving the prescription for pain medicine. Examples of these medicines are decongestants and antihistamines. Discuss these medications with your pharmacist.

You may give your child acetaminophen if they have pain. Give the dose printed on the bottle for your child’s age. Do not give your child ibuprofen or acetylsalicylic acid for two weeks after the surgery. These medications could increase your child’s risk of bleeding after the operation. Check with the nurse or doctor first before giving these medicines to your child.

Myringoplasty recovery time

Routine activities may be resumed in 2-5 days. Most children return to school in 3 to 5 days if eating and sleeping well and pain-free. Vigorous exercise, heavy lifting and physical activities should be avoided for 2 weeks. No swimming until advised by your doctor, typically in 4-6 weeks.

Follow-up care

A follow-up appointment with the ENT doctor

The ENT unit will make a follow-up appointment with the doctor for your child. If everything is normal during the appointment, the doctor will:

  • Check your child’s ear to see how it is healing.
  • Take out the packing from your child’s ear.
  • Tell you when your child can start to play sports again.

Myringoplasty complications

Common complaints after surgery:

  • Nausea and vomiting may occur for the first 24 to 48 hours.
  • Pain: Mild to moderate ear pain and/or pain at theincision site for 3 to 5 daysis expected.
  • Fever: A low-grade fever may be observed several days.
  • Ear drainage after surgery. Packing material is placed in the ear canal; sometimes there is clear, pink, or bloody drainage from the ear for 3-5 days. This may also occurwhen ear drops are started.
  • Dizziness or unsteadiness: Dizziness is common for several days.
  • Decreased hearing in the operated ear for several weeks.

Complications of the surgery include recurrence of the perforation, tympanic membrane retraction, otorrhea, cholesteatoma development, persistence or worsening of any conductive hearing loss, sensorineural hearing loss (rare), and taste disturbances. Post-auricular incisions are at risk for hematoma, and a mastoid pressure dressing is recommended for the first postoperative night. Outcomes can be optimized by a proper and detailed preoperative assessment and the careful construction of an effective surgical plan.

The graft can fail because of infection, failure to pack the graft securely in place, technical error, failure to clear mastoid and middle ear disease, and because of a concurrent undetected cholesteatoma. Excising all tympanosclerosis at the edge of the perforation so as to allow vascularized perimeters to incorporate the graft is critical.

Myringoplasty outcomes

The indications and outcomes vary depending on the specific clinical problem. Success rates of tympanic membrane closure vary greatly in the literature (35-98%) but are usually greater than 80% and depend largely on the size and location of the perforation, surgical technique, and overall health of the middle ear 8.

References
  1. Aggarwal R, Saeed SR, Green KJ. Myringoplasty. J Laryngol Otol. 2006 Jun. 120(6):429-32.
  2. Webb B, Chang CYJ. Efficacy of Tympanoplasty without mastoidectomy for Chronic Superative Otitis Media. Arch of Otolaryngol Head and Neck Surg. 2008/11. 1155-1158.
  3. Chang CYJ. Chronic Disorders of the Middle Ear and Mastoid (Tympanic Membrane Perforations and Cholesteatoma. Mitchell RB. Pediatric Otolaryngology for the Clinician. New York, NY: Springer; 2009.
  4. Wright D, Safranek S. Treatment of otitis media with perforated tympanic membrane. Am Fam Physician. 2009 Apr 15. 79(8):650, 654.
  5. Luetje III CM. Reconstruction of the Tympanic Membrane and Ossicular Chain. Bailey BJ. Head & Neck Surgery – Otolaryngology. 4th Edition. Philadelphia, PA: Lippincott Williams & Wilkins; 2006.
  6. Wasson JD, Papadimitriou CE, Pau H. Myringoplasty: impact of perforation size on closure and audiological improvement. J Laryngol Otol. 2009 Sep. 123(9):973-7.
  7. Dornhoffer JL. Cartilage tympanoplasty. Otolaryngol Clin North Am. 2006 Dec. 39(6):1161-76.
  8. Hardman J, Muzaffar J, Nankivell P, Coulson C. Tympanoplasty for Chronic Tympanic Membrane Perforation in Children: Systematic Review and Meta-analysis. Otol Neurotol. 2015 Jun. 36 (5):796-804.
read more
BladderKidneysProceduresUretersUrethraUrinary System

Uroflowmetry

Uroflowmetry

Uroflowmetry

Uroflowmetry is a simple, diagnostic screening procedure used to measures the flow rate of urine over time (urine speed and urine volume). Uroflowmetry tracks how fast urine flows, how much flows out, and how long it takes. It’s a diagnostic test to assess how well your urinary tract functions. Your doctor may suggest uroflowmetry if you have trouble urinating, or have a slow stream. Uroflowmetry test is noninvasive (the skin is not pierced), and may be used to assess bladder and sphincter function. Uroflowmetry measurements are performed in a health care provider’s office; no anesthesia is needed.

By measuring the average and top rates of urine flow, this test can show an obstruction in your urinary tract such as an enlarged prostate. When combined with the cystometrogram, uroflowmetry can help find problems like a weak bladder.

For uroflowmetry test, you should arrive at the doctor’s office with a fairly full bladder. If possible, do not urinate for a few hours before the test.

You will be asked to urinate privately into a special toilet that has a container for collecting the urine and a scale or a funnel connected to the electronic uroflowmeter. The equipment creates a graph that shows changes in urine flow rate from second to second so your doctor can see when the flow rate is the highest and how many seconds it takes to get there. This records information about your urine flow on a flow chart. The flow rate is calculated as milliliters (ml) of urine passed per second. Both average and top flow rates are measured.

Results of this test will be abnormal if the bladder muscles are weak or urine flow is blocked. Another approach to measuring flow rate is to record the time it takes to urinate into a special container that accurately measures the volume of urine.

Common urine flow patterns:

  • Flow rate (Q): Volume of fluid expelled via the urethra per unit time (mL/s).
  • Voided volume (Vvoid): Total volume expelled via the urethra (mL).
  • Average flow rate (Qave): Voided volume divided by the flow time.
  • Maximum flow rate (Qmax): Maximum measured value of the flow rate after correction for artefacts.
  • Voiding time: Total duration of micturition (second).
  • Flow time: Time over which measurable flow actually occurs.
  • Time to maximum flow: Elapsed time from onset of flow to maximum flow.

The fastest flow rate, also known as maximum flow rate (Qmax), is used to understand if a block or obstruction is severe.

Your doctor will know your test results right away. Average results are based on your age and sex.

  • Typically, urine flow rate from 10 ml to 21 ml per second. Women range closer to 15 ml to 18 ml per second.
  • A slow or low flow rate may mean there is an obstruction at the bladder neck or in the urethra, an enlarged prostate, or a weak bladder.
  • A fast or high flow rate may mean there are weak muscles around the urethra, or urinary incontinence problems.

You may be asked to take other tests to fully learn what’s going on for treatment. Your urologist will create a treatment plan based on test results and your health history.

Facts about urine:

  • Adults pass about a quart and a half of urine each day, depending on the fluids and foods consumed.
  • The volume of urine formed at night is about half that formed in the daytime.
  • Normal urine is sterile. It contains fluids, salts, and waste products, but it is free of bacteria, viruses, and fungi.
  • The tissues of the bladder are isolated from urine and toxic substances by a coating that discourages bacteria from attaching and growing on the bladder wall.

Figure 1. Uroflowmetry

Uroflowmetry

How does the urinary system work?

The body takes nutrients from food and converts them to energy. After the body has taken the food components that it needs, waste products are left behind in the bowel and in the blood.

The urinary system helps the body to eliminate liquid waste called urea and keeps the chemicals, such as potassium and sodium, and water in balance. Urea is produced when foods containing protein, such as meat, poultry, and certain vegetables, are broken down in the body. Urea is carried in the bloodstream to the kidneys, where it is removed along with water and other wastes in the form of urine.

Urinary system parts and their functions:

  • Two kidneys. This pair of purplish-brown organs is located below the ribs toward the middle of the back. Their function is to remove liquid waste from the blood in the form of urine, keep a stable balance of salts and other substances in the blood, and produce erythropoietin, a hormone that aids the formation of red blood cells. The kidneys also help to regulate blood pressure. The kidneys remove urea from the blood through tiny filtering units called nephrons. Each nephron consists of a ball formed of small blood capillaries, called a glomerulus, and a small tube called a renal tubule. Urea, together with water and other waste substances, forms the urine as it passes through the nephrons and down the renal tubules of the kidney.
  • Two ureters. These narrow tubes that carry urine from the kidneys to the bladder. Muscles in the ureter walls continually tighten and relax forcing urine downward, away from the kidneys. If urine backs up, or is allowed to stand still, a kidney infection can develop. About every 10 to 15 seconds, small amounts of urine are emptied into the bladder from the ureters.
  • Bladder. This triangle-shaped, hollow organ is located in the lower abdomen. It is held in place by ligaments that are attached to other organs and the pelvic bones. The bladder’s walls relax and expand to store urine, and contract and flatten to empty urine through the urethra. The typical healthy adult bladder can store up to two cups of urine for two to five hours.
  • Two sphincter muscles. These circular muscles help keep urine from leaking by closing tightly like a rubber band around the opening of the bladder
  • Nerves in the bladder. The nerves alert a person when it is time to urinate, or empty the bladder
  • Urethra. This tube allows urine to pass outside the body

Figure 2. Urinary system and anatomy

Urinary system anatomy

urinary tract system

Reasons for the uroflowmetry test

Uroflowmetry is a quick, simple diagnostic screening test that provides valuable feedback about the health of the lower urinary tract. It is commonly performed to determine if there is obstruction to normal urine outflow. Medical conditions that can alter the normal flow of urine include, but are not limited to, the following:

  • Benign prostatic hypertrophy. A benign enlargement of the prostate gland that usually occurs in men over age 50. Enlargement of the prostate interferes with normal passage of urine from the bladder. If left untreated, the enlarged prostate can obstruct the bladder completely.
  • Cancer of the prostate, or bladder tumor.
  • Urinary incontinence. Involuntary release of urine from the bladder.
  • Urinary blockage. Obstruction of the urinary tract can occur for many reasons along any part of the urinary tract from kidneys to urethra. Urinary obstruction can lead to a backflow of urine causing infection, scarring, or kidney failure if untreated.
  • Neurogenic bladder dysfunction. Improper function of the bladder due to an alteration in the nervous system, such as a spinal cord lesion or injury.
  • Frequent urinary tract infections.

Uroflowmetry may be performed in conjunction with other diagnostic procedures, such as cystometry, cystography, retrograde cystography, and cystoscopy.

There may be other reasons for your doctor to recommend uroflowmetry.

Urine flow rate test

Uroflowmetry is performed by having a person urinate into a special funnel that is connected to a measuring instrument. The measuring instrument calculates the amount of urine, rate of flow in seconds, and length of time until completion of the void. This information is converted into a graph and interpreted by a doctor. The information helps evaluate function of the lower urinary tract or help determine if there is an obstruction of normal urine outflow.

During normal urination, the initial urine stream starts slowly, but almost immediately speeds up until the bladder is nearly empty. The urine flow then slows again until the bladder is empty. In persons with a urinary tract obstruction, this pattern of flow is altered, and increases and decreases more gradually. The uroflowmeter graphs this information, taking into account the person’s gender and age. Depending on the results of the procedure, other tests may be recommended by your doctor.

Other related procedures that may be used to diagnose urinary outflow obstruction or lower urinary tract dysfunction include cystometry, cystography, retrograde cystography, and cystoscopy.

Before the urology flow rate test

  • Your doctor will explain the procedure to you and offer you the opportunity to ask any questions that you might have about the procedure.
  • Generally, no prior preparation, such as fasting or sedation, is required.
  • You may be instructed to drink about four glasses of water several hours before the test is performed to ensure that your bladder is full. In addition, you should not empty your bladder before arriving for the procedure.
  • If you are pregnant or suspect that you are pregnant, you should notify your doctor.
  • Notify your doctor of all medications (prescription and over-the-counter) and herbal supplements that you are taking.
  • Based on your medical condition, your doctor may request other specific preparation.

During the urology flow rate test

Uroflowmetry may be performed on an outpatient basis or as part of your stay in the hospital. Procedures may vary depending on your condition and your doctor’s practices.

Generally, uroflowmetry follows this process:

  1. You will be taken into the procedure area and instructed how to use the uroflowmetry device.
  2. When you are ready to urinate, you will press the flowmeter start button and count for five seconds before beginning urination.
  3. You will begin to urinate into the funnel device that is attached to the regular commode. The flowmeter will record information as you are urinating.
  4. You should not push or strain as you urinate. You should remain as still as possible.
  5. When you have finished urinating, you will count for five seconds and press the flowmeter button again.
  6. You should not put any toilet paper into the funnel device.
  7. The procedure will be concluded at this point. Depending on your specific medical condition, you may be asked to perform the test on several consecutive days.

After the urology flow rate test

Generally, there is no special type of care following uroflowmetry. However, your doctor may give you additional or alternate instructions after the procedure, depending on your particular situation.

Uroflowmetry normal flow

There is great variation in uroflowmetry parameters even in the non‐symptomatic population 1, although flow curves are generally repeatable for the same patient. In particular, there are no definitive ‘normal’ ranges for maximum flow rate (Qmax), although it decreases with age and voided volume (but not in a directly proportional manner). Males aged <40 years usually have a Qmax of >25 mL/s, and females usually have a Qmax of 5–10 mL/s more than males at a given bladder volume. Beware the ‘normal flow’ that in fact represents the effect of a compensatory increase in the voiding pressure generated by the detrusor in patients with bladder outlet obstruction 2.

Decreased urine flow

This is the most common abnormal flow trace seen in practice and is represented by a dampened curve with decreased Qmax and prolonged flow time. A significantly decreased Qmax (generally accepted as <15 mL/s) cannot be used to distinguish between BOO in men, outflow obstruction in women, and impaired detrusor contractility 6; in appropriate cases, formal multichannel urodynamic studies with concomitant measurements of flow and detrusor pressures are important to delineate between these conditions.

Despite the limitations, Qmax remains the single best non‐invasive urodynamic test to detect possible lower urinary tract obstruction. The test is also useful in some clinical situations to guide further evaluation to predict outcome after surgery and for preoperative counseling:

  • Males with a Qmax above the threshold value of 15 mL/s (or 12 mL/s) 3 may have a poorer outcome after prostate surgery for presumed bladder outlet obstruction 4 and these men should be considered for formal urodynamics to arrive at a definite diagnosis and decrease treatment failures.
  • Females undergoing mid‐urethral sling surgery with a Qmax of <15 mL/s at preoperative uroflowmetry are more likely to fail a trial of void after sling surgery 5.

Plateau urine flow

A long flow time, associated with a poor flow is typical of a stricture in the lower urinary tract. Another commonly encountered scenario is the patient with post‐radical prostatectomy incontinence. One should suspect an anastomotic stricture if this flow curve pattern is seen in the office during initial postoperative assessment. The patient should be considered for a cystoscopy with a view to treat the stricture as the next step in management, rather than referral for a formal urodynamic study as difficult catheterisation is commonly encountered.

Intermittent urine flow

This may be seen in patients who void with some abdominal straining due to bladder outlet obstruction or a poorly contractile detrusor, and is often superimposed on a decreased or plateauing curve pattern.

‘Saw‐tooth’ urine flow

Often pathogneumonic of detrusor‐sphincter‐dyssynergia, this curve should prompt urgent pressure‐flow studies to investigate high intravesical pressures that might damage the upper tracts.

‘Super‐voider’

This is seen after surgery for bladder outlet obstruction (e.g. TURP or urethroplasty), in patients with decreased urethral resistance (e.g. intrinsic urethral sphincter deficiency), or occasionally in those with detrusor overactivity. It may be considered ‘normal’ if there are no symptoms or signs to suggest underlying pathology, and is sometimes seen in young healthy female patients who may have a Qmax exceeding 40 mL/s.

‘Kicking the bucket’, and other artefacts

Urologists must be wary of artefacts and always compare the automated printout reading with the curve and clinical context. Smooth muscle physiology suggests that there should not be any abrupt spikes on a trace. A patient who accidentally kicks the flowmeter can appear to have a ‘normal’ Qmax. Other artefacts created by abdominal straining, squeezing the prepuce, or even variations in the direction of the urinary stream (within the funnel of the uroflowmeter) are common and urologists must recognise these.

Uroflowmetry procedure risks

Because uroflowmetry is a noninvasive procedure, it is safe for most persons. The test is usually done in privacy to ensure that the person voids in a natural setting.

There may be risks depending on your specific medical condition. Be sure to discuss any concerns with your doctor prior to the procedure.

Certain factors or conditions may interfere with the accuracy of uroflowmetry. These factors include, but are not limited to, the following:

  • Straining with urination
  • Body movement during urination
  • Certain medications that affect bladder and sphincter muscle tone
References
  1. Wyndaele JJ. Normality in urodynamics studied in healthy adults. J Urology 1999; 161: 899–902.
  2. Jarvis, T.R., Chan, L. and Tse, V. (2012), PRACTICAL UROFLOWMETRY. BJU Int, 110: 28-29. doi:10.1111/bju.11617
  3. McLoughlin J, Gill KP, Abel PD, Williams G. Symptoms versus flow rates versus urodynamics in the selection of patients for prostatectomy. Br J Urol 1990; 66: 303–305.
  4. Jensen KM, Jorgensen JB, Mogensen P. Urodynamics in prostatism. I. Prognostic value of uroflowmetry. Scand J Urol Nephrol 1988; 22: 109–117.
  5. Wheeler TL, Richter HE, Greer WJ, Bowling CB, Redden DT, Varner RE. Predictors of success with postoperative voiding trials after a mid‐urethral sling procedure. J Urol 2008; 179: 600–604.
read more
Procedures

Amylase test

amylase test

What is amylase test

Amylase test measures the amount of amylase in your blood or urine. Amylase is an enzyme hydrolase or special protein, that helps you degrade complex carbohydrates into simple sugars. Most of your amylase is made in the pancreas and salivary glands to aid in the digestion of starch. Amylase is also produced by the small intestine mucosa, ovaries, placenta, liver, and fallopian tubes. A small amount of amylase in your blood and urine is normal. A larger or smaller amount may mean that you have a disorder of the pancreas, an infection, alcoholism, or another medical condition.

Amylase is an enzyme that has several different forms called isoenzymes. Different tissues make different forms. P-amylase refers to the type of amylase made mainly in the pancreas. S-amylase refers to the type of amylase made mainly by the salivary glands. P-amylase in the blood increases when the pancreas is inflamed or damaged. S-amylase in the blood increases when the salivary gland is inflamed or damaged. Measuring pancreatic amylase, or P-amylase, may be useful in determining if an increase in a total amylase level is due to acute pancreatitis.

Plasma amylases (P-amylase) are of relatively low molecular weight for an enzyme (55,000-60,000 daltons) and enter the urine through glomerular filtration. Conditions that cause increased entry of amylase into plasma (e.g, acute pancreatitis) will thus result in increased urinary excretion of amylase. Therefore, urinary amylase is sometimes used in the diagnosis of acute pancreatitis. However, the rate of urinary amylase excretion appears to be less sensitive than plasma markers, and is not specific for the diagnosis of acute pancreatitis.

Similar to other low-molecular-weight proteins filtered by glomeruli, amylases are reabsorbed to an extent by the proximal tubule. Thus, conditions associated with increased production and glomerular filtration of other low-molecular-weight proteins that compete with tubular reabsorption of amylase or conditions of proximal tubular injury may increase urinary amylase excretion. Also, a number of disorders other than acute pancreatitis may cause increases in plasma amylase concentrations and consequent increases in urinary amylase excretion. These conditions include burns, ketoacidosis, myeloma, light-chain proteinuria, march hemoglobinuria, acute appendicitis, intestinal perforation, and following extracorporeal circulation.

Quantitation of urinary amylase excretion is also useful in monitoring for rejection following pancreas transplantation. The duodenal cuffs of donor pancreases are often surgically anastomosed to the recipient’s bladder at the time of pancreas transplantation, allowing for drainage of exocrine pancreas fluid into the bladder. In pancreatic rejection, urinary amylase excretion decreases.

Since the clinical use of amylase activity is usually to detect pancreatitis, the pancreatic amylase (p-amylase) form provides the single most useful test in the laboratory diagnosis of acute pancreatitis.

Total serum amylase continues to be the most widely used clinical test for the diagnosis of acute pancreatitis. Its use has been justified on the basis of its accuracy of 95%. The problem with its use is that it has relatively low specificity of between 70% and 80%.

  • An amylase blood test is used to diagnose or monitor a problem with your pancreas, including pancreatitis, an inflammation of the pancreas.
  • An amylase urine test may be ordered along with or after an amylase blood test. Urine amylase results can help diagnose pancreatic and salivary gland disorders.

One or both types of tests may be used to help monitor amylase levels in people who are being treated for pancreatic or other disorders.

In certain cases, for example when there is an accumulation of fluid in the abdomen (ascites), an amylase test may be performed on peritoneal fluid to help make a diagnosis of pancreatitis.

What happens during an amylase test?

For an amylase blood test, a health care professional will take a blood sample from a vein in your arm, using a small needle. After the needle is inserted, a small amount of blood will be collected into a test tube or vial. You may feel a little sting when the needle goes in or out. This usually takes less than five minutes.

For an amylase urine test, you will be given instructions to provide a “clean catch” sample. The clean catch method includes the following steps:

  • Wash your hands
  • Clean your genital area with a cleansing pad given to you by your provider. Men should wipe the tip of their penis. Women should open their labia and clean from front to back.
  • Start to urinate into the toilet.
  • Move the collection container under your urine stream.
  • Collect at least an ounce or two of urine into the container, which should have markings to indicate the amounts.
  • Finish urinating into the toilet.
  • Return the sample container as instructed by your health care provider.

Your health care provider may request that you collect all your urine during a 24-hour period. For this test, your health care provider or laboratory will give you a container and specific instructions on how to collect your samples at home. Be sure to follow all instructions carefully. This 24-hour urine sample test is used because the amounts of substances in urine, including amylase, can vary throughout the day. So collecting several samples in a day may give a more accurate picture of your urine content.

Amylase blood test

The blood amylase test is used to help diagnose and monitor acute pancreatitis. It is often ordered along with a lipase test. It may also be used to diagnose and monitor chronic pancreatitis and other disorders that may involve the pancreas.

Amylase tests are sometimes used to monitor treatment of cancers involving the pancreas and after the removal of gallstones that have caused gallbladder attacks.

If your health care provider suspects you have pancreatitis, he or she may order a lipase blood test, along with an amylase blood test. Lipase is another enzyme produced by the pancreas. Lipase tests are considered to be more accurate for detecting pancreatitis, especially in pancreatitis related to alcohol abuse.

What is lipase test?

Lipase is one of several enzymes produced by the pancreas to help digest dietary fats. Lipase test measures the amount of lipase in your blood.

Lipase is transported through the pancreatic duct and into the first part of the small intestine (duodenum), where it helps break down dietary triglycerides (a form of fat) into fatty acids. The pancreas is the primary source of lipase, but cells in other areas of the body involved with digestion and nutrient absorption also produce lipase, including those in the tongue, stomach and liver.

Lipase is usually present in the blood in small quantities. When cells in the pancreas are injured, like with pancreatitis, or when the pancreatic duct is blocked by a gallstone or, in rare cases, by a pancreatic tumor, increased amounts of lipase enter the blood and result in higher concentrations in the blood.

The blood test for lipase is most often used, along with an amylase test, to help diagnose and monitor acute pancreatitis. It may also be used to diagnose and monitor chronic pancreatitis and other disorders that involve the pancreas but is not as useful of a test for these conditions because lipase levels remain elevated for longer periods and may not reveal clinical progress.

Lipase testing is also occasionally used in the diagnosis and follow-up of cystic fibrosis, celiac disease, and Crohn disease.

Amylase urine test

Clinical application and interpretation:

  • Rarely indicated.
  • Suspected acute pancreatitis with normal serum amylase. Persistent, significant elevation of serum amylase if macroamylasemia is suspected.
  • Urine level may be increased in acute pancreatitis at a time when the serum amylase level has returned to within the reference interval.
  • High serum and low urine amylase levels are seen in macroamylasemia. Use of an amylase/creatinine clearance ratio is not recommended.

A urine amylase test (24 h urine collection with no preservative) may also be ordered. Typically, its level will mirror blood amylase concentrations, but both the rise and fall will occur later. Sometimes a urine creatinine clearance may be ordered along with the urine amylase to help evaluate the ratio of amylase to creatinine that is filtered by the kidneys. This ratio is used to assess kidney function because improper function can result in a slower rate of amylase clearance.

Normal reference value for urine amylase is 3-26 U/hour.

Interpretation

Decreases in urinary amylase excretion of greater than 30% to 50%, relative to baseline values, may be associated with acute pancreas allograft rejection. Because there is large day-to-day variability in urinary amylase excretion following pancreas transplantation, if a significant decrease is noted, it should be confirmed by a second collection. There is also large inter-individual variability in urinary amylase excretion among pancreas transplant recipients. Collecting a timed urine specimen and expressing the urinary amylase level as Units excreted/hour might reduce variability and improve test performance. However, acute rejection is usually not established solely by changes in urinary amylase excretion, but by tissue biopsy.

Urinary amylase is elevated in acute pancreatitis, but the test has poor sensitivity and specificity.

What is macroamylasemia?

Macroamylasemia is the presence of an abnormal substance called macroamylase in the blood 1.

Causes of macroamylasemia

Macroamylase is a substance that consists of an enzyme, called amylase, attached to a protein. Because it is large, macroamylase is filtered very slowly from the blood by the kidneys.

Most people with macroamylasemia do not have a serious disease that is causing it, but the condition has been associated with:

  • Celiac disease
  • Lymphoma
  • HIV infection
  • Monoclonal gammopathy
  • Rheumatoid arthritis
  • Ulcerative colitis

Macroamylasemia symptoms

Macroamylasemia does not cause symptoms.

Macroamylasemia diagnosis

A blood test will show high levels of amylase. However, macroamylasemia can look similar to acute pancreatitis, which also causes high levels of amylase in the blood.

Measuring amylase levels in the urine can help tell macroamylasemia apart from acute pancreatitis. Urine levels of amylase are low in people with macroamylasemia, but high in people with acute pancreatitis 2.

When is amylase test ordered?

A blood amylase test may be ordered when a person has symptoms of a pancreatic disorder, such as:

  • Severe abdominal or back pain
  • Fever
  • Loss of appetite
  • Nausea

A urine amylase test may be ordered along with or following a blood amylase test. One or both may also be ordered periodically when a health practitioner wants to monitor a person to evaluate the effectiveness of treatment and to determine whether amylase levels are increasing or decreasing over time.

Amylase test normal range

The normal range is 40 to 140 units per liter (U/L) or 0.38 to 1.42 microkat/L (µkat/L).

Note: Normal value ranges may vary slightly among different laboratories. Talk to your provider about the meaning of your specific test results.

The examples above show the common measurements for results for these tests. Some laboratories use different measurements or may test different specimens.

Amylase Normal Reference Values

  • 0-30 days: 0-6 U/L
  • 31-182 days: 1-17 U/L
  • 183-365 days: 6-44 U/L
  • 1-3 years: 8-79 U/L
  • 4-17 years: 21-110 U/L
  • Older than 18 years: 26-102 U/L

What does abnormal amylase test result mean?

High levels of amylase may indicate:

  • Very high levels are found with acute pancreatitis; lipase is a more sensitive and specific indicator of this disorder.
    • In pancreatitis, lipase levels typically peak higher and remain elevated longer than those of amylase, so that lipase is a more sensitive indicator of pancreatic cell damage.
    • Lipase is not elevated in salivary gland disease.
  • A normal amylase level does not exclude acute pancreatitis. The test is not specific, with very high levels being found in pancreatic pseudocyst, perforated duodenal ulcer and upper small bowel obstruction.
  • Moderately high levels are found frequently in:
    • Cancer of the pancreas, ovaries, or lungs
    • Cholecystitis
    • Gallbladder attack caused by disease
    • Gastroenteritis (severe)
    • Infection of the salivary glands (such as mumps) or a blockage
    • Intestinal blockage
    • Macroamylasemia
    • Pancreatic or bile duct blockage
    • Perforated ulcer
    • Tubal pregnancy (may have burst open)
  • High levels are also found in acute parotitis and macroamylasemia, a clinically insignificant disorder described in 1.5% of (non-alcoholic) hospitalised adult patients.
  • Assays which are specific for the pancreatic isoenzyme (P-amylase and S-amylase) improve the specificity of the test.

Low levels of amylase can indicate:

  • Chronic pancreatitis, an inflammation of the pancreas that gets worse over time and can lead to permanent damage. Chronic pancreatitis is most often caused by heavy alcohol use.
  • Liver disease
  • Cystic fibrosis
  • Cancer of the pancreas
  • Damage to the pancreas
  • Kidney disease
  • Toxemia of pregnancy

Be sure to tell your health care provider about any prescription or over-the-counter medicines you are taking, as they can affect your results. To learn more about your results, talk to your health care provider.

A high amylase level in the blood may indicate the presence of a condition affecting the pancreas.

  • In acute pancreatitis, amylase in the blood often increases to 4 to 6 times higher than the highest reference value, sometimes called the upper limit of normal. The increase occurs within 4 to 8 hours of injury to the pancreas and generally remains elevated until the cause is successfully treated. Then the amylase values will return to normal in a few days.
  • In acute pancreatitis, elevated amylase levels usually parallel lipase concentrations, although lipase levels will remain elevated longer. The lipase test is regarded as more accurate for detecting pancreatitis, particularly acute alcoholic pancreatitis, but both lipase and amylase tests are commonly ordered together when pancreatitis is suspected.
  • In chronic pancreatitis, amylase levels initially will be moderately elevated but often decrease over time with progressive pancreas damage. In this case, levels returning to normal may not indicate that the source of damage has been resolved. The magnitude of increase in amylase level does not indicate severity of pancreatic disease.
  • Chronic pancreatitis is often associated with alcoholism. It may also be caused by trauma or pancreatic duct obstruction or may be seen in association with genetic abnormalities such as cystic fibrosis.

Amylase levels may also be significantly increased in people with pancreatic duct obstruction and pancreatic cancers.

In general, urine amylase levels rise in proportion to blood amylase levels and will stay elevated for several days after blood levels have returned to normal.

An increased level of amylase in peritoneal fluid can occur in acute pancreatitis but may also occur in other abdominal disorders, such as obstructed intestine or decreased blood flow to the intestines (infarct).

A low amylase level in blood and urine in a person with pancreatitis symptoms may indicate permanent damage to the amylase-producing cells in the pancreas. Decreased levels can also be due to kidney disease and toxemia of pregnancy.

Increased blood amylase levels with normal to low urine amylase levels may indicate the presence of a macroamylase, a benign complex of amylase and other proteins that accumulates in the blood.

Elevated amylase

Pancreatic amylase is elevated in acute pancreatitis within 12 hours of onset and persists 3 to 4 days. The elevation is usually 4-fold to 6-fold the upper reference limit.

  • Values over the normal reference interval in patients with histories consistent with acute pancreatitis are confirmatory. Peak values are often 200 U/L or higher.
  • Mild elevations up to 78 U/L may have little clinical significance.
  • Not useful for diagnosing pancreatic cancer.
  • Detection of chronic pancreatitis can only be aided by p-amylase during acute episodes.

Macroamylase may cause small, but persistent elevations of p-amylase over weeks or months. This is usually accompanied by a reduced amylase clearance. This elevated pancreatic amylase is not diagnostic for pancreatitis. By utilizing serum lipase and urinary amylase values, the presence or absence of macroamylase may be determined.

An elevation of total serum alpha-amylase does not specifically indicate a pancreatic disorder since the enzyme is produced by the salivary glands, mucosa of the small intestine, ovaries, placenta, liver, and the lining of the fallopian tubes. Two isoenzymes, pancreatic and salivary, are found in serum. Pancreatic amylase has been shown to be more useful than total amylase when evaluating patients with acute pancreatitis.

Do elevated amylase levels always mean that I have a pancreatic condition?

No. Amylase levels may also be significantly increased in people with gallbladder attacks. Urine and blood amylase levels may be moderately elevated with a variety of other conditions, such as ovarian cancer, lung cancer, tubal pregnancy, acute appendicitis, diabetic ketoacidosis, mumps, intestinal obstruction, or perforated ulcer, but amylase tests are not generally used to diagnose or monitor these disorders.

Can medications that I am taking affect the amylase level?

Yes. Some drugs that may cause amylase to rise include aspirin, diuretics, oral contraceptives, corticosteroids, indomethacin, ethyl alcohol, and opiates (such as codeine and morphine).

References
  1. Forsmark CE. Pancreatitis. In: Goldman L, Schafer AI, eds. Goldman-Cecil Medicine. 25th ed. Philadelphia, PA: Elsevier Saunders; 2016:chap 144.
  2. Tenner S, Steinberg WM. Acute pancreatitis. In: Feldman M, Friedman LS, Brandt LJ, eds. Sleisenger and Fordtran’s Gastrointestinal and Liver Disease: Pathophysiology/Diagnosis/Management. 10th ed. Philadelphia, PA: Elsevier Saunders; 2016:chap 58.
read more
Procedures

Appendectomy

laparoscopic appendectomy

What is an appendectomy

An appendectomy also known as an appendicectomy, is an operation to remove the appendix, which is a small, tube-like part of the bowel. An appendectomy often needs to be performed urgently when someone has an infected and inflamed appendix (appendicitis) or the appendix has burst (perforated appendix). The appendix is a small, finger-shaped organ that branches off from the first part of the large intestine. When your appendix becomes swollen (inflamed) or infected, the condition is called appendicitis. When you have appendicitis, your appendix may need to be removed. An appendix that has a hole in it can leak and infect the entire abdomen area. This can be life threatening.

If the appendix becomes infected it must be surgically removed before it ruptures and spreads infection to the entire abdominal space. Symptoms of acute appendicitis include pain in the lower right side of the abdomen, fever, reduced appetite, nausea or vomiting.

  • There is no test to confirm appendicitis and the symptoms may be caused by other illnesses. The doctor must diagnose from the information you report and what he sees. During appendectomy surgery, even if the surgeon finds that the appendix is not infected (which can happen up to 25% of the time), he will thoroughly check the other abdominal organs and remove the appendix anyway.

Appendectomies are one of the most commonly performed operations, with approximately 1 in 2000 persons requiring an appendectomy during his or her lifetime 1.

Depending upon the circumstances of the individual patient, an appendectomy can be performed in one of two ways, through an open incision or with a laparoscope.

Types of appendectomy:

  • Open appendectomy, the traditional method of operation for appendicitis, requires a medium-sized incision (about 2 to 4 inches long) in the lower right part of the abdomen. The appendix is removed through this incision after surgically separating it from the base of the colon. Open appendectomy usually requires general anesthesia but in some cases may be performed with spinal anesthesia.
  • Laparoscopic appendectomy (key hole surgery) is performed using 1 to 3 small (often less than an inch long) incisions and a port (nozzle) is inserted into one of the slits, and carbon dioxide gas inflates the abdomen. A laparoscope is inserted through another port. It looks like a telescope with a light and camera on the end so the surgeon can see inside the abdomen. Surgical instruments are placed in the other small openings and used to remove the appendix. The area is washed with sterile fluid to decrease the risk of further infection. The carbon dioxide comes out through the slits, and then the sites are closed with sutures or staples or covered with glue-like bandage and Steri-Strips. Your surgeon may start with a laparoscopic technique and need to change to an open technique. This change is done for your safety. This technique is most often used for early appendicitis and has an overall shorter recovery time than open appendectomy. If the appendix has ruptured (burst) or if there is scar tissue from previous operations, the laparoscopic approach may not be possible and an open appendectomy is necessary. Laparoscopic appendectomy requires general anesthesia for the operation.

Some cases of appendicitis may be handled in a non-emergency manner if antibiotics are given while waiting. Operations may safely be delayed for certain individuals. Surgeons make that decision on a case-by-case basis.

Most studies have shown that there is minimal differences between open and laparoscopic appendectomy for appendicitis in terms of infection, pain control after surgery, hospitalization time and recovery. It is generally the surgeons preference as to whether an open or laparoscopic appendectomy is performed.

Appendectomy is done using either:

  • Spinal anesthesia. — Medicine is put into your back to make you numb below your waist. You will also get medicine to make you sleepy.
  • General anesthesia — You will be asleep and not feel any pain during the surgery.

If the appendix broke open or a pocket of infection (abscess) formed, your abdomen will be thoroughly washed out during surgery. The surgeon may then leave the skin open and allow it to heal together on its own, to allow the infection to drain, or less frequently, put in a small drainage tube

Living without an appendix causes no known health problems.

As for all surgical procedures, appendectomy contains risks.

Possible risks from appendectomy include wound infection, infection inside your abdomen, bleeding, damage to the intestine or bladder, and needing to change from a keyhole to an open procedure partway through the surgery and risks of the anaesthetic

However, these risks are considered to be minimal, especially when appendicitis can be fatal if it leads to peritonitis.

What is the appendix?

The appendix is a small, finger shaped pouch of intestine that extends from the cecum, which is the first part of the large intestine. It is found in the right lower quadrant of the abdomen. The purpose of the appendix is unknown, however it is not believed to have any significant function.

What is appendicitis?

Appendicitis is an infection of the appendix. The infection and swelling can decrease the blood supply to the wall of the appendix. This leads to tissue death, and the appendix can rupture or burst, causing bacteria and stool to release into the abdomen. This is called a ruptured appendix. A ruptured appendix can lead to peritonitis, which is an infection of your entire abdomen. Appendicitis most often affects people between the ages of 10 and 30 years old. It is a common reason for an operation in children, and it is the most common surgical emergency in pregnancy 2.

Figure 1. Laparoscopic appendectomy

laparoscopic appendectomyFigure 2. Appendectomy scar (open appendectomy)

appendectomy scar

Why is appendectomy performed?

An appendectomy is done for appendicitis. The condition can be hard to diagnose, especially in children, older people, and women of childbearing age.

Most often, the first symptom is pain around your belly button:

  • The pain may be mild at first, but it becomes sharp and severe.
  • The pain often moves into your right lower abdomen and becomes more focused in this area.

Other symptoms include:

  • Diarrhea or constipation
  • Fever (usually not very high)
  • Nausea and vomiting
  • Reduced appetite

There are many reasons for abdominal pain besides appendicitis. These include gastroenteritis, indigestion, constipation, diverticulitis, gallbladder disease, hernias, ulcer disease, female reproductive system disease (including ovarian torsion [a twisted ovary], pelvic inflammatory disease, miscarriage of a pregnancy, and ruptured ovarian cysts), male reproductive system disease, bladder infection, kidney or bladder stones, and other less common problems. The abdominal pain usually associated with appendicitis often starts around the umbilicus (belly button), then concentrates in the lower right part of the abdomen. It is made worse by movement or by pressing on the abdomen and quickly releasing that pressure (rebound tenderness).

If you have symptoms of appendicitis, seek medical help right away. DO NOT use heating pads, enemas, laxatives, or other home treatments to try to relieve symptoms.

Your health care provider will examine your abdomen and rectum. Other tests may be done:

  • Blood tests, including a white blood cell count, may be done to check for infection.
  • When the diagnosis is not clear, the doctor may order a CT scan or ultrasound to make sure the appendix is the cause of the problem.

There are no actual tests to confirm that you have appendicitis. Other illnesses can cause the same or similar symptoms.

The goal is to remove an infected appendix before it breaks open (ruptures). After reviewing your symptoms and the results of the physical exam and medical tests, your surgeon will decide whether you need surgery.

How to prepare for an appendectomy

You will need to fast (have nothing to eat or drink) for at least 6 hours before the operation. You might be given fluids through a drip (intravenously, directly into a vein) so you don’t get dehydrated.

Your doctors and nurses will explain the operation. Ask questions if you’re not sure about something.

What happens during an appendectomy?

A general anaesthetic is needed for this kind of surgery.

The surgeon might do the appendectomy laparoscopically, through several tiny cuts. Sometimes a larger cut is needed – this is known as an open appendectomy.

During and after the surgery you will be carefully monitored.

You are likely to be given antibiotics and pain relief.

Appendectomy recovery

Most people leave the hospital in 1 to 2 days after appendectomy surgery. You can go back to your normal activities within 2 to 4 weeks after leaving the hospital.

If you had laparoscopic appendectomy, you will likely recover quickly. Recovery is slower and more complicated if your appendix has broken open or an abscess has formed.

After your appendectomy surgery, it is normal to feel weak and tired for several days after you return home. Your abdomen may be swollen and may be painful. If you had laparoscopic appendectomy, you may have pain in your shoulder for about 24 hours. This is due to the gas inserted into your abdomen during the procedure. Moving and walking helps to decrease the gas and the right shoulder pain.

You may also feel sick to your stomach and have diarrhea, constipation, gas, or a headache. This usually goes away in a few days.

Your recovery time depends on the type of appendectomy surgery you had. If you had laparoscopic appendectomy, you will probably be able to return to work or a normal routine 1 to 3 weeks after surgery. If you had an open appendectomy surgery, it may take 2 to 4 weeks. If your appendix ruptured, you may have a drain in your incision.

Your body will work fine without an appendix. You will not have to make any changes in your diet or lifestyle.

Each person recovers at a different pace. Follow the steps below to get better as quickly as possible.

Call your healthcare provider if you have:

  • A fever higher than 100.4°F (38°C), or as directed by the healthcare provider
  • Abdominal swelling
  • Green or yellow drainage from any incision
  • Pain that gets worse as hours or days pass
  • Redness or swelling around the incision
  • Sluggishness
  • Vomiting

Appendectomy recovery tips

Activity

  • Rest when you feel tired. Getting enough sleep will help you recover.
  • Try to walk each day. Start by walking a little more than you did the day before. Bit by bit, increase the amount you walk. Walking boosts blood flow and helps prevent pneumonia and constipation.
  • When you have an operation, you are at risk of getting blood clots because of not moving during anesthesia. The longer and more complicated your surgery, the greater the risk. This risk is decreased by getting up and walking 5 to 6 times per day, wearing special support stockings or compression boots on your legs, and for high-risk patients, taking a medication that thins your blood.
  • For about 2 weeks, avoid lifting anything that would make you strain. This may include a child, heavy grocery bags and milk containers, a heavy briefcase or backpack, cat litter or dog food bags, or a vacuum cleaner.
  • Avoid strenuous activities, such as bicycle riding, jogging, weight lifting, or aerobic exercise, until your doctor says it is okay.
  • You may be able to take showers (unless you have a drain near your incision) 24 to 48 hours after surgery. Pat the incision dry. Do not take a bath for the first 2 weeks, or until your doctor tells you it is okay. If you have a drain near your incision, follow your doctor’s instructions.
  • You may drive when you are no longer taking pain medicine and can quickly move your foot from the gas pedal to the brake. You must also be able to sit comfortably for a long period of time, even if you do not plan on going far. You might get caught in traffic.
  • You will probably be able to go back to work in 1 to 3 weeks. If you had an open surgery, it may take 3 to 4 weeks.
  • Do not lift or participate in strenuous activity for 3 to 5 days for laparoscopic appendectomy and 10 to 14 days for open procedure.
  • Your doctor will tell you when you can have sex again.
  • Children can usually go to school 1 week or less after an operation for an unruptured appendix and up to 2 weeks after a ruptured appendix.
  • Most children will not return to gym class, sports, and climbing games for 2 to 4 weeks after the operation.

Diet

  • You can eat your normal diet. If your stomach is upset, try bland, low-fat foods like plain rice, broiled chicken, toast, and yogurt.
  • Drink plenty of fluids (unless your doctor tells you not to). Continue to drink lots of fluids, usually about 8 to 10 glasses per day.
  • After intestinal surgery, you may have loose watery stools for several days. If watery diarrhea lasts longer than 3 days, contact your surgeon.
  • Pain medication (narcotics) can cause constipation. Increase the fiber in your diet with high-fiber foods if you are constipated. Your surgeon may also give you a prescription for a stool softener.
  • Foods high in fiber include beans, bran cereals and whole-grain breads, peas, dried fruit (figs, apricots, and dates), raspberries, blackberries, strawberries, sweet corn, broccoli, baked potatoes with skin, plums, pears, apples, greens, and nuts.
  • You may notice that your bowel movements are not regular right after your surgery. This is common. Try to avoid constipation and straining with bowel movements. You may want to take a fiber supplement every day. If you have not had a bowel movement after a couple of days, ask your doctor about taking a mild laxative.

Medicines

  • Your doctor will tell you if and when you can restart your medicines. He or she will also give you instructionsabout taking any new medicines.
  • If you take blood thinners, such as warfarin (Coumadin), clopidogrel (Plavix), or aspirin, be sure to talk to your doctor. He or she will tell you if and when to start taking those medicines again. Make sure that you understandexactly what your doctor wants you to do.
  • If your appendix ruptured, you will need to take antibiotics. Take them as directed. Do not stop taking them just because you feel better. You need to take the full course of antibiotics.
  • Take pain medicines exactly as directed.
  • If the doctor gave you a prescription medicine for pain, take it as prescribed.
  • If you are not taking a prescription pain medicine, take an over-the-counter medicine such as acetaminophen (Tylenol), ibuprofen (Advil, Motrin), or naproxen (Aleve). Read and follow all instructions on the label.
  • Do not take two or more pain medicines at the same time unless the doctor told you to. Many pain medicines have acetaminophen, which is Tylenol. Too much Tylenol can be harmful.
  • If you think your pain medicine is making you sick to your stomach:
  • Take your medicine after meals (unless your doctor has told you not to).
  • Ask your doctor for a different pain medicine.

Surgical wound care

  • If you had an open appendectomy surgery, you may have staples in your incision. The doctor will take these out in 7 to 10 days.
  • If you have strips of tape on the incision, leave the tape on for a week or until it falls off.
  • If you have a glue-like covering over the incision, allow the glue to fl ake off on its own.
  • You may wash the area with warm, soapy water 24 to 48 hours after your surgery, unless your doctor tells you not to. Pat the area dry.
  • Keep the area clean and dry. You may cover it with a gauze bandage if it weeps or rubs against clothing. Change the bandage every day.
  • If your appendix ruptured, you may have an incision with packing in it. Change the packing as often as your doctor tells you to.
  • Packing changes may hurt at first. Taking pain medicine about half an hour before you change the dressing can help.
  • If your dressing sticks to your wound, try soaking it with warm water for about 10 minutes before you remove it. You can do this in the shower or by placing a wet face cloth over the dressing.
  • Remove the old packing and flush the incision with water. Gently pat the top area dry.
  • The size of the incision determines how much gauze you need to put inside. Fold the gauze over once, but do not wad it up so that it hurts. Put it in the wound carefully. You want to keep the sides of the wound from touching. A cotton swab may help you push the gauze in as needed.
  • Put a gauze pad over the wound, and tape it down.
  • You may notice greenish grey fluid seeping from your wound as you start to heal. This is normal. It is a sign that your wound is healing.

Appendectomy scar

  • Avoid wearing tight or rough clothing. It may rub your incisions and make it harder for them to heal.
  • Protect the new skin, especially from the sun. The sun can burn and cause darker scarring.
  • Your scar will heal in about 4 to 6 weeks and will become softer and continue to fade over the next year.
  • Sensation around your incision will return in a few weeks or months.

Follow-up care is a key part of your treatment and safety. Be sure to make and go to all appointments, and call your doctor or nurse call line if you are having problems. It’s also a good idea to know your test results and keep a list of the medicines you take.

When should you call for medical help?

Call your local emergency services anytime you think you may need emergency care. For example, call if:

  • You passed out (lost consciousness).
  • You are short of breath..
  • You are sick to your stomach or cannot drink fluids.
  • You cannot pass stools or gas.
  • You have pain that does not get better when you take your pain medicine.
  • You have signs of infection, such as:
  • Increased pain, swelling, warmth, or redness.
  • Red streaks leading from the wound.
  • Pus draining from the wound.
  • A fever.
  • You have loose stitches, or your incision comes open.
  • Bright red blood has soaked through the bandage over your incision.
  • You have signs of a blood clot in your leg (called a deep vein thrombosis), such as:
  • Pain in your calf, back of knee, thigh, or groin.
  • Redness and swelling in your leg or groin.

Appendectomy complications

Complications are higher in smokers, obese patients, and those with other diseases such as diabetes, heart failure, renal failure and lung disease. Wound healing may also be decreased in smokers.

Any complication, including: Surgical infections, breathing difficulties, blood clots, renal (kidney) complications, cardiac complications, and return to the operating room

  • Laparoscopic appendectomy 3.4%
  • Open appendectomy 6.4%

Children have less than 1% for all complications. Children with perforated appendix have increased wound infection rates and abdominal infections. There are no deaths reported with simple appendectomy.

Intestinal obstruction 3%: Short-term blockage of stool or fluids. Swelling of the tissue around the intestine can stop stool and fluid from passing. You will be asked if you are passing gas, and bowel sounds will be checked. If you have a temporary block, a tube may be placed through your nose into your stomach for 1 or 2 days to remove fluid from your stomach.

Pregnancy risks: Premature labor 8 to 10% and fetal loss 2%. The risk of fetal loss increases to 10% when the appendix ruptures and there is peritonitis (infection of the abdominal cavity) 3.

Wound Infection (laparoscopic 1.9% and open 4.3%): Infection at the area of the incision or near the organ where the surgery was performed. Antibiotics are typically given before the operation. Smoking can increase the risk of infection.

Return to the operating room 1.8%: Significant pain and bleeding may cause a return to surgery.

Pneumonia (less than 1%): Infection in the lungs. Stopping smoking, walking and deep breathing after your operation can help prevent lung infections.

Urinary tract infection (less than 1%): Infection of the bladder or kidneys. A urinary catheter (small thin tube) that drains urine from the bladder is sometimes inserted. Signs of a urinary tract infection include pain with urination, fever, and cloudy urine.

Blood clot (less than 1%): A clot in the legs that can travel to the lung Less than 1% Longer surgery and bed rest increase the risk. Getting up, walking 5 to 6 times per day, and wearing support stockings reduce the risk.

Heart complication (less than 1%): Includes heart attack or sudden stopping of the heart. Problems with your heart or lungs can be sometimes be worsened by general anesthesia. Your anesthesia provider will take your history and suggest the best option for you.

Risks of anesthesia and surgery in general include:

  • Reactions to medicines
  • Problems breathing
  • Bleeding, blood clots, or infection

Risks of an appendectomy after a ruptured appendix include:

  • Buildup of pus, which may need draining and antibiotics
  • Longer hospital stays.

Death: Less than 1%. Death is extremely rare in healthy people.

References
  1. Torpy JM, Burke AE, Golub RM. Appendectomy. JAMA. 2011;306(21):2404. doi:10.1001/jama.2011.767
  2. Cheng HT, Wang YC, Lo HC, et al. Laparoscopic appendectomy versus open appendectomy in pregnancy: a population-based analysis of maternal outcomes. Surgical Endoscopy. Aug 30, 2014; epub ahead of print.
  3. Li X, Zhang J, et al. Laparoscopic versus conventional appendectomy —a meta-analysis of randomized controlled trials. BMC Gastroenterology. 2010;10:129. www.ncbi.nlm.nih.gov/pmc/articles/PMC2988072
read more
Procedures

Erythropoietin

erythropoietin

What is erythropoietin

Erythropoietin (EPO) is a hormone produced primarily by the healthy kidneys and a small amount in your liver 1. Erythropoietin prompts your bone marrow stem cells to make more red blood cells, which then carry oxygen from the lungs to the rest of your body. When kidneys are diseased or damaged, they do not make enough erythropoietin. As a result, the bone marrow makes fewer red blood cells, causing anemia. When blood has fewer red blood cells, it deprives the body of the oxygen it needs.

Erythropoietin is produced and released into the blood by the kidneys in response to low blood oxygen levels (hypoxemia). Erythropoietin (EPO) is carried to the bone marrow, where it stimulates production of red blood cells. The hormone is active for a short period of time and then eliminated from the body in the urine.

The amount of erythropoietin released depends upon how low the oxygen level is and the ability of the kidneys to produce erythropoietin. Increased production and release of erythropoietin continues to occur until oxygen levels in the blood rise to normal or near normal concentrations, then production falls. The body uses this dynamic feedback system to help maintain sufficient oxygen levels and a relatively stable number of red blood cells in the blood.

However, if a person’s kidneys are damaged and do not produce sufficient erythropoietin, then too few red blood cells are produced and the person typically becomes anemic. Similarly, if a person’s bone marrow is unable to respond to the stimulation from erythropoietin, then the person may become anemic. This can occur with some bone marrow disorders or with chronic diseases, such as rheumatoid arthritis.

Individuals who have conditions that affect the amount of oxygen they breathe in, such as lung diseases, may produce more erythropoietin to try to compensate for the low oxygen level. People who live at high altitudes may also have higher levels of erythropoietin and so do chronic tobacco smokers.

If too much erythropoietin is produced, as occurs with some benign or malignant kidney tumors and with a variety of other cancers, too many red blood cells may be produced (polycythemia or erythrocytosis). This can lead to an increase in the blood’s thickness (viscosity) and sometimes to high blood pressure (hypertension), blood clots (thrombosis), heart attack, or stroke. Rarely, polycythemia is caused by a bone marrow disorder called polycythemia vera, not by increased erythropoietin.

Where is erythropoietin made?

Many researchers have made rigorous efforts to identify erythropoietin-producing cells in kidneys; however, a uniform understanding of which cells produce erythropoietin in kidneys was not established until the era of genetically modified mice 2. Using gene targeting and bacterial artificial chromosome transgenic methods, scientists have identified nearly all of interstitial fibroblast-like cells in the cortex and outer medulla to be renal erythropoietin-producing cells (kidney erythropoietin-producing cells) 3. Furthermore, interests in renal erythropoietin-producing cells (kidney erythropoietin-producing cells) have markedly increased by the evidence showing the crucial link between fibrosis and anemia via the loss of erythropoietin-producing ability of myofibroblast-transformed renal erythropoietin-producing cells 4. Importantly, this direct link indicates that kidney fibrosis (scarring) and anemia could be simultaneously treated by targeting or regulating the cellular properties of renal erythropoietin-producing cells.

Kidneys

The paired kidneys are reddish, kidney bean–shaped organs located just above the waist between the peritoneum and the posterior wall of the abdomen. Because their position is posterior to the peritoneum of the abdominal cavity, the organs are said to be retroperitoneal (Figure 1). The kidneys are located between the levels of the last thoracic vertebrae T12 and third lumbar (L3) vertebrae, a position where they are partially protected by ribs 11 and 12. If these lower ribs are fractured, they can puncture the kidneys and cause significant, even life-threatening damage. The right kidney is slightly lower than the left (see Figure 1) because the liver occupies considerable space on the right side superior to the kidney.

A typical adult kidney is 10–12 cm (4–5 in.) long, 5–7 cm (2–3 in.) wide, and 3 cm (1 in.) thick—about the size of a bar of bath soap—and weighs about 135–150 g (4.5–5 oz). The concave medial border of each kidney faces the vertebral column. Near the center of the concave border is an indentation called the renal hilum, through which the ureter emerges from the kidney along with blood vessels, lymphatic vessels, and nerves.

Three layers of tissue surround each kidney. The deep layer, the renal capsule, is a smooth, transparent sheet of dense irregular connective tissue that is continuous with the outer coat of the ureter. It serves as a barrier against trauma and helps maintain the shape of the kidney. The middle layer, the adipose capsule, is a mass of fatty tissue surrounding the renal capsule. It also protects the kidney from trauma and holds it firmly in place within the abdominal cavity. The superficial layer, the renal fascia, is another thin layer of dense irregular connective tissue that anchors the kidney to the surrounding structures and to the abdominal wall. On the anterior surface of the kidneys, the renal fascia is deep to the peritoneum.

Figure 1. Kidney location

kidney location

Figure 2. Kidney anatomy

kidney anatomy

Figure 3. Kidney structure

kidney structure

Figure 4. Bone marrow anatomy

bone marrow anatomy

Figure 5. Red blood cell formation

red blood cell formation

Note: Low blood oxygen causes the kidneys and to a lesser degree, the liver to release erythropoietin. Erythropoietin stimulates target cells in the red bone marrow to increase the production of red blood cells, which carry oxygen to tissues.

Erythropoietin test

The erythropoietin test measures the amount of a hormone called erythropoietin (EPO) in blood. To do the erythropoietin test, a blood sample is obtained by inserting a needle into a vein in your arm. An erythropoietin test is used primarily to help diagnose the cause of anemia. It can help identify candidates for erythropoietin replacement therapy (e.g., people with chronic kidney disease). Sometimes erythropoietin test is used to help diagnose the cause of too many red blood cells (polycythemia or erythrocytosis) or as part of an evaluation of a bone marrow disorder.

An erythropoietin test is usually ordered in follow up to abnormal findings on a complete blood count (CBC), such as a low red blood cell (RBC) count and low hemoglobin and hematocrit. These tests establish the presence and severity of anemia and give the healthcare practitioner clues as to the likely cause of the anemia. Erythropoietin testing is ordered to help determine if low erythropoietin may be causing and/or worsening the anemia.

In people with chronic kidney disease, the test may be ordered to evaluate the kidneys’ continued ability to produce sufficient erythropoietin. If the erythropoietin level is low, erythropoietin replacement therapy may help increase red cell production in the bone marrow.

Occasionally, an erythropoietin test may be ordered in follow up to complete blood count (CBC) results that show an increased number of red blood cells, to help determine whether the excess production of red blood cells (polycythemia or erythrocytosis) is due to an overproduction of erythropoietin or some other cause (e.g., JAK2 mutation).

When is erythropoietin test ordered?

An erythropoietin test may be ordered when a person has anemia that does not appear to be caused by iron deficiency, vitamin B12 or folate deficiency, decreased lifespan of red blood cells (hemolysis), or by excessive bleeding. It may be ordered when the red blood cell count, hemoglobin, and hematocrit are decreased and the reticulocyte count is inappropriately normal or decreased.

If someone has chronic kidney disease, erythropoietin levels may be ordered when the healthcare practitioner suspects that kidney dysfunction could be associated with a decrease in erythropoietin production.

An erythropoietin test may be ordered when a complete blood count reveals that a person has an increased number of red blood cells and a high hematocrit and hemoglobin.

An erythropoietin test may be ordered when a healthcare practitioner suspects that a person has a bone marrow disorder, such as a myeloproliferative neoplasms or myelodysplastic syndrome.

Erythropoietin level

The normal erythropoietin range is 2.6 to 18.5 milliunits per milliliter (mU/mL). Normal value ranges may vary slightly among different laboratories. Some labs use different measurements or test different samples. Talk to your health care provider about the meaning of your specific test result.

Increased erythropoietin level may be due to secondary polycythemia. This is an overproduction of red blood cells that occurs in response to an event such as low blood oxygen level. The condition may occur at high altitudes or, rarely, because of a tumor that releases erythropoietin.

Lower-than-normal erythropoietin level may be seen in chronic kidney failure, anemia of chronic disease, or polycythemia vera.

  • If a person is anemic and erythropoietin levels are low or normal, then the kidneys may not be producing an appropriate amount of the hormone.
  • If a person is anemic and erythropoietin levels are increased, then the anemia may be due to iron or vitamin deficiency, or a bone marrow disorder.
  • If a person has too many red blood cells and erythropoietin levels are increased, then it is likely that excess erythropoietin is being produced – either by the kidneys or by other tissues in the body. This condition is called secondary polycythemia.
  • If there is excess red blood cell production and erythropoietin levels are normal or low, then it is likely that the polycythemia has a cause that is independent of erythropoietin production. This condition is called primary polycythemia.

Table 1. What abnormal erythropoietin results mean

Erythropoietin levelExample(s) of possible cause(s)Condition present
Low or normalSevere kidney diseaseAnemia (low red blood cells, hemoglobin and hematocrit)
HighBone marrow disorder (e.g., myelodysplastic syndrome)Anemia
HighErythropoietin-producing kidney tumor or other tissue (secondary polycythemia)Polycythemia (high red blood cells, hemoglobin and hematocrit)
Normal or lowPolycythemia vera (primary polycythemia)Polycythemia

Erythropoietin deficiency

Erythropoietin an essential hormone for red blood cell production, is mainly produced in the liver before birth and in the kidney after birth 5. Erythropoietin is regulated in an oxygen-dependent manner by hypoxia inducible factor 6. Under hypoxic conditions, hypoxia inducible factor proteins become stable and upregulate downstream genes including erythropoietin. The kidney is a hypoxic organ because of huge oxygen consumption for tubular reabsorption 7. The physiological hypoxia makes the kidney an appropriate organ for sensitively detecting oxygen levels and producing erythropoietin.

Erythropoietin-deficiency anemia occurs in chronic kidney disease patients and in preterm neonates. In chronic kidney disease, renal anemia occurs since erythropoietin-producing fibroblasts transdifferentiate into myofibroblasts in response to injuries 5.

Erythropoietin therapy

Erythropoietin (EPO) alfa injection is used to treat anemia (a lower than normal number of red blood cells) in people with chronic kidney failure (condition in which the kidneys slowly and permanently stop working over a period of time). Erythropoietin alfa injection is also used to treat anemia caused by chemotherapy in people with certain types of cancer or caused by zidovudine (AZT, Retrovir, in Trizivir, in Combivir), a medication used to treat human immunodeficiency virus (HIV). Erythropoietin alfa injection is also used before and after certain types of surgery to decrease the chance that blood transfusions (transfer of one person’s blood to another person’s body) will be needed because of blood loss during surgery. Erythropoietin alfa injection should not be used to decrease the risk that transfusions will be needed in people who are having surgery on their hearts or blood vessels. Erythropoietin alfa injection also should not be used to treat people who are able and willing to donate blood before surgery so that this blood can be replaced in their bodies during or after surgery. Erythropoietin alfa injection cannot be used in place of a red blood cell transfusion to treat severe anemia and has not been shown to improve tiredness or poor well-being that may be caused by anemia. Erythropoietin alfa is in a class of medications called erythropoiesis-stimulating agents (ESAs). It works by causing the bone marrow (soft tissue inside the bones where blood is made) to make more red blood cells.

Erythropoietin (EPO) is a very large protein and does not cross the dialysis membrane during dialysis. Erythropoietin can be given either as an injection underneath the skin (subcutaneous) which results in a more sustained and longer action for the drug in the body. Erythropoietin can also be given intravenously through the tubes or lines on the dialysis machine. Erythropoietin can be given in the venous line as one is coming off of dialysis or it can be given at any time during dialysis as long as it is given in the venous line. In the dialysis unit, it is commonly given sometime in the last 30 minutes of the dialysis treatment or with the rinse back of the patient. Both of these techniques work equally well, but the drug has a shorter duration of action than giving it subcutaneously.

Erythropoietin Therapy Warning

ALL patients

Using erythropoietin alfa injection increases the risk that blood clots will form in or move to the legs, lungs, or brain. Tell your doctor if you have or have ever had heart disease and if you have ever had a stroke. Call your doctor immediately or get emergency medical help if you experience any of the following symptoms: pain, tenderness, redness, warmth, and/or swelling in the legs; coolness or paleness in an arm or leg; shortness of breath; cough that won’t go away or that brings up blood; chest pain; sudden trouble speaking or understanding speech; sudden confusion; sudden weakness or numbness of an arm or leg (especially on one side of the body) or of the face; sudden trouble walking, dizziness, or loss of balance or coordination; or fainting. If you are being treated with hemodialysis (treatment to remove waste from the blood when the kidneys are not working), a blood clot may form in your vascular access (place where the hemodialysis tubing connects to your body). Tell your doctor if your vascular access is not working as usual.

Your doctor will adjust your dose of epoetin alfa injection so that your hemoglobin level (amount of a protein found in red blood cells) is just high enough that you do not need a red blood cell transfusion (transfer of one person’s red blood cells to another person’s body to treat severe anemia). If you receive enough epoetin alfa to increase your hemoglobin to a normal or near normal level, there is a greater risk that you will have a stroke or develop serious or life threatening heart problems including heart attack or heart failure. Call your doctor immediately or get emergency medical help if you experience any of the following symptoms: chest pain, squeezing pressure, or tightness; shortness of breath; nausea, lightheadedness, sweating, and other early signs of heart attack; discomfort or pain in the arms, shoulder, neck, jaw, or back; or swelling of the hands, feet, or ankles.

Keep all appointments with your doctor and the laboratory. Your doctor will order certain lab tests to check your body’s response to epoetin alfa injection. Your doctor may decrease your dose or tell you to stop using epoetin alfa injection for a period of time if the tests show that you are at high risk of experiencing serious side effects of epoetin alfa injection. Follow your doctor’s directions carefully.

Your doctor or pharmacist will give you the manufacturer’s patient information sheet (Medication Guide) when you begin treatment with erythropoietin alfa injection and each time you refill your prescription. Read the information carefully and ask your doctor or pharmacist if you have any questions.

Talk to your doctor about the risks of using erythropoietin alfa injection.

CANCER patients

In clinical studies, people with certain cancers who received erythropoietin alfa injection died sooner or experienced tumor growth, a return of their cancer, or cancer that spread sooner than people who did not receive the medication. If you have cancer, you should receive the lowest possible dose of erythropoietin alfa injection. You should only receive erythropoietin alfa injection to treat anemia caused by chemotherapy if your chemotherapy is expected to continue for at least 2 months after you start your treatment with erythropoietin alfa injection and if there is not a high chance that your cancer will be cured. Treatment with erythropoietin alfa injection should be stopped when your course of chemotherapy ends.

A program called the ESA APPRISE Oncology Program has been set up to decrease the risks of using erythropoietin alfa injection to treat anemia caused by chemotherapy. Your doctor will need to complete training and enroll in this program before you can receive erythropoietin alfa injection. As part of the program, you will receive written information about the risks of using erythropoietin alfa injection and you will need to sign a form before you receive the medication to show that your doctor has discussed the risks of erythropoietin alfa injection with you. Your doctor will give you more information about the program and will answer any questions you have about the program and your treatment with erythropoietin alfa injection.

SURGICAL patients

You may be given erythropoietin alfa injection to decrease the risk that you will develop anemia and require a blood transfusion as a result of blood loss during surgery. However, receiving erythropoietin alfa injection before and after surgery may increase the risk that you will develop a dangerous blood clot during or after surgery. Your doctor will probably prescribe medication to help prevent blood clots.

How should erythropoietin injection be used?

Erythropoietin injection comes as a solution (liquid) to inject subcutaneously (just under the skin) or intravenously (into a vein). It is usually injected one to three times weekly. When erythropoietin alfa injection is used to decrease the risk that blood transfusions will be required due to surgery, it is sometimes injected once daily for 10 days before surgery, on the day of surgery and for 4 days after surgery. Alternatively, erythropoietin alfa injection is sometimes injected once weekly, beginning 3 weeks before surgery and on the day of surgery. To help you remember to use erythropoietin alfa injection, mark a calendar to keep track of when you are to receive a dose. Follow the directions on your prescription label carefully, and ask your doctor or pharmacist to explain any part you do not understand. Use erythropoietin alfa injection exactly as directed. Do not use more or less of it or use it more often than prescribed by your doctor.

Your doctor will start you on a low dose of erythropoietin alfa injection and adjust your dose depending on your lab results and how you are feeling, usually not more than once every month. Your doctor may also tell you to stop using erythropoietin injection for a time. Follow these instructions carefully.

erythropoietin injection will help control your anemia only as long as you continue to use it. It may take 2–6 weeks or longer before you feel the full benefit of erythropoietin injection. Do not stop using erythropoietin injection without talking to your doctor.

erythropoietin injections may be given by a doctor or nurse, or your doctor may decide that you can inject erythropoietin yourself or that you may have a friend or relative give the injections.You and the person who will be giving the injections should read the manufacturer’s information for the patient that comes with erythropoietin injection before you use it for the first time at home. Ask your doctor to show you or the person who will be injecting the medication how to inject it.

If you are using erythropoietin injection at home, you will need to use disposable syringes and needles to inject your medication. Your doctor or pharmacist will tell you what type of syringe you should use. Do not use any other type of syringe because you may not get the right amount of medication. Always keep a spare syringe and needle on hand.

Erythropoietin injection comes in multidose vials and single use vials. The multidose vials contain benzyl alcohol, a preservative that may be harmful to babies, so erythropoietin injection from multidose vials cannot be used to treat pregnant or nursing women or babies. The single use vials do not contain benzyl alcohol and may be used to treat pregnant or nursing women or babies, but they are only safe to use one time. Do not put a needle through the rubber stopper of the single use vial more than once. Dispose of the single use vial after you have used it for one dose, even if it is not empty.

Do not shake erythropoietin injection. If you shake the medication, it may look foamy and should not be used.

Always inject erythropoietin in its own syringe; never mix it with any other medication.

You can inject erythropoietin just under the skin anywhere on the outer area of your upper arms, middle of the front thighs, stomach (except for a 2-inch [5 centimeter] area around the navel [belly button]), or outer area of the buttocks. Do not inject erythropoietin into a spot that is tender, red, bruised, hard, or has scars or stretch marks. Choose a new spot each time you inject erythropoietin, as directed by your doctor. Write down the date, time, dose of erythropoietin injection, and the spot where you injected your dose in a record book.

If you are being treated with dialysis (treatment to remove waste from the blood when the kidneys are not working), your doctor may tell you to inject the medication into your venous access port. Ask your doctor if you have any questions about how to inject your medication.

Always look at erythropoietin solution before you inject it. Be sure that the vial is labeled with the correct name and strength of medication and an expiration date that has not passed. Also check that the solution is clear and colorless and does not contain lumps, flakes, or particles. If there are any problems with your medication, call your pharmacist and do not inject it.

Do not use disposable syringes more than once. Dispose of used syringes in a puncture-resistant container. Ask your doctor or pharmacist how to dispose of the puncture-resistant container.

This medication may be prescribed for other uses. Talk to your doctor about the risks of using this medication for your condition.

What special precautions should I follow?

Before using erythropoietin injection:

  • tell your doctor and pharmacist if you are allergic to erythropoietin, darberythropoietin (Aranesp), any other medications, or any of the ingredients in erythropoietin injection. Ask your pharmacist or check the Medication Guide for a list of the ingredients.
  • tell your doctor and pharmacist what other prescription and nonprescription medications, vitamins, nutritional supplements, and herbal products you are taking or plan to take. Your doctor may need to change the doses of your medications or monitor you carefully for side effects.
  • tell your doctor if you have or have had high blood pressure and if you have ever had pure red cell aplasia (a type of severe anemia that may develop after treatment with an erythropoiesis-stimulating agent such as darberythropoietin injection or erythropoietin injection). Your doctor may tell you not to use erythropoietin injection.
  • tell your doctor if you have or have ever had seizures. If you are using erythropoietin injection to treat anemia caused by chronic kidney disease, tell your doctor if you have or have ever had cancer.
  • tell your doctor if you are pregnant, plan to become pregnant, or are breast-feeding. If you become pregnant while using erythropoietin injection, call your doctor.
  • if you are having surgery, including dental surgery, tell the doctor or dentist that you are using erythropoietin injection.

What special dietary instructions should I follow?

Your doctor may prescribe a special diet to help control your blood pressure and to help increase your iron levels so that erythropoietin injection can work as well as possible. Follow these directions carefully and ask your doctor or dietician if you have any questions.

What should I do if I forget a dose?

Call your doctor to ask what to do if you miss a dose of erythropoietin injection. Do not use a double dose to make up for a missed one.

Erythropoietin side effects

Erythropoietin injection may cause side effects. Tell your doctor if any of these symptoms are severe or do not go away:

  • headache
  • joint or muscle aches, pain, or soreness
  • nausea
  • vomiting
  • indigestion
  • weight loss
  • sores in the mouth
  • difficulty falling asleep or staying asleep
  • depression
  • redness, swelling, pain, or itching at the injection spot

Some side effects can be serious. If you experience any of the following symptoms, or those listed in the Erythropoietin Therapy Warning section, call your doctor immediately or get emergency medical treatment:

  • rash
  • hives
  • itching
  • swelling of the face, throat, tongue, lips, or eyes
  • wheezing
  • difficulty breathing or swallowing
  • hoarseness
  • lack of energy
  • dizziness
  • fainting

Erythropoietin injection may cause other side effects. Call your doctor if you have any unusual problems while using this medication.

References
  1. Souma T, Suzuki N, Yamamoto M. Renal erythropoietin-producing cells in health and disease. Frontiers in Physiology. 2015;6:167. doi:10.3389/fphys.2015.00167. https://www.ncbi.nlm.nih.gov/pmc/articles/PMC4452800/
  2. Use of gene-manipulated mice in the study of erythropoietin gene expression. Suzuki N, Obara N, Yamamoto M. Methods Enzymol. 2007; 435():157-77.
  3. A mouse model of adult-onset anaemia due to erythropoietin deficiency. Yamazaki S, Souma T, Hirano I, Pan X, Minegishi N, Suzuki N, Yamamoto M. Nat Commun. 2013; 4:1950.
  4. Plasticity of renal erythropoietin-producing cells governs fibrosis. Souma T, Yamazaki S, Moriguchi T, Suzuki N, Hirano I, Pan X, Minegishi N, Abe M, Kiyomoto H, Ito S, Yamamoto M. J Am Soc Nephrol. 2013 Oct; 24(10):1599-616.
  5. Souma T, Suzuki N, Yamamoto M. Renal erythropoietin-producing cells in health and disease. Frontiers in physiology. 2015;6:167. doi: 10.3389/fphys.2015.00167 https://www.ncbi.nlm.nih.gov/pmc/articles/PMC4452800/
  6. Souma T, Suzuki N, Yamamoto M. Renal erythropoietin-producing cells in health and disease. Frontiers in physiology. 2015;6:167. doi: 10.3389/fphys.2015.00167.
  7. Evans RG, Gardiner BS, Smith DW, O’Connor PM. Intrarenal oxygenation: unique challenges and the biophysical basis of homeostasis. American journal of physiology. Renal physiology. 2008;295:F1259–1270. doi: 10.1152/ajprenal.90230.2008
read more
Procedures

Cardiac catheterization

cardiac catheterization

What is cardiac catheterization

Cardiac catheterization also called cardiac cath or heart cath test, is a medical procedure that examines the inside of your heart’s blood vessels using special X-rays called angiograms. Cardiac catheterization is also used to treat some heart conditions. During a heart cath procedure, dye visible by X-ray is injected into blood vessels using a long, thin, flexible tube called a catheter, that is put into a blood vessel in your arm, groin (upper thigh), or neck and threaded to your heart. Through the catheter, your doctor can do diagnostic tests and treatments on your heart.

The heart cath test can measure the pressure and oxygen levels in the different chambers of the heart, determine the amount of blood pumped by the heart, find heart defects that have been present since birth, and help diagnose heart valve problems.

For example, your doctor may put a special type of dye in the catheter. The dye will flow through your bloodstream to your heart. Then, your doctor will take x-ray pictures of your heart. The dye will make your coronary (heart) arteries visible on the pictures. This test is called coronary angiography.

Coronary angiography is often performed as part of cardiac catheterization to help find blockages in the arteries that supply blood to the heart muscle. If a significant blockage is found, a doctor may be able to treat it by inflating a tiny balloon in the artery and then placing a small metallic tube called a stent to keep the vessel propped open.

The dye can show whether a waxy substance called plaque has built up inside your coronary arteries. Plaque can narrow or block the arteries and restrict blood flow to your heart.

The buildup of plaque in the coronary arteries is called coronary heart disease or coronary artery disease.

Doctors also can use ultrasound during cardiac catheterization to see blockages in the coronary arteries. Ultrasound uses sound waves to create detailed pictures of the heart’s blood vessels.

Doctors may take samples of blood and heart muscle during cardiac catheterization or do minor heart surgery.

Cardiologists (heart specialists) usually do cardiac catheterization in a hospital. You’re awake during the procedure, and it causes little or no pain. However, you may feel some soreness in the blood vessel where the catheter was inserted.

Cardiac catheterization is a commonly performed and generally very safe procedure. The most common problems after cardiac catheterization are bruising and tenderness at the puncture site.

Rare but more serious risks due to cardiac catheterization include significant bleeding or blood vessel injury, allergic reaction, kidney injury, stroke, heart attack, or death 1. You should discuss these risks as well as the benefits of the procedure with your doctor prior to the test.

Figure 1. Cardiac catheterization

Cardiac catheterizationheart cath

Figure 2. The anatomy of the heart

Heart-Anatomy

Figure 3. The anatomy of the heart chambers

Heart-Anatomy-Cut-Section

Figure 4.  Normal heart blood flow

Normal_Heart_Anatomy_and_Blood_Flow

How long does a heart cath take?

A cardiac catheterization takes about 45 minutes to complete 2. However, the heart cath test may last 30 to 60 minutes. If you also need special procedures, the heart cath test may take longer. If the catheter is placed in your groin, you will often be asked to lie flat on your back for a few to several hours after the test to avoid bleeding.

Why the cardiac catheterization test is performed?

This procedure is most often done to get information about the heart or its blood vessels. It may also be done to treat some types of heart conditions, or to find out if you need heart surgery.

Your doctor may perform cardiac catheterization to diagnose or evaluate:

  • Cardiac amyloidosis
  • Causes of congestive heart failure or cardiomyopathy
  • Coronary artery disease
  • Heart defects that are present at birth (congenital)
  • High blood pressure in the lungs (pulmonary hypertension)
  • Problems with the heart valves

The following procedures may also be done using cardiac catheterization:

  • Repair certain types of heart defects
  • Open a narrowed (stenotic) heart valve
  • Open blocked arteries or grafts in the heart (angioplasty with or without stenting)

Who needs cardiac catheterization?

Doctors may recommend cardiac catheterization for various reasons. For example, cardiac catheterization can help a doctor diagnose and manage heart valve problems, congestive heart failure, or pulmonary hypertension (high blood pressure in the lungs). Cardiac catheterization with coronary angiography is commonly performed in patients who are having a heart attack or experiencing chest pain that is not relieved with medications or who have an abnormal stress test result.

The most common reason for cardiac catheterization is to evaluate chest pain.

Chest pain might be a symptom of coronary heart disease (coronary artery disease). Cardiac catheterization can show whether plaque is narrowing or blocking your coronary arteries.

Doctors also can treat coronary heart disease during cardiac catheterization using a procedure called percutaneous coronary intervention, also known as coronary angioplasty.

During percutaneous coronary intervention, a catheter with a balloon at its tip is threaded to the blocked coronary artery. Once in place, the balloon is inflated, pushing the plaque against the artery wall. This creates a wider path for blood to flow to the heart.

Sometimes a stent is placed in the artery during percutaneous coronary intervention. A stent is a small mesh tube that supports the inner artery wall.

Most people who have heart attacks have narrow or blocked coronary arteries. Thus, cardiac catheterization might be used as an emergency procedure to treat a heart attack. When used with percutaneous coronary intervention, the procedure allows your doctor to open up blocked arteries and prevent further heart damage.

Cardiac catheterization also can help your doctor figure out the best treatment plan for you if:

  • You recently recovered from a heart attack, but are having chest pain
  • You had a heart attack that caused major heart damage
  • You had an ECG (electrocardiogram), stress test, or other test with results that suggested heart disease

Cardiac catheterization also might be used if your doctor thinks you have a heart defect or if you’re about to have heart surgery. The procedure shows the overall shape of your heart and the four large spaces (heart chambers) inside it. This inside view of the heart will show certain heart defects and help your doctor plan your heart surgery.

Sometimes doctors use cardiac catheterization to see how well the heart valves work. Valves control blood flow in your heart. They open and shut to allow blood to flow between your heart chambers and into your arteries.

Your doctor can use cardiac catheterization to measure blood flow and oxygen levels in different parts of your heart. He or she also can check how well a man-made heart valve is working and how well your heart is pumping blood.

If your doctor thinks you have a heart infection or tumor, he or she may take samples of your heart muscle through the catheter. With the help of cardiac catheterization, doctors can even do minor heart surgery, such as repair certain heart defects.

Cardiac catheterization procedure steps

Cardiac catheterization is performed in an operating or procedure room that has specialized x-ray equipment. You may receive sedating medication but will usually be awake during the procedure. Your doctor administers local anesthetic to numb the site over the blood vessel (this is typically in the groin, wrist, or neck). Once the site is numb, the doctor uses a needle to help place a plastic tube called a sheath into the blood vessel. He or she then inserts a long, thin tube (catheter) and advances the catheter toward the heart using x-ray imaging for guidance. The catheter can be used to measure pressure, take blood samples, or perform a coronary angiogram by injecting dye to allow the doctor to examine the arteries of the heart. After the procedure is completed, the catheters and sheaths are removed. Pressure is held at the site of the puncture to prevent bleeding, or a specialized device is used to close the hole in the artery area and to aid in healing.

Before cardiac catheterization

Before having cardiac catheterization, discuss with your doctor:

  • How to prepare for the heart cath procedure
  • Any medicines you’re taking, and whether you should stop taking them before the procedure
  • Whether you have any conditions (such as diabetes or kidney disease) that may require taking extra steps during or after the procedure to avoid problems

Tell your doctor if you:

  • Are allergic to seafood or any medicines
  • Have had a bad reaction to contrast dye or iodine in the past
  • Take any medicines, including Viagra or other drugs for erectile dysfunction
  • Might be pregnant

Your doctor will let you know whether you need to arrange for a ride home after the procedure.

Cardiac catheterization is most often performed after completion of a history and physical examination and noninvasive cardiac testing such as an ECG (electrocardiogram), echocardiogram, or stress test to evaluate symptoms. Such symptoms commonly include chest pain (referred to as angina), shortness of breath, fatigue, dizziness, or palpitations. In addition to providing a roadmap of the coronary arteries, cardiac catheterization can help to determine how well the valves in between the chambers of the heart are working and how well the heart muscle is pumping.

Cardiac catheterization provides definitive confirmation of narrowing in the coronary arteries and may also exclude the presence of coronary artery disease before heart valve surgery or other major surgery. If significant coronary blockages are present, angioplasty, or stenting (also known as percutaneous coronary intervention) can be performed, often during the same procedure, to improve blood flow to the heart muscle and help to relieve symptoms. This procedure may also be performed emergently for persons with suspected heart attack to identify blood clots in the coronary arteries and rapidly restore blood flow to the heart muscle.

What to expect before the cardiac catheterization

Typically, you may eat and drink up until midnight before the day of the catheterization. On the morning of the test, you can take most routine medications, including aspirin, clopidogrel, prasugrel, or ticagrelor, with a sip of water. Certain oral anticoagulation medications, such as warfarin (Jantoven or Coumadin) or dabigatran (Pradaxa), or any injectable anticlotting drugs should be held as directed by the managing clinician.

If you have diabetes mellitus, any oral diabetes medications should be held the night before and the morning of the procedure, and you may be instructed to adjust your insulin dose. Your blood sugar will be closely monitored during your hospital stay. If you have previously experienced an allergic reaction to contrast dye or if you have impaired kidney function, you should notify your physician to inquire about pretreatment.

Once at the hospital, you will change into a gown and have an intravenous line started in your arm. The hair on your wrist, arm, or legs will typically be shaved. Staff will review your medical history and answer questions from you and your family. After discussion and review of a form outlining details and risks of the procedure, you will be asked to sign to provide your consent.

During cardiac catheterization procedure

Cardiac catheterization is done in a hospital. During the cardiac catheterization, you’ll be kept on your back and awake. A specialized team of technologists and nurses will help to position you flat on an x-ray table in the catheterization laboratory. This allows you to follow your doctor’s instructions during the procedure. You’ll be given a mild sedative to help you relax, which might make you sleepy.

The entry point(s) is washed with a cool antiseptic soap, and your doctor will numb the area on the arm, groin (upper thigh), or neck where the catheter will enter your blood vessel with a local anesthetic, causing a temporary stinging sensation. Then, a needle will be used to make a small hole in the blood vessel. Your doctor will put a tapered tube called a sheath through the hole.

For left heart catheterization and coronary angiography, the femoral artery in the leg has been the traditional access site. However, the radial artery in the wrist is being used more commonly because this approach offers greater patient comfort and may reduce bleeding risks 2.

Next, your doctor will put a thin, flexible guide wire through the sheath and into your blood vessel. He or she will thread the wire through your blood vessel to your heart.

Your doctor will use the guide wire to correctly place the catheter. He or she will put the catheter through the sheath and slide it over the guide wire and into the coronary arteries.

Special x-ray movies will be taken of the guide wire and the catheter as they’re moved into the heart. The movies will help your doctor see where to put the tip of the catheter.

When the catheter reaches the right spot, your doctor will use it to do tests or treatments on your heart. For example, your doctor may perform a percutaneous coronary intervention, also known as coronary angioplasty, and stenting.

During the procedure, your doctor may put a special type of dye in the catheter. The dye will flow through your bloodstream to your heart. Then, your doctor will take x-ray pictures of your heart. The dye will make your coronary (heart) arteries visible on the pictures. This test is called coronary angiography.

Coronary angiography can show how well the heart’s lower chambers, called the ventricles, are pumping blood.

When the catheter is inside your heart, your doctor may use it to take blood and tissue samples or do minor heart surgery.

To get a more detailed view of a blocked coronary artery, your doctor may do intracoronary ultrasound. For this test, your doctor will thread a tiny ultrasound device through the catheter and into the artery. This device gives off sound waves that bounce off the artery wall (and its blockage). The sound waves create a picture of the inside of the artery.

If the angiogram or intracoronary ultrasound shows blockages in the coronary arteries, your doctor may use percutaneous coronary intervention to treat the blocked arteries.

After your doctor does all of the needed tests or treatments, he or she will pull back the catheter and take it out along with the sheath. The opening left in the blood vessel will be closed up and bandaged.

A small weight might be put on top of the bandage for a few hours to apply more pressure. This will help prevent major bleeding from the site.

What to expect after cardiac catheterization

After the cardiac catheterization, the catheter is removed from the access site(s). Manual pressure is applied, and an internal plug or stitch may be used to close the blood vessel. If the leg was used, you will be required to lie flat, keeping the leg straight for several hours, during which you will need to use a bedpan or urinal. If the wrist or arm was used, you may sit up immediately and walk to the bathroom with assistance when awake and alert. A band on the wrist will maintain pressure, and wrist movement will be restricted for several hours. You may be given fluids intravenously and can eat and drink as tolerated. A nurse will monitor you closely during recovery and review discharge instructions. If angioplasty or stenting was performed, you may need to stay in the hospital overnight.

After cardiac catheterization, you will be moved to a special care area. You will rest there for several hours or overnight. During that time, you’ll have to limit your movement to avoid bleeding from the site where the catheter was inserted.

While you recover in this area, nurses will check your heart rate and blood pressure regularly. They also will check for bleeding from the catheter insertion site.

A small bruise might form at the catheter insertion site, and the area may feel sore or tender for about a week. Let your doctor know if you have problems such as:

A constant or large amount of bleeding at the insertion site that can’t be stopped with a small bandage
Unusual pain, swelling, redness, or other signs of infection at or near the insertion site

Talk to your doctor about whether you should avoid certain activities, such as heavy lifting, for a short time after the procedure.

Cardiac catheterization recovery

What you should do at home

Take the bandage off as instructed by the cardiologist, usually the day after the catheterization. Wetting the sticky parts of the bandage will help it come off. Then, dry the area and put a small adhesive bandage over the place where the catheter went in.

Gently wash the area with soap and water at least once a day. Then, cover it with a new adhesive bandage.

For 2–3 days, take sponge baths or short showers so that the area where the catheter went in does not get too wet. Avoid baths, hot tubs, and swimming, and don’t use any creams, lotions, or ointments on the area.

Self-care

In general, people who have angioplasty can walk around within 6 hours after the procedure. Complete recovery takes a week or less. Keep the area where the catheter was inserted dry for 24 to 48 hours. If the catheter was inserted into your arm, recovery is often faster.

If the doctor put the catheter in through your groin:

  • Walking short distances on a flat surface is OK. Limit going up and downstairs to around twice a day for the first 2 to 3 days.
  • DO NOT do yard work, drive, squat lift heavy objects, or play sports for at least 2 days, or until your health care provider tells you it is OK.

If the doctor put the catheter in your arm:

  • DO NOT lift anything heavier than 10 pounds (4.5 kilograms). (This is a little more than a gallon of milk).
  • DO NOT do any heavy pushing, pulling, or twisting.

For a catheter in your groin or arm:

  • Avoid sexual activity for 2 to 5 days. Ask your doctor when it will be OK to start again.
  • You should be able to return to work in 2 to 3 days if you DO NOT do heavy work.
  • DO NOT take a bath or swim for the first week. You may take showers, but make sure the area where the catheter was inserted does not get wet for the first 24 to 48 hours.

You will need to take care of your incision.

  • Your doctor will tell you how often to change your dressing.
  • If your incision bleeds, lie down and put pressure on it for 30 minutes.

Many people take aspirin, often with another medicine such as clopidogrel (Plavix), prasugrel (Efient), or ticagrelor (Brilinta), after this procedure. These medicines are blood thinners, and they keep your blood from forming clots in your arteries and stent. A blood clot can lead to a heart attack. Take the medicines exactly as your provider tells you. DO NOT stop taking them without talking to your doctor.

You should eat a heart-healthy diet, exercise, and follow a healthy lifestyle. Your provider can refer you to other health experts who can help you learn about exercise and healthy foods that will fit into your lifestyle.

When to call your Doctor

Call your doctor if:

  • There is bleeding at the catheter insertion site that does not stop when you apply pressure.
  • Your arm or leg below where the catheter was inserted changes color, is cool to the touch, or is numb.
  • The small incision for your catheter becomes red or painful, or yellow or green discharge is draining from it.
  • You have chest pain or shortness of breath that does not go away with rest.
  • Your pulse feels irregular — it is very slow (fewer than 60 beats a minute) or very fast (over 100 to 120 beats a minute).
  • You have dizziness, fainting, or you are very tired.
  • You are coughing up blood or yellow or green mucus.
  • You have problems taking any of your heart medicines.
  • You have chills or a fever over 101 °F (38.3 °C)

Cardiac catheterization risks

Cardiac catheterization is a common diagnostic procedure performed >2 million times per year in the United States with minimal risk 2. The most common risks of cardiac catheterization include bleeding or hematoma. Rare risks include reaction to contrast dye, impaired kidney function due to contrast dye, abnormal heart rhythm, and infection. Extremely rare complications (<1%) include heart attack, stroke, need for emergent cardiac surgery, and death 2.

Cardiac catheterization complications can include:

  • Bleeding, infection, and pain at the catheter insertion site.
  • Damage to blood vessels. Rarely, the catheter may scrape or poke a hole in a blood vessel as it’s threaded to the heart.
  • An allergic reaction to the dye that’s used during coronary angiography.

Other, less common complications include:

  • Arrhythmias (irregular heartbeats). These irregular heartbeats often go away on their own. However, your doctor may recommend treatment if they persist.
  • Heart attack.
  • Kidney damage caused by the dye used during coronary angiography.
  • Blood clots that can trigger a stroke, heart attack, or other serious problems.
  • Low blood pressure.
  • A buildup of blood or fluid in the sac that surrounds the heart (cardiac tamponade). This fluid can prevent the heart from beating properly.

As with any procedure involving the heart, complications sometimes can be fatal. However, this is rare with cardiac catheterization.

The risks of cardiac catheterization are higher in people who are older and in those who have certain diseases or conditions (such as chronic kidney disease and diabetes).

References
  1. Kosova E, Ricciardi M. Cardiac Catheterization. JAMA. 2017;317(22):2344. doi:10.1001/jama.2017.0708
  2. What to Expect During Cardiac Catheterization. Circulation February 21, 2012, Vol 125, Issue 7 https://www.ahajournals.org/doi/10.1161/CIRCULATIONAHA.111.025916
read more
Procedures

Radiofrequency ablation

radiofrequency ablation

What is radiofrequency ablation

Radiofrequency ablation is also known as rhizotomy, is one of the newest pain control techniques. In this non-surgical procedure, radio waves are used to heat and destroy certain nerves, with the goal of interrupting pain signals to the brain. The radio waves travel through electrodes (small devices that carry electricity). Radiofrequency ablation uses imaging techniques such as ultrasound, computed tomography (CT) or magnetic resonance imaging (MRI) to help guide a needle electrode into the target area. High-frequency electrical currents are then passed through the electrode to ground pads placed on the body, creating focal heat that destroys certain nerves or cancer cells surrounding the electrode.

Radiofrequency ablation is done using fluoroscopic (x-ray) guidance and should NOT be performed on people who have an infection, are pregnant, or have bleeding problems.

The types of physicians who perform radiofrequency ablation include physiatrists, pain specialists, radiologists, anesthesiologists, neurologists, and surgeons.

Radiofrequency ablation typically targets pain from the facet joints, which can contribute to chronic pain in the neck or lower back, and the sacroiliac joints, which can contribute to chronic low back pain. However, the efficacy of radiofrequency ablation for discogenic back pain remains unclear 1.

Facet joints are pairs of small joints located at each vertebral level of the spine. Each facet joint is connected to two medial branch nerves that carry signals, including pain signals, away from the joints to the spine and brain. The sacroiliac joints are located at the lowest part of the spine, between the sacrum and ilium in the pelvis, and are also connected to nerves that carry signals to other parts of the body.

Radiofrequency ablation is usually done by a doctor who specializes in treating pain. The goal is to reduce chronic back, neck, hip or knee pain that hasn’t improved with medications or physical therapy, or when surgery isn’t an option.

For example, your doctor may suggest the procedure if you have back pain that:

  • Occurs on one or both sides of your lower back
  • Spreads to the buttocks and thighs (but not below the knee)
  • Feels worse if you twist or lift something
  • Feels better when you’re lying down

Radiofrequency neurotomy might also be recommended to treat neck pain associated with whiplash.

Radiofrequency ablation can also be used to treat stomach pain caused by pancreatic cancer or pelvic pain caused by ovarian cancer.

Radiofrequency ablation is sometimes used to treat cancers in the:

  • Adrenal gland
  • Breast
  • Bone
  • Kidney
  • Liver
  • Lung
  • Pancreas
  • Thyroid

Radiofrequency ablation is typically considered a treatment option only if you’re not a good candidate for surgery for some reason — such as your overall health or the presence of many small tumors in an organ.

Radiofrequency ablation is most commonly used to treat a spot of cancer that is causing problems such as pain or other discomfort, and is generally not used as the primary treatment for most cancers.

Radiofrequency ablation may also be an option for treating precancerous cells in the esophagus that are associated with Barrett’s esophagus. Radiofrequency ablation is one of several types of ablation therapy used to treat a wide range of conditions.

Radiofrequency ablation is commonly used to treat many types of liver cancer. The two most common types are:

  • hepatocellular carcinoma, which is a primary liver cancer (meaning it begins in the liver).
  • colon cancer that metastasizes or spreads from the colon to the liver.

Radiofrequency ablation can be an effective treatment for primary liver cancer and for cancers that have spread to the liver in select patients whose liver tumors are unsuitable for surgical resection. In general, radiofrequency ablation is most effective treating tumors that are less than one and a half inches in diameter. It may be used in addition to chemotherapy or radiation therapy or as an alternative to surgical treatment. In cancer treatment a radiofrequency ablation needle is inserted into the tumor either percutaneously or surgically (via the laparoscopic or open approach). Alternating current is generated using radio waves and, through radiofrequency ablation needle, create local tissue temperatures of 50-100˚C temperature for at least 4-6 minutes 2, that causes “coagulation” 3 and tumor necrosis 4; usually the duration of radiofrequency ablation is 10-30 minutes for the slow conduction from the radiofrequency ablation needle electrode through the tumor 2. To reduce the incidence of local tumor recurrence after radiofrequency ablation, a 1-cm-thick tumor-free margin along each tumor is necessary, which can be achieved by multiple overlapping ablations or modified radiofrequency ablation devices 2. At present, new modified radiofrequency ablation devices are available: a multi-pled expandable electrode with multiple retractable prongs on the tip (AngioDynamics/RITA Medical Systems) and an internally cooled electrode (Radionics, Tyco Healthcare Group, Burlington, MA) 3. Tumor size and localization are important factors for successfully ablation treatment, such as smaller colorectal derived oligometastasis isolated to the liver less than 3 cm in diameter 2, surrounded by liver parenchyma, 1 cm or more deep to the liver glissonian, and ≥ 2 cm from large liver veins 5. Data on long-term survival (5-year overall survival), after different methods of radiofrequency ablation, have been reported with a range between 22-30% 6. There is a 5-year overall survival increasing (40%) in small (≤4 cm) solitary liver metastases from colorectal cancer 7. A well conducted 2012 Cochrane Systematic study 8 showed that progression-free survival (the length of time during and after the treatment of a disease, such as cancer, that a patient lives with the disease but it does not get worse) was significantly higher in the group that received radiofrequency ablation. However, the review was not able to provide information on overall survival. In conclusion, evidence from the included studies are insufficient to recommend radiofrequency ablation for a radical oncological treatment of liver metastases from colorectal cancer.

Radiofrequency ablation is a viable and effective treatment option if you:

  • are not a good candidate for surgery because your tumor is difficult to reach.
  • have other medical conditions that make surgery especially risky.
  • would not have enough liver tissue left for the organ to function adequately following the surgical removal of a tumor.
  • have liver tumors that have not responded to chemotherapy or that have recurred after being removed surgically.
  • you have several small liver tumors that are too spread out to be removed surgically.

How does radiofrequency ablation work?

Radiofrequency ablation works by passing electrical currents in the range of radiofrequency waves between the needle electrode and the grounding pads placed on the patient’s skin. These currents create heat around the electrode, which when directed into the nerve or tumor, heats and destroys the nerve or cancer cells. At the same time, heat from radiofrequency energy closes small blood vessels and lessens the risk of bleeding. The dead nerve or tumor cells are gradually replaced by scar tissue that shrinks over time.

Radiofrequency ablation preparation

  • Arrange to have someone drive you home after the procedure, as you will not be able to drive or operate machinery for at least 24 hours after the radiofrequency ablation procedure.
  • Do not eat or drink anything after midnight the night before the procedure, except for a small amount of water if needed to take medications on the day of the radiofrequency ablation procedure.
  • If you have diabetes and use insulin, you must adjust the dosage of insulin the day of the procedure. Consult the doctor who manages your insulin or diabetes medication for any necessary adjustments. Bring your diabetes medication with you so you can take it after the radiofrequency ablation procedure.
  • If you take any blood thinning medications or antiplatelet medications, these must be stopped with the permission of your doctor who manages these medications.
  • Continue to take all other medications with a small sip of water. Bring all medications with you so you can take them after the procedure. It is important to note that you must not stop taking any medication without first consulting with your primary or referring doctor.

Radiofrequency ablation procedure

Radiofrequency ablation is a minimally invasive procedure that does not require anesthesia. During the procedure, you will lie on your stomach, or for some neck procedures, on your side. You may have an intravenous (IV) line so we can administer a sedative to relax you.

Your doctor will numb a small area of skin around your spine with an anesthetic. The doctor will then use X-ray guidance to direct a special radiofrequency needle alongside the targeted nerves. There are two types of needle electrodes: simple straight needles and a straight, hollow needle that contains several retractable electrodes that extend when needed. The radiofrequency generator produces electrical currents in the range of radiofrequency waves. It is connected by insulated wires to the needle electrodes and to grounding pads that are placed on the patient’s back or thigh. To confirm proper position, a small amount of electrical current is passed through a probe placed in the needle to the targeted nerve. At this point, you may experience brief pain or a muscle twitch, which the doctor will discuss with you at the time.

Once proper position is confirmed, more local anesthetic is given to the area where the radiofrequency ablation will be performed. During the procedure, most patients feel either nothing or a mild warm sensation.

Radiofrequency ablation procedure may take one to two hours, depending on the treatment site and number of treatments performed.

What will I experience during and after the radiofrequency ablation procedure?

Devices to monitor your heart rate and blood pressure will be attached to your body.

You will feel a slight pin prick when the needle is inserted into your vein for the intravenous line (IV) and when the local anesthetic is injected. Most of the sensation is at the skin incision site, which is numbed using local anesthetic. You may feel pressure when the catheter is inserted into the vein or artery.

If the procedure is done with sedation, the intravenous (IV) sedative will make you feel relaxed, sleepy and comfortable for the procedure. You may or may not remain awake, depending on how deeply you are sedated.

If you are put under general anesthesia, your throat may be sore after you wake up. This is caused by the breathing tube that was placed in your throat while you were asleep.

Pain immediately following ablation can be controlled by pain medication given through your IV or by injection. Afterward any mild discomfort you experience can be controlled by oral pain medications. Patients may feel nauseous, but this can also be relieved by medication.

You will remain in the recovery room until you are completely awake and ready to return home.

You should be able to resume your usual activities within a few days.

Only about ten percent of patients will still have pain a week following radiofrequency ablation.

Radiofrequency ablation for back pain

Radiofrequency ablation or radiofrequency neurotomy uses heat generated by radio waves to target specific nerves and temporarily turn off their ability to send pain signals. Needles inserted through your skin near the painful area deliver the radio waves to the targeted nerves. Your doctor will use imaging scans during radiofrequency neurotomy to make sure the needles are positioned properly. Radiofrequency ablation is most commonly used for pain in the back, neck and buttocks (sacroiliac joint). It may also be helpful for long-term knee or hip joint pain.

Radiofrequency ablation isn’t a permanent fix for back or neck pain. Studies on the success of treatment have been conflicting. Some people may have modest, short-term pain relief, while others might feel better for several months. Sometimes, the treatment does not improve pain or function at all. For the treatment to work and for you to feel better, it’s important that the nerves targeted by the procedure are the same nerves responsible for your pain.

More than 80% of the global population will experience low back pain at least once in their life 9. At any one time, low back pain is prevalent in 4% to 33% of the population 10. One-half of the adult population in the United States report having experienced low back pain within the previous year, and one-quarter report experiencing low back pain in the previous three months 11. Low back pain is responsible for significant resource utilization; it has been estimated that this condition costs more than $100 billion per year in the United States, primarily due to lost productivity and wages 12.

Low back pain can originate from the lumbar facet joints, the sacroiliac joint, the intervertebral discs (discogenic low back pain) and the coccyx. While there is no standardized definition 13, chronic low back pain is typically defined as pain in the low back that persists for ≥3 months, while acute low back pain is typically defined as pain lasting for <3 months 14. Of the population with acute low back pain, approximately 2% to 34% will eventually experience chronic low back pain 15.

Conservative treatment options for chronic low back pain may include pharmaceuticals, manual therapy (eg, massage, physiotherapy, spinal manipulation), exercise therapy (eg, aerobic activity, muscle strengthening), and educational or psychological therapies (eg, cognitive behavioural therapy, support groups, educational sessions) 16. A systematic review of randomized controlled trials, which assessed conservative treatment options for low back pain, found strong evidence for the use of muscle relaxants, manipulation, education (‘back school’) and exercise therapy 17. If conservative treatments are unsuccessful, more invasive methods, such as steroid injections, nerve blocks, cryoablation, radiofrequency ablation (radiofrequency ablation) or surgery, can be attempted 17.

First used to treat low back pain by Shealy 18 in 1975, radiofrequency ablation is a procedure that may offer low back pain relief for patients without a known pathology (infection, tumor, fracture or osteoporosis). During the procedure, a high-frequency electrical current runs through an insulated needle. At the tip of the needle, the electric field causes molecule movement which, in turn, produces thermal energy. The heat from the tip of the radiofrequency ablation device is targeted to create a small lesion within a nerve, which disrupts the pain signal. Numerous randomized controlled trials and observational studies have been completed assessing the ability of radiofrequency ablation to treat low back pain.

radiofrequency ablation for back pain

Discogenic back pain

Three studies assessed the use of radiofrequency ablation for treating discogenic back pain using a variety of methods. Two of the included studies used conventional radiofrequency ablation 19, 20 and one used cooled radiofrequency ablation 21. The study using cooled radiofrequency ablation, used a bipolar configuration which was then followed by the standard monopolar configuration 21.

All three studies used diagnostic discography to confirm diagnosis of discogenic low back pain, and only participants with a positive response to this procedure were included in the studies.

Studies used radiofrequency ablation at a temperature between 50°C and 70°C to create the lesion. The three studies reported that the characteristics of patients were not significantly different between the control and intervention groups, with the exception of Barendse et al 19, who reported that those in the intervention group had higher pain and had a longer duration of pain than the control group. Although all three studies used different outcome measures to assess change in pain, all used a 0 to 10 scale.

The two studies, Barendse et al 19 and Kvarstein et al 20, that assessed the efficacy of conventional radiofrequency ablation found no evidence of statistically significant benefit when the intervention group was compared with the control group. A study conducted by Kapural et al 21, which assessed the efficacy of cooled radiofrequency ablation, found evidence of a statistically significant benefit. This study reported a 2.19-point reduction in pain within the intervention group and a 0.6-point reduction in pain in the control group six months postprocedure 21.

Lumbar facet joint pain

Six studies included in the present systematic review assessed the efficacy of radiofrequency ablation in reducing chronic lumbar facet back pain 22, 23, 24, 25, 26, 27. Five studies used continuous radiofrequency ablation 22, 23, 24, 26, 27, and one used a combination of pulsed and continuous radiofrequency ablation (22). All six included studies used conventional radiofrequency ablation, and used diagnostic blocks to confirm diagnosis of lumbar facet joint pain 22, 23, 24, 25, 26, 27. Five of the six studies used 22-gauge cannulas 23, 24, 25, 26, 27 and one study did not report these data 22,. All six studies assessed pain reduction using a visual analogue scale; three used a 0 to 10 scale 26, 27, two used a 0 to 100 scale (16,19) and one study did not report the scale used 25. Five studies reported that there were no statistically significant differences in patient characteristics between the intervention and control groups at baseline 22, 23, 24, 26, 27. Nath et al 24 reported that those who received radiofrequency ablation had more general pain, low back pain and referred pain than those in the control group.

Results from the included studies were mixed as to the efficacy of radiofrequency ablation. Five of the included studies found evidence of statistically significant reductions in pain when comparing radiofrequency ablation with sham 22, 24, 26, 27. One of these studies found a significant effect only in participants who experienced a positive response to diagnostic block; for participants who experienced equivocal response to diagnostic blocks, statistically significant benefit was not found 22. One of the six included studies did not find any evidence of statistically significant improvement; this study found a 0.5 point reduction in pain within the intervention group and a 0.6 point reduction in pain in the control group 23.

Sacroiliac joint pain

Two studies assessed the efficacy of radiofrequency ablation for treating sacroiliac pain 28, 29. Both used continuous, cooled radiofrequency ablation procedures 28, 29. These studies used a 17-gauge cannula and a 4 mm tip length. Cohen et al 28 heated the device to 80°C for 90 seconds, while Patel et al 29 used 60°C heat for 150 seconds. Both studies used a numerical rating scale, with a range of 0 to 10 to assess change in pain. Cohen et al 28 followed participants for six months. Patel et al 29 followed participants for nine months postprocedure, but only presented data for the control group up to three months. Both of these studies reported that there were no statistically significant differences in patient characteristics at baseline between the intervention and controls groups.

These two studies assessing the efficacy of radiofrequency ablation for treating sacroiliac joint pain studies found statistically significant reduction in pain for the intervention group, when compared with the control group 28, 29. Three months post procedure, Cohen et al 28 found a 3.7-point reduction in pain within the intervention group, while the control group experienced only a 0.5-point reduction in pain. Three months postprocedure, Patel et al 29 found a 2.4-point pain reduction in the intervention group, and a 0.8-point pain reduction in the control group.

Lumbar radiofrequency ablation success rate

Eleven sham-controlled randomized controlled trials were found, assessing the efficacy of radiofrequency ablation for discogenic back pain 19, 21, 30, lumbar facet joint pain 23, 29 and sacroiliac joint pain 28, 29. There were no randomized controlled trials investigating the use of radiofrequency ablation for pain in the coccyx region found in the literature. The efficacy of radiofrequency ablation for discogenic back pain remains unclear.

The evidence supports radiofrequency ablation as an efficacious treatment for lumbar facet joint and sacroiliac joint pain with five of six and both of the randomized controlled trials demonstrating statistically significant pain reductions, respectively. The evidence supporting radiofrequency ablation for treatment for discogenic pain is mixed and no randomized controlled trial evidence exists for treatment of the coccyx. However, all the randomized controlled trial data are short-term (<1 year) and do not report clinically meaningful pain reduction or outcomes such as ability to complete daily tasks or return to work. Further evidence should be generated before radiofrequency ablation is widely integrated into evidence-based clinical guidelines.

How you prepare for a lumbar radiofrequency ablation

To determine if you’re a good candidate for radiofrequency neurotomy, your doctor may refer you to a pain specialist or order more tests.

For example, a test may be done to see if the nerves commonly targeted by the procedure are the same nerves responsible for your pain. A small amount of numbing medication is injected into the precise spots where the radiofrequency needles will go. If your pain significantly lessens, radiofrequency treatment at those spots may help you.

However, the doctor may determine a different procedure is needed to help your specific symptoms.

Before the lumbar radiofrequency ablation

Let your doctor know if you take blood-thinning medications. You may need to stop taking them for a period of time before the procedure.

Follow these steps:

  • Arrange for someone to drive you home.
  • Swallow any necessary medications with clear liquids only and take them as early in the day as possible. Don’t take medications within two hours of your surgery.
  • Don’t smoke or use any tobacco products the day of your procedure.

During the lumbar radiofrequency ablation

Radiofrequency neurotomy is an outpatient procedure, so you’ll go home later that same day.

You’ll wear a hospital gown and lie on your stomach on an X-ray table. An intravenous (IV) line will be placed in your arm or hand to deliver medication that will keep you comfortable during the procedure. Numbing medication will be injected into your skin before the radiofrequency needles are inserted.

The doctor will the use a special X-ray machine (fluoroscope) to guide the radiofrequency needles to the precise area — so only the targeted nerve tissue will be treated.

After lumbar radiofrequency ablation

You’ll be taken to another room to rest until you feel ready to go home. You might notice some soreness in the area where the needles were inserted, but this usually goes away in a day or two.

When you get home:

  • Use an ice pack on the injection sites if you have discomfort. Place the pack on the sore spot for 20 minutes, three or four times a day, during the first day of your recovery.
  • Don’t use a heating pad on the injection sites.
  • Avoid baths for two days. You may take a warm shower 24 hours after your procedure.

Radiofrequency ablation recovery time

Most patients can walk around immediately after the procedure. After being monitored for a short time, you can usually leave the office or suite. Someone must drive you home.

After the radiofrequency ablation procedure, you may experience soreness in the targeted area for a few days, which may be relieved by oral medications. Some swelling or bruising may occur where the needle was inserted and this may be reduced by applying a cold pack.

You may experience pain from the procedure for up to 14 days, but this is generally due to the residual effects of the nerve ablation or muscle spasm. Some patients are often up and around and back to work 24 to 72 hours after the procedure. Pain relief is typically experienced within 10 days, although relief may be immediate for some patients and it may take up to three weeks for others for the full effects of radiofrequency ablation to be felt.

Although results vary from patient to patient, the effectiveness of radiofrequency ablation may last from three to 12 months. Often the nerve will eventually regenerate and in some cases, the joint pain may return and radiofrequency ablation may need to be repeated.

Radiofrequency ablation side effects

Common side effects of lumbar radiofrequency ablation include:

  • Temporary numbness
  • Temporary pain at the procedure site

Rarely, more-serious complications may occur, including:

  • Bleeding
  • Infection
  • Nerve damage
References
  1. Leggett LE, Soril LJ, Lorenzetti DL, et al. Radiofrequency ablation for chronic low back pain: A systematic review of randomized controlled trials. Pain Research & Management : The Journal of the Canadian Pain Society. 2014;19(5):e146-e153. https://www.ncbi.nlm.nih.gov/pmc/articles/PMC4197759/
  2. Lencioni R, Crocetti L, Cioni D. Loco-regional ablative therapies for colorectal metastases. In: Dionigi R editor(s). Recent advances in liver surgery. Austin (USA): Landes Bioscience, 2009:234-41.
  3. Lencioni R, Cioni D, Lera J, Rocchi E, Della Pina C, Crocetti L. Radiofrequency ablation: principles and techniques. In: Lencioni R, Cioni D, Bartolozzi C editor(s). Focal liver lesions. Heidelberg (Germany): Springer-Verlag, 2005:307-316.
  4. Decadt B, Siriwardena AK. Radiofrequency ablation of liver tumours: systematic review. Lancet Oncology 2004;5(9):550-60.
  5. Goode JA, Sabharwal T, Adam A. Percutaneous ablation of hepatic metastases. In: Lencioni R, Cioni D, Bartolozzi C editor(s). Focal liver lesions. Heidelberg: Springer-Verlag, 2005:337-48.
  6. Veltri A, Sacchetto P, Tosetti I, Pagano E, Fava C, Gandini G. Radiofrequency ablation of colorectal liver metastases:small size favourably predicts technique effectiveness and survival. Cardiovascular Interventional Radiolology 2008;31:948–56.
  7. Gillams AR, Lees WR. Five-year survival following radiofrequency ablation of small, solitary, hepatic colorectal metastases. Journal of Vascular and Interventional Radiology 2008;19:712-7.
  8. Cirocchi R, Trastulli S, Boselli C, Montedori A, Cavaliere D, Parisi A, Noya G, Abraha I. Radiofrequency ablation in the treatment of liver metastases from colorectal cancer. Cochrane Database of Systematic Reviews 2012, Issue 6. Art. No.: CD006317. DOI: 10.1002/14651858.CD006317.pub3. http://cochranelibrary-wiley.com/doi/10.1002/14651858.CD006317.pub3/full
  9. World Health Organization WHO Technical Report Series: The Burden of Musculoskeletal Conditions at the Start of the New Millenium. World Health Organization. 2003
  10. World Health Organization Chronic Diseases and Health Promotion. World Health Organization. 2013. http://www.who.int/chp/topics/rheumatic/en/
  11. Lawrence R, Felson D, Helmick C, et al. Estimates of the prevalence of arthritis and other rheumatic conditions in the United States: Part II. Arthritis Rheum. 2008;58:26–35 https://www.ncbi.nlm.nih.gov/pmc/articles/PMC3266664/
  12. Katz JN. Lumbar disc disorders and low-back pain: Socioeconomic factors and consequences. J Bone Joint Surg Am. 2006;88(Suppl 2):21–4. https://www.ncbi.nlm.nih.gov/pubmed/16595438
  13. Andersson GB. Epidemiological features of chronic low-back pain. Lancet. 1999 Aug 14;354:581–5. https://www.ncbi.nlm.nih.gov/pubmed/10470716
  14. Office of Communication and Public Liaison. Low Back Pain Fact Sheet. National Institute of Neurological Disorders and Stroke. 2013. https://www.ninds.nih.gov/Disorders/All-Disorders/Back-Pain-Information-Page
  15. Steenstra IA, Verbeek JH, Heymans MW, et al. Prognostic factors for duration of sick leave in patients sick listed with acute low back pain: A systematic review of the literature. Occup Environ Med. 2005;62:851–60. https://www.ncbi.nlm.nih.gov/pmc/articles/PMC1740930/
  16. Savigny P, Watson P, Underwood M. Early management of persistent non-specific low back pain: Summary of NICE guidance. BMJ. 2009;338:61805
  17. Towards Optimized Practice Program. Guideline for the Evidence-Informed Primary Care Management of Low Back Pain. Toward Optimized Practice Program. 2011 http://nationalpaincentre.mcmaster.ca/documents/LowerBackPainGuidelineNov2011.pdf
  18. Shealy CN. Percutaneous radiofrequency denervation of spinal facets: Treatment for chronic back pain and sciatica. J Neurosurg. 1975;43:448–51. https://www.ncbi.nlm.nih.gov/pubmed/125787
  19. Barendse GA, van Den Berg SG, Kessels AH, et al. Randomized controlled trial of percutaneous intradiscal radiofrequency thermocoagulation for chronic discogenic back pain: Lack of effect from a 90-second 70 C lesion. Spine. 2001;26:287–92.
  20. Kvarstein G, Mawe L, Indahl A, et al. A randomized double-blind controlled trial of intra-annular radiofrequency thermal disc therapy – a 12-month follow-up. Pain. 2009;145:279–86
  21. Kapural L, Vrooman B, Sarwar S, et al. A randomized, placebo-controlled trial of transdiscal radiofrequency, biacuplasty for treatment of discogenic lower back pain. Pain Med. 2013;14:362–73.
  22. Gallagher J, Petriccione DVPL, Wedley JR, et al. Radiofrequency facet joint denervation in the treatment of low back pain: A prospective controlled double-blind study to assess its efficacy. Pain Clin. 1994;7:193–8.
  23. Leclaire R, Fortin L, Lambert R, et al. Radiofrequency facet joint denervation in the treatment of low back pain: A placebo-controlled clinical trial to assess efficacy. Spine. 2001;26:1411–6.
  24. Nath S, Nath CA, Pettersson K. Percutaneous lumbar zygapophysial (Facet) joint neurotomy using radiofrequency current, in the management of chronic low back pain: A randomized double-blind trial. Spine. 2008;33:1291–7.
  25. Tekin I, Mirzai H, Ok G, et al. A comparison of conventional and pulsed radiofrequency denervation in the treatment of chronic facet joint pain. Clin J Pain. 2007;23:524–9.
  26. van Wijk R, Geurts JWM, Wynne HJ, et al. Radiofrequency denervation of lumbar facet joints in the treatment of chronic low back pain: A randomized, double-blind, sham lesion-controlled trial. Clin J Pain. 2005;21:335–44.
  27. van Kleef M, Barendse GA, Kessels A, et al. Randomized trial of radiofrequency lumbar facet denervation for chronic low back pain. Spine. 1999;24:1937–42.
  28. Cohen SP, Hurley RW, Buckenmaier CC, et al. Randomized placebo-controlled study evaluating lateral branch radiofrequency denervation for sacroiliac joint pain. Anesthesiology. 2008;109:279–88.
  29. Patel N, Gross A, Brown L, et al. A randomized, placebo-controlled study to assess the efficacy of lateral branch neurotomy for chronic sacroiliac joint pain. Pain Med. 2012;13:383–98.
  30. Kvarstein G, Mawe L, Indahl A, et al. A randomized double-blind controlled trial of intra-annular radiofrequency thermal disc therapy – a 12-month follow-up. Pain. 2009;145:279–86.
read more
Procedures

Fundoplication

fundoplication

What is fundoplication surgery

In a fundoplication is a surgery used to control problematic gastro-esophageal reflux or vomiting where the gastric fundus (upper part) of the stomach is wrapped around the lower end of the esophagus and stitched in place to reinforce the lower esophageal sphincter. The reinforced and tightened lower esophageal sphincter now provides a better “seal” and relieves the symptoms associated with GERD (gastroesophageal reflux disease) and achalasia. Fundoplication surgical procedure addresses the acid reflux–backflow of strong and irritating stomach acid into the lower esophagus–caused by gastroesophageal reflux disease (GERD). Constant exposure to the strong acids can damages the cells of your lower esophagus, where it joins the upper part of the stomach. In some cases, patients suffering from achalasia (a swallowing disorder) may need to undergo a fundoplication to reinforce the lower esophageal sphincter’s ability to close.

Fundoplication comes in a variety of forms such as Nissen, Dor, Toupet and Belsey. These surgical approaches differ in how much–and where–the lower esophagus is wrapped by the stomach. For example, in a Dor fundoplication, the top of the stomach is partially wrapped around the front of the esophagus’ lower end; while in a Toupet fundoplication, the top of the stomach is partially wrapped around the back of the lower esophagus. In Nissen fundoplication, the surgeon wraps the top of the stomach around the lower esophagus. This reinforces the lower esophageal sphincter, making it less likely that acid will back up in the esophagus (see Figure 4). Over the last decade and a half, the number of patients referred for antireflux surgery has increased eight fold. Approximately 70,000 operations are performed annually in the United States.

Gastro‐esophageal reflux disease (GERD) is a condition which develops when stomach contents regurgitate into the esophagus causing troublesome symptoms such as heartburn (burning sensation at the lower end of the breastbone) or regurgitation (perception of flow of stomach content into the throat or mouth) 1. Long‐term complications of GERD include reflux oesophagitis (injury to lining of esophagus), bleeding from the esophagus, narrowing of the esophagus, change in the nature of the lining of the esophagus which can sometimes give rise to esophageal cancer 2. Other researchers have hypothesized that there is a direct link between symptomatic GERD and esophageal cancer based on their observation of increased esophageal cancer irrespective of the presence of Barrett’s esophagus 3. While there has been significant controversy over the definition of GERD, the international consensus definition of GERD includes asymptomatic patients with complications, does not stipulate the method of diagnosis, and includes reflux which may be weakly acidic or gaseous 1.

There is global variation in the prevalence of GERD. The prevalence is higher in Europe, North and South America, and the Middle East, with a prevalence ranging between 9% and 33% of adults compared to a prevalence ranging between 3% and 8% in East Asia 4. The incidence of GERD is available from the UK and the USA and is about five cases of GERD per 1000 person-years 4. The risk factors for GERD include genetic factors such as a family history of reflux disease in immediate relatives; demographic factors such as pregnancy, older age and obesity; behavioral factors such as cigarette smoking, excessive alcohol consumption, drug treatments such as non-steroidal anti-inflammatory drugs (NSAIDs), oral steroids; and co-morbidities such as abdominal pain, irritable bowel syndrome, gallstone disease, asthma, chronic obstructive pulmonary disease, chest pain, and angina. Coffee consumption, oral contraceptive consumption, and hormonal replacement therapy are associated with lower prevalence of GERD 5. It should be noted that these are associations and no causal association can be shown for many of these factors. Apart from lifestyle changes (such as cessation of smoking) and diet changes (avoiding food that causes heartburn), the major forms of treatment for GERD are medical and surgical. The medical treatment is usually aimed at decreasing acidity in the stomach. Currently a group of drugs which suppress acid secretion, called proton pump inhibitors, are considered the best in decreasing acid secretion.

Gastric contents are prevented from entering into the esophagus by the lower esophageal sphincter (LES). However, lower esophageal sphincter (LES) relaxes transiently resulting in the reflux of gastric contents into the esophagus, even in normal individuals 6. However, increased reflux of gastric contents into the esophagus and prolonged exposure of the lower esophagus to gastric contents are believed to contribute to the symptoms and complications of GERD 6. Hiatus hernia lowers the competence and pressure of the lower esophageal sphincter, reduces the length of the gastro-esophageal junction, and alters the opening characteristics of the gastro-oesophageal junction. This results in an increase in the exposure of the esophagus to acid 6. Hiatus hernia is associated with severe GERD symptoms and complications 6.

The main surgical treatment is fundoplication which involves wrapping around the lower part of the food pipe with stomach. This can be performed by traditional open surgery, keyhole surgery or surgery that is performed without making any cut from within the stomach with the help of an endoscope (in this context, a flexible tube introduced through the mouth to give a view of the food pipe and stomach). There are various modifications to original complete fundoplication suggested by Nissen, mainly with regards to the amount and area of the gastric fundus which is plicated and where the wrap is fixed 7. Fundoplication can be performed by open or laparoscopic surgery 7. Currently laparoscopic Nissen fundoplication is the most common surgical procedure for the management of GERD offering promising long-term outcomes 8 and has been recommended as a choice of surgical therapy by the European Study Group for Antireflux Surgery and the Society of American Gastrointestinal Endoscopic Surgeons 9. Nevertheless, laparoscopic Nissen fundoplication can induce functional disorders, such as dysphagia, gas-bloating and an inability to belch. Compared to laparoscopic Nissen fundoplication, several surgeons have stated that laparoscopic Toupet fundoplication has a lower prevalence of postoperative complications while obtaining a similar control of reflux 10, but, several studies have failed to show a significant difference between them 11. Also, whether preoperative esophageal motility should be considered when surgeons select a procedure has not been elucidated. Hence, the controversy regarding the optimal surgical method continues.

This report 12 demonstrated that the operating time of laparoscopic Toupet fundoplication was longer than that of laparoscopic Nissen fundoplication, which might be due to the fact that the gastric fundus and both sides of the esophagus should be secured, respectively. Prevalence of perioperative complications between the two groups was not significantly different. But it is notable that Strate et al. 13 and Booth et al. 14 reported a perforation in the fundal wrap and an episode of perioperative bleeding after laparoscopic Toupet fundoplication. And Guérin et al. 15 also observed in-hospital bleeding. This phenomenon may be because the esophagus does not have a serosal layer and gastric fundus and both sides of the esophagus wall need to be sutured together, which may increase the risk of perforation and bleeding.

Recently endoscopic endoluminal fundoplication, which involves fundoplication without any incision, has been proposed 16.

The short‐term gastro‐esophageal reflux disease (GERD)‐specific quality of life was better in the laparoscopic fundoplication group than in the medical treatment group 17. Research has shown that fundoplication surgery is more effective than medication, at least within the first year after surgery, fundoplication is better at relieving symptoms like heartburn and acid reflux, and can improve quality of life 18. However, it was not clear how much this improvement benefited the patient. Furthermore there is not enough good research to say whether these advantages of fundoplication surgery are sustained in the long term.

The proportion of people with serious adverse events, short‐term dysphagia, and medium‐term dysphagia was higher in the laparoscopic fundoplication group than in the medical treatment group. The proportion of people with heartburn at short term, medium term, and long term, and those with acid regurgitation at short term and medium term was less in the laparoscopic fundoplication group than in the medical treatment group 17. The severity of difficulty in swallowing, heartburn, or acid regurgitation was not reported. There is considerable uncertainty in the balance of benefits versus harms of laparoscopic fundoplication compared to long‐term medical treatment with proton pump inhibitors. Due to the poor quality of the trials, future high‐quality studies are needed in this field 17.

Fundoplication key points

  • Fundoplication surgery works as well as only taking medicine to keep you from getting acid reflux and heartburn. However, you may still need medicine after fundoplication surgery to control your symptoms.
  • People who have had fundoplication surgery usually take less medication than before, but they cannot always stop taking it altogether. One study showed the following 18:
    • Without fundoplication surgery: 87 out of 100 people who didn’t have surgery were still taking medication after one year.
    • With fundoplication surgery: 36 out of 100 people who had surgery were still taking proton pump inhibitors after one year.
  • There are different ways to do fundoplication surgery (for example, with a laporascope or through a large cut in your belly), but they all work about the same.

Figure 1. Stomach

stomach

Figure 2. Parts of the stomach

parts of the stomach

Figure 3. Gastroesophageal junction

lower esophageal sphincter

Figure 4. Gastroesophageal reflux disease (GERD) 

reflux esophagitis disease

Figure 5. Fundoplication

fundoplication

Figure 6. Nissen fundoplication

Nissen fundoplication

Fundoplication surgery

The lower esophageal sphincter (LES) plays an important role in the pathogenesis of gastroesophageal reflux disease (GERD) 19. In order to inhibit lower esophageal sphincter relaxation, fundoplication is considered to be an essential and important part of antireflux surgery. Fundoplication can be done in two ways, depending on whether a section of the stomach is wrapped all the way around the food pipe, or only part of the way around it. A complete fundoplication, where the stomach is wrapped all the way around the food pipe, is called Nissen fundoplication. In what is known as Toupet fundoplication, the stomach is only partially wrapped around the food pipe. This surgical technique is the method of choice if, for example, there is a problem with the movements of the food pipe (called a motility disorder).

Laparoscopic Nissen fundoplication, a total wrap that surrounds the esophagus 360°, is the most commonly used, gold standard technique worldwide for antireflux surgery 20. However, laparoscopic Nissen fundoplication is associated with a high incidence of postoperative dysphagia and gas-bloat syndrome 21. Laparoscopic Toupet fundoplication, a 270° partial wrap, was introduced to counteract these side effects.

Many surgeons advocate that the incidence of regurgitation and heartburn are similar in both laparoscopic Nissen fundoplication and laparoscopic Toupet fundoplication, while postoperative dysphagia may have a higher incidence following laparoscopic Nissen fundoplication 22. Besides fundoplication type, other variables such as the length of the wrap and impaired esophageal peristalsis may also be associated with postoperative dysphagia 23. The original laparoscopic Nissen fundoplication procedure, which purports a 6-cm wrap length, is associated with a higher dysphagia rate 24. Two studies on the length of the Nissen fundoplication showed that a loose wrap of 1–2 cm was sufficient to suppress reflux and reduce the incidence of postoperative bloating and dysphagia 25, 26. An early study showed that laparoscopic Toupet fundoplication was more effective when esophageal motility was abnormal (less than 50% peristaltic waveforms) 27. However, a previous study reported a similar incidence of dysphagia between laparoscopic Toupet fundoplication and laparoscopic Nissen fundoplication 1 year postoperatively 28. Whether laparoscopic Toupet fundoplication has a benefit on abnormal esophageal peristalsis remains controversial.

Several meta-analyses have been performed comparing outcomes between laparoscopic Nissen fundoplication and laparoscopic Toupet fundoplication until 2011 29, 30. However, a comprehensive study collecting randomized clinical trials has not been conducted to date. In recent years, several studies with large sample sizes and recent follow-up data have been published comparing long-term efficacy and adverse events of both total and partial fundoplication 31, 32. The results of this 2010 meta-analysis 33 suggested that laparoscopic Toupet fundoplication might be the current procedure of choice to treat GERD.

DOR fundoplication

Achalasia is a rare neurodegenerative disease of the esophagus and the lower esophageal sphincter that has generally been accepted as an autoimmune esophageal motility disorder resulting from the loss of inhibitory nerve endings in the myenteric plexus of the esophagus 34. Pathophysiologically esophageal achalasia is characterized by poor relaxation of lower esophageal sphincter (LES) and aperistalsis of the esophageal body, achalasia presents mainly relevant symptoms are dysphagia, regurgitation, heartburn, and chest pain 35. The commonly used treatment of achalasia involves medicine therapy, endoscopic pneumatic dilation, and surgical myotomy with the aim of eliminating the high lower esophageal sphincter (LES) pressure.

Current treatment of achalasia is directed at palliation of symptoms. Therapies include pharmacological therapy, endoscopic injection of botulinum toxin, endoscopic dilation, and surgery. Until the late 1980s, endoscopic dilation was the first line of therapy. The advent of safe and effective minimally invasive surgical techniques in the early 1990s paved the way for the introduction of laparoscopic myotomy.

Laparoscopic Heller myotomy has gained world-wide popularity and is increasingly regarded as the standard treatment for achalasia by surgeons and gastroenterologists. However, laparoscopic Heller myotomy alone has been shown to increase gastroesophageal reflux disease (GERD) 36; hence, it is now common practice to include an antireflux procedure. A 360° (Nissen) fundoplication has been used. However, this patient population experienced a high rate of dysphagia. These patients have some degree of esophageal body dysmotility, and a 360° wrap can make esophageal emptying more difficult 37. Thus, although Nissen fundoplication is effective at controlling postoperative acid reflux, it is less favorable because of a high dysphagia recurrence rate 36.

A partial fundoplication has the benefits of less dissection, decreased operative time, and improvement in dysphagia symptoms, while showing improvement in reflux rates comparable with 360° fundoplication 38. Both Dor and Toupet fundoplications provide antireflux benefits with less risk for recurrent dysphagia in postmyotomy patients 39. Dor fundoplication which is a 180° anterior fundoplication, with the advantage of a simple procedure and covering of the mucosa, is being accepted as the first-line type of fundoplication for achalasia in most regions. Dor partial anterior fundoplication allows preservation of the posterior gastroesophageal junction as well as the potential advantage of protection of the exposed mucosa at the myotomy site. However, laparoscopic Heller myotomy alone or laparoscopic Heller myotomy plus other types of fundoplication (e.g., posterior 270° Toupet and total 360° Nissen fundoplication) have also been reported to have different benefits compared with laparoscopic Heller myotomy plus Dor fundoplication. Thus, there is no consensus on whether Dor fundoplication is the optimum procedure after laparoscopic Heller myotomy for the prevention of gastroesophageal reflux 35.

Toupet fundoplication

Toupet fundoplication is first described in 1963. Toupet fundoplication is described as a 270-degree posterior fundoplication, with crural closure and fixation of the wrap to the closure 40. The efficacy of Toupet fundoplication has been demonstrated and a partial wrap is believed to produce less postoperative side effects than the complete wrap. However, some studies have indicated that recurrence rate of reflux symptoms may be higher after Toupet fundoplication 41. Laparoscopic Toupet fundoplication is performed with five ports under general anesthesia. After dissecting the gastro-hepatic ligament with a harmonic scalpel, a window was created behind the lower esophagus. Then, the diaphragmatic crura were carefully dissected, and approximately 5 cm of the distal esophagus was mobilized, while the mediastinal structures, including the pleura, pericardium, vagus nerves, and aorta, were identified and preserved. In all cases, the gastric fundus was dissected by dividing the short gastric vessels. The diaphragmatic crura were sewed behind the esophagus with 1-2 non-absorbable sutures, and a posterior 270° and 2-cm-long fundoplication was constructed with 5-6 interrupted non-absorbable sutures.

Nissen fundoplication surgery

Laparoscopic Nissen Fundoplication is a minimally invasive surgery that has been very successful and replaces classical open operations for the treatment of GERD (gastroesophageal reflux disease). The Nissen fundoplication is performed under general anesthesia with 5 small (puncture hole) incisions placed on the abdomen. The stomach is wrapped around the lower esophagus, which then prevents the reflux of stomach contents into the esophagus and respiratory tract.

Patients typically spend one night in the hospital and go home the next day. After surgery, patients will no longer need “heartburn” medications, with a greater than 90% success rate in relieving symptoms of GERD (gastroesophageal reflux disease).

Nissen fundoplication complications

Every surgical procedure carries certain risks. The complications related to fundoplication include injury to nearby structures such as the liver, spleen, or esophagus; dysphagia (troublesome difficulty in swallowing) (5%); wrap migration (1%); recurrent regurgitation (1%); recurrent heartburn (1% to 10%); and chest complications (3%) 17. Overall, 1% to 14% of patients undergoing fundoplication develop complications 17.

Quite a lot of people have symptoms such as flatulence (“passing wind” or “farting”) and regurgitation after having anti-reflux surgery. But these symptoms could also be caused by the disease itself, and not by the surgery. Surgery causes swallowing problems in some people, or makes existing swallowing problems worse. Up to 23 out of 100 people in the studies had symptoms like these after fundoplication surgery.

Possible serious complications of surgery include severe bleeding, organ injury and infections. Up to 2 out of 100 people have severe bleeding, and the digestive tract is injured in about 1 out of 100 people.

Fundoplication side effects

  • Fundoplication surgery can cause you to feel bloated and make it hard to swallow. These side effects may last for 30 days or longer, and some side effects may require a second surgery to fix.
  • Serious side effects, such as infection and heart attack, may be more common with surgery than with medicine. These side effects are rare.

Nissen fundoplication recovery

You will need to be in hospital for about 5 days for the operation. You may need to be nursed in the intensive care unit after the operation for 1-2 days.

The major risks of the operation are bleeding, infection, leakage from oesophagus or stomach and chest infection.

Nissen fundoplication diet

There is not a lot of good research about post Nissen fundoplication diet and whether making changes in daily life helps relieve heartburn and acid reflux. But it can be worth changing certain habits. For instance, the symptoms might get better if you stop smoking or drink less alcohol.

If certain foods appear to make your gastroesophageal reflux symptoms worse, avoiding those foods could help. The problems are often caused by specific things, such as coffee, chocolate, very fatty or spicy foods, citrus fruits or fizzy drinks. It might take time and patience to find out which types of food you don’t tolerate well. Sometimes people also find that food hardly has any effect on their symptoms.

People who are overweight are often advised to lose weight because the extra pounds can put a strain on the digestive system and push against the food pipe and stomach. This could affect the function of the sphincter muscle at the lower end of the food pipe. Meals that have a lot of fat or calories in them, or large meals, can cause gastroesophageal reflux disease (GERD) symptoms too. But thin people who have low-fat diets can also have gastroesophageal reflux and heartburn. So there is no guarantee that your symptoms will get better if you lose weight or change your diet.

Many people wake up several times a night because of pain and burning in their food pipe. Some then decide to stop eating late in the evening, or only lie down at least three hours after a meal. Others sleep with their upper body raised. Lying on your left side can also help because then the entrance to your stomach is higher than your stomach itself.

If your symptoms do not improve despite making changes to your lifestyle, medication is a further treatment option. Various medications are available, some of which can relieve the symptoms very effectively – but the effect only lasts for as long as you take it.

Which medications can help?

Proton pump inhibitors (PPIs)

Proton pump inhibitors (PPIs) reduce the production of acidic stomach juices by inhibiting a certain enzyme. They can relieve typical symptoms like heartburn.

There are many names and brands of PPIs. Most work equally as well. Side effects may vary from drug to drug.

  • Omeprazole (Prilosec), also available over-the-counter (without a prescription)
  • Esomeprazole (Nexium), also available over-the-counter (without a prescription)
  • Lansoprazole (Prevacid)
  • Rabeprazole (AcipHex)
  • Pantoprazole (Protonix)
  • Dexlansoprazole (Dexilant)
  • Zegerid (omeprazole with sodium bicarbonate), also available over-the-counter (without a prescription)

Studies have tested just how effective these medications are. It was found that:

  • 25 out of 100 people who took a dummy drug (placebo) hardly had heartburn any more after two to eight weeks.
  • 70 out of 100 people who took a proton pump inhibitors (PPI) hardly had heartburn any more after two to eight weeks.

In other words, the medications led to a noticeable improvement in symptoms in 45 out of 100 people.

Research has shown that proton pump inhibitors usually relieve the symptoms or reduce food pipe inflammations better than H2-receptor antagonists do. But proton pump inhibitors (PPIs) sometimes don’t reduce the production of stomach acid enough at night. If this happens, people may have reflux symptoms at night despite taking medication. In the US and other countries, proton pump inhibitors (PPIs) are available over the counter at low doses and in small pack sizes. A prescription is needed for higher doses.

H2-receptor antagonists (H2RAs)

H2-receptor antagonists (e.g., ranitidine, cimetidine, famotidine, nizatidine) prevent large amounts of stomach juices from being made, by blocking the action of the hormone histamine in the stomach. Studies have shown that these drugs can relieve the symptoms of reflux:

  • 41 out of 100 people who took a dummy drug (placebo) hardly had heartburn any more after two to six weeks.
  • 55 out of 100 people who took an H2-receptor antagonist hardly had heartburn any more after two to six weeks.

In other words, the medication relieved heartburn in 14 out of 100 people.

Antacids

Antacids used to be a commonly used treatment option in Germany. These drugs are meant to bind to stomach acid, thereby neutralizing acidic stomach juices in the food pipe and stomach. But no good-quality studies have shown that antacids help in people who have GERD. Antacids might be an option if someone only has mild heartburn or cannot tolerate the medications mentioned above. In Germany, they are available in pharmacies without a prescription.

Prokinetics

Prokinetics are meant to speed up the emptying of your stomach and help stop stomach contents from flowing back into the food pipe. However, it is not clear whether they help in people who have GERD. There has not been enough good-quality research in this area. For this reason, prokinetics are only rarely used in the treatment of GERD in the US.

Side effects does the medication

Overall, about 2 out of 100 people who take proton pump inhibitors have side effects like diarrhea, nausea or vomiting, pain in the upper stomach area, difficulty swallowing or headaches. Sometimes these side effects can be avoided by switching to a different proton pump inhibitors (PPI) or changing the dose.

The long-term use of Proton pump inhibitors (PPIs) can increase the risk of bone fractures, particularly if they are taken at high doses for more than a year. There is some debate as to whether these drugs might also make people more likely to develop a severe inflammation of the bowel or pneumonia.

Fewer than 1 out of 100 people who take H2-receptor antagonists have side effects such as nausea or headaches.

References
  1. Vakil N, Van Zanten SV, Kahrilas P, Dent J, Jones R, Global Consensus G. The Montreal definition and classification of gastroesophageal reflux disease: a global evidence-based consensus. American Journal of Gastroenterology 2006;101(8):1900-20.
  2. Solaymani-Dodaran M, Logan RF, West J, Card T, Coupland C. Risk of oesophageal cancer in Barrett’s oesophagus and gastro-oesophageal reflux. Gut 2004;53(8):1070-4.
  3. Cook MB, Corley DA, Murray LJ, Liao LM, Kamangar F, Ye W, et al. Gastroesophageal reflux in relation to adenocarcinomas of the esophagus: a pooled analysis from the Barrett’s and Esophageal Adenocarcinoma Consortium (BEACON). PloS One 2014;9(7):e103508.
  4. El-Serag HB, Sweet S, Winchester CC, Dent J. Update on the epidemiology of gastro-oesophageal reflux disease: a systematic review. Gut 2014;63(6):871-80.
  5. Dent J, El-Serag HB, Wallander MA, Johansson S. Epidemiology of gastroesophageal reflux disease: a systematic review. Gut 2005;54:710-7.
  6. Boeckxstaens GE, Rohof WO. Pathophysiology of gastroesophageal reflux disease. Gastroenterology Clinics of North America 2014;43(1):15-25.
  7. Watson A. Update: total versus partial laparoscopic fundoplication. Digestive Surgery 1998;15(2):172-80.
  8. The impact of laparoscopic Nissen fundoplication on the long-term quality of life in patients with gastroesophageal reflux disease. Korkolis DP, Kapritsou M, Konstantinou EA, Giannakopoulou M, Chrysi MS, Tsakiridou M, Kouloura A, Flamourakis M, Maricosu M, Gontikakis E, Plataniotis G. Gastroenterol Nurs. 2015 Mar-Apr; 38(2):111-5. https://www.ncbi.nlm.nih.gov/pubmed/25831248/
  9. Guidelines for surgical treatment of gastroesophageal reflux disease (GERD). Society of American Gastrointestinal Endoscopic Surgeons (SAGES). Surg Endosc. 1998 Feb; 12(2):186-8. https://www.ncbi.nlm.nih.gov/pubmed/9479742/
  10. Owers C, Ackroyd R. Management of gastroesophageal reflux disease and hiatus hernia: Overview and authors’ perspective. J Surg. 2013;1:51–8.
  11. Influence of wrap length on the effectiveness of Nissen and Toupet fundoplication: a prospective randomized study. Mickevicius A, Endzinas Z, Kiudelis M, Jonaitis L, Kupcinskas L, Maleckas A, Pundzius J. Surg Endosc. 2008 Oct; 22(10):2269-76. https://www.ncbi.nlm.nih.gov/pubmed/18398651/
  12. Du X, Hu Z, Yan C, Zhang C, Wang Z, Wu J. A meta-analysis of long follow-up outcomes of laparoscopic Nissen (total) versus Toupet (270°) fundoplication for gastro-esophageal reflux disease based on randomized controlled trials in adults. BMC Gastroenterology. 2016;16:88. doi:10.1186/s12876-016-0502-8. https://www.ncbi.nlm.nih.gov/pmc/articles/PMC4969978/
  13. Strate U, Emmermann A, Fibbe C, Layer P, Zornig C. Laparoscopic fundoplication: Nissen versus Toupet two-year outcome of a prospective randomized study of 200 patients regarding preoperative esophageal motility. Surg Endosc. 2008;22:21–30. doi: 10.1007/s00464-007-9546-8.
  14. Booth MI, Stratford J, Jones L, Dehn TC. Randomized clinical trial of laparoscopic total (Nissen) versus posterior partial (Toupet) fundoplication for gastro-oesophageal reflux disease based on preoperative oesophageal manometry. Br J Surg. 2008;95(1):57–63. doi: 10.1002/bjs.6047
  15. Guérin E, Betroune K, Closset J, Mehdi A, Lefebvre JC, Houben JJ, Gelin M, Vaneukem P, El NI. Nissen versus Toupet fundoplication: results of a randomized and multicenter trial. Surg Endosc. 2007;21(11):1985–90. doi: 10.1007/s00464-007-9474-7
  16. Zacherl J, Roy-Shapira A, Bonavina L, Bapaye A, Kiesslich R, Schoppmann SF, et al. Endoscopic anterior fundoplication with the Medigus Ultrasonic Surgical Endostapler (MUSE) for gastroesophageal reflux disease: 6-month results from a multi-center prospective trial. Surgical Endoscopy 2015;29(1):220-9.
  17. Garg SK, Gurusamy KS. Laparoscopic fundoplication surgery versus medical management for gastro-oesophageal reflux disease (GORD) in adults. Cochrane Database of Systematic Reviews 2015, Issue 11. Art. No.: CD003243. DOI: 10.1002/14651858.CD003243.pub3. http://cochranelibrary-wiley.com/doi/10.1002/14651858.CD003243.pub3/full
  18. Heartburn and GERD: Treatment options for GERD. https://www.ncbi.nlm.nih.gov/pubmedhealth/PMH0072436
  19. GERD pathogenesis, pathophysiology, and clinical manifestations. Kahrilas PJ. Cleve Clin J Med. 2003 Nov; 70 Suppl 5():S4-19. https://www.ncbi.nlm.nih.gov/pubmed/14705378/
  20. Columnar mucosa and intestinal metaplasia of the esophagus: fifty years of controversy. DeMeester SR, DeMeester TR. Ann Surg. 2000 Mar; 231(3):303-21. https://www.ncbi.nlm.nih.gov/pmc/articles/PMC1421001/
  21. Rantanen TK, Salo JA, Salminen JT, Kellokumpu IH. (1999) Functional outcome after laparoscopic or open Nissen fundoplication: a follow-up study. Archives of surgery. 134: 240–244 https://www.ncbi.nlm.nih.gov/pubmed/10088561
  22. Owers C, Ackroyd R. (2013) Management of gastroesophageal reflux disease and hiatus hernia: Overview and authors’ perspective. Journal of Surgery 1: 51–58.
  23. Mickevičius A, Endzinas Ž, Kiudelis M, Jonaitis L, Kupčinskas L, Pundzius J, et al. (2013) Influence of wrap length on the effectiveness of Nissen and Toupet fundoplications: 5-year results of prospective, randomized study[J]. Surgical endoscopy 27: 986–991. doi: 10.1007/s00464-012-2550-7 https://www.ncbi.nlm.nih.gov/pubmed/23052526
  24. Nissen R. (1956) Gastropexy as the lone procedure in the surgical repair of hiatus hernia. The American Journal of Surgery 92: 389–392. https://www.ncbi.nlm.nih.gov/pubmed/13354861
  25. DeMeester TR, Bonavina L, Albertucci M. (1986) Nissen fundoplication for gastroesophageal reflux disease. Evaluation of primary repair in 100 consecutive patients. Annals of surgery 204: 9–20. https://www.ncbi.nlm.nih.gov/pmc/articles/PMC1251217/pdf/annsurg00089-0015.pdf
  26. del Pino Porres FJ, Sancho Fornos S, Benages Martinez A, Mora F. (2000) Manometric comprobation of esophagogastric junction competence after Nissen fundoplication and its relation to the length of fundic wrap. World journal of surgery 24: 870–873. https://www.ncbi.nlm.nih.gov/pubmed/10833257
  27. Worrell SG, Greene CL, DeMeester TR. (2014) The state of surgical treatment of gastroesophageal reflux disease after five decades. Journal of the American College of Surgeons 219: 819–830. doi: 10.1016/j.jamcollsurg.2014.05.018 https://www.ncbi.nlm.nih.gov/pubmed/25241236
  28. Chrysos E, Tsiaoussis J, Zoras OJ, Athanasakis E, Mantides A, Katsamouris A, et al. (2003) Laparoscopic surgery for gastroesophageal reflux disease patients with impaired esophageal peristalsis: total or partial fundoplication? Journal of the American College of Surgeons 197: 8–15. https://www.ncbi.nlm.nih.gov/pubmed/12831918
  29. Shan CX, Zhang W, Zheng XM, Jiang DZ, Liu S, Qiu M. (2010) Evidence-based appraisal in laparoscopic Nissen and Toupet fundoplications for gastroesophageal reflux disease. World journal of gastroenterology: WJG, 16: 3063–3071. https://www.ncbi.nlm.nih.gov/pmc/articles/PMC2890948/
  30. Tan G, Yang Z, Wang Z. (2011) Meta-analysis of laparoscopic total (Nissen) versus posterior (Toupet) fundoplication for gastro-oesophageal reflux disease based on randomized clinical trials. ANZ journal of surgery 81: 246–252. doi: 10.1111/j.1445-2197.2010.05481.x https://www.ncbi.nlm.nih.gov/pubmed/21418467
  31. Koch OO, Kaindlstorfer A, Antoniou SA, Luketina RR, Emmanuel K, Pointner R. (2013) Comparison of results from a randomized trial 1 year after laparoscopic Nissen and Toupet fundoplications[J]. Surgical endoscopy 27: 2383–2390. doi: 10.1007/s00464-013-2803-0 https://www.ncbi.nlm.nih.gov/pubmed/23361260
  32. Qin M, Ding G, Yang H. (2013) A clinical comparison of laparoscopic nissen and toupet fundoplication for gastroesophageal reflux disease. Journal of Laparoendoscopic & Advanced Surgical Techniques 23: 601–604. https://www.ncbi.nlm.nih.gov/pubmed/23614820
  33. Shan C-X, Zhang W, Zheng X-M, Jiang D-Z, Liu S, Qiu M. Evidence-based appraisal in laparoscopic Nissen and Toupet fundoplications for gastroesophageal reflux disease. World Journal of Gastroenterology : WJG. 2010;16(24):3063-3071. doi:10.3748/wjg.v16.i24.3063. https://www.ncbi.nlm.nih.gov/pmc/articles/PMC2890948/
  34. Zaninotto G, Rizzetto C. Endoscopic and surgical management of achalasia. Eur Surg. 2008;40:146–153.
  35. Wei M-T, He Y-Z, Deng X-B, et al. Is Dor fundoplication optimum after laparoscopic Heller myotomy for achalasia? A meta-analysis. World Journal of Gastroenterology : WJG. 2013;19(43):7804-7812. doi:10.3748/wjg.v19.i43.7804. https://www.ncbi.nlm.nih.gov/pmc/articles/PMC3837282/
  36. Richards WO, Torquati A, Holzman MD, et al. Heller myotomy versus Heller myotomy with Dor fundoplication for achalasia: a prospective randomized double-blind clinical trial. Ann Surg. 2004;240(3):405–415 https://www.ncbi.nlm.nih.gov/pmc/articles/PMC1356431/
  37. Topart P, Deschamps C, Taillefer R, Duranceau A. Long-term effect of total fundoplication on the myotomized esophagus. Ann Thorac Surg. 1992;54(6):1046–1051 https://www.ncbi.nlm.nih.gov/pubmed/1449285
  38. Rebecchi F, Giaccone C, Farinella E, Campaci R, Morino M. Randomized controlled trial of laparoscopic Heller myotomy plus Dor fundoplication versus Nissen fundoplication for achalasia: long term results. Ann Surg. 2008;248(6):1023–1030
  39. Williams VA, Peters JH. Achalasia of the esophagus: a surgical disease. J Am Coll Surg 2009;208(1):151–162
  40. Wykypiel H, Bonatti H, Hinder RA, Glaser K, Wetscher GJ. The laparoscopic fundoplications: Nissen and partialposterior (Toupet) fundoplication. Eur Surg. 2006;38:244–9.
  41. Cuschieri A, Hunter J, Wolfe B, Swanstrom LL, Hutson W. Multicentre evaluation of laparoscopic antireflux surgery. Preliminary report. Surg Endosc. 1993;7:505–10.
read more
Procedures

Sclerotherapy

sclerotherapy

What is sclerotherapy

Sclerotherapy involves injecting a solution of either salt water (hypertonic saline 20% NaCl) or a chemical solution (e.g. sodium tetradecyl sulphate or polidocanol) directly into the varicose or spider vein that causes them to collapse permanently. Sclerotherapy uses injections from a very fine, thin needle to improve the cosmetic appearance of spider veins, treat small varicose veins in the legs, and relieve related symptoms such as aching, burning, swelling and cramping. The sclerotherapy solution causes the vein walls to swell, stick together and seal shut, stopping the flow of blood, forcing blood to reroute through healthier veins. The collapsed vein is reabsorbed into local tissue and eventually fades within a few weeks.

Larger varicose veins may also be treated by sclerotherapy. This is the best method for varicose veins if they are tortuous or recurrent (endovenous laser treatment may be preferred for stright veins or on the first occasion). First a Duplex ultrasound scan should be performed to map out the path of superficial, perforator and deep veins. Those greater than 5mm in width and demonstrating reflux are the most suitable for treatment. Sclerotherapy of larger superficial veins and perforator vessels is usually performed with ultrasound (echo) guidance. Best results are achieved using a foam sclerosant, where the sclerosant solution is mixed with air in a ratio of 1: 4 to form minute bubbles. This provides a greater volume to push the blood away so the sclerosant may adhere more effectively to the blood vessel wall.

Most often sclerotherapy is used to treat leg veins, but sclerotherapy may also be used for venous malformation, or blue vessels on the sides of the nose and elsewhere. No anaesthetic is required. A strong solution (the sclerosant) is injected directly into the blood vessel causing inflammation of the walls of the vessel. The vessel disappears over a few weeks to months.

Sclerotherapy is the most common treatment for improving the appearance of varicose and spider veins on the legs. Sclerotherapy is often considered the treatment of choice for small varicose veins. Each treatment session typically results in elimination of 50 to 80 percent of the injected veins. Repeated treatments may be necessary at six- to twelve-weekly intervals to achieve up to 85% success at three years.

Although each session may involve a large number of injections, the needle used is very fine so that pain is not generally a problem. There may be some stinging as the solution travels through the smaller vessels. These become red and slightly swollen, sometimes itchy for a few hours.

The number of veins treated in one session varies, and depends on the size and location of the veins. The procedure is usually completed within 30 to 45 minutes.

After sclerotherapy, treated veins tend to fade within a few weeks, although occasionally it may take a month or more to see the full results. In some instances, several sclerotherapy treatments may be needed.

Varicose veins are caused by weak or damaged valves in the veins. The heart pumps oxygen-rich blood to the body through the arteries. Veins then carry the blood from the body back to the heart. As your leg muscles squeeze, they push blood back to the heart from your lower body against the flow of gravity.

Veins have valves that act as one-way flaps to prevent blood from flowing backwards as it moves up your legs. If the valves become weak, blood can leak back into the veins and collect there, causing veins to enlarge and become varicose.

Spider veins can develop from weak or damaged valves as well. They can also be caused by hormone changes, exposure to sun and injuries.

If you are considering sclerotherapy, you will meet with a dermatologic surgeon for a consultation to discuss your cosmetic goals and to determine if sclerothereapy is the best approach to meet your needs. Your surgeon will examine the veins you would like treated, and will also examine you for evidence of more serious venous problems. Photographs may be taken for before and after results.

You will also discuss your medical history, including previous surgeries, present and past health problems, medications, and nutritional and herbal supplements you are taking or have taken at some time.

If you decide to have sclerotherapy, your doctor will give you specific instructions to follow before surgery. Your doctor will also review any medications you regularly take and tell you if you need to stop taking them before treatment.

Your doctor may recommend that you wear compression stockings after sclerotherapy to help with healing and decrease swelling. You will be told where you can buy them before your procedure.

Reasons for sclerotherapy

Sclerotherapy is often done for:

  • Cosmetic purposes — to improve the appearance of varicose and spider veins

Sclerotherapy procedure also can improve related symptoms such as:

  • Aching
  • Swelling
  • Burning
  • Night cramps

If you’re pregnant or breast-feeding, doctors recommend waiting to have sclerotherapy done.

What are varicose veins and spider veins?

Varicose veins are enlarged veins that can be blue, red, or flesh-colored. They often look like cords and appear twisted and bulging. They can be swollen and raised above the surface of the skin. Varicose veins are often found on the thighs, backs of the calves, or the inside of the leg. During pregnancy, varicose veins can form around the vagina and buttocks.

Spider veins are like varicose veins but smaller. They also are closer to the surface of the skin than varicose veins. Often, they are red or blue. They can look like tree branches or spiderwebs with their short, jagged lines. They can be found on the legs and face and can cover either a very small or very large area of skin.

What causes varicose veins and spider veins?

Varicose veins can be caused by weak or damaged valves in the veins. The heart pumps blood filled with oxygen and nutrients to the whole body through the arteries. Veins then carry the blood from the body back to the heart. As your leg muscles squeeze, they push blood back to the heart from your lower body against the flow of gravity. Veins have valves that act as one-way flaps to prevent blood from flowing backwards as it moves up your legs. If the valves become weak, blood can leak back into the veins and collect there. (This problem is called venous insufficiency.) When backed-up blood makes the veins bigger, they can become varicose.

Spider veins can be caused by the backup of blood. They can also be caused by hormone changes, exposure to the sun, and injuries.

Many factors increase a person’s chances of developing varicose or spider veins. These include:

  • Increasing age. As you get older, the valves in your veins may weaken and not work as well.
  • Medical history. Being born with weak vein valves increases your risk. Having family members with vein problems also increases your risk. About half of all people who have varicose veins have a family member who has them too.
  • Hormonal changes. These occur during puberty, pregnancy, and menopause. Taking birth control pills and other medicines containing estrogen and progesterone also may contribute to the forming of varicose or spider veins.
  • Pregnancy. During pregnancy, there is a huge increase in the amount of blood in the body. This can cause veins to enlarge. The growing uterus also puts pressure on the veins. Varicose veins usually improve within 3 months after delivery. More varicose veins and spider veins usually appear with each additional pregnancy.
  • Obesity. Being overweight or obese can put extra pressure on your veins. This can lead to varicose veins.
  • Lack of movement. Sitting or standing for a long time may force your veins to work harder to pump blood to your heart. This may be a bigger problem if you sit with your legs bent or crossed.
  • Sun exposure. This can cause spider veins on the cheeks or nose of a fair-skinned person.

How can I prevent varicose veins and spider veins?

Not all varicose and spider veins can be prevented. But, there are some steps you can take to reduce your chances of getting new varicose and spider veins. These same things can help ease discomfort from the ones you already have:

  • Wear sunscreen to protect your skin from the sun and to limit spider veins on the face.
  • Exercise regularly to improve your leg strength, circulation, and vein strength. Focus on exercises that work your legs, such as walking or running.
  • Control your weight to avoid placing too much pressure on your legs.
  • Don’t cross your legs for long times when sitting. It’s possible to injure your legs that way, and even a minor injury can increase the risk of varicose veins.
  • Elevate your legs when resting as much as possible.
  • Don’t stand or sit for long periods of time. If you must stand for a long time, shift your weight from one leg to the other every few minutes. If you must sit for long periods of time, stand up and move around or take a short walk every 30 minutes.
  • Wear elastic support stockings and avoid tight clothing that constricts your waist, groin, or legs.
  • Avoid wearing high heels for long periods of time. Lower-heeled shoes can help tone your calf muscles to help blood move through your veins.
  • Eat a low-salt diet rich in high-fiber foods. Eating fiber reduces the chances of constipation, which can contribute to varicose veins. High-fiber foods include fresh fruits and vegetables and whole grains, like bran. Eating less salt can help with the swelling that comes with varicose veins.

Are varicose veins and spider veins dangerous?

Spider veins rarely are a serious health problem, but they can cause uncomfortable feelings in the legs. If there are symptoms from spider veins, most often they will be itching or burning. Less often, spider veins can be a sign of blood backup deeper inside that you can’t see on the skin. If so, you could have the same symptoms you would have with varicose veins.

Varicose veins may not cause any problems, or they may cause aching pain, throbbing, and discomfort. In some cases, varicose veins can lead to more serious health problems. These include:

  • Sores or skin ulcers due to chronic (long-term) backing up of blood. These sores or ulcers are painful and hard to heal. Sometimes they cannot heal until the backward blood flow in the vein is repaired.
  • Bleeding. The skin over the veins becomes thin and easily injured. When an injury occurs, there can be significant blood loss.
  • Superficial thrombophlebitis, which is a blood clot that forms in a vein just below the skin. Symptoms include skin redness; a firm, tender, warm vein; and sometimes pain and swelling.
  • Deep vein thrombosis (DVT), which is a blood clot in a deeper vein. It can cause a “pulling” feeling in the calf, pain, warmth, redness, and swelling. However, sometimes it causes no significant symptoms. If the blood clot travels to the lungs, it can be fatal.

Is sclerotherapy safe?

Yes, sclerotherapy is a simple and typically safe procedure. In most cases, the pain, discomfort and swelling associated with the veins disappears within days, and the vessels slowly resolve over several months.

  • Any procedure where the skin is penetrated carries a risk of infection. The chance of infection requiring antibiotic treatment appears to be less than one in 1,000.
  • Risks include the formation of blood clots in the veins, severe inflammation, adverse allergic reactions to the sclerosing solution and skin injury that could leave a small but permanent scar.

Larger injected varicose veins may become lumpy and/or hard for several months before resolving. Raised red areas may appear at the injection sites and should disappear within a few days. Brown lines or spots on the skin may be seen at the injection sites. In most cases, they disappear within three to six months, but can be permanent about five percent of the time. Bruising may occur around the injection site and can last several days or weeks.

In general, spider veins respond to sclerotherapy in three to six weeks, and larger veins respond in three to four months. If the veins respond to the treatment, they will not reappear. However, new veins may appear over time, and if needed, you may return for additional injections.

Is sclerotherapy painful?

You will feel small needle sticks and possibly a mild burning sensation. And you may experience a cramping sensation for one to two minutes when larger varicose veins are injected.

What are the limitations of sclerotherapy?

Large varicose veins do not respond as well as small ones to sclerotherapy. A few (less than 10 percent) of people who have sclerotherapy do not respond to the injections at all. In these instances, different solutions or a different method, such as cutaneous laser therapy, may be attempted.

You will not be able to undergo sclerotherapy treatment if you are pregnant, breastfeeding, or are bedridden. You must wait at least three months after giving birth before you can be considered for this procedure.

Often, phlebectomy is used with a more comprehensive treatment plan, including additional procedures such as endovenous catheter ablation that use radiofrequency or laser energy.

You should discuss your individualized treatment plan with your provider.

Sclerotherapy side effects

Serious complications following sclerotherapy are rare. However, as with any procedure, it does carry some risk and may cause side effects.

  • Allergy from the sclerosant (this does not occur with hypertonic saline).
  • Ulceration. This will eventually heal leaving a small scar, or may be removed surgically. If an artery is inadvertently treated, the surrounding tissue may die (necrose), which is potentially serious.
  • Deep venous thrombosis. The risk is very small when venules are treated but it occasionally follows sclerotherapy of larger varicose veins. It is more likely in those predisposed to blood clotting through inherited thrombophilia, lack of exercise, air travel, after major operations and other reasons. Deep venous thrombosis may rarely lead to potentially serious pulmonary emboli (clots in the blood vessels of the lungs) in about 1 in every ten thousand procedures.

Temporary side effects that may occur at the injection site include:

  • Stinging or pain at the sites of injection
  • Swelling of the ankles or feet, or muscle cramps

The following occur more frequently:

  • Staining or brown pigmentation, at the site or along the line of the vein. This occurs in about 30% of patients. In most cases this resolves but it may take many months.
  • Clots within treated vessels. These are not dangerous but can be quite tender if they occur in the larger veins. They can be removed through a needle prick after several weeks if necessary, but left alone they will eventually be reabsorbed.
  • Temporary bruising. Bruises at the injection sites are quite common but resolve within a week or so.
  • Capillary matting (multiple tiny red blood vessels). This is an increase in the number of fine red vessels around the injection site: it may disappear on its own, or can be treated by further injections or a vascular laser.

Very fine vessels may be too small to inject, in which case a vascular laser or intensed pulsed light treatment may be worth trying.

These side effects usually occur when hypertonic saline solution is used

  • Red, raised areas at the injection sites

These are similar to hives, and should disappear within a day or so.

  • Brown lines or spots on the skin at the injection sites

Darkened areas may result when blood escapes from treated veins. They are probably formed from iron in the blood. These dark areas occur more often in patients who have larger veins or patients who tan easily. In most cases they disappear within a year, but they may last longer.

  • Groups of fine red blood vessels near the injection sites of larger vessels

About one-third of patients develop groups of vessels, especially on the thighs. Most disappear by themselves, some need additional injection treatments or laser therapy, and a few vessels may not disappear with treatment.

  • Small, painful ulcers at treatment sites, which may develop immediately following treatment or after a few days

These occur when some of the solution escapes into the surrounding skin or enters a small artery at the treatment site. They can be successfully treated, but it is important to tell your dermatologist immediately if they develop.

  • Temporary bruises

Bruises usually occur after laser treatments and are probably related to the thinness of blood vessel walls. They usually disappear in a few weeks. Occasionally, bruising occurs after sclerotherapy.

  • Allergic reactions to sclerosing solutions

Although allergic reactions are uncommon, they can be treated. Inform your dermatologist immediately if you do experience an allergic reaction.

  • Inflammation of treated blood vessels

This is very unusual but can be treated with medications such as aspirin, compression, antibiotics or heat.

  • Lumps in injected vessels

Lumps are caused by coagulated blood. They are not dangerous and may be drained by your dermatologist a few weeks after injection.

  • Burning with discoloration of the skin

Side effects that may require treatment

Other complications are less common but may require treatment. These include:

  • Inflammation. This is usually mild but may cause swelling, warmth and discomfort around the injection site. Your doctor may suggest aspirin to reduce the inflammation.
  • Blood clot. A lump of clotted blood may form in a treated vein that may require drainage. Rarely, a blood clot may travel to a deeper vein in your leg (deep vein thrombosis). Deep vein thrombosis (DVT) carries a risk of pulmonary embolism (a very rare complication of sclerotherapy), an emergency situation where the clot travels from your leg to your lungs and blocks a vital artery. Seek immediate medical care if you experience difficulty breathing, chest pain or dizziness, or you cough up blood.
  • Air bubbles. Tiny air bubbles may rise in your bloodstream. These don’t always cause symptoms, but if they do, symptoms include visual disturbances, headache, fainting and nausea. These symptoms generally go away, but call your doctor if you experience problems with limb movement or sensation after the procedure.
  • Allergic reaction. It’s possible that you may have an allergic reaction to the solution used for treatment, but this is uncommon.

How should I prepare for a sclerotherapy

Before the sclerotherapy procedure, your doctor performs a physical exam and gathers your medical history.

Medical history

Your doctor will want to know your medical history, including asking about any:

  • Recent illnesses or existing medical conditions, such as a heart condition or a past history of blood clots
  • Medications or supplements you take, especially aspirin, nonsteroidal anti-inflammatory drugs (NSAIDs), blood thinners or herbal supplements
  • Allergies especially to local anesthetic medications, general anesthesia or to contrast materials containing iodine (sometimes referred to as “dye” or “x-ray dye”)
  • Previous treatment for varicose veins and the results of the treatment

Tell your doctor if there’s a possibility you are pregnant and discuss any recent illnesses, medical conditions, allergies and medications you’re taking, including herbal supplements and aspirin. You may be advised to stop taking aspirin, nonsteroidal anti-inflammatory drugs (NSAIDs), iron supplements, or blood thinners several days prior to your procedure.

  • You may be asked to stop taking iron supplements.
  • Also inform your doctor about recent illnesses or other medical conditions.
  • Ask your doctor about antibiotic medications you may be taking or ask for safe guidelines for discontinuing these medications.
  • No lotion should be applied to legs before or after sclerotherapy.
  • You should wear comfortable, loose-fitting clothing to your exam. You may be given a gown to wear during the procedure.
  • You may want to bring a pair of shorts to wear during the procedure.

Do not apply lotion to your legs before or after sclerotherapy. Leave jewelry at home and wear loose, comfortable clothing. Since you may be asked to wear a gown, you may want to bring a pair of shorts to wear during the procedure.

Ultrasound

Depending on which veins are involved, your doctor may request ultrasound imaging on the veins in your legs. Ultrasound is a painless procedure that uses sound waves to produce images of structures inside the body.

Sclerotherapy procedure

Sclerotherapy procedure is often done on an outpatient basis. However, some patients may require admission following the procedure. Please consult with your physician as to whether or not you will be admitted. Sclerotherapy does not require anesthesia and is typically performed in your dermatologic surgeon’s office. The procedure takes about 15 to 30 minutes, but the exact length of time depends on the size of the area and the number of veins being treated.

Depending on its size, a single vein may have to be injected more than once. Treatment must be performed weeks or months apart. Multiple veins may be injected during one treatment session.

During the procedure, you’ll lie on your back with your legs slightly elevated. Your doctor will cleanse the area to be treated before inserting a sclerosing solution into the targeted vein with a fine needle. The solution displaces the blood and reacts with the vascular endothelium causing the vein walls to swell, stick together and scarring the vein, stopping the flow of blood. As a result, the vein fades within a few weeks.

A variety of products are used, including hyperosmotic solutions (e.g., hypertonic saline), detergent solutions (e.g., sodium tetradecyl sulfate), and corrosive agents (e.g., glycerin). Injections typically work better on small (1 to 3 mm) and medium (3 to 5 mm) veins; however, a precise diameter used to make treatment decisions is lacking. Although sclerotherapy is a clinically effective and cost-effective treatment for smaller varicose veins, concerns about the development of deep venous thrombosis and visual disturbances, and the recurrence of varicosities have been noted 1.

You may experience some minor stinging or cramps when the needle is inserted into the vein. Be sure to tell your doctor if you have any discomfort. Some people experience minor stinging or cramps when the needle is inserted into the vein. If you have a lot of pain, tell your doctor. Pain may occur if the solution leaks from the vein into surrounding tissue.

After the injections, your doctor will apply compression and massage the treated area to keep blood out of the injected vein and disperse the solution. A compression pad may be taped onto the injection site to keep the area compressed while your doctor moves on to the next vein.

The number of injections depends on the number and size of veins being treated.

Sclerotherapy aftercare

Often cotton wool pads under adhesive plasters are applied to the injection sites. Pressure is applied to the treated vessels using Grade 2 graduated compression hosiery (support stockings) and/or bandages. These are usually worn for between seven days and three weeks following each treatment. They come in different sizes and colors.

You’ll be able to get up and walk around soon after the procedure. Walking and moving your legs is important to prevent the formation of blood clots.

Patients are usually able to return to normal daytime activities immediately after sclerotherapy. They should walk for at least thirty minutes a day, especially for the first few days following the procedure. Vigorous physical activities such as weight lifting or aerobics classes are not advised during this time.

Sclerotherapy recovery

After the procedure, it is important to walk around to prevent formation of blood clots in your legs. Most people return to their normal activities on the same day, but it may be wise to have someone drive you home after the procedure. Your doctor will probably advise you to avoid strenuous exercise for two weeks after the procedure.

You’ll also want to avoid sun exposure to the treated areas during that time. The inflammation caused by the injections combined with sun exposure can lead to dark spots on your skin, especially if you already have a dark skin tone.

Your doctor will give you specific instructions to follow for recovery, including:

  • Avoid sun exposure to the treated areas for two weeks after the procedure. The inflammation caused by the injections combined with sun exposure can lead to dark spots on your skin, especially if you already have a dark skin tone.
  • Wear compression stockings to maintain compression on the treated veins.

You’ll be asked to wear compression stockings or bandages — usually for about two weeks — to maintain compression on the treated veins.

Sclerotherapy before and after

If you were treated for small varicose veins or spider veins, you can usually expect to see definitive results in three to six weeks. Larger veins may require three to four months. However, multiple treatments may be needed to achieve the results you want.

Veins that respond to treatment generally don’t come back, but new veins may appear.

Your doctor will likely schedule a follow-up visit about a month after the procedure to check the procedure’s success and decide whether further sessions are needed. Generally, you need to wait about six weeks before undergoing another sclerotherapy session.

Studies of sclerotherapy as a treatment for varicose and spider veins indicate that it has an overall success rate of about 60 to 80 percent in eliminating treated veins.

sclerotherapy before and after

sclerotherapy before and after

sclerotherapy before and after

References
  1. Campbell B. Varicose veins and their management. BMJ. 2006;333(7562):287–292.
read more
Procedures

Brachytherapy

brachytherapy

What is brachytherapy

Brachytherapy is an internal radiation therapy or radiotherapy in which radioactive material sealed in needles, seeds, wires, or catheters is placed directly into or near a tumor. Getting the implant placed is usually a painless procedure. Depending on your type of cancer and treatment plan, you might get a temporary or a permanent implant.

Brachytherapy or internal radiation therapy allows a higher dose of radiation in a smaller area than might be possible with external radiation treatment. Brachytherapy uses a radiation source that’s usually sealed in a small holder called an implant. Different types of implants may be called pellets, seeds, ribbons, wires, needles, capsules, balloons, or tubes. No matter which type of implant is used, it is placed in your body, very close to or inside the tumor. This way the radiation harms as few normal cells as possible.

  • During intracavitary radiation, the radioactive source is placed in a body cavity (space), such as the rectum or uterus.
  • With interstitial radiation, the implants are placed in or near the tumor, but not in a body cavity.

How your doctor places that radioactive material in your body depends on many factors, including the location and extent of the cancer, your overall health, and your treatment goals.

Some brachytherapy treatments are given using specialist applicators. The applicators are hollow tubes that the doctor puts into or as close to the area of cancer as possible.

There are different types of applicator for different areas of the body. You have the applicators inserted in the operating room. You either have a general anaesthetic or a spinal anaesthetic. A spinal anaesthetic means you have no feeling from below your waist.

One or more radioactive metal pellets travel out of the machine, into the applicators. The metal gives a dose of radiotherapy in the area of the cancer. You might have more than one treatment.

Some treatments use radioactive seeds. Using specialised needles, the doctor puts the seeds in the area of the cancer. The seeds stay there permanently. They are tiny and don’t cause any problems.

Placement may be inside a body cavity or in body tissue:

  • Radiation placed inside a body cavity. During intracavity brachytherapy, a device containing radioactive material is placed in a body opening, such as the windpipe or the vagina. The device may be a tube or cylinder made to fit the specific body opening. Your radiation therapy team may place the brachytherapy device by hand or may use a computerized machine to help place the device.Imaging equipment, such as a CT scanner or ultrasound machine, may be used to ensure the device is placed in the most effective location.
  • Radiation inserted into body tissue. During interstitial brachytherapy, devices containing radioactive material are placed within body tissue, such as within the breast or prostate. Devices that deliver interstitial radiation into the treatment area include wires, balloons and tiny seeds the size of grains of rice. A number of techniques are used for inserting the brachytherapy devices into body tissue. Your radiation therapy team may use needles or special applicators. These long, hollow tubes are loaded with the brachytherapy devices, such as seeds, and inserted into the tissue where the seeds are released. In some cases, narrow tubes (catheters) may be placed during surgery and later filled with radioactive material during brachytherapy sessions. CT scans, ultrasound or other imaging techniques may be used to guide the devices into place and to ensure they’re positioned in the most-effective locations.

Brachytherapy side effects

Side effects of brachytherapy are specific to the area being treated. Because brachytherapy focuses radiation in a small treatment area, only that area is affected.

You may experience tenderness and swelling in the treatment area. Ask your doctor what other side effects can be expected from your treatment.

Brachytherapy procedure

Before you begin brachytherapy, you may meet with a doctor who specializes in treating cancer with radiation (radiation oncologist). You may also undergo scans to help your doctor determine your treatment plan.

Procedures such as X-rays, computerized tomography (CT) or magnetic resonance imaging (MRI) may be performed before brachytherapy.

The brachytherapy implant procedure is usually done in a hospital operating room designed to keep the radiation inside the room. You’ll get anesthesia, which may be either general (where drugs are used to put you into a deep sleep so that you don’t feel pain) or local (where part of your body is numbed).

One or more radioactive implants is put into your body cavity or tissue with an applicator, usually a metal tube or a plastic tube called a catheter. Imaging tests (an x-ray, ultrasound, MRI, or CT scan) are usually used during the procedure to find the exact place the implant needs to go.

Before being placed, implants are kept in containers that hold the radiation inside so it can’t affect others. The health professionals handling the radioactive implants may wear special gear that protects them from exposure once the implants are taken out of the container.

HDR brachytherapy

HDR (high-dose-rate) brachytherapy is often an outpatient procedure, which means each treatment session is brief and doesn’t require that you be admitted to the hospital. High-dose-rate brachytherapy allows a person to be treated for only a few minutes up to 20 minutes at a time with a powerful radioactive source that’s put in the applicator. The source is removed after several minutes. This may be repeated over the course of a few days to weeks. The radioactive material is not left in your body. The applicator might be left in place between treatments, or it might be put in before each treatment.

You’ll lie in a comfortable position during high-dose-rate brachytherapy. Your radiation therapy team will position the radiation device. This may be a simple tube or tubes placed inside a body cavity or small needles inserted into the tumor.

The radioactive material is inserted into the brachytherapy device with the help of a computerized machine.

Your radiation therapy team will leave the room during your brachytherapy session. They’ll observe from a nearby room where they can see and hear you.

You shouldn’t feel any pain during brachytherapy, but if you feel uncomfortable or have any concerns, be sure to tell your caregivers.

Once the radioactive material is removed from your body, you won’t give off radiation or be radioactive. You aren’t a danger to other people, and you can go on with your usual activities.

Low-dose-rate brachytherapy

In low-dose-rate (LDR) brachytherapy, the implant gives off lower doses of radiation over a longer period – from several hours to several days.

Some implants are left in from 1 to a few days and then removed. You’ll probably have to stay in the hospital, sometimes in a special room, during treatment. For larger implants, you might have to stay in bed and lie still to keep it from moving.

Some smaller implants (such as the seeds or pellets) are left in place – they’re never taken out. Over the course of several weeks they stop giving off radiation. The seeds are about the size of rice grains and rarely cause problems. If your implants are to be left in, you may be able to go home the same day they’re put in.

Radioactive material is placed in your body by hand or by machine. Brachytherapy devices may be positioned during surgery, which may require anesthesia or sedation to help you remain still during the procedure and to reduce discomfort.

You’ll likely stay in a private room in the hospital during low-dose-rate brachytherapy. Because the radioactive material stays inside your body, there is a small chance it could harm other people. For this reason, visitors will be restricted.

Children and pregnant women shouldn’t visit you in the hospital. Others may visit briefly once a day or so. Your health care team will still give you the care you need, but may restrict the amount of time they spend in your room.

You shouldn’t feel pain during low-dose-rate brachytherapy. Keeping still and remaining in your hospital room for days may be uncomfortable. If you feel any discomfort, tell your health care team.

After a designated amount of time, the radioactive material is removed from your body. Once brachytherapy treatment is complete, you’re free to have visitors without restrictions.

Permanent brachytherapy

In some cases, such as with prostate cancer brachytherapy, radioactive material is placed in your body permanently.

The radioactive material is typically placed by hand with the guidance of an imaging test, such as ultrasound or CT. You may feel pain during the placement of radioactive material, but you shouldn’t feel any discomfort once it’s in place.

Your body will emit low doses of radiation from the area being treated at first. Usually the risk to others is minimal and may not require any restrictions about who can be near you.

In some cases, for a short period of time you may be asked to limit the length and frequency of visits with pregnant women or with children. The amount of radiation in your body will diminish with time, and restrictions will be discontinued.

How long do brachytherapy implants stay in place?

The length of time a brachytherapy implant is left in place depends on the type of brachytherapy you are getting. Some implants are permanent, while others are taken out after a few minutes or days. The type of implant you get will depend on the kind of cancer, where it is in your body, your general health, and other treatments you have had.

How will I feel during brachytherapy implant therapy?

You’re not likely to have a lot of pain or feel sick while implants are being put in. The drugs used while they’re being placed might make you feel drowsy, weak, or sick to your stomach, but these side effects don’t last long. If your brachytherapy implant is held in place by an applicator, you may have some discomfort in that area. Ask for medicine to help you relax or to relieve pain if needed. Be sure to tell your cancer care team if you have burning, sweating, or other symptoms.

What happens after a temporary brachytherapy implant is removed?

In most cases, anesthesia is not needed when the applicator and/or implant is removed. It’s usually done right in your hospital room. The treated area may be sore or tender for some time after treatment, but most people can return to normal activities quickly. Keep in mind that your body is recovering from radiation treatments, and you may need extra sleep or rest breaks over the next few days.

What happens to permanent brachytherapy implants?

The radioactive materials stop giving off radiation over time. It may take weeks or months. Talk to your cancer care team about how long it will take in your case. Once the radiation is gone, the implant(s) are no longer active. They usually stay in place and cause no harm, so there’s no need to take them out.

Will I be radioactive during or after internal radiation treatment?

With brachytherapy, your body may give off a small amount of radiation for a short time.

If you have a temporary implant, you’ll be asked to stay in the hospital and might have to limit visitors during treatment. You also may be asked to stay a certain distance away from them. Pregnant women and children might not be allowed to visit you. Once the implant is removed, your body will no longer give off radiation.

Over a few weeks to months, permanent implants will slowly stop giving off radiation. The radiation usually doesn’t travel much farther than the area being treated, so the chances that others could be exposed to radiation is very small. Still, your health care team might ask you to take certain precautions such as staying away from small children and pregnant women, especially right after you get the implants.

Brachytherapy for breast cancer

If you’ve been diagnosed with breast cancer, your cancer care team will discuss your treatment options with you. It’s important that you think carefully about each of your choices.

Some women with breast cancer will need radiation, often in addition to other treatments. The need for radiation depends on what type of surgery you had, whether your cancer has spread to the lymph nodes or somewhere else in your body, and in some cases, your age. Tumors that are large or involve the skin might also need radiation. You could have just one type of radiation, or a combination of different types.

Radiation therapy is treatment with high-energy rays (such as x-rays) or particles that destroy cancer cells. Two main types of radiation therapy can be used to treat breast cancer:

  • External beam radiation: This is the most common type of radiation therapy for women with breast cancer. A machine outside the body focuses the radiation on the area affected by the cancer.
  • Internal radiation (brachytherapy): For this treatment, a radioactive source is put inside the body for a short time.

Brachytherapy, also known as internal radiation, is another way to deliver radiation therapy. Instead of aiming radiation beams from outside the body, a device containing radioactive seeds or pellets is placed into the breast tissue for a short time in the area where the cancer had been removed.

When might radiation therapy be used for breast cancer?

Not all women with breast cancer need radiation therapy, but it may be used in several situations:

  • After breast-conserving surgery, to help lower the chance that the cancer will come back in the breast or nearby lymph nodes.
  • After a mastectomy, especially if the cancer was larger than 5 cm (about 2 inches), or if cancer is found in the lymph nodes.
  • If cancer has spread to other parts of the body, such as the bones or brain.

For women who had breast-conserving surgery, brachytherapy can be used along with external beam radiation as a way to add an extra boost of radiation to the tumor site. It may also be used by itself (instead of radiation to the whole breast) as a form of accelerated partial breast irradiation. Tumor size, location, and other factors may limit who can get brachytherapy.

Types of brachytherapy for breast cancer

There are different types of brachytherapy:

  • Interstitial brachytherapy: In this approach, several small, hollow tubes called catheters are inserted into the breast around the area where the cancer was removed and are left in place for several days. Radioactive pellets are inserted into the catheters for short periods of time each day and then removed. This method of brachytherapy has been around longer (and has more evidence to support it), but it is not used as much anymore.
  • Intracavitary brachytherapy: This is the most common type of brachytherapy for women with breast cancer. A device is put into the space left from BCS and is left in place until treatment is complete. There are several different devices available (including MammoSite, SAVI, Axxent, and Contura), most of which require surgical training for proper placement . They all go into the breast as a small catheter (tube). The end of the device inside the breast is then expanded so that it stays securely in place for the entire treatment. The other end of the catheter sticks out of the breast. For each treatment, one or more sources of radiation (often pellets) are placed down through the tube and into the device for a short time and then removed. Treatments are typically given twice a day for 5 days as an outpatient. After the last treatment, the device is collapsed down again and removed.

Early studies of intracavitary brachytherapy as the only radiation after BCS have had promising results as far as having at least equal cancer control compared with standard whole breast radiation, but may have more complications including poor cosmetic results. Studies of this treatment are being done and more follow-up is needed.

Intracavitary brachytherapy for breast cancer side effects

As with external beam radiation, intracavitary brachytherapy can have side effects, including:

  • Redness at the treatment site
  • Bruising at the treatment site
  • Breast pain
  • Infection
  • Damage to fatty tissue in the breast
  • Weakness and fracture of the ribs in rare cases
  • Fluid collecting in the breast (seroma)

Brachytherapy cervical cancer

If you’ve been diagnosed with cervical cancer, your cancer care team will talk with you about treatment options. In choosing your treatment plan, you and your cancer care team will also take into account your age, your overall health, and your personal preferences.

The stage of a cervical cancer is the most important factor in choosing treatment. But other factors can also affect your treatment options, including the exact location of the cancer within the cervix, the type of cancer (squamous cell or adenocarcinoma), your age and overall health, and whether you want to have children.

Radiation therapy uses high energy x-rays or radioactive particles to kill cancer cells. Radiation therapy may be used for cervical cancer:

  • As a part of the main treatment. For some stages of cervical cancer, the preferred treatment is radiation alone or surgery followed by radiation. For other stages, radiation and chemo given together (called concurrent chemoradiation) is the preferred treatment. The chemo helps the radiation work better.
  • To treat cervical cancer that has spread or that has come back after treatment. Radiation therapy may be used to treat cancers that have spread to other organs and tissues.

The two types of radiation therapy most often used to treat cervical cancer include:

  • External beam radiation
  • Brachytherapy

Brachytherapy used most often to treat cervical cancer is known as intracavitary brachytherapy. The radiation source is placed in a device in the vagina (and sometimes in the cervix). This is often used in addition to external beam radiation therapy as a part of the main treatment for cervical cancer.

There are two types of brachytherapy:

  • Low-dose rate (LDR) brachytherapy is completed over a few days. During this time, the patient stays in bed in a private room in the hospital with instruments holding the radioactive material in place. While the radiation therapy is being given, the hospital staff will care for you, but also take precautions to lessen their own radiation exposure.
  • High-dose rate (HDR) brachytherapy is done as an outpatient over several treatments (often at least a week apart). For each high-dose treatment, the radioactive material is inserted for a few minutes and then removed. The advantage of HDR treatment is that you do not have to stay in the hospital or stay still for long periods of time.

To treat cervical cancer in women who have had a hysterectomy, the radioactive material is placed in a tube in the vagina.

To treat a woman who still has a uterus, the radioactive material can be placed in a small metal tube (called a tandem) that goes in the uterus, along with small round metal holders (ovoids) placed near the cervix. This is sometimes called tandem and ovoid treatment. Another option is called tandem and ring. For this, a round holder (like a disc) is placed close to the uterus. The choice of which one to use depends on what type of brachytherapy is planned.

Brachytherapy for cervical cancer side effects

Since the radiation only travels a short distance with brachytherapy, the main effects of the radiation are on the cervix and the walls of the vagina. The most common side effect is irritation of the vagina. It may become red and sore, and there may be a discharge. The vulva may become irritated as well.

Brachytherapy can also cause many of the same side effects as external beam radiation therapy, such as fatigue, diarrhea, nausea, irritation of the bladder, and low blood counts. Often brachytherapy is given right after external beam radiation (before the side effects can go away), so it can be hard to know which type of treatment is causing the side effect.

Long-term side effects of radiation therapy

Vaginal stenosis: Both external beam radiation therapy and brachytherapy can cause scar tissue to form in the vagina. The scar tissue can make the vagina narrower (called vaginal stenosis), less able to stretch, or even shorter, which can make vaginal sex painful.

A woman can help prevent this problem by stretching the walls of her vagina several times a week, either by having sex or by using a vaginal dilator (a plastic or rubber tube used to stretch out the vagina).

Vaginal dryness: Vaginal dryness and painful sex can be long-term side effects from radiation (both brachytherapy and external beam radiation therapy). Estrogens used locally may help with vaginal dryness and changes to the vaginal lining, especially if radiation to the pelvis damaged the ovaries, causing early menopause. These hormones are typically applied into the vagina and absorbed into the genital area, rather than taken by mouth. They come in gel, cream, ring, and tablet forms.

Weakened bones: Radiation to the pelvis can weaken the bones, leading to fractures. Hip fractures are the most common, and might occur 2 to 4 years after radiation. Bone density tests are recommended to monitor the risk of fracture.

Swelling of the leg(s): If pelvic lymph nodes are treated with radiation, it can lead to fluid drainage problems in the leg. This can cause severe swelling in the leg, a condition called lymphedema. More information about lymphedema can be found in our section on Lymphedema

If you are having side effects from radiation treatment, discuss them with your cancer care team.

It is important to know that smoking increases the side effects from radiation and can make treatment less effective. If you smoke, you should stop.

Brachytherapy for prostate cancer

Depending on each case, treatment options for men with prostate cancer might include:

  • Watchful waiting or active surveillance
  • Surgery
  • Radiation therapy
  • Cryotherapy (cryosurgery)
  • Hormone therapy
  • Chemotherapy
  • Vaccine treatment
  • Bone-directed treatment

These treatments are generally used one at a time, although in some cases they may be combined.

When is radiation therapy used in prostate cancer?

Radiation may be used:

  • As the first treatment for cancer that is still just in the prostate gland and is low grade. Cure rates for men with these types of cancers are about the same as those for men treated with radical prostatectomy.
  • As part of the first treatment (along with hormone therapy) for cancers that have grown outside the prostate gland and into nearby tissues.
  • If the cancer is not removed completely or comes back (recurs) in the area of the prostate after surgery.
  • If the cancer is advanced, to help keep the cancer under control for as long as possible and to help prevent or relieve symptoms.

Types of radiation therapy

The 2 main types of radiation therapy used for prostate cancer are:

  • External beam radiation
  • Brachytherapy (internal radiation)

Radiopharmaceuticals are drugs that contain radioactive elements. They are injected into a vein and settle in areas of damaged bones (like those containing cancer spread). Once there, they give off radiation that kills cancer cells. These drugs can be used to treat prostate cancer that has spread to many bones. Unlike external beam radiation, these drugs can reach all the affected bones at the same time.

The radiopharmaceuticals that can be used to treat prostate cancer spread to bone include:

  • Strontium-89 (Metastron)
  • Samarium-153 (Quadramet)
  • Radium-223 (Xofigo)

All of these drugs can help relieve pain caused by bone metastases. Radium-223 has also been shown to help men who have prostate cancer spread only to their bones (as opposed to spread to other organs such as the lungs) to live longer. For these men, radium-223 may be an early part of treatment.

The major side effect of these drugs is a decrease in blood cell counts, which could increase risks for infections or bleeding, especially if your counts are already low. Other side effects have also been seen, so ask your doctor what you can expect.

Brachytherapy (also called seed implantation or interstitial radiation therapy) uses small radioactive pellets, or “seeds,” each about the size of a grain of rice. These pellets are placed directly into your prostate.

  • Brachytherapy alone is generally used only in men with early-stage prostate cancer that is relatively slow growing (low-grade).
  • Brachytherapy combined with external radiation is sometimes an option for men who have a higher risk of the cancer growing outside the prostate.

The use of brachytherapy is also limited by some other factors. For men who have had a transurethral resection of the prostate (TURP) or for those who already have urinary problems, the risk of urinary side effects may be higher. Brachytherapy might not work as well in men with large prostate glands because it might not be possible to place the seeds into all of the correct locations. One way to get around this may be to get a few months of hormone therapy beforehand to shrink the prostate.

Imaging tests such as transrectal ultrasound, CT scans, or MRI are used to help guide the placement of the radioactive pellets. Special computer programs calculate the exact dose of radiation needed.

brachytherapy for prostate cancer

Types of prostate cancer brachytherapy

There are 2 types of prostate brachytherapy. Both are done in an operating room. You will get either spinal anesthesia (where the lower half of your body is numbed) or general anesthesia (where you are asleep), and you might need to stay in the hospital overnight.

Permanent (low dose rate, or LDR) brachytherapy

In this approach, pellets (seeds) of radioactive material (such as iodine-125 or palladium-103) are placed inside thin needles, which are inserted through the skin in the area between the scrotum and anus and into the prostate. The pellets are left in place as the needles are removed and give off low doses of radiation for weeks or months. Radiation from the seeds travels a very short distance, so the seeds can give off a large amount of radiation in a very small area. This limits the amount of damage to nearby healthy tissues.

Usually, around 100 seeds are placed, but this depends on the size of the prostate. Because the seeds are so small, they seldom cause discomfort, and are simply left in place after their radioactive material is used up.

You may also get external beam radiation along with brachytherapy, especially if there is a higher risk that your cancer has spread outside the prostate (for example, if you have a higher Gleason score).

Temporary (high dose rate, or HDR) brachytherapy

This technique is done less often. It uses higher doses of radiation that are left in place for a short time. Hollow needles are placed through the skin between the scrotum and anus and into the prostate. Soft nylon tubes (catheters) are placed in these needles. The needles are then removed but the catheters stay in place. Radioactive iridium-192 or cesium-137 is then placed in the catheters, usually for 5 to 15 minutes. Generally, about 3 brief treatments are given over 2 days, and the radioactive substance is removed each time. After the last treatment the catheters are removed. For about a week after treatment, you may have some pain or swelling in the area between your scrotum and rectum, and your urine may be reddish-brown.

These treatments are usually combined with external beam radiation given at a lower dose than if used by itself. The advantage of this approach is that most of the radiation is concentrated in the prostate itself, sparing nearby normal tissues.

Brachytherapy prostate cancer side effects

Radiation precautions: If you get permanent (low dose rate) brachytherapy, the seeds will give off small amounts of radiation for several weeks or months. Even though the radiation doesn’t travel far, your doctor may advise you to stay away from pregnant women and small children during this time. If you plan on traveling, you might want to get a doctor’s note regarding your treatment, as low levels of radiation can sometimes be picked up by detection systems at airports.

There’s also a small risk that some of the seeds might move (migrate). You may be asked to strain your urine for the first week or so to catch any seeds that might come out. You may be asked to take other precautions as well, such as wearing a condom during sex. Be sure to follow any instructions your doctor gives you. There have also been reports of the seeds moving through the bloodstream to other parts of the body, such as the lungs. As far as doctors can tell, this is uncommon and doesn’t seem to cause any ill effects.

These precautions aren’t needed after HDR brachytherapy, because the radiation doesn’t stay in the body after treatment.

Bowel problems: Brachytherapy can sometimes irritate the rectum and cause a condition called radiation proctitis. Bowel problems such as rectal pain, burning, and/or diarrhea (sometimes with bleeding) can occur, but serious long-term problems are uncommon.

Urinary problems: Severe urinary incontinence (trouble controlling urine) is not a common side effect. But some men have problems with frequent urination or other symptoms due to irritation of the urethra, the tube that drains urine from the bladder. This tends to be worse in the weeks after treatment and gets better over time. Rarely, the urethra may actually close off (known as a urethral stricture) and need to be opened with a catheter or surgery.

Erection problems: Some studies have found rates of erection problems to be lower after brachytherapy, but other studies have found that the rates were no lower than with external beam radiation or surgery. The younger you are and the better your sexual function before treatment, the more likely you will be to regain function after treatment.

Erection problems can often be helped by treatments such as those listed in the surgery section, including medicines.

read more
1 2 3 12
Page 1 of 12
Health Jade