close

Musculoskeletal System

BonesConditions & DiseasesMusculoskeletal System

Aneurysmal bone cyst

Aneurysmal bone cyst

Aneurysmal bone cyst

Aneurysmal bone cyst is a benign, blood-filled lesion in the bone that tends to expand or grow and mostly diagnosed in children and adolescents. While it is referred to as a cyst, it is a true benign bone tumor surrounded by a thin wall of bone. Aneurysmal bone cyst is a type of osseous lesion characterized by a benign pseudocyst with fibrous connective tissue stroma and large spaces filled with blood and no endothelial lining 1. The World Health Organization (WHO) defines aneurysmal bone cyst as a benign tumorlike lesion that is described as “an expanding osteolytic lesion consisting of blood-filled spaces of variable size separated by connective tissue septa containing trabeculae or osteoid tissue and osteoclast giant cells” 2. Even though aneurysmal bone cysts are not cancerous, aneurysmal bone cysts tend to grow quickly, and treatment is recommended. If an aneurysmal bone cyst is not treated it can cause pain, fractures, disrupt growth and cause neurological symptoms.

Aneurysmal bone cysts can occur in any bones, but they are more common in the long bones, most commonly found around the knee, pelvis or spine with prevalence of only 2% in the jaws 3.

Aneurysmal bone cysts are typically eccentrically located in the metaphysis of long bones, adjacent to an unfused growth plate. Although they have been described in most bones, the most common locations are 4:

  • Long bones: 50-60%, typically the metaphysis
    • lower limb: 40%
      • tibia and fibula: 24%, especially proximal tibia
      • femur: 13%, especially proximally
    • upper limb: 20%
  • Spine and sacrum: 20-30%
    • especially posterior elements, with extension into the vertebral body in 40% of cases 5
  • Craniofacial: jaw, basisphenoid, and paranasal sinuses
  • Epiphysis, epiphyseal equivalent, or apophysis: rare but important

Almost all aneurysmal bone cysts of the spine involve the posterior elements, and a high incidence of neurologic symptoms is observed, as well as more local aggressive behavior.

The pelvis accounts for approximately 50% of lesions occurring in the flat bones 6. Secondary lesions tend to have a predilection for the areas of the body in which the primary lesion typically arises.

Although the aneurysmal bone cyst can appear in persons of any age, it is generally a disease of the young (albeit a rare one in the very young). About 50-80% of aneurysmal bone cysts occur before age 20 7, with 70-86% occurring in patients between 10 and 20 years of age 3. The mean patient age at onset is 13-17.7 years and 13 years the median age of patients reported by many studies 8. Most studies have also found aneurysmal bone cysts occur slightly more frequently in females than males.

Aneurysmal bone cysts are generally considered rare, accounting for only 1-6% of all primary bony tumors 9. A group from Austria reported an annual incidence of 0.14 aneurysmal bone cysts per 100,000 people 10; however, the true incidence is difficult to calculate because of the existence of spontaneous regression and clinically silent cases.

A biopsy-proven incidence study from the Netherlands showed that aneurysmal bone cysts were the second most common tumor or tumorlike lesion found in children 11.

Aneurysmal bone cysts may occur spontaneously, or be a secondary reaction to another bony growth elsewhere in the body. Research has revealed a high incidence of accompanying tumors specifically chondroblastoma and giant cell tumors in 23 to 32 percent of patients with an aneurysmal bone cyst.

There is no consensus in the literature regarding the best therapeutic method for treating aneurysmal bone cysts. The most commonly used treatment methods are resection, curettage, embolization and intracystic injections. The choice of treatment method varies greatly, especially in children 12. But, despite of the method chosen, the goal is always the success of the treatment, which consists of complete reossification, with new bone formation with normal volume and mineralization characteristics 13 and without recurrence of the cystic lesion 14. There is a 10-15 percent recurrence rate with treatment 15.

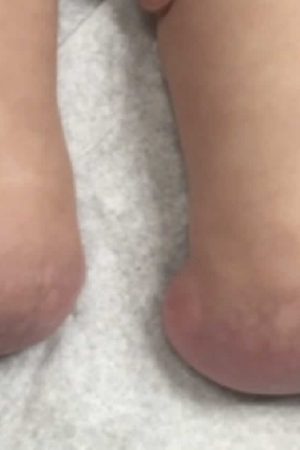
Figure 1. Aneurysmal bone cyst calcaneus

Aneurysmal bone cyst calcaneus

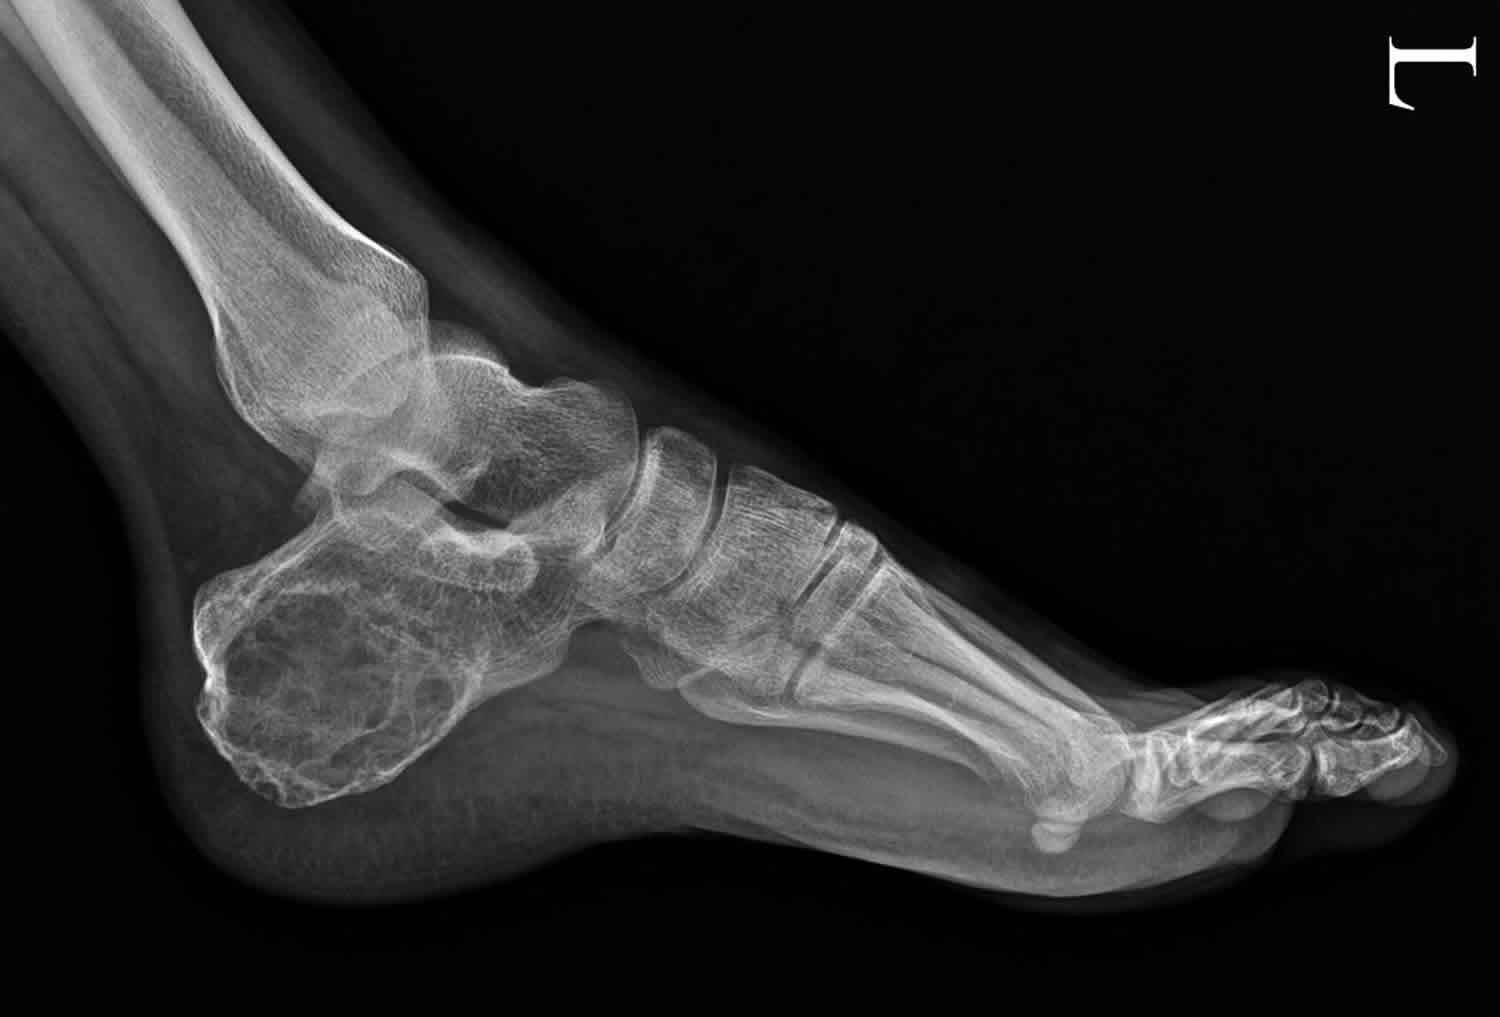
Figure 2. Aneurysmal bone cyst jaw

aneurysmal bone cyst mandible

[Source 16 ]

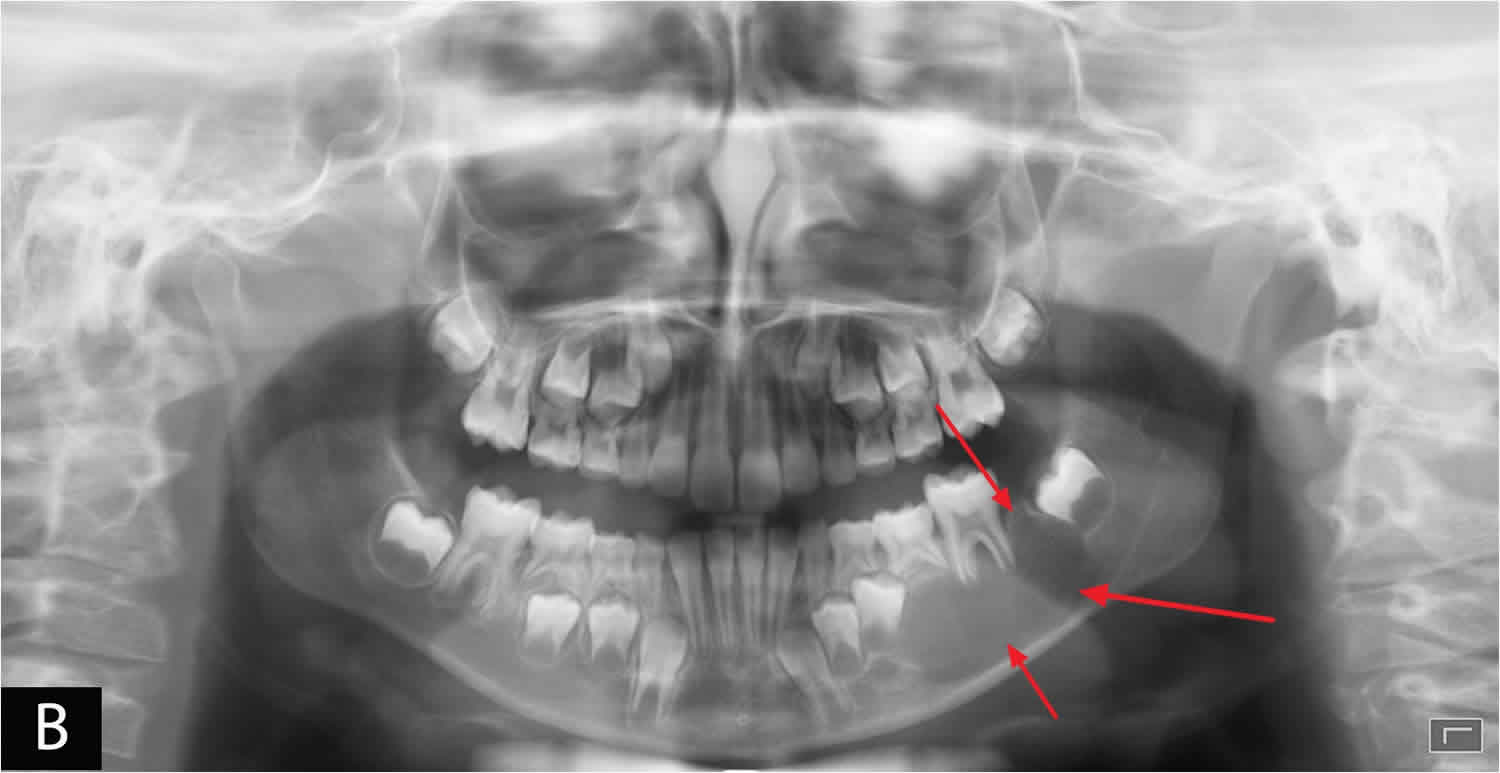
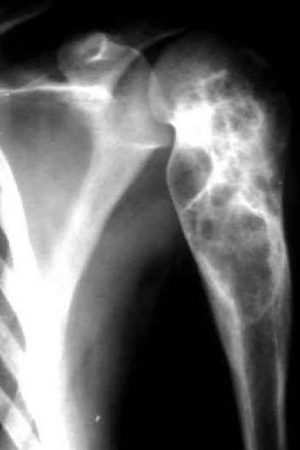
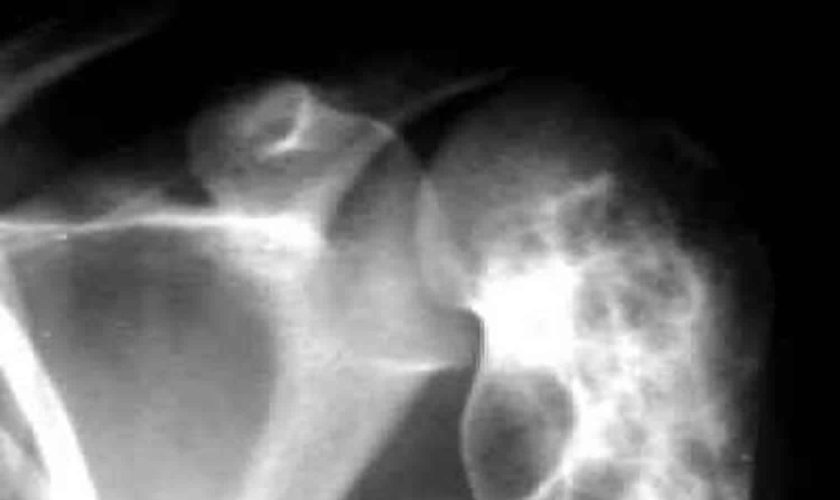
Figure 3. Aneurysmal bone cyst of the clavicle

aneurysmal bone cyst collarbone

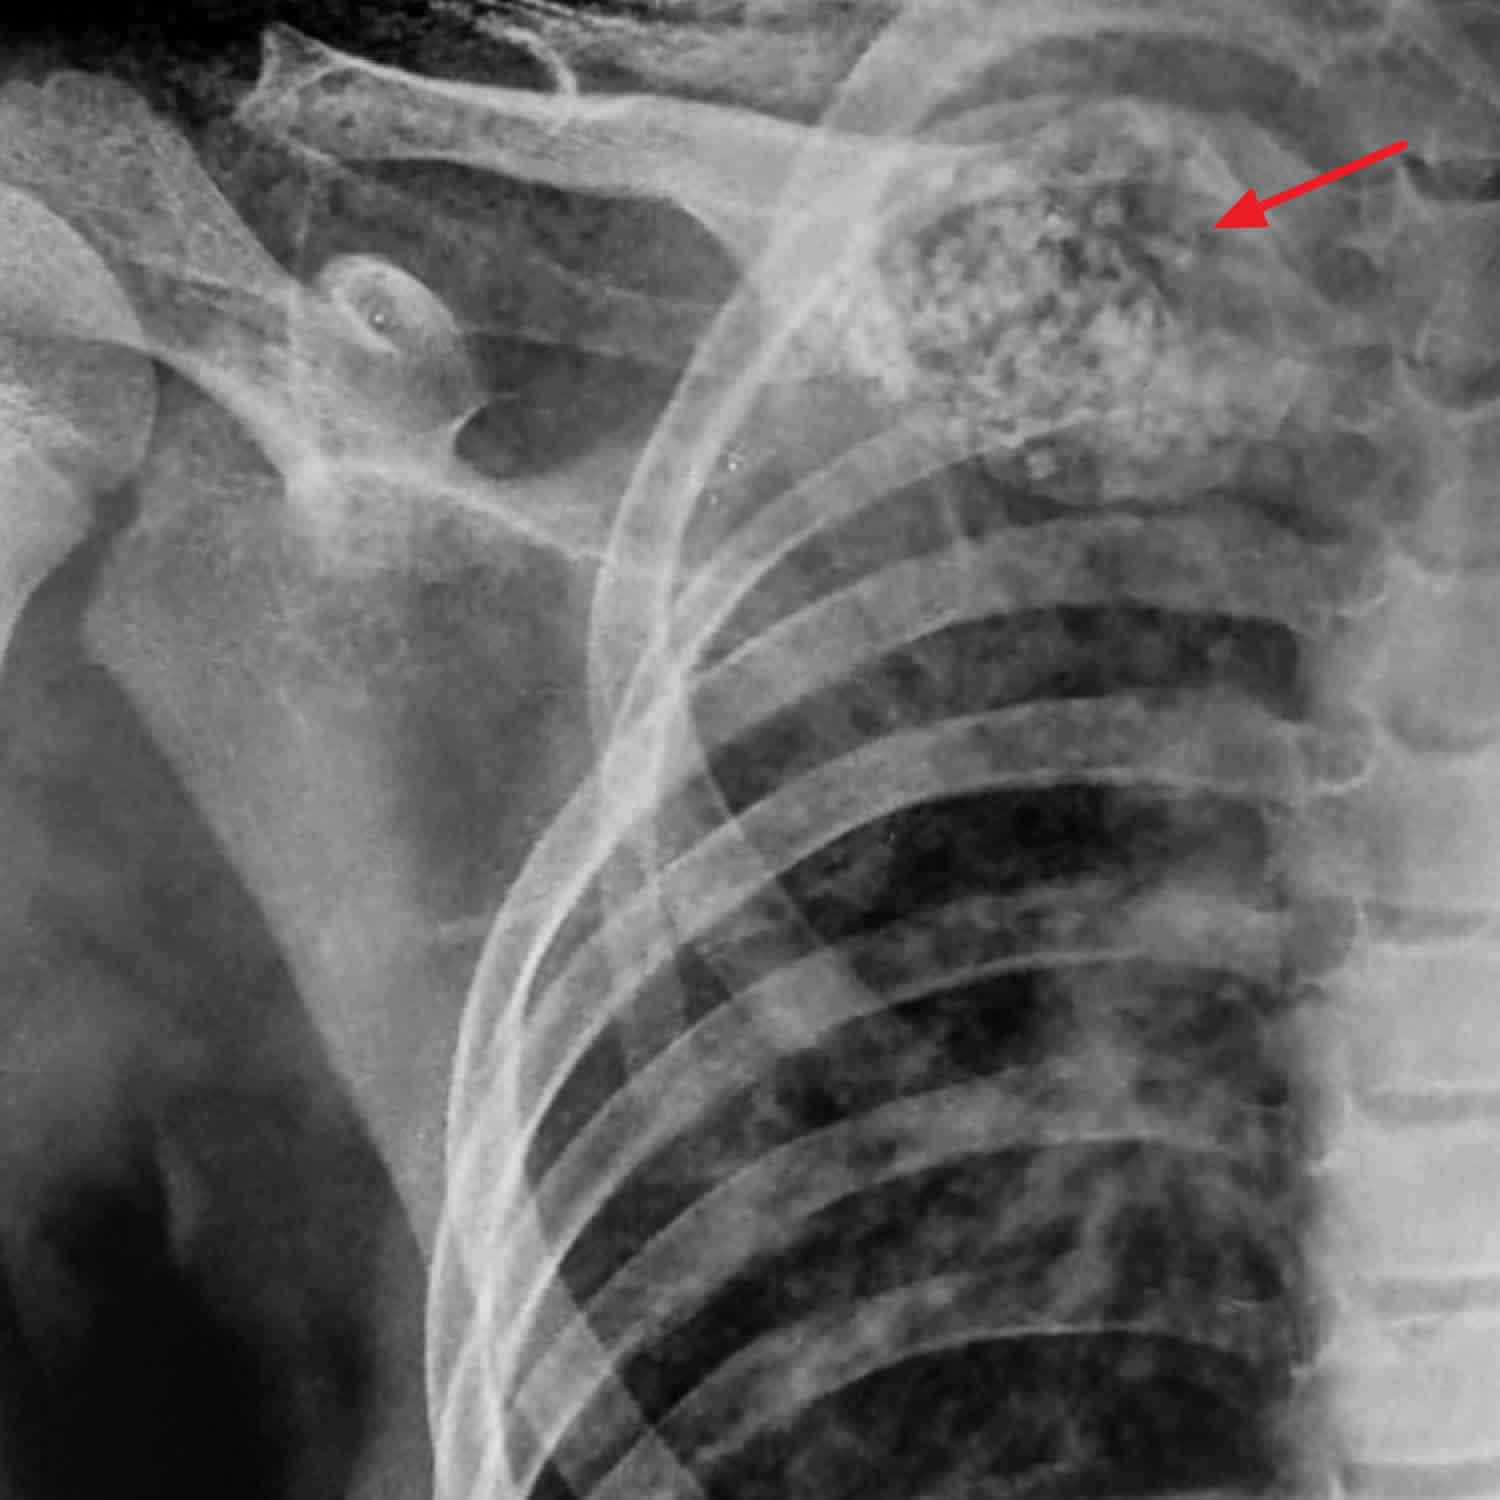
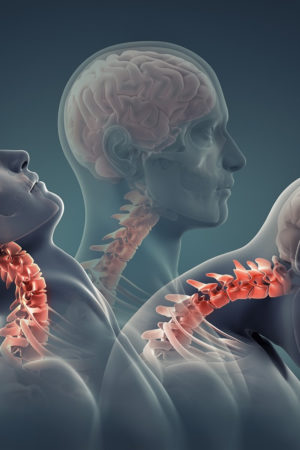
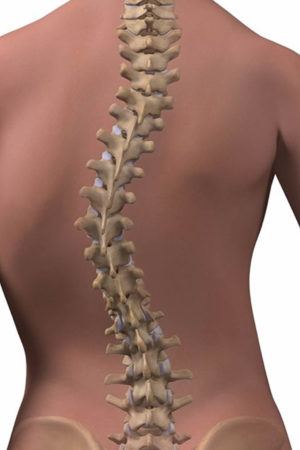
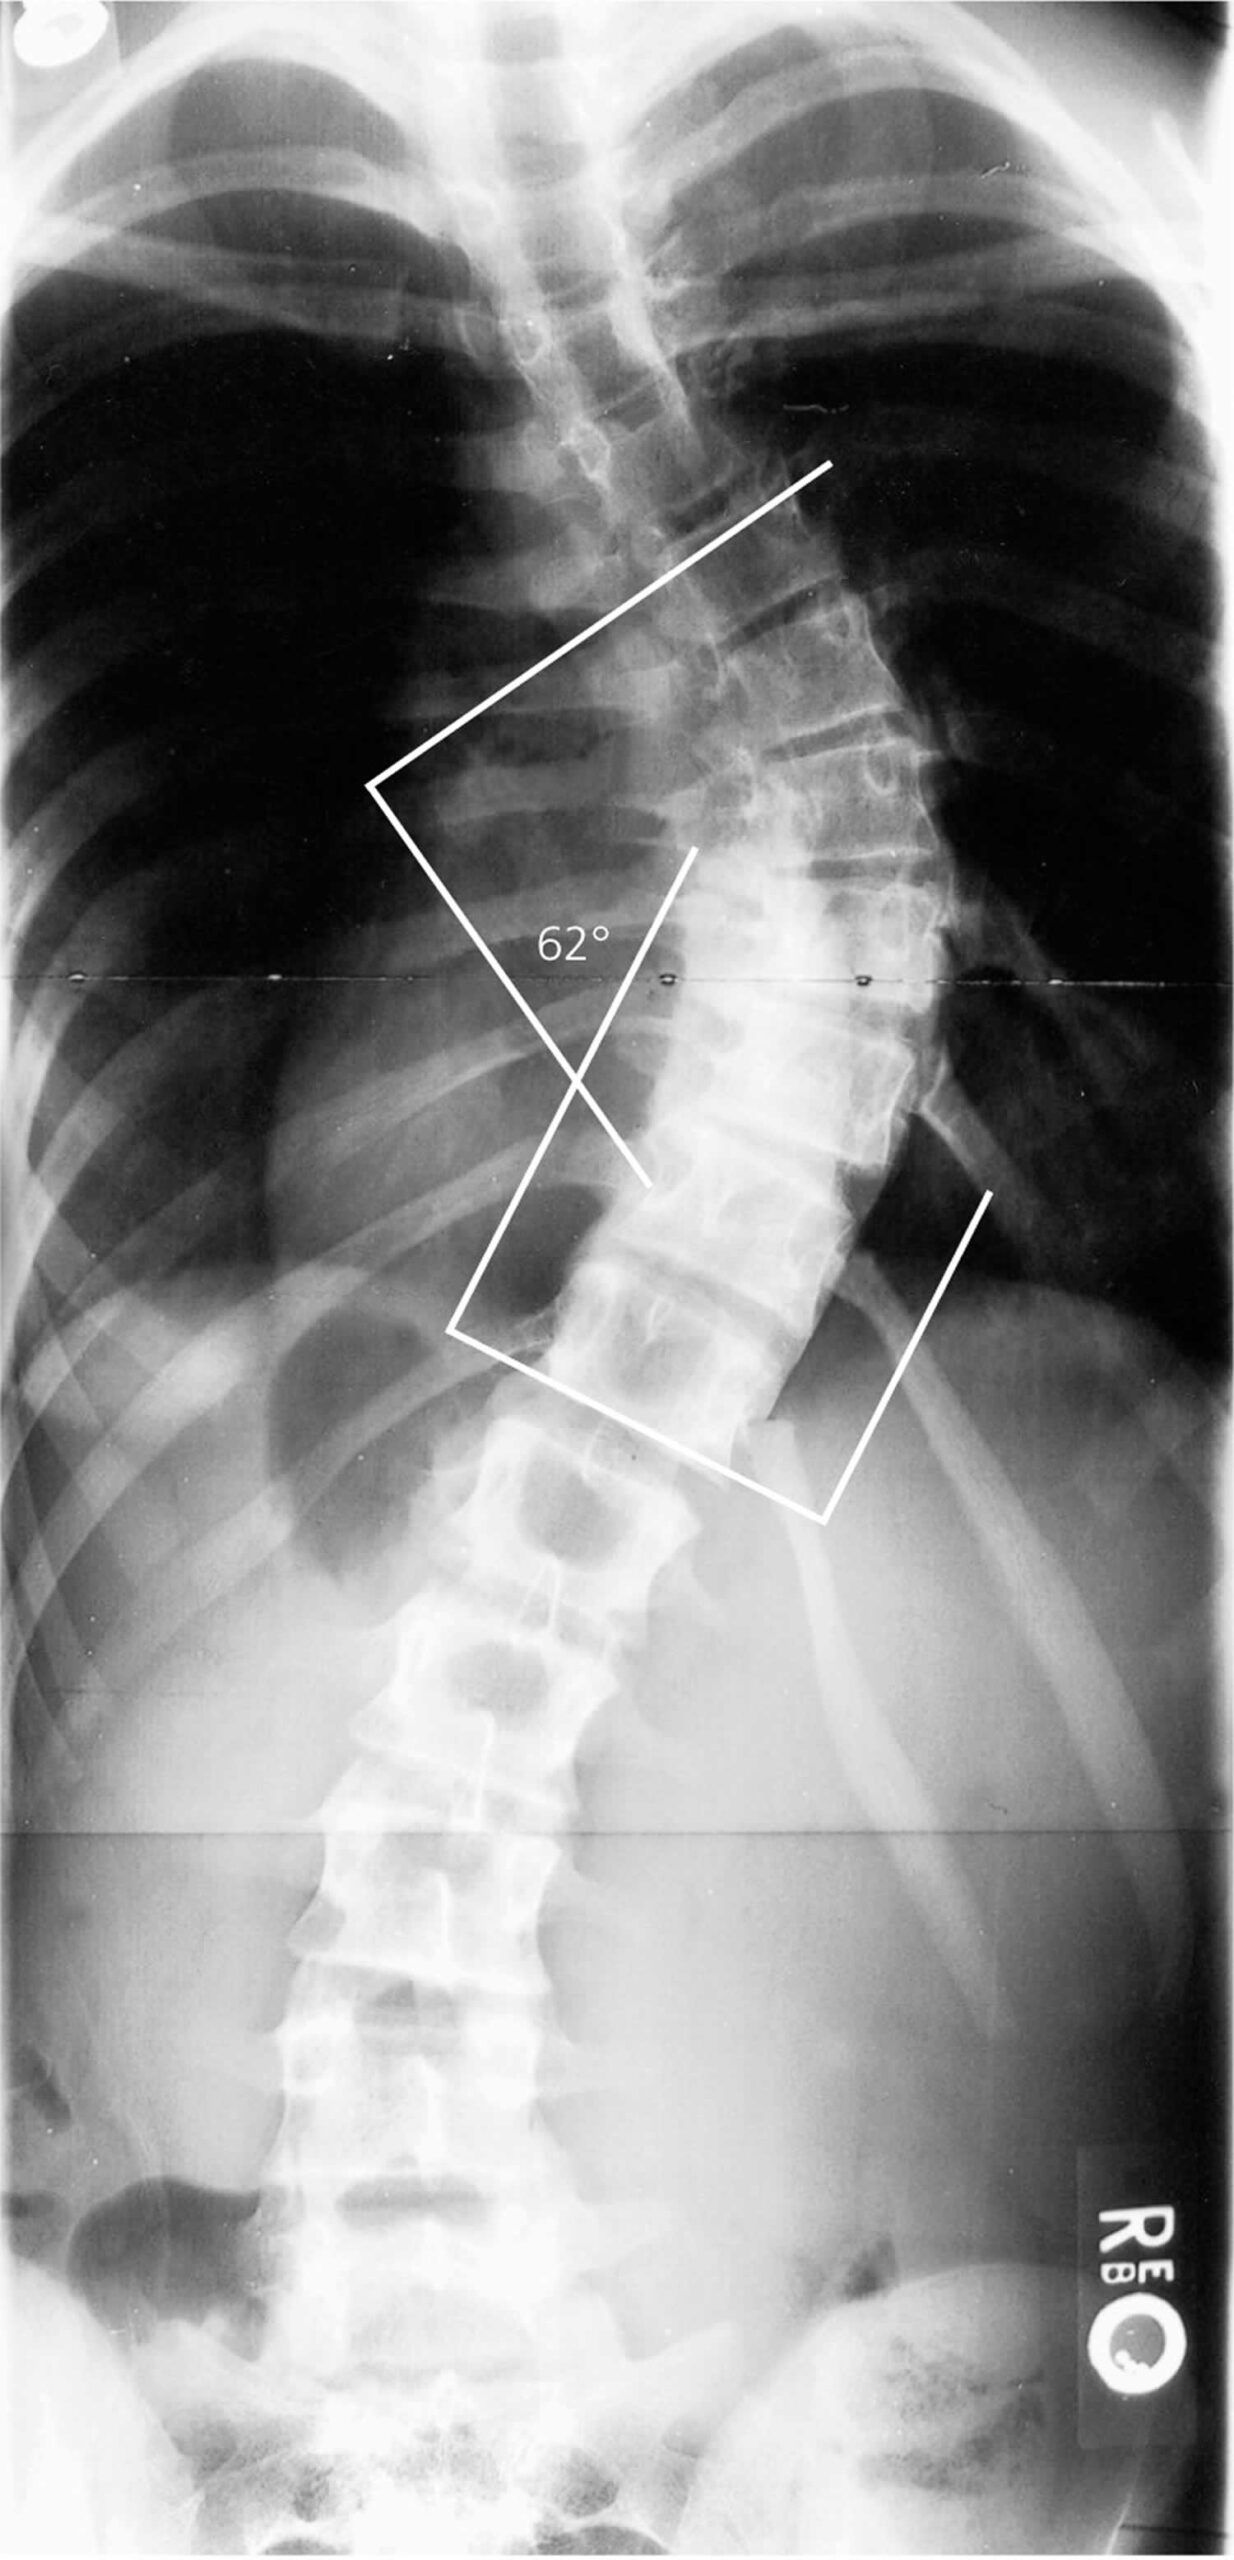
Figure 4. Aneurysmal bone cyst spine

Aneurysmal bone cyst spine

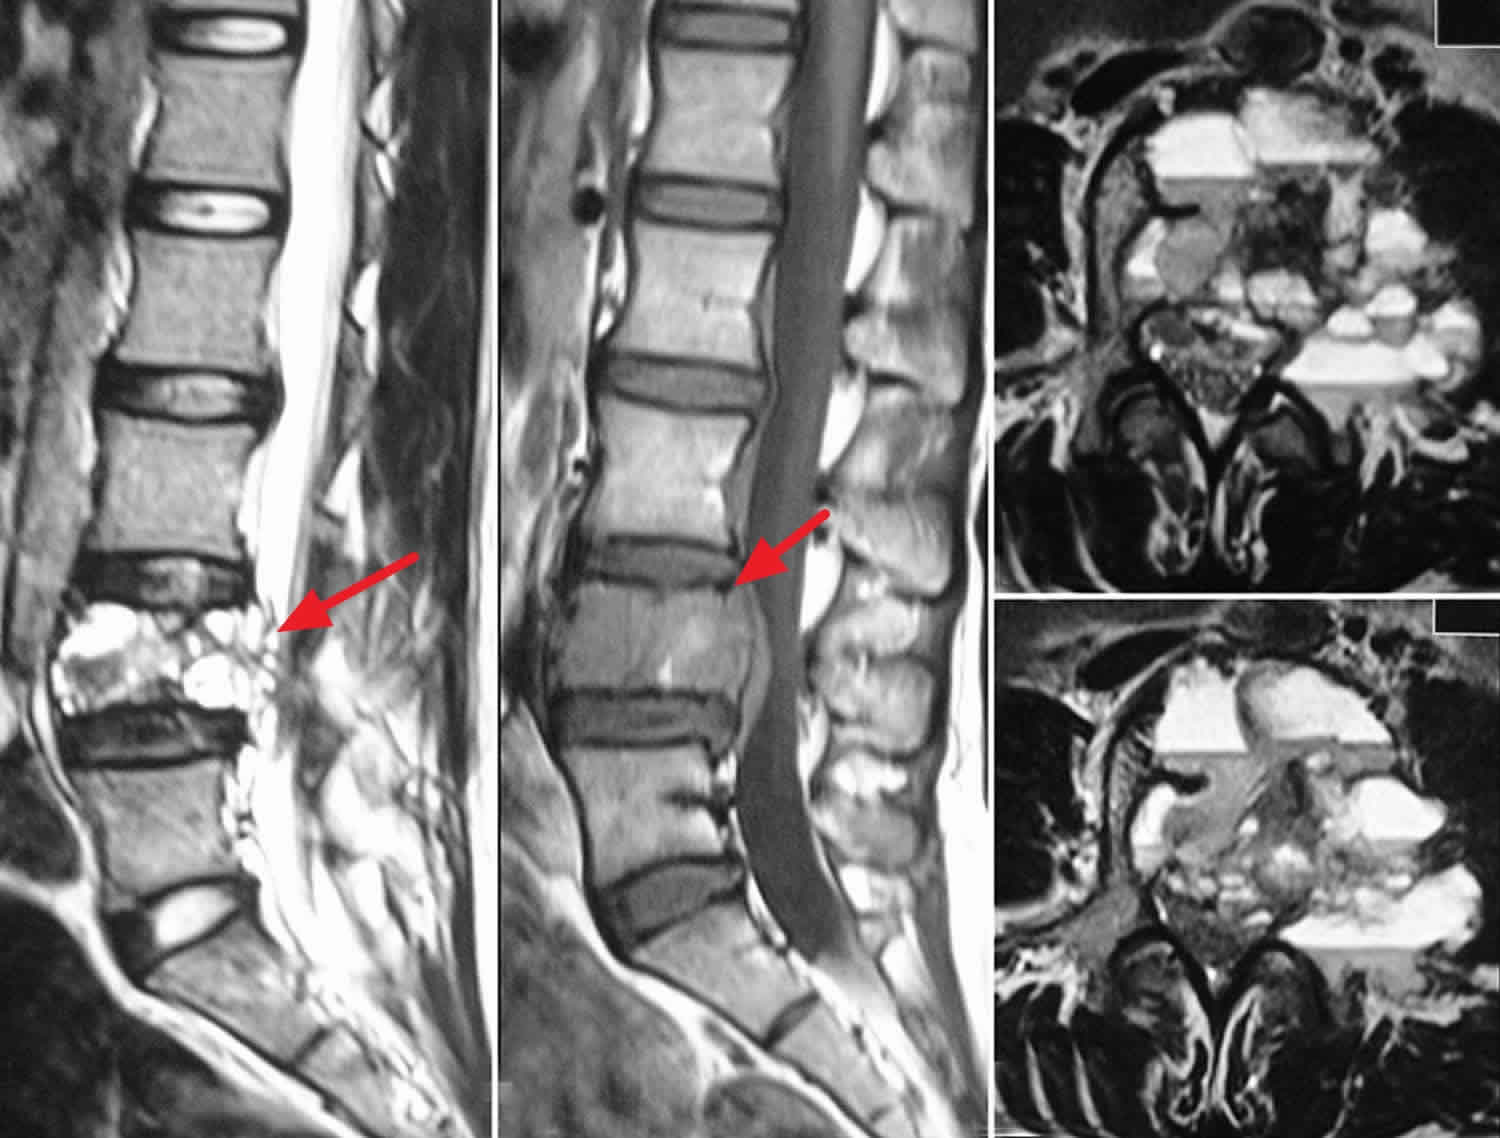
Footnote: MRI scan of the lumbar spine sagittal T1 (a) and T2 (b) Weighted images and axial sections; (c and d) of T2 weighted images showing characteristic findings of aneurysmal bone cyst with multiple fluid-fluid levels.

[Source 17 ]

Aneurysmal bone cyst causes

While the cause of aneurysmal bone cysts is currently unknown. Most investigators believe that aneurysmal bone cysts are the result of a vascular malformation within the bone; however, the ultimate cause of the malformation is a topic of controversy. Different theories about several vascular malformations exist; these include arteriovenous fistulas and venous blockage. The vascular lesions then cause increased pressure, expansion, erosion, and resorption of the surrounding bone. The malformation is also believed to cause local hemorrhage that initiates the formation of reactive osteolytic tissue. Findings from a study in which manometric pressures within the aneurysmal bone cysts were measured support the theory of altered hemodynamics.

Three commonly proposed theories are as follows:

  • Aneurysmal bone cysts may be caused by a reaction secondary to another bony lesion – This theory has been proposed because of the high incidence of accompanying tumors in 23-32% of aneurysmal bone cysts; although giant cell tumors of bone are most commonly present, many other benign and malignant tumors are found, including fibrous dysplasia, osteoblastoma, chondromyxoid fibroma, nonossifying fibroma, chondroblastoma, osteosarcoma, chondrosarcoma, unicameral or solitary bone cyst, hemangioendothelioma, and metastatic carcinoma; aneurysmal bone cysts in the presence of another lesion are called secondary aneurysmal bone cysts, and treatment of these aneurysmal bone cysts is based on what is appropriate for the underlying tumor
  • Aneurysmal bone cysts may arise de novo; those that arise without evidence of another lesion are classified as primary aneurysmal bone cysts
  • Aneurysmal bone cysts may arise in an area of previous trauma

Recently aneurysmal bone cysts have been linked to a mutation of the ubiquitin specific peptidase 6 (USP6) gene on chromosome 17. Researchers are currently working to better understand the genetic mutation, learn when it develops, and discover how it may affect a child’s development.

A certain percentage of primary aneurysmal bone cysts may be truly neoplastic—as opposed to vascular, developmental, or reactive—phenomena. It has been shown that as many as 69% of primary aneurysmal bone cysts demonstrate a characteristic clonal t(16;17) genetic translocation 18 leading to upregulation of the TRE17/USP6 oncogene 19, whereas no secondary aneurysmal bone cysts demonstrate this cytogenetic aberration.

Most primary aneurysmal bone cysts demonstrate a t(16;17)(q22;p13) fusion of the TRE17/CDH11-USP6 oncogene. This fusion leads to increased cellular cadherin-11 activity that seems to arrest osteoblastic maturation in a more primitive state 20. This process may be the neoplastic driving force behind primary aneurysmal bone cysts as opposed to secondary aneurysmal bone cysts, which seem to occur reactively as a result of another underlying disease process.

Aneurysmal bone cysts consist of blood-filled spaces of variable size that are separated by connective tissue containing trabeculae of bone or osteoid tissue and osteoclast giant cells. They are not lined by endothelium. A fine needle aspiration cytology is usually nondiagnostic, often dominated by fresh blood 21.

Although often primary, up to a third of aneurysmal bone cysts are secondary to an underlying lesion (e.g. fibrous dysplasia, osteosarcoma, giant cell tumor, chondromyxoid fibroma6, non-ossifying fibroma, chondroblastoma) 22, 23.

A variant of aneurysmal bone cysts is the giant cell reparative granuloma which is usually seen in the tubular bones of the hands and feet as well as in the craniofacial skeleton. Occasionally they are also seen in appendicular long bones where they are known as solid aneurysmal bone cysts. Histologically these two entities are identical 24.

Aneurysmal bone cyst symptoms

Patients with aneurysmal bone cyst may present with pain, which may be of insidious onset or abrupt due to pathological fracture, with a palpable lump or with restricted movement or a combination of these symptoms in the affected area. The symptoms are usually present for several weeks to months before the diagnosis is made, and the patient may also have a history of a rapidly enlarging mass. Neurologic symptoms associated with aneurysmal bone cysts may develop secondary to pressure or tenting of the nerve over the lesion, typically in the spine.

Pathologic fracture occurs in about 8% of aneurysmal bone cysts, but the incidence may be as high as 21% in aneurysmal bone cysts that have spinal involvement.

The symptoms of an aneurysmal bone cyst can include:

  • Pain
  • Swelling
  • Stiffness
  • Deformity in the area of the growth
  • The feeling of warmth over the affected area
  • Decreased range of motion, weakness or stiffness
  • Reactive torticollis
  • Occasionally, bruit over the affected area
  • Warmth over the affected area

Aneurysmal bone cyst diagnosis

Diagnostic tests to diagnose aneurysmal bone cysts, including:

  • X-rays, which produce images of bones.
  • Magnetic resonance imaging (MRI), which uses a combination of large magnets, radiofrequencies and a computer to produce detailed images of organs, soft tissues, muscles, ligaments and other structures within the body. Your child is exposed to no radiation during an MRI.
  • Computed tomography (CT) scan, which uses a combination of X-rays and computer technology to examine bones and produces cross-sectional images (“slices”) of the body.
  • EOS imaging, an imaging technology that creates 3-dimensional models from two flat images. Unlike a CT scan, EOS images are taken while the child is in an upright or standing position, enabling improved diagnosis due to weight-bearing positioning.
  • Angiography, a radiograph-type X-ray test which reveals the inside of blood vessels and organs.
  • Needle biopsy, which is a procedure where a doctor places a small needle through the skin and into the lesion to withdraw a small sample of the abnormal tissue. The tissue is analyzed to confirm any findings.

In addition to diagnosing the specific type of growth your child may have, these tests will also help determine the size and location of the tumor. All of this information is crucial in determining the best treatment options for your child.

Aneurysmal bone cyst staging

The staging of benign musculoskeletal neoplasms was described by Enneking in 1986 25, who classified benign lesions into the following three broad categories:

  • Stage 1: Latent (inactive)
  • Stage 2: Active
  • Stage 3: Aggressive

This system has been adopted by the Musculoskeletal Tumor Society (MSTS). Part of the Enneking classification contains the Lodwick radiographic grading system (see below) 26.

Lodwick radiographic grading with bone destruction

Lodwick grade 1A is characterized as follows 27:

  • Mandatory geographic destruction
  • Characteristic regular, lobulated, or multicentric edge
  • No or partial cortex penetration
  • Mandatory sclerotic rim
  • Expanded shell optional, 1 cm or less

Lodwick grade 1B is characterized as follows:

  • Mandatory geographic destruction
  • Characteristic regular, lobulated, multicentric, or ragged or poorly defined edge
  • No or partial cortex penetration
  • Optional sclerotic rim
  • If sclerotic rim present, expanded shell must be larger than 1 cm

Lodwick grade 1C is characterized as follows:

  • Mandatory geographic destruction
  • Edge characteristic is regular, lobulated, multicentric, ragged or poorly defined, or moth-eaten, 1 cm or smaller
  • Mandatory total penetration of the cortex
  • Optional sclerotic rim
  • Optional expanded shell

Lodwick grade 2 is characterized as follows:

  • Moth-eaten or geographic destruction – If geographic destruction, mandatory moth-eaten edge is larger than 1 cm
  • By definition, total penetration of cortex
  • Optional sclerotic rim, but unlikely
  • Optional expanded shell, but unlikely

Lodwick grade 3 is characterized as follows:

  • Mandatory permeated destruction
  • Any edge
  • By definition, total penetration of cortex
  • Optional sclerotic rim, but unlikely

Latent or inactive musculoskeletal neoplasms

Latent (inactive) musculoskeletal neoplasms have the following characteristics:

  • Asymptomatic
  • Usually incidental findings
  • Rare to have a pathologic fracture or other dysfunction
  • May grow slowly, but almost always reach a steady state where they no longer grow
  • Remain intracompartmental
  • Do not deform the compartment
  • If palpable, are small, movable, and nontender
  • Radiography – Well marginated, with a mature shell of cortical-like reactive bone without deformation or expansion of the encasing bone; Lodwick 1A
  • Isotope scan – Little or no increased uptake
  • Angiography – No significant neoangiogenesis
  • CT – Homogeneous density, good margination, no cortical broaching or cross-facial extension
  • Histology – Low cell-to-matrix ratio; mature, well-differentiated matrices; benign cytologic characteristics; encapsulation by mature fibrous tissue or cortical bone; little or no reactive mesenchymal proliferation, inflammatory infiltrate, or neoangiogenesis about the lesions

Active musculoskeletal neoplasms

Active musculoskeletal neoplasms have the following characteristics:

  • Mildly symptomatic
  • Discovered because of patient discomfort or the presence of a pathologic fracture or mechanical dysfunction
  • Grow steadily, continue to enlarge during observation
  • Appear responsive to contact inhibition but not at normal levels
  • Can expand by deformation of the overlying cortical bone, articular cartilage, or fascial septa
  • Remain encapsulated
  • Only a thin layer of filmy areolar tissue separates the reactive zone between the lesions and the surrounding normal tissue.
  • If palpable, are small with moderate tenderness and movable (The increase in size can be felt on serial examinations.)
  • Radiography – Well-defined, yet irregular margination; a mature cancellous ring margin, rather than a cortical shell; irregular or corrugated inner aspect, resulting in a septated appearance; expansion, bulging, deformation, or the combination of overlying cortex/reactive bone is frequently observed; Lodwick 1B
  • Isotope scan – Increased isotope uptake only around the limits of the defect
  • Angiography – Often, a reactive angiogenesis is observed around the lesion, almost never within.
  • CT – Homogeneous density; irregular but intact reactive bone, expansion of the overlying cortex, and intracompartmental containment by bone or fascia
  • Histology – Relatively balanced cell-to-matrix ratio; well-defined matrices; benign cytologic characteristics; intact capsule of mature fibrous tissue and/or cancellous bone; narrow zone of mesenchymal, inflammatory, and vascular reactive tissue between the capsule and the surrounding normal tissue; resorption of the preexisting bone by osteoclasts, rather than by neoplastic cells, as the mechanism of expansion; may have areas of intermittent resorption that produce an irregular, serrated, and sometimes corrugated interface between the capsule and the adjacent reactive bone

Aggressive musculoskeletal neoplasms

Aggressive musculoskeletal neoplasms have the following characteristics:

  • Despite being benign, may act more like a low-grade malignancy
  • Often symptomatic
  • Discovered because of patient discomfort, a growing mass, or a pathologic fracture
  • If palpable, are often large and tender; may feel rapid enlargement on serial physical examinations; may feel more fixed
  • May have an inflammatory appearance
  • Little contact inhibition
  • Penetrate or permeate the natural barriers to tumor growth, which are cortical bone, fascial septa, and articular cartilage
  • Penetrate the capsule with fingerlike projections directly into the surrounding zone
  • Destroy or resorb the surrounding bone or fascia and permeate into adjacent tissues or compartments rather than expanding by concomitant endosteal resorption and subperiosteal apposition
  • In unrestrained areas, may expand rapidly and may be preceded by a pseudocapsule
  • Radiography – Ragged, permeative interface with adjacent bone; incomplete attempts at containment by reactive bone; cortical destruction; endosteal buttresses; periosteal Codman triangles; rapid soft-tissue expansion; Lodwick 1C
  • Isotope scan – Increased uptake in the early vascular phase and the late bone phase, often beyond radiographic limits
  • Angiography – Distinct reactive zone of neovasculature on the early arterial phase and an intralesional hypervascular blush on the late venous phase
  • CT – Nonhomogeneous, mottled, attenuating areas with defects in attempts at reactive containment; early extracompartmental extension from bone; indistinct margins in soft tissues; possible neurovascular bundle involvement
  • Histology – High cell-to-matrix ratio; clearly differentiated matrices of varying maturity; predominantly benign cytologic characteristics without anaplasia or pleomorphism, but with frequent hyperchromatic nuclei; mitosis occasionally encountered; possible vascular invasion; extensions are usually still continuous with the main mass but may have some satellite lesions; thick, succulent zone of reactive tissue between the penetrated capsule and the more peripheral normal tissue (zone or pseudocapsule encircles but does not inhibit growth of the aggressive tumor; however, it does inhibit tumor nodules from extending directly into normal tissue); destruction of surrounding bone via reactive osteoclasts, not by tumor cells; tumor fingers that may grow into the reactive bone

Aneurysmal bone cyst treatment

There are many treatment options available for bone and soft tissue tumors, and some children will need a combination of these therapies. Orthopaedic, oncology and other specialists collaborate to provide your child with individualized care and the best possible outcomes. Your child’s clinical team will recommend the best treatment for your child’s individual situation.

Treatment for aneurysmal bone cysts may include:

  • Intralesional curettage, which involves scraping out the bone to completely remove the tumor and all cyst lining
  • Intraoperative adjuvants — such as cryotherapy (liquid nitrogen), phenol (a chemical) or cauterization (burning the tumor bed) — which are used to remove microscopic tumor cells
  • Bone grafting, a surgical procedure to replace missing bone with artificial graft material or cadaver bone

Depending on the size and location of aneurysmal bone cyst removed, your child may be able to return home that day or may spend one night in the hospital.

Aneurysmal bone cysts generally are treated surgically usually with curettage and resection 28. The extent of the treatment depends on the localization of the cyst, its size, its clinical characteristics and the age of the patient 29. With the vascular type, bleeding may be intense 3, especially when the lesion is reached. Accordingly, preoperative embolization is commonly performed to minimize excessive bleeding during the curettage procedure.

Some anatomic locations may be difficult to access surgically. If this situation is encountered, other methods of treatment, such as intralesional injection, selective serial arterial embolization and sclerotherapy performed by an interventional radiologist, may be successful 12. Percutaneous embolization, or sclerotherapy, has been considered a treatment option for aneurysmal bone cysts as reported by some authors 12 primarily because, if performed by an experienced professional, it is an easy, safe, cost-effective and minimally invasive procedure compared to surgery. In addition, a success rate of over 90% with the use of sclerotherapy for treating aneurysmal bone cysts is reported 30.

It is possible to find different fibrosing agents in the literature, including Ethibloc®, Absolute Alcohol and Histoacryl® 14. However, the most commonly used agents are Ethibloc and Absolute Alcohol.

Histoacryl® consists of an acrylic resine (n-butyl-2-cyanoacrylate) that acts as a tissue glue, and in contact with blood, it is quickly polymerized, preventing bleeding 31. In order to prevent n-butyl-2-cyanoacrylate solidification from occurring too fast, mixing with lipiodol is required 31. After injection, the cystic lesion is filled with this solidifying mixture that is visualized as an opacified image 32. The Histoacryl® will then be reabsorbed, and the reossification process will take place in the region of the lesion 32. Many authors had demonstrated new bone formation occurring in different areas of the human body when sclerosis of bone lesions are performed with fibrosing agents 33.

The first use of n-butyl-2-cyanoacrylate in sclerotherapy was reported by Soehendra et al. in 1986 34, who used this tissue adhesive agent to treat bleeding gastric varices, reporting the success of the therapy in 3 patients. Since then, many authors have begun to use this fibrosing agent in sclerotherapy.

However, since aneurysmal bone cysts are most frequently found in the long bones, the therapeutic procedures most commonly reported also involve these skeletal regions. According to the literature, percutaneous embolization with Histoacryl® is generally used to treat aneurysmal bone cysts in long bones 14. In addition, this fibrosing agent is the only recommended to treat aneurysmal bone cyst in the skull and spine, due to the considerable inflammatory reaction caused by Ethibloc 14. Rossi et al. 35 reported 36 aneurysmal bone cysts (4 in the thoracic cage, 6 in the spine, 9 in the long bones and 17 in the pelvis) treated with n-butyl-2-cyanoacrylate injection. The authors reported a success rate of 94%, and in most lesions (61%) only one embolization was required. In a total of 55 procedures performed, complications were observed only in 3 of them (5%) 35.

The literature also reports the use of Histoacryl® in other facial lesions. Alaraj et al. 36 reported a series of 20 patients with cranial, facial, and neck tumors treated with n-butyl-2-cyanoacrylate embolization, either preoperatively or palliatively in cases of uncontrollable bleeding.

In the future, advances in osteoinductive materials (eg, genetically engineered bone morphogenic protein) may offer a less invasive treatment of aneurysmal bone cyst.

Impending pathologic fracture, especially a fracture of the hip, is a challenging problem and an indication for intervention, which often includes curettage, adjuvant treatment, and internal fixation.

Rarely, asymptomatic aneurysmal bone cysts may be seen in which there is clinically insignificant destruction of bone. In such cases, close monitoring alone of the lesion may be indicated because of the evidence that some aneurysmal bone cysts spontaneously resolve. When a patient is monitored in this manner, the diagnosis must be certain, and the lesion should not be increasing in size.

Surgical therapy

Extensive preoperative planning should be completed with the use of cross-sectional imaging. Embolization as a treatment or preoperative technique should be considered. When possible, a tourniquet should be used. Thought should also be given to what possible methods and materials may be needed to provide stability after aneurysmal bone cyst excision or resection.

Depending on the size and nature of the lesion, the patient’s fluid volume and blood loss may have to be monitored closely.

Curettage and excision

The unusual stage 1 aneurysmal bone cyst can be treated with intralesional curettage 37; the more common stage 2 aneurysmal bone cyst is treated by intralesional excision. The difference between curettage and excision is that excision involves wide unroofing of the lesion through a cortical window by careful abrasion of all the surfaces with a high-speed burr and, possibly, local adjuvants such as phenol, methylmethacrylate (MMA), or liquid nitrogen. These adjuvants are controversial because firm evidence that they are effective is lacking, and their use entails considerable risk.

En-bloc or wide excision is typically reserved for stage 3 aneurysmal bone cysts that are not amenable to intralesional excision (eg, extensive bony destruction); the recurrence rate after en-bloc excision is about 7%. Reconstructive options after wide excision include structural allografting and reconstruction with either endoprostheses or allograft-prosthetic composites.

In the past, intralesional excision was the mainstay of treatment. The aneurysmal bone cyst is accessed, a window is opened in the bony wall, and then the contents of the aneurysmal bone cyst are removed. Excision of the walls with curettes, rongeurs, or high-speed burrs has been described. The intralesional method leaves more bony structure intact than en-bloc or regional resection.

Intralesional excision may also be used around joints and other vital areas to try to preserve function. The defect may then be filled with bone chips, bone strut, or other supporting material to add strength and to enhance healing of the excised area.

Concerns for local resection include the following:

  • The region must be expendable and not affect function (eg, spinous process, rib, clavicle, or fibula)
  • Some investigators believe that elective arterial embolization should be tried first if it is not contraindicated

Concerns for en-bloc excision of a deep lesion include the following:

  • Resection destabilizes the area; some surgeons use more than one third of the bone width
  • Loss of function (eg, joint loss) is possible
  • Some investigators believe that elective arterial embolization should be tried first if it is not contraindicated

Concerns for intralesional removal include the following:

  • The area may be surgically inaccessible
  • Some investigators believe that elective arterial embolization should be tried first if it is not contraindicated

Adjuvant therapy

The surgeon may also use adjuvant therapy, which extends the area of treatment beyond that which can be physically excised. The use of liquid nitrogen, phenol, argon beam gas plasma photocoagulation, and polymethylmethacrylate (PMMA) may achieve an extended area of treatment.

The adjuvants involve the use of chemical, freezing, or thermal means to cause bone necrosis and microvascular damage to the walls of the physically excised cyst, disrupting the possible etiology. Compared with en-bloc and regional resection, the use of adjuvants leaves more bone intact, and an increased area is treated compared with the area treated with intralesional resection alone.

Liquid nitrogen is the most popular adjuvant, and it is often described in the literature. After the aneurysmal bone cyst is exposed and a window is opened, liquid nitrogen may be applied by pouring it into the cyst through a funnel or by using a machine that is designed to spray the liquid onto the walls of the lesion. The surgeon should be sure to leave the window open, allowing the gas to escape.

A total of two or three cycles of freezing and thawing should be used to obtain maximum bone necrosis. The surrounding tissue, especially the neurovascular bundles, must be protected to ensure these structures are not damaged. Avoiding the use of a tourniquet with cryotherapy is suggested to keep the surrounding tissue vascularized, making it more resistant to freezing.

Phenol is much less often used as an adjuvant. Some authors have questioned the effectiveness of phenol because of its poor penetration of bony tissue compared with that of liquid nitrogen. However, phenol has had some success in certain studies, and it has the benefit of being easy to use. Phenol is simply applied to the mechanically removed walls by using soaked swabs. Any remaining phenol is removed with suction, and the cavity is filled with absolute alcohol. Finally, the cavity is irrigated with isotonic sodium chloride solution.

Polymethylmethacrylate (PMMA) may also be used, though the effectiveness of its thermal properties in causing bone necrosis has been questioned in the literature. However, polymethylmethacrylate (PMMA) does have the benefit of rendering a large lesion mechanically sound and making it easier to recognize a local recurrence. If polymethylmethacrylate (PMMA) is used in a subchondral location, the joint surface should be protected by placing cancellous grafts or Gelfoam (Pharmacia & Upjohn Co, Kalamazoo, MI) before cementation. It is not clear that removing the cement and replacing it with a bone graft is necessary.

Argon beam coagulation has also been used in several studies, with some promising results 38. One study noted that surgical treatment with curettage and adjuvant argon beam coagulation is an effective treatment option for aneurysmal bone cyst; the primary complication was postoperative fracture 38.

An additional study found that argon beam photocoagulation, while avoiding the toxic effects of phenol, yielded statistically equivalent recurrence rates, functional outcomes, and complication rates in the treatment of benign-aggressive bone tumors 39. However, the authors also noted an increased fracture rate in the argon beam photocoagulation cohort as compared with the phenol cohort.

Concerns for adjuvant intralesional therapy include the following:

  • Substances such as liquid nitrogen and phenol could penetrate tissues and damage the surrounding structures, with neural and vascular tissues being at particularly high risk; for this reason, some investigators discourage the use of intralesional therapy in the spine
  • Caution should be used in areas prone to fracture; liquid nitrogen and argon beam photocoagulation can make the surrounding bone stock more brittle and thus increase the likelihood of fracture

Additional considerations

NOTE: Special consideration is necessary in dealing with aneurysmal bone cysts that are near open physes. The reader is referred to the literature for general considerations when operating around physes. The reported rate of physeal injury is significant, and patients and their families must be made aware of this possibility. Furthermore, it has been shown that attempts to spare the adjacent physes by performing a less-than-aggressive curettage of aneurysmal bone cysts have resulted in increased risk of local recurrence in patients with open growth plates 40.

Spinal aneurysmal bone cysts usually cause neurologic symptoms and pose treatment challenges. The details of surgical excision can be found elsewhere. There is evidence to support an attempt at one or two trials of selective arterial embolization before surgical excision.

A group in Japan developed an endoscopic approach to the treatment of aneurysmal bone cyst 41. They successfully treated four patients with aneurysmal bone cysts that lacked the aneurysmal component. The technique was completed with a variety of curettes, ball forceps, Kirschner wires (K-wires), an arthroscope, and a drill. The method may leave a more stable structure and is minimally invasive.

Treatment for a secondary aneurysmal bone cyst is that which is appropriate for the underlying lesion.

Selective arterial embolization

Selective arterial embolization has shown much promise for aneurysmal bone cysts in small studies. However, the number of cases treated with this therapy is not large, both because aneurysmal bone cysts are rare and because selective arterial embolization has been available only since the 1980s 42.

With the use of angiography, an embolic agent is placed at a feeding artery to the aneurysmal bone cyst, cutting off the nutrient supply and altering the hemodynamics of the lesion. Various materials, such as springs and foam, have been used to create the emboli.

Selective arterial embolization has the advantage of being able to reach difficult locations, being able to save joint function when subchondral bone destruction is present, and making the complications that are associated with invasive surgery (eg, bleeding) less likely to occur. Selective arterial embolization may be performed within 48 hours before surgery to reduce the amount of intraoperative hemorrhage.

Some of the literature suggests that selective arterial embolization can be a primary treatment for aneurysmal bone cyst if the following conditions are met:

  • Histologically confirmed tissue diagnosis of aneurysmal bone cyst
  • Technical feasibility and safety
  • Stability; no evidence of pathologic fracture or impeding fracture
  • No neurologic involvement

Contraindications for selective arterial embolization include the following:

  • Uncertain diagnosis; need to perform an open biopsy
  • Structural instability; pathologic or impending fracture
  • Neurologic symptoms
  • Mechanical disruption
  • Unsafe location to embolize with angiography or anatomically (eg, segmental arteries, certain cervical and thoracic areas that may lead to spinal cord ischemia, or subcutaneous bones [such as the clavicle or iliac crest] that may lead to adjacent skin necrosis and need for flap or skin graft coverage)

Intralesional injection

Only case evidence exists for intralesional injection, but the injection may be attempted for cases in which surgical access is difficult and for those in which other modalities are contraindicated 43.

Note: Do not use this approach if the patient has allergies to the injection components, a pathologic or impeding fracture, neurologic symptoms, or unbearable symptoms such as pain. Do not use intralesional injection if a more proven treatment is indicated.

There has also been case evidence for the use of calcitonin 44 and methylprednisolone injections in the regression of aneurysmal bone cysts. This is thought to combine the inhibitory angiostatic and fibroblastic effects of methylprednisolone with the osteoclastic inhibitory effect and the trabecular bone-stimulating properties of calcitonin. The injections are performed under computed tomography (CT) guidance and anesthesia. Growth of the aneurysmal bone cyst must be closely monitored, and the treatment may need to be repeated several times. Years may pass before the aneurysmal bone cyst resolves.

ETHIBLOC (Ethicon, Norderstedt, Germany) injection is also performed under CT guidance and anesthesia 45. The injected solution is a mixture of zein, oleum papaveris, and propylene glycol and acts as a fibrosing agent, and an inflammatory reaction may occur after its administration. Bony healing may take months to years. Side effects (eg, localized thrombosis, pulmonary embolus, osseocutaneous fistula formation, and severe surrounding tissue necrosis) make it a poor first-line choice in the absence of an obvious surgical contraindication 46.

Some case evidence also suggests healing improvement when systemic calcitonin treatment is used as an adjuvant to other treatment modalities.

An Australian study by Clayer 15 in 15 patients with pathologically confirmed aneurysmal bone cyst suggests that percutaneous aspiration and injection of aneurysmal bone cysts using an aqueous solution of calcium sulfate may have value. All patients except one who have reported pain before the procedure were completely without symptoms at 4 weeks post injection. The calcium sulfate was reabsorbed within 8 weeks.

During the minimum 2-year follow-up period, two patients developed local recurrence of the lesion, one of whom later developed a pathologic fracture. Two other patients sustained pathologic fractures at 12 and 22 months post injection, respectively. Clayer concluded that this procedure has “early clinical and radiological responses and a low complication rate in a consecutive group of patients with aneurysmal bone cyst” 15.

In several series, intralesional percutaneous injection of doxycycline has been reported to be beneficial in inducing stromal cell necrosis, reversing bone destruction, and preserving neighboring anatomy including physes and subchondral bone 47. The principal proposed mechanisms of action for the success seen include the following 48:

  • Matrix metalloproteinase (MMP) and angiogenesis inhibition
  • Osteoclast inhibition and apoptosis
  • Enhanced osteoblastic bone healing

Contraindications for intralesional injection are as follows:

  • Uncertain diagnosis; need to obtain an open biopsy
  • Structural instability; pathologic or impending fracture
  • Neurologic symptoms
  • Mechanical disruption
  • Allergy to injected substance
  • Unbearable symptoms; lengthy time to resolution.

Treatment complications

Complications can vary with the location in which the aneurysmal bone cyst arises. Many of these are related to the proximity of the surrounding tissues.

Universal complications that have been described with surgery include the following:

  • Recurrence
  • Blood loss
  • Wound infection
  • Wound slough
  • Wound hematoma
  • Osteomyelitis
  • Damage to the surrounding tissue
  • Possible physis damage
  • Pulmonary embolism

Additional complications that have been shown with spinal locations include the following:

  • Tear of the dura
  • Transient spastic paralysis from hematomas
  • Tear in the vena cava
  • Persistent back ache
  • Deformity
  • Neurologic symptoms

Complications that are associated with liquid nitrogen include the following:

  • Rare gas embolism
  • Rare late fracture
  • Wound necrosis
  • Damage to the surrounding tissue (eg, neurovascular bundles, physis)

A complication that is associated with phenol is necrosis of the surrounding tissue exposed to the phenol (eg, neurovascular bundles, physis).

A complication that is associated with selective arterial embolization is unintentional embolization of a vital area.

Finally, fracture risk may be elevated in those adjuvantly treated with argon beam photocoagulation, particularly in weightbearing bones.

Aneurysmal bone cyst recurrence

Aneurysmal bone cysts can recur in 10-15 percent of patients, so it is important for your child to continue to see your child’s surgeon after treatment. Recurrence usually happens within the first year after surgery, and almost all episodes occur within 2 years 49. However, patients should still be monitored on a regular basis for 5 years. It is beneficial to detect recurrence early when the lesion is still small and easier to treat. Children should be monitored until they have reached maturity to ensure that any possible recurrence does not cause deformity or interfere with their growth. Any patients who have received radiation should be monitored for life because of the risk of secondary sarcoma.

Your child will see the orthopaedic surgeon about one to two weeks after surgery, then again every three to four months for two years to monitor for possible recurrence of the growth.

During follow-up visits, X-rays and other diagnostic testing of the tumor site are recommended to closely monitor your child’s health, check the reconstruction, and make sure there is no recurrence.

If the aneurysmal bone cyst returns, surgeons will treat the recurrence with intralesional curettage, intraoperative adjuvants, and bone grafting.

In most cases, an aneurysmal bone cyst tumor will not recur more than two years after surgery.

In a published review of 897 cases of aneurysmal bone cyst, the following rates of occurrence were reported 50:

  • Tibia – 17.5%
  • Femur – 15.9%
  • Vertebra – 11.2%
  • Pelvis – 11.6%
  • Humerus – 9.1%
  • Fibula – 7.3%
  • Foot – 6.3%
  • Hand – 4.7%
  • Ulna – 3.8%
  • Radius – 3.1%
  • Other – 9.2%

Spontaneous regression may occur, including following partial removal, but this is not the typical natural history 51.

Aneurysmal bone cyst prognosis

The prognosis for an aneurysmal bone cyst is generally excellent, though some patients need repeated treatments because of recurrence, which is the most common problem encountered when treating an aneurysmal bone cyst.

The overall cure rate is 90-95% 52. A younger age, open growth plates, and a metaphyseal location all have been associated with an increased risk of recurrence 52. The stage of the aneurysmal bone cyst has not been shown to influence the rate of recurrence; however, most clinicians believe that Enneking/Musculoskeletal Tumor Society (MSTS) stage 3 lesions have the highest recurrence rate, other factors being equal. Capanna morphologic types I and II recur more often than types III, IV, and V.

Reported primary recurrence rates have varied greatly. Small studies have shown a benefit to using selective arterial embolization, and some authors advocate it as a first-line treatment. Other authors argue that not enough data on selective embolization exist and that surgery is the first-line treatment. Intralesional excision has the most data to suggest that it is a safe and effective method.

Recurrence rates for different techniques have varied. Some studies have reported recurrence rates as high as 59% with intralesional excision 53 and as low as 0% with resection 50. In a summary of studies of different treatment methods, the following rates of recurrence were reported 50:

  • Irradiation – 34 performed with 4 recurrences (11.8% recurrence rate)
  • Irradiation and curettage – 35 performed with 5 recurrences (14.3% recurrence rate)
  • Curettage and bone graft – 484 performed with 149 recurrences (30.8% recurrence rate)
  • Curettage and cryobiopsy – 78 performed with 10 recurrences (12.8% recurrence rate)
  • Marginal resection – 81 performed with 6 recurrences (7.4% recurrence rate)
  • Wide resection – 59 performed with 0 recurrences (0% recurrence rate).
References
  1. Y. Zadik, A. Aktas, S. Drucker, D.W. Nitzan. Aneurysmal bone cyst of mandibular condyle: a case report and review of the literature. J Cranio-Maxillo-Fac Surg, 40 (2012), pp. e243-e248, 10.1016/j.jcms.2011.10.026
  2. Schajowicz F. Aneurysmal bone cyst. Histologic Typing of Bone Tumours. Berlin: Springer-Verlag; 1992. 37.
  3. M.H. Motamedi. Aneurysmal bone cysts of the jaws: clinicopathological features, radiographic evaluation and treatment analysis of 17 cases. J Cranio-Maxillofacial Surg, 26 (1998), pp. 56-62
  4. Meyers SP. MRI of bone and soft tissue tumors and tumorlike lesions, differential diagnosis and atlas. Thieme Publishing Group. (2008) ISBN:3131354216
  5. Blake MA. Imaging in oncology. Springer Verlag. (2008) ISBN:0387755861
  6. Kransdorf MJ, Sweet DE. Aneurysmal bone cyst: concept, controversy, clinical presentation, and imaging. AJR Am J Roentgenol. 1995 Mar. 164(3):573-80.
  7. M. Boubbou, K. Atarraf, S. Tizniti. Aneurysmal bone cyst primary. About eight pediatric cases: radiological aspects and review of the literature. Pan Afr Med J, 15 (2013), 10.11604/pamj.2013.15.111.2117
  8. A. Leithner, R. Windhager, S. Lang, O.A. Haas, F. Kainberger, R. Kotz. Aneurysmal bone cyst. A population based epidemiologic study and literature review. Clin Orthop Relat Res (1999), pp. 176-179
  9. Aneurysmal Bone Cyst. https://emedicine.medscape.com/article/1254784-overview#a7
  10. Leithner A, Windhager R, Lang S, et al. Aneurysmal bone cyst. A population based epidemiologic study and literature review. Clin Orthop Relat Res. 1999 Jun. (363):176-9.
  11. van den Berg H, Kroon HM, Slaar A, Hogendoorn P. Incidence of biopsy-proven bone tumors in children: a report based on the Dutch pathology registration “PALGA”. J Pediatr Orthop. 2008 Jan-Feb. 28(1):29-35.
  12. J. Cottalorda, S. Bourelle. Modern concepts of primary aneurysmal bone cyst. Arch Orthop Trauma Surg, 127 (2007), pp. 105-114, 10.1007/s00402-006-0223-5
  13. S. Rastogi, M.K. Varshney, V. Trikha, S.A. Khan, B. Choudhury, R. Safaya. Treatment of aneurysmal bone cysts with percutaneous sclerotherapy using polidocanol. J Bone Joint Surg Br (2006), 10.1302/0301-620X.88B9.17829
  14. J. Dubois, V. Chigot, G. Grimard, M. Isler, L. Garel. Sclerotherapy in aneurysmal bone cysts in children: a review of 17 cases. Pediatr Radiol, 33 (2003), pp. 365-372, 10.1007/s00247-003-0899-4
  15. Clayer M. Injectable form of calcium sulphate as treatment of aneurysmal bone cysts. ANZ J Surg. 2008 May. 78(5):366-70.
  16. Percutaneous embolization of aneurysmal bone cyst of the mandible: A 3-year follow-up. Oral and Maxillofacial Surgery Cases Volume 5, Issue 4, December 2019, 100121 https://doi.org/10.1016/j.omsc.2019.100121
  17. Cugati G, Pande A, Jain PK, Symss NP, Ramamurthi R, Vasudevan CM. Aneurysmal bone cyst of the lumbar spine. Asian J Neurosurg. 2015;10:216–218.
  18. Panoutsakopoulos G, Pandis N, Kyriazoglou I, Gustafson P, Mertens F, Mandahl N. Recurrent t(16;17)(q22;p13) in aneurysmal bone cysts. Genes Chromosomes Cancer. 1999 Nov. 26(3):265-6.
  19. Guseva NV, Jaber O, Tanas MR, Stence AA, Sompallae R, Schade J, et al. Anchored multiplex PCR for targeted next-generation sequencing reveals recurrent and novel USP6 fusions and upregulation of USP6 expression in aneurysmal bone cyst. Genes Chromosomes Cancer. 2017 Apr. 56 (4):266-277.
  20. Lau AW, Pringle LM, Quick L, Riquelme DN, Ye Y, Oliveira AM, et al. TRE17/ubiquitin-specific protease 6 (USP6) oncogene translocated in aneurysmal bone cyst blocks osteoblastic maturation via an autocrine mechanism involving bone morphogenetic protein dysregulation. J Biol Chem. 2010 Nov 19. 285(47):37111-20.
  21. Layfield LJ. Cytopathology of bone and soft tissue tumors. Oxford University Press, USA. (2002) ISBN:019513236X
  22. Subach BR, Copay AG, Martin MM, Schuler TC, Romero-Gutierrez M. An unusual occurrence of chondromyxoid fibroma with secondary aneurysmal bone cyst in the cervical spine. Spine J. 2010;10(2):e5-e9. doi:10.1016/j.spinee.2009.11.016
  23. Tomoyuki K, Susa M, Nakayama R, et al. Secondary aneurysmal bone cyst following chondroblastoma of the patella. Rare Tumors. 2013;5(3):e43. Published 2013 Sep 4. doi:10.4081/rt.2013.e43
  24. Ilaslan H, Sundaram M, Unni KK. Solid variant of aneurysmal bone cysts in long tubular bones: giant cell reparative granuloma. AJR Am J Roentgenol. 2003;180(6):1681-1687. doi:10.2214/ajr.180.6.1801681
  25. Enneking WF. A system of staging musculoskeletal neoplasms. Clin Orthop Relat Res. 1986 Mar. 204:9-24.
  26. Lodwick GS. The bones and joints. Hodes PJ, ed. Atlas of Tumor Radiology. Chicago: Year Book; 1971.
  27. Lodwick GS. Radiographic diagnosis and grading of bone tumors with comments on computer evaluation. Presented at the Proceedings of the Fifth National Cancer Conference, Philadelphia. September 17-19, 1964.
  28. Park HY, Yang SK, Sheppard WL, Hegde V, Zoller SD, Nelson SD, et al. Current management of aneurysmal bone cysts. Curr Rev Musculoskelet Med. 2016 Dec. 9 (4):435-444.
  29. Z.J. Sun, H.L. Sun, R.L. Yang, R.A. Zwahlen, Y.F. Zhao. Aneurysmal bone cysts of the jaws. Int J Surg Pathol, 17 (2009), pp. 311-322, 10.1177/1066896909332115
  30. P. Tsagozis, O. Brosjö. Current strategies for the treatment of aneurysmal bone cysts. Orthop Rev, 7 (2015), p. 6182, 10.4081/or.2015.6182
  31. S. Seewald, T.L. Ang, H. Imazu, M. Naga, S. Omar, S. Groth, et al. A standardized injection technique and regimen ensures success and safety of N-butyl-2-cyanoacrylate injection for the treatment of gastric fundal varices (with videos). Gastrointest Endosc, 68 (2008), pp. 447-454, 10.1016/j.gie.2008.02.050
  32. D. Liu, X. Ma, F. Zhao, J. Zhang. Intraosseous embolotherapy of central arteriovenous malformations in the jaw: long-term experience with 8 cases. J Oral Maxillofac Surg, 67 (2009), pp. 2380-2387, 10.1016/j.joms.2009.04.088
  33. J.T.K. Woon, D. Hoon, A. Graydon, M. Flint, A.J. Doyle. Aneurysmal bone cyst treated with percutaneous doxycycline: is a single treatment sufficient? Skelet Radiol, 48 (2019), pp. 765-771, 10.1007/s00256-019-03188-y
  34. N. Soehendra, V.C. Nam, H. Grimm, I. Kempeneers. Endoscopic obliteration of large esophagogastric varices with bucrylate. Endoscopy, 18 (1986), pp. 25-26, 10.1055/s-2007-1013014
  35. G. Rossi, E. Rimondi, T. Bartalena, A. Gerardi, M. Alberghini, E.L. Staals, et al. Selective arterial embolization of 36 aneurysmal bone cysts of the skeleton with N-2-butyl cyanoacrylate. Skelet Radiol, 39 (2010), pp. 161-167, 10.1007/s00256-009-0757-z
  36. A. Alaraj, R. Dashti, N.K. Mehta, S. Goodin, F.T. Charbel, V.A. Aletich. Augmentation of N-butyl cyanoacrylate embolization of cranial, head, and neck tumors by simultaneous infusion of 5% dextrose solution. J Neurointerventional Surg, 7 (2015), pp. 463-470, 10.1136/neurintsurg-2013-011071
  37. Chowdhry M, Chandrasekar CR, Mohammed R, Grimer RJ. Curettage of aneurysmal bone cysts of the feet. Foot Ankle Int. 2010 Feb. 31(2):131-5.
  38. Steffner RJ, Liao C, Stacy G, et al. Factors associated with recurrence of primary aneurysmal bone cysts: is argon beam coagulation an effective adjuvant treatment?. J Bone Joint Surg Am. 2011 Nov 2. 93(21):e1221-9.
  39. Benevenia J, Patterson FR, Beebe KS, Abdelshahed MM, Uglialoro AD. Comparison of phenol and argon beam coagulation as adjuvant therapies in the treatment of stage 2 and 3 benign-aggressive bone tumors. Orthopedics. 2012 Mar 7. 35(3):e371-8.
  40. Erol B, Topkar MO, Caliskan E, Erbolukbas R. Surgical treatment of active or aggressive aneurysmal bone cysts in children. J Pediatr Orthop B. 2015 Sep. 24 (5):461-8.
  41. Otsuka T, Kobayashi M, Sekiya I, et al. A new treatment of aneurysmal bone cyst by endoscopic curettage without bone grafting. Arthroscopy. 2001 Sep. 17(7):E28.
  42. Rossi G, Mavrogenis AF, Facchini G, Bartalena T, Rimondi E, Renzulli M, et al. How effective is embolization with N-2-butyl-cyanoacrylate for aneurysmal bone cysts?. Int Orthop. 2016 Dec 8.
  43. Bush CH, Adler Z, Drane WE, Tamurian R, Scarborough MT, Gibbs CP. Percutaneous radionuclide ablation of axial aneurysmal bone cysts. AJR Am J Roentgenol. 2010 Jan. 194(1):W84-90.
  44. Chang CY, Kattapuram SV, Huang AJ, Simeone FJ, Torriani M, Bredella MA. Treatment of aneurysmal bone cysts by percutaneous CT-guided injection of calcitonin and steroid. Skeletal Radiol. 2017 Jan. 46 (1):35-40.
  45. Adamsbaum C, Kalifa G, Seringe R, Dubousset J. Direct Ethibloc injection in benign bone cysts: preliminary report on four patients. Skeletal Radiol. 1993. 22(5):317-20.
  46. Rapp TB, Ward JP, Alaia MJ. Aneurysmal bone cyst. J Am Acad Orthop Surg. 2012 Apr. 20(4):233-41.
  47. Woon JTK, Hoon D, Graydon A, Flint M, Doyle AJ. Aneurysmal bone cyst treated with percutaneous doxycycline: is a single treatment sufficient?. Skeletal Radiol. 2019 May. 48 (5):765-771.
  48. Shiels WE 2nd, Mayerson JL. Percutaneous doxycycline treatment of aneurysmal bone cysts with low recurrence rate: a preliminary report. Clin Orthop Relat Res. 2013 Aug. 471 (8):2675-83.
  49. Brosjö O, Pechon P, Hesla A, Tsagozis P, Bauer H. Sclerotherapy with polidocanol for treatment of aneurysmal bone cysts. Acta Orthop. 2013 Oct. 84(5):502-5.
  50. Schreuder HW, Veth RP, Pruszczynski M, et al. Aneurysmal bone cysts treated by curettage, cryotherapy and bone grafting. J Bone Joint Surg Br. 1997 Jan. 79(1):20-5.
  51. Bocklage TJM, Quinn RHM, Schmit BPM et-al. Bone and Soft Tissue Tumours: A Multidisciplinary Review With Case Presentations. JP MEDICAL PUBLISHERS. ISBN:1907816224
  52. Gibbs CP Jr, Hefele MC, Peabody TD, et al. Aneurysmal bone cyst of the extremities. Factors related to local recurrence after curettage with a high-speed burr. J Bone Joint Surg Am. 1999 Dec. 81(12):1671-8.
  53. Marcove RC, Sheth DS, Takemoto S, Healey JH. The treatment of aneurysmal bone cyst. Clin Orthop Relat Res. 1995 Feb. 311:157-63.
read more
Conditions & DiseasesMusculoskeletal System

Congenital scoliosis

Congenital scoliosis

Congenital scoliosis

Congenital scoliosis is a sideways curvature of the spine that is caused by a defect that was present at birth. The term “congenital” means that you are born with the condition. Congenital scoliosis occurs in only 1 in 10,000 newborns and is much less common than the type of scoliosis that begins in adolescence.

Congenital scoliosis starts as the spine forms before birth. Part of one vertebra (or more) does not form completely or the vertebrae do not separate properly. Some types of congenital scoliosis can change quickly with growth while others remain unchanged.

Children with congenital scoliosis sometimes have other health issues, such as kidney, heart or bladder problems.

Even though congenital scoliosis is present at birth, it is sometimes impossible to see any spine problems until a child reaches adolescence.

No certain cause of congenital scoliosis has been identified until today 1. Congenital scoliosis is a failure of vertebral formation, segmentation, or a combination of the 2 arising from abnormal vertebral development during weeks 4 to 6 of gestation. The associated spinal deformity can be of varying severity and result in a stable or progressive deformity based on the type and location of the anomalous vertebrae 2. The ultimate cause is probably multifactorial, involving some combination of inherited genetic susceptibility and de-novo alteration in molecular mechanisms, possibly from exposure to teratogens such as cigarette smoking, organophosphate pesticides, or carbon monoxide 3.

The diagnosis requires a thorough clinical and imaging examination in order to establish an individualized therapeutic strategy.

The treatment of congenital scoliosis is different from the adolescent idiopathic one. Therapeutic criteria are significantly different. It is essential to assess the difference in growth of the concavity related to the convexity when choosing a particular procedure. The magnitude of the curve and the progressive rate are fundamental issues to the surgeon.

Defects of segmentation usually induce a severe deformity. If the segmentation defect is associated to 2-3 fully segmented hemivertebrae, a maximal progression rate is present and significant curves are present at early ages (Figure 1). A severe curve in older children is very difficult to correct and a result is never obtained as in idiopathic scoliosis where correction may be up to 50-60%. In congenital scoliosis corrections of such kind of curves require laborious interventions, osteotomy or segmental resection, with high neurological risks 4 and low rates of success, not exceeding 20% as presented in different statistical data.

As a strategic aspect, the surgeon has to know that the preoperative planning has to identify the presence or absence of a dysraphic status 5 or syringomyelia. Always, the first aim is to stop the progression of the deformity.

Figure 1. Congenital scoliosis

congenital scoliosis

Footnote: Congenital scoliosis with a high progression potential due to 3 hemivertebrae situated on the same side of the spine. Trunk shifting and shoulder imbalance are noticed at an early age

[Source 1 ]

Congenital scoliosis types

Congenital scoliosis represents a wide range of pathology from the simple, stable hemivertebra to the complex, progressive spinal deformity with chest wall abnormalities and associated cardiac, renal, and neural axis anomalies 2.

The first classification of congenital scoliosis based on X-rays imaging was described by Winter in 1968 6. Kawakami 7 reclassified the vertebral malformations depending on the presence or absence of normal formation based on a 3D-CT study. The purpose of these classifications is to understand the embryology, etiology, prognostic and to choose the right therapeutic strategy.

Congenital scoliosis is a malformation characterized by a longitudinal and rotational imbalance.

  1. Congenital scoliosis with imbalance in the longitudinal growth is produced by defects of formation, segmentation or mixed ones.
  2. Congenital scoliosis with rotational imbalance is mainly characterized by the vertebral rotation related to the curve in the coronal plan and they may be due to an effect of:
    • spinal traction – osseous bridges with congenital transverso-sacrate synostosis;
    • spinal pushing – mega-apophysis of the L5 transverse process;
    • mixed (traction and pushing) – sacral agenesis with pelvic malposition.
    • These types of scoliosis are secondary to a congenital malformation, either vertebral or pelvic, which induce as the main manifestation the vertebral rotation by means of traction, pushing or mixed action. Usually, the scoliosis and the vertebral rotation are not present at birth. During growth and development, the first presence is the vertebral rotation accompanied by walking impairment and next by the scoliotic curve.

Congenital scoliosis with longitudinal imbalance, mainly with deviation in the coronal plan in comparison with vertebral rotation, may be due to defects of formation with the presence of: trapezoidal vertebra, hemivertebra or vertebral hemibody. Hemivertebra depending on segmentation may be fully segmented, hemisegmented (partially segmented) or unsegmented. There may be congenital malformations characterized by the presence of more than one hemivertebra disposed in the following manner: adjacent (successive) – 2-3 hemivertebrae disposed unilaterally inducing a short arch scoliosis, being noticed at birth and having a high rate of evolution, unilateral alternant (intermittent) – 2-3 hemivertebrae placed unilaterally leading to a long arch scoliosis and a unique curve and bilateral alternant which themselves may be:

  • compensated – 2 symmetric hemivertebrae in a 4-5 vertebral segment inducing an equilibrated spinal deformity not requiring surgery;
  • uncompensated – if the hemivertebrae are disposed on a distance of more than 6 vertebrae leading to a double congenital scoliosis.

Due to defects of segmentation, congenital scolioses are characterized by a unilateral defect: longitudinal bar or a bilateral defect: vertebral block.

The third possibility is represented by mixed anomalies where we may find the next malformations:

  • hemivertebra and a bar on the opposite spinal side;
  • hemivertebra, vertebral block and longitudinal bar.

Incomplete formation of vertebrae

As the spine forms before birth, part of one vertebra (or more) may not form completely. When this occurs, the abnormality is called a hemivertebra and can produce a sharp angle in the spine. The angle can get worse as the child grows.

This abnormality can happen in just one vertebra or in many throughout the spine. When there is more than one hemivertebra, they will sometimes balance each other out and make the spine more stable.

Failure of separation of vertebrae

During fetal development, the spine forms first as a single column of tissue that later separates into segments that become the bony vertebrae. If this separation is not complete, the result may be a partial fusion (boney bar) joining two or more vertebrae together.

Such a bar prevents the spine from growing on one side after a child is born. This results in a spinal curve that increases as a child grows.

Combination of bars and hemivertebrae

The combination of a bar on one side of the spine and a hemivertebra on the other causes the most severe growth problem. These cases can require surgery at an early age to stop the increased curvature of the spine.

Compensatory curves

In addition to scoliosis curves, a child’s spine may also develop compensatory curves in order to maintain an upright posture. This occurs when the spine tries to make up for a scoliosis curve by creating other curves in the opposite direction above, or below, the affected area. The vertebrae are shaped normally in compensatory curves.

Congenital scoliosis causes

Congenital scoliosis is a failure of vertebral formation, segmentation, or a combination of the 2 arising from abnormal vertebral development during weeks 4 to 6 of gestation. The associated spinal deformity can be of varying severity and result in a stable or progressive deformity based on the type and location of the anomalous vertebrae 2.

The ultimate cause of a congenital spinal abnormality is an irrecoverable difference in spine development at the embryonic level. Much research has been performed to understand the mechanisms of embryonic segmentation, and a variety of genetic defects have been suggested as a cause for congenital vertebral malformations.

Single-nucleotide polymorphisms in glucose-metabolizing genes, including GLUT1, HK1, and LEP, have been linked to the occurrence of malformations observed in diabetic embryopathy 8. Hox-mediated gene expression has been thought to be the target for spine abnormalities related to carbon monoxide 9. In addition, an increased risk of congenital vertebral malformations is noted in monozygotic and dizygotic twins 10.

Despite the isolation of genetic mechanisms, no convincing familial linkage exists to explain the majority of congenital scoliosis cases. Winter et al 11 found that only 13 of 1250 patients had a positive family history of such deformity. Furthermore, hereditary congenital scoliosis is relegated to sporadic case reports and is described mostly in the setting of an overlying syndrome, such as Jarcho-Levin (extensive defects of segmentation in association with spondylocostal, costovertebral, or spondylothoracic dysplasia).

The ultimate cause is probably multifactorial, involving some combination of inherited genetic susceptibility and de-novo alteration in molecular mechanisms, possibly from exposure to teratogens such as cigarette smoking, organophosphate pesticides, or carbon monoxide 3.

Congenital scoliosis symptoms

Congenital scoliosis is often detected during the pediatrician’s examination at birth because of a slight abnormality of the back.

Scoliosis is not painful, so if the curvature is not detected at birth, it can go undetected until there are obvious signs — which could be as late as adolescence. A child may suspect that something is wrong when clothes do not fit properly. Parents can discover the problem in early summer when they see their child in a bathing suit.

The physical signs of scoliosis include:

  • Tilted, uneven shoulders, with one shoulder blade protruding more than the other
  • Prominence of the ribs on one side
  • Uneven waistline
  • One hip higher than the other
  • Overall appearance of leaning to the side
  • In rare cases there may be a problem with the spinal cord or nerves that produces weakness, numbness, or a loss of coordination.

Associated anomalies

Letts et al 12 found that 82% of patients with congenital scoliosis had associated malformation in four different organ systems. Beals et al found that 61% of patients with congenital scoliosis had abnormalities in seven different organ systems. Highest on the list were anomalies of the genitourinary tract.

Research on patients with congenital scoliosis by MacEwen et al 13 revealed a 20% incidence of urinary tract anomalies detected on routine intravenous pyelography (IVP), whereas a study by Hensinger et al 14 on cervical spine anomalies found a rate of 33%. Many of these anomalies, such as the presence of a single kidney, duplicate ureters, or crossed renal ectopia, while being of interest, were not potentially dangerous. However, in about 5% of the patients, obstructive uropathy, most commonly urethrovesicular obstruction, was present.

Renal ultrasonography (US) and magnetic resonance imaging (MRI) may be used to diagnose renal anomalies accurately 15.

A second area of great concern is cardiac anomalies. As many as 10-15% of patients with congenital scoliosis have been noted to have congenital heart defects. Murmurs should never be attributed to the scoliosis and must be evaluated thoroughly.

The frequency of spinal dysraphism is high in patients with congenital scoliosis. The prevalence of a dysraphic lesion was approximately 40% in three independent studies. McMaster 16 reported that about 20% of these patients with congenital scoliosis had some form of dysraphism (eg, diastematomyelia, tethered spinal cord, fibrous dural band, syringomyelia, or intradural lipoma). Many other anomalies can occur in addition to the above problems, such as Sprengel deformity, Klippel-Feil deformity, Goldenhar syndrome (oculoauriculovertebral dysplasia), and anal atresia.

Neurologic malformations

Congenital scolioses are associated in 35% of the patients with other neurologic malformations related to the nervous system and its coating. The most frequently encountered are diastematomyelia, Chiari’s malformation, intradural lipoma and tethered cord 1.

Congenital heart malformations

Congenital heart malformations are present in up to 25% of the patients with congenital scoliosis. Severe anomalies like Fallot tetralogy or the transposition of the great vessels require surgery prior to a spinal surgical approach 17.

Urologic anomalies

Urologic anomalies are encountered in 20% of the cases. These anomalies associated to congenital scoliosis are horseshoe kidney, vesicoureteral reflux (VUR) or hypospadias. Some kids may also have inguinal hernia, which is usually of great size, needing surgery 1.

Musculoskeletal anomalies

These malformations, clinically and imagistically detected, are usually treated after scoliosis surgery. They include Sprengel’s disease, Klippel-Feil syndrome 18, congenital femoral hypoplasia or acetabular dysplasia.

Congenital scoliosis diagnosis

The doctor will initially take a detailed medical history and may ask questions about recent growth.

Taking a full, detailed history and performing a full physical examination are mandatory because associated anomalies of many organs are common. [18] Maternal perinatal history, family history, and developmental milestones must be explored fully. A comprehensive review of systems includes evaluation for the following:

  • Hearing, visual, and dental problems
  • Cleft palate and cleft lip
  • Hernias, anorectal abnormalities, and genitourinary problems
  • Cardiac murmurs
  • Respiratory complaints
  • Neurologic disorders

In the physical examination, the physician must not only explore the spinal deformity but also focus particular attention on chest deformities and cutaneous lesions (especially dimples and hair patches overlying the spine). A detailed neurologic examination should be performed.

The genitalia should be examined for maturity, epispadias, hypospadias, and the presence of undescended testicles. The hand must be examined for clubhand, thenar hypoplasia, or other, more subtle, anomalies. The feet must be studied for clubfeet, cavus or varus deformities, vertical tali, clawing of the toes, or other signs of motor weakness.

During the physical exam, your doctor may have your child stand and then bend forward from the waist, with arms hanging loosely, to see if one side of the rib cage is more prominent than the other.

Your doctor may also perform a neurological exam to check for:

  • Muscle weakness
  • Numbness
  • Abnormal reflexes

Physical examination

Physical examination for scoliosis mainly consists of the Adam’s forward bend test or the forward bending test (Figure 2) 19. A spinal deformity will be most noticeable when your child is in this position. Your child stands and bends forward at the waist, your doctor will observe your child from the back assessing for symmetry of the back from behind and beside your child, looking for a difference in the shape of the ribs on each side 20. A child with possible scoliosis will have a lateral bending of the spine, but the curve will cause spinal rotation and eventually a rib hump, which is visible on examination 21.

The standard screening test for scoliosis is the forward bending test. Your child will bend forward and your doctor will observe your child from the back.

With your child standing upright, your doctor will check to see if the hips are level, the shoulders are level, and that the position of the head is centered over the hips. He or she will check the movement of the spine in all directions.

To rule out the presence of a spinal cord or nerve problem, your doctor may check the strength in your child’s legs and the reflexes in the abdomen and legs.

Figure 2. Forward bending test (Adam’s forward bend test)

Adam's forward bend test

[Source 19 ]

Tests

Although the forward bending test can detect scoliosis, it cannot detect the presence of congenital abnormalities. Imaging tests can provide more information.

X-rays. Images of your child’s spine are taken from the back and the side. The x-rays will show the abnormal vertebrae and how severe the curve is. If a doctor suspects that an underlying condition — such as a tumor — is causing the scoliosis, he or she may recommend additional imaging tests, such as an MRI.

Once your doctor makes the diagnosis of congenital scoliosis, your child will be referred to a pediatric orthopaedic surgeon for specialized care and further tests.

Computed tomography (CT) scan and 3D-CT. A CT scan can provide a detailed image of your child’s spine, showing the size, shape, and position of the vertebrae. To see the vertebrae better, your doctor may have a 3-D image made from the CT scan. This looks like a photograph of the bones (Figure 4).

Ultrasound. Your doctor will do an ultrasound of your child’s kidneys to detect any problems.

Magnetic resonance imaging (MRI) scan. Because an MRI can evaluate soft tissues better than a CT scan, an MRI will be done to check for abnormalities of the spinal cord at least once for every patient.

Figure 3. Cobb angle

Cobb angle of scoliosis

Figure 4. CT scan of hemivertebrae scoliosis

CT scan of hemivertebrae scoliosis

Footnote: This 3-D image from a CT scan shows hemivertebrae, as well as a fused, boney block.

Congenital scoliosis treatment

The presence of a scoliotic deformity at birth is a sign of worse prognosis and it requires treatment starting with the first days of life 1. Not all scolioses need bracing or surgery. 25% of them present a low progression rate or compensating defects of formation. These deformities have to be periodically evaluated and usually do not require surgery.

There are several treatment options for congenital scoliosis. In planning your child’s treatment, your doctor will take into account the type of vertebral abnormality, the severity of the curve, and any other health problems your child has.

Your doctor will determine how likely it is that your child’s curve will get worse, and then suggest treatment options to meet your child’s specific needs.

About 75% of congenital scoliosis require surgery. Surgery is indicated at the age of 1-4 years.

The essential criteria to choose the right moment of surgery is the magnitude of the scoliotic curve. Evaluation is performed by measuring the Cobb’s angle (Figure 3). Up to 40° of Cobb’s angle, the patient is periodically carefully monitored, at every 4-6 months. Above 40° Cobb’s angle, surgery is required. The presence of a respiratory disorder associated to some congenital malformations endangers the patient and imposes a more careful supervision and surgery as soon as possible. Congenital scoliosis with more than one fully segmented, successive hemivertebrae and severe deformities of the rib cage with thoracic insufficiency syndrome may be operated at the age of 8-12 months, even if Cobb’s angle is less than 40°.

Nonsurgical treatment

Observation

A child with a small curve that seems to be unchanging will be monitored to make sure the curve is not getting worse. Although it does not happen in every patient, congenital scoliosis curves can get bigger as the spine grows and the deformity of the back becomes more noticeable. It is likely that a curve in a young child will get worse because younger children still have a lot of growing to do.

Your doctor will follow the changes of your child’s curve using x-rays taken at 6- to 12- month intervals during the growing years.

Physical activity does not increase the risk for curve progression. Children with congenital scoliosis can participate in most sports and hobbies.

Bracing or casting

Braces or casts are not effective in treating the curvature caused by the congenitally abnormal vertebrae, but they are sometimes used to control compensatory curves where the vertebrae are normally shaped 22. This is because the primary deformity in congenital scoliosis is in the vertebrae rather than in the soft tissues, and the curves tend to be rigid. In addition, in cases where the natural history indicates a poor prognosis, orthotic treatment is contraindicated. Thus, contraindications for orthotic treatment are as follows:

  • Short, stiff curves
  • Unsegmented bar
  • Congenital lordosis
  • Congenital kyphosis

Congenital scoliosis responds well to bracing only when the scoliosis features long curves with good flexibility—best determined by bending or by traction radiographs—or when the scoliosis is unbalanced secondary to an unbalanced hemivertebra at the T12 or L5 level.

The brace of choice is the Milwaukee brace for high thoracic curves (apex T6 or above), because it avoids the constriction of the thorax that may occur with an underarm brace, and the thoracolumbosacral orthosis (TLSO) for lower curves. Winter et al indicated that certain patients did well in the Milwaukee brace for many years and that a few could even be treated permanently with an orthosis and avoid surgery 23.

The best results were in patients with mixed anomalies that were flexible and in patients with a progressive secondary curve. Braces are unlikely to be effective if the scoliosis is more than 40° or if less than 50% flexibility is established using side bending or distraction radiographs 24.

A significant shoulder elevation is best treated with a shoulder ring that is attached to the Milwaukee brace, and head support pads can be added to create a neutral head position if the patient has a head tilt. Only the Milwaukee brace and its modifications can control high curves.

Congenital scoliosis surgery

Surgical treatment is reserved for patients who:

  • have curves that have significantly worsened during the course of x-ray monitoring
  • have severe curves
  • have a large deformity of the spine or trunk
  • are developing a neurological problem due to an abnormality in the spinal cord

An important goal of surgery is to allow the spine and chest to grow as much as possible. There are several surgical options.

  • Spinal fusion. In this procedure, the abnormal curved vertebrae are fused together so that they heal into a single, solid bone. This will stop growth completely in the abnormal segment of the spine and prevent the curve from getting worse.
  • Hemivertebra removal. A single hemivertebra can be surgically removed. The partial correction of the curve that is achieved by doing this can then be maintained using metal implants. This procedure will only fuse two to three vertebrae together.
  • Growing rod. Growing rods do not actually grow but can be lengthened with minor surgery that is repeated every 6 to 8 months. The goal of a growing rod is to allow continued growth while correcting the curve. One or two rods are attached to the spine above and below the curve. Every 6 to 8 months, the child returns to the doctor and the rod is lengthened to keep up with the child’s growth. When the child is full grown, the rod(s) are replaced and a spinal fusion is performed.

In situ spinal fusion

This procedure, even if being a safe technique, presents certain indications because correction possibilities are limited. It is indicated in progressive scoliosis presenting with a minimal deformity at surgery time, no more than 25°, with a limited area of no more than 5 vertebrae. It may be regarded as a prophylactic act in cases of high rate progression scoliosis with a fully segmented hemivertebra. This kind of arthrodesis insignificantly limits the growth in length of the spinal column and it may be used as an elective procedure in children with age ranging 1 to 4 years.

Present deformities correct slowly and the result is efficient if the growth potential is properly assessed by a CT-scan or MRI. In situ fusion may be performed by an open anterior approach, by thoracoscopy or by an open posterior approach through the pedicles. Usually, the surgeon chooses one of these options depending on its experience and the deformity’s location.

Convex hemiepiphysiodesis

The elective indication is congenital scoliosis due to defect of formation with the presence of a hemivertebra 25. During surgery, the correction of the curve is partially obtained, the remaining correction being achieved slowly in time because of the ablation of the intervertebral disks on the convex side.

Best results are achieved if the procedure is performed in a child with age ranging 1 to 4 years. All over, in the long term, same as for in situ fusion, the correction limit is up to 20-25°. Argues about its indication are present in literature due to the fact that expected results were not obtained. Good results may be obtained if the curve is less than 30°, if it is associated to posterior fusion, the progressive rate before surgery being constantly of 8-10° per year and the malformation being a fully segmented vertebra 1. The approach is via a thoracotomy or an abdomino-thoracotomy on the side of the convexity depending on the level of the malformation.

Excision of the hemivertebra

The excision of the hemivertebra is recommended if the curve progresses rapidly. It becomes an emergency in the presence of spinal canal stenosis or disk hernia, as a measure of decompression.

Excision of the hemivertebra is the best treatment method in comparison to in situ fusion and hemiepiphysiodesis. Maximal efficiency is obtained if performed at the age of 1-4 years, when the hemivertebra has a thoracic, lumbar or lumbo-sacral position and there is an imbalance of the trunk. Excision of the hemivertebra may be performed by an anterior or a posterior approach 26. A posterior approach is indicated in case of an isolated resection. A posterior and anterior simultaneous approach allows a complete excision of the adjacent disks of the hemivertebra by a circumferential exposure. This allows total visibility when excising the hemibody and the pedicle. This kind of approach requires the reposition of the patient during surgery.

The approach is variable depending on the site of the hemivertebra: Transthoracic for T4-T11, Hodgson (transpleural, retroperitoneal for T9-L5), Burnei (transthoracic, retropleural for T2-T11) and Mirbaha (extrapleural, retroperitoneal for T11-L5).

Some surgeons prefer a successive approach during the same surgical procedure by rotating the patient in the same sterile field, next instrumenting the spine after the hemivertebral excision 1. During 1998 and 2006 Burnei et al 27 practiced 23 procedures with a medium correction of 64% (an average of 41° preoperatively to an average of 16° postoperatively). The evolution in time of the deformity has been of about 3-4° per year, requiring a conversion of the anterior instrumentation to a posterior one at puberty in order to stabilize the spine.

Posterior excision of the hemivertebra ensures very good results. This method is best for a hemivertebra located in the thoracolumbar junction and is accompanied by kyphosis 28.

Growing rods

The first to initiate this concept was Harrington in 1960. The promoter of this method is Akbarnia 29 who improved the distraction device by using tandem connectors on 2 rods with distraction possibilities. He succeeded in correcting the angle from 82° to 38° in cases of early onset scoliosis and ensured a 1.2 cm/ year growth of the spine 29.

This method is a fusionless curve correcting one. Growing rods have become implants suitable in congenital scoliosis with large curves with normal disks above and below the malformation or the curve’s apex and with flexibility of the upper and lower segments of the spine. Growing rods are more suitable due to the fact that children younger than 5 years treated by thoracic fusion developed important respiratory problems finally leading to respiratory insufficiency. Data regarding physiopathology, growth and development of the spine and thoracic organs up to 5 years showed that the height and volume of the vertebra are of about 70% of an adult. That is why congenital scoliosis is associated with a diminished trunk height and, as a consequence, a shorter stature. Arthrodesis in these children will lead to a more reduced trunk height and thoracic volume. Nowadays, fusion is avoided in children of less than 10 years of age, just as Harrington predicted.

Growing rods are distracted at every 6 months. Transpedicular screws have to be used with caution in the upper thoracic part in very young children, but if required at least 4 should be used in order to spread the local tension 30. If the established spinal anchoring points prove to be anomalous not allowing the placement of implants, a VEPTR (Vertical Expandable Prosthetic Titanium Rib) should be used.

Halo traction

If the spinal column in congenital scoliosis is very stiff halo traction should be used before surgery. Traction is indicated even in some cases with neurological problems. It is a gravitational traction allowing the patient to sit in bed or walk with a wheelchair or with any other walking device. Gravity will ensure a partial reduction of the curve up to 70% before surgery without any neurological issues. If required, the traction weight will be diminished or even suppressed.

VEPTR (Vertical Expandable Prosthetic Titanium Rib)

This device ensures a progressive correction of the curve and the expansion of the thorax by a thoracotomy. The elective indication is in cases of scoliosis associated to rib synostoses and thin thorax that induce a defective lung development and evolve to thoracic insufficiency if not treated 31. Thoracic volume may be increased by the use of VEPTR, fixed rib-to-rib or more frequently rib-to-spine. If the deformity is a lumbar one and the pelvis is unbalanced, a device rib-to-ilium is indicated. Expansion thoracoplasty resides in the axial sectioning of the bony synostotic rib plate followed by intra-operative distraction maintained next by the aid of VEPTR (Vertical Expandable Prosthetic Titanium Rib).

Contraindications of VEPTR consist in inadequate strength of bone for the attachment of the device, absence of ribs for attachment, inadequate soft tissue for coverage, age of less than 6 months, absent diaphragmatic function, allergy to material, infection at the operative site and age beyond skeletal maturity or spinal canal stenosis.

In our series, we met a case of congenital scoliosis with spinal stenosis due to the protrusion of the 11th and 12th rib into the canal, which were removed before scoliosis correction 32.

This method allows an important correction of the Cobb angle up to 60% and the vital capacity of the lung remains the same or even it increases in some cases. As a rule, the spine will grow and the volume of the hemithorax increases without an improvement of the functional pulmonary volume. The current results showed a benefic result especially in congenital scoliosis associated to chest wall deformities 33. If needed, the device may be repositioned or converted. The complications in the use of VEPTR are bone erosion, skin breakthrough, infection, post-operative pain, device fracture due to stress fatigue, scapular elevation, brachial plexus palsy 34 and medullar lesion, as an exception.

The thoracoplasty is adequate to the simultaneous treatment of the scoliotic curve, thoracic expansion and chest wall lesions 35. A proper correction of the thoracic deformity may require the use of 2 or more such devices.

Guided-growth implants

Growing rods and VEPTR (Vertical Expandable Prosthetic Titanium Rib) require periodic minimal invasive procedures for distraction. The use of guided-growth implants like Shilla or a modified Luque trolley presents the advantage of an in situ correction and arthrodesis of the apical site of the deformity. Spinal growth is ensured and guided by the implant below and above the apex of the curve 36. The guided-growth implants are indicated in early onset, neuro-muscular and syndromic scoliosis in children less than 10 years of age.

Vertebrectomy

Vertebrectomy is the most radical of all procedures for congenital scoliosis. It consists of the removal of two or more vertebrae in their entirety, including the pedicles from both sides as well as the laminae and bodies. Vertebrectomy is performed to create mobility, but it is carried out at the price of instability. The procedure is neurologically risky and must be accompanied by appropriate spinal cord monitoring and wakeup tests. It should be reserved for the most severe deformities and performed only by highly skilled spinal surgeons 37.

Congenital scoliosis surgery recovery

Rehabilitation. Young children usually recover quickly from surgery and are discharged from the hospital within 1 week. Depending on the operation, a child may need to wear a cast or brace for 3 to 4 months.

Once they are healed, children are allowed to participate in most of the activities that they had previously participated in.

Congenital scoliosis prognosis

Congenital scoliosis detected at an early age is one of the most challenging types of scoliosis to treat. The curves can be large to begin with and because children have so much growth ahead of them, the chance of severe curve is high.

Although fusion of vertebrae at an early age results in the spine and trunk being shorter than they would have been, children can have outstanding results and achieve normal, or near-normal, function.

References
  1. Burnei G, Gavriliu S, Vlad C, et al. Congenital scoliosis: an up-to-date. J Med Life. 2015;8(3):388-397. https://www.ncbi.nlm.nih.gov/pmc/articles/PMC4556925
  2. Pahys JM, Guille JT. What’s New in Congenital Scoliosis?. J Pediatr Orthop. 2018;38(3):e172-e179. doi:10.1097/BPO.0000000000000922
  3. Congenital Spinal Deformity. https://emedicine.medscape.com/article/1260442-overview#a10
  4. Samdani AF, St. Hilaire T, Emans JB, Smith JT, Song K, Robert J, Campbell RJ, Betz RR. The Usefulness of VEPTR in the Older Child With Complex Spine and Chest Deformity. Clin Orthop Relat Res. 2010;468:700–704. doi: 10.1007/s11999-009-0886-7
  5. Gavriliu S, Vlad C, Georgescu I, Burnei G. Diastematomyelia in congenital scoliosis: a report of two cases. Eur Spine J. 2014 May;23(Suppl. 2):262–266. doi: 10.1007/s00586-014-3218-x
  6. Winter RB, Moe JH, Eilers VE. Congenital Scoliosis A Study of 234 Patients Treated and Untreated PART I: NATURAL HISTORY. J Bone Joint Surg Am. 1968 Jan Jan;50(1):1–15.
  7. Kawakami N, Taichi T, Imagama S, Lenke LG, Puno RM, Kuklo TR. Classification of Congenital Scoliosis and Kyphosis: A New Approach to the Three-dimensional Classification for Progressive Vertebral Anomalies Requiring Operative Treatment Spine. 2009;34(17):1756–1765.
  8. Alexander PG, Tuan RS. Role of environmental factors in axial skeletal dysmorphogenesis. Birth Defects Res C Embryo Today. 2010 Jun. 90(2):118-32.
  9. Wéry N, Narotsky MG, Pacico N, Kavlock RJ, Picard JJ, Gofflot F. Defects in cervical vertebrae in boric acid-exposed rat embryos are associated with anterior shifts of hox gene expression domains. Birth Defects Res A Clin Mol Teratol. 2003 Jan. 67(1):59-67.
  10. Corsello G, Piro E. The world of twins: an update. J Matern Fetal Neonatal Med. 2010 Oct. 23 Suppl 3:59-62.
  11. Winter RB, Moe JH, Lonstein JE. A review of family histories in patients with congenital spinal deformities. Orthop Trans. 1983. 7:32.
  12. Letts RM, Bobechko WP. Fusion of the scoliotic spine in young children. Clin Orthop Relat Res. 1974 Jun. (101):136-45.
  13. MacEwen GD, Winter RB, Hardy JH. Evaluation of kidney anomalies in congenital scoliosis. J Bone Joint Surg Am. 1972 Oct. 54(7):1451-4.
  14. Hensinger RN, Lang JE, MacEwen GD. Klippel-Feil syndrome; a constellation of associated anomalies. J Bone Joint Surg Am. 1974 Sep. 56(6):1246-53.
  15. Riccio AI, Guille JT, Grissom L, Figueroa TE. Magnetic resonance imaging of renal abnormalities in patients with congenital osseous anomalies of the spine. J Bone Joint Surg Am. 2007 Nov. 89(11):2456-9.
  16. McMaster MJ. Spinal growth and congenital deformity of the spine. Spine (Phila Pa 1976). 2006 Sep 15. 31 (20):2284-7.
  17. Hedequist D, Emans J. Congenital scoliosis: a review and update. J Pediatr Orthop. 2007;27(1):106-116. doi:10.1097/BPO.0b013e31802b4993
  18. Masquijo JJ, Bassini O, Paganini F, Goyeneche R, Miscione H. Congenital elevation of the scapula: surgical treatment with Mears technique. J Pediatr Orthop. 2009;29(3):269-274. doi:10.1097/BPO.0b013e31819962f6
  19. Reamy BV, Slakey JB. Adolescent idiopathic scoliosis: review and current concepts. Am Fam Physician. 2001;64(1):111–116.
  20. Greene WB, ed. Essentials of Musculoskeletal Care. 2nd ed. Rosemont, Ill.: American Academy of Orthopaedic Surgeons; 2001:696–699.
  21. Roach JW. Adolescent idiopathic scoliosis. Orthop Clin North Am. 1999;30(3):353–365, vii–viii.
  22. Pahys JM, Guille JT. What’s New in Congenital Scoliosis?. J Pediatr Orthop. 2018 Mar. 38 (3):e172-e179.
  23. Winter RB, Lonstein JE, Boachie-Adjei O. Congenital spinal deformity. Instr Course Lect. 1996. 45:117-27.
  24. Bouchoucha S, Khelifi A, Saied W, Ammar C, Nessib MN, Ben Ghachem M. Progressive correction of severe spinal deformities with halo-gravity traction. Acta Orthop Belg. 2011 Aug. 77(4):529-34.
  25. O’Leary PT, Sturm PF, Hammerberg KW, Lubicky JP, Mardjetko SM. Convex hemiepiphysiodesis: the limits of vertebral stapling. Spine (Phila Pa 1976) 2011 Sep 1;36(19):1579–1583. doi:10.1097/BRS.0b013e318227df9c
  26. Bollini G, Launay F, Docquier PL, Viehweger E, Jouve JL. Congenital abnormalities associated with hemivertebrae in relation to hemivertebrae location. Journal of Pediatric Orthopaedics B. 2010;19:90–94.
  27. Burnei G, Georgescu I, Gavriliu S, Vlad C, Dan D. The correction of congenital scoliosis by somatic instrumentation associated to hemivertebral resection and discectomy. In: World IV interdisciplinary congress on spine care. Istanbul, Turkey: 2007. Jul-Aug.
  28. Obeid I, Bourghli A, Vital JM. Thoracic hemivertebraresection by posterior approach for congenital scoliosis. Eur Spine J. 2013;22(3):678–680.
  29. Akbarnia BA, Marks DS, Boachie-Adjei O, Thompson AG, Asher MA. Dual Growing Rod Technique for the Treatment of Progressive Early-Onset Scoliosis A Multicenter Study. SPINE. 2005;30, 17S:S46–S57.
  30. Gomez JA, Lee JK, Kim PD, Roye DP, Vitale MG. “Growth Friendly” Spine Surgery: Management Options for the Young Child With Scoliosis. J Am Acad Orthop Surg. 2011;19:722–727.
  31. Campbell RM Jr, Smith MD, Mayes TC. The characteristics of thoracic insufficiency syndrome associated with fused ribs and congenital scoliosis. J Bone Joint Surg Am. 2003;85-A:399–408.
  32. Burnei G, Gavriliu TS, Vlad C, Georgescu I, Alexandra GR, Maria JE. Transient paresis in a congenital scoliosis with double rib protrusion into the spinal canal. Spine J. 2014 Apr 14; pii: S1529-9430(14)00378-7. doi: 10.1016/j.spinee.2014.01.064
  33. Ramirez N, Flynn JM, Emans JB, Betz R, Smith JT, Price N, St. Hilaire T, Joshi AP, Campbell RM. Vertical Expandable Prosthetic Titanium Rib as Treatment of Thoracic Insufficiency Syndrome in Spondylocostal Dysplasia. J Pediatr Orthop. 2010;30:521–526.
  34. Gauthier LE, Mandourah Y, Soroceanu A, McIntosh Al, Flynn JM, El-Hawary R. Perioperative Neurologic Injury Associated With Rib-Based Distraction Surgery. Spine Deformity. 2014;2:481–488.
  35. Hell AK, Campbell RM, Hefti F. The vertical expandable prosthetic titanium rib implant for the treatment of thoracic insufficiency syndrome associated with congenital and neuromuscular scoliosis in young children. J Pediatr Orthop B. 2015;14:287–293.
  36. Ouellet J. Surgical Technique: Modern Luqué Trolley, a Self-growing Rod Technique. Clin Orthop Relat Res. 2011 May;469(5):1356–1367.
  37. Chang DG, Yang JH, Lee JH, Kim JH, Suh SW, Ha KY, et al. Congenital scoliosis treated with posterior vertebral column resection in patients younger than 18 years: longer than 10-year follow-up. J Neurosurg Spine. 2016 Aug. 25 (2):225-33.
read more
Conditions & DiseasesMusculoskeletal System

Congenital vertical talus

Congenital vertical talus

Congenital vertical talus

Congenital vertical talus also called rocker-bottom foot is a rare congenital foot deformity in which the sole of a child’s foot flexes abnormally in a convex position giving the foot a rocker-bottom appearance. For this reason, congenital vertical talus is often called rocker-bottom foot. Congenital vertical talus is characterized by a prominent calcaneus/heel and a convexly rounded sole. Congenital vertical talus is usually a rigid deformity, unlike the more common calcaneovalgus foot (flexible deformity), and rarely improves with stretching or bracing. In most cases, surgery is required.

When a child is born, their feet usually appear flat because of the extra fat pads on the bottom. As the child grows, a concave arch in their foot normally develops. In a child with rocker-bottom foot, the bottom of the foot flexes in the opposite direction, making the middle of the foot touch the floor, while the toes and heel curve upward, touching the shin.

Congenital vertical talus is an uncommon disorder. Jacobsen and Crawford 1 reported only 273 cases. Congenital vertical talus (rocker-bottom foot) affects about 1 in 10,000 births and occurs equally in boys and girls. In about half of the cases, both feet are affected. Some have estimated the incidence of congenital vertical talus to be one tenth that of congenital clubfoot.

Congenital vertical talus is often associated with an underlying musculoskeletal or neurological condition such as:

  • Spina bifida
  • Trisomy 13, 14, 15 or 18
  • Arthrogryposis multiplex congenita

In a minority of cases, the cause of rocker-bottom foot is unknown, in an otherwise healthy child.

Although the cause of congenital vertical talus is likely heterogeneous, recent evidence strongly supports a genetic cause linking it to genes expressed during early limb development 2. Traditional management for vertical talus involves extensive surgeries that are associated with significant short- and long-term complications. A minimally invasive approach that relies on serial manipulation and casting to achieve most of the correction has been shown to produce excellent short-term results with regard to clinical and radiographic correction in both isolated and nonisolated cases of vertical talus. Although long-term studies are needed, achieving correction without extensive surgery may lead to more flexible and functional feet, much as Ponseti method has done for clubfeet 2.

Autopsy and surgical findings have contributed to the understanding of the pathologic anatomy of the vertical talus 3. The hindfoot is in marked equinus and valgus caused by contracture of the Achilles tendon and the posterolateral ankle and subtalar joint capsules. The midfoot and forefoot are dorsiflexed and abducted relative to the hindfoot secondary to contractures of the tibialis anterior, extensor digitorum longus, extensor hallucis brevis, peroneus tertius, and extensor hallucis longus tendons and the dorsal aspect of the talonavicular capsule. The navicular is dorsally and laterally dislocated on the head of the talus, resulting in the development of a hypoplastic and wedge-shaped navicular. Both the talar head and neck are abnormal in shape and orientation, resulting in a flat appearance that is angled medially from the midline. The position of the talus stretches vertically and weakens the plantar soft tissues, including the calcaneonavicular, or spring ligament, which gives the foot a rocker-bottom appearance. The plantar surface of the foot is convex, whereas the dorsal aspect of the midfoot has deep creases (see Figure 1). The calcaneus is in extreme equinus, which often causes either dorsolateral subluxation or frank dorsal dislocation of the calcaneocuboid joint. The posterior tibial tendon and the peroneus longus and brevis are commonly subluxated anteriorly over the medial and lateral malleolus, respectively; the subluxated tendons may then function as ankle dorsiflexors rather than plantar flexors 4.

Primary surgical treatment of a congenital vertical talus in a child younger than 2 years can be done with either a one-stage or two-stage extensive soft-tissue release 5. The first stage of the two-stage approach consists of lengthening the contracted dorsolateral tendons, releasing the associated dorsolateral capsular contractures, and reducing the talonavicular and subtalar joint complex. The second stage consists of lengthening the Achilles and peroneal tendons as well as performing a posterolateral capsular release 6. Historically, the one-stage approach was simply a combination of the two stages into a one-stage procedure. Seimon 7 modified the one-stage approach, emphasizing that, by carefully addressing the dorsolateral soft-tissue contractures, less extensive soft-tissue release was needed posteriorly. Mazzocca et al 8 compared Seimon’s dorsal approach with more extensive staged approaches and found that it required less surgical time, had fewer complications, and resulted in improved clinical outcomes. Today, most authors use some form of the single-stage approach 9 and report better results than those achieved using a two-stage approach 10. However, the complications associated with both approaches (eg, wound necrosis, osteonecrosis, undercorrection and overcorrection of deformities) are concerning 11. Longer-term problems include stiffness of the ankle and subtalar joints and the development of degenerative arthritis, leading to the need for salvage procedures, such as subtalar and triple arthrodeses. These problems are similar to the poor long-term outcomes and functional disability reported with extensive soft-tissue release surgery for clubfoot 12.

Figure 1. Vertical talus deformity

vertical talus deformity

Footnote: Clinical photographs of a newborn’s feet demonstrating the features of vertical talus. The plantar aspect of the feet (A) show forefoot abduction deformities, and the dorsolateral aspect of the feet (B) demonstrate deep creases on presentation secondary to forefoot and midfoot dorsiflexion.

[Source 2 ]

Congenital vertical talus classification

Current classification systems for vertical talus focus on either a description of the anatomic abnormalities present or the presence or absence of associated diagnoses. The most widely used anatomic classification system was proposed by Coleman et al 13. They described two types of vertical talus; type 1 deformity is characterized by a rigid dorsal dislocation of the talonavicular joint. In addition to a rigid dislocation of the talonavicular joint, a type 2 deformity has a dislocation or subluxation of the calcaneocuboid joint (ie, the long axis of the calcaneus lies plantar to the long axis of the cuboid). Other classification systems have focused on whether the vertical talus was an isolated deformity or was present in addition to other abnormalities 14. The problem with these classification systems is that they do not directly take into account the motor function of the lower legs. Weak or absent motor function in the lower leg musculature is predictive of not only poor response to initial treatment but also a risk of relapse 15. The child’s ability to dorsiflex and plantarflex the toes can be evaluated by lightly stimulating the dorsal and plantar aspects of the foot. Movement can be graded as definitive, slight, or absent. This simple examination can be repeated at each clinical visit to improve accuracy. A new classification system that takes this into account is needed because the ability to better predict the response to treatment will allow for the development of an individualized treatment program for patients.

It should be noted that current classification systems have attempted to define oblique talus as a milder form of vertical talus based on radiographic and clinical examination criteria 16. However, these attempts at classification have not translated into consistent treatment recommendations because some oblique tali do require treatment despite being milder in nature 14. Oblique tali that have an associated Achilles tendon contracture are at risk of becoming symptomatic with time. For this reason, some experts consider oblique tali and vertical tali to be related entities that occur along a spectrum of severity. Similar to clubfeet, not all vertical tali have the same rigidity. If oblique talus is diagnosed on radiography, but an equinus contracture (defined as the inability to achieve 10° of passive ankle dorsiflexion with the knee extended and flexed) is present, some experts treat it as a vertical talus. Treatment decisions, should be based on the rigidity of the talonavicular joint as well as of the hindfoot.

Vertical talus causes

In most cases, the cause of vertical talus deformity remains unknown. Approximately one half of cases of vertical talus occur in conjunction with neurologic disorders (neuromuscular and central nervous system) 17 or known genetic defects and/or syndromes 15. The other half occur in children without other congenital anomalies and are considered idiopathic or isolated cases 2. Ogata et al 18 proposed a congenital vertical talus classification system that divides patients into the following three groups:

  • Idiopathic
  • Genetic/syndromic
  • Neuromuscular

The most common neurologic disorders associated with vertical talus are distal arthrogryposis and myelomeningocele 17 and the most common genetic defects include aneuploidy of chromosomes 13, 15, and 18 19. Vertical talus is also commonly associated with a variety of syndromes, including De Barsy, Costello, and Rasmussen syndromes22 and split hand and split foot limb malformation disorders. Of the 50% of cases of vertical talus that are isolated, almost 20% have a positive family history of vertical talus. In most of these cases, congenital vertical talus is inherited in an autosomal dominant fashion, supporting the theory that a significant number of isolated cases have a genetic origin, as well 20. Specific gene mutations in the homeobox transcription factor and cartilage-derived morphogenetic protein-1 genes have been found to be causative in some patients with familial, autosomal dominant isolated vertical talus and in some families with congenital hand and foot anomalies of which vertical talus is a feature 20. Growth differentiation factor 5 is closely related to the bone morphogenetic proteins associated with neurologic and limb development.

No single gene defect is responsible for all cases of vertical talus; therefore, it is likely that the pathophysiologic basis for the development of vertical talus is heterogeneous in nature. One hypothesis to explain vertical talus associated with neuromuscular disorders is an imbalance in muscle strength. In patients with myelomeningocele with vertical talus, a weak posterior tibialis and relatively strong ankle dorsiflexors could be contributing factors, whereas weakness of the foot intrinsic muscles may play a contributing role in other neuromuscular disorders. These mechanisms and congenital muscle abnormalities, which are also seen in the setting of distal arthrogryposis, may play a role in some cases of isolated vertical talus, as well. This is supported by the high percentage of abnormal skeletal muscle biopsies performed in this patient population 15. Congenital vascular deficiency of the lower extremities has also been proposed as a potential cause of vertical talus based on magnetic resonance angiography findings that demonstrated congenital arterial deficiencies of the lower extremity in a group of patients with isolated vertical talus 21.

Vertical talus associations

  • Aneuploidic syndromic
    • trisomy 13
    • trisomy 18
    • 18q deletion syndrome
  • Non-aneuploidic non-syndromic
    • spina bifida
    • arthrogryposis

Congenital vertical talus symptoms

The most common symptom of congenital vertical talus is a rocker-bottom appearance of the foot, which is usually obvious at birth or seen when a child begins to walk.

Other symptoms include:

  • An upward flex of the mid- and forefoot
  • The hindfoot is elevated due to an abnormal flex in the ankle
  • The midfoot cannot be properly aligned with the hindfoot
  • Abnormal positioning of the foot; child may walk on the inside of their foot, while the outside edge is elevated, leading to improper balance and weight distribution

Clinically, congenital vertical talus presents as a rigid flatfoot with a rocker-bottom appearance of the foot. The calcaneus is in fixed equinus, and the Achilles tendon is very tight. The hindfoot is in valgus, and the head of the talus is found medially in the sole, creating the rocker-bottom appearance. The forefoot is abducted and dorsiflexed.

The foot is stiff. In ambulatory children, calluses can develop under the head of the talus, which is very prominent along the plantar-medial foot.

Associated genetic syndromes must be excluded; therefore, a consultation with a pediatric geneticist may be indicated.

Congenital vertical talus diagnosis

Early detection of congenital vertical talus is important for successful treatment. Trained pediatric orthopaedic surgeon will perform a complete medical history, a physical examination and a visual evaluation of your child.

During the physical exam, the doctor will examine your entire child — not just their foot. The doctor will be looking for other abnormalities such as multiple joint contractures or evidence suggesting your child may have a larger multisystem genetic disorder.

Doctors will also closely examine your child’s foot — while standing and in motion — to determine if your child has rocker-bottom foot, or a more common and benign conditions such as calcaneovalgus foot or flat foot. Though symptoms of these conditions may mimic each other in young children, treatments are very different.

Physical examination

Hindfoot equinus, hindfoot valgus, forefoot abduction, and forefoot dorsiflexion are present in all newborns with vertical talus. The rigidity of the deformity is the key to distinguishing between vertical talus and more common conditions, such as calcaneovalgus foot, posteromedial bowing of the tibia, and oblique talus. If hindfoot equinus is not a clinical feature, then the deformity is not vertical talus and is likely positional in nature. Because of the frequency of neuromuscular and genetic abnormalities associated with vertical talus, it is important to perform a comprehensive physical examination. The clinician should look for facial dysmorphic features that require a referral to a geneticist or abnormalities suggestive of a neuromuscular etiology, which would require MRI evaluation of the neuroaxis and referral to a pediatric neuromuscular specialist. The presence of a sacral dimple, in particular, should alert the examiner to possible central nervous system anomalies.

It is equally important for the examiner to document motor function of the foot and ankle with special attention to the toe flexors and extensors. This is done by stimulating the plantar and dorsal aspects of the foot separately to elicit plantar flexion and dorsiflexion of the toes. This should be done serially during treatment sessions because the examination can be difficult, and results from serial examinations are more telling. The presence of dorsiflexion and plantar flexion of the toes is recorded as absent, slight, or definitive. This should be recorded for the great toe alone as well as the lesser toes as a separate group. In our experience, slight or absent ability to move the toes with stimulation correlates with a vertical talus deformity that is more rigid and less responsive to treatment. It may also be indicative of a subtle congenital neurologic or muscular anomaly.

Clinically, a congenital vertical talus foot has a convex plantar surface that results in a rocker-bottom appearance (Figure 1A). The dorsum of the foot has deep creases secondary to forefoot and midfoot dorsiflexion (Figure 1B). The extreme dorsiflexion of the forefoot creates a distinct palpable gap dorsally where the navicular and talar head would articulate in a normal foot. Characteristics of this gap can help the examiner assess rigidity. If the gap reduces with plantar flexion of the forefoot, then the deformity has a degree of flexibility; this may help predict responsiveness to treatment. Left untreated, a rigid vertical talus deformity may worsen with weight bearing because secondary adaptive changes occur in the tarsal bones 22. Painful callosities can develop along the plantar medial border of the foot around the prominent and unreduced talar head. Heel strike does not occur, shoe wear becomes difficult, and pain develops 23.

Imaging studies

To confirm the diagnosis or better understand the anatomy of your child’s foot and leg, doctors may also order imaging tests such as:

  • X-rays, which produce images of bones. Weightbearing anteroposterior (AP) and lateral views of the foot are the first radiographs that must be obtained. A lateral radiograph with the foot in maximum plantarflexion is mandatory to confirm congenital vertical talus. The hallmark of congenital vertical talus deformity is an abnormally positioned talus bone (this is the bone that connects the foot to the ankle). Because the navicular may not be ossified, the alignment of the first metatarsal to the talus must be evaluated. In a vertical talus, the metatarsal does not line up with the talus. Lines drawn through the long axis of the first metatarsal and the talus converge on the plantar aspect of the foot. Hamanishi 24 described two radiographic angles: the talar axis–first metatarsal base angle (TAMBA) and the calcaneal axis–first metatarsal base angle (CAMBA). The changing point from a flexible oblique talus to rigid CVT is a TAMBA of approximately 60° and a CAMBA of 20°.
  • EOS imaging, an imaging technology that creates 3-dimensional models from two flat images. Unlike a CT scan, EOS images are taken while the child is in an upright or standing position, enabling improved diagnosis due to weight-bearing positioning.
  • Computed tomography (CT) scan, which uses a combination of X-rays and computer technology to examine bones and produces cross-sectional images (“slices”) of the body.
  • Magnetic resonance imaging (MRI), which uses a combination of large magnets, radiofrequencies and a computer to produce detailed images of organs, soft tissues, muscles, ligaments and other structures within the body. Your child is exposed to no radiation during an MRI. Magnetic resonance imaging (MRI) of the spine may be indicated if an occult spinal dysraphism, such as lipomeningocele, is suspected 25. Posterior and lateral lumbar spine radiographs also may be useful to exclude occult spinal dysraphism. Thometz et al 26 evaluated nine patients with congenital vertical talus using MRI to evaluate the three-dimensional morphologic changes and pathoanatomy. They concluded that there is significant pathology at the level of the subtalar joint.
  • Ultrasonography. Ultrasonography has been reported to be helpful in distinguishing between congenital vertical talus (irreducible talonavicular dorsal dislocation) and oblique talus (reducible talonavicular dorsal dislocation) 27. Lateral radiographs of the foot in maximal plantarflexion can reveal if the navicular is reducible. However, radiographs of an infant’s foot can be difficult to interpret. The use of dynamic ultrasonography has been reported to be helpful in the evaluation of infants with vertical or oblique talus 27.

If your child appears to have a neurological condition, the orthopedic physician may refer your child to a neurologist for a complete neurological exam.

Congenital vertical talus treatment

All children with congenital vertical talus will require some form of treatment. While some children may be helped with non-surgical treatment, most will require surgery.

Non-surgical treatment

Doctors may recommend a variety of non-surgical treatments to prevent your child’s condition from getting worse. These include:

  • Stretching exercises for the forefoot and hindfoot
  • Serial manipulation and casting of the midfoot and forefoot in a flexed position to reduce the upward curve of the foot

Improvements from these treatments do occur, but are often temporary.

Congenital vertical talus surgery

Surgery for congenital vertical talus is complicated because it involves correcting foot movement in three directions — side-to-side, up-and-down and front-and-back. A specialist in pediatric foot deformities should perform it. Surgery can dramatically improve the long-term outcomes for your child with congenital vertical talus, but it can also be a stressful experience for you and your child. With adequate serial casting, need for extensive soft-tissue release surgery can be minimized to minimally invasive tendon procedures which leave smaller scars and shorter recovery time. Other procedures can include bone work in older children.

Controversy exists over the choice of surgical approaches. However, some experts believe that the choice of structures to be released is a more important factor in determining outcomes than is the choice of incisions to be used. Special attention must be paid to the dorsal and dorsolateral contracted tissues. Controversy also exists over the need for an anterior tibialis tendon transfer.

Several authors, beginning with Osmond-Clarke 28, Herndon and Heyman 29 and Coleman and associates 30, described staged two-incision reconstructive surgery. The first stage of the Coleman procedure consisted of lengthening the extensor digitorum longus, the extensor hallucis longus, and the tibialis anterior, with capsulotomies of the talonavicular and calcaneocuboid joints and release of the talocalcaneal interosseous ligament. The second stage consisted of Achilles tendon lengthening and a posterior capsulotomy of the ankle and subtalar joints.

After noting a high incidence of complications with the two-stage technique, Ogata et al 18 recommended a single-stage procedure with a medial approach. Kodros and Dias 31 published results they derived using a single-stage approach with a Cincinnati incision.

Seimon described a single-stage dorsal approach in which the extensor digitorum longus and the peroneus tertius were tenotomized and the talonavicular joint was opened 32. The talonavicular joint was reduced and held with a K-wire. The Achilles tendon was lengthened percutaneously. Stricker and Rosen 33 published their experience with this technique, as did Mazzocca et al 34; both groups noted excellent results with few complications.

The trend toward less surgery for congenital vertical talus continued with Dobbs et al 35, who published their technique of casting, percutaneous K-wire pinning of the talonavicular joint, and percutaneous heel-cord tenotomy. No patients had extensive soft-tissue releases, though some required lengthening of the tibialis anterior or the peroneus brevis tendon. Casting without pinning of the talonavicular joint was associated with recurrence of deformity.

Saini et al 36 reported on their surgical experience with 20 cases of congenital vertical talus using a dorsal approach. According to the authors, talonavicular reduction was achieved in all 20 feet, and postoperative talocalcaneal and talo-first metatarsal angles were significantly improved. The results were retained at 4-year follow-up 36.

Bhaskar 37 described a surgical technique used for idiopathic congenital vertical talus in four feet; this technique was similar to the Ponseti technique for clubfoot, except that the forces applied were in a reverse direction. The four feet were treated by serial manipulation and casting, tendo Achillis tenotomy, and percutaneous pinning of the talonavicular joint.

To correct the forefoot deformity, four to six plaster cast applications were required 37. Once the talus and navicular were aligned, percutaneous fixation of the talonavicular joint with a K-wire and percutaneous tendo Achillis tenotomy under anesthesia were performed, followed by application of a cast with the foot in slight dorsiflexion. After treatment, the mean talocalcaneal angle decreased from 70º to 31º, and the mean talar axis–first metatarsal base angle (TAMBA) decreased from 60º to 10.5º.

Wright et al 38 reported on 12 children (21 feet) with idiopathic and teratologic causes. They noted 10 recurrences, a rate higher than those cited in other reports. The authors felt that a limited capsulotomy of the talonavicular joint might reduce the risk of recurrence. They did not find a difference in results between the two groups of patients.

In 2012, Chalayon et al 39 reported on 15 consecutive patients (25 feet) with nonisolated congenital vertical talus who were followed for a minimum of 2 years after reverse Ponseti casting, percutaneous Achilles tendon lengthening and pin fixation of the talonavicular joint. Five feet required a small medial incision to ensure joint reduction and accurate pin placement, and 20 feet had selective capsulotomies of the talonavicular joint and the anterior aspect of the subtalar joint. Initial correction was obtained in all cases, but recurrence was noted in three patients (five feet).

Yang and Dobbs 40 published a comparison of the minimally invasive method versus extensive soft-tissue release with a minimum follow-up of 5 years (Dobbs technique). They documented that the minimally invasive method resulted in better results in terms of range of motion and patient-reported outcomes.

Chan et al 41 evaluated the Dobbs method for correction of idiopathic congenital vertical talus versus correction of teratologic congenital vertical talus. The results were comparable, but the recurrence rate was slightly higher for teratologic congenital vertical talus.

Complications

Complications can occur around the time of surgery (perioperatively) or can manifest early or late in the postoperative period.

Common complications in the perioperative period include infection, wound-healing problems, and skin slough; however, these complications are not unique to congenital vertical talus.

In the first 1-2 years after surgery, the deformity can recur, usually secondary to undercorrection. Undercorrection can occur because of incomplete talonavicular reduction, insufficient posterior ankle release, or residual forefoot abduction. [16] Recurrence of the deformity can also be attributable to neurologic causes, especially in patients with spina bifida. Kodros and Dias reported a high recurrence rate in patients with spina bifida and believed that in these cases the recurrences might be secondary to a tethered spinal cord or other neurologic abnormality.

Avascular necrosis (AVN) of the talus is a unique complication of congenital vertical talus surgery. It was more often reported in the older literature and was associated with the two-stage release and extensive surgery. Subsequent articles by Kodros and Dias 31, Seimon 32, Stricker and Rosen 33, and Mazzocca et al 34 did not report occurrences of avascular necrosis (AVN) of the talus.

Late complications include restricted range of motion of the foot and ankle, which can contribute to calf muscle atrophy. This in turn can lead to easy fatigue of the affected limb.

Congenital vertical talus prognosis

Most children who are surgically treated for congenital vertical talus have good outcomes. Some children may need an orthotic to ensure proper foot alignment during critical growth and development periods.

Children who have congenital vertical talus as part of a larger neurological or musculoskeletal syndrome will likely need lifelong follow-up care.

In general, the outcome and prognosis are good 36. Some minor calf atrophy and foot size asymmetry occur and are more noticeable in unilateral cases. Ankle range of motion is about 75% of normal. If avascular necrosis (AVN) of the talus occurs, the results are less optimal because of ankle pain, stiffness, and weakness.

Patients with congenital vertical talus have a more favorable prognosis when treated with the Dobbs technique than they do when treated with extensive soft-tissue release. Idiopathic congenital vertical talus tends to have a more favorable outcome than teratologic congenital vertical talus does 42.

References
  1. Jacobsen ST, Crawford AH. Congenital vertical talus. J Pediatr Orthop. 1983 Jul. 3 (3):306-10.
  2. Miller, Mark MD; Dobbs, Matthew B. MD Congenital Vertical Talus, Journal of the American Academy of Orthopaedic Surgeons: October 2015 – Volume 23 – Issue 10 – p 604-611 doi: 10.5435/JAAOS-D-14-00034
  3. Drennan JC: Congenital vertical talus. Instr Course Lect 1996;45:315–322.
  4. Alaee F, Boehm S, Dobbs MB: A new approach to the treatment of congenital vertical talus. J Child Orthop 2007;1(3):165–174.
  5. Kodros SA, Dias LS: Single-stage surgical correction of congenital vertical talus. J Pediatr Orthop 1999;19(1):42–48.
  6. Walker AP, Ghali NN, Silk FF: Congenital vertical talus: The results of staged operative reduction. J Bone Joint Surg Br 1985;67(1):117–121.
  7. Seimon LP: Surgical correction of congenital vertical talus under the age of 2 years. J Pediatr Orthop 1987;7(4):405–411.
  8. Mazzocca AD, Thomson JD, Deluca PA, Romness MJ: Comparison of the posterior approach versus the dorsal approach in the treatment of congenital vertical talus. J Pediatr Orthop 2001;21(2):212–217.
  9. Duncan RD, Fixsen JA: Congenital convex pes valgus. J Bone Joint Surg Br 1999;81(2):250–254.
  10. Jacobsen ST, Crawford AH: Congenital vertical talus. J Pediatr Orthop 1983;3(3):306–310.
  11. Mathew PG, Sponer P, Karpas K, Shaikh HH: Mid-term results of one-stage surgical correction of congenital vertical talus. Bratisl Lek Listy 2009;110(7):390–393.
  12. Dobbs MB, Nunley R, Schoenecker PL: Long-term follow-up of patients with clubfeet treated with extensive soft-tissue release. J Bone Joint Surg Am 2006;88(5):986–996.
  13. Coleman SS, Stelling FH III, Jarrett J: Pathomechanics and treatment of congenital vertical talus. Clin Orthop Relat Res 1970;70:62–72.
  14. Hamanishi C: Congenital vertical talus: Classification with 69 cases and new measurement system. J Pediatr Orthop 1984;4(3):318–326.
  15. Merrill LJ, Gurnett CA, Connolly AM, Pestronk A, Dobbs MB: Skeletal muscle abnormalities and genetic factors related to vertical talus. Clin Orthop Relat Res 2011;469(4):1167–1174.
  16. Gould N, Moreland M, Alvarez R, Trevino S, Fenwick J: Development of the child’s arch. Foot Ankle 1989;9(5):241–245.
  17. Sharrard WJ, Grosfield I: The management of deformity and paralysis of the foot in myelomeningocele. J Bone Joint Surg Br 1968;50(3):456–465.
  18. Ogata K, Schoenecker PL, Sheridan J. Congenital vertical talus and its familial occurrence: an analysis of 36 patients. Clin Orthop Relat Res. 1979 Mar-Apr. (139):128-32.
  19. Townes PL, Manning JA, Dehart GK Jr: Trisomy 18 (16-18) associated with congenital glaucoma and optic atrophy. J Pediatr 1962;61:755–758.
  20. Dobbs MB, Gurnett CA, Pierce B, et al.: HOXD10 M319K mutation in a family with isolated congenital vertical talus. J Orthop Res 2006;24(3):448–453.
  21. Kruse L, Gurnett CA, Hootnick D, Dobbs MB: Magnetic resonance angiography in clubfoot and vertical talus: A feasibility study. Clin Orthop Relat Res 2009;467(5):1250–1255.
  22. Outland T, Sherk HH: Congenital vertical talus. Clin Orthop 1960;16(16):214–218.
  23. Harris RI, Beath T: Hypermobile flat-foot with short tendo achillis. J Bone Joint Surg Am 1948;30(1):116–140.
  24. Hamanishi C. Congenital vertical talus: classification with 69 cases and new measurement system. J Pediatr Orthop. 1984 May. 4 (3):318-26.
  25. Kruse L, Gurnett CA, Hootnick D, Dobbs MB. Magnetic resonance angiography in clubfoot and vertical talus: a feasibility study. Clin Orthop Relat Res. 2009 May. 467 (5):1250-5.
  26. Thometz JG, Zhu H, Liu XC, Tassone C, Gabriel SR. MRI pathoanatomy study of congenital vertical talus. J Pediatr Orthop. 2010 Jul-Aug. 30 (5):460-4.
  27. Supakul N, Loder RT, Karmazyn B. Dynamic US study in the evaluation of infants with vertical or oblique talus deformities. Pediatr Radiol. 2013 Mar. 43 (3):376-80.
  28. OSMOND-CLARKE H. Congenital vertical talus. J Bone Joint Surg Br. 1956 Feb. 38-B (1):334-41.
  29. Herndon CH, Heyman CH. Problems in the recognition and treatment of congenital pes valgus. J Bone Joint Surg Am. 1963. 45:413-29.
  30. Coleman SS, Stelling FH 3rd, Jarrett J. Pathomechanics and treatment of congenital vertical talus. Clin Orthop Relat Res. 1970 May-Jun. 70:62-72.
  31. Kodros SA, Dias LS. Single-stage surgical correction of congenital vertical talus. J Pediatr Orthop. 1999 Jan-Feb. 19 (1):42-8.
  32. Seimon LP. Surgical correction of congenital vertical talus under the age of 2 years. J Pediatr Orthop. 1987 Jul-Aug. 7 (4):405-11.
  33. Stricker SJ, Rosen E. Early one-stage reconstruction of congenital vertical talus. Foot Ankle Int. 1997 Sep. 18 (9):535-43.
  34. Mazzocca AD, Thomson JD, Deluca PA, Romness MJ. Comparison of the posterior approach versus the dorsal approach in the treatment of congenital vertical talus. J Pediatr Orthop. 2001 Mar-Apr. 21 (2):212-7.
  35. Dobbs MB, Purcell DB, Nunley R, Morcuende JA. Early results of a new method of treatment for idiopathic congenital vertical talus. J Bone Joint Surg Am. 2006 Jun. 88 (6):1192-200.
  36. Saini R, Gill SS, Dhillon MS, Goyal T, Wardak E, Prasad P. Results of dorsal approach in surgical correction of congenital vertical talus: an Indian experience. J Pediatr Orthop B. 2009 Mar. 18 (2):63-8.
  37. Bhaskar A. Congenital vertical talus: treatment by reverse ponseti technique. Indian J Orthop. 2008 Jul. 42 (3):347-50.
  38. Wright J, Coggings D, Maizen C, Ramachandran M. Reverse Ponseti-type treatment for children with congenital vertical talus: comparison between idiopathic and teratological patients. Bone Joint J. 2014 Feb. 96-B (2):274-8
  39. Chalayon O, Adams A, Dobbs MB. Minimally invasive approach for the treatment of non-isolated congenital vertical talus. J Bone Joint Surg Am. 2012 Jun 6. 94 (11):e73.
  40. Yang JS, Dobbs MB. Treatment of Congenital Vertical Talus: Comparison of Minimally Invasive and Extensive Soft-Tissue Release Procedures at Minimum Five-Year Follow-up. J Bone Joint Surg Am. 2015 Aug 19. 97 (16):1354-65.
  41. Chan Y, Selvaratnam V, Garg N. A comparison of the Dobbs method for correction of idiopathic and teratological congenital vertical talus. J Child Orthop. 2016 Apr. 10 (2):93-9.
  42. Congenital Vertical Talus. https://emedicine.medscape.com/article/1259681-overview#a2
read more
BonesConditions & DiseasesHealth topicsJointsLigamentsMusculoskeletal System

Kids sprained ankle

Kids sprained ankle

Kids sprained ankle

A sprained ankle means one or more ligaments on the outer side of your ankle were stretched or torn. Ankle sprains are one of the most common injuries in children. Ankles are made up of three bones with ligaments (tough, stretchy tissue that hold the bones together). The ligaments help stop the ankle joint from moving around too much.

Ankle sprains usually happen when there is a sudden movement or twist – often when the foot rolls over – and the ligaments are overstretched. This causes tears and bleeding (which show as bruising and swelling) around the ankle joint. These movements are more likely to happen when a person is running, jumping or quickly changing direction e.g. in sports such as basketball, netball or football. Risk factors for both include poor conditioning, fatigue, poor warm up, slippery surfaces and poorly fitting footwear.

Pain, swelling, bruising, tenderness, difficulty moving the ankle or difficulty walking are common symptoms of an ankle sprain. However,  symptoms of a severe sprain are similar to those of a broken bone and require prompt medical evaluation.

A sprained ankle can vary greatly in severity from a minor “rolled ankle” to a complete ligament rupture with or without bone tendon or muscle injury. They are graded as 1, 2 or 3 depending on the severity. If a sprained ankle is not treated properly, you could have long-term problems. Typically sprained ankle is rolled either inward (inversion sprain) or outward (eversion sprain). Inversion sprains cause pain along the outer side of the ankle and are the most common type. Pain along the inner side of the ankle may represent a more serious injury to the tendons or to the ligaments that support the arch and should always be evaluated by a doctor.

Ankle sprains happen when you overstretch or torn a ligament. Ankle sprains occur most commonly by a sudden twisting or rolling action of your ankle often on unstable irregular surfaces. The ligaments affected is determined by the direction the foot rolls. The most common ankle sprain is the ligament on the side which occurs when the foot is turned in.

Certain factors can put a person at greater risk of spraining their ankle including poor footwear, not warming up before exercising, tired muscles and playing sport, previous injury, reduced strength, poor biomechanics or poor balance receptors. You’re most likely to sprain your ankle when you have your toes on the ground and heel up (plantar flexion). This position puts your ankle’s ligaments under tension, making them vulnerable. A sudden force like landing on an uneven surface may turn your ankle inward (inversion). When this happens, one, two or three of your ligaments may be hurt.

A sprained ankle can be difficult to differentiate from a fracture (broken bone) without an x-ray. If you are unable to bear weight after this type of injury, or if there is significant swelling or deformity, you should seek medical treatment from a doctor. This may be your primary care physician, an emergency department, or an orthopaedist, depending on the severity of your injury.

Ankle sprains are very common injuries. There’s a good chance that while playing or stepping on an uneven surface you sprained your ankle–some 25,000 people do it every day.​​​

Sometimes, it is an awkward moment when you lose your balance, but the pain quickly fades away and you go on your way. But the sprain could be more severe; your ankle might swell and it might hurt too much to stand on it. If it’s a severe sprain, you might have felt a “pop” when the injury happened.

Treatment for a sprained ankle depends on the severity of the injury. Although self-care measures and over-the-counter pain medications may be all you need, a medical evaluation might be necessary to reveal how badly you’ve sprained your ankle and to determine the appropriate treatment.

Minor ankle strains/sprains require rest, ice, compression, elevation (RICE) and over-the-counter pain relievers for treatment. An ankle brace may be helpful to support the ankle while it heals.

Surgical treatment for ankle sprains is rare. Surgery is reserved for injuries that fail to respond to nonsurgical treatment, and for patients who experience persistent ankle instability after months of rehabilitation and nonsurgical treatment.

When to see a doctor

Seek medical advice from your doctor or a physiotherapist if:

  • the pain from your child’s ankle has not improved after a few days
  • your child is unable to put weight on the injured ankle immediately after the injury
  • there is tenderness (pain when pressing) over the ankle bones
  • you are unable to control your child’s ankle pain.

Doctors and physiotherapists can examine your child’s ankle, order an X-ray if needed and provide a management plan for your child’s injury. If your child has ongoing or recurrent problems with their ankle, consider ankle braces or tape – your doctor or physiotherapist can advise you how to use these.

Ankle Joint ligaments

The ankle (talocrural) joint includes two articulations—a medial joint between the tibia and talus and a lateral joint between the fibula and talus, both enclosed in one joint capsule. The malleoli of the tibia and fibula overhang the talus on each side like a cap and prevent most side-to-side motion. The ankle therefore has a more restricted range of motion than the wrist.

Ligaments are strong, fibrous tissues that connect bones to other bones. The ligaments in the ankle help to keep the bones in proper position and stabilize the joint.

The ligaments of the ankle include (1) anterior and posterior tibiofibular ligaments, which bind the tibia to the fibula; (2) a multipart medial (deltoid) ligament, which binds the tibia to the foot on the medial side; and (3) a multipart lateral (collateral) ligament, which binds the fibula to the foot on the lateral side.

Most sprained ankles occur in the lateral ligaments on the outside of the ankle. Sprains can range from tiny tears in the fibers that make up the ligament to complete tears through the tissue.

The ankle joint is responsible for plantarflexion and dorsiflexion of the ankle. The subtalar joint lies underneath the true ankle joint and is the articulation between the talus and calcaneus. It assists the talo-crural joint in inversion and eversion. Most ankle sprains occur from an inversion mechanism of injury (rolled in).

The calcaneal (Achilles) tendon extends from the calf muscles to the calcaneus. It plantarflexes the foot and limits dorsiflexion. Plantar flexion is limited by extensor tendons on the anterior side of the ankle and by the anterior part of the joint capsule.

The most commonly injured ligaments of the ankle are the lateral ligaments which sit on the outside of the ankle. These include the anterior talofibular ligament, calcaneofibular ligament and posterior talofibular ligament. The ligament on the inside of the ankle is called the deltoid ligament which is much stronger and hence more difficult to injure.

Sprains (torn ligaments and tendons) are common at the ankle, especially when the foot is suddenly inverted or everted to excess. They are painful and usually accompanied by immediate swelling. They are best treated by immobilizing the joint and reducing swelling with an ice pack, but in extreme cases may require a cast or surgery.

High ankle sprains refer to injury to the inferior tibiofibular ligaments and syndesmosis which bind the tibia (shin bone) and fibula (calf bone) together above the ankle. A high ankle sprain is a much more debilitating injury, requiring a longer recovery time.

Figure 1. Ankle joint ligaments

Ankle joint ligaments

What is Chronic Ankle Sprains?

Once you have sprained your ankle, you may continue to sprain it if the ligaments do not have time to completely heal. It can be hard for patients to tell if a sprain has healed because even an ankle with a chronic tear can be highly functional because overlying tendons help with stability and motion.

If pain continues for more than 4 to 6 weeks, you may have a chronic ankle sprain. Activities that tend to make an already sprained ankle worse include stepping on uneven surfaces and participating in sports that require cutting actions or rolling and twisting of the foot.

Abnormal proprioception—a common complication of ankle sprains—can also lead to repeat sprains. There may be imbalance and muscle weakness that causes a reinjury. If you sprain your ankle over and over again, a chronic situation may persist with instability, a sense of the ankle giving way, and chronic pain. This can also happen if you return to work, sports, or other activities before your ankle heals and is rehabilitated.

How long does a sprained ankle take to heal?

After 2 weeks, most ankle sprains and strains will feel better. Avoid strenuous exercise such as running for up to 8 weeks, as there’s a risk of further damage.

Severe ankle sprains (grade 2 and 3) and strains can take months to get back to normal.

Most importantly, successful outcomes are dependent upon patient commitment to rehabilitation exercises. Incomplete rehabilitation is the most common cause of chronic ankle instability after a sprain. If a patient stops doing the strengthening exercises, the injured ligament(s) will weaken and put the patient at risk for continued ankle sprains.

I sprained my ankle last spring while I was running. The ankle doesn’t really hurt anymore, but it keeps ‘giving out’. What should I do?

Ankle sprains are the most common foot and ankle injury in sports. Typically, sprains occur when the foot inverts with an awkward step while running or jumping. As the foot rotates inward, the ligaments on the outside, or lateral aspect of the ankle, are stretched, causing swelling and pain. Most frequently, sprains will recover completely with rest, ice, compression, elevation and early mobilization.

In less than 10% of cases, while ankle swelling and pain improves, the ankle continues to “give out” or feel unstable. Classically, this occurs when walking on uneven ground or when stepping off of a curb. Repeated episodes of “giving out” is a condition called chronic ankle instability. Most frequently, this is a result of incomplete recovery from an acute ankle sprain that leaves the ankle with weakness and impaired postural control.

The initial treatment for chronic ankle instability is a program of structured rehabilitation with the help of a physical therapist. Exercises are aimed specifically at strengthening the peroneal tendons which run on the outside aspect of the ankle. The regimen should also include use of a balance board or similar device to work on proprioception – awareness of the position of the foot and ankle in space. Improved proprioception helps the ankle react more quickly to stresses, preventing future sprains.

After 6-8 weeks of intensive therapy, if the ankle continues to feel unstable, one might be a candidate for surgery to reconstruct the injured ankle ligaments. At this point, an MRI is helpful to identify any underlying injury such as cartilage damage at the ankle or peroneal tendon tears. Complete recovery from surgery takes at least 3 months, but patients will typically be able to return to full activity without limitation, and, most importantly, without the sensation of their ankle “giving out”.

Grades of Ankle Sprains

After the examination, your doctor will determine the grade of your sprain to help develop a treatment plan. Sprains are graded based on how much damage has occurred to the ligaments.

Some sprained ankles are minor injuries that heal with little treatment. Others can be more serious, though. The three grades of ankle sprains, based on how much damage is done to the ligaments, are (see Figure 2 below):

Figure 2. Sprained ankle grades

Sprained ankle grades

Grade 1 Sprain (Mild)

  • This is a mild sprain where ligaments stretch slightly.
  • Slight stretching and microscopic tearing of the ligament fibers
  • Someone with a grade 1 sprain will feel some soreness and may notice a bit of swelling around the ankle

Grade 2 Sprain (Moderate)

  • This is a moderate sprain where ligaments tear partly, making the ankle joint feel loose.
  • Partial tearing of the ligament
  • Moderate tenderness and swelling around the ankle
  • If the doctor moves the ankle in certain ways, there is an abnormal looseness of the ankle joint
  • The ankle will feel painful, and may stay swollen for a while. Putting weight on the foot can be difficult.

Grade 3 Sprain (Severe)

  • This is the most severe kind of sprain, where an ankle ligament tears completely.
  • Complete tear of the ligament
  • Significant tenderness and swelling around the ankle
  • If the doctor pulls or pushes on the ankle joint in certain movements, substantial instability occurs
  • The ankle joint will be very painful, with quite a bit of swelling. The person’s ankle will feel loose and unsteady and early on the person probably won’t be able to put any weight on the ankle.
  • If there is a complete tear of the ligaments, the ankle may become unstable after the initial injury phase passes. Over time, this instability can result in damage to the bones and cartilage of the ankle joint.

Tell your doctor what you were doing when you sprained your ankle. He or she will examine it and may want an x-ray to make sure no bones are broken. Most ankle sprains do not require surgery, and minor sprains are best treated with a functional rehabilitation program.

If you repeatedly sprain the same ankle or feel pain for more than 4 to 6 weeks, you may have what’s called a chronic sprain. This type of lasting sprain can flare up and be made worse by activities that involve rolling or twisting the feet, like running, dancing, or playing sports.

Sprained ankle causes

A sprain occurs when your ankle is forced to move out of its normal position, which can cause one or more of the ankle’s ligaments to stretch, partially tear or tear completely.

The most common type of sprained ankle is called an inversion sprain, or lateral ligament sprain. With this type of sprain, the ankle turns so the sole of the foot is facing inwards, stretching and possibly damaging the ligaments on the outer part of the ankle.

You don’t have to be playing hard to injure an ankle: sprains can happen just from taking an awkward step or tripping on the stairs.

Causes of a sprained ankle might include:

  • A fall that causes your ankle to twist
  • Landing awkwardly on your foot after jumping or pivoting
  • Walking or exercising on an uneven surface
  • Another person stepping or landing on your foot during a sports activity, while you are running, causing your foot to twist or roll to the side
  • Participating in sports that require cutting actions or rolling and twisting of the foot—such as trail running, basketball, tennis, football, and soccer.

Risk factors for sprained ankle

Factors that increase your risk of a sprained ankle include:

  • Sports participation. Ankle sprains are a common sports injury, particularly in sports that require jumping, cutting action, or rolling or twisting of the foot such as basketball, tennis, football, soccer and trail running.
  • Uneven surfaces. Walking or running on uneven surfaces or poor field conditions may increase the risk of an ankle sprain.
  • Prior ankle injury. Once you’ve sprained your ankle or had another type of ankle injury, you’re more likely to sprain it again.
  • Poor physical condition. Poor strength or flexibility in the ankles may increase the risk of a sprain when participating in sports.
  • Improper shoes. Shoes that don’t fit properly or aren’t appropriate for an activity, as well as high-heeled shoes in general, make ankles more vulnerable to injury.

Sprained ankle prevention

The following tips can help you prevent a sprained ankle or a recurring sprain:

  • Warm up before you exercise or play sports.
  • Be careful when walking, running or working on an uneven surface.
  • Use an ankle support brace or tape on a weak or previously injured ankle.
  • Wear shoes that fit well and are made for your activity.
  • Minimize wearing high-heeled shoes.
  • Don’t play sports or participate in activities for which you are not conditioned.
  • Maintain good muscle strength and flexibility.
  • Slow down or stop activities when you feel pain or fatigue.
  • Practice stability training, including balance exercises.

Signs and symptoms of ankle sprains

Signs and symptoms of a sprained ankle vary depending on the severity of the injury. If your child has sprained their ankle, they may have:

  • Swelling, which develops in minutes or over several hours – this is caused by soft tissue damage
  • Pain around the outside part of the ankle joint
  • Bruising, which shows up within two to three days
  • Ankle pain, especially when you bear weight on the affected foot
  • Tenderness when you touch the ankle (injured ligaments will be quite tender to touch in that initial phase)
  • Restricted range of motion
  • Instability in the ankle
  • If there is severe tearing of the ligaments, your child might also hear or feel a “pop” when the sprain occurs.
  • In the cases of a severe ankle sprain, your child may have difficulty walking and may require the use of crutches to mobilize.

Symptoms of a severe sprain are similar to those of a broken bone and require prompt medical evaluation.

Sprained ankle complications

Failing to treat a sprained ankle properly, engaging in activities too soon after spraining your ankle or spraining your ankle repeatedly might lead to the following complications:

  • Chronic ankle pain
  • Chronic ankle joint instability
  • Arthritis in the ankle joint

Kids sprained ankle diagnosis

During a physical, your doctor will examine your ankle, foot and lower leg. The doctor will touch the skin around the injury to check for points of tenderness and move your foot to check the range of motion and to understand what positions cause discomfort or pain.

Depending on how many ligaments are injured, your sprain will be classified as Grade 1, 2 or 3. In a mild sprain (grade 1), the ankle ligament simply is overstretched. More severe ankle sprains can involve partial tearing of the ankle ligament (grade 2), or complete tearing (grade 3).

If the injury is severe, your doctor may recommend one or more of the following imaging scans to rule out a broken bone or to evaluate in more detail the extent of ligament damage:

  • X-ray. During an X-ray, a small amount of radiation passes through your body to produce images of the bones of the ankle. This test is good for ruling out bone fractures.
  • Stress x-rays. In addition to plain X-rays, your doctor may also order stress X-rays. These scans are taken while the ankle is being pushed in different directions. Stress X-rays help to show whether the ankle is moving abnormally because of injured ligaments.
  • Magnetic resonance imaging (MRI). MRIs use radio waves and a strong magnetic field to produce detailed cross-sectional or 3-D images of soft internal structures of the ankle, including ligaments. Your doctor may order an MRI if he or she suspects a very severe injury to the ligaments, damage to the cartilage or bone of the joint surface, a small bone chip, or another problem. The MRI may not be ordered until after the period of swelling and bruising resolves.
  • CT scan. CT scans can reveal more detail about the bones of the joint. CT scans take X-rays from many different angles and combine them to make cross-sectional or 3-D images.
  • Ultrasound. An ultrasound uses radio waves to produce real-time images. These images may help your doctor judge the condition of a ligament or tendon when the foot is in different positions.

How to treat a sprained ankle yourself

See your doctor if your child has pain and swelling in his ankle and you suspect a sprain. Self-care measures may be all you need, but talk to your doctor to discuss whether your child should have his ankle evaluated. If signs and symptoms are severe, your child may have significant damage to a ligament or a broken bone in his ankle or lower leg.

Care at home

If your child has sprained their ankle, you can care for them at home using first aid principles (the Rest, Ice, Compression, Elevation (RICE) strategy) and ankle exercises. For a Grade 1 sprained ankle, follow the R.I.C.E. guidelines to help bring down swelling and support the injury. Treatment should start immediately and continue for the next two to three days.

  • Rest: rest the ankle by not walking on it and avoid activities that cause a lot of pain. If your child is having difficulty walking, crutches should be used. You can hire crutches from your local pharmacy.
  • Ice: apply ice to the injured area for 10–15 minutes. Never place the ice directly on the skin because it can burn the skin – wrap the ice or ice pack in a tea towel or a pillow case. Ice the injury every two to four hours for two to three days, when your child is awake. You can make an ice pack using a plastic bag with some ice and water in it. This moulds better to the ankle joint area than ice alone. Don’t ice more than 20 minutes every 2 to 3 hours at a time to avoid frost bite.
  • Compression: wrap a firm bandage that is not too tight and does not stop circulation or cause extra pain. The bandage should cover from just above the ankle right down to the foot. Do not cover the toes.
  • Elevation: raise the ankle whenever possible to help reduce the swelling. For example, raise your child’s injured leg and rest it on some pillows while they are watching TV, reading or resting.

Some children will need medicine to help with the pain. In most cases, acetaminophen (paracetamol) is enough. Anti-inflammatory medications may help, but these are not suitable for every child. Ask your doctor for further advice. Always read and follow the instructions on the package for the appropriate dose of medication for your child. See our fact sheet Pain relief for children.

Figure 3. How to wrap a sprained ankle

How to wrap a sprained ankle

In the first two to three days after your child’s injury, avoid:

  • heat (e.g. heat packs or hot baths) – this increases blood flow and makes the swelling worse
  • re-injury – protect the ankle joint from re-injury by keeping weight off it and moving carefully
  • massage – this promotes blood flow and makes the swelling worse.

Swelling usually goes down with a few days.

  • Take nonsteroidal anti-inflammatory drugs (NSAIDs). Ibuprofen and other non-steroidal anti-inflammatory drugs (NSAIDs) can help relieve pain and reduce swelling in the ankle.
  • Crutches. In most cases, swelling and pain will last from 2 to 3 days. Walking may be difficult during this time and your doctor may recommend that you use crutches as needed.
  • Avoid activities that put pressure on your ankle. Don’t play sports that require running, cutting, or stopping quickly until your doc says it’s OK. Don’t hike, jog, or exercise on uneven surfaces until the ankle is properly healed.
  • Do stretching and strengthening exercises. After the pain and swelling have improved, ask your doctor about an exercise program to improve your ankle’s strength and flexibility. Depending on the severity of the sprain, the doctor may recommend physical therapy to help the healing process.
  • Immobilization. During the early phase of healing, it is important to support your ankle and protect it from sudden movements. For a Grade 2 sprain, a removable plastic device such as a cast-boot or air stirrup-type brace can provide support. Grade 3 sprains may require a short leg cast or cast-brace for 2 to 3 weeks.

For a Grade 2 sprained ankle, follow the R.I.C.E. guidelines and allow more time for healing. A doctor may immobilize or splint your sprained ankle.

A Grade 3 sprained ankle puts you at risk for permanent ankle instability. Rarely, surgery may be needed to repair the damage, especially in competitive athletes. For severe ankle sprains, your doctor may also consider treating you with a short leg cast for two to three weeks or a walking boot. People who sprain their ankle repeatedly may also need surgical repair to tighten their ligaments.

Doctors usually try immobilization and other treatments before recommending surgery. But if your doctor decides surgery is the best option, he or she may start with arthroscopy. This involves inserting a small camera device into the joint through a tiny cut. It allows the doctor to look inside the joint to see what’s going on — like if part of the ligament is caught in the joint or there are bone fragments in the joint — and treat it if necessary.

In very rare cases, doctors will recommend surgery to reconstruct a torn ligament. It’s unlikely that most teens will need this type of surgery for a sprained ankle, though. Your body will probably heal on its own as long as you don’t overdo it too quickly.

Not overdoing things is key when it comes to sprained ankle. So follow your doctor’s advice and don’t push yourself or feel pressure to get back into sports or other activities too soon. Sprains usually heal well, but they need time to get fully better.

Rehabilitating your sprained ankle

Every ligament injury needs rehabilitation. Otherwise, your sprained ankle might not heal completely and you might re-injure it. All ankle sprains, from mild to severe, require three phases of recovery:

  • Phase 1 includes resting, protecting and reducing swelling of your injured ankle.
  • Phase 2 includes restoring your ankle’s flexibility, range of motion and strength.
  • Phase 3 includes maintenance exercises and the gradual return to activities that do not require turning or twisting the ankle. This will be followed later by being able to do activities that require sharp, sudden turns (cutting activities)—such as tennis, basketball, or football.

This three-phase treatment program may take just 2 weeks to complete for minor sprains, or up to 6 to 12 weeks for more severe injuries.

Once you can stand on your ankle again, your doctor will prescribe exercise routines to strengthen your muscles and ligaments and increase your flexibility, balance and coordination. Later, you may walk, jog and run figure eights with your ankle taped or in a supportive ankle brace.

It’s important to complete the rehabilitation program because it makes it less likely that you’ll hurt the same ankle again. If you don’t complete rehabilitation, you could suffer chronic pain, instability and arthritis in your ankle. If your ankle still hurts, it could mean that the sprained ligament has not healed right, or that some other injury also happened.

To prevent future sprained ankles, pay attention to your body’s warning signs to slow down when you feel pain or fatigue, and stay in shape with good muscle balance, flexibility and strength in your soft tissues.

Sprained ankle exercises

Rehabilitation exercises are used to prevent stiffness, increase ankle strength, and prevent chronic ankle problems.

  • Early motion. To prevent stiffness, your doctor or physical therapist will provide you with exercises that involve range-of-motion or controlled movements of your ankle without resistance.
  • Strengthening exercises. Once you can bear weight without increased pain or swelling, exercises to strengthen the muscles and tendons in the front and back of your leg and foot will be added to your treatment plan. Water exercises may be used if land-based strengthening exercises, such as toe-raising, are too painful. Exercises with resistance are added as tolerated.
  • Proprioception (balance) training. Poor balance often leads to repeat sprains and ankle instability. A good example of a balance exercise is standing on the affected foot with the opposite foot raised and eyes closed. Balance boards are often used in this stage of rehabilitation.
  • Endurance and agility exercises. Once you are pain-free, other exercises may be added, such as agility drills. Running in progressively smaller figures-of-8 is excellent for agility and calf and ankle strength. The goal is to increase strength and range of motion as balance improves over time.

How to Stretch Your Ankle After A Sprain

You should perform the following stretches in stages once the initial pain and swelling have receded, usually within five to seven days. First is restoration of ankle range of motion, which should begin when you can tolerate weight bearing.

Once ankle range of motion has been almost or completely restored, you must strengthen your ankle. Along with strengthening, you should work toward a feeling of stability and comfort in your ankle, which orthopaedic foot and ankle specialists call proprioception.

Consider these home exercises when recuperating from an ankle sprain. Perform them twice per day.

  • While seated, bring your ankle and foot all the way up as much as you can.
    • Do this slowly, while feeling a stretch in your calf.
    • Hold this for a count of 10.
    • Repeat 10 times.
  • From the seated starting position, bring your ankle down and in.
    • Hold this inverted position for a count of 10.
    • Repeat 10 times.
  • Again from the starting position, bring your ankle up and out.
    • Hold this everted position for a count of 10.
    • Repeat 10 times.
  • From the starting position, point your toes down and hold this position for a count of 10.
    • Repeat 10 times.

This stretch should be done only when the pain in your ankle has significantly subsided.

  • While standing on the edge of a stair, drop your ankles down and hold this stretched position for a count of 10.
    • Repeat 10 times.
  • Stand 12 inches from a wall with your toes pointing toward the wall.
    • Squat down and hold this position for a count of 10.
    • Repeat 10 times.

How to Strengthen Your Ankle After a Sprain

Following an ankle sprain, strengthening exercises should be performed once you can bear weight comfortably and your range of motion is near full. There are several types of strengthening exercises. The easiest to begin with are isometric exercises that you do by pushing against a fixed object with your ankle.

Once this has been mastered, you can progress to isotonic exercises, which involve using your ankle’s range of motion against some form of resistance. The photos below show isotonic exercises performed with a resistance band, which you can get from your local therapist or a sporting goods store.

Figure 4. Sprained ankle exercises

Sprained ankle exercises

Range of Motion

  • Ankle Alphabet: Spell out each letter of the alphabet with your foot, keeping your leg still while moving at the ankle. Use the biggest movements your ankle allows to go through the whole thing, A-Z.
  • Calf Stretches: As soon as you can, start stretching your calves by putting the injured leg behind you, keeping your leg straight, and leaning pushing on a wall. If you can’t tolerate standing on your injured foot, straighten your leg by propping it up on a chair, or while sitting on your bed, then use a towel to pull the ball of your foot towards you. Hold for 30 seconds and repeat 3 times.

Strengthening

  • Resisted 4-Way Ankle Holds: As pain allows, use a resistance band or towel to work against while you pull your ankle as far as you can in all 4 directions: up, down, inverted (top of foot towards the outside) and everted (sole of the foot towards the outside). Hold for 10 seconds, 5 times in each direction.
  • Heel Raises: Once you can bear weight on your foot, stand on the ground and slowly raise your heels off as far as you can, hold for 5 seconds then slowly lower back down. Do 3 sets of 10 reps. You can progress this by standing half-way on a stair with both heels hanging off. Allow your heels to drop below the stair as you come down, holding that position for 5 seconds before rising back up (this can be a great way to stretch your calves too). Once you’re feeling really strong, switch to just using one foot at a time, rinse and repeat.

Balance

  • Single Leg Stands: Stand on one foot (once you can tolerate it) while working up to balancing for 30 seconds. If needed, stand next to a chair or wall for support. Make it even tougher by closing your eyes, then progress to standing on a pillow to destabilize you. Stand with your affected leg on a pillow. Hold this position for a count of 10. Repeat 10 times.
  • Advanced Balance Training: Once you’ve mastered single leg stands, you can really get your balance on by standing on one leg (yes, again) and putting both arms straight up above your head. Now slowly bend forward at the waist (keeping your back straight) as far as you can while keeping your balance. Not so easy, right? Try bending backwards as far as you can (hands still above your head), then to the left and to the right. Finally you can slowly twist to the left and right all while keeping balanced and tight in your core.

These same exercises that you’ve used to rehab your ankle can serve to strengthen it for future protection against another sprain. Progressing to longer periods of balancing and more reps on your resisted exercises will keep you strong and in tune with your ankle for years to come.

Once you have regained the motion and strength in your ankle, you are ready for sporting activities such as gentle jogging and biking. After you feel your ankle strength is approximately 80% of your other side, then you can begin cutting or twisting sports.

Using a brace or getting your ankle wrapped during risky activities will also help prevent future ankle sprains by adding increased support to your injured ligaments, even once they’ve healed. Whether the brace is soft or hard, find something comfortable and supportive that you’re willing to use each time you lace up your sport shoes.

Surgery

In rare cases, surgery is performed when the injury doesn’t heal or the ankle remains unstable after a long period of physical therapy and rehabilitative exercise.

Surgery may be performed to:

  • Repair a ligament that won’t heal
  • Reconstruct a ligament with tissue from a nearby ligament or tendon

Surgical options may include:

  • Arthroscopy. During arthroscopy, your doctor uses a small camera, called an arthroscope, to look inside your ankle joint. Miniature instruments are used to remove any loose fragments of bone or cartilage, or parts of the ligament that may be caught in the joint.
    Reconstruction. Your doctor may be able to repair the torn ligament with stitches or sutures. In some cases, he or she will reconstruct the damaged ligament by replacing it with a tissue graft obtained from other ligaments and/or tendons found in the foot and around the ankle.
  • Immobilization. There is typically a period of immobilization following surgery for an ankle sprain. Your doctor may apply a cast or protective boot to protect the repaired or reconstructed ligament. Be sure to follow your doctor’s instructions about how long to wear the protective device; if you remove it too soon, a simple misstep can re-tear the fixed ligament.

Rehabilitation

Rehabilitation after surgery involves time and attention to restore strength and range of motion so you can return to pre-injury function. The length of time you can expect to spend recovering depends upon the extent of injury and the amount of surgery that was done. Rehabilitation may take from weeks to months.

read more
BonesConditions & DiseasesJointsLigamentsMusclesMusculoskeletal SystemTendons

Whiplash

whiplash

What is whiplash

Whiplash also known as neck sprain, is an injury to the muscles, tendons and other soft tissues of the neck 1, 2, 3, 4, 5. Whiplash injury is caused by a sudden and vigorous movement of the head, sideways, backwards or forwards. Any impact that causes your head to suddenly accelerate or decelerate can cause symptoms of whiplash. However, sometimes whiplash result in no injury or pain at all 6.

The term “whiplash” injury was first coined by Harold Crowe in 1928 to define acceleration-deceleration injuries occurring to the cervical spine or neck region 7. Later modified to an all-encompassing term known as whiplash-associated disorders (WAD), these clinical entities have been refined to describe any collection of neck-related symptoms following a car accident 8, 9. Whiplash-associated disorder is a globally important clinical, social, and financial problem 10.

Your neck is made up by the cervical spine, the first seven vertebrae of the back (see Figure 1 below). Areas of the vertebrae commonly affected are the intervertebral joints (the joints between each vertebrae), the intervertebral discs (the soft material that cushions one vertebrae from another), and the ligaments, muscles and nerve roots that hold the vertebrae together.

Rear collision motor vehicle crashes are the most common cause of whiplash injuries. Whiplash injuries can also occur in other situations where the body is exposed to sudden starts and stops such as contact sports like football, rugby or soccer. Neck sprain or neck strain are other terms that are used to describe whiplash injuries.

Approximately 120,000 whiplash injuries occur in the US each year. The statistics vary for different countries. It is very interesting to find that Australia was the most prolific countries on whiplash injury, and the United States ranked second. A study of drivers in collisions involving two cars found similar results in French (1997–2003) and Spanish databases (2002–2004): 12.2% were diagnosed with whiplash in France and 12.0% in Spain 11. The annual economic cost of whiplash injury is estimated to be $3.9 billion in the United States 12.

Generally, whiplash injury causes acute neck pain and stiffness within hours of the accident, however these symptoms may in some cases be delayed for several days.

Pain should resolve with treatment after several weeks, and most patients are fully recovered within three months of the injury. Some individuals may continue to suffer pain and headaches after this.

Whiplash symptoms often greatly improve or disappear within a few days to weeks. It may take longer for symptoms to completely disappear and some people experience some pain and neck stiffness for months after a whiplash injury.

More than 50% of whiplash resolve after a few weeks of treatment 13, 14, 15. However, approximately 30% of cases develop long-term complex pain related disability and persist for months or years 16, 15. Recovery following whiplash injury, if it is to occur, will occur for the most part within the first 3 months post injury 17. Current estimates suggest that approximately 50% of individuals will recover by 3 months post injury, whilst the remainder will experience mild to moderate long-term disability 18, 19, 20. The development of chronic symptoms after whiplash injuries may also be influenced by psychological and social factors as well as with changes in the central nervous system (brain and spinal cord) 20, 21, 22. In countries such as Lithuania and Greece, where there is no compensation culture and no formal compensation system for late whiplash-related injuries, the development of chronic symptoms following whiplash is a rare phenomenon 23, 24. This evidence suggests that the culture and expectations around whiplash, local insurance systems, and the prospect of monetary benefits are likely to play important roles in the prevalence of whiplash injuries and related claims, as well as in the recovery process 25.

Common symptoms of whiplash include 26:

  • neck pain and tenderness
  • neck stiffness and difficulty moving your head
  • headaches
  • muscle spasms
  • pain in the shoulders and arms

Less common symptoms include pins and needles in your arms and hands, dizziness, tiredness, memory loss, poor concentration and irritability.

It can take several hours for the symptoms to develop after you injure your neck. The symptoms are often worse the day after the injury, and may continue to get worse for several days.

Whiplash injuries are commonly caused by:

  • motor vehicle accidents (80% of whiplash injury cases) 27, 28
  • a sudden blow to the head from contact sports such as rugby or boxing
  • being hit on the head by a heavy object
  • a slip or fall where the head is jolted or jarred.

Whiplash occurs when the neck is moved beyond its usual range of movement, which overstretches or sprains the soft tissues of the neck (tendons, muscles and ligaments). This causes pain and discomfort in the neck and shoulders and may also cause back pain.

The joints and ligaments of the neck are covered by muscles. So whiplash injury cannot be seen from the surface. This can be frustrating when your neck is painful. Imagine a sprained ankle. Immediately following a sprain, the ankle becomes bruised, swollen and painful to move.

Key points about whiplash:

  • Whiplash injury is poorly understood, but usually involves the muscles, discs, nerves, and tendons in your neck.
  • It is caused by the neck bending forcibly forward and then backward, or vice versa.
  • Many whiplash injuries occur if you are involved in a rear-end automobile collision.
  • Your healthcare provider will determine specific treatment for your whiplash.

When to contact a medical professional

If severe neck pain occurs following an injury (motor vehicle accident, diving accident, or fall), a trained professional, such as a paramedic, should immobilize the patient to avoid the risk of further injury and possible paralysis. Medical care should be sought immediately.

Immediate medical care should also be sought when an injury causes pain in the neck that radiates down the arms and legs.

Radiating pain or numbness in your arms or legs causing weakness in the arms or legs without significant neck pain should also be evaluated.

If there has not been an injury, you should seek medical help right away if you have:

  • A fever and headache, and your neck is so stiff that you cannot touch your chin to your chest. This may be meningitis. Call your local emergency number or get to a hospital.
  • Symptoms of a heart attack, such as shortness of breath, sweating, nausea, vomiting, or arm or jaw pain.
  • Neck pain that is:
    • Continuous and persistent
    • Severe
    • Accompanied by pain that radiates down the arms or legs
    • Accompanied by headaches, numbness, tingling, or weakness

See your doctor if:

  • Symptoms do not go away in 1 week with self-care
  • You have numbness, tingling, or weakness in your arm or hand
  • Your neck pain was caused by a fall, blow, or injury — if you cannot move your arm or hand, have someone call your local emergency services number
  • You have swollen glands or a lump in your neck
  • Your pain does not go away with regular doses of over-the-counter pain medicine
  • You have difficulty swallowing or breathing along with the neck pain
  • The pain gets worse when you lie down or wakes you up at night
  • Your pain is so severe that you cannot get comfortable
  • You lose control over urination or bowel movements
  • You have trouble walking and balancing

Cervical spine anatomy

Your spine is made up of 24 bones, called vertebrae, that are stacked on top of one another. These bones connect to create a canal that protects the spinal cord.

Other parts of your spine include:

  • Spinal cord and nerves. These “electrical cables” travel through the spinal canal carrying messages between your brain and muscles. Nerve roots branch out from the spinal cord through openings in the vertebrae (foramen).
  • Intervertrebral disks. In between your vertebrae are flexible intervertebral disks. They act as shock absorbers when you walk or run.

Intervertebral disks are flat and round and about a half inch thick. They are made up of two components:

  • Annulus fibrosus. This is the tough, flexible outer ring of the disk.
  • Nucleus pulposus. This is the soft, jelly-like center of the disk.

The cervical spine is made up of the first 7 vertebrae and functions to provide mobility and stability to the head, while connecting it to the relative immobile thoracic spine (see the image below). The first 2 vertebral bodies are quite different from the rest of the cervical spine. The atlas, or C1, articulates superiorly with the occiput and inferiorly with the axis, or C2.

The atlas is ring-shaped and does not have a body, unlike the rest of the vertebrae. The body has become part of C2, and it is called the odontoid process, or dens. The atlas is made up of an anterior arch, a posterior arch, 2 lateral masses, and 2 transverse processes. The transverse foramen, through which the vertebral artery passes, is enclosed by the transverse process. On each lateral mass is a superior and inferior facet (zygapophyseal) joint. The superior articular facets are kidney-shaped, concave, and face upward and inward. These superior facets articulate with the occipital condyles, which face downward and outward. The relatively flat inferior articular facets face downward and inward to articulate with the superior facets of the axis.

The axis has a large vertebral body, which contains the fused remnant of the C1 body, the dens. The dens articulates with the anterior arch of the atlas via its anterior articular facet and is held in place by the transverse ligament. The axis is composed of a vertebral body, heavy pedicles, laminae, and transverse processes, which serve as attachment points for muscles. The axis articulates with the atlas by its superior articular facets, which are convex and face upward and outward.

The remaining cervical vertebrae, C3-C7, are similar to each other, but they are very different from C1 and C2. They each have a vertebral body, which is concave on its superior surface and convex on its inferior surface. On the superior surfaces of the bodies are raised processes or hooks called uncinate processes, which articulate with depressed areas on the inferior aspect of the superior vertebral bodies called the echancrure or anvil. These uncovertebral joints are most noticeable near the pedicles and are usually referred to as the joints of Luschka 29. These joints are believed to be the result of degenerative changes in the annulus, which leads to fissuring in the annulus and the creation of the joint. The spinous processes of C3-C5 are usually bifid, in comparison to the spinous processes of C6 and C7, which are usually tapered.

The facet joints in the cervical spine are diarthrodial synovial joints with fibrous capsules. The joint capsules in the lower cervical spine are more lax compared with other areas of the spine to allow for gliding movements of the facets. The joints are inclined at 45° from the horizontal plane and angled 85° from the sagittal plane. This alignment helps to prevent excessive anterior translation and is important in weight bearing 30.

The fibrous capsules are innervated by mechanoreceptors (types I, II, and III), and free nerve endings have been found in the subsynovial loose areolar and dense capsular tissues 31. In fact, there are more mechanoreceptors in the cervical spine than in the lumbar spine 32. This neural input from the facets may be important for proprioception and pain sensation and may modulate protective muscular reflexes that are important in preventing joint instability and degeneration.

The facet joints in the cervical spine are innervated by both the anterior and dorsal rami. The occipitoatlantal joint and atlantoaxial joint are innervated by the ventral rami of the first and second cervical spinal nerves. Two branches of the dorsal ramus of the third cervical spinal nerve innervate the C2-C3 facet joint, a communicating branch and a medial branch known as the third occipital nerve.

The remaining cervical facets, C3-C4 to C7-T1, are supplied by the dorsal rami medial branches that arise one level cephalad and caudad to the joint 33. Therefore, each joint from C3-C4 to C7-T1 is innervated by the medial branches above and below. These medial branches send off articular branches to the facet joints as they wrap around the waists of the articular pillars.

Intervertebral discs are located between each vertebral body caudad to the axis. The discs are composed of 4 parts, including the nucleus pulposus in the middle, the annulus fibrosis surrounding the nucleus, and 2 end plates that are attached to the adjacent vertebral bodies. The discs are involved in cervical spine motion, stability, and weight bearing. The annular fibers are composed of collagenous sheets called lamellae, which are oriented 65-70° from the vertical and alternate in direction with each successive sheet. Therefore, the annular fibers are prone to injury with rotation forces because only one half of the lamellae are oriented to withstand the force in this direction 32. The middle and outer one third of the annulus is innervated by nociceptors, and phospholipase A2 has been found in the disc and may be an inflammatory mediator 34.

Several ligaments of the cervical spine, which provide stability and proprioceptive feedback, are worth mentioning 35. The transverse ligament, the major portion of the cruciate ligament, arises from tubercles on the atlas and stretches across its anterior ring while holding the dens against the anterior arch. A synovial cavity is located between the dens and the transverse process. This ligament allows for rotation of the atlas on the dens and is responsible for stabilizing the cervical spine during flexion, extension, and lateral bending. The transverse ligament is the most important ligament in preventing abnormal anterior translation 36.

The alar ligaments run from the lateral aspects of the dens to the ipsilateral medial occipital condyles and to the ipsilateral atlas. The alar ligaments limit axial rotation and side bending. If the alar ligaments are damaged, as in a whiplash injury, the joint complex becomes hypermobile, which can lead to kinking of the vertebral arteries and stimulation of the nociceptors and mechanoreceptors. This may be associated with the typical complaints of patients with whiplash injuries such as headache, neck pain, and dizziness. The alar ligaments prevent excessive lateral and rotational motions, while allowing flexion and extension.

The anterior longitudinal ligament and the posterior longitudinal ligament are the major stabilizers of the intervertebral joints. Both ligaments are found throughout the entire length of the spine; however, the anterior longitudinal ligament is closely adhered to the discs in comparison to the posterior longitudinal ligament, and it is not well developed in the cervical spine. The anterior longitudinal ligament becomes the anterior atlantooccipital membrane at the level of the atlas, whereas the posterior longitudinal ligament merges with the tectorial membrane. Both ligaments continue onto the occiput. The posterior longitudinal ligament prevents excessive flexion and distraction 37.

The supraspinous ligament, interspinous ligament, and ligamentum flavum maintain stability between the vertebral arches. The supraspinous ligament runs along the tips of the spinous processes, the interspinous ligament runs between the spinous processes, and the ligamentum flavum runs from the anterior surface of the cephalad vertebra to the posterior surface of the caudad vertebra. The interspinous ligament and especially the ligamentum flavum control for excessive flexion and anterior translation 37. The ligamentum flavum also connects to and reinforces the facet joint capsules on the ventral aspect. The ligamentum nuchae is the cephalad continuation of the supraspinous ligament and has a prominent role in stabilizing the cervical spine.

Figure 1. Cervical spine

Cervical spine

Figure 2. Cervical disc

cervical disc

Figure 3. Cervical facet joint (cervical zygapophyseal joint)

Cervical facet joint

How do I know if I have whiplash?

Sometimes you can have no symptoms after a whiplash injury, but sometimes your symptoms can be severe. Pain from a whiplash injury often begins 6 to 12 hours after the injury. You may just feel uncomfortable on the day of the injury or accident and find that your pain, swelling and bruising increase over the following days.

Common symptoms of whiplash include:

  • neck problems: pain, stiffness, swelling or tenderness
  • difficulty moving your neck
  • headaches, difficulty concentrating
  • muscle spasms or weakness
  • ‘pins and needles’, numbness or pain in your arms and hands or shoulders
  • dizziness, vertigo, (a feeling you are moving or spinning) or tinnitus (ringing in your ears)
  • difficulties swallowing or blurred vision

Your symptoms are likely to greatly improve or disappear within a few days to weeks. It may take longer for your symptoms to resolve completely and you might even experience some pain and neck stiffness for months after a whiplash injury.

How long does whiplash last?

Pain from a whiplash injury often begins 6 to 12 hours after the injury. Many people feel uncomfortable on the day of the injury or accident and find that pain, swelling and bruising increase over the following days.

Many people recover within a few days or weeks. For others it may take several months but sometimes it can last up to a year or more to experience substantial improvement in symptoms. Ongoing symptoms may vary in their intensity during the recovery period. This is normal.

You should see a doctor if you have had a motor vehicle accident or an injury that’s causing pain and stiffness in your neck.

The length of time it takes to recover from whiplash can vary and is very hard to predict.

Many people will feel better within a few weeks or months, but sometimes it can last up to a year or more.

Severe or prolonged pain can make it difficult to carry out daily activities and enjoy your leisure time. It may also cause problems at work and could lead to anxiety or depression.

Try to remain positive and focus on your treatment objectives. But if you do feel depressed, speak to your doctor about appropriate treatment and support.

What can I do to help my recovery?

Research has shown that it is better to try to keep doing normal daily activities as much as possible to aid recovery.

You need to take care of your neck and not expose it to unnecessary strain during the healing phase. It’s also important to regularly exercise your neck muscles. This booklet offers advice on how to care for your neck and suggests some specific exercises for your neck to help recovery.

Can I do the same activities as before?

Are there any limitations?

In the early stages of recovery, you may need to adapt some activities to care for your neck. However you should gradually resume normal activity as your neck improves (work, recreation and social).

Those who continue to work, even in a reduced capacity at first, have been shown to have a better recovery than people who take a long time off work.

An injury will cause pain. However the pain that occurs in the recovery period does not automatically mean that there is further injury. It is best to stay active and gently exercise to recover.

It may be necessary to limit some of your usual work and recreational activities in the early to mid-stage of recovery. Be adaptable – find new ways to do tasks to avoid unnecessary strain on your neck.

Whiplash causes

Whiplash injuries are commonly caused by car accidents. Whiplash can occur if your head is thrown forwards, backwards or sideways violently. For example if your neck is quickly accelerated and decelerated in a rear-end or side impact.

Common causes of whiplash include:

  • road traffic accidents and collisions
  • a sudden blow to the head – for example, during sports such as boxing or rugby
  • a slip or fall where the head is suddenly jolted backwards
  • being struck on the head by a heavy or solid object
  • physical abuse or assault. Whiplash can occur if you are punched or shaken. It’s one of the injuries seen in shaken baby syndrome.

Studies with cadavers have shown the whiplash injury is the formation of the S-shaped curvature of the cervical spine which induced hyperextension on the lower end of the spine and flexion of the upper levels, which exceeds the physiologic limits of spinal mobility 38. The Quebec task force (QTF) defined whiplash as bony or soft tissue injuries as a result of rear-end or side-impact in road traffic accidents, and from other injuries resulting in “an acceleration-deceleration mechanism of energy transfer to the cervical spine” 5. The Quebec task force proposed a classification system to define the severity of the whiplash injury. In Grade 1 the patient complains of neck pain, stiffness, or tenderness with no positive findings on physical exam. In Grade 2 the patient exhibits musculoskeletal signs including decreased range of motion and point tenderness. In Grade 3 the patient also shows neurologic signs that may include sensory deficits, decreased deep tendon reflexes, muscle weakness. Grade 4 the patient shows a fracture 5. Most whiplash-associated disorders are considered to be minor soft tissue-based injuries without evidence of fracture.

Whiplash signs and symptoms

The symptoms of Whiplash Injury often include pain, decreased mobility of the neck, tenderness, headaches and problems of concentration and memory.

Common symptoms of whiplash include:

  • neck pain and stiffness
  • swelling and tenderness in the neck
  • temporary loss of movement, or reduced movement, in the neck
  • headaches, most often starting at the base of the skull
  • muscle spasms
  • tenderness or pain in shoulder, upper back or arms
  • tingling or numbness in the arms
  • fatigue
  • pain in the shoulders or arms.

Whiplash can also cause:

  • lower back pain
  • pins and needles, numbness or pain in the arms and hands (paresthesias)
  • dizziness
  • sleep disturbances
  • tiredness and irritability
  • difficulties swallowing (dysphasia)
  • temporomandibular joint symptoms
  • blurred vision
  • memory problems
  • vertigo (a feeling you are moving or spinning)
  • difficulty concentrating
  • irritability
  • tinnitus (ringing in the ears)

Psychosocial symptoms 39:

  • depression
  • anger
  • frustration
  • anxiety
  • family stress
  • occupational stress
  • hypochondriasis (also known as health anxiety or illness anxiety disorder)
  • compensation neurosis
  • drug dependency
  • post-traumatic stress syndrome (PTSD)
  • litigation
  • social isolation

You should see a doctor if you have neck pain after a car accident or after an injury.

Pain

Whiplash injury is a painful injury. As a result of the impact that caused the injury, there may be bruising or tearing of the soft tissues in the neck region, contributing to symptoms of pain. The pain of whiplash might be localized in the neck, or may also extend to the shoulders, and upper arms. Many individuals who have sustained whiplash injuries also report pain in the lower back region.

Decreased Mobility of the Neck

The uninjured neck has considerable mobility in several directions. The neck can move up and down (flexion-extension), side to side (lateral flexion) and can rotate (rotation). These movements are often restricted following a whiplash injury. There is a natural tendency for muscles to contract when the neck is painful. This contraction is the body’s way of trying to protect itself against further injury.

Tenderness of the Injured Area

Whiplash injury is considered to be an ‘overload’ injury. As a function of the excessive forces that impacted on the neck in the motor vehicle crash, elongation, bruising or tearing of the soft tissue can occur. In turn, the soft-tissue injuries can lead to inflammation and edema (e.g., swelling). Inflamed and swollen tissues are more ‘tender’ in that they are more sensitive to touch. Following a whiplash injury, areas of tenderness can include regions of the neck, shoulders and upper arms.

Headaches

Whiplash injury can also cause headaches. Headaches of whiplash injury may differ from tension or migraine headaches. Whiplash headaches, are more likely to occur at the top or the back of the head as opposed to regions around the eyes or the side of the head. Whiplash headaches can be intermittent or constant.

Memory and Concentration Problems

Individuals who have sustained whiplash injuries sometimes report problems with memory and concentration. If the head was struck during the crash that caused the whiplash injury, it is possible that the memory or concentration problems might be due to concussion. If the head was not struck, the memory and concentration problems are most likely due to the distracting effects of pain or anxiety.

Long term effects of whiplash

Most people who have whiplash injury feel better within a few weeks and don’t seem to have any lasting effects from the injury. However, some people continue to have pain for several months or years after the whiplash injury occurred.

It is difficult to predict how each person with whiplash may recover. In general, you may be more likely to have chronic pain if your first symptoms were intense, started rapidly and included:

  • Severe neck pain
  • More-limited range of motion
  • Pain that spread to the arms

The following risk factors have been linked to a worse outcome:

  • Having had whiplash before
  • Older age
  • Existing low back or neck pain
  • A high-speed injury

Whiplash is an injury from which most individuals recover well. Studies have shown that people who are positive about recovery and resume their normal daily activities as tolerated may recover faster than those who markedly alter or markedly reduce their activity level for a period.

A small percentage of people who have a whiplash injury may develop long-term neck pain. Research is being conducted worldwide to understand why there are different recovery rates between different people. Some reasons have been identified such as age and initial severity of the pain or injury. However there is still more to be learnt.

The main symptoms of a whiplash associated disorder are neck pain and stiffness. Other symptoms such as headaches, aching in the arms or feelings of being lightheaded are common.

Symptoms may appear immediately after the incident or have a delayed onset of a few hours or days. The nature of injury and the number and severity of symptoms vary between different people.

Neck x-rays may be taken to rule out injuries such as bone fractures or dislocations. X-ray reports often state that no abnormality has been found. However, x-rays do not reveal injuries to the soft tissues of the neck (non bony parts of joints, ligaments, muscles) and x-rays do not provide information about pain levels. Normal x-rays only provide assurance that there are no major bone injuries.

Whiplash injury diagnosis

Questions about the event and your symptoms are the doctor’s first step for making a diagnosis. You also may be asked to fill out a brief form that can help your doctor understand the frequency and severity of your symptoms, as well as your ability to do normal daily tasks.

Examination

During the exam your doctor will need to touch and move your head, neck and arms. He or she will also ask you to move and perform simple tasks. This examination helps your doctor determine:

  • The range of motion in your neck and shoulders
  • The degree of motion that causes pain or an increase in pain
  • Tenderness in the neck, shoulders or back
  • Reflexes, strength and sensation in your limbs

Imaging tests

Your doctor will likely order one or more imaging tests to rule out other conditions that could be causing or contributing to neck pain. These include the following tests:

  • X-rays of the neck. X-rays of the neck taken from multiple angles can identify fractures, dislocations or arthritis.
  • Computerized tomography (CT). Computerized tomography (CT) is a specialized X-ray technology that can produce multiple cross-sectional images of bone and reveal details of possible bone damage.
  • Magnetic resonance imaging (MRI). Magnetic resonance imaging (MRI) is a technology that uses radio waves and a magnetic field to produce detailed 3-D images. In addition to bone injuries, MRI scans can detect some soft tissue injuries, such as damage to the spinal cord, disks or ligaments.

Imaging techniques (e.g., magnetic resonance imaging or computerized tomography) and physiological methods are often unable to provide useful and unequivocal information in the instances of mild injuries 40. In the past, the suggestion was to combine various investigation methods, such as imaging techniques and psychiatric, orthopedic, and neurological data, together with a detailed clinical history and evaluation, to draw a complete diagnostic picture of a patient and a realistic level of disability 40. However, this kind of assessment is costly in terms of time and expenses related to the instruments, it requires the presence of specialists 40, and, most importantly, does not necessarily exclude the presence of exaggerated symptoms.

Whiplash treatment

It is important to note that, although there are many different treatment options available for the management of whiplash injury, not all have been shown to be effective. It is also important to note that even though a certain treatment might have been shown to be effective, it might not be the right treatment for you.

The goals of whiplash treatment are to:

  • Control pain
  • Restore normal range of motion in your neck
  • Get you back to your normal activities

It is best to have an in-depth discussion with your doctor, chiropractor or physiotherapist to determine the best treatments for the symptoms you are experiencing.

Your treatment plan will depend on the extent of your whiplash injury. Some people only need over-the-counter pain medication or nonsteroidal anti-inflammatory drugs (NSAIDs), a cervical collar, and at-home care. Others may need prescription medication (antidepressants, muscle relaxants) and specialized pain treatment in conjunction with physiotherapy or chiropractic care.

Soft foam cervical collars were once commonly used for whiplash injuries to hold the neck and head still. However, studies have shown that keeping the neck still for long periods of time can decrease muscle strength and interfere with recovery 41, 42, 43. Still, using of a cervical collar to limit movement may help reduce pain soon after your injury, and may help you sleep at night. Recommendations for using a cervical collar vary though. Some experts suggest limiting cervical collar use to no more than 72 hours, while others say it may be worn up to three hours a day for a few weeks. Your doctor can instruct you on how to properly use the cervical collar, and for how long.

Pain management

Your doctor may recommend one or more of the following treatments to lessen pain 44:

  • Rest. Rest may be helpful during the first 24 hours after injury, but prolonged bed rest may delay recovery.
  • Ice or heat. Apply ice or heat to the neck for 15 minutes up to six times a day.
  • Over-the-counter pain medications. Over-the-counter pain relievers, such as acetaminophen (Tylenol, others) and ibuprofen (Advil, Motrin IB, others), often can control mild to moderate whiplash pain.
  • Prescription painkillers. People with more-severe pain may benefit from short-term treatment with prescription pain relievers.
  • Muscle relaxants. These drugs may control pain and help restore normal sleep if pain prevents you from sleeping well at night.
  • Injections. An injection of lidocaine (Xylocaine) — a numbing medicine — into painful muscle areas may be used to decrease pain so that you can do physical therapy.

Individuals at high-risk of non-recovery should receive referral to a specialist clinician with expertise in the management of whiplash associated disorder 45, 6.

How to treat whiplash

A number of treatments have been developed to manage the symptoms of whiplash injury. Some of the more common treatments described below include 46:

  • Advice to remain active
  • Education
  • Medication
  • Physiotherapy
  • Treatment of Mental Health Problems

Advice to Remain Active

Many doctor’s and physiotherapists will recommend to their patients that they try to remain as active as possible during the recovery period. While such advice might not appear to be much of a treatment, the advice is nevertheless a critical element in ensuring optimum recovery.

When people are injured and are experiencing pain and discomfort, there is a tendency to reduce one’s participation in important activities of daily life. As a result of pain or discomfort, individuals might reduce their participation in family or home activities, in recreational activities and individuals might also discontinue their occupational activities.

Reducing activity sometimes feels like the right thing to do because it is associated with a reduction in pain. But there lies the trap. Activity reduction is probably the worst thing to do in the management of a whiplash injury. While activity reduction might reduce pain and discomfort in the short term, in the long term, activity reduction will likely lead to more severe pain, and more severe disability.

Muscles need to move to remain healthy. Individuals who discontinue the important activities of their daily lives, or individuals who spend excessive time resting or lying down will actually recover more slowly. Slowing down a little bit makes sense during the initial days of recovery, but lying down or bed rest should be avoided. Remaining active is the best formula for optimal recovery.

Medication

The two most frequently prescribed medications for whiplash injury are anti-inflammatories and painkillers 47. Following a whiplash injury, the soft-tissues of the neck and shoulders can become inflamed. Inflammation often leads to increased stiffness and pain. Anti-inflammatories reduce swelling of the injured soft tissues, and reduce pain as well. Inflammation is typically only present in the first few weeks following injury so anti-inflammatories tend not be used for long term pain management.

There are two main types of painkillers (analgesics) that might be prescribed for pain caused by whiplash injury. There are non-steroidal analgesics such as aspirin or paracetamol (acetaminophen), and there are opiate analgesics such as codeine. Painkillers can be useful treatments to manage the pain of whiplash injury in the short term, but long-term use is typically not recommended. Long-term use of acetaminophen (paracetamol) can cause stress on liver function. Long-term use of opiate analgesics can lead to gastro-intestinal problems, and of even more concern, these medications can lead to problems of addiction.

Education

It is becoming increasingly clear that education is an important element of the management of whiplash injury. A doctor or a physiotherapist might choose to spend some time explaining to a patient exactly what whiplash is and describe the pros and cons of different treatments.

One of the benefits of education is that it can help reduce anxiety. The experience of severe pain and symptoms of stiffness and headaches can be alarming. The injured person might think, ‘there must be something seriously wrong with my neck’, ‘if it hurts this much, there must be a lot of damage’, ‘when I move, it hurts more, so I should probably not move’. Thoughts like these will create anxiety or fear. In turn, anxiety and fear will lead the person to discontinue even more of their activities.

The doctor or physiotherapist might wish to educate the injured person about why he or she is experiencing a lot of pain, to explain that the symptoms of whiplash will recover over time, and to explain the importance of remaining as active as possible.

The doctor or physiotherapist might also wish to educate the injured person about the relation between pain and injury severity. We often assume that if the pain is severe, this must mean that the injury is severe. But with whiplash injury that is not the case. The pain of whiplash can be very severe, but that does not mean that severe or irreparable damage has been done to the neck. The majority of whiplash injuries are not considered ‘medically serious’; the pain might be initially severe, but the pain dissipates over time.

Exercise

Your doctor will likely prescribe a series of stretching and movement exercises for you to do at home. These exercises can help restore range of motion in your neck and get you back to your normal activities 48, 49, 50. Applying moist heat to the painful area or taking a warm shower may be recommended before exercise.

Exercises may include (see more below):

  • Rotating your neck in both directions
  • Tilting your head side to side
  • Bending your neck toward your chest
  • Rolling your shoulders

Physical therapy

Physical therapy is another commonly used approach to treating whiplash injury. If you have ongoing whiplash pain or need assistance with range-of-motion exercises, your doctor may recommend that you see a physical therapist. A physical therapist might use a variety of treatment techniques to manage the symptoms of whiplash. Initially, the physiotherapist might use modalities such as manual therapy or ice to reduce the swelling and inflammation of the injured areas. The physical therapist will also provide the injured person with exercises to improve or maintain the movement in their neck as well as strength and control of the muscles in their neck and upper body and to restore normal movement. This in turn will help increase the person’s tolerance for participation in household, recreational and occupational activities.

As the injured person begins to be more physically active, it sometimes happens that their pain and discomfort might increase. This increase in pain is usually caused by engaging muscles that have remained inactive or immobile for extended periods of time. The pain associated with increasing activity is temporary and will usually subside in a day or two.

In some cases, transcutaneous electrical nerve stimulation (TENS) may be used. TENS applies a mild electric current to the skin. Limited research suggests this treatment may temporarily ease neck pain and improve muscle strength.

The number of physical therapy sessions needed will vary from person to person. Your physical therapist can also create a personalized exercise routine that you can do at home.

Treatment of Mental Well Being

Some individuals with whiplash injuries might develop symptoms of a mental health problem. The most common mental health problems associated with whiplash injury include depression, anxiety and post-traumatic stress symptoms. If an injured person is experiencing troubling symptoms of depression, anxiety or post-traumatic symptoms, the doctor might consider prescribing medication such as an anti-depressant or anti-anxiety medication. Since the presence of symptoms of a mental health problem can slow the rate of recovery following whiplash injury, these medications can play an important role in the successful management of whiplash injury.

If you have developed symptoms of a mental health problem following your whiplash injury, your doctor might also consider a referral to a mental health professional such as a psychologist or a social worker. Psychologists and social workers can provide counselling or psychotherapy that can be useful in managing some of the mental health consequences of whiplash injury. Your doctor can familiarize you with the mental health services that are available in your community.

Alternative medicine

There are many other types of treatments that have been tried to treat whiplash pain, but research about how well they work is limited 51, 52, 53, 54, 55. Some of these include manipulation, acupuncture, electrical nerve stimulation, traction, biofeedback, ultrasound among many others 56, 57.

  • Acupuncture. Acupuncture involves inserting ultrafine needles through specific areas on your skin. It may offer some relief from neck pain.
  • Chiropractic care. A chiropractor performs joint manipulation techniques. There is some evidence that chiropractic care may provide pain relief when paired with exercise or physical therapy.
  • Neck massage. Neck massage may provide short-term relief of neck pain from whiplash injury.
  • Mind-body therapies. Exercises that incorporate gentle movements and a focus on breathing and mindfulness, such as tai chi, qi gong and yoga, may help ease pain and stiffness.

It is difficult to make strong statements about the utility of these treatments since so little research has examined whether they are effective. Injured individuals who are slow to recover might reach a level of desperation where they are willing to try anything. It is important to remember that unless a treatment has been shown to be effective in a clinical trial, there is always the possibility that the treatment might not be helpful, or could actually worsen the condition. Before starting any treatment for your whiplash injury, it is best to discuss with a doctor or medical specialist the treatment options that are most appropriate for your condition.

Home remedies for whiplash injury

You are your own best resource in the recovery process. Managing yourself is a key part to stopping the discomfort that you are experiencing. Staying active is important. Do as many of your normal activities as possible. Some more vigorous activities that place undue stresses on your neck may need to be avoided in the early stages of recovery.

However, better recovery has been found in individuals who continue a healthy active routine after a whiplash injury. This goes for your general health as well as that of your neck.

Plan gradual increases in activity and exercise levels so that you can successfully return to full participation in your regular activities, hobbies or sports.

Continue or resume working

Those who continue to work, even in a reduced capacity at first, have been shown to have a better recovery than people who take a long time off work. It may be necessary to change some work routines for a while.

You may wish to talk to your employer or health care practitioner regarding ways to modify your particular work tasks and environment if difficulties continue.

Keeping a good relationship with your employer and co-workers is helpful in the recovery process. Talk to your employer openly and frequently.

During times of high work load or busy periods, it is important to let colleagues and supervisors know that you may need extra time or help to meet deadlines. Don’t be afraid to ask for help. You may be in a position to return the favor at some time.

Maintain the flexibility and muscle support of your neck

An exercise program that is specific to the neck and upper back will greatly benefit your recovery. The exercise program in this booklet will help you regain normal neck movement and function.

The exercises are also designed to ensure that your neck receives proper support from the muscles.

Perform daily activities in a strain-free way

Thinking about how you do your work and recreational activities can avoid unnecessary strain on your neck, reduce pain and positively assist recovery.

Be aware of neck positions and postures at work and home

Keeping your spine in a good position is important in everyday activities as well as during the exercises.

The positions in which you work and relax each day have a great impact on the health of your spine. It is easy to compensate and allow yourself to develop poor postural habits. You will need to be consciously aware of postures and positions when you are performing tasks at home and work.

Postural correction exercise

Correct your posture by gently growing tall from the lower back and pelvic region (see Figure 1 below).

Gently raise your pelvis up out of a slumped position.

Next, reposition your shoulder blades so they draw back and across your rib cage (towards the center of your spine). This needs only minimal effort.

Gently lift the base of your skull off the top of your neck. This takes the weight of your head off your neck and stimulates the muscles to work.

Hold the position for at least 10 seconds. Repeat frequently during the day (e.g. three or four times an hour).

Perform this exercise when sitting, standing or while walking, at work and at home.

Figure 4. Whiplash injury exercises

Whiplash injury exercises

Range of motion exercises

For each of the following exercises, complete 5-10 repetitions in each direction.

Neck rotation exercise

Assume the correct postural position. Gently turn your head to the left, looking where you are going to see over your shoulder as much as possible.

You may find it easier to have a target on the wall to focus on.

With each repetition, try to go a little further in that direction. Perform the same exercise to the right side.

Figure 5. Neck rotation exercise

Neck rotation exercise

Neck side bending exercise

Assume the correct postural position. Start with your head centered and gently bring your right ear down towards your right shoulder. You may feel a normal stretch of the muscles on the side of your neck. The exercise should be pain-free. Perform this exercise on the left side.

Figure 6. Neck side bending exercise

Neck side bending exercise

Forward and backward bending

Assume the correct postural position.

Figure 7. Neck forward and backward bending exercise

Neck forward and backward bending exercise

Neck forward and backward bending exercise

Exercises to retrain muscle control

Head nod and holding exercise

This is an important exercise to retrain the deep neck muscles of the front of your neck for pain relief and muscle control.

Lie on your back with knees bent without a pillow under your head and neck.

A. If this is not comfortable, place a small, folded towel under your head for support.

B. Start by looking up at a point on the ceiling. Then with your eyes, look at a spot on the wall just above your knees. Feel the back of your head slide up the bed as you perform a slow and gentle nod as if you were indicating ‘yes’.

While doing the exercise, place your hand gently on the front of the neck to feel the superficial muscles. Make sure they stay soft and relaxed when doing the head nod movement. Stop at the point you sense the muscles are beginning to harden, but keep looking down with your eyes.

Hold the position for 10 seconds and then relax. Look up to a point on the ceiling to resume the starting position. Repeat the exercise 10 times.

Figure 8. Head nod and holding exercise

Head nod and holding exercise

Head and neck exercises

These are important exercises to retrain the muscles at the back of your neck for pain relief and muscle control. There are three exercises to perform, which ensures you exercise the upper and lower regions of your neck.

Lie on your stomach, propped up on your elbows. Push through your elbows to prevent your chest from sagging between your shoulder blades.

To begin, perform each exercise five times as one set. Try to build up to three sets (and eventually three sets of 10 repetitions each). Remember to keep pushing through your elbows to keep your chest raised for the whole set. Have a rest between sets.

Figure 9. Head and neck exercises

Head and neck exercises

Head and neck exercises

Head and neck exercises

Shoulder blade exercises

Poor muscle control around the shoulder blades can increase pain and strain on the neck. There are three exercises that you can do for your shoulder blades and arms.

This first exercise will relax and ease any tension in the muscles on top of your shoulders. It can give you pain relief.

Figure 10. Shoulder blade exercises

Shoulder blade exercises

Shoulder blade exercises

The second exercise helps you to improve the control of your shoulder blades while mimicking work you may do with your arms. It trains you to ease any tension in the muscles on top of your shoulders while you are using your arms.

Sit and correct your posture and draw your shoulder blades back and across your rib cage as you have already practised.

Concentrate on holding your shoulder blade position. Then move your arms:

  • (A) forwards and backwards;
  • (B) out to the side; and
  • (C) turn your forearms outwards.

Do not lift your arms more than 30 degrees in exercises A and B (that is, about a quarter of the way up). Perform each exercise (A,B and C) five times and repeat this set three times.

When you feel confident that you can do the exercise keeping your shoulder blades gently back, hold a 250 gram can in each hand as a small weight.

Figure 11. Shoulder blade exercises part 2

Shoulder blade exercises

The third exercise is simply raising alternate arms forward as far up as you can go. Make sure that you maintain a good posture, especially concentrating on lifting the base of your skull off the top of your neck and then as you raise your arm, keep your thumb facing upwards. Perform three sets of five left and right arm raises.

Figure 12. Shoulder blade exercises part 3

Shoulder blade exercises

Neck isometric exercise (no movement)

Assume the correct postural position and gently raise the back of your head. Place your right hand on the right cheek. Without moving your head, turn your eyes to the right and gently push your head into your hand as if to look over your shoulder. While performing this exercise no movement occurs. Hold the muscle contraction for five seconds.

Do the exercise smoothly and gently, use only 10% effort.

Change hand position and perform the same exercise to the left side. Do five repetitions on each side.

Figure 13. Neck isometric exercise

Neck isometric exercise

Once your neck pain has settled, the exercises can be progressed to include strengthening exercises.

These exercises should not cause pain. Progress slowly.

Head lift exercise

The weight of your head is enough weight to lift. Start by sitting on a chair close to a wall. Rest your head back on the wall.

Slide the back of your head up the wall to nod your chin and hold it in this position. Then just take the weight of your head off the wall (your hair still touches the wall). Hold for five seconds and relax.

Start by doing three sets of two to three repetitions and gradually build up to three sets of five repetitions.

Shifting the chair a little further from the wall makes the exercise more difficult.

You can progress the exercise by moving the chair away from the wall in five centimeter stages.

Figure 14. Head lift exerciseHead lift exercise

Progression: Lie resting your head on two pillows.

Slide the back of your head up the pillow to nod your chin and hold it in this position. Then try to just lift the weight of your head until it just clears the pillow.

Hold for five seconds and relax. Start by doing three sets of two to three repetitions and gradually build up to three sets of five repetitions.

The exercise can be progressed by removing one pillow and performing the exercise in the same way.

Figure 15. Head lift exercise (progression)

Head lift exercise

Sitting

Sitting in one position for prolonged periods is not good for anyone, certainly not someone with neck pain.

Change your position

Sitting in one position for prolonged periods is not good for anyone, certainly not someone with neck pain. Keep your neck healthy and move often.

It is essential that you change your position before your neck becomes stiff or sore. Perform the postural correction exercise regularly. Stand up and move regularly, at least every hour.

Assess how you spend your day at work

Whether sitting in a motor vehicle, at a desk or computer terminal, you need to give your body a regular change of position throughout the day. Take a ‘neck break’, it can be as simple as standing up for a few moments to straighten your spine. Stand and stretch backwards gently to reverse the flexed sitting posture. A complete change of position every hour is advisable.

Working at a computer

Arrange your desk, chair and computer to avoid strain on your neck (see Figure 2). Have work materials close to you and in easy reach.

  • A. Position the top of your screen slightly below eye level and directly in front of you (50-70cm or arm’s length away). There is no single monitor height suitable for everyone. Position the screen to have a comfortable viewing angle to the middle of the screen. Avoid extremes of head and neck bending (upwards or downwards).
  • B. Have an adjustable chair so that you can change the height and angle of the back support. Have the chair close to the desk so you do not have to reach for the keyboard or mouse. If possible, rest your forearms on the desktop to ‘unload’ the shoulders.
  • C. Desk height should allow sitting with shoulders and arms relaxed with elbows at a 90 degree angle and wrists in a neutral position. Sit with hips and knees at close to 90 degree angles. Feet should be flat on the floor or use a foot stool to achieve a comfortable position.
  • D. If working from documents for prolonged periods, these should be placed on a document holder either positioned between the keyboard and monitor or at the same eye level as the screen and close to the monitor. Reading from items placed flat on the desktop may increase the strain on your neck and should be avoided. Books and documents should be elevated onto a sloped surface (e.g. an empty 2-ring folder).
  • E. When using the computer mouse, keep the mouse close to the keyboard, use keyboard shortcuts instead of the mouse and alternate which hand uses the mouse.

Current research suggests that spending time standing at work (high set work station) has benefits not only for the neck and back, but also for general health (e.g. by increasing daily activity levels to help maintain healthy body weight). At home and work, try to spend time working in a standing position.

Figure 16. Working at a computer

Working at a computer

Whiplash prognosis

Most people with whiplash get better within a few weeks by following a treatment plan that includes pain medication and exercise. However, some people have chronic neck pain and other long-lasting complications. Recovery following whiplash injury, if it is to occur, will occur for the most part within the first 3 months post injury 17. Current estimates suggest that approximately 50% of individuals will recover by 3 months post injury, whilst the remainder will experience mild to moderate long-term disability 18, 19, 20.

Whiplash prognosis varies secondary to comorbidities prior to the injury, severity of whiplash-associated disorders, age, the legal environment and socioeconomic environment 8. Full recovery has been shown to occur in a few days to several weeks 58. However, disability can be permanent and range from chronic pain to impaired physical function 58. There have been inadequate studies that incorporate mitigating factors, such as socioeconomic and legal, which can impact an accurate assessment of recovery 8. Legal environment, prior injury, comorbidity, age, and defensive medicine all play roles in the management and outcomes 58. In countries where there is little or no litigation, whiplash prognosis is more favorable lending that economic gain for disability may play a role in determining the patient’s reports of full recovery 58. For example, in countries such as Lithuania and Greece, where there is no compensation culture and no formal compensation system for late whiplash-related injuries, the development of chronic symptoms following whiplash is a rare phenomenon 23, 24. This evidence suggests that the culture and expectations around whiplash, local insurance systems, and the prospect of monetary benefits are likely to play important roles in the prevalence of whiplash injuries and related claims, as well as in the recovery process 25. In Germany, for instance, whiplash-associated disorders represent the most common consequence of road traffic accidents, counting approximately 20,000 cases each year and costing insurance companies more than 500 million euro annually 24. Similarly, in Italy, it is estimated that the compensation for whiplash-related damages amounts to more than 2 million euro every year 59.

References
  1. Godek P. Whiplash Injuries. Current State of Knowledge. Ortop Traumatol Rehabil. 2020 Oct 31;22(5):293-302. doi: 10.5604/01.3001.0014.4210
  2. Aarnio M, Fredrikson M, Lampa E, Sörensen J, Gordh T, Linnman C. Whiplash injuries associated with experienced pain and disability can be visualized with [11C]-D-deprenyl positron emission tomography and computed tomography. Pain. 2022 Mar 1;163(3):489-495. doi: 10.1097/j.pain.0000000000002381
  3. Eck JC, Hodges SD, Humphreys SC. Whiplash: a review of a commonly misunderstood injury. Am J Med. 2001 Jun 1;110(8):651-6. doi: 10.1016/s0002-9343(01)00680-5
  4. Ferrari R. Whiplash–review of a commonly misunderstood injury. Am J Med. 2002 Feb 1;112(2):162-3. doi: 10.1016/s0002-9343(01)00953-6.
  5. Spitzer WO, Skovron ML, Salmi LR, Cassidy JD, Duranceau J, Suissa S, Zeiss E. Scientific monograph of the Quebec Task Force on Whiplash-Associated Disorders: redefining “whiplash” and its management. Spine (Phila Pa 1976). 1995 Apr 15;20(8 Suppl):1S-73S. Erratum in: Spine 1995 Nov 1;20(21):2372.
  6. Griffin A, Jagnoor J, Arora M, Cameron ID, Kifley A, Sterling M, Kenardy J, Rebbeck T. Evidence-based care in high- and low-risk groups following whiplash injury: a multi-centre inception cohort study. BMC Health Serv Res. 2019 Nov 6;19(1):806. doi: 10.1186/s12913-019-4623-y
  7. Evans, R.W. (2010), Persistent Post-Traumatic Headache, Postconcussion Syndrome, and Whiplash Injuries: The Evidence for a Non-Traumatic Basis With an Historical Review. Headache: The Journal of Head and Face Pain, 50: 716-724. https://doi.org/10.1111/j.1526-4610.2010.01645.x
  8. Bragg KJ, Varacallo M. Cervical Sprain. [Updated 2022 Sep 4]. In: StatPearls [Internet]. Treasure Island (FL): StatPearls Publishing; 2022 Jan-. Available from: https://www.ncbi.nlm.nih.gov/books/NBK541016
  9. Toney-Butler TJ, Varacallo M. Motor Vehicle Collisions. [Updated 2022 Aug 29]. In: StatPearls [Internet]. Treasure Island (FL): StatPearls Publishing; 2022 Jan-. Available from: https://www.ncbi.nlm.nih.gov/books/NBK441955
  10. Chappuis G, Soltermann B; CEA; AREDOC; CEREDOC. Number and cost of claims linked to minor cervical trauma in Europe: results from the comparative study by CEA, AREDOC and CEREDOC. Eur Spine J. 2008 Oct;17(10):1350-7. doi: 10.1007/s00586-008-0732-8
  11. Martin JL, Perez K, Mari-Dell’olmo M, Chiron M. Whiplash risk estimation based on linked hospital-police road crash data from France and Spain. Inj Prev. 2008;14:185–190. doi: 10.1136/ip.2007.016600
  12. Ye S, Chen Q, Liu N, Chen R, Wu Y. Citation analysis of the most influential publications on whiplash injury: A STROBE-compliant study. Medicine (Baltimore). 2022 Sep 30;101(39):e30850. doi: 10.1097/MD.0000000000030850
  13. Carroll LJ, Hogg-Johnson S, Côté P, van der Velde G, Holm LW, Carragee EJ, Hurwitz EL, Peloso PM, Cassidy JD, Guzman J, Nordin M, Haldeman S; Bone and Joint Decade 2000-2010 Task Force on Neck Pain and Its Associated Disorders. Course and prognostic factors for neck pain in workers: results of the Bone and Joint Decade 2000-2010 Task Force on Neck Pain and Its Associated Disorders. Spine (Phila Pa 1976). 2008 Feb 15;33(4 Suppl):S93-100. doi: 10.1097/BRS.0b013e31816445d4
  14. Sterling M, Carroll LJ, Kasch H, Kamper SJ, Stemper B. Prognosis after whiplash injury: where to from here? Discussion paper 4. Spine (Phila Pa 1976). 2011 Dec 1;36(25 Suppl):S330-4. doi: 10.1097/BRS.0b013e3182388523
  15. Al-Khazali HM, Ashina H, Iljazi A, Lipton RB, Ashina M, Ashina S, Schytz HW. Neck pain and headache after whiplash injury: a systematic review and meta-analysis. Pain. 2020 May;161(5):880-888. doi: 10.1097/j.pain.0000000000001805
  16. Schofferman J, Bogduk N, Slosar P. Chronic whiplash and whiplash-associated disorders: an evidence-based approach. J Am Acad Orthop Surg. 2007 Oct;15(10):596-606. doi: 10.5435/00124635-200710000-00004
  17. Kamper SJ, Rebbeck TJ, Maher CG, McAuley JH, Sterling M. Course and prognostic factors of whiplash: a systematic review and meta-analysis. Pain. 2008;138(3):617–629. doi: 10.1016/j.pain.2008.02.019
  18. Sterling M, Hendrikz J, Kenardy J. Compensation claim lodgement and health outcome developmental trajectories following whiplash injury: A prospective study. Pain. 2010 Jul;150(1):22-28. doi: 10.1016/j.pain.2010.02.013
  19. Carroll LJ, Hogg-Johnson S, Côté P, van der Velde G, Holm LW, Carragee EJ, Hurwitz EL, Peloso PM, Cassidy JD, Guzman J, Nordin M, Haldeman S. Course and prognostic factors for neck pain in workers: results of the Bone and Joint Decade 2000-2010 Task Force on Neck Pain and Its Associated Disorders. J Manipulative Physiol Ther. 2009 Feb;32(2 Suppl):S108-16. doi: 10.1016/j.jmpt.2008.11.015
  20. Kamper SJ, Rebbeck TJ, Maher CG, McAuley JH, Sterling M. Course and prognostic factors of whiplash: a systematic review and meta-analysis. Pain. 2008 Sep 15;138(3):617-629. doi: 10.1016/j.pain.2008.02.019
  21. Linnman C, Appel L, Furmark T, Söderlund A, Gordh T, Långström B, Fredrikson M. Ventromedial prefrontal neurokinin 1 receptor availability is reduced in chronic pain. Pain. 2010 Apr;149(1):64-70. doi: 10.1016/j.pain.2010.01.008
  22. Linnman, C., Appel, L., Söderlund, A., Frans, Ö., Engler, H., Furmark, T., Gordh, T., Långström, B. and Fredrikson, M. (2009), Chronic whiplash symptoms are related to altered regional cerebral blood flow in the resting state. European Journal of Pain, 13: 65-70. https://doi.org/10.1016/j.ejpain.2008.03.001
  23. Cassidy JD, Carroll LJ, Côté P, Lemstra M, Berglund A, Nygren Å. Effect of eliminating compensation for pain and suffering on the outcome of insurance claims for whiplash injury. N Engl J Med. 2000;342:1179–1186. doi: 10.1056/NEJM200004203421606
  24. Noll-Hussong M. Whiplash Syndrome Reloaded: Digital Echoes of Whiplash Syndrome in the European Internet Search Engine Context. JMIR Public Health Surveill. 2017;3:e15. doi: 10.2196/publichealth.7054
  25. Monaro M, Bertomeu CB, Zecchinato F, Fietta V, Sartori G, De Rosario Martínez H. The detection of malingering in whiplash-related injuries: a targeted literature review of the available strategies. Int J Legal Med. 2021 Sep;135(5):2017-2032. doi: 10.1007/s00414-021-02589-w
  26. Sterling M. Clinical presentation of whiplash associated disorders. In: Sterling M, Kenardy J, editors. Whiplash: evidence base for clinical practice. Sydney: Churchill Livingstone: Elsevier Australia; 2011. pp. 9–15.
  27. Cassidy JD, Carroll LJ, Côté P, Lemstra M, Berglund A, Nygren A. Effect of eliminating compensation for pain and suffering on the outcome of insurance claims for whiplash injury. N Engl J Med. 2000 Apr 20;342(16):1179-86. doi: 10.1056/NEJM200004203421606
  28. Cassidy JD, Leth-Petersen S, Rotger GP. What happens when compensation for whiplash claims is made more generous? J Risk Insur. 2018;85:635–662. doi: 10.1111/jori.12169
  29. Johnson R. Anatomy of the cervical spine and its related structures. Torg JS, ed. Athletic Injuries to the Head, Neck, and Face. 2nd ed. St Louis, Mo: Mosby-Year Book; 1991. 371-83.
  30. Parke WW, Sherk HH. Normal adult anatomy. Sherk HH, Dunn EJ, Eismon FJ, et al, eds. The Cervical Spine. 2nd ed. Philadelphia, Pa: JB Lippincott Co; 1989. 11-32.
  31. McLain RF. Mechanoreceptor endings in human cervical facet joints. Spine. 1994 Mar 1. 19(5):495-501.
  32. Bogduk N, Twomey L. Clinical Anatomy of the Lumbar Spine. 2nd ed. New York, NY: Churchill Livingstone; 1991.
  33. Dreyfus P. The cervical spine: Non-surgical care Presented at: The Tom Landry Sports Medicine and Research Center; April 8, 1993; Dallas, Texas.
  34. Mendel T, Wink CS, Zimny ML. Neural elements in human cervical intervertebral discs. Spine. 1992 Feb. 17(2):132-5.
  35. Panjabi MM, Oxland TR, Parks EH. Quantitative anatomy of cervical spine ligaments. Part I. Upper cervical spine. J Spinal Disord. 1991 Sep. 4(3):270-6.
  36. Fielding JW, Cochran GB, Lawsing JF 3rd, Hohl M. Tears of the transverse ligament of the atlas. A clinical and biomechanical study. J Bone Joint Surg Am. 1974 Dec. 56(8):1683-91.
  37. Panjabi MM, Vasavada A, White A III. Cervical spine biomechanics. Semin Spine Surg. 1993. 5:10-6.
  38. Chen HB, Yang KH, Wang ZG. Biomechanics of whiplash injury. Chin J Traumatol. 2009 Oct;12(5):305-14. https://doi.org/10.3760/cma.j.issn.1008-1275.2009.05.011
  39. Ebell MH. Diagnosis: making the best use of medical data. Am Fam Physician. 2009 Mar 15;79(6):478-80. https://www.aafp.org/pubs/afp/issues/2002/0201/p478.html
  40. Blakely TAB, Jr, Harrington DE. Mild head injury is not always mild; implications for damage litigation. Med Sci Law. 1993;33:231–242. doi: 10.1177/002580249303300309
  41. Gennis P, Miller L, Gallagher EJ, Giglio J, Carter W, Nathanson N. The effects of soft cervical collars on persistent neck pain in patients with whiplash injury. Acad Emerg Med. 1996;3(6):568–573. doi: 10.1111/j.1553-2712.1996.tb03466.x
  42. Ricciardi L, Stifano V, D’Arrigo S, Polli FM, Olivi A, Sturiale CL. The role of non-rigid cervical collar in pain relief and functional restoration after whiplash injury: a systematic review and a pooled analysis of randomized controlled trials. Eur Spine J. 2019 Aug;28(8):1821-1828. doi: 10.1007/s00586-019-06035-9
  43. Hernández-Sousa MG, Sánchez-Avendaño ME, Solís-Rodríguez A, Yáñez-Estrada M. Incapacidad por esguince cervical I y II y el uso del collarín [Disability by cervical sprain I and II and the use of neck collar]. Rev Med Inst Mex Seguro Soc. 2013 Mar-Apr;51(2):182-7. Spanish.
  44. Peloso P, Gross A, Haines T, Trinh K, Goldsmith CH, Burnie S; Cervical Overview Group. Medicinal and injection therapies for mechanical neck disorders. Cochrane Database Syst Rev. 2007 Jul 18;(3):CD000319. doi: 10.1002/14651858.CD000319.pub4. Update in: Cochrane Database Syst Rev. 2015;5:CD000319.
  45. Bandong AN, Leaver A, Mackey M, Sterling M, Kelly J, Ritchie C, Rebbeck T. Referral to specialist physiotherapists in the management of whiplash associated disorders: Perspectives of healthcare practitioners. Musculoskelet Sci Pract. 2018 Apr;34:14-26. doi: 10.1016/j.msksp.2017.11.006
  46. Ritchie C, Hollingworth SA, Warren J, Sterling M. Medicine use during acute and chronic postinjury periods in whiplash-injured individuals. Pain. 2019 Apr;160(4):844-851. doi: 10.1097/j.pain.0000000000001460
  47. Binder AI. Neck pain. BMJ Clin Evid. 2008 Aug 4;2008:1103. https://www.ncbi.nlm.nih.gov/pmc/articles/PMC2907992
  48. Ludvigsson ML, Peterson G, Dedering A, Peolsson A. One- and two-year follow-up of a randomized trial of neck-specific exercise with or without a behavioural approach compared with prescription of physical activity in chronic whiplash disorder. J Rehabil Med. 2016;48(1):56–64. doi: 10.2340/16501977-2041
  49. Peterson G, Nilsson D, Trygg J, Peolsson A. Neck-specific exercise improves impaired interactions between ventral neck muscles in chronic whiplash: a randomized controlled ultrasound study. Sci Rep. 2018;8(1):9649. doi: 10.1038/s41598-018-27685-7
  50. Peolsson A, Landen Ludvigsson M, Peterson G. Neck-specific exercises with internet-based support compared to neck-specific exercises at a physiotherapy clinic for chronic whiplash-associated disorders: study protocol of a randomized controlled multicentre trial. BMC Musculoskelet Disord. 2017;18(1):524. doi: 10.1186/s12891-017-1853-1
  51. Teasell RW, McClure JA, Walton D, Pretty J, Salter K, Meyer M, Sequeira K, Death B. A research synthesis of therapeutic interventions for whiplash-associated disorder (WAD): part 3 – interventions for subacute WAD. Pain Res Manag. 2010 Sep-Oct;15(5):305-12. doi: 10.1155/2010/108685
  52. Aigner N, Fialka C, Radda C, Vecsei V. Adjuvant laser acupuncture in the treatment of whiplash injuries: a prospective, randomized placebo-controlled trial. Wien Klin Wochenschr. 2006;118(3):95. doi: 10.1007/s00508-006-0530-4
  53. Brijnath B, Bunzli S, Xia T, et al. General practitioners knowledge and management of whiplash associated disorders and post-traumatic stress disorder: implications for patient care. BMC Fam Pract. 2016;17:82. doi: 10.1186/s12875-016-0491-2
  54. Borchgrevink GE, Kaasa A, McDonagh D, Stiles TC, Haraldseth O, Lereim I. Acute treatment of whiplash neck sprain injuries: a randomized trial of treatment during the first 14 days after a car accident. Spine. 1998;23(1):25–31. doi: 10.1097/00007632-199801010-00006
  55. Teasell RW, McClure JA, Walton D, Pretty J, Salter K, Meyer M, Sequeira K, Death B. A research synthesis of therapeutic interventions for whiplash-associated disorder (WAD): part 2 – interventions for acute WAD. Pain Res Manag. 2010 Sep-Oct;15(5):295-304. doi: 10.1155/2010/640164
  56. Gálvez-Hernández CL, Rodríguez-Ortiz MD, Del Río-Portilla Y. Retroalimentación biológica para pacientes con esguince cervical agudo [Biofeedback treatment for acute whiplash patients]. Rev Med Inst Mex Seguro Soc. 2016 Jul-Aug;54(4):480-9. Spanish.
  57. Ruiz-Molinero C, Jimenez-Rejano JJ, Chillon-Martinez R, Suarez-Serrano C, Rebollo-Roldan J, Perez-Cabezas V. Efficacy of therapeutic ultrasound in pain and joint mobility in whiplash traumatic acute and subacute phases. Ultrasound Med Biol. 2014 Sep;40(9):2089-95. doi: 10.1016/j.ultrasmedbio.2014.04.016
  58. Binder A. The diagnosis and treatment of nonspecific neck pain and whiplash. Eura Medicophys. 2007 Mar;43(1):79-89. https://www.minervamedica.it/en/journals/europa-medicophysica/article.php?cod=R33Y2007N01A0079
  59. Previtera AM (2004) Il colpo di frusta cervicale. Diagnosi, biomeccanica e trattamento. Grafica MA.RO Editrice S.r.l.
read more
Conditions & DiseasesMusculoskeletal System

Scoliosis

scoliosis

What is scoliosis

Scoliosis is a sideways curve in the spine commonly seen in children and adolescents 1. Scoliosis is defined as a lateral curve to the spine that is greater than 10 degrees with vertebral rotation 2.

There are several different types of scoliosis. By far, the most common type is “idiopathic,” which means the exact cause is not known. Idiopathic scoliosis can occur in toddlers and young children, but the majority of cases occur from age 10 to the time a child is fully grown. Children with true adolescent idiopathic scoliosis may have been born with the genetic markers that cause scoliosis. The genes that these markers are on are not known exactly, and researchers are working on finding them.

These curves are often S- or C-shaped. Scoliosis is most common in late childhood and the early teens, when children grow fast. It can run in families. Symptoms include leaning to one side and having uneven shoulders and hips. Sometimes it is easy to notice, but not always.

Adolescent idiopathic scoliosis is the most common form of scoliosis, affecting approximately 2% to 4% of (one out of every 25 children) adolescents. The incidence of scoliosis is about the same in males and females; however, females have up to a 10-fold greater risk of curve progression to more severe disease, possibly needing treatment 3. Adolescent idiopathic scoliosis is the most common form 4. Scoliosis usually does not cause problems, but sometimes leads to visible deformity, emotional distress, and respiratory impairment from rib deformity 5.

Children who have mild scoliosis are monitored closely, usually with X-rays, to see if the curve is getting worse. In many cases, no treatment is necessary. Some children will need to wear a brace to stop the curve from worsening. Others may need surgery to keep the scoliosis from worsening and to straighten severe cases of scoliosis.

Although physical therapy exercises can’t stop scoliosis (there is no evidence for or against exercises) 6, general exercise or participating in sports may have the benefit of improving overall health and well-being. Moreover, the use of exercise for the treatment of adolescent idiopathic scoliosis is controversial. Whilst it is currently routinely used in France, Germany, Italy, and a number of other countries in continental Europe, most centres in the UK and USA do not advocate its use. Until a high quality randomized clinical trial is conducted, we will not know for certain whether scoliosis-specific exercises are effective or not. In a recent International Scientific Society on Scoliosis Orthopaedic and Rehabilitation Treatment study 7 involving 24 young adolescents (5 males and 19 females, mean age 12.3 ± 1.4 years) showed there is evidence to suggest that Schroth scoliosis-specific exercises can slow progression in mild scoliosis 7. In the exercise group, spinal deformity improved in 17% of patients (Cobb angle improvement of ≥ 6°), worsened in 21% (Cobb angle increases of ≥ 6°), and remained stable in 62%. In the control group, 4% improved, 50% worsened, and 46% remained stable. In the subgroup analysis, 31% of patients who were compliant (13 cases) improved, 69% remained static, and none had worsened, while in the non-compliant group (11 cases), none had improved, 46% worsened, and 46% remained stable. Analysis of the secondary outcomes showed improvement of the truncal shift, angle of trunk rotation, the Scoliosis Research Society function domain, and total scores in favor of the exercise group 7. The Schroth method is the most widely studied and used physiotherapy scoliosis-specific exercises approach. It consists of three-dimensional principles of correction, namely auto-elongation, deflection, derotation, rotational breathing, and stabilization 8. It uses specific rotational angular breathing for vertebral and rib cage derotation, with muscle activation and mobilization. It emphasizes postural corrections throughout the day to change habitual postures and improve alignment, pain, and progression. The Schroth method exercises are curve pattern specific and can be applied in ordinary daily activity, thereby allowing the patients to spend more time in leisure activities and to live a normal life 9. See below under treatment for Schroth method scoliosis-specific exercises.

Children may get screening for scoliosis at school or during a checkup. If it looks like there is a problem, your doctor will use your medical and family history, a physical exam, and imaging tests to make a diagnosis. Treatment depends on your age, how much more you’re likely to grow, how much curving there is, and whether the curve is temporary or permanent.

When to see a doctor

Go to your doctor if you notice signs or symptoms of scoliosis in your child. Mild curves, however, can develop without the parent or child knowing it because they appear gradually and usually don’t cause pain. Occasionally, teachers, friends and sports teammates are the first to notice a child’s scoliosis.

How serious is adolescent scoliosis ?

Adolescent scoliosis is not life threatening, and most curves do not cause serious problems. Children with scoliosis can have normal active lives, including sports participation.

If the curve gets really large, it can cause heart and lung problems. A very severe curve can also compress nerves or the spinal cord, which can result in paralysis. This is extremely rare. Proper treatment will prevent the curve from progressing to such a severe degree.

Does scoliosis cause back pain ?

Adolescent scoliosis does not usually cause back pain, although larger curves may cause occasional discomfort.

If the back pain is severe or is associated with weakness of the limbs or numbness, call your doctor. This may require investigations to rule out other sources of pain.

Can scoliosis curves get better on their own ?

Some very small idiopathic scoliosis curves may improve without treatment but this is the exception rather than the rule. Many children have slight curves that do not need treatment. In these cases, the children grow up to lead normal lives — but their small curves remain.

If larger curves are not treated, the best you can hope for is that they will not get worse. This depends on how much growing your child has left to do. Curves in children who are almost fully grown may stop getting worse. If your child’s spine is still growing, it is more likely that the curves will worsen.

Will you be able to live a normal life ?

Yes. People who have curves that do not require surgery are able to participate in the same activities and sports as people without scoliosis. There are rarely restrictions on any of their activities.

The same usually applies to people who have had surgery for scoliosis. They can have the same jobs as people who have not had scoliosis surgery. They can usually do the same sports as before surgery. They should, however, contact their doctors before starting new activities (jobs or sports) to make sure they have no specific restrictions.

Figure 1. Scoliosis

scoliosis

Types of scoliosis

Idiopathic scoliosis

The term “idiopathic” means unknown cause. Although doctors do not know for sure what causes the majority of scoliosis cases (80% to 85%), doctors do know it tends to run in families 10. Scoliosis is not a disease that is caught from someone else, like a cold. There is nothing you could have done to prevent it.

Idiopathic scoliosis can be further classified by age of onset 11:

  • Infantile (birth to two years),
  • Juvenile (three to nine years), and
  • Adolescent (10 years and older). Adolescent idiopathic scoliosis is the most common form. Scoliosis usually does not cause problems, but sometimes leads to visible deformity, emotional distress, and respiratory impairment from rib deformity.

Congenital scoliosis

The term “congenital” means that you are born with the condition. Congenital scoliosis starts as the spine forms before birth. Part of one vertebra (or more) does not form completely or the vertebrae do not separate properly. Some types of congenital scoliosis can change quickly with growth while others remain unchanged. This type of scoliosis can be associated with other health issues, such as heart and kidney problems.

Neuromuscular scoliosis

Any medical condition that affects the nerves and muscles can lead to scoliosis. This is most commonly due to muscle imbalance and/or weakness. Common neuromuscular conditions that can lead to scoliosis include cerebral palsy, muscular dystrophy, and spinal cord injury.

Scoliosis symptoms

People with scoliosis might have:

  • shoulders that are uneven
  • waist creases that are uneven
  • one shoulder blade that sticks out more than the other
  • one hip higher than the other
  • an obvious exaggerated curve of the spine
  • back pain or discomfort.

Some people with scoliosis have a posture that is unusual or uneven.

If a scoliosis curve gets worse, the spine will also rotate or twist, in addition to curving side to side. This causes the ribs on one side of the body to stick out farther than on the other side.

If you are concerned that your child may have scoliosis, see your doctor. Early diagnosis and treatment is important.

What causes scoliosis

Doctors don’t know what causes the most common type of scoliosis — although it appears to involve hereditary factors, because the disorder tends to run in families 12. If both parents have idiopathic scoliosis, their children are 50 times more likely to require scoliosis treatment compared with the general population 2. Scoliosis is believed to be a polygenic disorder with multiple inheritance patterns 12. Saliva-based genetic markers could be a useful adjunct in predicting which patients are at risk of scoliosis progression 12. However, further studies are needed, and genetic testing is not recommended at this time.

Less common types of scoliosis may be caused by:

  • Neuromuscular conditions, such as cerebral palsy or muscular dystrophy
  • Birth defects affecting the development of the bones of the spine
  • Injuries to or infections of the spine

Sometimes it is congenital, meaning it is present at birth. It is sometimes caused by problems with the nerves and muscles, such as with cerebral palsy.

Risk factors of scoliosis

Risk factors for developing the most common type of scoliosis include:

  • Age. Signs and symptoms typically begin during the growth spurt that occurs just prior to puberty.
  • Sex. Although both boys and girls develop mild scoliosis at about the same rate, girls have a much higher risk of the curve worsening and requiring treatment.
  • Family history. Scoliosis can run in families, but most children with scoliosis don’t have a family history of the disease.

Complications of scoliosis

While most people with scoliosis have a mild form of the disorder, scoliosis may sometimes cause complications, including:

  • Lung and heart damage. In severe scoliosis, the rib cage may press against the lungs and heart, making it more difficult to breathe and harder for the heart to pump.
  • Back problems. Adults who had scoliosis as children are more likely to have chronic back pain than are people in the general population.
  • Appearance. As scoliosis worsens, it can cause more noticeable changes — including unlevel shoulders, prominent ribs, uneven hips, and a shift of the waist and trunk to the side. Individuals with scoliosis often become self-conscious about their appearance.

Screening for scoliosis

For decades, scoliosis screenings were a routine part of school physical examinations in adolescents 13. The screening itself carries little cost and negligible risk to the patient, but radiographs and referrals in youths who may be at low risk of disease progression can lead to significant expense and risk of harm to patients 14.

The U.S. Preventive Services Task Force 14 did not find good evidence that screening in asymptomatic adolescents detects idiopathic scoliosis at an earlier stage than no screening.

Here is the U.S. Preventive Services Task Force 14 conclusion:

“We found no direct evidence for a benefit of universal adolescent-idiopathic-scoliosis screening of adolescents on long-term health outcomes. There is evidence that demonstrates that AIS can be identified with the most commonly used screening test for adolescent-idiopathic-scoliosis (FBT with scoliometer, followed by referral for diagnostic imaging), although estimates of predictive value and sensitivity are variable, and the majority of individuals identified through screening will never require treatment. Theoretical harms of universal screening have been proposed, but high-quality evidence is lacking. A growing body of evidence suggests that brace treatment can interrupt or slow progression of scoliosis curves before skeletal maturity; and limited evidence suggests that curves of smaller magnitude may respond similarly to physiotherapeutic scoliosis-specific exercise treatment. Surgical treatment remains the standard of care for curves that progress to greater than 40–50 degrees; however, there are no controlled studies of surgical versus non-surgical treatment in individuals with lower degrees of curvature at adolescent-idiopathic-scoliosis detection, which would represent a likely screening population. Although long-term observational studies suggest that continued curve progression in adulthood is less likely if the magnitude of the curve at skeletal maturity is smaller, and that very high degrees of curvature may be associated with pathology in later adulthood, direct evidence on the association between magnitude of curve at skeletal maturity and adult quality of life outcomes is lacking.”

The accuracy of the most common screening test, the Adam’s forward bend test, with or without a scoliometer, is variable. The U.S. Preventive Services Task Force 14 found that most cases detected through screening do not progress to clinically significant scoliosis, and scoliosis requiring surgery is likely to be detected without screening.

In a prospective study in the Netherlands that followed more than 30,000 students 10 to 14 years of age for up to three years, annual scoliosis screening in addition to the usual biennial health checkup detected no cases of idiopathic scoliosis requiring surgery, and the authors concluded that additional annual scoliosis screening was not needed. Based on these findings, in 2004 the U.S. Preventive Services Task Force 14 concluded that the harms of screening asymptomatic adolescents for idiopathic scoliosis exceeded the potential benefits. The American Academy of Family Physicians concurs in recommending against routine screening 15.

The Scoliosis Research Society, American Academy of Orthopaedic Surgeons, American Academy of Pediatrics, and Pediatric Orthopaedic Society of North America convened a task force in 2007 supporting scoliosis screening, while also recognizing the need for greater care in deciding which patients with positive screening results need further evaluation 16. These groups argue that the cost of scoliosis screening is relatively low, and that the radiation exposure with current radiographic techniques is significantly less than in the past. They list prevention of deformity progression with brace treatment and earlier recognition of severe deformities requiring surgery as potential benefits of screening.

The 14 suggests that most patients who need treatment will be detected without screening, when presenting with visible curvature or possibly incidentally during another type of examination.

Diagnosis of scoliosis

The doctor will initially take a detailed medical history and may ask questions about recent growth. During the physical exam, your doctor may have your child stand and then bend forward from the waist, with arms hanging loosely, to see if one side of the rib cage is more prominent than the other.

Your doctor may also perform a neurological exam to check for:

  • Muscle weakness
  • Numbness
  • Abnormal reflexes

Physical Examination

Physical examination for scoliosis mainly consists of the Adam’s forward bend test (Figure 2) 11. The patient stands and bends forward at the waist, with the examiner assessing for symmetry of the back from behind and beside the patient 17. Patients with possible scoliosis will have a lateral bending of the spine, but the curve will cause spinal rotation and eventually a rib hump, which is visible on examination 18.

Figure 2. Adam’s forward bend test for scoliosis screening

Adam forward bend test for scoliosis screening

[Source 11]

The examiner may then attempt to quantify the spinal curve and rotation with a scoliometer, or inclinometer (Figure 3) 3. The inclination angle measured by a scoliometer will help determine which patients may need radiography. The estimated magnitude of the spinal curve can be used to determine the angle of trunk rotation. This can help avoid imaging in patients with clearly insignificant curves; however, a Cobb angle measurement using radiography is needed for the official diagnosis of scoliosis. Generally, an angle of trunk rotation that is less than 5 degrees is insignificant and may not require follow-up. A measurement of 5 to 9 degrees at least warrants reexamination in six months. A measurement of 10 degrees or greater requires radiologic evaluation for Cobb angle measurement (see Figure 4).

Figure 3. Scoliometer measurement for scoliosis

scoliometer

Imaging tests

Plain X-rays can confirm the diagnosis of scoliosis and reveal the severity of the spinal curvature. If a doctor suspects that an underlying condition — such as a tumor — is causing the scoliosis, he or she may recommend additional imaging tests, such as an MRI.

Figure 4. Cobb angle

Cobb angle of scoliosis

Note: Tangential lines are drawn from the superior end plate of the superior vertebra and the inferior end plate of the inferior vertebra. The angle formed at the intersection of these two lines is the Cobb angle (62 degrees in this image). A Cobb angle of at least 10 degrees is necessary for diagnosing scoliosis.

Red Flags  of Scoliosis

Although scoliosis is usually benign and rarely requires treatment, there are several characteristics that suggest more serious problems and a diagnosis of nonidiopathic scoliosis. Approximately 85% to 90% of adolescent idiopathic scoliosis cases involve a right thoracic curve (the spinal curve is convex to the right) 4. A left thoracic curve (convex to the left) is more likely to be associated with additional pathology, including spinal cord tumors, neuromuscular disorders, Arnold-Chiari malformations, or occult syrinx 10.

Scoliosis rarely causes significant pain; therefore, severe pain should prompt evaluation for other possible etiologies. Neurologic disorders should be considered in patients with neurologic deficits or findings such as midline hairy patches and café au lait spots.

Risk Factors for Scoliosis Progression

Three major factors that determine whether scoliosis will progress are patient sex, magnitude of curve on presentation, and growth potential. One study followed 186 skeletally immature patients with idiopathic scoliosis, diagnosed through school screening, until skeletal maturity. The initial Cobb angle magnitude was the most important predictor of long-term curve progression and behavior past skeletal maturity, whereas initial age, sex, age of menarche, and pubertal status were less important prognostic factors. The authors suggested an initial Cobb angle of 25 degrees as an important threshold magnitude for long-term curve progression 19.

The examiner may estimate growth potential based on age and Tanner stage; however, for more precise determination of growth potential, radiographs may be needed to measure the Risser grade. The Risser grade measures bony fusion of the iliac apophysis (Figure 5), with higher Risser grades indicating greater skeletal ossification, hence less potential for growth and curve progression 20. The time of greatest curve change is in early adolescence (curve acceleration phase). Progression of scoliosis curve averages 0.2 degrees per month before the curve acceleration phase, although curves could change 1 to 2 degrees per month at the start of this phase 21.

Figure 5. Risser grade 

Risser grade for scoliosis progression

Note: The Risser grade is used to measure ossification of the iliac apophysis. Grade 1 is 25% ossification, grade 2 is 50% ossification, grade 3 is 75% ossification, grade 4 is 100% ossification, and grade 5 is fusion of ossified epiphysis to the iliac wing.

The Tanner-Whitehouse 3 assessments, which assess skeletal maturity based on radiographic evaluation of the epiphyses of the distal radius, distal ulna, and small hand bones, were simplified and used to create a skeletal scoring system to estimate scoliosis behavior 22. The researchers eliminated the radial and ulnar radiographic scores to produce a digital skeletal age score, which correlates with the curve acceleration phase. Table 1 shows predictions of scoliosis progressing to a 50-degree curve, with its potential for surgical treatment, based on digital skeletal age staging and curvature at the time of the measurement. The simplified Tanner-Whitehouse 3 skeletal maturity assessment goes up to stage 8, which corresponds to Risser grade 5. Many patients could be stage 5 on the simplified Tanner-Whitehouse 3 scale, but be a Risser grade 0. Therefore, the prediction of scoliosis activity may be stronger with the simplified Tanner-Whitehouse 3 scale than with the Risser grade 22.

The Cobb angle and Risser grade or digital skeletal age can be compared to predict the likelihood of curve progression (Tables 1 and 2). This information can help guide decisions about referral and treatment.

Table 1. Incidence of Progression as Related to the Magnitude of the Curve and the Risser Sign

Risser signPercentage of curves that progressed
5- to 19-degree curves20- to 29-degree curves

Grade 0 or 1

22

68

2, 3, or 4

1.6

23

[Source 23]

Table 2. Treatment and Referral Guidelines for Patients with Scoliosis

Cobb angle (degrees)Risser gradeRadiography/referralTreatment

10 to 19

0 to 1

Radiography every six months, no referral

Observe

10 to 19

2 to 4

Radiography every six months, no referral

Observe

20 to 29

0 to 1

Radiography every six months, referral

Brace after 25 degrees

20 to 29

2 to 4

Radiography every six months, referral

Observe or brace*

29 to 40

0 to 1

Referral

Brace

29 to 40

2 to 4

Referral

Brace

> 40

0 to 4

Referral

Surgery†


*—Risser grade 4 probably warrants only observation.

†—Surgery can be delayed with Risser grade 4.

[Source 24]

Treatment of scoliosis

Treatment usually aims to straighten the spine to improve the person’s appearance. What treatment to use depends on how severe the scoliosis is and the age of the person affected.

If the condition is mild, regular check-ups are all that is needed.

If it is more severe, the treatment may involve wearing a brace, which can help prevent the curvature getting worse.

For some people, the curvature is so severe that surgery is suggested. That might involve the insertion of metal rods to straighten the spine, or surgery to fuse some of the bones together.

Exercise and physiotherapy can help ease pain.

Most children with scoliosis have mild curves and probably won’t need treatment with a brace or surgery. Children who have mild scoliosis may need checkups every four to six months to see if there have been changes in the curvature of their spines.

While there are guidelines for mild, moderate and severe curves, the decision to begin treatment is always made on an individual basis. Factors to be considered include:

  • Sex. Girls have a much higher risk of progression than do boys.
  • Severity of curve. Larger curves are more likely to worsen with time.
  • Curve pattern. Double curves, also known as S-shaped curves, tend to worsen more often than do C-shaped curves.
  • Location of curve. Curves located in the center (thoracic) section of the spine worsen more often than do curves in the upper or lower sections of the spine.
  • Maturity. If a child’s bones have stopped growing, the risk of curve progression is low. That also means that braces have the most effect in children whose bones are still growing.


Scoliosis braces

If your child’s bones are still growing and he or she has moderate scoliosis, your doctor may recommend a brace. Wearing a brace won’t cure scoliosis or reverse the curve, but it usually prevents further progression of the curve.

The most common type of brace is made of plastic and is contoured to conform to the body. This close-fitting brace is almost invisible under the clothes, as it fits under the arms and around the rib cage, lower back and hips.

Most braces are worn day and night. A brace’s effectiveness increases with the number of hours a day it’s worn. Children who wear braces can usually participate in most activities and have few restrictions. If necessary, kids can take off the brace to participate in sports or other physical activities.

Braces are discontinued after the bones stop growing. This typically occurs:

  • About two years after girls begin to menstruate
  • When boys need to shave daily
  • When there are no further changes in height

Figure 6. Scoliosis brace

scoliosis brace

Note: This low-profile brace is made of plastic materials and is contoured to conform to the body.

Schroth method physiotherapy scoliosis-specific exercises

Based upon typical physiotherapeutic principles, the Schroth method was developed by Katharina Schroth in 1920, and continuously refined through the treatment of approximately 3,000 scoliosis cases per year. The Asklepios Katharina Schroth Spinal Deformities Rehabilitation Centre in Germany offers a scoliosis-specific intensive inpatient rehabilitation program. In addition to the treatment offered at the Centre, 2,500 trained and certified Schroth therapists treat patients through the center’s residential outpatient treatment program.

The Schroth Classification system

The Schroth system of classification 25 is derived from the Schroth principle of dividing the body into ‘Body Blocks’. This symbolic description helps to explain the scoliotic alterations as compensatory adaptations. The Body Blocks depict the trunk deformation as a change in their geometric form from a rectangle to a trapezium shape. Side-shift and rotation as well as compression on the concave side and expansion on the convex side are clearly visible. In the standing static position the body blocks should be aligned perpendicularly with their center of gravity integrated in the central sacral line as seen in Figure 7. The scoliotic trunk asymmetry is a loss of symmetry and shows the blocks skewed and off-center (Figure 7).

Figure 7. Schroth Body Blocks

Schroth Body Blocks

Note: (a, b, c, d): Schroth Body Blocks. The Schroth system of scoliosis curve classification is derived from the Schroth principle of dividing the body into “body blocks” as pictured anatomically (a) and schematically (b). Scoliosis causes the body blocks to become deformed, changing their geometric shape from a rectangle (b) to a trapezium (c). A patient with a major lumbar scoliosis left convex curve has a lumbar block shifted to the left and a hip-pelvic block shifted to the right (d)

The Schroth classification system gives the direction of the side deviation and rotation of the main important body blocks (major curves) and a clear orientation for the standardized therapy plan which includes the therapy diagram, exercise-program with home-exercises, and necessary mobilizing technique.

According to the Schroth classification system, the different scoliosis types always start with the major curve and are followed by relevant secondary curves.

The uppercase letters represent the body blocks and the lowercase letters describe the direction of the lateral deviation and rotation: right = ri, left = le.

Schroth body blocks:

H – Hip-pelvic block including the lower limbs reaching the lower end vertebra (LEV) of the lumbar curve.

L – Lumbar block enclosed by upper end vertebra (UEV) and LEV of the lumbar curve or thoracolumbar curve respectively.

T – Thoracic block between UEV and LEV of the thoracic curve.

S – Shoulder block represents the cervical thoracic (proximal thoracic) curve located between UEV of the thoracic curve and UEV of the proximal thoracic curve.

The following is an overview of the classifications:

  1. Thoracic scoliosis (means that the major curve is located in the thoracic spine, and the curve can be to the right or to the left).

    1. Thoracic only.
    2. Thoracic with lumbar to opposite side with hips in center.
    3. Thoracic with lumbar and hips protruding to the opposite side of the thoracic curve (along with the lumbar).
  2. Lumbar scoliosis (means that the major curve is located in the lumbar spine, and the curve can be to the right or to the left).

    1. Lumbar only with hips protruding to the opposite side of the curve.
    2. Lumbar curve with thoracic and hips protruding to the opposite side of the lumbar curve.
    3. Lumbar and thoracic curves with hips in center.
  3. Sagittal plane deformities including increased thoracic kyphosis (round back), decreased thoracic kyphosis (flat back) and increased lumbar kyphosis or loss of the normal anatomical lordosis (curve) of the lumbar spine.

Age specifics

The Schroth method is primarily used for idiopathic scoliosis, including Adolescent Idiopathic Scoliosis and late juvenile idiopathic scoliosis. People with early onset scoliosis and adults, are treated with modified principles. Sagittal plane deformities such as hyper-kyphosis (Scheuermann’s kyphosis) and lordosis (inverted back) can also be treated with Schroth exercises. Treatment of juvenile idiopathic scoliosis involves a less intense and modified Schroth method as well. Treatment of Adolescent Idiopathic Scoliosis using strict Schroth principles is aimed at preventing curve progression before the end of growth. Treatment of adult onset scoliosis implements a modified Schroth method based on the severity of pain and the degree and rigidity of the spinal deformity.

3D principles of correction

In the Schroth method there are five pelvic corrections that are assumed prior to the execution of the main principles of correction. These five pelvic corrections ensure that the pelvis is best aligned with the trunk prior to the major corrections.

The five principles of the Schroth method are: 1) Auto-elongation (detorsion); 2) Deflection; 3) Derotation; 4) Rotational breathing; and 5) Stabilization. During the application of these principals, the patient is taught how to de-collapse the concaved areas of the trunk and how to reduce the prominences.

Description of Schroth method exercises

Four of the most commonly used exercises in the Schroth method are the “50 x Pezziball” exercise, Prone exercise, Sail exercise, and the Muscle-cylinder exercise. All of these exercises can be used for all curve types. The “50 x Pezziball” exercise works on auto-self-elongation and activation of muscles in the trunk that force the convexities in the trunk “forward and inward” and the concavities “outward and backward” (Figure 9).

Figure 8. Schroth method lumbar mobilization (a) and curve flexibility (b) exercises

Schroth method lumbar mobilzation and exercises

Figure 9. Schroth 50 x Pezziball exercise

Schroth 50 x Pezziball exercise

Note: The Schroth “50 x Pezziball” exercise where the patient sits on a Swiss-ball in front of a mirror (a) and performs active 3D auto self-correction using the wall bar (b)

The Prone exercise corrects the thoracic curve using shoulder traction and shoulder counter-traction and the lumbar curve via activation of the iliopsoas muscle (Figure 10). The Sail exercise is a very effective stretching exercise, which helps elongate the thoracic concavity (Figure 11). The Muscle-cylinder engages the quadratus lumborum muscle to correct the lumbar curve against gravity (Figure 12). Other exercises related to the Schroth method involve postural correction during activities of daily living. These exercises focus on correcting posture while resting, sitting, or standing.

Figure 10. Schroth prone exercise

Schroth prone exercise

Note: The Schroth prone exercise with activation of the iliopsoas muscle (right hip flexion). Blue arrows represent trunk elongation with caudal and cranial forces. Red arrows represent areas of muscle activation around the convexities towards the midline. Green half-moons represent areas of expansion of the concavities. Red circles represent additional corrective forces: red circles around the right lower extremity and the right upper extremity represent iliopsoas activation and shoulder traction/counter-traction, respectively, resulting in correction of the lumbar and thoracic curves

Figure 11. Schroth Sail exercise

Schroth Sail exercise

Note: The Schroth “Sail” exercise where the patient stands on a half foam-roll with two poles and performs active stabilization. The red circle represents the concavity (weak side according to Schroth). During active stabilization, the patient is consciously expanding the left rib cage with right directional breathing, opening the collapsed left lung, while maintaining 3D postural correction

Figure 12. Schroth Side-lying exercise

Schroth Side-lying exercise

Note: The “Muscle-cylinder” exercise (also known as the “Side-lying” exercise), focusing mainly on the correction of the lumbar scoliosis curve. During this exercise, the patient lies on the lumbar convex side. The lumbar convexity is supported by a rice bag to help align the spine in the horizontal plane. The patient’s right leg is supported by a stool (in case of 4C/major lumbar scoliosis) and the patient’s right arm is supported on a chair during the exercise. Light blue arrows represent trunk elongation with cranial and caudal forces. Green half-moons represent areas of expansion of the concavities. Red arrows represent areas of muscle activation, approximating the convexities towards midline, and the direction of the correction. The dark blue arrow pointing upwards from the right elbow represents the shoulder traction, which is an isometric tension from the shoulder in a lateral/outward direction with a fixed scapula as a continuation of the transversal expansion in the proximal thoracic region

Activities of daily living

The Schroth method emphasizes teaching postural corrections throughout the day in order to change habitual default postures and improve alignment, pain and progression (Figure 13). The main advantage of this program lies in its application to ordinary daily activity for the purpose of changing the asymmetrical loading on the body in order to decrease progression and pain. This also reduces the amount of time needed to practice the highly demanding exercises and allows patients to spend more time in leisure activities and to live a normal life.

Figure 13. Schroth 3D postural corrections

Schroth 3D postural corrections

Note: Patients performing Schroth 3D postural corrections in sitting and standing positions. These postural corrections are practiced during activities of daily living in order to change habitual default postures and improve alignment, pain, and curve progression.

What can you do to prevent my scoliosis from getting worse ?

The only treatments that have been shown to effect idiopathic scoliosis are bracing and surgery. There is no evidence in the current medical literature that physical therapy, electrical stimulation, chiropractic care, or other options have any long term impact on scoliosis curves. Scoliosis Specific Exercises (SSE) may be useful together with bracing and are currently being studied.

Is it safe for you to exercise and participate in sports ?

Children with idiopathic scoliosis can participate in any sport up to their own level of tolerance. It is always a good idea for children to stay physically fit with exercise.

Surgery for scoliosis

Severe scoliosis typically progresses with time, so your doctor might suggest scoliosis surgery to reduce the severity of the spinal curve and to prevent it from getting worse. The most common type of scoliosis surgery is called spinal fusion.

In spinal fusion, surgeons connect two or more of the bones in the spine (vertebrae) together, so they can’t move independently. Pieces of bone or a bone-like material are placed between the vertebrae. Metal rods, hooks, screws or wires typically hold that part of the spine straight and still while the old and new bone material fuses together.

If the scoliosis is progressing rapidly at a young age, surgeons can install a rod that can adjust in length as the child grows. This growing rod is attached to the top and bottom sections of the spinal curvature, and is usually lengthened every six months.

Complications of spinal surgery may include bleeding, infection, pain or nerve damage. Rarely, the bone fails to heal and another surgery may be needed.

Alternative medicine

Studies indicate that the following treatments for scoliosis are ineffective:

  • Chiropractic manipulation
  • Electrical stimulation of muscles
  • Dietary supplements

Scoliosis in adults

Everyone’s spine has subtle natural curves. But some people have different curves, side-to-side spinal curves that also twist the spine. This condition is called “scoliosis”. On an x-ray with a front or rear view of the body, the spine of a person with scoliosis looks more like an “S” or a “C” than a straight line. These curves can make a person’s shoulders or waist appear uneven. These curves can’t be corrected simply by learning to stand up straight. You can’t cause scoliosis; it does not come from carrying heavy backpacks, participating vigorously in sports, or poor posture.

Types of Adult Scoliosis

In addition to the two types of adult scoliosis discussed in this section—Adult Idiopathic Scoliosis and Adult Degenerative Scoliosis—types of scoliosis that develops early in life or that results from a separate syndrome also effect adults.

Adult Idiopathic Scoliosis

Adult idiopathic scoliosis is, in essence, a continuation of adolescent idiopathic scoliosis 26. Sometimes a spine curvature of an idiopathic (cause not known) nature that began during teenage years may progress during adult life. Curves may increase in size 0.5° to 2° per year. Adolescent curves less than 30° are unlikely to progress significantly into adulthood, while those over 50° are likely to get bigger, which is why adult scoliosis specialists should monitor the curves over time.

Locations of adult scoliosis

Occurs in the thoracic (upper) and lumbar (lower) spine, with the same basic appearance as that in teenagers, such as shoulder asymmetry, a rib hump, or a prominence of the lower back on the side of the curvature. Curves can worsen in the older patient due to disc degeneration and/or sagittal imbalance. Additionally, arthritis commonly affects joints of the spine and leads to the formation of bone spurs.

Symptoms of adult scoliosis

Adults with idiopathic scoliosis have more symptoms than teens because of degeneration in discs and joints leading to narrowing of the openings for the spinal sac and nerves (spinal stenosis). Some patients may lean forward to try and open up space for their nerves. Others may lean forward because of loss of their natural curve (lordosis, sway back) in their lumbar spine (low back). The imbalance causes the patients to compensate by bending their hips and knees to try and maintain an upright posture. Adult patients may have a variety of symptoms, which can lead to gradual loss of function:

  • Low back pain and stiffness are the 2 most common symptoms
  • Numbness, cramping, and shooting pain in the legs due to pinched nerves
  • Fatigue results from strain on the muscles of the lower back and legs

Imaging Evaluation of adult scoliosis

Scoliosis defined with radiographs that can include the following:

  • Standing x-ray of the entire spine looking both from the back as well as from the side so your physician can measure the radiographs to determine curve magnitude, measured in degrees using the Cobb method.
  • Magnetic resonance imaging (MRI) study of the spine is rarely used for patients experiencing minimal symptoms with adult idiopathic scoliosis. An MRI is usually ordered if you have leg pain, your physician finds some subtle neurologic abnormalities on physical examination, or if you have significant pain or an “atypical” curve pattern.

Treatment Options of adult scoliosis

Nonoperative treatment

The majority of adults with idiopathic scoliosis do not have disabling symptoms and can be managed with simple measures including the following:

  • Periodic observation
  • Over-the-counter pain relievers
  • Exercises aimed at strengthening the core muscles of the abdomen and back and improving flexibility
  • Braces, in short-term use for pain relief (long-term use in adults is discouraged because braces can weaken the core muscles)
  • Epidurals or nerve block injections for temporary relief if the patient has persistent leg pain and other symptoms due to arthritis and pinched nerves.
  • Patients should track their response to the various injections to help define their pain generators.

Stronger pain medications can also be habit-forming and must be used with caution. If narcotics are needed to control the pain, see a scoliosis surgeon to learn more about the possible causes of pain.

Operative treatment

Surgical treatment is reserved for patients who have:

  • Failed all reasonable conservative (non-operative) measures.
  • Disabling back and/or leg pain and spinal imbalance.
  • Severely restricted functional activities and substantially reduced overall quality of life.

The goals of surgery are to restore spinal balance and reduce pain and discomfort by relieving nerve pressure (decompression) and maintaining corrected alignment by fusing and stabilizing the spinal segments. When patients are carefully chosen and mentally well-prepared for surgery, excellent functional outcomes can be achieved which can provide positive life-changing experience for a given individual patient. When larger surgeries—those greater than 8 hours—are necessary, surgery may be divided into 2 surgeries 5 to 7 days apart.

Surgical procedures include:

  • Microdecompression relieves pressure on the nerves; A small incision is made and magnification loupes or a microscopic assists the surgeon in guiding tools to the operation site. This type of procedure is typically used only at one vertebra level, and carries a risk of causing the curve to worsen, especially in larger curves >30 degrees.
  • Surgical stabilization involves anchoring hooks, wires or screws to the spinal segments and using metal rods to link the anchors together. They stabilize the spine and allow the spine to fuse in the corrected position.
  • Fusion uses the patient’s own bone or using cadaver or synthetic bone substitutes to “fix” the spine into a straighter position
  • Osteotomy is a procedure in which spinal segments are cut and realigned
  • Vertebral column resection removes entire vertebral sections prior to realigning the spine and is used when an osteotomy and other operative measures cannot correct the scoliosis.

Adult Degenerative Scoliosis

Also known as de novo (new) scoliosis. This type of scoliosis begins in the adult patient due to degeneration of the discs, arthritis of the facet joints and collapse and wedging of the disc spaces 26.

Locations of Adult Degenerative Scoliosis

It is typically seen in the lumbar spine (lower back), and usually accompanied by straightening of the spine from the side view (loss of lumbar lordosis).

Symptoms of Adult Degenerative Scoliosis

Disc degeneration and spinal stenosis associated with adult degenerative scoliosis can cause the following symptoms:

  • Back pain
  • Numbness
  • Shooting pain down the legs

Imaging Evaluation of Adult Degenerative Scoliosis

X-rays, front and standing, must include all segments of the spine as well as the pelvis and hips to measure alignment, curvatures, and balance. For the side x-rays, hips and knees must be straight. Focused x-rays of the cervical, thoracic, and lumbar spine may also be necessary.
Magnetic resonance imaging (MRI) or computerized tomography (CT), advanced imaging techniques to assess patients with lower extremity symptoms or other neurologic signs or symptoms.

Treatment Options for Adult Degenerative Scoliosis

Nonoperative treatment is appropriate for the majority of adults with degenerative scoliosis who don’t have disabling symptoms. Treatments include:

  • Periodic observation
  • Over-the-counter pain relievers
  • Exercises aimed at strengthening the core muscles of the abdomen and back and improving flexibility
  • Braces with short-term use of for pain relief (long-term use in adolescents is discouraged because braces can weaken the core muscles)
  • Epidurals or nerve block injections for temporary relief of leg pain and other symptoms

Stronger pain medications can also be habit-forming and must be used with caution. If narcotics are needed to control the pain, see a scoliosis surgeon to learn more about the pain generators.

Operative treatment of Adult Degenerative Scoliosis

Surgical treatment is reserved for patients who have:

  • Failed all reasonable conservative (non-operative) measures.
  • Disabling back and/or leg pain and spinal imbalance.
  • Severely restricted functional activities and substantially reduced overall quality of life.

The goals of surgery are to restore spinal balance and reduce pain and discomfort by relieving nerve pressure (decompression) and maintaining corrected alignment by fusing and stabilizing the spinal segments. When patients are carefully chosen and mentally well-prepared for surgery, excellent functional outcomes can be achieved which can provide positive life-changing experience for a given individual patient. When larger surgeries—those greater than 8 hours—are necessary, surgery may be divided into 2 surgeries 5 to 7 days apart.

Surgical procedures include:

  • Decompression surgery removes the roof of the spinal canal (laminectomy) and enlarging the spaces where the nerve roots exit the canal (foraminotomy), resulting in decompressed nerve roots and pain relief. Typically only used at one or two vertebral levels in patients with leg pain from stenosis and smaller curves (< 30 degrees). In patients with more than two levels of stenosis and larger curves >30 degrees, a decompression without fusion has a risk of destabilizing the spine and causing the curve to worsen.
  • Surgical stabilization involves anchoring hooks, wires or screws to the spinal segments and using metal rods to link the anchors together. They stabilize the spine and allow the spine to fuse in the corrected position, and is always performed with the addition of a fusion.
  • Fusion uses the patient’s own bone or using cadaver or synthetic bone substitutes to “fix” the spine into a straighter position
  • Osteotomy is a procedure in which spinal segments are cut and realigned
  • Vertebral column resection removes entire vertebral sections prior to realigning the spine and is used when an osteotomy and other operative measures cannot correct the scoliosis.
References
  1. Scoliosis. Pediatric Orthopaedic Society of North America. http://orthoinfo.aaos.org/topic.cfm?topic=A00633
  2. Smith JR, Sciubba DM, Samdani AF. Scoliosis: a straightforward approach to diagnosis and management. JAAPA. 2008;21(11):40–45.
  3. Bunnell WP. Selective screening for scoliosis. Clin Orthop Relat Res. 2005;(434):40–45.
  4. O’Connor F. Pediatric Orthopedics for the Family Physician. Infant, Child & Adolescent Medicine. AAFP CME Program. 2007.
  5. Glassman SD, Carreon LY, Shaffrey CI, et al. The costs and benefits of nonoperative management for adult scoliosis. Spine (Phila Pa 1976). 2010;35(5):578–582.
  6. Romano M, Minozzi S, Bettany-Saltikov J, Zaina F, Chockalingam N, Kotwicki T, Maier-Hennes A, Negrini S. Exercises for adolescent idiopathic scoliosis. Cochrane Database of Systematic Reviews 2012, Issue 8. Art. No.: CD007837. DOI: 10.1002/14651858.CD007837.pub2. http://onlinelibrary.wiley.com/doi/10.1002/14651858.CD007837.pub2/full
  7. Effectiveness of Schroth exercises during bracing in adolescent idiopathic scoliosis: results from a preliminary study—SOSORT Award 2017 Winner. Published online 2017 Oct 16. doi: 10.1186/s13013-017-0139-6. https://www.ncbi.nlm.nih.gov/pmc/articles/PMC5641990/
  8. [Schroth’s three dimensional treatment of scoliosis]. ZFA (Stuttgart). 1979 Dec 10;55(34):1969-76. https://www.ncbi.nlm.nih.gov/pubmed/547573/
  9. Physiotherapy scoliosis-specific exercises – a comprehensive review of seven major schools. Berdishevsky H, Lebel VA, Bettany-Saltikov J, Rigo M, Lebel A, Hennes A, Romano M, Białek M, M’hango A, Betts T, de Mauroy JC, Durmala J. Scoliosis Spinal Disord. 2016; 11():20. https://www.ncbi.nlm.nih.gov/pmc/articles/PMC4973373/
  10. Neinstein LS, Chorley JN. Scoliosis and kyphosis. Adolescent Health Care: A Practical Guide. 4th ed. Philadelphia, Pa.: Lippincott Williams & Wilkins; 2002:345–355.
  11. Reamy BV, Slakey JB. Adolescent idiopathic scoliosis: review and current concepts. Am Fam Physician. 2001;64(1):111–116.
  12. Ogilvie J. Adolescent idiopathic scoliosis and genetic testing. Curr Opin Pediatr. 2010;22(1):67–70.
  13. Linker B. A dangerous curve: the role of history in America’s scoliosis screening programs. Am J Public Health. 2012;102(4):606–616.
  14. U.S. Preventive Services Task Force. Screening for idiopathic scoliosis in adolescents. Recommendation statement. https://www.uspreventiveservicestaskforce.org/Page/Document/UpdateSummaryDraft/adolescent-idiopathic-scoliosis-screening1
  15. American Academy of Family Physicians. Clinical recommendations. Scoliosis, idiopathic in adolescents. 2004. http://www.aafp.org/patient-care/clinical-recommendations/all/scoliosis.html
  16. Richards BS, Vitale M. SRS/AAOS position statement. School screening programs for the early detection of scoliosis. 2017. http://www.srs.org/patients-and-families/patient-brochures
  17. Greene WB, ed. Essentials of Musculoskeletal Care. 2nd ed. Rosemont, Ill.: American Academy of Orthopaedic Surgeons; 2001:696–699.
  18. Roach JW. Adolescent idiopathic scoliosis. Orthop Clin North Am. 1999;30(3):353–365, vii–viii.
  19. Tan KJ, Moe MM, Vaithinathan R, Wong HK. Curve progression in idiopathic scoliosis: follow-up study to skeletal maturity. Spine (Phila Pa 1976). 2009;34(7):697–700.
  20. Lonstein JE, Carlson JM. The prediction of curve progression in untreated idiopathic scoliosis during growth. J Bone Joint Surg Am. 1984;66(7):1061–1071.
  21. Sanders JO, Khoury JG, Kishan S, et al. Predicting scoliosis progression from skeletal maturity: a simplified classification during adolescence. J Bone Joint Surg Am. 2008;90(3):540–553.
  22. Greiner KA. Adolescent idiopathic scoliosis: radiologic decision-making. Am Fam Physician. 2002;65(9):1817–1822.
  23. Lonstein JE, Carlson JM. The prediction of curve progression in untreated idiopathic scoliosis during growth. J Bone Joint Surg Am. 1984;66(7):1067.
  24. Adolescent Idiopathic Scoliosis: Diagnosis and Management. Am Fam Physician. 2014 Feb 1;89(3):193-198. http://www.aafp.org/afp/2014/0201/p193.html#afp20140201p193-b6
  25. Lenhert-Schroth C. Three diamentional treatment of scoloisis. 2007.
  26. Adults Scoliosis. Scoliosis Research Society. http://www.srs.org/patients-and-families/conditions-and-treatments/adults/scoliosis
read more
Musculoskeletal SystemTendons

Tendons

no thumb

What are tendons

Tendons are connective tissues that attach muscles to bones and and transfer muscular tension to bones.

Ligaments are structurally similar to tendons that connect bones to other bones and tightly bind bones together and resist stress.

Both tendons and ligaments are dense regular connective tissue, because of its two properties: (1) The collagen fibers are closely packed (dense) and leave relatively little open space, and (2) the fibers are parallel to each other (regular). The parallel arrangement of fibers is an adaptation to the fact that musculoskeletal stresses pull tendons and ligaments in predictable directions. With minor exceptions such as blood vessels and sensory nerve fibers, the only cells in this tissue are fibroblasts, visible by their slender, violet-staining nuclei squeezed between bundles of collagen. This type of tissue has few blood vessels, so injured tendons and ligaments are slow to heal.

Muscles have two forms of attachment to bones—direct and indirect.

In a direct (fleshy) attachment, such as in the brachialis and the lateral head of the triceps brachii, there is so little separation between muscle and bone that to the naked eye, the red muscular tissue seems to emerge directly from the bone.

In an indirect attachment, the muscle ends conspicuously short of its bony destination, and the gap is bridged by a fibrous band or sheet called a tendon. See, for example, the two ends of the biceps brachii and the photographs of tendons in figures. You can easily palpate tendons and feel their texture just above your heel (your calcaneal or Achilles tendon) and on the anterior side of your wrist (tendons of the palmaris longus and flexor carpi radialis muscles). Collagen fibers of the muscle continue into the tendon and from there into the periosteum and matrix of the bone, creating very strong structural continuity from muscle to bone.

In some cases, the tendon is a broad sheet called an aponeurosis. This term originally referred to the tendon located beneath the scalp, but now it also refers to similar tendons associated with certain abdominal, lumbar, hand, and foot muscles. For example, the palmaris longus tendon passes through the wrist and then expands into a fanlike palmar aponeurosis beneath the skin of the palm.

In some places, groups of tendons from separate muscles pass under a band of connective tissue called a retinaculum. One of these covers each surface of the wrist like a bracelet, for example. The tendons of several forearm muscles pass under them on their way to the hand.

Figure 1. Tendons of the wrist and hand (flexors)

tendons of wrist and hand

Note: Anterior views of the forearm. (a) Superficial flexors. (b) The flexor digitorum superficialis, deep to the muscles in part (a). (c) Deep flexors. Flexor muscles of each compartment are labeled in boldface.

Figure 2. Tendons of the wrist and hand (extensors)

extensor tendons of wrist and hand

Figure 3. Finger and hand tendons

tendon of the hand and fingers

Figure 4. Tendons of the leg and foot

tendons of leg and foot

Figure 5. Tendons of the calf and foot (back of leg)

tendons of the leg and foot

read more
MusclesMusculoskeletal System

Muscle

muscle anatomy

What is Muscle

Muscles constitute nearly half of your body’s weight and occupy a place of central interest in several fields of health care and fitness. Life without muscle tissue mean you couldn’t sit, stand, walk, speak, or grasp objects. Blood would not circulate because the heart couldn’t propel it through the vessels. The lungs couldn’t empty and fill, nor could food move along the digestive tract.

The muscular system of the human body has more than 700 skeletal muscles and includes all the skeletal muscles that are under voluntary control.

Many of your physiological processes and virtually all your dynamic interactions with the environment, involve muscle tissue. There are three types of muscle tissue: skeletal muscle, cardiac muscle, and smooth muscle.

Skeletal muscle tissue moves the body by pulling on bones of the skeleton, making it possible for us to walk, dance, or play a musical instrument.

Cardiac muscle tissue pushes blood through the blood vessels of the cardiovascular system.

Smooth muscle tissue pushes fluid and solids along the digestive tract and performs varied functions in other systems. These muscle tissues share four properties:

  • Excitability: The ability to respond to stimulation. For example, skeletal muscles respond to stimulation by the nervous system, and some smooth muscles respond to circulating hormones.
  • Contractility: The ability to shorten actively and exert a pull or tension that is harnessed by connective tissues.
  • Extensibility: The ability to contract over a range of resting lengths. For example, a smooth muscle cell can be stretched to several times its original length and still contract when stimulated.
  • Elasticity: The ability of a muscle to return to its original length after a contraction.

The Functions of Muscles

Collectively, the three types of muscle serve the following functions:

  • Movement. Muscles enable us to move from place to place and to move individual body parts; they move body contents in the course of breathing, blood circulation, feeding and digestion, defecation, urination, and childbirth; and they serve various roles in communication—speech, writing, cial expressions, and other body language.
  • Stability. Muscles maintain posture by preventing unwanted movements. Some are called antigravity muscles because, at least part of the time, they resist the pull of gravity and prevent us from falling or slumping over. Many muscles also stabilize the joints by maintaining tension on tendons and bones.
  • Control of body openings and passages. Muscles encircling the mouth serve not only for speech but also for food intake and retention of food while chewing. In the eyelid and pupil, they regulate the admission of light to the eye. Internal muscular rings control the movement of food, bile, blood, and other materials within the body. Muscles encircling the urethra and anus control the elimination of waste. Some of these muscles are called sphincters, but not all.
  • Heat production. The skeletal muscles produce as much as 85% of one’s body heat, which is vital to the functioning of enzymes and therefore to all metabolism.
  • Glycemic control. This means the regulation of blood glucose concentration within its normal range. The skeletal muscles absorb, store, and use a large  share of one’s glucose and play a highly significant role in stabilizing its blood concentration. In old age, in obesity, and when muscles become deconditioned and weakened, people suffer an increased risk of type 2 diabetes mellitus because of the decline in this glucose-buffering function.

Skeletal muscle

Skeletal muscles are organs composed mainly of skeletal muscle, but a skeletal muscle consists of more than muscular tissue. It also contains connective tissue, nerves, and blood vessels. The connective tissue components, from the smallest to largest and from deep to superficial, are as follows:

Endomysium. This is a thin sleeve of loose connective tissue that surrounds each muscle fiber. It creates room for blood capillaries and nerve fibers to reach every muscle fiber, ensuring that no muscle cell is without stimulation and nourishment. The endomysium also provides the extracellular chemical environment for the muscle fiber and its associated nerve ending. Excitation of a muscle fiber is based on the exchange of calcium, sodium, and potassium ions between the endomysial tissue fluid and the nerve and muscle fibers.

Perimysium. This is a thicker connective tissue sheath that wraps muscle fibers together in bundles called fascicles. Fascicles are visible to the naked eye as parallel strands—the grain in a cut of meat; if you pull apart “fork-tender” roast beef, it separates along these fascicles. The perimysium carries the larger nerves and blood vessels as well as stretch receptors called muscle spindles.

Epimysium. This is a fibrous sheath that surrounds the entire muscle. On its outer surface, the epimysium grades into the fascia, and its inner surface issues projections between the fascicles to form the perimysium.

Fascia. This is a sheet of connective tissue that separates neighboring muscles or muscle groups from each other and from the subcutaneous tissue. Muscles are grouped in compartments separated from each other by fasciae. The fascicles defined by the perimysium are oriented in a variety of ways that determine the strength of a muscle and the direction in which it pulls.

The muscular system, like the skeletal system, is divided into axial and appendicular divisions. The axial musculature originates on the axial skeleton. It positions the head and vertebral column and helps breathing by moving the rib cage. The appendicular musculature inserts onto and stabilizes or moves the appendicular skeleton.

Figures 1 illustrate the major axial and appendicular muscles of the human body. These are the superficial muscles, which are relatively large. Superficial muscles cover deeper, smaller muscles that cannot be seen unless the overlying muscles are cut and pulled out of the way.

Figure 1. Muscle anatomy (front or anterior view)

muscle anatomy

Figure 2. Muscle anatomy (back or posterior view)

muscle anatomy - back view

There are four groups of axial muscles:

  1. Muscles of the head and neck. These muscles include those that move the face, tongue, larynx, and eyes. They are responsible for verbal and nonverbal communication, such as laughing, talking, frowning, smiling, and whistling. This group is also involved in chewing, swallowing, and moving the eyes.
  2. Muscles of the vertebral column. This group includes flexors and extensors of the axial skeleton.
  3. Muscles that form the walls of the abdominal and pelvic cavities. This group, the oblique and rectus muscles, is located between the first thoracic vertebra and the pelvis. These muscles move the chest wall during breathing (inspiration and expiration), compress the abdominal cavity, and rotate the vertebral column. In the thoracic area, the ribs separate these muscles, but over the abdominal surface, the muscles form broad muscular sheets. There are also oblique and rectus muscles in the neck. Although they do not form a muscular wall, they are included in this group because they share a common embryological origin. The diaphragm is within this group because it is embryologically linked to other muscles of the chest wall.
  4. Muscles of the perineal region and pelvic diaphragm. These muscles extend between the sacrum and pelvic girdle to support organs of the pelvic cavity, flex joints of the sacrum and coccyx, and control movement of materials through the urethra and anus.

The Appendicular Musculature

There are two major groups of appendicular muscles: (1) the muscles of the pectoral girdle and upper limb and (2) the muscles of the pelvic girdle and lower limb. The upper limb has a large range of motion (amount of movement that occurs at a joint) because of the muscular connections between the pectoral girdle and the axial skeleton. These muscular connections also act as shock absorbers. For example, when you jog, you can perform delicate hand movements at the same time because the appendicular muscles absorb the shocks and bounces in your stride. In contrast, the pelvic girdle transfers weight from the axial skeleton to the lower limb. The emphasis is on strength rather than mobility, and the anatomical features that strengthen the joints limit the range of movement of the lower limbs.

Figure 3. Appendicular muscles

appendicular muscles

Muscles That Move the Arm

The deltoid is the prime mover for abducting the arm, but the supraspinatus is a synergist at the start of this movement. The subscapularis and teres major rotate the arm medially, whereas the infraspinatus and teres minor are antagonistic to that action, rotating the arm laterally. All of these muscles originate on the scapula. The coracobrachialis is the only muscle attached to the scapula that flexes and adducts the arm at the shoulder joint.

The pectoralis major originates from the cartilages of ribs 2 to 6 and inserts onto the crest of the greater tubercle of the humerus. The pectoralis major flexes, adducts, and medially rotates the humerus at the shoulder joint. The latissimus dorsi has a wide variety of origins and inserts onto the intertubercular sulcus of the humerus. The latissimus dorsi flexes, adducts, and medially rotates the humerus at the shoulder joint.

The shoulder is a mobile but weak joint. The tendons of the supraspinatus, infraspinatus, subscapularis, and teres minor join with the connective tissue of the shoulder joint capsule and form the rotator cuff. The rotator cuff supports and strengthens the joint capsule of the shoulder. Powerful, repetitive arm movements common in many sports (such as pitching a fastball for many innings) place considerable strain on the muscles of the rotator cuff, often causing tendon damage, muscle strains, bursitis, and other painful injuries.

Figure 4. Muscles that move the arm (front or anterior view)

muscles that move the arm - front view


Figure 5. Muscles that move the arm (back or posterior view)

muscles that move the arm - back view

Muscles That Move the Forearm and Hand

Most of the muscles that move the forearm and hand originate on the humerus and insert on the forearm and wrist. There are two noteworthy exceptions:

  • The long head of the triceps brachii originates on the scapula and inserts on the olecranon.
  • The long head of the biceps brachii originates on the scapula and inserts on the radial tuberosity of the radius.

The triceps brachii and biceps brachii are examples of muscles of the arm that exert actions at more than one joint. Contracting the triceps brachii extends and adducts the shoulder and also extends the elbow. Contracting the biceps brachii flexes the shoulder and also flexes the elbow and supinates the forearm. Although these muscles exert an action at the shoulder, their primary (most important) actions are at the elbow.

The biceps brachii is also an example of how the position of the body affects the action of a muscle: When the forearm is pronated, the biceps brachii cannot contract as forcefully as when the forearm is supinated due to the position of the muscle’s insertion.

The brachialis and brachioradialis also flex the elbow. The anconeus and the triceps brachii are antagonists to this action. The flexor carpi ulnaris, flexor carpi radialis, and palmaris longus are superficial muscles that work together to flex the wrist. The flexor carpi radialis also abducts the wrist, while the flexor carpi ulnaris adducts the wrist. The extensor carpi radialis and the extensor carpi ulnaris also have an antagonistic action: The extensor carpi radialis extends and abducts the wrist, and the extensor carpi ulnaris extends and adducts the wrist.

The pronator teres and the supinator muscle are antagonistic muscles that originate on the humerus and the ulna. They insert on the radius and rotate the forearm without flexing or extending the elbow. The pronator quadratus originates on the ulna and assists the pronator teres in opposing the supination actions of the supinator muscle and the biceps brachii. Figure 7 shows the muscles involved in pronation and supination (medial and lateral rotation). Note how the radius changes position as the pronator teres and pronator quadratus contract. A bursa prevents abrasion against the tendon as the tendon of the biceps brachii rolls under the radius during pronation.

Figure 6. Muscles that move forearm and hand

muscles that move forearm and hand

Figure 7. Muscles that pronate and supinate the forearm

muscles that pronate and supinate the forearm

Muscles That Move the Hands and Fingers

Several superficial and deep muscles of the forearm flex and extend the joints of the fingers. These muscles provide strength and gross motor control of the hand and fingers and are called extrinsic muscles of the hand.

Only the tendons of the extrinsic muscles of the hand cross the wrist joint. These are large muscles, so to ensure maximum mobility of the wrist and hand, the tendons of these muscles must be kept clear of the wrist joints. The tendons crossing the posterior and anterior surfaces of the wrist pass through synovial tendon sheaths, elongated bursae that reduce friction. Figures 8 show these muscles in an anterior view and Figures 9 show them in a posterior view.

The fascia of the forearm thickens on the posterior surface of the wrist to form a wide band of connective tissue, the extensor retinaculum. The extensor retinaculum holds the tendons of the extensor muscles in place. The fascia also thickens on the anterior surface, forming another wide band of connective tissue, the flexor retinaculum, which holds the tendons of the flexor muscles in place Inflammation of the retinacula and tendon sheaths restricts movement and irritates the median nerve, a sensory and motor nerve that innervates the hand. This condition, known as carpal tunnel syndrome, causes chronic pain.

Figure 8. Muscles that move the hands and fingers (front view)

muscles that move hand and fingers

Figure 9. Muscles that move the hands and fingers (back view)

muscles that move hand and fingers - back view

Intrinsic Muscles of the Hand

Fine motor control of the hand involves small intrinsic muscles of the hand that originate on the carpal and metacarpal bones (Figures 10 and 11). These intrinsic muscles are responsible for (1) flexion and extension of the fingers at the metacarpophalangeal joints, (2) abduction and adduction of the the fingers at the metacarpophalangeal joints, and (3) opposition and reposition of the thumb. No muscles originate on the phalanges, and only tendons extend across the distal joints of the fingers.

The four lumbricals originate on the tendons of the flexor digitorum profundus muscle in the palm of the hand. They insert onto the tendons of the extensor digitorum muscle. These muscles flex the metacarpophalangeal joints and extend the interphalangeal joints of the fingers.

The four dorsal interossei abduct the fingers. The abductor digiti minimi abducts the little finger, and the abductor pollicis brevis abducts the thumb. The adductor pollicis adducts the thumb, and the four palmar interossei adduct the fingers at the metacarpophalangeal joints.

Opposition of the thumb refers to flexing and medially rotating the thumb at the carpometacarpal joint and touching any other digit on the same hand.

The opponens pollicis allows this action. Two extrinsic muscles of the hand, the extensor pollicis longus and the abductor pollicis longus reposition the thumb.

Figure 10. Muscles of the hand (front view)

muscles of the hand

Figure 11. Muscles of the hand (back view)

muscles of the hand - back view

Muscles That Move the Thigh – Groin muscles

The hip joint, like the shoulder joint, is a multiaxial synovial joint that flexes, extends, adducts, abducts, medially rotates, and laterally rotates. The movement at the joint depends on the anatomy of the joint and its axes of movement. The large, powerful muscles that move the thigh originate on the pelvis. These muscles include the gluteal group, lateral rotator group, adductor group, and iliopsoas group. Three gluteal muscles cover the lateral surface of the ilium. The gluteus maximus is the largest and most superficial of the gluteal muscles. It originates on the posterior gluteal line and parts of the iliac crest; the sacrum, coccyx, and associated ligaments; and the thoracolumbar fascia. This muscle extends and laterally rotates the thigh at the hip. The gluteus maximus shares an insertion with the tensor fasciae latae, which originates on the iliac crest and lateral surface of the anterior superior iliac spine. Together, these muscles pull on the iliotibial tract, a band of collagen fibers that extends along the lateral surface of the thigh and inserts on the tibia. This tract braces the lateral surface of the knee and stabilizes the knee when a person balances on one foot.

The gluteus medius and gluteus minimus originate anterior to the gluteus maximus and insert on the greater trochanter of the femur. Both abduct and medially rotate the thigh at the hip. The anterior gluteal line on the lateral surface of the ilium marks the boundary between the gluteus medius and gluteus minimus.

The lateral rotators laterally rotate the thigh at the hip. In addition, the piriformis obturator muscles and the gemelli muscles abduct the thigh at the hip. The dominant lateral rotators of this group are the piriformis, obturator externus, and obturator internus.

The adductors are found inferior to the acetabulum. The adductor magnus, adductor brevis, adductor longus, pectineus and gracilis all originate on the pubis. Except for the gracilis, all of these muscles insert on the linea aspera, a ridge along the posterior surface of the femur. The gracilis inserts on the tibia. Their actions are varied. All of the adductors except the adductor magnus originate both anterior and inferior to the hip, so they are flexors, adductors, and medial rotators of the thigh at the hip. The adductor magnus adducts, flexes, and medially rotates, or extends and laterally rotates, the thigh at the hip, depending on which region of the muscle is stimulated.

When an athlete pulls a groin muscle, he or she has torn one of these adductor muscles.

The medial surface of the pelvis is dominated by a single pair of muscles: the psoas major and iliacus. The psoas major originates on the inferior thoracic and lumbar vertebrae and inserts onto the lesser trochanter of the femur. The tendon of the psoas major muscle joins with the tendon of the iliacus, which originates on the iliac fossa. These two muscles are powerful flexors of the hip, and they pass deep to the inguinal ligament. They are often referred to together as the iliopsoas. One way to organize the diverse muscles is to group them by their orientation around the hip. Muscles that originate on the pelvis and insert on the femur produce characteristic movements determined by their position relative to the acetabulum.

Figure 12. Muscles that move the thigh

muscle that move the thigh

Figure 13. Groin (hip joint) muscles and actions at the hip and thigh

groin - hip muscles

Muscles That Move the Leg

Muscles that move the leg are detailed in Figure 14. You can use the relationships between the action lines and the axis of the knee joint to predict the actions of the muscles that move the leg at the knee. However, the anterior/posterior orientation of the muscles that move the leg is reversed. This is related to the rotation of the limb during embryological development. Therefore: Muscles that have action lines passing anteriorly to the axis of the knee joint, such as the quadriceps femoris, extend the knee. Muscles that have action lines passing posteriorly to the axis of the knee joint, such as the hamstrings, flex the knee. Most of the extensor muscles originate on the femur and extend along the anterior and lateral surfaces of the thigh. Flexor muscles originate on the pelvis and extend along the posterior and medial surfaces of the thigh.

Collectively, the knee extensors are called the quadriceps femoris, or the quadriceps muscles. Three of the quadriceps muscles, the vastus muscles (vastus lateralis, vastus medialis, and vastus intermedius), originate on the femur, and the rectus femoris originates on the anterior inferior iliac spine. All of these muscles insert onto the tibial tuberosity by the quadriceps tendon, patella, and patellar ligament. The three vastus muscles surround the rectus femoris the same way a bun surrounds a hot dog. The vastus lateralis, vastus medialis, and vastus intermedius extend the knee. Because the rectus femoris originates on the anterior inferior iliac spine of the pelvis, it crosses the hip and the knee joints, so it flexes the hip and extends the knee.

The flexors of the knee are the biceps femoris, semimembranosus, semitendinosus and sartorius. These muscles originate on the pelvis and insert on the tibia and fibula. Because the long head of the biceps femoris and the semimembranosus and semitendinosus originate on the pelvis inferior and posterior to the acetabulum, they also cross the hip joint and, therefore, extend the hip. These muscles are often called the “hamstrings.” The sartorius is the only knee flexor that originates superior to the acetabulum. It inserts on the medial aspect of the tibia. The sartorius flexes, abducts, and laterally rotates the hip and also flexes the knee.

the knee joint can be locked at full extension by a slight lateral rotation of the tibia. The small popliteus originates on the femur near the lateral condyle and inserts on the posterior tibial shaft. When the knee starts to flex, this muscle contracts and medially rotates the tibia, unlocking the knee joint.

Figure 14. Muscles that move the leg (front view)

muscles that move the leg

Figure 15. Muscles that move the leg (back view)

muscles that move the leg - back view

Figure 16. Muscles that move the leg (side view)

muscles that move the leg - side view

Calf muscles – Muscles That Move the Foot and Toes

Extrinsic muscles of the foot move the foot and toes. Figure 16 show the extrinsic muscles of the foot. The large gastrocnemius and the underlying soleus are plantar flexors of the foot. The soleus is a synergist to the gastrocnemius, increasing the speed and force of the plantar flexion. The gastrocnemius originates on the medial and lateral condyles of the femur. A sesamoid bone, called the fabella, is sometimes found in the tendon of the lateral head of the gastrocnemius. The gastrocnemius and soleus insert onto the calcaneal tendon (commonly called the “Achilles tendon”).

The two fibularis longus and fibularis brevis (peroneus longus and peroneus brevis) lie partially deep to the gastrocnemius and soleus. These muscles plantar flex and evert the ankle. The tibialis anterior dorsiflexes and inverts the foot and is an antagonist to the gastrocnemius. Muscles that flex or extend the toes originate on the tibia, the fibula, or both. Large tendon sheaths surround the tendons of the tibialis anterior, extensor digitorum longus, and extensor hallucis longus where they cross the ankle joint. The superior extensor retinaculum and inferior extensor retinaculum stabilize these tendon sheaths.

Figure 17. Calf muscles that move the leg and foot – superficial muscles

muscles that move the leg and foot - superficial muscles

Figure 18. Calf muscles that move the leg and foot – deep muscles

muscles that move the leg and foot - deep muscles

read more
LigamentsMusculoskeletal System

Ligaments

ligaments

What are ligaments

Ligaments are connective tissues that connect bones to other bones and tightly bind bones together and resist stress.

Tendons are structurally similar to ligaments but attach muscles to bones and and transfer muscular tension to bones.

Both tendons and ligaments are dense regular connective tissue, because of its two properties: (1) The collagen fibers are closely packed (dense) and leave relatively little open space, and (2) the fibers are parallel to each other (regular). The parallel arrangement of fibers is an adaptation to the fact that musculoskeletal stresses pull tendons and ligaments in predictable directions. With minor exceptions such as blood vessels and sensory nerve fibers, the only cells in this tissue are fibroblasts, visible by their slender, violet-staining nuclei squeezed between bundles of collagen. This type of tissue has few blood vessels, so injured tendons and ligaments are slow to heal.

The articulations of the phalanges (finger joints) are joined by ligaments that limit their movement (see Figure 1). As you flex one of your knuckles, ligaments on the anterior (palmar) side of the joint go slack, but ligaments on the posterior (dorsal) side tighten and prevent the joint from flexing beyond 90° or so. The knee is another case in point. In kicking a football, the knee rapidly extends to about 180°, but it can go no farther. Its motion is limited in part by a cruciate ligament and other knee ligaments described later. Gymnasts, dancers, and acrobats increase the range of motion of their synovial joints by gradually stretching their ligaments during training. “Double-jointed” people have unusually large range of motions at some joints, not because the joint is actually double or fundamentally different from normal in its anatomy, but because the ligaments are unusually long or slack.

Figure 1. Ligaments

ligaments


Jaw joint ligaments

The temporomandibular (jaw) joint (TMJ) is the articulation of the condyle of the mandible with the mandibular fossa of the temporal bone.

Two ligaments support the joint. The lateral ligament prevents posterior displacement of the mandible. If the jaw receives a hard blow, this ligament normally prevents the condylar process from being driven upward and fracturing the base of the skull. The sphenomandibular ligament on the medial side of the joint extends from the sphenoid bone to the ramus of the mandible.

Figure 2. Temporomandibular (jaw) joint ligaments

Temporomandibular joint ligaments

Shoulder joint ligaments

The glenohumeral (humeroscapular) joint or shoulder joint, is where the hemispherical head of the humerus articulates with the glenoid cavity of the scapula.

The major ligaments that help stabilize the shoulder joint are shown in Figure 3.

  • The capsule surrounding the shoulder joint is thin. Areas of localized thickening of the anterior capsule surface are known as the glenohumeral ligaments. These ligaments help stabilize the shoulder joint only when the humerus approaches or exceeds maximum normal motion.
  • The coracohumeral ligament originates at the base of the coracoid process and inserts on the head of the humerus. This ligament strengthens the superior part of the articular capsule and supports the weight of the upper limb.
  • The coraco-acromial ligament spans the gap between the coracoid process and the acromion, just superior to the capsule. This ligament provides additional support to the superior surface of the capsule.
  • The strong acromioclavicular ligament attaches the acromion to the clavicle and restricts movement of the clavicle at the acromial end. A shoulder separation is a relatively common injury involving partial or complete dislocation of the acromioclavicular joint.
  • The coracoclavicular ligaments attach the clavicle to the coracoid process and limit motion between the clavicle and scapula.
  • The transverse humeral ligament extends between the greater and lesser tubercles and holds the tendon of the long head of the biceps brachii in the intertubercular groove of the humerus.

Figure 3. Shoulder joint ligaments

shoulder joint ligaments

The Elbow Joint ligaments

The elbow is a hinge joint composed of two articulations: the humeroulnar joint where the trochlea of the humerus joins the trochlear notch of the ulna, and the humeroradial joint where the capitulum of the humerus meets the head of the radius. Both are enclosed in a single joint capsule. Side-to-side motions of the elbow joint are restricted by a pair of ligaments: the radial (lateral) collateral ligament and ulnar (medial) collateral ligament.

Another joint occurs in the elbow region, the proximal radioulnar joint, but it is not involved in the hinge. At this joint, the edge of the disclike head of the radius fits into the radial notch of the ulna. It is held in place by the anular ligament, which encircles the radial head and is attached at each end to the ulna. The radial head rotates like a wheel against the ulna as the forearm is pronated or supinated.

Figure 4. Elbow joint ligaments

elbow joint ligaments

The Hip Joint ligaments

The hip joint is the point where the head of the femur inserts into the acetabulum of the hip bone. Because the hip joints bear much of the body’s weight, they have deep sockets and are much more stable than the shoulder joint.

Ligaments that support the hip joint include the iliofemoral and pubofemoral ligaments on the anterior side and the ischiofemoral ligament on the posterior side. The name of each ligament refers to the bones to which it attaches—the femur and the ilium, pubis, or ischium. When you stand up, these ligaments become twisted and pull the head of the femur tightly into the acetabulum. The head of the femur has a conspicuous pit called the fovea capitis.

The round ligament or ligamentum teres, arises here and attaches to the lower margin of the acetabulum. This is a relatively slack ligament, so it is doubtful that it plays a significant role in holding the femur in its socket. It does, however, contain an artery that supplies blood to the head of the femur. A transverse acetabular ligament bridges a gap in the inferior margin of the acetabular labrum.

Figure 5. Hip Joint ligaments

hip joint ligaments

Knee joint ligaments

The knee (tibiofemoral) joint is the largest and most complex diarthrosis of the body. It is primarily a hinge joint, but when the knee is flexed it is also capable of slight rotation and lateral gliding. The patella and patellar ligament also articulate with the femur to form a gliding patellofemoral joint.

The joint cavity contains two C-shaped cartilages called the lateral and medial menisci (singular, meniscus) joined by a transverse ligament. The menisci absorb the shock of the body weight jostling up and down on the knee and prevent the femur from rocking from side to side on the tibia.

The posterior popliteal region of the knee is supported by a complex array of extracapsular ligaments external to the joint capsule and two intracapsular ligaments within it.

The extracapsular ligaments include two collateral ligaments that prevent the knee from rotating when the joint is extended—the fibular (lateral) collateral ligament and the tibial (medial) collateral ligament—and other ligaments.

The two intracapsular ligaments lie deep within the joint. The synovial membrane folds around them, however, so that they are excluded from the fluid-filled synovial cavity. These ligaments cross each other in the form of an X; hence, they are called the anterior cruciate ligament (ACL) and posterior cruciate ligament (PCL). These are named according to whether they attach to the anterior or posterior side of the tibia, not for their attachments to the femur. When the knee is extended, the ACL is pulled tight and prevents hyperextension. The PCL prevents the femur from sliding off the front of the tibia and prevents the tibia from being displaced backward. The ACL is one of the most common sites of knee injury.

An important aspect of human bipedalism is the ability to lock the knees and stand erect without tiring the extensor muscles of the leg. When the knee is extended to the fullest degree allowed by the ACL, the femur rotates medially on the tibia. This action locks the knee, and in this state, all the major knee ligaments are twisted and taut. To unlock the knee, the popliteus muscle rotates the femur laterally and untwists the ligaments.

Figure 6. Knee Joint ligaments

knee joint ligaments

The Ankle Joint ligaments

The ankle (talocrural) joint includes two articulations—a medial joint between the tibia and talus and a lateral joint between the fibula and talus, both enclosed in one joint capsule. The malleoli of the tibia and fibula overhang the talus on each side like a cap and prevent most side-to-side motion. The ankle therefore has a more restricted range of motion than the wrist.

The ligaments of the ankle include (1) anterior and posterior tibiofibular ligaments, which bind the tibia to the fibula; (2) a multipart medial (deltoid) ligament, which binds the tibia to the foot on the medial side; and (3) a multipart lateral (collateral) ligament, which binds the fibula to the foot on the lateral side.

The calcaneal (Achilles) tendon extends from the calf muscles to the calcaneus. It plantarflexes the foot and limits dorsiflexion. Plantar flexion is limited by extensor tendons on the anterior side of the ankle and by the anterior part of the joint capsule.

Sprains (torn ligaments and tendons) are common at the ankle, especially when the foot is suddenly inverted or everted to excess. They are painful and usually accompanied by immediate swelling. They are best treated by immobilizing the joint and reducing swelling with an ice pack, but in extreme cases may require a cast or surgery.

Figure 7. Ankle joint ligaments

ankle joint ligaments

Thumb joint ligaments

The wrist j oint is formed between the radius and carpal bones of the hand and between an articular disc, distal to the ulna, and carpal bones.

The first metacarpal bone has a saddle joint at the wrist, the carpometacarpal joint of the thumb. The joint between the metacarpal of the thumb (metacarpal
I) and one of the carpal bones allows greater mobility than the limited sliding movement that occurs at the carpometacarpal joints of the fingers.

Distally, the heads of metacarpals II to V (i.e. , except that of the thumb) are interconnected by strong ligaments.

Lack of this ligamentous connection between the metacarpal bones of the thumb and index finger together with the biaxial saddle joint between the metacarpal bone of the thumb and the carpus provide the thumb with greater freedom of movement than the other digits of the hand.

Figure 8. Thumb joint ligaments

wrist and thumb joint ligaments

read more
JointsMusculoskeletal System

Joints in the body

types of joints

Joints in the body

Any point where two bones meet is called a joint (articulation), whether or not the bones are mobile at that interface. Joints, or articulations, link the bones of the skeletal system into a functional whole—a system that supports the body, permits effective movement, and protects the softer organs. Joints such as the shoulder, elbow, and knee are remarkable specimens of biological design—self-lubricating, almost frictionless, and able to bear heavy loads and withstand compression while executing smooth and precise movements. Yet it is equally important that other joints be less movable or even immobile. Such joints are better able to support the body and protect delicate organs. The vertebral column, for example, is only moderately mobile, for it must allow for flexibility of the torso and yet protect the delicate spinal cord and support much of the body’s weight. Bones of the cranium must protect the brain and sense organs, but need not allow for movement (except during birth); thus, they are locked together by immobile joints.

The science of joint structure, function, and dysfunction is called arthrology. The study of musculoskeletal movement is kinesiology. This is a branch of biomechanics, which deals with a broad variety of movements and mechanical processes in the body, including the physics of blood circulation, respiration, and hearing.

The name of a joint is typically derived from the names of the bones involved. For example, the atlanto–occipital joint is where the atlas meets the occipital condyles; the glenohumeral joint is where the glenoid cavity of the scapula meets the humerus; and the radioulnar joint is where the radius meets the ulna.

Joints can be classified according to the manner in which the adjacent bones are bound to each other, with corresponding differences in how freely the bones can move. Authorities differ in their classification schemes, but one common view places the joints in four major categories: bony, fibrous, cartilaginous, and synovial
joints.

Bony Joints

A bony joint, or synostosis, is an immobile joint formed when the gap between two bones ossifies and they become, in effect, a single bone. Bony joints can form by ossification of either fibrous or cartilaginous joints. An infant is born with right and left frontal and mandibular bones, for example, but these soon fuse seamlessly into a single frontal bone and mandible. In old age, some cranial sutures become obliterated by ossification and the adjacent cranial bones, such as the parietal bones, fuse. The epiphyses and diaphyses of the long bones are joined by cartilaginous joints in childhood and adolescence, and these become bony joints in early adulthood. The attachment of the first rib to the sternum also becomes a bony joint with age.

Fibrous Joints

A fibrous joint is also called a synarthrosis. It is a point at which adjacent bones are bound by collagen fibers that emerge from one bone, cross the space between them, and penetrate into the other. There are three kinds of fibrous joints: sutures, gomphoses, and syndesmoses. In sutures and gomphoses, the fibers are very short and allow for little or no movement. In syndesmoses, the fibers are longer and the attached bones are more mobile.

Figure 1. Fibrous joints

sutures joint

Note: (a) A suture between the parietal bones. (b) A gomphosis between a tooth and the jaw. (c) A syndesmosis between the tibia and fibula.

Sutures

Sutures are immobile or only slightly mobile fibrous joints that closely bind the bones of the skull to each other; they occur nowhere else. Sutures can be classified as serrate, lap, and plane sutures. Readers with some knowledge of woodworking may recognize that the structures and functional properties of these sutures have something in common with basic types of carpentry joints.

Serrate sutures appear as wavy lines along which the adjoining bones firmly interlock with each other by their serrated margins, like pieces of a jigsaw puzzle. Serrate sutures are analogous to a dovetail wood joint. Examples include the coronal,  sagittal, and lambdoid sutures that border the parietal bones.

Lap (squamous) sutures occur where two bones have overlapping beveled edges, like a miter joint in carpentry. On the surface, a lap suture appears as a relatively smooth (nonserrated) line. An example is the squamous suture where the temporal bone meets the sphenoid and parietal bones. The beveled edge of the temporal bone.

Plane (butt) sutures occur where two bones have straight nonoverlapping edges. The two bones merely border on each other, like two boards glued together in a butt joint. This type of joint is represented by the intermaxillary suture in the roof of the mouth.

Figure 2. Sutures joint

sutures joint

Gomphoses

Even though the teeth are not bones, the attachment of a tooth to its socket is classified as a joint called a gomphosis. The term refers to its similarity to a nail hammered into wood. The tooth is held firmly in place by a fibrous periodontal ligament, which consists of collagen fibers that extend from the bone matrix of the jaw into the dental tissue. The periodontal ligament allows the tooth to move or give a little under the stress of chewing. Along with associated nerve endings, this slight tooth movement allows you to sense how hard you are biting and to sense a particle of food stuck between the teeth.

Syndesmoses

A syndesmosis is a fibrous joint at which two bones are bound by relatively long collagenous fibers. The separation between the bones and length of the fibers give these joints more mobility than a suture or gomphosis has. An especially mobile syndesmosis exists between the shafts of the radius and ulna, which are joined by a broad fibrous interosseous membrane. This permits such movements as pronation and supination of the forearm. A less mobile syndesmosis is the one that binds the distal ends of the tibia and fibula together, side by side.

Cartilaginous Joints

A cartilaginous joint is also called an amphiarthrosis. In these joints, two bones are linked by cartilage. The two types of cartilaginous joints are synchondroses and symphyses.

Figure 3. Cartilaginous joints

Cartilaginous Joints

Note: a) A synchondrosis, represented by the costal cartilage joining rib 1 to the sternum. (b) The pubic symphysis. (c) Intervertebral discs, which join adjacent vertebrae to each other by symphyses.

Synchondroses

A synchondrosis is a joint in which the bones are bound by hyaline cartilage. An example is the temporary joint between the epiphysis and diaphysis of a long  bone in a child, formed by the cartilage of the epiphyseal plate. Another is the attachment of the first rib to the sternum by a hyaline costal cartilage. The other costal cartilages are joined to the sternum by synovial joints.

Symphyses

In a symphysis, two bones are joined by fibrocartilage. One example is the pubic symphysis, in which the right and left pubic bones are joined anteriorly by the cartilaginous interpubic disc. Another is the joint between the bodies of two vertebrae, united by an intervertebral disc. The surface of each vertebral body is covered with hyaline cartilage. Between the vertebrae, this cartilage becomes infiltrated with collagen bundles to form fibrocartilage. Each intervertebral disc permits only slight movement between adjacent vertebrae, but the collective effect of all 23 discs gives the spine considerable flexibility.

Synovial Joints

The most familiar type of joint is the synovial joint, also called a diarthrosis. Ask most people to point out any joint in the body, and they are likely to point to a synovial joint such as an elbow, knee, or knuckle. Many synovial joints, like these examples, are freely mobile. Others, such as the joints between the wrist and ankle bones and between the articular processes of the vertebrae, have more limited mobility.

Synovial joints are the most structurally complex type of joint and are the type most likely to develop uncomfortable and crippling dysfunctions. They are the most important joints for such professionals as physical and occupational therapists, athletic coaches, nurses, and fitness trainers to understand well. Their mobility makes the synovial joints especially important to the quality of life. Reflect, for example, on the performance extremes of a young athlete, the decline in flexibility that comes with age, and the crippling effect of rheumatoid arthritis.

In synovial joints, the facing surfaces of the two bones are covered with articular cartilage, a layer of hyaline cartilage up to 2 or 3 mm thick. These surfaces are separated by a narrow space, the joint (articular) cavity, containing a slippery lubricant called synovial fluid. This fluid, for which the joint is named, is rich in albumin and hyaluronic acid, which give it a viscous, slippery texture similar to raw egg white. It nourishes the articular cartilages, removes their wastes, and makes movements at synovial joints almost friction-free. A connective tissue joint (articular) capsule encloses the cavity and retains the fluid. It has an outer fibrous capsule continuous with the periosteum of the adjoining bones, and an inner, cellular synovial membrane.

The synovial membrane is composed mainly of fibroblast-like cells that secrete the fluid, and is populated by macrophages that remove debris from the joint cavity. Joint capsules and ligaments are well supplied with lamellar corpuscles and other sensory nerve endings that enable the brain to monitor limb positions and joint movements.

In a few synovial joints, fibrocartilage grows inward from the joint capsule and forms a pad between the articulating bones. In the jaw (temporomandibular) joint, at both ends of the clavicle (sternoclavicular and acromioclavicular joints), and between the ulna and carpal bones, the pad crosses the entire joint capsule and is called an articular disc. In the knee, two cartilages extend inward from the left and right but do not entirely cross the joint. Each is called a meniscus because of its crescent-moon shape. These cartilages absorb shock and pressure, guide the bones across each other, improve the fit between the bones, and stabilize the joint, reducing the chance of dislocation.

Accessory structures associated with a synovial joint include tendons, ligaments, and bursae. A tendon is a strip or sheet of tough collagenous connective tissue that attaches a muscle to a bone. Tendons are often the most important structures in stabilizing a joint. A ligament is a similar tissue that attaches one bone to another.

A bursa is a fibrous sac of synovial fluid located between adjacent muscles, where a tendon passes over a bone, or between bone and skin. Bursae cushion muscles, help tendons slide more easily over the joints, and sometimes enhance the mechanical effect of a muscle by modifying the direction in which its tendon pulls. Tendon (synovial) sheaths are elongated cylindrical bursae wrapped around a tendon, seen especially in the hand and foot. They enable tendons to move back and forth more freely in such tight spaces as the wrist and ankle.

Figure 4. Synovial joint

synovial joint

Classes of Synovial Joints

There are six fundamental types of synovial joints, distinguished by the shapes of their articular surfaces and their degrees of freedom. We will begin by looking at these six types in simple terms, but then see that this is an imperfect classification for reasons discussed at the end. All six types can be found in the upper limb. They are listed here in descending order of mobility: one multiaxial type (ball-and-socket), three biaxial types (condylar, saddle, and plane), and two monaxial types (hinge and pivot).

  1. Ball-and-socket joints. These are the shoulder and hip joints—the only multiaxial joints in the body. In both cases, one bone (the humerus or femur) has a smooth hemispherical head that fits into a cuplike socket on the other (the glenoid cavity of the scapula or the acetabulum of the hip bone).
  2. Condylar (ellipsoid) joints. These joints exhibit an oval convex surface on one bone that fits into a complementary shaped depression on the other. The radiocarpal joint of the wrist and metacarpophalangeal joints at the bases of the fingers are examples. They are biaxial joints, capable of movement in two planes. To demonstrate this, hold your hand with the palm facing you. Make a fist, and these joints flex in the sagittal plane. Fan your fingers apart, and they move in the frontal plane.
  3. Saddle joints. Here, both bones have a saddle-shaped surface—concave in one direction (like the front-to-rear curvature of a horse’s saddle) and convex in the other (like the left-to-right curvature of a saddle). The clearest example of this is the trapeziometacarpal joint between the trapezium of the wrist and metacarpal I at the base of the thumb. Saddle joints are biaxial. The thumb, for example, moves in a frontal plane when you spread the fingers apart, and in a sagittal plane when you move it as if to grasp a tool such as a hammer. This range of motion gives us and other primates that invaluable anatomical hallmark, the opposable thumb. Another saddle joint is the sternoclavicular joint, where the clavicle articulates with the sternum. The clavicle moves vertically in the frontal plane at this joint when you lift a suitcase, and moves horizontally in the transverse plane when you reach forward to push open a door.
  4. Plane (gliding) joints. Here the bone surfaces are flat or only slightly concave and convex. The adjacent bones slide over each other and have relatively limited movement. Plane joints are found between the carpal bones of the wrist, the tarsal bones of the ankle, and the articular processes of the vertebrae. Their movements, although slight, are complex. They are usually biaxial. For example, when the head is tilted forward and back, the articular facets of the vertebrae slide anteriorly and posteriorly; when the head is tilted from side to side, the facets slide laterally. Although any one joint moves only slightly, the combined action of the many joints in the wrist, ankle, and vertebral column allows for a significant amount of overall movement.
  5. Hinge joints. These are essentially monaxial joints, moving freely in one plane with very little movement in any other, like a door hinge. Some examples are the elbow, knee, and interphalangeal (finger and toe) joints. In these cases, one bone has a convex (but not hemispherical) surface, such as the trochlea of the humerus and the condyles of the femur. This fits into a concave depression on the other bone, such as the trochlear notch of the ulna and the condyles of the tibia.
  6. Pivot joints. These are monaxial joints in which a bone spins on its longitudinal axis like the axle of a bicycle wheel. There are two principal examples: the atlantoaxial joint between the first two vertebrae, and the radioulnar joint at the elbow. At the atlantoaxial joint, the dens of the axis projects into the vertebral foramen of the atlas and is held against the anterior arch of the atlas by the transverse ligament. As the head rotates left and right, the skull and atlas pivot around the dens. At the radioulnar joint, the anular ligament of the ulna wraps around the neck of the radius. During pronation and supination of the forearm, the disclike radial head pivots like a wheel turning on its axle. The edge of the wheel spins against the radial notch of the ulna like a car tire spinning in snow.

Figure 5. Six types of synovial joints

six types of synovial joints

Some joints cannot be easily classified into any one of these six categories. The jaw joint, for example, has some aspects of condylar, hinge, and plane joints. It clearly has an elongated condyle where it meets the temporal bone of the cranium, but it moves in a hingelike fashion when the mandible moves up and down in speaking, biting, and chewing; it glides slightly forward when the jaw juts (protracts) to take a bite; and it glides from side to side to grind food between the molars. To observe the importance of the forward glide, try to open your mouth while pushing the jaw posteriorly with the heel of your hand; it is difficult to open the mouth more than 1 or 2 cm when there is resistance to protraction of the mandible.

The knee is a classic hinge joint, but has an element of the pivot type; when we lock our knees to stand more effortlessly, the femur pivots slightly on the tibia. The humeroradial joint acts as a hinge joint when the elbow flexes and a pivot joint when the forearm pronates.

The Jaw Joint

The temporomandibular (jaw) joint (TMJ) is the articulation of the condyle of the mandible with the mandibular fossa of the temporal bone. You can feel its action by pressing your fingertips against the jaw immediately anterior to the ear while opening and closing your mouth. The synovial cavity of the TMJ is divided into superior and inferior chambers by an articular disc, which permits lateral and medial excursion of the mandible. Two ligaments support the joint. The lateral ligament prevents posterior displacement of the mandible. If the jaw receives a hard blow, this ligament normally prevents the condylar process from being  driven upward and fracturing the base of the skull. The sphenomandibular ligament on the medial side of the joint extends from the sphenoid bone to the ramus  of the mandible. A stylomandibular ligament extends from the styloid process to the angle of the mandible but is not part of the TMJ proper.

A deep yawn or other strenuous depression of the mandible can dislocate the TMJ by making the condyle pop out of the fossa and slip forward. The joint is relocated by pressing down on the molars while pushing the jaw posteriorly.

Figure 6. Temporomandibular joint (TMJ)

Temporomandibular joint

The Shoulder Joint

The glenohumeral (humeroscapular) joint, or shoulder joint, is where the hemispherical head of the humerus articulates with the glenoid cavity of the scapula. Together, the shoulder and elbow joints serve to position the hand for the performance of a task; without a hand, shoulder and elbow movements are almost useless. The relatively loose shoulder joint capsule and shallow glenoid cavity sacrifice joint stability for freedom of movement. The cavity, however, has a ring of fibrocartilage called the glenoid labrum around its margin, making it somewhat deeper than it looks on a dried skeleton.

The shoulder is stabilized mainly by the biceps brachii muscle on the anterior side of the arm. One of its tendons arises from the long head of the muscle, passes through the intertubercular groove of the humerus, and inserts on the superior margin of the glenoid cavity. It acts as a taut strap that presses the humeral head against the glenoid cavity. Four additional muscles help to stabilize this joint: the supraspinatus, infraspinatus, teres minor, and subscapularis. Their tendons form the rotator cuff, which is fused to the joint capsule on all sides except the inferior.

Five principal ligaments also support this joint. Three of them, called the glenohumeral ligaments, are relatively weak and sometimes absent. The other two are the coracohumeral ligament, which extends from the coracoid process of the scapula to the greater tubercle of the humerus, and the transverse humeral ligament, which extends from the greater to the lesser tubercle of the humerus and forms a tunnel housing the tendon from the long head of the biceps.

Four bursae occur at the shoulder. Their names describe their locations: the subdeltoid, subacromial, subcoracoid, and subscapular bursae. The deltoid is the large muscle that caps the shoulder, and the other bursae are named for parts of the scapula.

Figure 7. Shoulder joint

shoulder joint

The Elbow Joint

The elbow is a hinge joint composed of two articulations: the humeroulnar joint where the trochlea of the humerus joins the trochlear notch of the ulna, and the humeroradial joint where the capitulum of the humerus meets the head of the radius. Both are enclosed in a single joint capsule. On the posterior side of the elbow, there is a prominent olecranon bursa to ease the movement of tendons over the joint. Side-to-side motions of the elbow joint are restricted by a pair of ligaments: the radial (lateral) collateral ligament and ulnar (medial) collateral ligament.

Another joint occurs in the elbow region, the proximal radioulnar joint, but it is not involved in the hinge. At this joint, the edge of the disclike head of the radius fits into the radial notch of the ulna. It is held in place by the anular ligament, which encircles the radial head and is attached at each end to the ulna. The radial head rotates like a wheel against the ulna as the forearm is pronated or supinated.

Figure 8. Elbow joint

elbow joint

The Hip Joint

The coxal (hip) joint is the point where the head of the femur inserts into the acetabulum of the hip bone. Because the coxal joints bear much of the body’s weight, they have deep sockets and are much more stable than the shoulder joint. The depth of the socket is somewhat greater than you see on dried bones because of a horseshoeshaped ring of fibrocartilage, the acetabular labrum, attached to its rim. Dislocations of the hip are rare, but some infants suffer congenital dislocations because the acetabulum is not deep enough to hold the head of the femur in place. If detected early, this condition can be treated with a harness, worn for 2 to 4 months, that holds the head of the femur in the proper position until the joint is stronger.

Figure 9. Hip joint

hip joint

The Knee Joint

The tibiofemoral (knee) joint is the largest and most complex diarthrosis of the body. It is primarily a hinge joint, but when the knee is flexed it is also capable of slight rotation and lateral gliding. The patella and patellar ligament also articulate with the femur to form a gliding patellofemoral joint. The joint capsule encloses only the lateral and posterior aspects of the knee joint, not the anterior. The anterior aspect is covered by the patellar ligament and the lateral and medial patellar retinacula. These are extensions of the tendon of the quadriceps femoris muscle, the large anterior muscle of the thigh. The knee is stabilized mainly by the quadriceps tendon in front and the tendon of the semimembranosus muscle on the rear of the thigh. Developing strength in these muscles therefore reduces the risk of knee injury. The joint cavity contains two C-shaped cartilages called the lateral and medial menisci (singular, meniscus) joined by a transverse ligament. The menisci absorb the shock of the body weight jostling up and down on the knee and prevent the femur from rocking from side to side on the tibia.

The posterior popliteal region of the knee is supported by a complex array of extracapsular ligaments external to the joint capsule and two intracapsular ligaments within it. The extracapsular ligaments include two collateral ligaments that prevent the knee from rotating when the joint is extended—the fibular (lateral) collateral ligament and the tibial (medial) collateral ligament—and other ligaments. The two intracapsular ligaments lie deep within the joint. The synovial membrane folds around them, however, so that they are excluded from the fluid-filled synovial cavity. These ligaments cross each other in the form of an X; hence, they are called the anterior cruciate ligament (ACL) and posterior cruciate ligament (PCL). These are named according to whether they attach to the anterior or posterior side of the tibia, not for their attachments to the femur. When the knee is extended, the ACL is pulled tight and prevents hyperextension. The PCL prevents the femur from sliding off the front of the tibia and prevents the tibia from being displaced backward. The ACL is one of the most common sites of knee injury.

Figure 10. Knee joint

knee joint

The Ankle Joint

The talocrural (ankle) joint includes two articulations—a medial joint between the tibia and talus and a lateral joint between the fibula and talus, both enclosed in one joint capsule. The malleoli of the tibia and fibula overhang the talus on each side like a cap and prevent most side-to-side motion. The ankle therefore has a more restricted range of motion than the wrist.

The ligaments of the ankle include (1) anterior and posterior tibiofibular ligaments, which bind the tibia to the fibula; (2) a multipart medial (deltoid) ligament, which binds the tibia to the foot on the medial side; and (3) a multipart lateral (collateral) ligament, which binds the fibula to the foot on the lateral side. The calcaneal (Achilles) tendon extends from the calf muscles to the calcaneus. It plantarflexes the foot and limits dorsiflexion. Plantar flexion is limited by extensor tendons on the anterior side of the ankle and by the anterior part of the joint capsule.

Sprains (torn ligaments and tendons) are common at the ankle, especially when the foot is suddenly inverted or everted to excess. They are painful and usually accompanied by immediate swelling. They are best treated by immobilizing the joint and reducing swelling with an ice pack, but in extreme cases may require a cast or surgery.

Figure 11. Ankle joint

ankle joint

read more
1 2
Page 1 of 2
Health Jade