Kids sprained ankle
A sprained ankle means one or more ligaments on the outer side of your ankle were stretched or torn. Ankle sprains are one of the most common injuries in children. Ankles are made up of three bones with ligaments (tough, stretchy tissue that hold the bones together). The ligaments help stop the ankle joint from moving around too much.
Ankle sprains usually happen when there is a sudden movement or twist – often when the foot rolls over – and the ligaments are overstretched. This causes tears and bleeding (which show as bruising and swelling) around the ankle joint. These movements are more likely to happen when a person is running, jumping or quickly changing direction e.g. in sports such as basketball, netball or football. Risk factors for both include poor conditioning, fatigue, poor warm up, slippery surfaces and poorly fitting footwear.
Pain, swelling, bruising, tenderness, difficulty moving the ankle or difficulty walking are common symptoms of an ankle sprain. However, symptoms of a severe sprain are similar to those of a broken bone and require prompt medical evaluation.
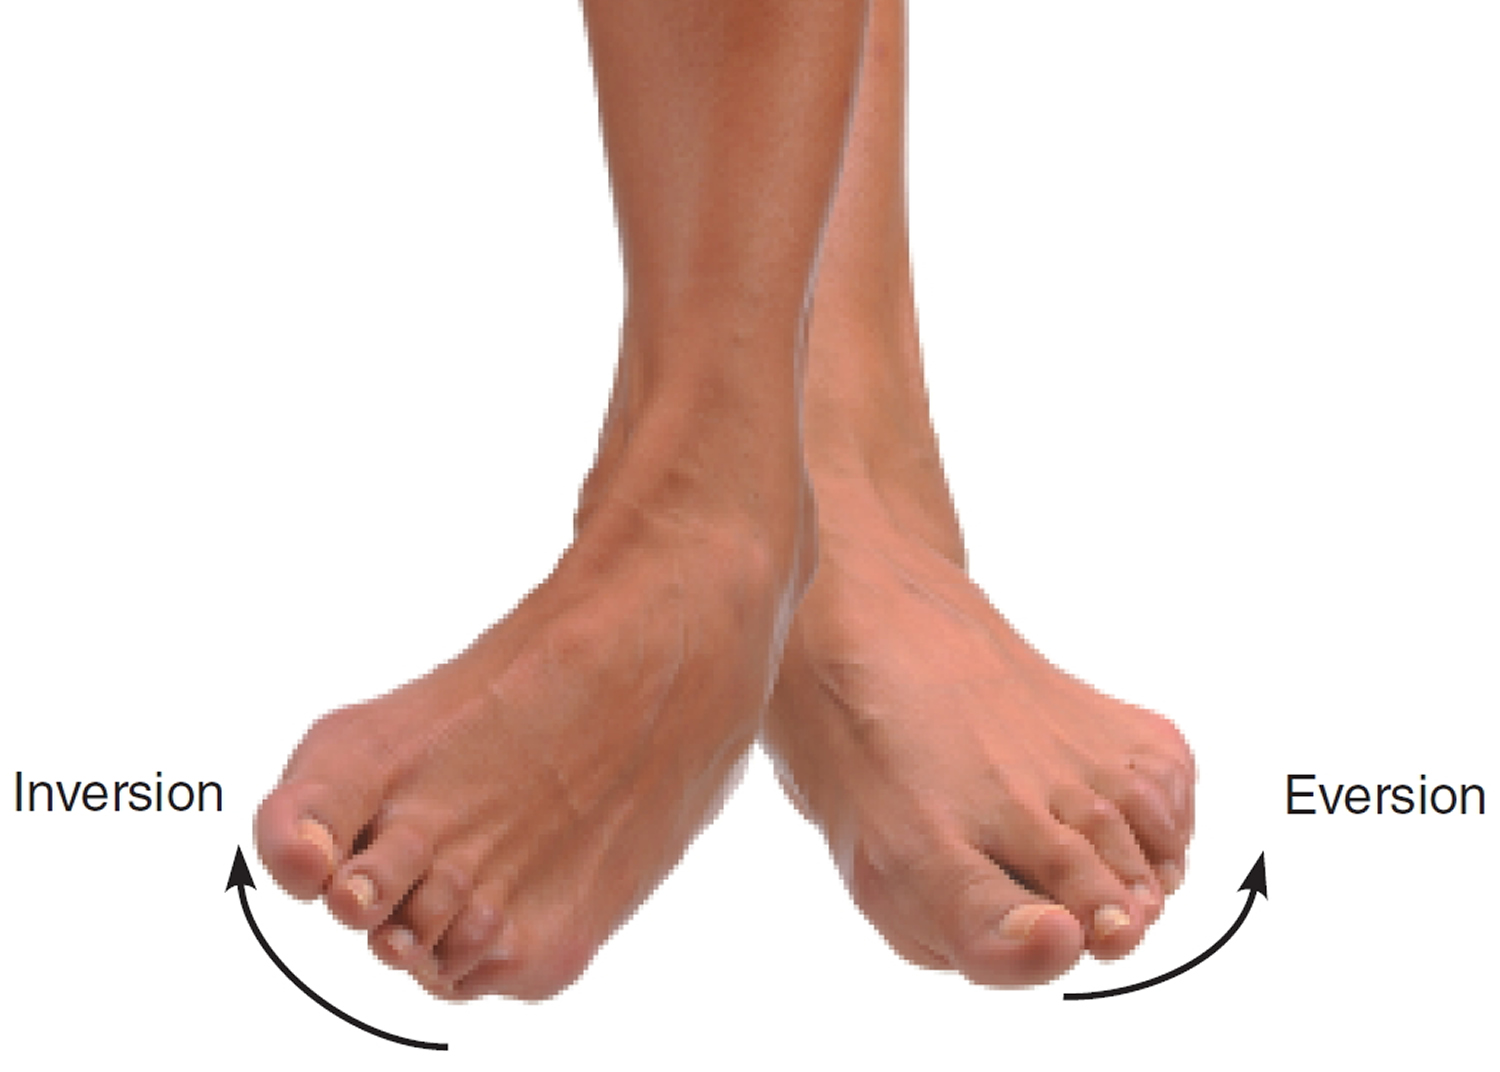
A sprained ankle can vary greatly in severity from a minor “rolled ankle” to a complete ligament rupture with or without bone tendon or muscle injury. They are graded as 1, 2 or 3 depending on the severity. If a sprained ankle is not treated properly, you could have long-term problems. Typically sprained ankle is rolled either inward (inversion sprain) or outward (eversion sprain). Inversion sprains cause pain along the outer side of the ankle and are the most common type. Pain along the inner side of the ankle may represent a more serious injury to the tendons or to the ligaments that support the arch and should always be evaluated by a doctor.
Ankle sprains happen when you overstretch or torn a ligament. Ankle sprains occur most commonly by a sudden twisting or rolling action of your ankle often on unstable irregular surfaces. The ligaments affected is determined by the direction the foot rolls. The most common ankle sprain is the ligament on the side which occurs when the foot is turned in.
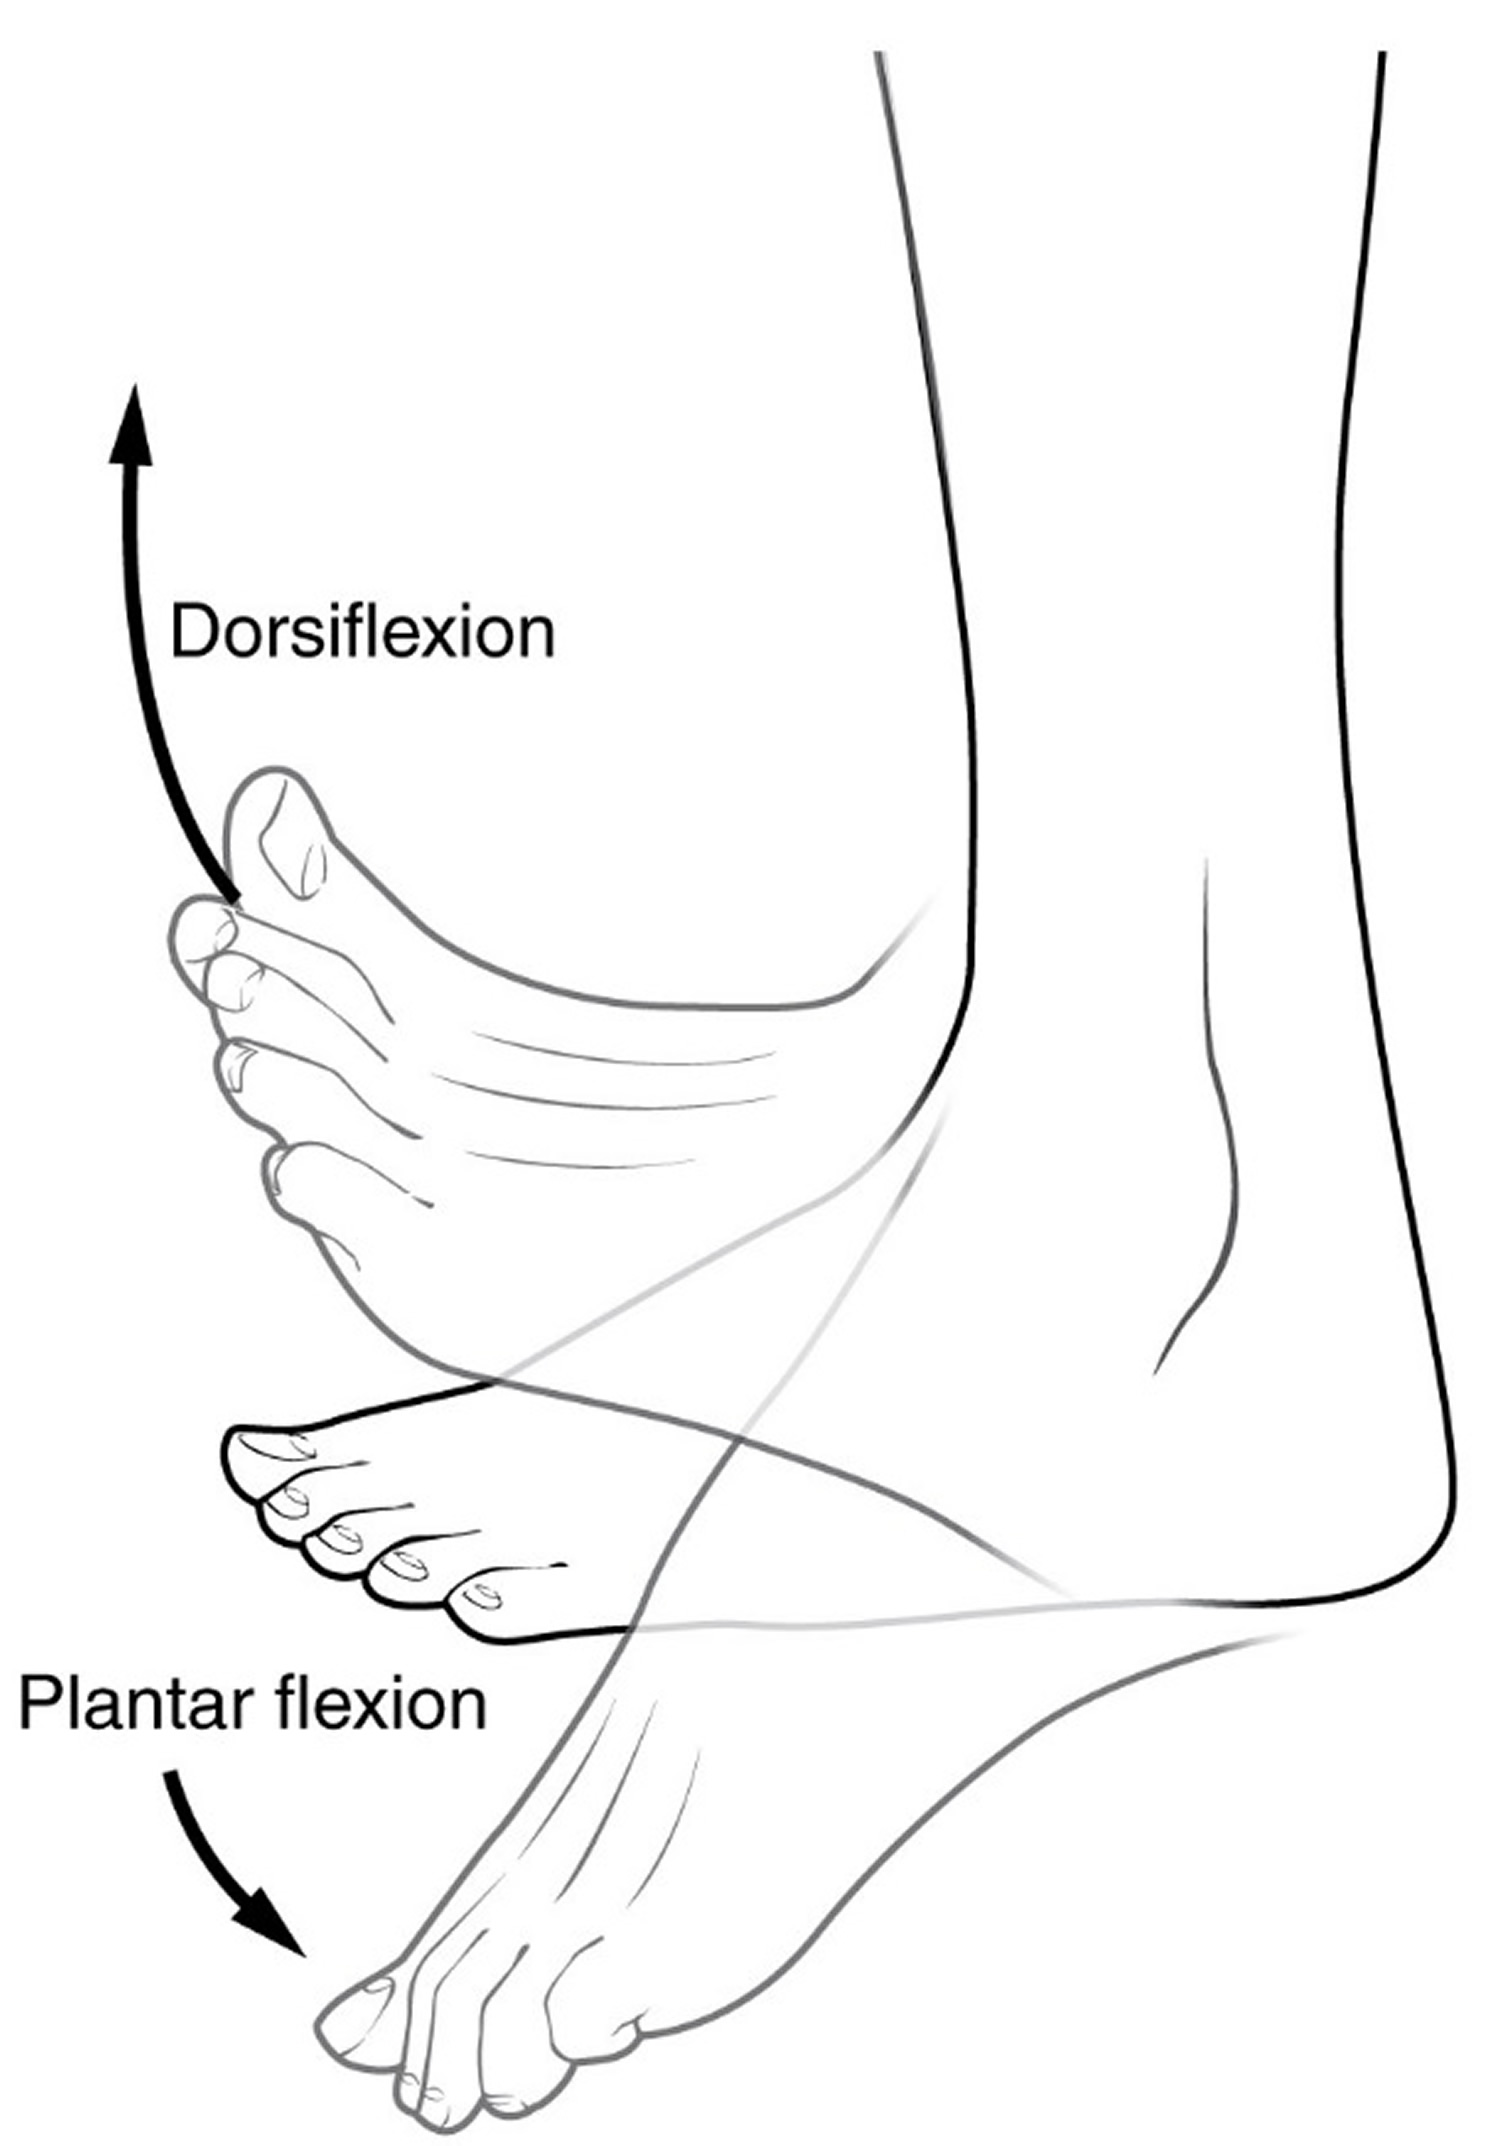
Certain factors can put a person at greater risk of spraining their ankle including poor footwear, not warming up before exercising, tired muscles and playing sport, previous injury, reduced strength, poor biomechanics or poor balance receptors. You’re most likely to sprain your ankle when you have your toes on the ground and heel up (plantar flexion). This position puts your ankle’s ligaments under tension, making them vulnerable. A sudden force like landing on an uneven surface may turn your ankle inward (inversion). When this happens, one, two or three of your ligaments may be hurt.
A sprained ankle can be difficult to differentiate from a fracture (broken bone) without an x-ray. If you are unable to bear weight after this type of injury, or if there is significant swelling or deformity, you should seek medical treatment from a doctor. This may be your primary care physician, an emergency department, or an orthopaedist, depending on the severity of your injury.
Ankle sprains are very common injuries. There’s a good chance that while playing or stepping on an uneven surface you sprained your ankle–some 25,000 people do it every day.
Sometimes, it is an awkward moment when you lose your balance, but the pain quickly fades away and you go on your way. But the sprain could be more severe; your ankle might swell and it might hurt too much to stand on it. If it’s a severe sprain, you might have felt a “pop” when the injury happened.
Treatment for a sprained ankle depends on the severity of the injury. Although self-care measures and over-the-counter pain medications may be all you need, a medical evaluation might be necessary to reveal how badly you’ve sprained your ankle and to determine the appropriate treatment.
Minor ankle strains/sprains require rest, ice, compression, elevation (RICE) and over-the-counter pain relievers for treatment. An ankle brace may be helpful to support the ankle while it heals.
Surgical treatment for ankle sprains is rare. Surgery is reserved for injuries that fail to respond to nonsurgical treatment, and for patients who experience persistent ankle instability after months of rehabilitation and nonsurgical treatment.
Seek medical advice from your doctor or a physiotherapist if:
- the pain from your child’s ankle has not improved after a few days
- your child is unable to put weight on the injured ankle immediately after the injury
- there is tenderness (pain when pressing) over the ankle bones
- you are unable to control your child’s ankle pain.
Doctors and physiotherapists can examine your child’s ankle, order an X-ray if needed and provide a management plan for your child’s injury. If your child has ongoing or recurrent problems with their ankle, consider ankle braces or tape – your doctor or physiotherapist can advise you how to use these.
Ankle Joint ligaments
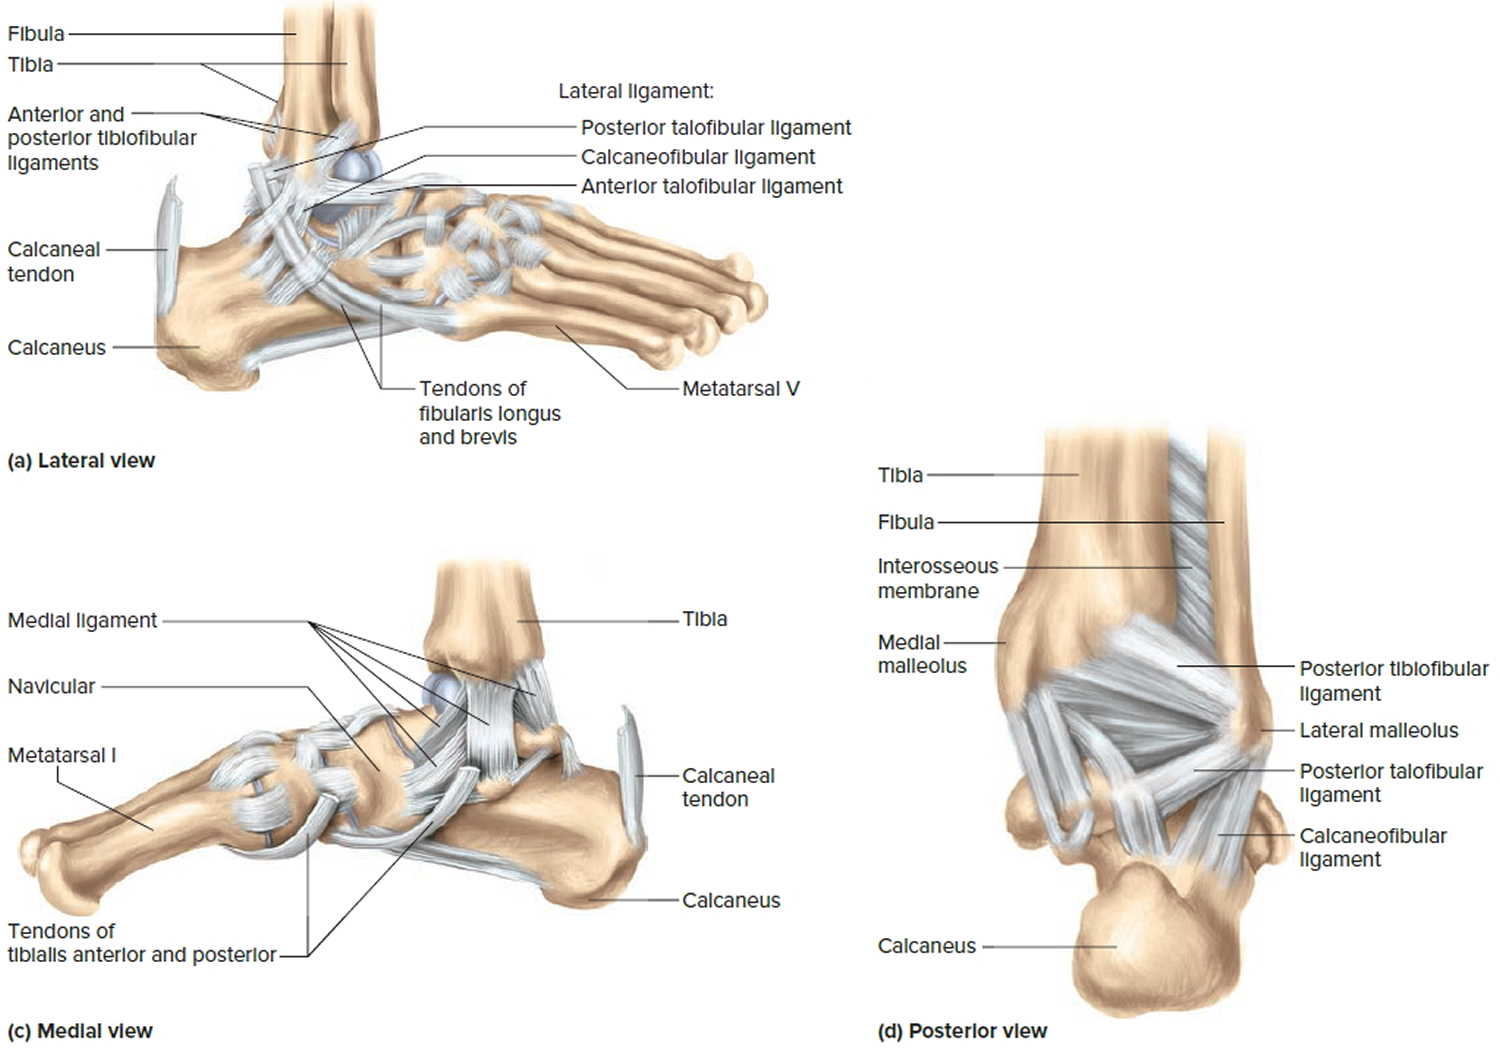
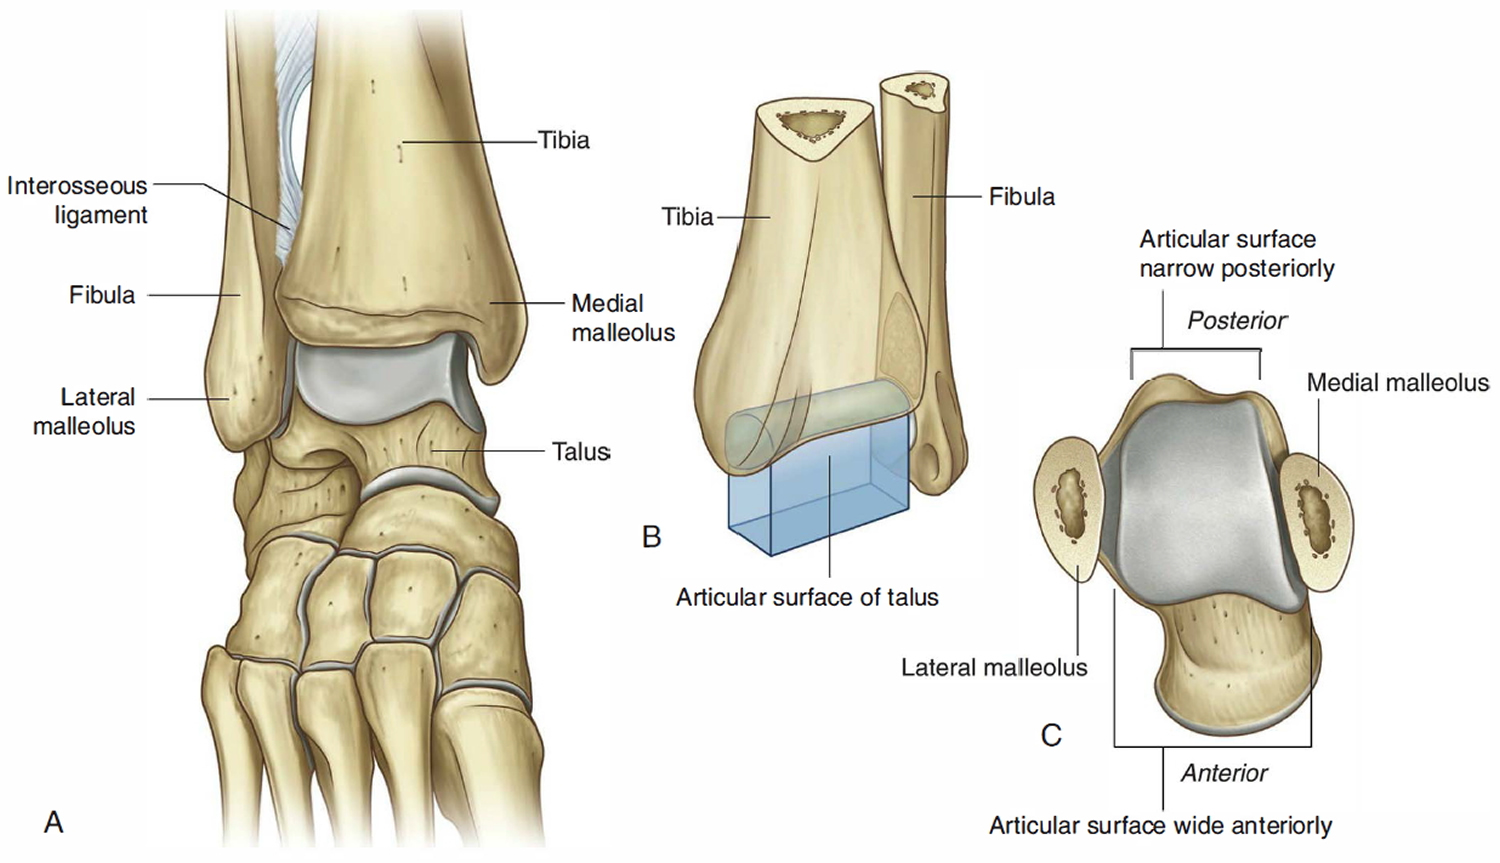
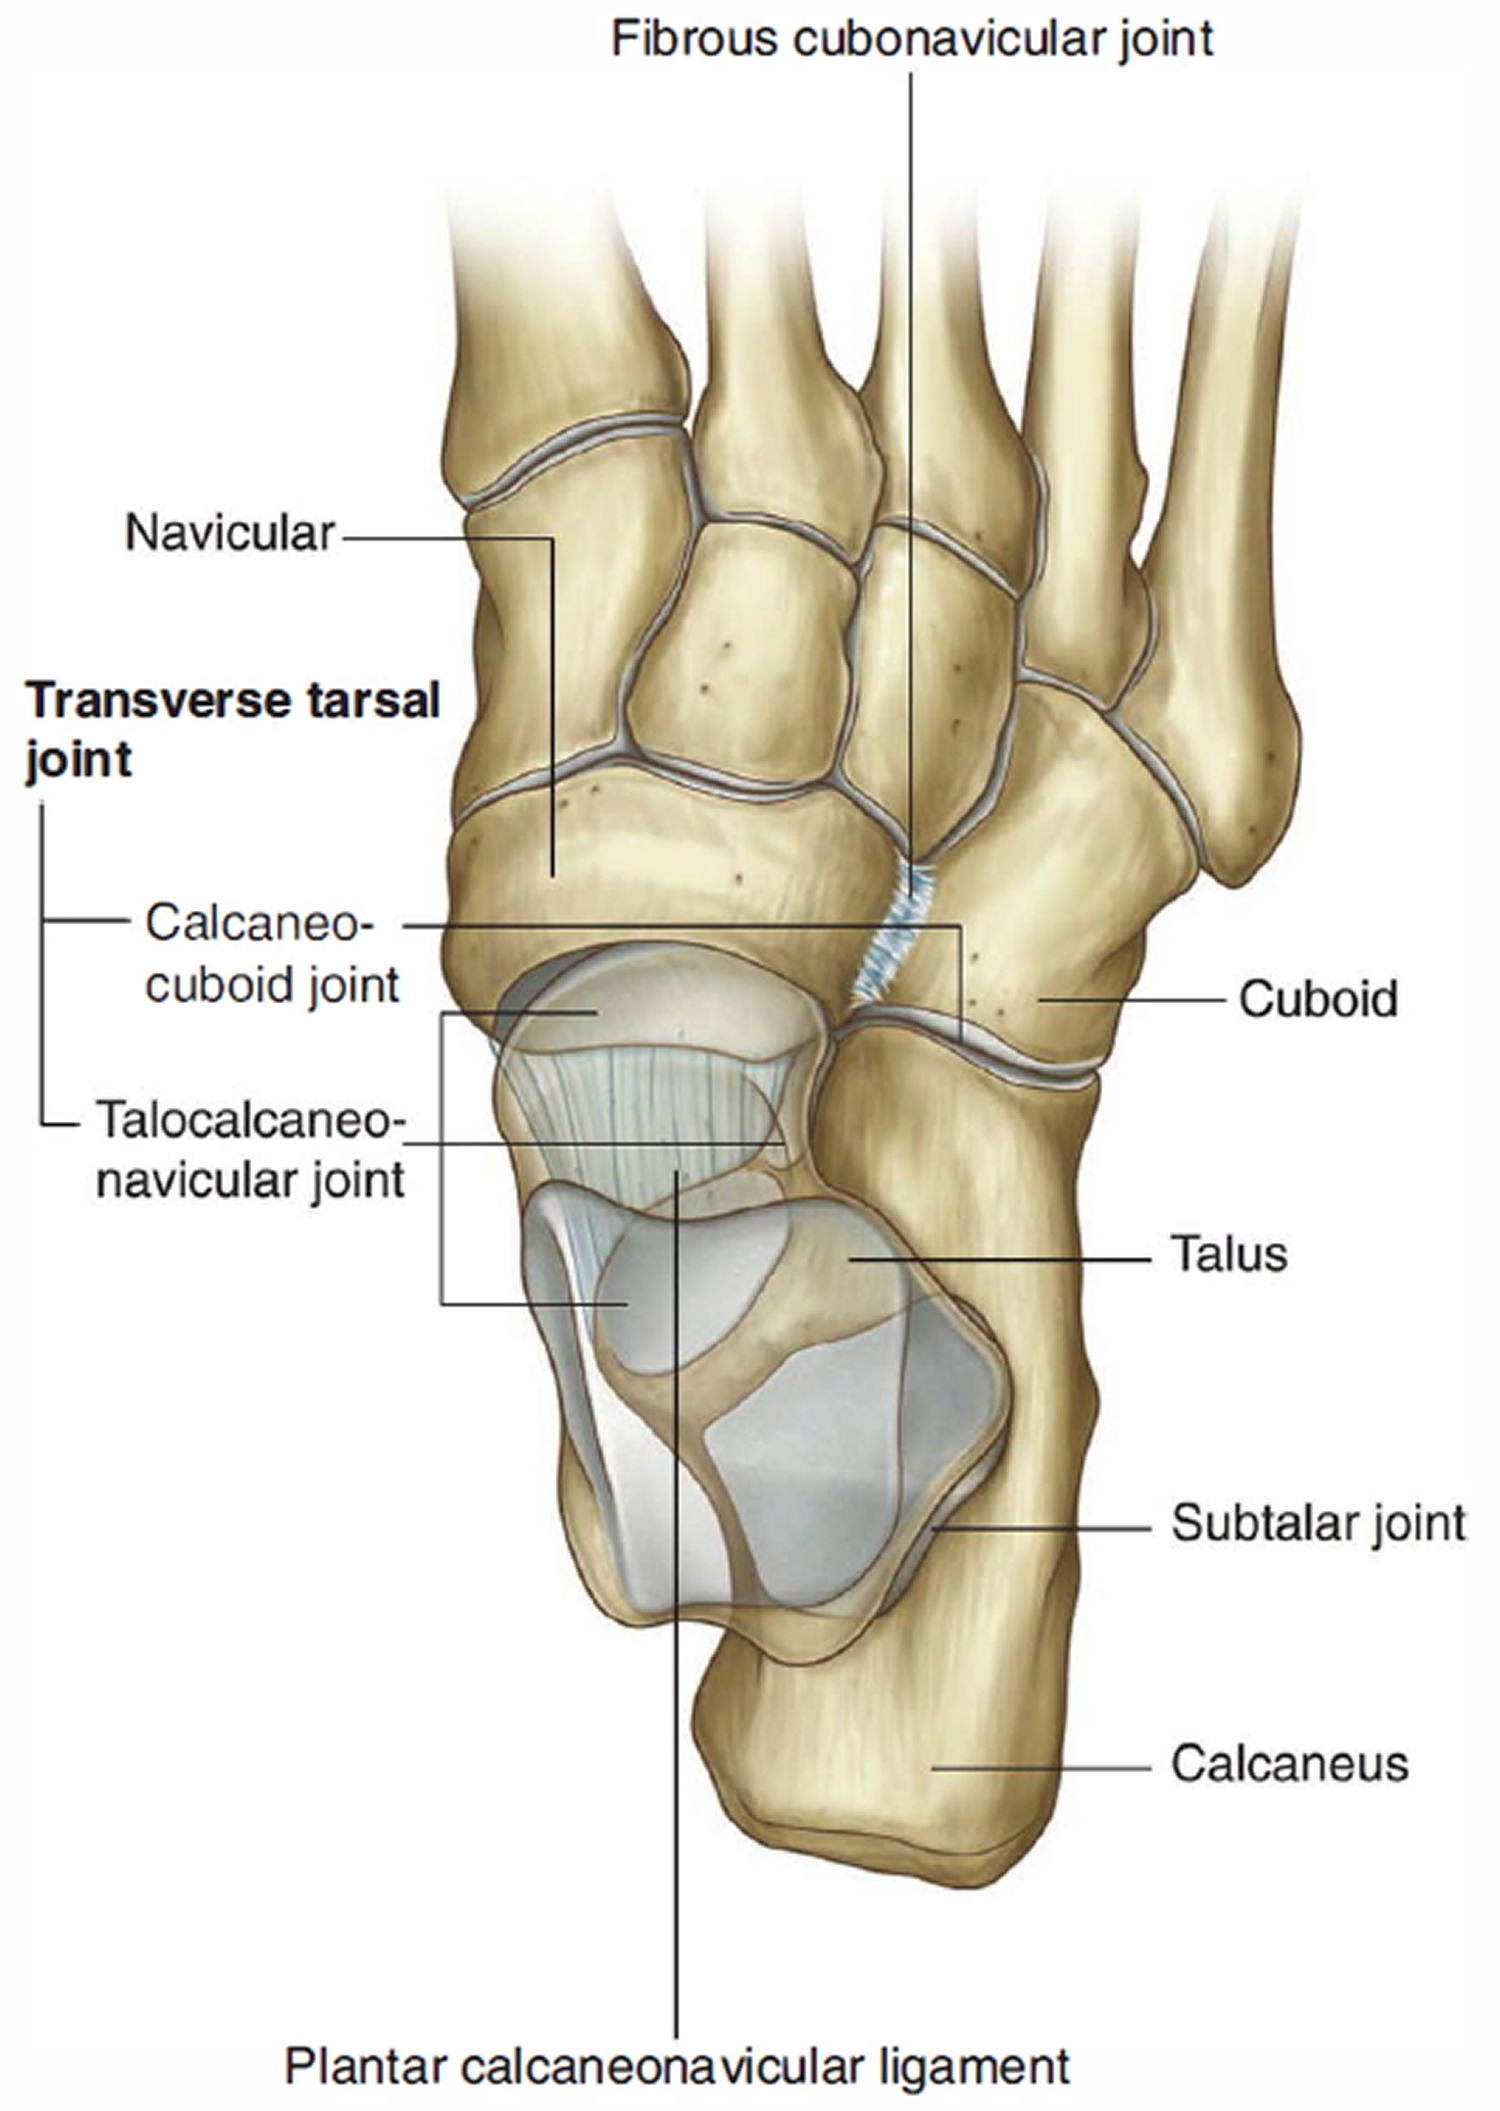
The ankle (talocrural) joint includes two articulations—a medial joint between the tibia and talus and a lateral joint between the fibula and talus, both enclosed in one joint capsule. The malleoli of the tibia and fibula overhang the talus on each side like a cap and prevent most side-to-side motion. The ankle therefore has a more restricted range of motion than the wrist.
Ligaments are strong, fibrous tissues that connect bones to other bones. The ligaments in the ankle help to keep the bones in proper position and stabilize the joint.
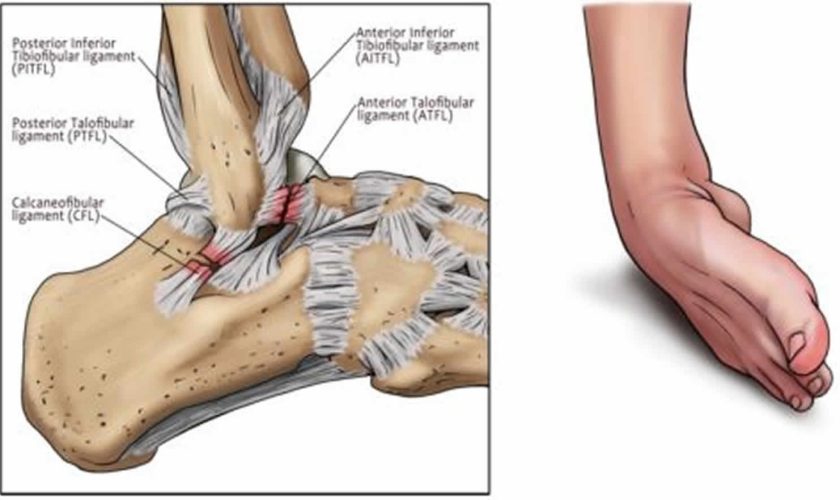
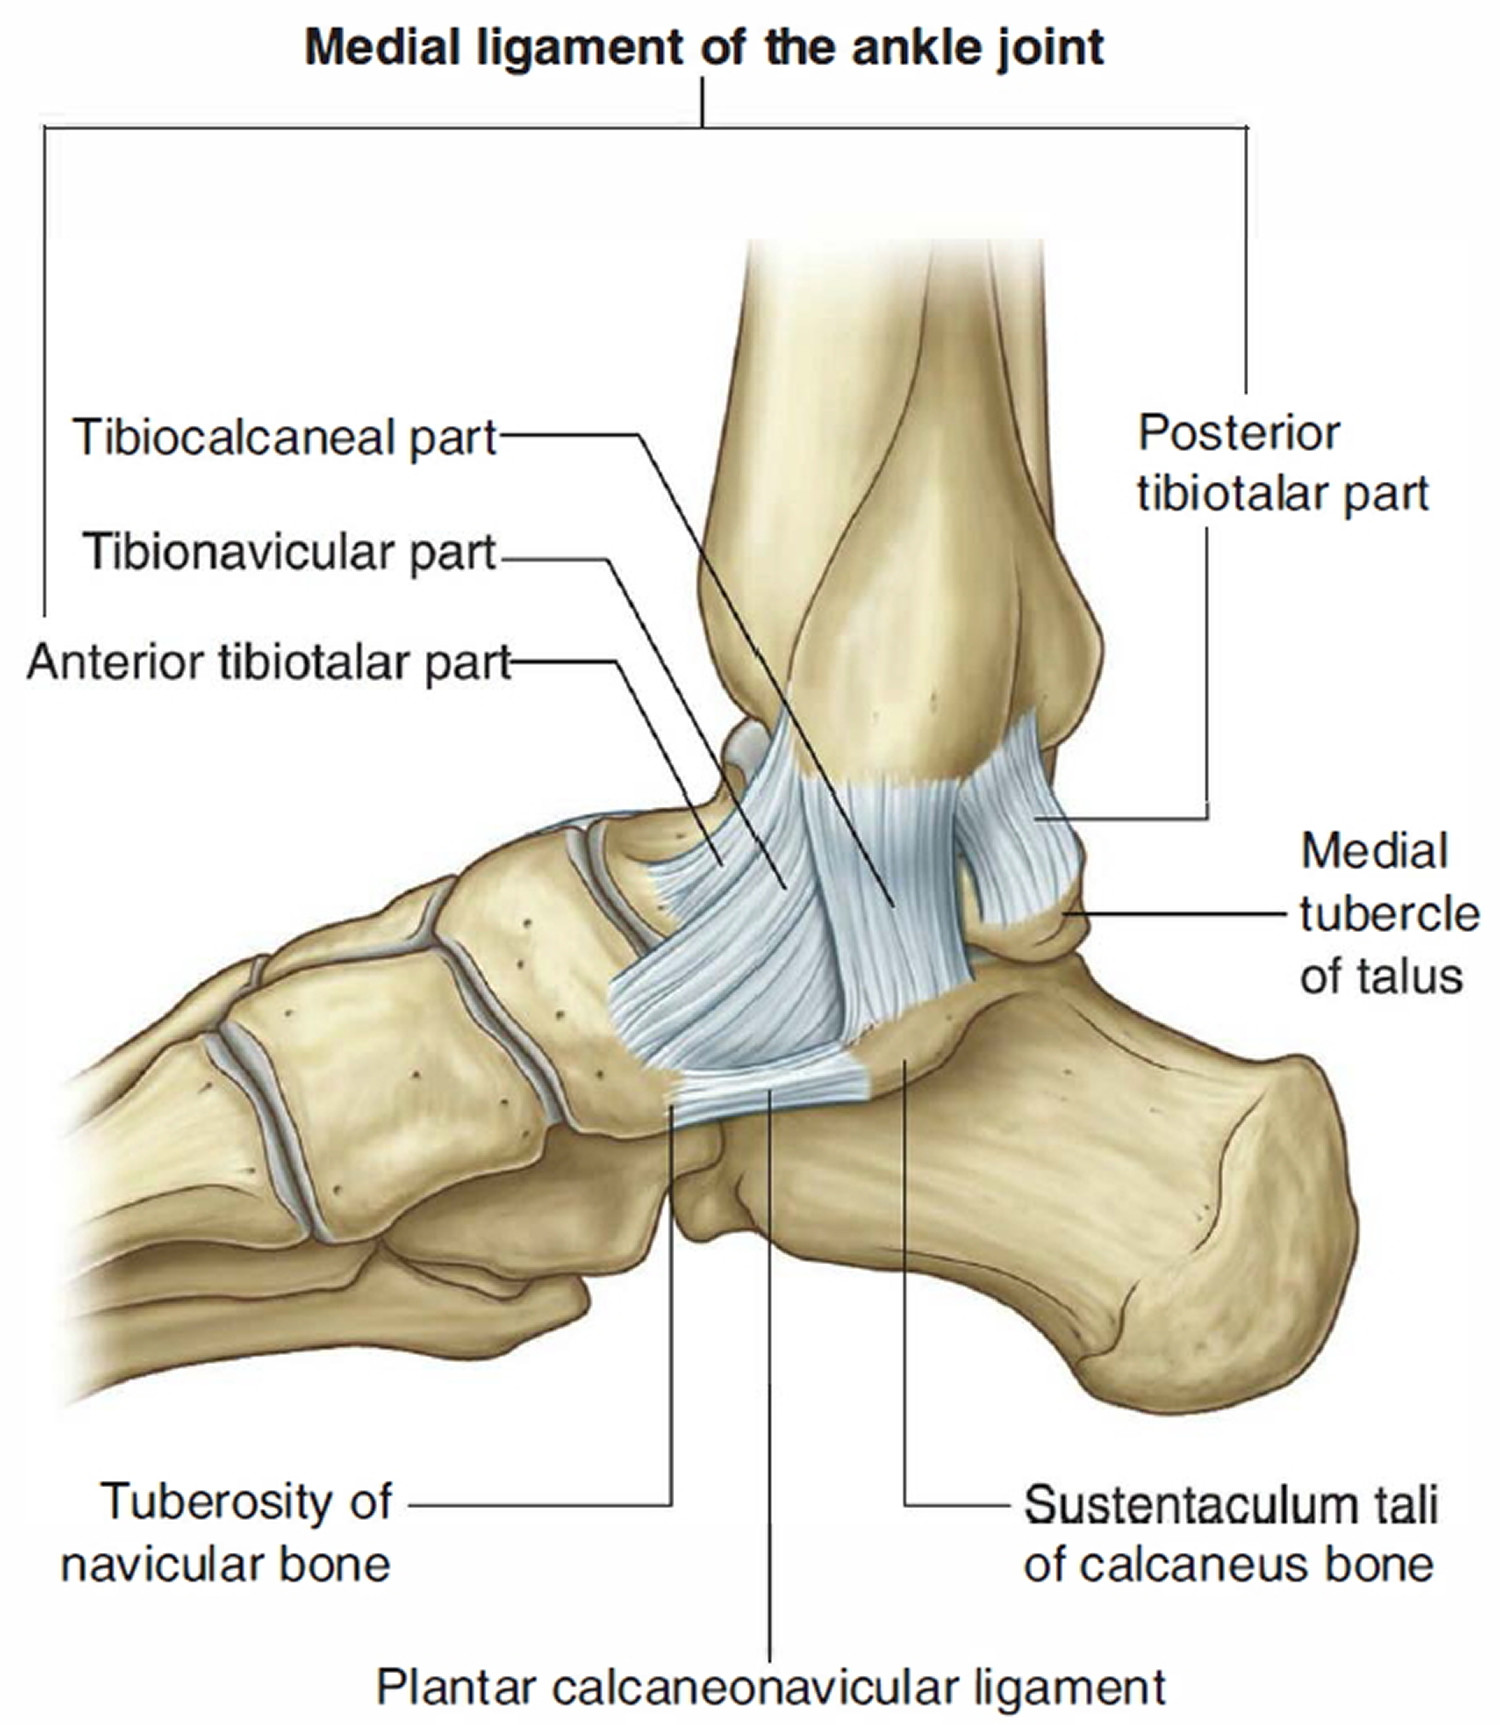
The ligaments of the ankle include (1) anterior and posterior tibiofibular ligaments, which bind the tibia to the fibula; (2) a multipart medial (deltoid) ligament, which binds the tibia to the foot on the medial side; and (3) a multipart lateral (collateral) ligament, which binds the fibula to the foot on the lateral side.
Most sprained ankles occur in the lateral ligaments on the outside of the ankle. Sprains can range from tiny tears in the fibers that make up the ligament to complete tears through the tissue.
The ankle joint is responsible for plantarflexion and dorsiflexion of the ankle. The subtalar joint lies underneath the true ankle joint and is the articulation between the talus and calcaneus. It assists the talo-crural joint in inversion and eversion. Most ankle sprains occur from an inversion mechanism of injury (rolled in).
The calcaneal (Achilles) tendon extends from the calf muscles to the calcaneus. It plantarflexes the foot and limits dorsiflexion. Plantar flexion is limited by extensor tendons on the anterior side of the ankle and by the anterior part of the joint capsule.
The most commonly injured ligaments of the ankle are the lateral ligaments which sit on the outside of the ankle. These include the anterior talofibular ligament, calcaneofibular ligament and posterior talofibular ligament. The ligament on the inside of the ankle is called the deltoid ligament which is much stronger and hence more difficult to injure.
Sprains (torn ligaments and tendons) are common at the ankle, especially when the foot is suddenly inverted or everted to excess. They are painful and usually accompanied by immediate swelling. They are best treated by immobilizing the joint and reducing swelling with an ice pack, but in extreme cases may require a cast or surgery.
High ankle sprains refer to injury to the inferior tibiofibular ligaments and syndesmosis which bind the tibia (shin bone) and fibula (calf bone) together above the ankle. A high ankle sprain is a much more debilitating injury, requiring a longer recovery time.
Figure 1. Ankle joint ligaments

What is Chronic Ankle Sprains?
Once you have sprained your ankle, you may continue to sprain it if the ligaments do not have time to completely heal. It can be hard for patients to tell if a sprain has healed because even an ankle with a chronic tear can be highly functional because overlying tendons help with stability and motion.
If pain continues for more than 4 to 6 weeks, you may have a chronic ankle sprain. Activities that tend to make an already sprained ankle worse include stepping on uneven surfaces and participating in sports that require cutting actions or rolling and twisting of the foot.
Abnormal proprioception—a common complication of ankle sprains—can also lead to repeat sprains. There may be imbalance and muscle weakness that causes a reinjury. If you sprain your ankle over and over again, a chronic situation may persist with instability, a sense of the ankle giving way, and chronic pain. This can also happen if you return to work, sports, or other activities before your ankle heals and is rehabilitated.
How long does a sprained ankle take to heal?
After 2 weeks, most ankle sprains and strains will feel better. Avoid strenuous exercise such as running for up to 8 weeks, as there’s a risk of further damage.
Severe ankle sprains (grade 2 and 3) and strains can take months to get back to normal.
Most importantly, successful outcomes are dependent upon patient commitment to rehabilitation exercises. Incomplete rehabilitation is the most common cause of chronic ankle instability after a sprain. If a patient stops doing the strengthening exercises, the injured ligament(s) will weaken and put the patient at risk for continued ankle sprains.
I sprained my ankle last spring while I was running. The ankle doesn’t really hurt anymore, but it keeps ‘giving out’. What should I do?
Ankle sprains are the most common foot and ankle injury in sports. Typically, sprains occur when the foot inverts with an awkward step while running or jumping. As the foot rotates inward, the ligaments on the outside, or lateral aspect of the ankle, are stretched, causing swelling and pain. Most frequently, sprains will recover completely with rest, ice, compression, elevation and early mobilization.
In less than 10% of cases, while ankle swelling and pain improves, the ankle continues to “give out” or feel unstable. Classically, this occurs when walking on uneven ground or when stepping off of a curb. Repeated episodes of “giving out” is a condition called chronic ankle instability. Most frequently, this is a result of incomplete recovery from an acute ankle sprain that leaves the ankle with weakness and impaired postural control.
The initial treatment for chronic ankle instability is a program of structured rehabilitation with the help of a physical therapist. Exercises are aimed specifically at strengthening the peroneal tendons which run on the outside aspect of the ankle. The regimen should also include use of a balance board or similar device to work on proprioception – awareness of the position of the foot and ankle in space. Improved proprioception helps the ankle react more quickly to stresses, preventing future sprains.
After 6-8 weeks of intensive therapy, if the ankle continues to feel unstable, one might be a candidate for surgery to reconstruct the injured ankle ligaments. At this point, an MRI is helpful to identify any underlying injury such as cartilage damage at the ankle or peroneal tendon tears. Complete recovery from surgery takes at least 3 months, but patients will typically be able to return to full activity without limitation, and, most importantly, without the sensation of their ankle “giving out”.
Grades of Ankle Sprains
After the examination, your doctor will determine the grade of your sprain to help develop a treatment plan. Sprains are graded based on how much damage has occurred to the ligaments.
Some sprained ankles are minor injuries that heal with little treatment. Others can be more serious, though. The three grades of ankle sprains, based on how much damage is done to the ligaments, are (see Figure 2 below):
Figure 2. Sprained ankle grades
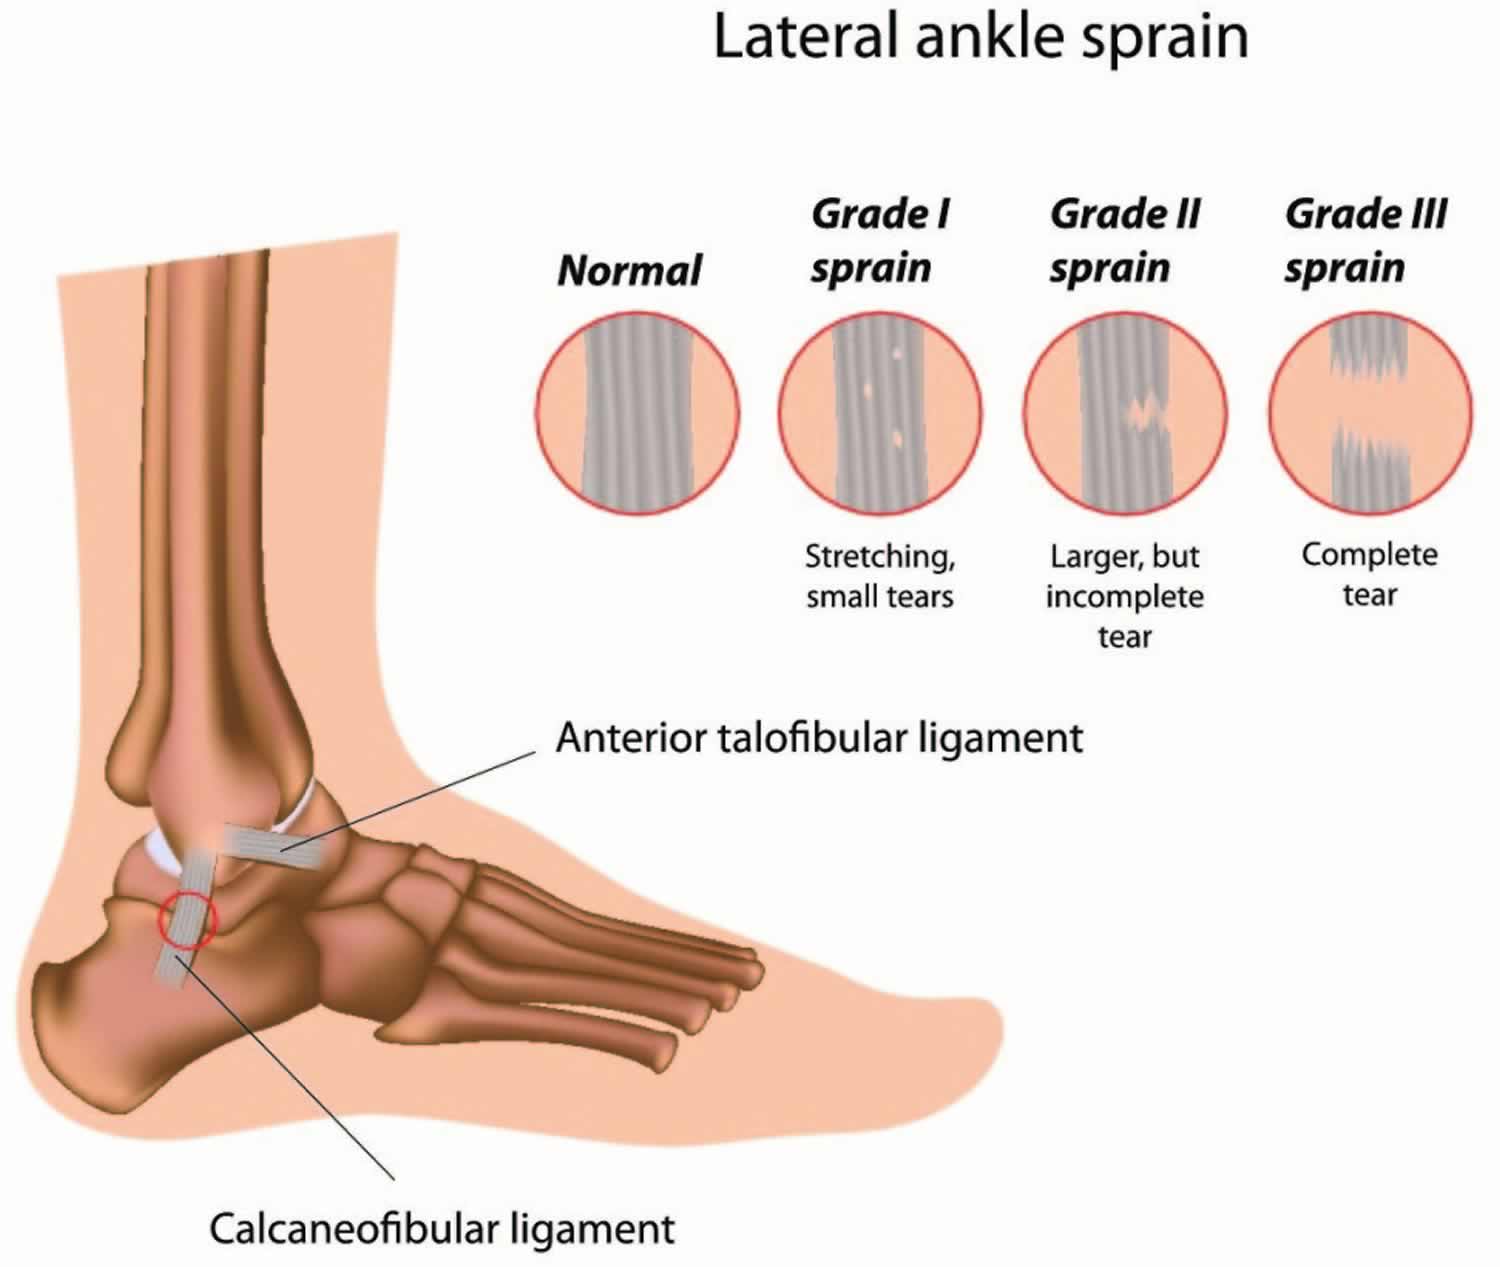
Grade 1 Sprain (Mild)
- This is a mild sprain where ligaments stretch slightly.
- Slight stretching and microscopic tearing of the ligament fibers
- Someone with a grade 1 sprain will feel some soreness and may notice a bit of swelling around the ankle
Grade 2 Sprain (Moderate)
- This is a moderate sprain where ligaments tear partly, making the ankle joint feel loose.
- Partial tearing of the ligament
- Moderate tenderness and swelling around the ankle
- If the doctor moves the ankle in certain ways, there is an abnormal looseness of the ankle joint
- The ankle will feel painful, and may stay swollen for a while. Putting weight on the foot can be difficult.
Grade 3 Sprain (Severe)
- This is the most severe kind of sprain, where an ankle ligament tears completely.
- Complete tear of the ligament
- Significant tenderness and swelling around the ankle
- If the doctor pulls or pushes on the ankle joint in certain movements, substantial instability occurs
- The ankle joint will be very painful, with quite a bit of swelling. The person’s ankle will feel loose and unsteady and early on the person probably won’t be able to put any weight on the ankle.
- If there is a complete tear of the ligaments, the ankle may become unstable after the initial injury phase passes. Over time, this instability can result in damage to the bones and cartilage of the ankle joint.
Tell your doctor what you were doing when you sprained your ankle. He or she will examine it and may want an x-ray to make sure no bones are broken. Most ankle sprains do not require surgery, and minor sprains are best treated with a functional rehabilitation program.
If you repeatedly sprain the same ankle or feel pain for more than 4 to 6 weeks, you may have what’s called a chronic sprain. This type of lasting sprain can flare up and be made worse by activities that involve rolling or twisting the feet, like running, dancing, or playing sports.
Sprained ankle causes
A sprain occurs when your ankle is forced to move out of its normal position, which can cause one or more of the ankle’s ligaments to stretch, partially tear or tear completely.
The most common type of sprained ankle is called an inversion sprain, or lateral ligament sprain. With this type of sprain, the ankle turns so the sole of the foot is facing inwards, stretching and possibly damaging the ligaments on the outer part of the ankle.
You don’t have to be playing hard to injure an ankle: sprains can happen just from taking an awkward step or tripping on the stairs.
Causes of a sprained ankle might include:
- A fall that causes your ankle to twist
- Landing awkwardly on your foot after jumping or pivoting
- Walking or exercising on an uneven surface
- Another person stepping or landing on your foot during a sports activity, while you are running, causing your foot to twist or roll to the side
- Participating in sports that require cutting actions or rolling and twisting of the foot—such as trail running, basketball, tennis, football, and soccer.
Risk factors for sprained ankle
Factors that increase your risk of a sprained ankle include:
- Sports participation. Ankle sprains are a common sports injury, particularly in sports that require jumping, cutting action, or rolling or twisting of the foot such as basketball, tennis, football, soccer and trail running.
- Uneven surfaces. Walking or running on uneven surfaces or poor field conditions may increase the risk of an ankle sprain.
- Prior ankle injury. Once you’ve sprained your ankle or had another type of ankle injury, you’re more likely to sprain it again.
- Poor physical condition. Poor strength or flexibility in the ankles may increase the risk of a sprain when participating in sports.
- Improper shoes. Shoes that don’t fit properly or aren’t appropriate for an activity, as well as high-heeled shoes in general, make ankles more vulnerable to injury.
Sprained ankle prevention
The following tips can help you prevent a sprained ankle or a recurring sprain:
- Warm up before you exercise or play sports.
- Be careful when walking, running or working on an uneven surface.
- Use an ankle support brace or tape on a weak or previously injured ankle.
- Wear shoes that fit well and are made for your activity.
- Minimize wearing high-heeled shoes.
- Don’t play sports or participate in activities for which you are not conditioned.
- Maintain good muscle strength and flexibility.
- Slow down or stop activities when you feel pain or fatigue.
- Practice stability training, including balance exercises.
Signs and symptoms of ankle sprains
Signs and symptoms of a sprained ankle vary depending on the severity of the injury. If your child has sprained their ankle, they may have:
- Swelling, which develops in minutes or over several hours – this is caused by soft tissue damage
- Pain around the outside part of the ankle joint
- Bruising, which shows up within two to three days
- Ankle pain, especially when you bear weight on the affected foot
- Tenderness when you touch the ankle (injured ligaments will be quite tender to touch in that initial phase)
- Restricted range of motion
- Instability in the ankle
- If there is severe tearing of the ligaments, your child might also hear or feel a “pop” when the sprain occurs.
- In the cases of a severe ankle sprain, your child may have difficulty walking and may require the use of crutches to mobilize.
Symptoms of a severe sprain are similar to those of a broken bone and require prompt medical evaluation.
Sprained ankle complications
Failing to treat a sprained ankle properly, engaging in activities too soon after spraining your ankle or spraining your ankle repeatedly might lead to the following complications:
- Chronic ankle pain
- Chronic ankle joint instability
- Arthritis in the ankle joint
Kids sprained ankle diagnosis
During a physical, your doctor will examine your ankle, foot and lower leg. The doctor will touch the skin around the injury to check for points of tenderness and move your foot to check the range of motion and to understand what positions cause discomfort or pain.
Depending on how many ligaments are injured, your sprain will be classified as Grade 1, 2 or 3. In a mild sprain (grade 1), the ankle ligament simply is overstretched. More severe ankle sprains can involve partial tearing of the ankle ligament (grade 2), or complete tearing (grade 3).
If the injury is severe, your doctor may recommend one or more of the following imaging scans to rule out a broken bone or to evaluate in more detail the extent of ligament damage:
- X-ray. During an X-ray, a small amount of radiation passes through your body to produce images of the bones of the ankle. This test is good for ruling out bone fractures.
- Stress x-rays. In addition to plain X-rays, your doctor may also order stress X-rays. These scans are taken while the ankle is being pushed in different directions. Stress X-rays help to show whether the ankle is moving abnormally because of injured ligaments.
- Magnetic resonance imaging (MRI). MRIs use radio waves and a strong magnetic field to produce detailed cross-sectional or 3-D images of soft internal structures of the ankle, including ligaments. Your doctor may order an MRI if he or she suspects a very severe injury to the ligaments, damage to the cartilage or bone of the joint surface, a small bone chip, or another problem. The MRI may not be ordered until after the period of swelling and bruising resolves.
- CT scan. CT scans can reveal more detail about the bones of the joint. CT scans take X-rays from many different angles and combine them to make cross-sectional or 3-D images.
- Ultrasound. An ultrasound uses radio waves to produce real-time images. These images may help your doctor judge the condition of a ligament or tendon when the foot is in different positions.
How to treat a sprained ankle yourself
See your doctor if your child has pain and swelling in his ankle and you suspect a sprain. Self-care measures may be all you need, but talk to your doctor to discuss whether your child should have his ankle evaluated. If signs and symptoms are severe, your child may have significant damage to a ligament or a broken bone in his ankle or lower leg.
Care at home
If your child has sprained their ankle, you can care for them at home using first aid principles (the Rest, Ice, Compression, Elevation (RICE) strategy) and ankle exercises. For a Grade 1 sprained ankle, follow the R.I.C.E. guidelines to help bring down swelling and support the injury. Treatment should start immediately and continue for the next two to three days.
- Rest: rest the ankle by not walking on it and avoid activities that cause a lot of pain. If your child is having difficulty walking, crutches should be used. You can hire crutches from your local pharmacy.
- Ice: apply ice to the injured area for 10–15 minutes. Never place the ice directly on the skin because it can burn the skin – wrap the ice or ice pack in a tea towel or a pillow case. Ice the injury every two to four hours for two to three days, when your child is awake. You can make an ice pack using a plastic bag with some ice and water in it. This moulds better to the ankle joint area than ice alone. Don’t ice more than 20 minutes every 2 to 3 hours at a time to avoid frost bite.
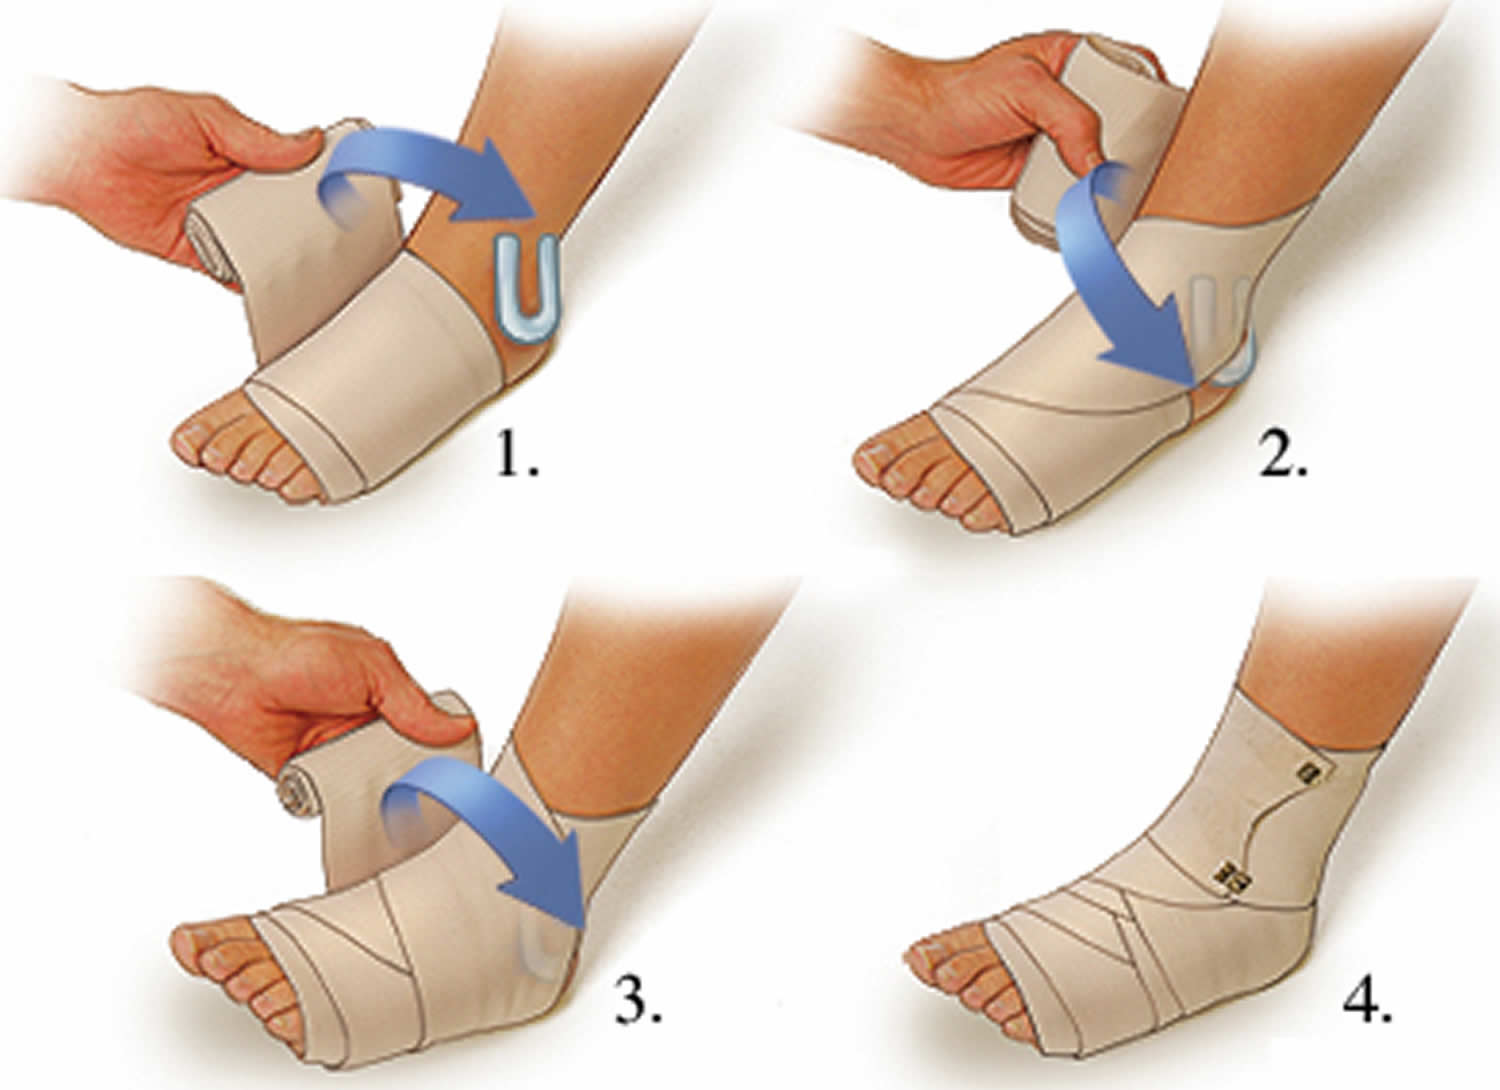
- Compression: wrap a firm bandage that is not too tight and does not stop circulation or cause extra pain. The bandage should cover from just above the ankle right down to the foot. Do not cover the toes.
- Elevation: raise the ankle whenever possible to help reduce the swelling. For example, raise your child’s injured leg and rest it on some pillows while they are watching TV, reading or resting.
Some children will need medicine to help with the pain. In most cases, acetaminophen (paracetamol) is enough. Anti-inflammatory medications may help, but these are not suitable for every child. Ask your doctor for further advice. Always read and follow the instructions on the package for the appropriate dose of medication for your child. See our fact sheet Pain relief for children.
Figure 3. How to wrap a sprained ankle
In the first two to three days after your child’s injury, avoid:
- heat (e.g. heat packs or hot baths) – this increases blood flow and makes the swelling worse
- re-injury – protect the ankle joint from re-injury by keeping weight off it and moving carefully
- massage – this promotes blood flow and makes the swelling worse.
Swelling usually goes down with a few days.
- Take nonsteroidal anti-inflammatory drugs (NSAIDs). Ibuprofen and other non-steroidal anti-inflammatory drugs (NSAIDs) can help relieve pain and reduce swelling in the ankle.
- Crutches. In most cases, swelling and pain will last from 2 to 3 days. Walking may be difficult during this time and your doctor may recommend that you use crutches as needed.
- Avoid activities that put pressure on your ankle. Don’t play sports that require running, cutting, or stopping quickly until your doc says it’s OK. Don’t hike, jog, or exercise on uneven surfaces until the ankle is properly healed.
- Do stretching and strengthening exercises. After the pain and swelling have improved, ask your doctor about an exercise program to improve your ankle’s strength and flexibility. Depending on the severity of the sprain, the doctor may recommend physical therapy to help the healing process.
- Immobilization. During the early phase of healing, it is important to support your ankle and protect it from sudden movements. For a Grade 2 sprain, a removable plastic device such as a cast-boot or air stirrup-type brace can provide support. Grade 3 sprains may require a short leg cast or cast-brace for 2 to 3 weeks.
For a Grade 2 sprained ankle, follow the R.I.C.E. guidelines and allow more time for healing. A doctor may immobilize or splint your sprained ankle.
A Grade 3 sprained ankle puts you at risk for permanent ankle instability. Rarely, surgery may be needed to repair the damage, especially in competitive athletes. For severe ankle sprains, your doctor may also consider treating you with a short leg cast for two to three weeks or a walking boot. People who sprain their ankle repeatedly may also need surgical repair to tighten their ligaments.
Doctors usually try immobilization and other treatments before recommending surgery. But if your doctor decides surgery is the best option, he or she may start with arthroscopy. This involves inserting a small camera device into the joint through a tiny cut. It allows the doctor to look inside the joint to see what’s going on — like if part of the ligament is caught in the joint or there are bone fragments in the joint — and treat it if necessary.
In very rare cases, doctors will recommend surgery to reconstruct a torn ligament. It’s unlikely that most teens will need this type of surgery for a sprained ankle, though. Your body will probably heal on its own as long as you don’t overdo it too quickly.
Not overdoing things is key when it comes to sprained ankle. So follow your doctor’s advice and don’t push yourself or feel pressure to get back into sports or other activities too soon. Sprains usually heal well, but they need time to get fully better.
Rehabilitating your sprained ankle
Every ligament injury needs rehabilitation. Otherwise, your sprained ankle might not heal completely and you might re-injure it. All ankle sprains, from mild to severe, require three phases of recovery:
- Phase 1 includes resting, protecting and reducing swelling of your injured ankle.
- Phase 2 includes restoring your ankle’s flexibility, range of motion and strength.
- Phase 3 includes maintenance exercises and the gradual return to activities that do not require turning or twisting the ankle. This will be followed later by being able to do activities that require sharp, sudden turns (cutting activities)—such as tennis, basketball, or football.
This three-phase treatment program may take just 2 weeks to complete for minor sprains, or up to 6 to 12 weeks for more severe injuries.
Once you can stand on your ankle again, your doctor will prescribe exercise routines to strengthen your muscles and ligaments and increase your flexibility, balance and coordination. Later, you may walk, jog and run figure eights with your ankle taped or in a supportive ankle brace.
It’s important to complete the rehabilitation program because it makes it less likely that you’ll hurt the same ankle again. If you don’t complete rehabilitation, you could suffer chronic pain, instability and arthritis in your ankle. If your ankle still hurts, it could mean that the sprained ligament has not healed right, or that some other injury also happened.
To prevent future sprained ankles, pay attention to your body’s warning signs to slow down when you feel pain or fatigue, and stay in shape with good muscle balance, flexibility and strength in your soft tissues.
Sprained ankle exercises
Rehabilitation exercises are used to prevent stiffness, increase ankle strength, and prevent chronic ankle problems.
- Early motion. To prevent stiffness, your doctor or physical therapist will provide you with exercises that involve range-of-motion or controlled movements of your ankle without resistance.
- Strengthening exercises. Once you can bear weight without increased pain or swelling, exercises to strengthen the muscles and tendons in the front and back of your leg and foot will be added to your treatment plan. Water exercises may be used if land-based strengthening exercises, such as toe-raising, are too painful. Exercises with resistance are added as tolerated.
- Proprioception (balance) training. Poor balance often leads to repeat sprains and ankle instability. A good example of a balance exercise is standing on the affected foot with the opposite foot raised and eyes closed. Balance boards are often used in this stage of rehabilitation.
- Endurance and agility exercises. Once you are pain-free, other exercises may be added, such as agility drills. Running in progressively smaller figures-of-8 is excellent for agility and calf and ankle strength. The goal is to increase strength and range of motion as balance improves over time.
How to Stretch Your Ankle After A Sprain
You should perform the following stretches in stages once the initial pain and swelling have receded, usually within five to seven days. First is restoration of ankle range of motion, which should begin when you can tolerate weight bearing.
Once ankle range of motion has been almost or completely restored, you must strengthen your ankle. Along with strengthening, you should work toward a feeling of stability and comfort in your ankle, which orthopaedic foot and ankle specialists call proprioception.
Consider these home exercises when recuperating from an ankle sprain. Perform them twice per day.
- While seated, bring your ankle and foot all the way up as much as you can.
- Do this slowly, while feeling a stretch in your calf.
- Hold this for a count of 10.
- Repeat 10 times.
- From the seated starting position, bring your ankle down and in.
- Hold this inverted position for a count of 10.
- Repeat 10 times.
- Again from the starting position, bring your ankle up and out.
- Hold this everted position for a count of 10.
- Repeat 10 times.
- From the starting position, point your toes down and hold this position for a count of 10.
- Repeat 10 times.
This stretch should be done only when the pain in your ankle has significantly subsided.
- While standing on the edge of a stair, drop your ankles down and hold this stretched position for a count of 10.
- Repeat 10 times.
- Stand 12 inches from a wall with your toes pointing toward the wall.
- Squat down and hold this position for a count of 10.
- Repeat 10 times.
How to Strengthen Your Ankle After a Sprain
Following an ankle sprain, strengthening exercises should be performed once you can bear weight comfortably and your range of motion is near full. There are several types of strengthening exercises. The easiest to begin with are isometric exercises that you do by pushing against a fixed object with your ankle.
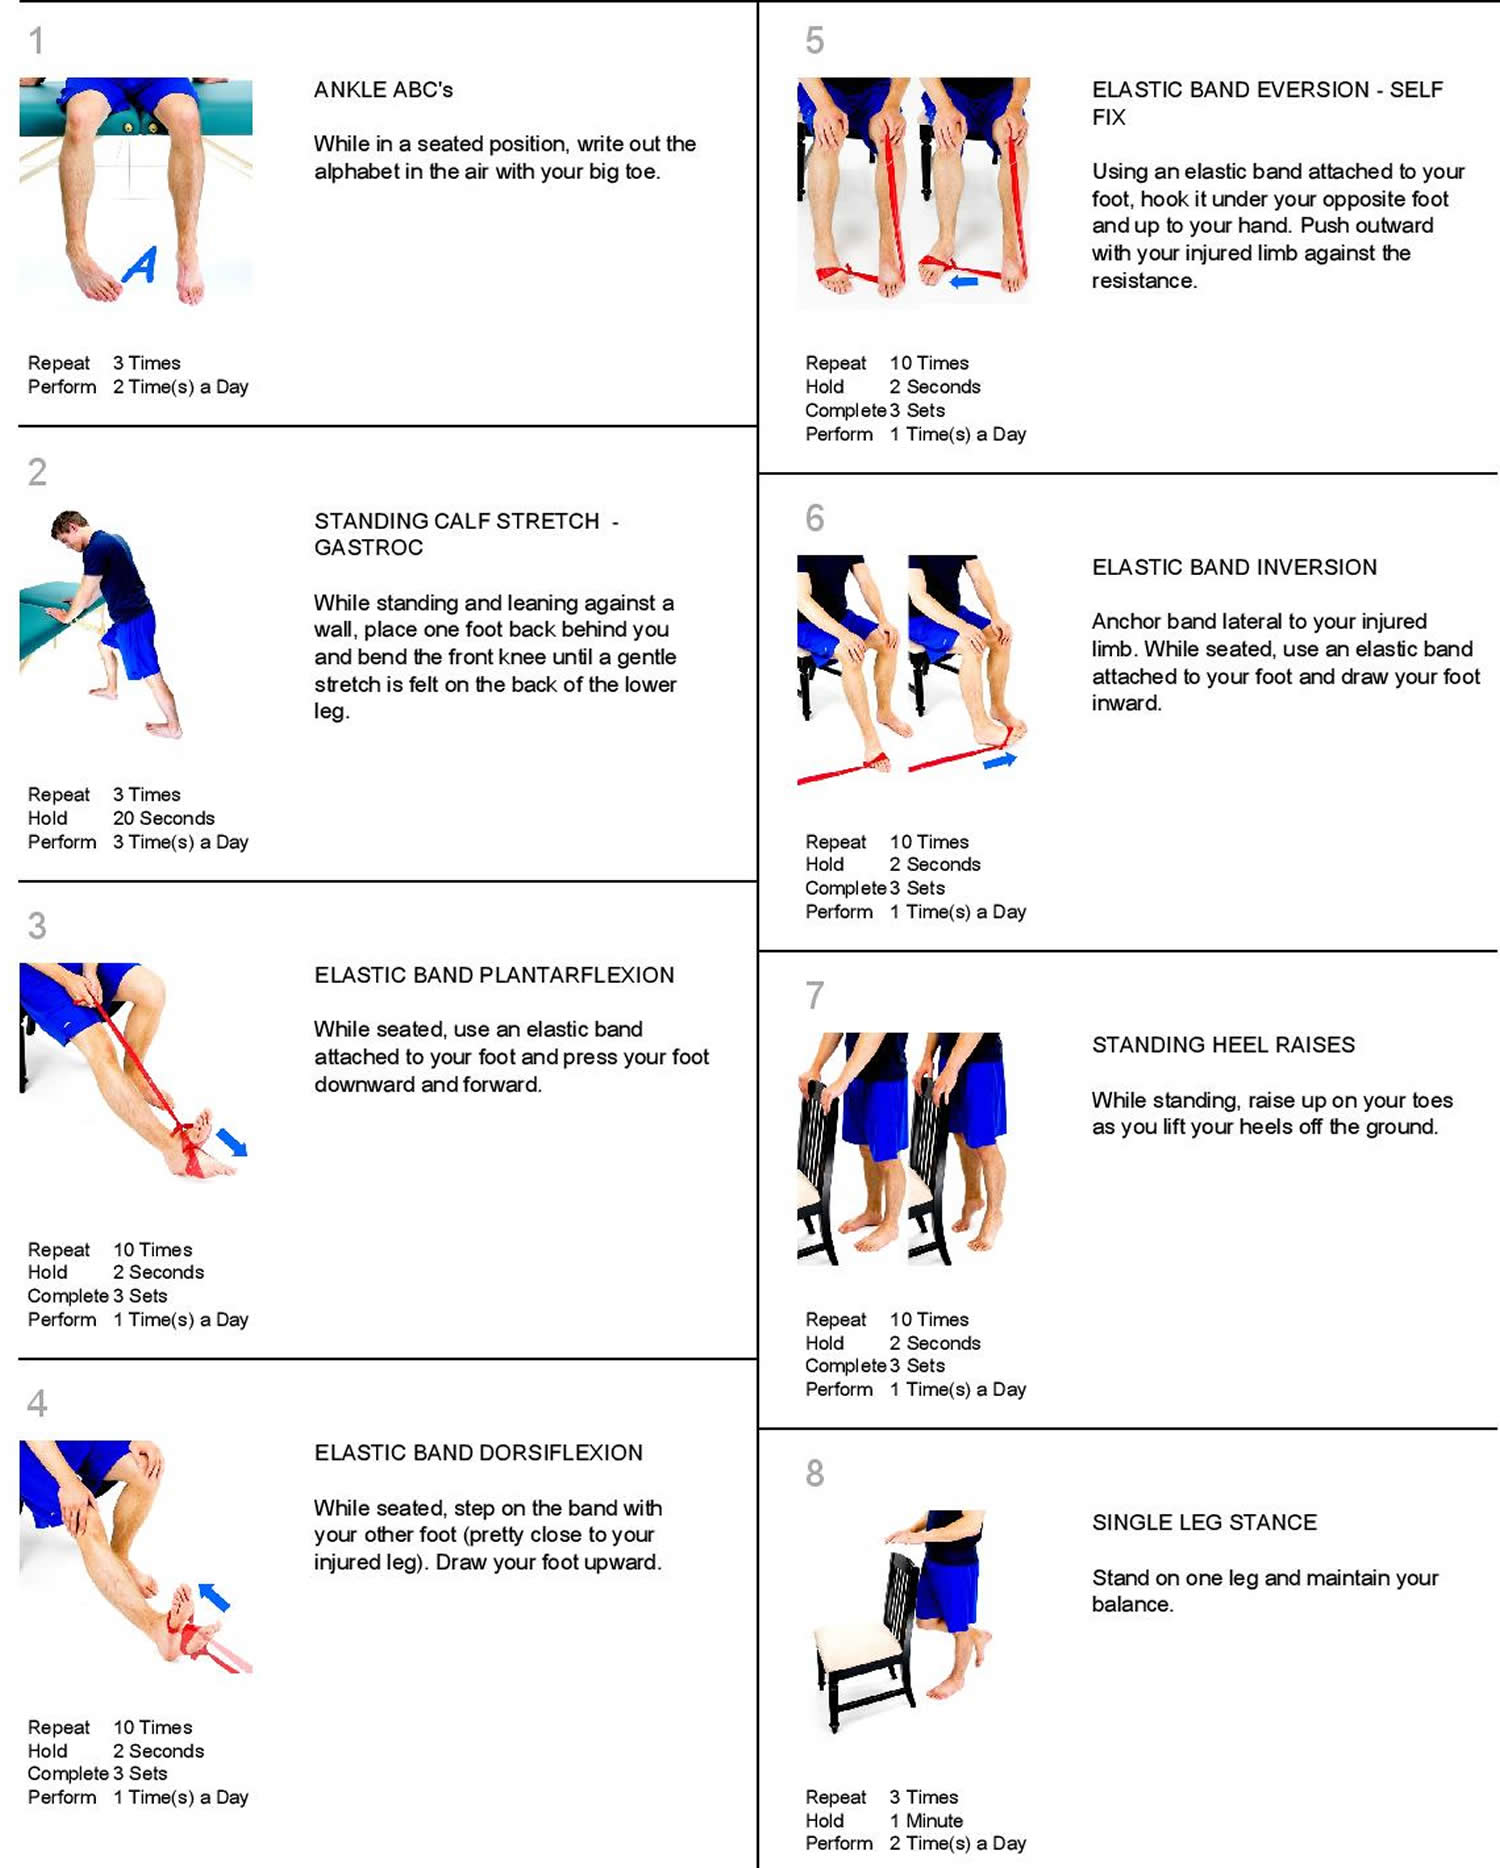
Once this has been mastered, you can progress to isotonic exercises, which involve using your ankle’s range of motion against some form of resistance. The photos below show isotonic exercises performed with a resistance band, which you can get from your local therapist or a sporting goods store.
Figure 4. Sprained ankle exercises
Range of Motion
- Ankle Alphabet: Spell out each letter of the alphabet with your foot, keeping your leg still while moving at the ankle. Use the biggest movements your ankle allows to go through the whole thing, A-Z.
- Calf Stretches: As soon as you can, start stretching your calves by putting the injured leg behind you, keeping your leg straight, and leaning pushing on a wall. If you can’t tolerate standing on your injured foot, straighten your leg by propping it up on a chair, or while sitting on your bed, then use a towel to pull the ball of your foot towards you. Hold for 30 seconds and repeat 3 times.
Strengthening
- Resisted 4-Way Ankle Holds: As pain allows, use a resistance band or towel to work against while you pull your ankle as far as you can in all 4 directions: up, down, inverted (top of foot towards the outside) and everted (sole of the foot towards the outside). Hold for 10 seconds, 5 times in each direction.
- Heel Raises: Once you can bear weight on your foot, stand on the ground and slowly raise your heels off as far as you can, hold for 5 seconds then slowly lower back down. Do 3 sets of 10 reps. You can progress this by standing half-way on a stair with both heels hanging off. Allow your heels to drop below the stair as you come down, holding that position for 5 seconds before rising back up (this can be a great way to stretch your calves too). Once you’re feeling really strong, switch to just using one foot at a time, rinse and repeat.
Balance
- Single Leg Stands: Stand on one foot (once you can tolerate it) while working up to balancing for 30 seconds. If needed, stand next to a chair or wall for support. Make it even tougher by closing your eyes, then progress to standing on a pillow to destabilize you. Stand with your affected leg on a pillow. Hold this position for a count of 10. Repeat 10 times.
- Advanced Balance Training: Once you’ve mastered single leg stands, you can really get your balance on by standing on one leg (yes, again) and putting both arms straight up above your head. Now slowly bend forward at the waist (keeping your back straight) as far as you can while keeping your balance. Not so easy, right? Try bending backwards as far as you can (hands still above your head), then to the left and to the right. Finally you can slowly twist to the left and right all while keeping balanced and tight in your core.
These same exercises that you’ve used to rehab your ankle can serve to strengthen it for future protection against another sprain. Progressing to longer periods of balancing and more reps on your resisted exercises will keep you strong and in tune with your ankle for years to come.
Once you have regained the motion and strength in your ankle, you are ready for sporting activities such as gentle jogging and biking. After you feel your ankle strength is approximately 80% of your other side, then you can begin cutting or twisting sports.
Using a brace or getting your ankle wrapped during risky activities will also help prevent future ankle sprains by adding increased support to your injured ligaments, even once they’ve healed. Whether the brace is soft or hard, find something comfortable and supportive that you’re willing to use each time you lace up your sport shoes.
Surgery
In rare cases, surgery is performed when the injury doesn’t heal or the ankle remains unstable after a long period of physical therapy and rehabilitative exercise.
Surgery may be performed to:
- Repair a ligament that won’t heal
- Reconstruct a ligament with tissue from a nearby ligament or tendon
Surgical options may include:
- Arthroscopy. During arthroscopy, your doctor uses a small camera, called an arthroscope, to look inside your ankle joint. Miniature instruments are used to remove any loose fragments of bone or cartilage, or parts of the ligament that may be caught in the joint.
Reconstruction. Your doctor may be able to repair the torn ligament with stitches or sutures. In some cases, he or she will reconstruct the damaged ligament by replacing it with a tissue graft obtained from other ligaments and/or tendons found in the foot and around the ankle.
- Immobilization. There is typically a period of immobilization following surgery for an ankle sprain. Your doctor may apply a cast or protective boot to protect the repaired or reconstructed ligament. Be sure to follow your doctor’s instructions about how long to wear the protective device; if you remove it too soon, a simple misstep can re-tear the fixed ligament.
Rehabilitation
Rehabilitation after surgery involves time and attention to restore strength and range of motion so you can return to pre-injury function. The length of time you can expect to spend recovering depends upon the extent of injury and the amount of surgery that was done. Rehabilitation may take from weeks to months.


