close

Procedures

Procedures

Dental implants

dental-implant-surgery

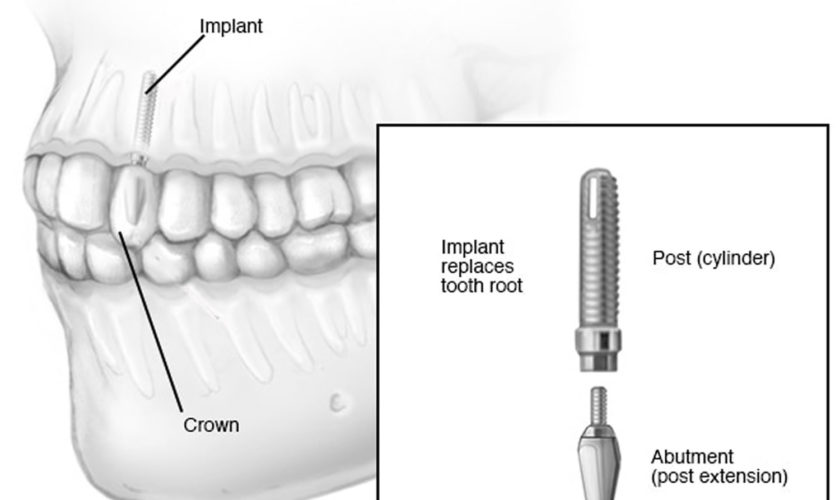
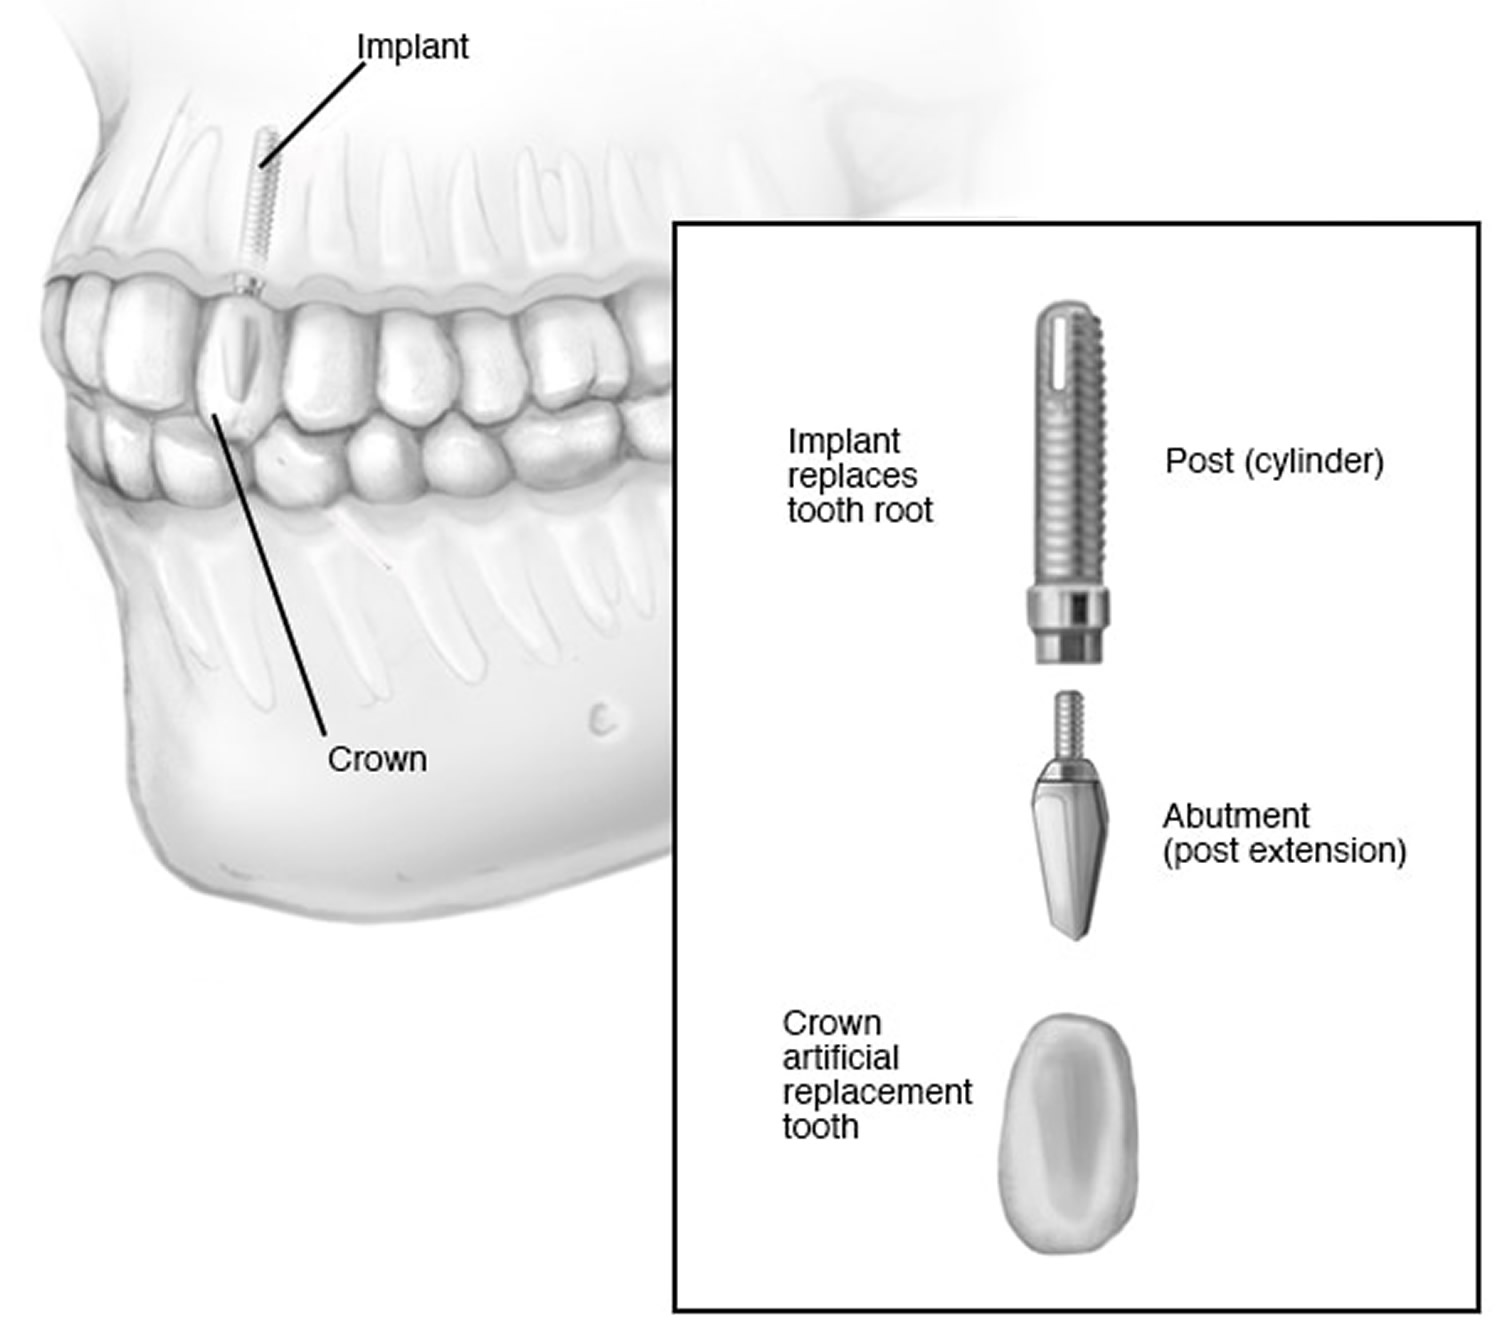
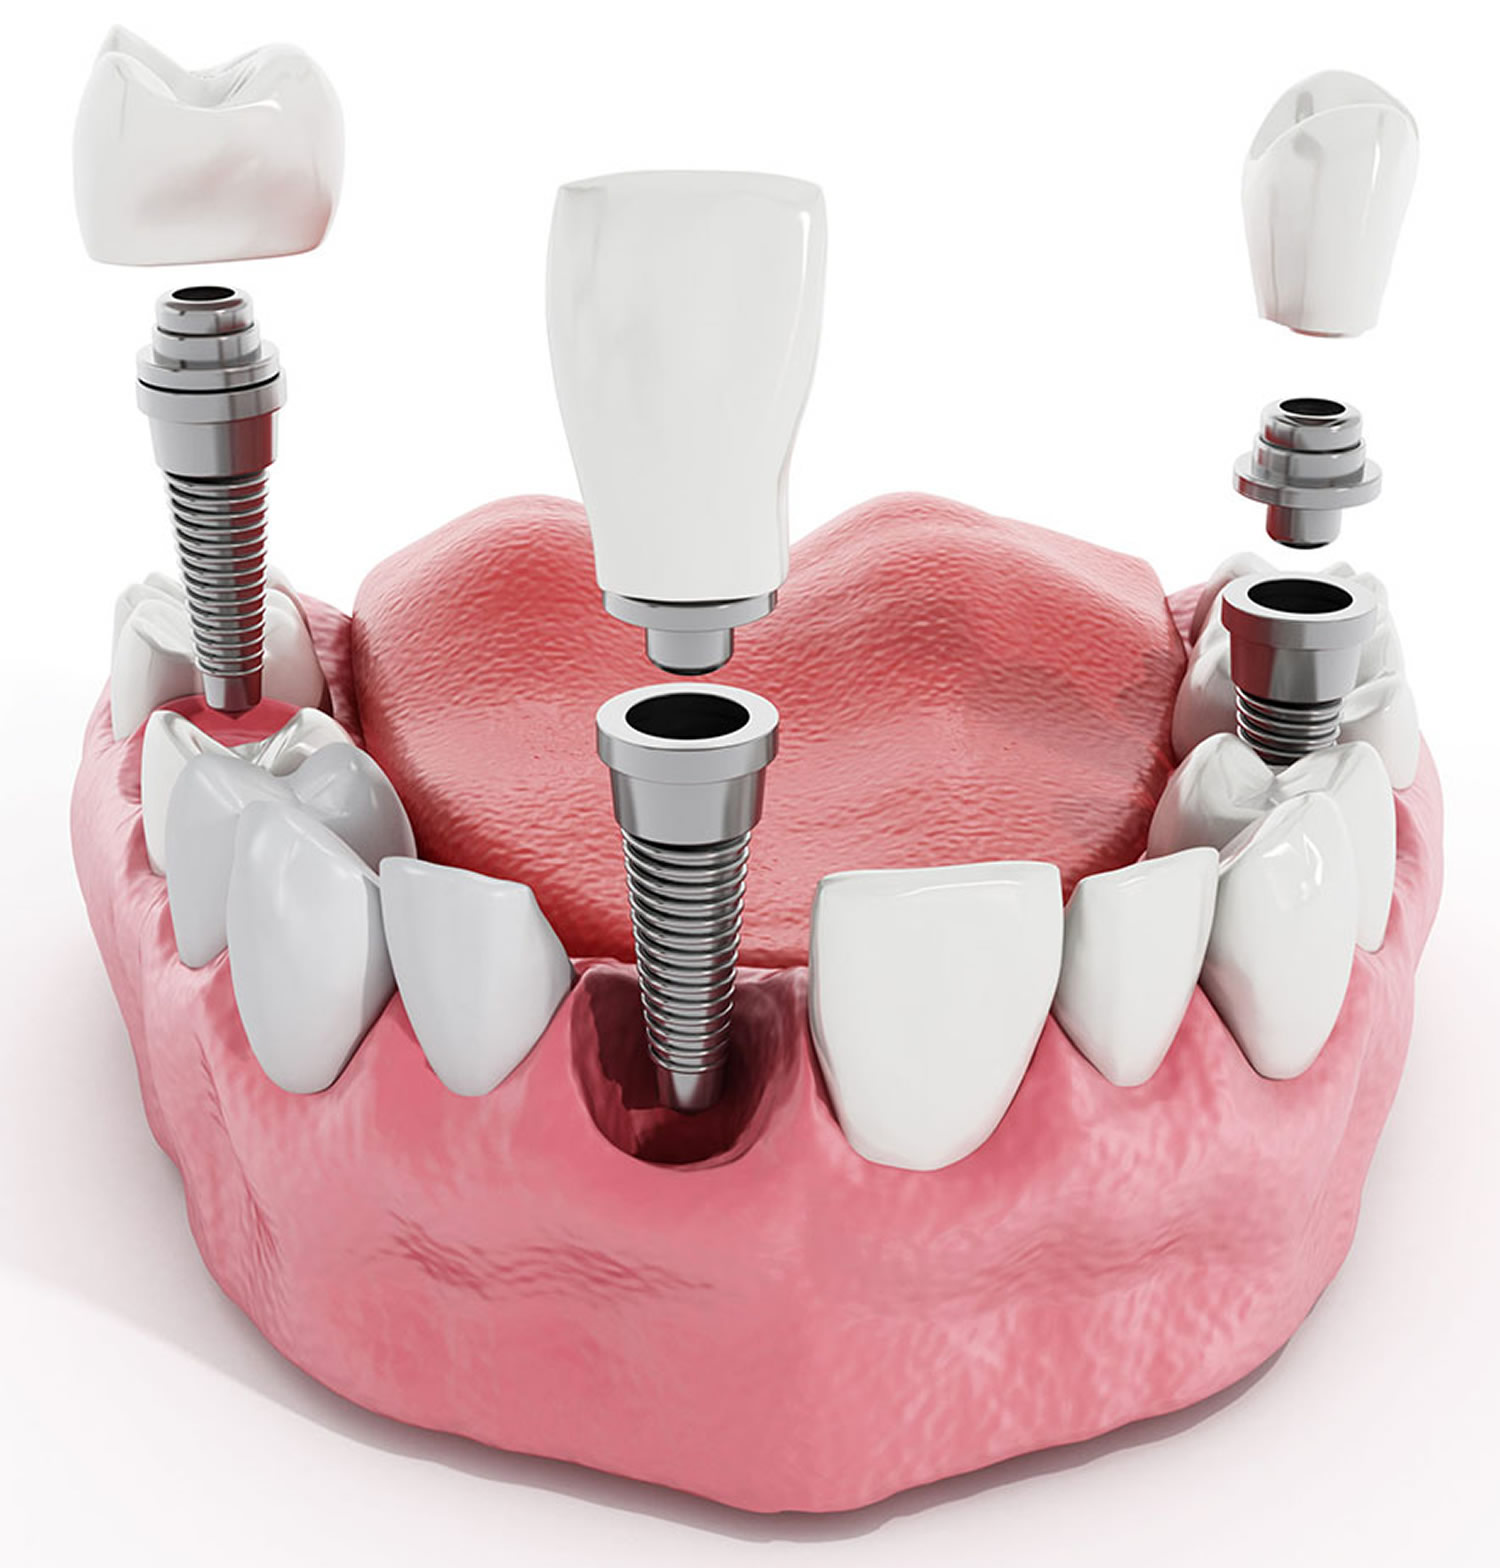
What are dental implants

A dental implant is a dental procedure to replace a missing tooth, to support one or more false teeth (dentures). Unlike dentures, which are false teeth that you can easily remove, dental implants are placed in your jawbone in a series of minor operations. A dental implant is a piece of metal titanium that looks like a screw and is put into the jawbone that can replace the root of a tooth when it fails. Over time, bone grows around the dental implant, which helps to hold it in place. Once the dental implant integrates to your bone, a structure called an abutment is connected to the implant and then the artificial tooth/teeth are attached to the metal dental implant to fill in the gap left by the missing tooth. The crown is specially made to look like your other teeth in size, shape and color. Most dental implants look exactly like natural teeth. Dental implants can also be used to hold a dental bridge or dentures in place.

Titanium is “biocompatible”, meaning it is not rejected by the body and the metal will fuse with the surrounding living bone. Dental implants can last a lifetime and can improve your appearance, your confidence, and your ability to eat the foods you like, and participate in an active lifestyle, without worrying about your teeth. Dental implants are made of titanium and can never get dental decay.

If you have a single tooth missing, you will need an implant to support it. If you have a number of teeth missing, and these are next to each other, you could still have one implant for each tooth. Or you may find that, if you have two or more implants, they may be able to support more than one tooth each. Your dentist will talk to you about the best option for you.

There are 3 parts to an “implant tooth”: the dental implant itself, the abutment, and the artificial tooth. State-of-the-art technology makes it possible for these implant-supported replacement teeth to look, feel, and function like natural teeth. Dental implants are available privately but can be expensive – costing in the thousands of dollars, rather than hundreds of dollars. Make sure you know all the costs before you start. If you have private health insurance, ask the insurance company how much of your dental implant costs they’ll cover.

A dental implant is usually done in stages over a few months, with a series of minor operations and tests.

  • You’ll need scans and x-rays to give the dentist a very clear picture of where to place the implant.
  • You’ll have a minor operation to have the dental implant put in your jawbone. You will usually be given an anesthetic so that you don’t feel pain during the surgery.
  • You wait for a few months while the bone grows around the dental implant.
  • Once the implant is stable, your dentist will create a foundation for your new tooth.
  • Some time later, your dentist will take a mould of your mouth to make the artificial tooth or teeth.
  • Finally, the artificial tooth or teeth are screwed or cemented into the foundation.

It’s a slow process, with quite a few visits to the dentist and possibly some trips to have scans or x-rays done.

There are many types of dental implants and many ways to use dental implants to achieve your goals of a pleasing smile and good chewing function. Visit with your dentist or prosthodontist to find out how dental implants can improve your life and if you are a good candidate for dental implants. Be aware that not all general dentists and dental specialists perform dental implant therapy in their practice. Dental implants like all dental procedures require dental education and additional training. A prosthodontist is a specialist with an additional three years of training after dental school who focuses on the restoration and replacement of teeth, including dentures for even the most complex cases. A prosthodontist also will be able to help determine if another treatment option might be more suited to your particular situation.

In general, dental implants may be right for you if you:

  • Have one or more missing teeth
  • Have a jawbone that’s reached full growth
  • Have adequate bone to secure the implants or are able to have a bone graft
  • Have healthy oral tissues
  • Don’t have health conditions that will affect bone healing
  • Are unable or unwilling to wear dentures
  • Ill-fitting and loose dentures
  • Want to improve your speech
  • Are willing to commit several months to the process

Most patients find that a dental implant is secure, stable and a good replacement for their own tooth.

In children dental implant is usually deferred until their jaw growth is complete. There are, however, some instances when a dental implant may be appropriate, such as when it is part of the child’s orthodontic treatment plan. Your family dentist or orthodontist can guide you in this instance.

Dental implants are usually successful. Complications are rare but include:

  • infection
  • injury or damage to surrounding teeth or blood vessels
  • nerve damage
  • sinus problems.

Pros And Cons of Dental Implants

Every procedure has both pros and cons, and dental implants are no exception, although they’re completely safe. Here are the biggest upsides and downsides of getting an implant.

Pros

Unlike traditional dentures, dental implants are placed into and integrate with your jawbone. This gives them enough support for the artificial tooth to withstand the same amount of pressure as natural teeth and not slide or shift.
After your mouth has healed post-surgery, dental implants are usually more comfortable than standard dentures or bridges. Implants don’t require any surgery or removal of any teeth except the affected or damaged teeth, as is the case with your typical denture or teeth bridge.

On top of all this, having a dental implant can help preserve the bone in your jaw. When teeth are missing for a long time, the jawbone begins to deteriorate. This can deform your entire jaw and, in turn, your facial structure.

Cons

The biggest negative to getting an implant is the cost. Average cost of dental implant is about $1,000-3,000. And in many cases, dental insurance will not cover the procedure as they may categorize it as a “cosmetic” elective procedure.

Unfortunately, dental implants are not perfect. They can fail for a number of reasons, including smoking, an autoimmune disease, or infection. These can also cause the implant to become loose or painful, in either case it may need to be removed.

Dental implants results

Most dental implants are successful. Sometimes, however, the bone fails to fuse sufficiently to the metal implant. Smoking, for example, can contribute to implant failure and complications. Dental implants fail about 5% of the time. To prevent a dental implant failure, keep your mouth clean, visit your dentist regularly, and eat healthily.

According to research by Buser and colleagues 1, patients exposed to with irradiation (radiotherapy) before or after implantation, or patients with severe diabetes or heavy smoking habits have significantly increased risks of dental implant failure. It has been suggested that such conditions could impair implant survivability by increasing the susceptibility of the patient to other diseases or by interfering with the tissue healing process 2. Moreover, osteoporosis, with its high prevalence in the aged population, is also considered a relative contraindication for dental implant therapy 3; the alveolar ridge atrophy and low bone mineral density, caused by osteoporosis may impair bone quality and quantity at implant sites 4.

If the bone fails to fuse sufficiently, the implant is removed, the bone is cleaned up, and you can try the procedure again in two or three months.

You can help your dental work — and remaining natural teeth — last longer if you:

  • Practice excellent oral hygiene. Just as with your natural teeth, keep implants, artificial teeth and gum tissue clean. Specially designed brushes, such as an interdental brush that slides between teeth, can help clean the nooks and crannies around teeth, gums and metal posts.
  • See your dentist regularly. Schedule regular dental checkups to ensure the health and proper functioning of your implants.
  • Avoid damaging habits. Don’t chew hard items, such as ice and hard candy, which can break your crowns — or your natural teeth. Avoid tooth-staining tobacco and caffeine products. Get treatment if you grind your teeth.

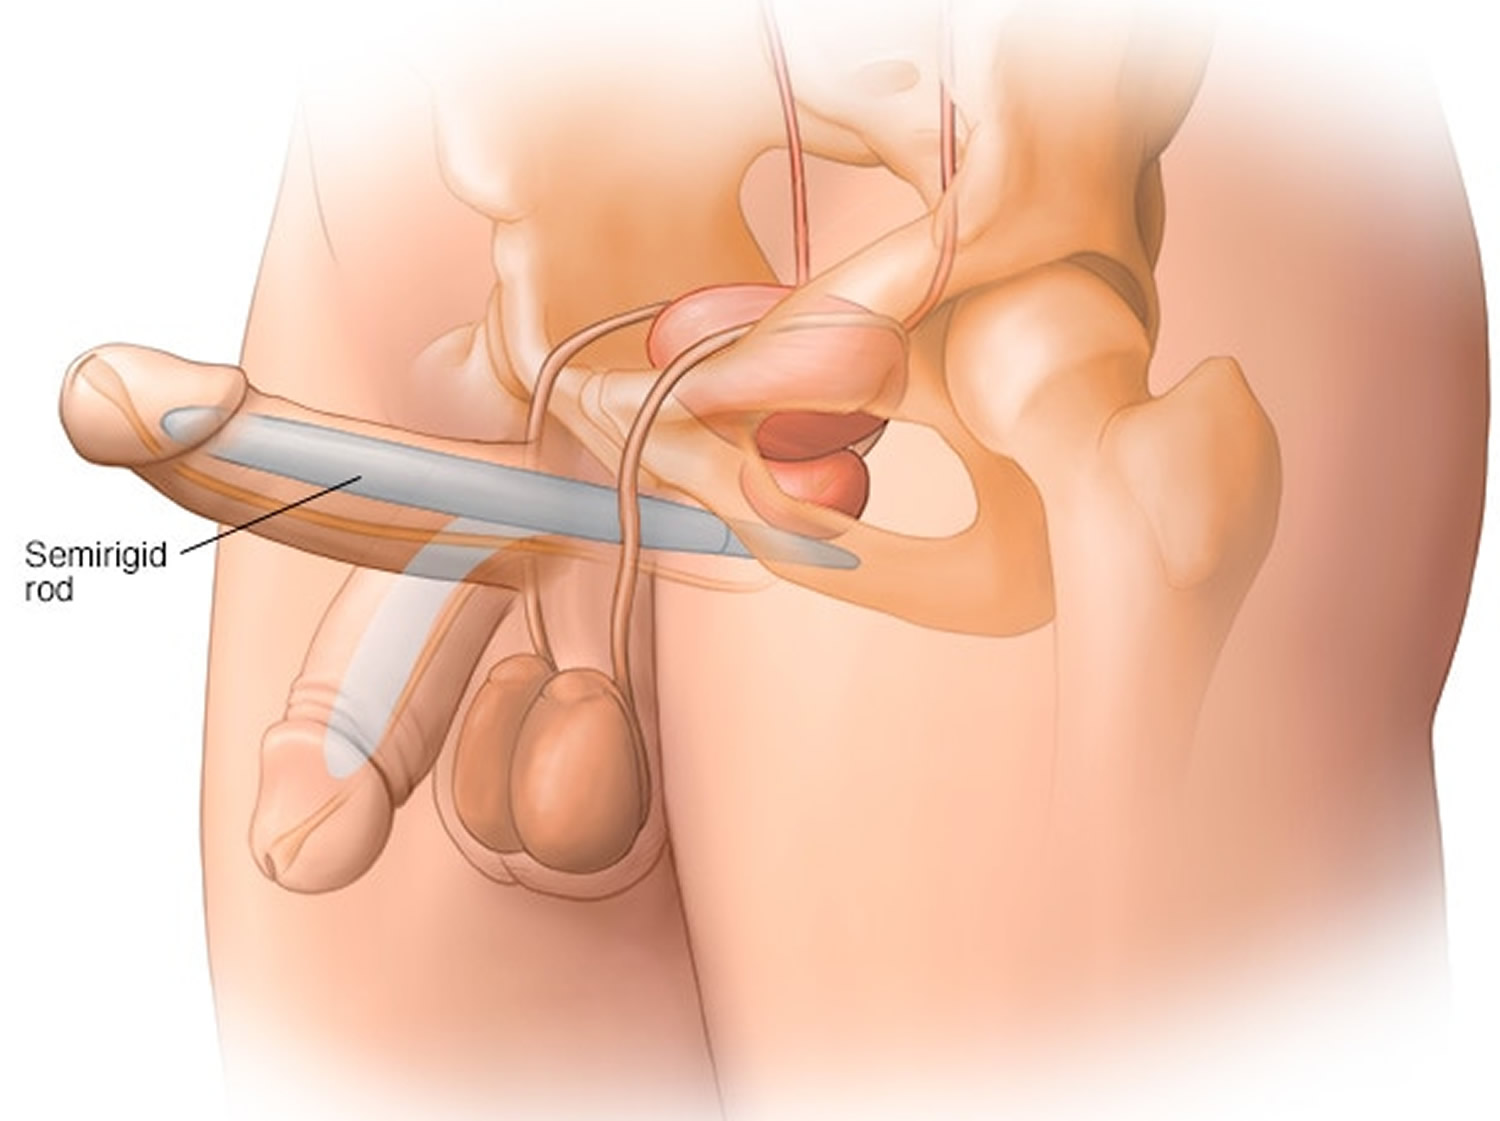
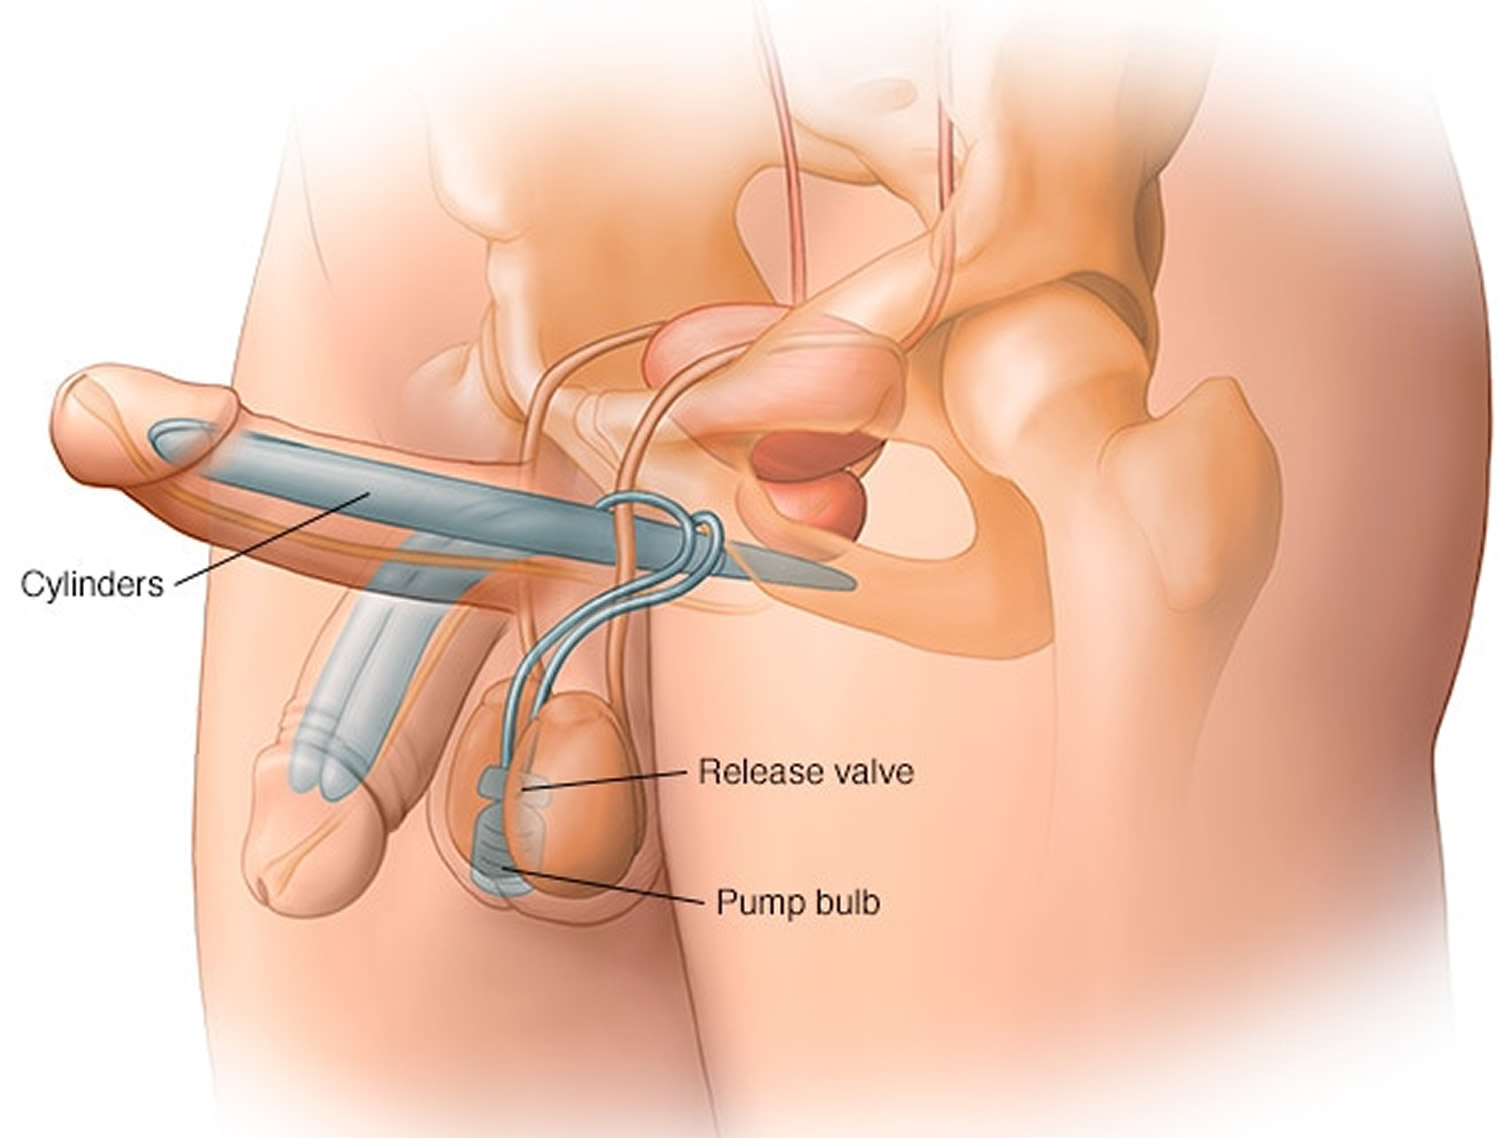
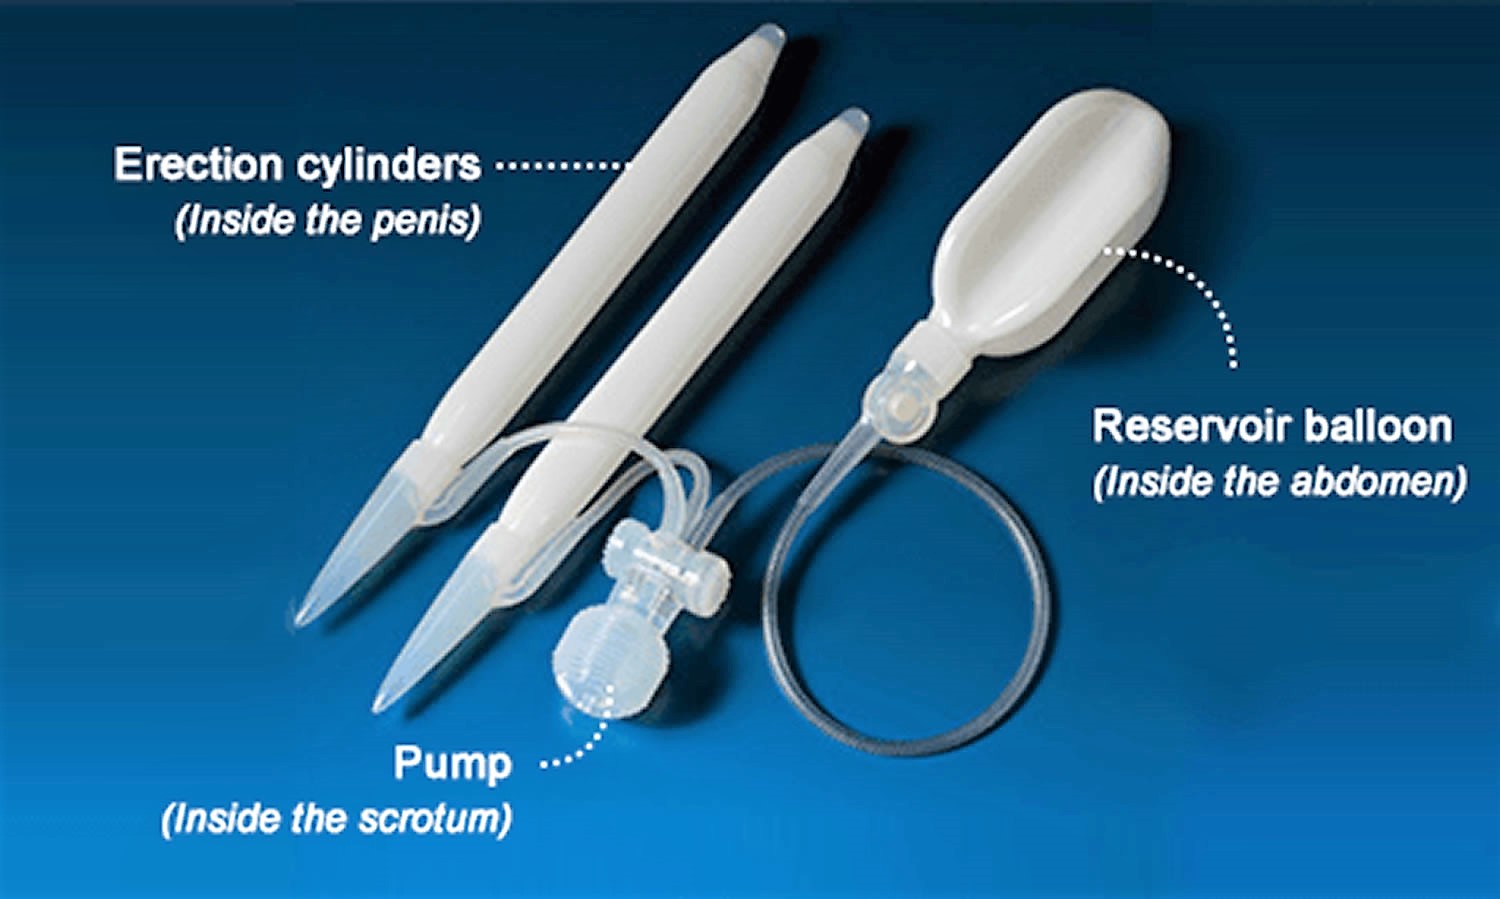
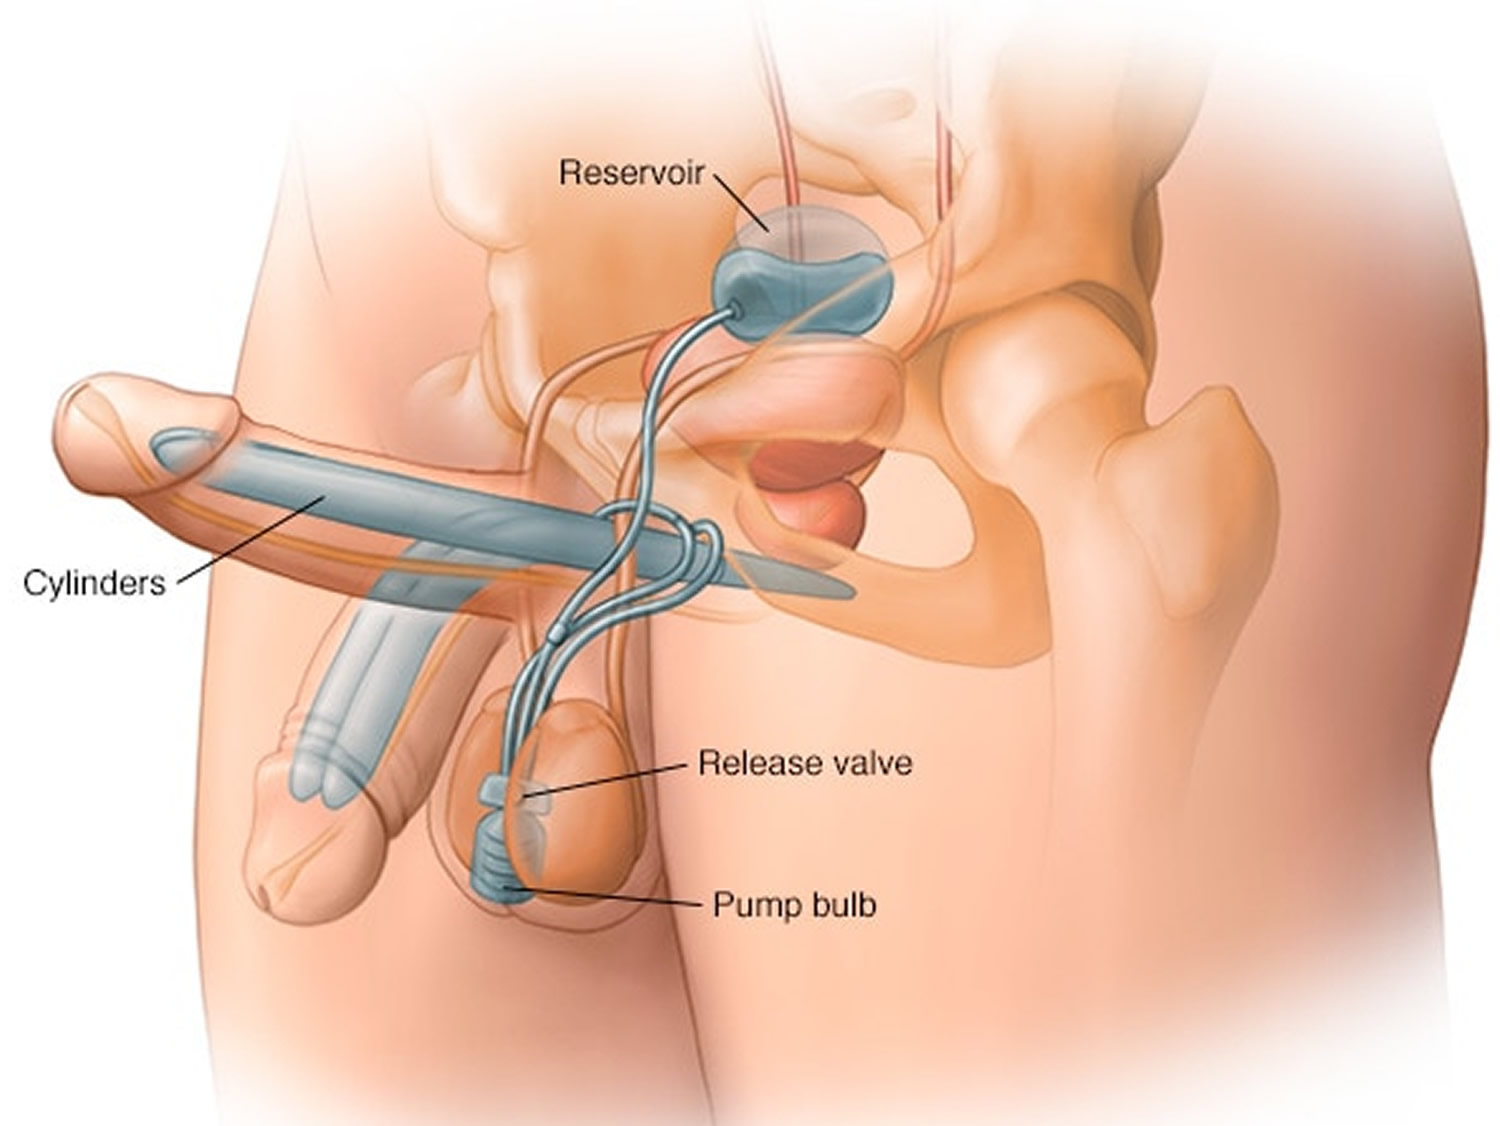
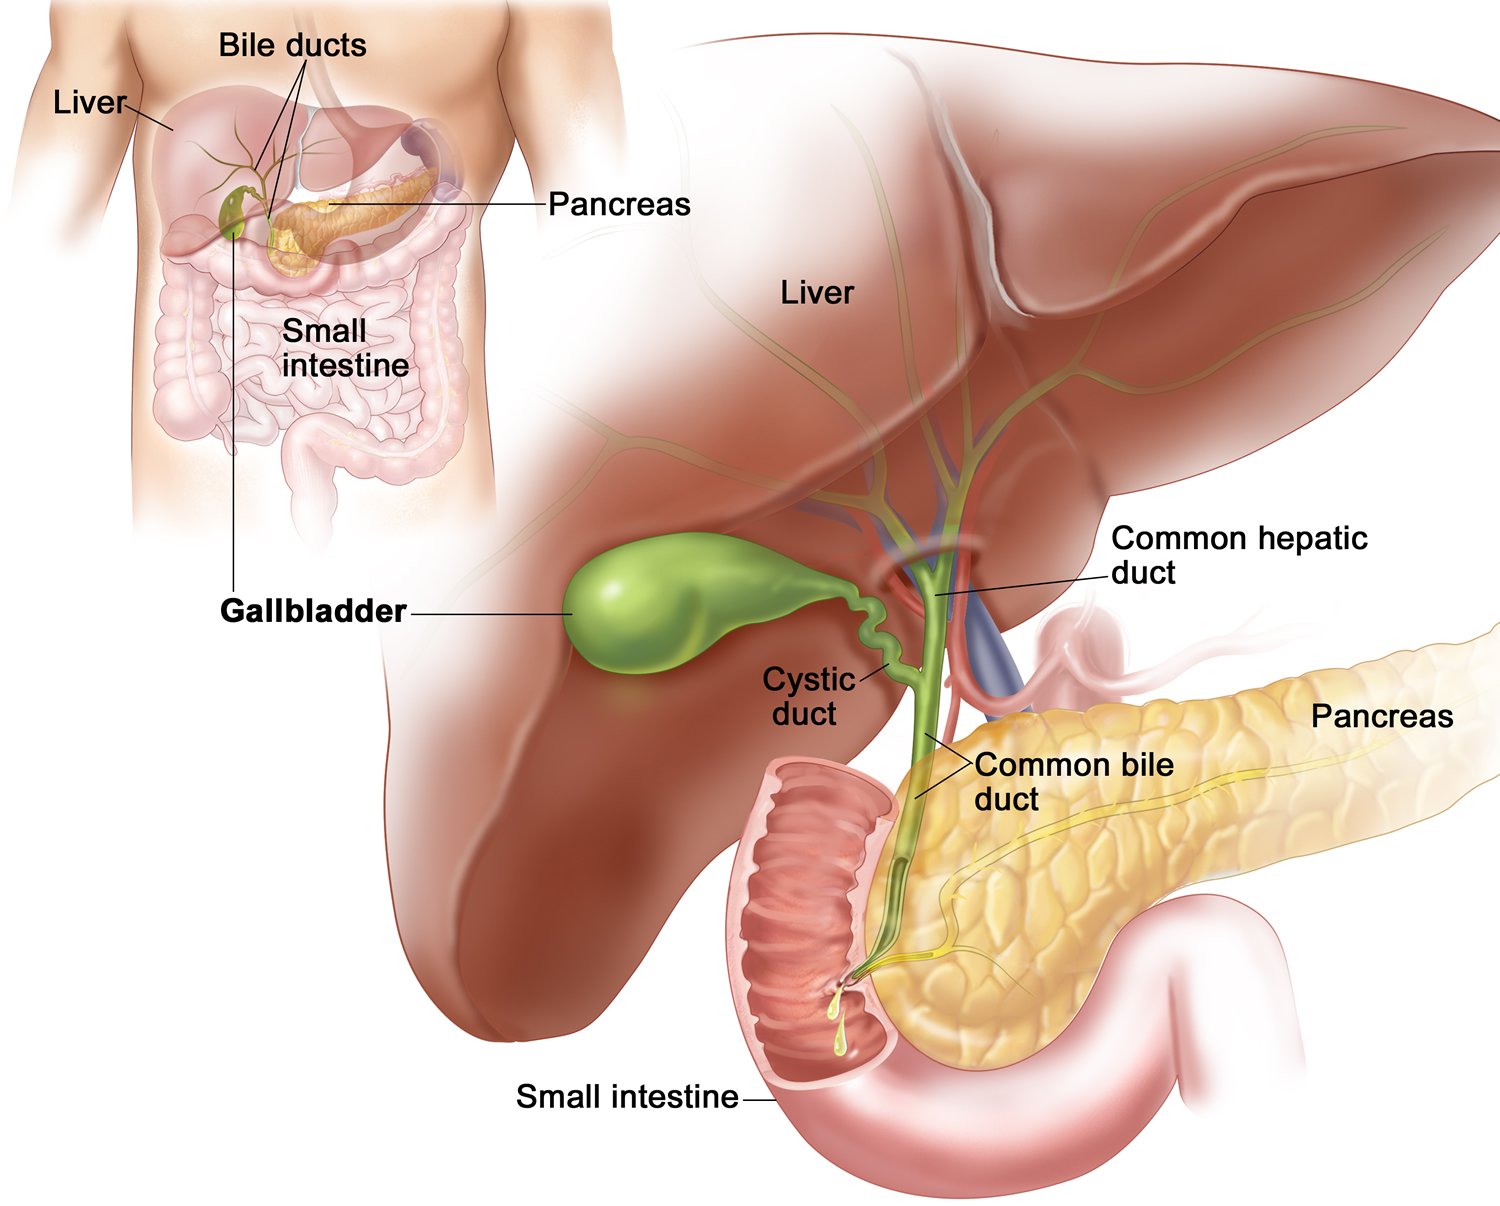
Figure 1. Dental implants

Dental implant surgery

Dental implants Dental implants

How long will a dental implant last?

With proper care, you can expect your dental implant to last as long as 25 years.

Can you drink alcohol after dental implant surgery?

This is a question that dental implant patients often ask. It’s obvious that smoking is not good for your implant (or your oral hygiene in general), but drinking alcohol is not as obvious.

For the same reason you should avoid mouthwash with alcohol in it – as well as any type of alcoholic beverage. The alcohol can restrict blood flow, which is not good for healing, and it can even increase your chance of infection.

You may want to check with your dentist on the specific instructions, but typically, dentists allow their implant patients to drink alcohol no sooner than 72 hours after the final stage.

When might a dental implant be needed?

If you have one or more teeth that are missing, having a dental implant might be an option for replacing the missing teeth. In general, a dental implant might be suitable if you:

  • have a fully grown, healthy jawbone
  • don’t have gum disease
  • don’t have conditions that affect bone healing.

Your dentist will discuss with you whether a dental implant procedure is suitable for you.

What happens if the dental implant does not fuse with the bone?

This happens very rarely. If the dental implant becomes loose during the healing period, or just after, it is easily removed and your jaw will heal in the normal way. Once your jaw has healed, another dental implant can be placed there. Or the dentist can make a bridge, fitting it to the implanted false teeth that have been successful.

Are dental implants safe?

Dental implants are a safe, well-established treatment. It’s probably true to say that dental implants, much like natural teeth, will last for as long as you care for them.

How well you look after your dental implants and whether you go for your regular maintenance appointments – will have the biggest impact on how long they will last.

If you don’t look after your dental implants they will develop a coating similar to what you get on neglected natural teeth. Left untreated, this can lead to gum infection, bleeding, soreness and general discomfort. You could get all these problems with natural teeth.

If your dental implants are well looked after and if the bone they are fitted to is strong and healthy, you can expect them to last for many years. However, just as with other surgical implants (such as a hip replacement) there is no lifetime guarantee.

What are alternatives to dental implants?

The alternatives to dental implants are wearing dentures or a dental bridge.

Fixed bridges and removable dentures, however, are not the perfect solution and often bring with them a number of other problems. Removable dentures may slip or cause embarrassing clicking sounds while eating or speaking. A removable partial denture may also contribute to the loss of adjacent teeth. A dental bridge may require the cutting down of healthy, adjacent teeth that may or may not need to be restored in the future. Then there is the additional cost of possibly having to replace the bridge once, twice or more over the course of a lifetime. Of even greater concern, fixed bridges often affect adjacent healthy teeth, and denture wearers may suffer bone loss in the area where the tooth or teeth are missing. Recurrent decay, gum disease and wear and tear often doom fixed bridgework to early failure. For these reasons, fixed bridges and removable dentures usually need to be replaced every seven to 15 years. Studies show that within five to seven years there is a failure rate of up to 30% in teeth located next to a fixed bridge or removable partial denture.

Rather than resting on the gum line like removable dentures, or using adjacent teeth as anchors like fixed bridges, dental implants are long-term replacements that your oral surgeon surgically places in the jawbone. Composed of titanium metal that “fuses” with the jawbone through a process called osseointegration,
dental implants never slip, make embarrassing noises or decay like teeth anchoring fixed bridges. Because dental implants fuse with the jawbone, bone loss is generally less of a problem.

Are the implant teeth difficult to clean?

No. But aftercare is important if you are going to have a long-lasting, successful implant. Your dental team should give you detailed advice on how to look after your dental implants. Cleaning around the teeth attached to the dental implants is no more difficult than cleaning natural teeth. However, there may be areas that are difficult to reach and you’ll be shown how to clean them. You may need to visit your hygienist more often but your dental team will be able to talk to you about this.

Can I take the teeth out if they are fixed to implants?

Most teeth attached to dental implants can only be fitted and removed by the dentist. However, if you have removable dentures attached to the implants, you’ll be able to take them out for cleaning.

Do dental implants hurt?

Placing a dental implant is often easier than taking a tooth out and is usually done using a simple local anaesthetic. You will not feel any pain at the time but, just like after an extraction, you may feel some discomfort during the week after the dental implant surgery.

Sometimes your dentist might give you a sedative if you are very nervous or if the case is a complicated one. General anaesthetics are rarely used for dental implant surgery and are generally only used for very complicated cases.

Can dental implants always be used to replace missing teeth?

It depends on the condition of the bone in your jaw. Your dentist will arrange for a number of special tests to find out the amount of bone still there. If there is not enough, or if it isn’t healthy enough, it may not be possible to place dental implants without grafting bone into the area first.

I have some of my own teeth. Can I still have dental implants?

Yes. You can have any number of teeth replaced with dental implants – from one single tooth to a complete set.

If I had gum disease when I had my own teeth, will I get it with the dental implants?

Yes, if you don’t care for them well enough. If you keep your dental implants clean and have them regularly checked by your dental team you should not have any problems. Smoking also affects the health of implants. So, if you smoke, you may need to look after your dental implants more carefully. Some dentists will not place dental implants in people who are smokers.

How long does the dental implant treatment take?

Your dental team will be able to give you a rough timetable before the dental implant treatment starts.

Some false teeth can now even be fitted at the same time as the dental implants (these are called ‘immediate implants’). Check with your dental team to see whether these are suitable for you. Usually the false teeth are fitted 3 to 4 months after the dental implants are put in. Sometimes treatment takes longer and your dental team will be able to talk to you about your treatment time.

Do dental implants last?

Unlike natural teeth, dental implants are not susceptible to dental disease such as decay; however, the health of the gums is vital to maintaining lasting implant success. Conscientious home care by the patient and regular professional cleanings and check-ups are essential elements for dental implant sustainability. Each patient is different, and success relies upon diagnosis and planning, medical history, and a variety of other factors.

What if I want “metal-free” implants?

There is no such thing as “metal-free” teeth. Almost all materials used for teeth replacements have some sort of metal ions in them. Dental implants are made of titanium alloy (similar to hip implants, shoulder implants, and knee implants), which is highly biocompatible, and an allergy to titanium is extremely rare! Currently, there are no proven alternatives to titanium dental implants.

How do dental implants help if I have full dentures or partial dentures?

Actually implants are most popularly used in patients who wear full dentures or partial dentures. Dental implants can be used to provide retention and support for a removable implant overdenture, which basically snaps on the implants! Therefore the partial or full denture does not move and reduces the dependency on denture adhesives/denture glue. Or, dental implants can be used for a fixed denture, where a patient’s dentures are fixed/bolted to the implants through titanium components. Only the dentist can remove this from the mouth.

Can dentures be made into implants?

Dentures cannot be “made into implants”. Implants are metal screws placed into the jawbone to help anchor and support artificial teeth (dentures). It may be possible to have implants placed beneath existing dentures to aid in the stabilization and support for those dentures. This could only be done if the current dentures were otherwise in excellent condition. You should consult with your prosthodontist to have your existing dentures carefully examined.

Are dental implants removable like dentures or do they stay in your mouth?

No, dental implants are fixed solidly in the bone and allow teeth to be replaced in a manner that is closest to natural teeth.

What do I do if the screws in the denture are loosening?

If you had implants inserted, it sounds like the implants were intended to help stabilize the denture, in which case, they should reduce the movement. If your dentures rub your cheeks or if you’re biting your cheeks, you should return to the dentist or prosthodontist who made the dentures to continue to have the fit and bite refined. You should visit your dentist or prosthodontist to remedy these difficulties.

What if I have an accident?

Dental implants and the teeth they support can be damaged by an accident in the same way that natural teeth can. So it is important that you wear a professionally made mouthguard if you play sports that involve contact or moving objects.

If just the teeth are damaged, they can usually be removed from the implant and replaced.

However, if the titanium implant itself is damaged beyond repair, it can be safely left in the jaw if it is too difficult to remove. Another implant may be fitted alongside it to replace the damaged one.

What are the disadvantages of dental implants?

Like any minor oral surgical procedure, there is a risk of infection, inflammation, and pain, but your prosthodontist will discuss how these can be managed for your specific situation. If there is no available bone to place the implant, then bone and gum grafting procedures may be required, which can increase the cost of your treatment. However, the upfront investment can pay off in the long term.

How much do implants cost and does insurance cover the cost?

In general, the cost of replacing a single tooth with a dental implant is almost the same as replacing it with a regular fixed bridge. Dental implant treatment may qualify for some insurance coverage, but situations vary. The cost will vary by patient needs, bone quantity, and region. A prosthodontist will make an assessment based on your unique needs.

What is the success rate of dental implants?

It varies from individual to individual and with health and habits. For a healthy individual with good oral hygiene and good health, dental implants are predictably successful with reported success rates above 90-95 percent.

Types of dental implants

There are two main types of dental implants: endosteal and subperiosteal (whether it’s a mini dental implant or standard implant).

  • Endosteal dental implants are inserted into the bone, fusing with it.
  • Subperiosteal dental implants simply sit on top of the jawbone — these are rarely used anymore because of their poor long-term performance.

The type of dental implant that your dentist chooses will be specific to your situation (but it will either be a endosteal and subperiosteal implant). In either case, it will require a recovery period that could last several months.

Dental implants can also be classified by the following type :

  • ‘Immediate’ implants are placed in dental sockets just after tooth extraction.
  • ‘Immediate-delayed’ implants are those implants inserted after weeks up to about a couple of months to allow for soft tissue healing.
  • ‘Delayed’ implants are those placed thereafter in partially or completely healed bone.

The potential advantages of immediate implants are that treatment time can be shortened and that bone volumes might be partially maintained thus possibly providing good aesthetic results. The potential disadvantages are an increased risk of infection and failures. After implant placement in postextractive sites, gaps can be present between the implant and the bony walls. A well conducted systematic review found insufficient evidence to determine possible advantages or disadvantages of immediate, immediate-delayed or delayed implants 5. There is currently too little evidence to draw any reliable conclusions, however, the aesthetic outcome could be slightly better when placing implants early after tooth extraction, though early placed implants might be at a higher risk of failure. There is not enough evidence supporting or refusing the need of bone augmentation when extracted teeth are immediately replaced with dental implants, nor it is known whether any augmentation procedure is better than the others. Bone substitutes (anorganic bovine bone) can be used instead of self generated (autogenous) bone graft 5.

Single-Tooth Implants

A single-tooth implant replaces the roots of one missing tooth. It doesn’t involve treating the surrounding teeth as some procedures do. This is a good option not just for aesthetics, but also because missing one tooth could change the sound of your speech, make it more difficult to chew, the natural teeth around it can shift over time, and you can even experience bone loss.

The single tooth implant replaces the missing tooth’s roots. A single tooth implant is a stand-alone unit and does not involve treating the teeth next to it.

Implant-Supported Bridges and Dentures

Dental implants can also help support a denture bridge when you have multiple teeth missing (even all of your teeth missing). Rather than getting support from nearby teeth, an implant-supported bridge uses implants as its support system.

A common type of denture implant is the All-On-4 (AO4) denture. With this prosthesis, the dentist inserts four or more implants to act as the anchors for the denture.

Dental implant procedure

Dental implants are metal screws made of titanium directly implanted (surgically placed) into the gum and jawbone where teeth are missing. Dental implants replace the roots of missing teeth and support single crowns, large bridges or dentures and replace missing teeth.

Dental implant process

There are generally three phases to getting a dental implant:

  1. First, the dentist surgically places the implant into the jawbone. Your dentist may recommend a diet of soft foods, cold foods and warm soup during the healing process.
  2. Next, the bone around the implant heals in a process called osseointegration. What makes an implant so strong is that the bone actually grows around it and holds it in place. Osseointegration means “combines with the bone” and takes time. Some patients might need to wait until the implant is completely integrated, up to several months, before replacement teeth can be attached to the implant. Other patients can have the implants and replacement teeth placed all in one visit.
  3. Finally, it’s time for the placement of the artificial tooth/teeth. For a single tooth implant, your dentist will customize a new tooth for you, called a dental crown. The crown will be based on size, shape, color and fit, and will be designed to blend in with your other teeth. If you are replacing more than a single tooth, custom-made bridges or dentures will be made to fit your mouth and your implants. (Note: The replacement teeth usually take some time to make. In the meantime, your dentist may give you a temporary crown, bridge or denture to help you eat and speak normally until the permanent replacement is ready.)

If you are interested in dental implants, it’s a good idea to discuss it carefully with your dentist first. If you are in good general health this treatment may be an option for you. In fact, your health is more of a factor than your age. You may be medically evaluated by a physician before any implant surgery is scheduled.

Chronic illnesses, such as diabetes or leukemia, may interfere with healing after surgery. Patients with these issues may not be good candidates for implants. Using tobacco can also slow healing.

How you prepare for dental implants

Because dental implants require one or more surgical procedures, you must have a thorough evaluation to prepare for the process, including a:

  • Comprehensive dental exam. You may have dental X-rays taken and models made of your teeth and mouth.
  • Treatment plan. Tailored to your situation, this plan takes into account factors such as how many teeth you need to have replaced and the condition of your jawbone. The planning process may involve a variety of dental specialists, including a doctor who specializes in conditions of the mouth, jaw and face (oral and maxillofacial surgeon), a dentist who works with the structures that support teeth (periodontist) and a dentist who will restore the implants with crowns, bridges or dentures.

Tell your doctor about any medical conditions and any medications you take, including prescription and over-the-counter drugs and supplements. If you have certain heart conditions or orthopedic implants, your doctor may prescribe antibiotics before surgery to help prevent infection.

To control pain, anesthesia options during surgery include local anesthesia, sedation or general anesthesia. Talk to your dental specialist about which option is best for you. Your dental care team will instruct you about eating and drinking before surgery, depending on what type of anesthesia you have. If you’re having general anesthesia, plan to have someone take you home after surgery and expect to rest for the remainder of the day.

Dental implant surgery

What you can expect during a dental implant

Dental implant surgery is usually an outpatient surgery performed in stages:

  • Your damaged tooth is removed.
  • Your jawbone is prepared for surgery, a process that may involve bone grafting.
  • After your jawbone heals, your oral surgeon places the dental implant metal post in your jawbone.
  • You go through a healing period that may last several months.
  • Your oral surgeon places the abutment, which is an extension of the implant metal post. (In some cases, when the implant is very stable, this can be done at the same time that the implant is placed.)
  • After the soft tissue heals, your dentist will make molds of your teeth and jawbone and later place the final tooth or teeth.

The entire process can take many months from start to finish. Much of that time is devoted to healing and waiting for the growth of new bone in your jaw.

When bone grafting is required

If your jawbone isn’t thick enough or is too soft, you may need bone grafting before you can have dental implant surgery. That’s because the powerful chewing action of your mouth exerts great pressure on your bone, and if it can’t support the implant, the surgery likely would fail. A bone graft can create a more solid base for the implant.

In bone grafting, a piece of bone is removed from another part of your jaw or your body — your hip, for example — and transplanted to your jawbone. Another option is to use artificial bone (bone commercially available) to place in these areas. It may take several months for the transplanted bone to grow enough new bone to support a dental implant.

In some cases, you may need only minor bone grafting, which can be done at the same time as the implant surgery. The condition of your jawbone determines how you proceed.

Placing the dental implant

During surgery to place the dental implant, your oral surgeon makes a cut to open your gum and expose the bone. Holes are drilled into the bone where the dental implant metal post will be placed. Since the post will serve as the tooth root, it’s implanted deep into the bone.

At this point, you’ll still have a gap where your tooth is missing. A type of partial, temporary denture can be placed for appearance, if needed. You can remove this denture for cleaning and while you sleep.

Waiting for bone growth

Once the metal implant post is placed in your jawbone, osseointegration begins. During this process, the jawbone grows into and unites with the surface of the dental implant. This process, which can take several months, helps provide a solid base for your new artificial tooth — just as roots do for your natural teeth. Once your mouth is healed, you’ll be ready for the next stage.

Placing the healing collar and/or temporary crown

After the implants have fused with your jawbone, you’re ready for the next stage, which is getting a healing collar and possibly a temporary crown.

The dentist will place the healing collar (also called a healing cap) on the head of the implant — this helps guide the gum tissue in the proper way to heal. It’s a round piece of metal that keeps the gums away from the implant. This collar will stay on for 10-14 days.

After this time, in which your tissue should have healed, the dentist will remove it and move onto the next step.

Placing the abutment

When osseointegration is complete, you may need additional surgery to place the abutment — which is the part that screws into the implant and will support the crown. This minor surgery is typically done with local anesthesia in an outpatient setting. Once the abutment is placed, your dentist will take another impression of the abutment for each replacement tooth.

To place the abutment:

  • Your oral surgeon reopens your gum to expose the dental implant
  • The abutment is attached to the dental implant
  • The gum tissue is then closed around, but not over, the abutment

In some cases, the abutment is attached to the dental implant metal post when the post is implanted. That means you won’t need an extra surgical step. Because the abutment juts past the gumline, however, it’s visible when you open your mouth — and it will be that way until your dentist completes the tooth prosthesis. Some people don’t like that appearance and prefer to have the abutment placed in a separate procedure.

Choosing your new artificial teeth

After the abutment is placed, your gums must heal for one or two weeks before the artificial tooth (the crown) can be attached. Once your gums heal, you’ll have more impressions made of your mouth and remaining teeth. These impressions are used to make the crown — your realistic-looking artificial tooth. The crown can’t be placed until your jawbone is strong enough to support use of the new tooth.

You and your dental specialist can choose artificial teeth that are either removable, fixed or a combination of both.

  • Removable crown. This type is similar to a conventional removable denture. It contains artificial white teeth surrounded by pink plastic gum. It’s mounted on a metal frame that’s attached to the implant abutment, and it snaps securely into place. It can be easily removed for repair or daily cleaning.
  • Fixed crown. In this type, an artificial tooth is permanently screwed or cemented onto an individual implant abutment. You can’t remove the tooth for cleaning or during sleep. If affordability isn’t a concern, you can opt to replace several missing teeth this way. Most of the time, each crown is attached to its own dental implant. However, because implants are exceptionally strong, several teeth can be replaced by one implant if they’re bridged together.

Dental implant recovery

Whether you have dental implant surgery in one stage or multiple stages, you may experience some of the typical discomforts associated with any type of dental surgery, such as:

  • Swelling of your gums and face
  • Bruising of your skin and gums
  • Pain at the implant site
  • Minor bleeding

You may also have some bleeding from the gums.

To help make your recovery speedier and the pain minimal, here are some dental implant recovery tips you should follow:

  • Be careful not to disturb the surgical areas
  • Brush your teeth the night of surgery with a gentle toothbrush
  • After 24 hours, gently rinse with salt water 2-3 times a day
  • Rest as much as possible
  • Apply ice if needed

You might need to eat soft foods after each surgery to let the dental implant site heal.

No special care is required for a dental implant. You will probably be advised to keep your natural and artificial teeth clean by brushing and flossing, and have regular dental check-ups.

You may notice a greenish-yellowish discoloration or bruising around the surgical areas, but this is normal and should only last for 2-3 days after the surgery. After that, you can apply moist heat to the area to decrease the discoloration.

If you happen to feel a sharp protrusion or a edge of your tooth, this is also common. If it concerns you, feel free to contact your dentist.

You may also experience dry lips, a sore throat, and stiff jaw muscles, all expected signs of having gauze in your mouth. All of these things should go away after about 2-3 days.

Here are some general instructions for how to care for you implants in the days following the procedure to help your recovery time:

  • Rinse your mouth with salt water, taking five minutes to use up an entire 8-ounce glass. You can do this as often as you’d like, at least twice a day.
  • Gently brush your teeth as you normally would as soon as you can after the procedure. Because you may have soreness and swelling, you may not be able to (or want to) brush with regular vigor. But it’s important to have great oral hygiene during this recovery time.

Another thing you should consider during recovery is altering your diet.

If swelling, discomfort or any other problem gets worse in the days after surgery, contact your oral surgeon. You may need pain medications or antibiotics.

After each stage of surgery, you may need to eat soft foods while the surgical site heals. Typically, your surgeon will use stitches that dissolve on their own. If your stitches aren’t self-dissolving, your doctor removes them.

Dental implant recovery diet

It’s a smart idea to consider temporarily changing your diet to help your mouth heal quickly and properly. It doesn’t sound fun, but it can greatly help.

The best thing you can do regarding your diet is to avoid direct contact with the implant for as long as possible. This means no hard foods until the area is fully healed.

Foods you should (and shouldn’t) eat after dental implant surgery

Generally speaking, you should eat mostly soft foods, alternating which side of your mouth you’re chewing on.

Here are some ideas of foods that are good to eat following surgery:

  • Avocado
  • Baked beans
  • Bananas
  • Eggs
  • Fish (don’t use citrus)
  • Healthy juice or smoothies
  • Oatmeal
  • Noodles
  • Rice

On the flip side, there are plenty of foods to AVOID right after surgery:

  • Hard foods, like chips, nuts, or apples
  • Acidic foods, like tomatoes, lemons, limes, orange juice
  • Popcorn
  • Spicy foods as they may cause discomfort

Dental implant recovery time

Typically, it will take 5-7 days for all the symptoms to subside. However, some patients may experience a longer recovery time due to some different factors.

Here are some of the reasons why your recovery time may vary.

How many implants you get

Depending on whether you get a single implant, multiple implants, or an All-On-4 implants, your recovery time can vary. Basically, the more implants mean a longer and more involved surgery, which means a bit longer of a recovery time.

Sinus lift

Recovery from a sinus lift dental implant can vary as well. A sinus lift (or a sinus augmentation) can also lengthen your recovery time. This is a surgery that adds bone to your upper jaw by your molars and premolars. The dentist will have to move the sinus membrane upward (or be lifted) in order for the additional bone to fit.

Bone grafting

Bone grafting is required when your jawbone is not thick enough to secure an implant. When you chew, it puts a lot of pressure on the bone and it needs to be as strong as possible.

If you need a bone graft, your dentist will take bone from somewhere else in your body (like your hip) and transplant it into your jawbone. They can also use artificial bone.

In either case, it can take several months for the healing process to take place. But if minimal bone grafting is needed, it may not take that long.

Osseointegration

Osseointegration is the process of a dental implant integrating with your jawbone. This takes time to happen successfully — and it may be different for each patient — so it may add to the recovery time.

Dental implants aftercare

Your dental team will give you instructions on how to look after your dental implant. They may give you some painkillers after the surgery – or make sure you have some at home – to take over the next few days if you need them.

After your dental implants have been placed, the bone in your jaw needs to grow onto them and fuse to them. This usually takes a few months. Sometimes the dental implants may be stable enough when they are placed for the false teeth to be fitted sooner than this.

If you are having one, two or three teeth replaced, you may have a temporary denture in the meantime. If you already have full dentures, you can keep wearing these while your dental implants are healing. Your dentures will need altering, to fit properly after the surgery, and a ‘healing cap’ will usually be placed onto the implant site to protect it.

Implant Care

Basically, you should care for your implant the same way you would care for your natural teeth. You should be brushing 2-3 times a day, flossing daily, and rinsing with non-alcoholic mouthwash. Also, it’s important to have a regular checkup with your dentist every six months.

X-Rays

Your dentist may take more X-rays during your follow-up visits. They will be looking at how the implant, abutment, and crown are fitting together and if there are any issues with their alignment.

Dental implant complications

Like any surgery, dental implant surgery poses some health risks. Problems are rare, though, and when they do occur they’re usually minor and easily treated. Risks include:

  • Infection at the implant site
  • Injury or damage to surrounding structures, such as other teeth or blood vessels
  • Nerve damage, which can cause pain, numbness or tingling in your natural teeth, gums, lips or chin
  • Sinus problems, when dental implants placed in the upper jaw protrude into one of your sinus cavities.

As with any surgery, there are possible risks. With dental implants, there’s the chance the implant could fail, whether it’s due to infection, the bite, clenching, or grinding of the teeth.

If you’re getting a replacement tooth on the lower jaw, there is a chance a nerve that runs under the lower jaw can be injured during the drilling or placement of the implant. It may cause numbness or tingling, however this may just be temporary until the nerve heals. But there is the chance that the nerve won’t heal.

When getting implants in the upper jaw, there’s a chance that the drilling may break through to the sinuses above the upper teeth, which may lead to an infection. To keep this from happening, the dentist will take X-rays before the surgery so they know where any nearby nerves or sinuses are located.

Dental implant failures

Despite the many benefits of dental implants, they do have the potential to fail. The rate at which dental implants fail is about 5% — a small number, but when you consider how many people get implants, you realize a lot of people suffer from this. And the rate of failure can be due to many things.

Reasons for dental implant failure

The factors for whether or not an implant(s) fails has a lot to do with how experienced the dentist is and how careful they were during the procedure.

But there are also many other reasons an implant could fail, and these reasons can cause either an early dental implant failure or late/long-term failure.
Early Dental Implant Failure

Early failure of dental implants usually happens within three to four months after the procedure during the process of the implant integrating with the jaw bone.

Here are some of the most common causes of early dental implant failure.

Autoimmune diseases

The dental implant failure rate with patients who have an autoimmune disease is higher than those without.

An autoimmune disease is basically illness that causes the body’s immune system to fight against itself, attacking and damaging the body’s tissues. This can lead to a high probability of the body rejecting an implant.

Types of autoimmune diseases include:

  • Rheumatoid arthritis
  • Lupus
  • Multiple sclerosis
  • Type 1 diabetes
  • Celiac disease

Poor blood supply

Blood clots open wounds and carry nutrients needed for the body to heal. So if after getting implant you have a lack of blood rushing to the surgical area, the healing process will be slowed or even halted.

This poor blood supply could be from a blood disease, a blood clot elsewhere in the body, or an autoimmune disease.

Medications

Some medications can get in the way of the success of dental implants. That’s why it’s so important to be completely upfront with your dentist about the medications you take or have taken in the past.

One example is bisphosphonates, which is a type of medication used to treat osteoporosis.

Poor health

If you don’t take good care of your teeth, gums, and entire body, this can affect the success of dental implants. They will be less likely to integrate with an unhealthy body than with a healthy body.

Infections

Infections can destroy an implant’s chances of successfully integrating.

One of the most common infections that affects dental implants is peri-implantitis, a type of gum disease. This infection can begin during or after the surgery, whether it’s because there’s an open wound or because of the dental cement, which can leak under the crown and get stuck in the gums.

In most cases of peri-implantitis, it requires a dental implant failure replacement. Patients with an autoimmune disease, those who smoke, or those with bad oral hygiene are more likely to get this infection.

Overloading

In a typical implant procedure, the dentist will complete it in two stages: insertion of the implant and the placing of the abutment and crown. The time in between these two stages allows the implant to fuse to the jawbone before placing the abutment and crown.

But sometimes the dentist will do what’s called an “immediate loading procedure”. This is where both stages are done one right after the other. It makes the treatment time shorter, requires less surgical care afterwards, and can lead to a quicker recovery.

However, this way of doing the procedure can lead to overloading, an implant failure caused by excessive force or pressure on the abutment and crown. This can especially be a problem if the patient has poor bone density.

Rejection of the foreign body

As is the case with any organ transplant, the patient’s body can reject the implant. Although it’s rare, it’s still possible. Basically, the body sees the implant as a malignant foreign body and rejects its integration. This leads to a loose and/or failed implant.

Allergic reaction

Most dental implants are made of titanium alloy and can sometimes have small traces of nickel. This can cause an allergic inflammatory reaction in some patients. The reaction can be a tingling or burning feeling (more on symptoms below).

Nerve/Tissue Damage

If the nerves or tissue surrounding the implant are damaged, the patient can feel ongoing pain or numbness after the procedure. The sensations can spread from the area to the cheek, tongue, chin, and lips.

In most cases, nerve damage is due to an inexperienced dentist making placing the implant too close to a nerve. No matter how experienced the dentist, minimal tissue damage is expected. But if the damage is extreme, that can be due to the surgeon’s mistake.

Late or Long-Term Failure

If a dental implant fails anywhere from one to 10 years after the procedure, this is considered a late/long-term failure. There are several factors that can contribute to a late dental implant failure.

“Under-Engineered” Procedure

An under-engineered procedure means that there are too few implants to support the replacement teeth. This leads to too much stress on the implants. This can be because the dentist was not knowledgeable or experienced enough to know how many implants to use.

Smoking

Smokers who need dental implants are at a higher risk of experiencing a failed implant, anywhere between 6.5% to 20%, according to the Journal of International Society of Preventive & Community Dentistry

So smoking is definitely a risk factor in failed dental implants, but it can still be done. Your smoking history is something your dentist will as about before scheduling the procedure. And for overall dental health, smokers should try to stop (as their dentists have surely recommended already).

Bruxism

Bruxism is a fancy word for repetitive teeth grinding or clenching, and it’s actually common.

It can happen for many reasons, like stress, misaligned teeth, or missing teeth. This grinding or clenching puts extra pressure on the teeth and causes them to wear down or be damaged. Usually, bruxism happens overnight while a person is sleeping.

Bruxism can make it difficult for an implant to integrate with the jaw bone because excessive pressure on the teeth and implant and hurt the process. If it persists, it can lead to a failed implant.

Poor oral hygiene

If a dental implant patient doesn’t take care of their gums and teeth, this can lead to gum disease and infections. And as we mentioned earlier, those things can cause implants to fail.

Lack of gum tissue

The amount of gum tissue determines the quality of the seal around the implants — the more tissue, the better the seal. So if a patient lacks the adequate amount of gum tissue, this can cause the implants to loosen and eventually fail.

Head and neck radiation

If a patient has had head and/or neck cancer (including and especially mouth cancer) and has been treated with radiation therapy, this can increase the risk of implant failure.

Lack of bone

Patients who don’t have sufficient bone to support an implant, bacteria can get in there and infect the site. It’s difficult for the body to rid this small and crowded area of bacteria, and the dentist may need to replace the implant.

Infections

Just as with early dental implant failures, infections can affect implants in the long run. Bacteria can get under the gums and cause an infection, slowly eating away at the implant cement and the surrounding areas.

Mechanical damages

Obviously, if an implant is damaged (from an injury to the mouth/teeth), that can cause it to fail. If it’s left uncared for, the dentist may eventually have to replace the implant.

Dental implant failure prevention

Before you start experiencing symptoms, the best way to avoid problems is to properly maintain your dental implants, helping you to avoid implant failure.

First, you can do this by keeping up good oral hygiene, brushing and flossing twice a day and using an alcohol-free antibacterial mouthwash.

Second, scheduling regular visits to your dentist is crucial to the health of not only your dental implant but your overall mouth health. It’s best to schedule an appointment every three to six months.

Third, you may want to consider updating your diet to eat more bone- and gum-healthy foods, like milk, eggs, and fish. And you should also avoid hard foods and candies to prevent damage to the implant.

Dental implant failure symptoms

Here are the main symptoms and signs of late and early dental implant failure you should look out for:

  • Severe pain or discomfort
  • A loose or shifting implant
  • Swelling or inflammation of the gums
  • Gum recession around dental implant
  • Difficulty chewing and biting

Andy pain, swelling, or shifting are common signs of a failing dental implant. If you experience these symptoms, contact your dentist.

Dental implant failure treatment

How you take care of the potential failure depends on the cause. But no matter what the cause is, the first thing you should do is contact your dentist.

If the implant area is infected, try to gently clean the area on a regular basis until you can meet with your dentist. Good oral hygiene is also very important in these cases. The sooner you notice an infection and get it taken care of, the better.

On the other hand, if the implant is failing because of too much stress or damage, your dentist may need to perform and bone graft in order to make it more secure.

References
  1. Buser D, von Arx T, ten Bruggenkate CM, Weingart D (2000) Basic surgical principles with ITI implants. Clin Oral Implants Res 11 Suppl.: 59–68. https://www.ncbi.nlm.nih.gov/pubmed/11168257
  2. Klokkevold PR, Han TJ (2007) How do smoking, diabetes, and periodontitis affect outcomes of implant treatment? Int J Oral Maxillofac Implants 22 Suppl.: 173–202. https://www.ncbi.nlm.nih.gov/pubmed/18437796
  3. Gaetti-Jardim EC, Santiago-Junior JF, Goiato MC, Pellizer EP, Mafro-Filho O, et al. (2011) Dental implants in patients with osteoporosis: a clinical reality? J Craniofac Surg 22: 1111–1113 https://www.ncbi.nlm.nih.gov/pubmed/21586959
  4. Moedano DE, Irigoyen ME, Borges-Yáñez A, Flores-Sánchez I, Rotter RC (2011) Osteoporosis, the risk of vertebral fracture, and periodontal disease in an elderly group. Gerodontology 28: 19–27. https://www.ncbi.nlm.nih.gov/pubmed/19863666
  5. Esposito M, Grusovin MG, Polyzos IP, Felice P, Worthington HV. Interventions for replacing missing teeth: dental implants in fresh extraction sockets (immediate, immediate-delayed and delayed implants). Cochrane Database of Systematic Reviews 2010, Issue 9. Art. No.: CD005968. DOI: 10.1002/14651858.CD005968.pub3 http://cochranelibrary-wiley.com/doi/10.1002/14651858.CD005968.pub3/full
read more
Procedures

HIV test

hiv test

How to test for HIV

HIV stands for human immunodeficiency virus. It is the virus that can lead to acquired immunodeficiency syndrome, or AIDS. Unlike some other viruses, the human body cannot get rid of HIV. That means that once you have HIV, you have it for life. An estimated 1.1 million people in the United States are living with HIV, including about 162,500 people who are unaware of their status. About 1 in 7 people in the United States who have HIV don’t know they have it. Approximately 40% of new HIV infections are transmitted by people who are living with undiagnosed HIV. For those who are living with undiagnosed HIV, testing is the first step in maintaining a healthy life and reducing the spread of HIV. And the only way to know for sure whether you have HIV is to get tested. Testing associated with HIV/AIDS involves detecting HIV antigen (p24) and/or the affected person’s response to HIV (antibodies), measuring the amount of virus, or detecting the viral nucleic acid. The goals of HIV testing are to:

  • Screen for and diagnose HIV infection
  • Measure and monitor the amount of virus in the person’s blood (the viral load)
  • Evaluate HIV’s resistance to available drug therapies

Centers for Disease Control and Prevention (CDC) recommends that everyone between the ages of 13 and 64 get tested at least once as a part of their routine health care 1. People with higher risk factors, such as more than one sex partner, other STDs, gay and bisexual men and individuals who inject drugs should be tested at least once a year.

If you’re pregnant, talk to your health care provider about getting tested for HIV and other ways to protect you and your baby from getting HIV. Ideally, all women should be screened for HIV during each pregnancy at their initial prenatal care visit or as early in pregnancy as possible. CDC also recommends a second HIV test during a woman’s third trimester for women who meet certain criteria, including: a) those who continue behaviors with a high risk for acquiring HIV, b) residing in specific high-prevalence jurisdictions, and c) receiving health care in facilities with at least 1 diagnosed HIV case per 1,000 pregnant women per year.

Preventive antiviral therapy is most effective when it is initiated early in pregnancy. However, starting antiretroviral treatment during labor and delivery, or even providing it to the newborn within hours after birth can reduce mother-to-child transmission by half 2. To maximize the benefit, it is important to obtain HIV test results for women in labor quickly in order to start antiretroviral therapy as soon as possible. CDC recommends that clinicians test for HIV any newborn whose mother’s HIV status is unknown. For those women whose HIV status is unknown at labor, CDC recommends routine, rapid HIV testing. When the mother’s HIV status is unknown prior to the onset of labor and rapid HIV testing is not done during labor, CDC recommends rapid HIV testing of the infant immediately post-partum, so that antiretroviral prophylaxis can be offered to HIV-exposed infants. When intervention begins at the intrapartum (during labor or delivery) or neonatal periods, 9% to 13% HIV transmission rates are achievable based on clinical trial and observational data. This represents a 50% reduction in HIV transmission from rates that would be expected without intervention.

You should get tested for HIV at least once a year if:

  • You’re a sexually active gay or bisexual man. Some sexually active gay and bisexual men may benefit from more frequent testing (every 3 to 6 months).
  • You’ve had sex with an HIV-positive partner.
  • You’ve had more than one partner since your last HIV test.
  • You’ve shared needles or works to inject drugs.
  • You’ve exchanged sex for drugs or money.
  • You have another sexually transmitted disease, hepatitis, or tuberculosis.
  • You’ve had sex with anyone who has done anything listed above or with someone whose sexual history you don’t know.

You should be tested at least once a year if you keep doing any of these things. Sexually active gay and bisexual men may benefit from more frequent testing (for example, every 3 to 6 months).

Only certain body fluids; blood, semen (cum), pre-seminal fluid (pre-cum), rectal fluids, vaginal fluids, and breast milk from a person who has HIV can transmit HIV. These fluids must come in contact with a mucous membrane or damaged tissue or be directly injected into the bloodstream (from a needle or syringe) for transmission to occur. Mucous membranes are found inside the rectum, vagina, penis, and mouth. Early HIV infection often times has no symptoms. The only way to know if you are infected with HIV is to be tested. Currently, there is no effective cure that exists for HIV. However, with proper medical care, HIV can be controlled.

Before having sex for the first time with a new partner, you and your partner should talk about your sexual and drug-use history, disclose your HIV status, and consider getting tested for HIV and learning the results.

Knowing your HIV status gives you powerful information to help you take steps to keep you and your partner healthy.

  • If you test positive for HIV, you can take medicine to treat HIV to stay healthy for many years and greatly reduce the chance of transmitting HIV to your sex partner.
  • If you test negative for HIV, you have more prevention tools available today to prevent HIV than ever before.
  • If you are pregnant for HIV, you should be tested for HIV so that you can begin treatment if you’re HIV-positive. If an HIV-positive woman is treated for HIV early in her pregnancy, the risk of transmitting HIV to her baby is very low.

What happens during an HIV test?

You will either get a blood test in a lab, or do your own test at home.

For a blood test in a lab:

A health care professional will take a blood sample from a vein in your arm, using a small needle. After the needle is inserted, a small amount of blood will be collected into a test tube or vial. You may feel a little sting when the needle goes in or out. This usually takes less than five minutes.

For at home test, you will need to get a sample of saliva from your mouth or a drop of blood from your fingertip.

The test kit will provide instructions on how to get your sample, package it, and send it to a lab.

  • For a saliva test, you will use special spatula-like tool to take a swab from your mouth.
  • For a fingertip antibody blood test, you will use a special tool to prick your finger and collect a sample of blood.

For more information on at-home testing, talk to your health care provider.

Will other people know my HIV test result?

If you take an anonymous test, no one but you will know the result. If you take a confidential test, your test result will be part of your medical record, but it is still protected by state and federal privacy laws.

  • Anonymous testing means that nothing ties your test results to you. When you take an anonymous HIV test, you get a unique identifier that allows you to get your test results.
  • Confidential testing means that your name and other identifying information will be attached to your test results. The results will go in your medical record and may be shared with your health care providers and your health insurance company. Otherwise, the results are protected by state and federal privacy laws, and they can be released only with your permission.

With confidential testing, if you test positive for HIV, the test result and your name will be reported to the state or local health department to help public health officials get better estimates of the rates of HIV in the state. The state health department will then remove all personal information about you (name, address, etc.) and share the remaining non-identifying information with CDC. CDC does not share this information with anyone else, including insurance companies.

HIV test types

HIV tests are very accurate at detecting HIV, but no HIV test can detect HIV immediately after infection. How soon a test can detect infection depends upon different factors, including the type of HIV test being used. In general, nucleic acid tests (NAT) can detect HIV the soonest, followed by combination or fourth generation tests, and then antibody tests.

There are three types of HIV diagnostic tests: nucleic acid tests (NAT), antigen/antibody tests, and antibody tests.

  1. Nucleic acid tests (NAT) look for the actual virus in the blood. Nucleic acid test (NAT) is very expensive and is not routinely used for HIV screening unless the person recently had a high-risk exposure or a possible exposure with early symptoms of HIV infection. The NAT test can give either a positive/negative result or an amount of virus present in the blood (known as an HIV viral load test). Nucleic acid testing is usually considered accurate during the early stages of infection. Nucleic acid tests (NAT) can usually tell you if you are infected with HIV 10 to 33 days after an exposure. However, it is best to get an antibody (Ab) or antigen/antibody (Ag/Ab) test at the same time to help the health care provider understand what a negative NAT means. Taking pre-exposure prophylaxis (PrEP) or post-exposure prophylaxis (PEP) may also reduce the accuracy of NAT if you have HIV.
  2. Antigen/antibody tests look for both HIV antibodies and antigens. Antibodies are produced by your immune system when you’re exposed to bacteria or viruses like HIV. Antigens are foreign substances that cause your immune system to activate. If you’re infected with HIV, an antigen called p24 is produced even before antibodies develop. Tests that detect both antigen and antibodies are recommended for testing done in labs and are now common in the United States. There is also a rapid antigen/antibody test available. This test can usually find HIV within 2–6 weeks of infection.
  3. Antibody tests (also called immunoassay) detect the presence of antibodies, proteins that a person’s body makes against HIV, not HIV itself. Most rapid tests and home tests are antibody tests. In general, antibody tests that use blood from a vein can detect HIV sooner after infection than tests done with blood from a finger prick or with oral fluid. An HIV antibody test can determine if you have HIV from 3–12 weeks after infection. That’s because it can take a few weeks or longer for your immune system to make antibodies to HIV.
    • While most laboratories are now using antigen/antibody tests, laboratory-based antibody screening tests are still available. These tests require blood to be drawn from your vein into a tube and then that blood is sent to a laboratory for testing. The results may take several days to be available.
    • With a rapid antibody screening test, results are ready in 30 minutes or less. These tests are used in clinical and nonclinical settings, usually with blood from a finger prick or with oral fluid.
    • The oral fluid antibody self-test provides fast results. You have to swab your own mouth to collect an oral fluid sample and use a kit to test it. Results are available in 20 minutes. The manufacturer provides confidential counseling and referral to follow-up testing sites. These tests are available for purchase in stores and online. They may be used at home, or they may be used for testing in some community and clinic testing programs.
    • The home collection kit involves pricking your finger to collect a blood sample, sending the sample by mail to a licensed laboratory, and then calling in for results as early as the next business day. This antibody test is anonymous. The manufacturer provides confidential counseling and referral to treatment.

Most HIV tests, including most rapid tests and home tests, are antibody tests. Antibodies are produced by your immune system when you’re exposed to viruses like HIV and bacteria. Antibody tests look for these antibodies to HIV in your blood or oral fluid. In general, antibody tests that use blood can detect HIV slightly sooner after infection than tests done with oral fluid.

If you use any type of HIV antibody test and have a positive result, you will need to take a follow-up test to confirm your results. If your first HIV test is a rapid home test and it’s positive, you will be sent to a health care provider to get follow-up testing. If your first HIV test is done in a testing lab and it’s positive, the lab will conduct the follow-up testing, usually on the same blood sample as the first test.

A combination, or fourth-generation test looks for both HIV antibodies and antigens. Antigens are foreign substances that cause your immune system to activate. The antigen is part of the virus itself and is present during acute HIV infection. If you’re infected with HIV, an antigen called p24 is produced even before antibodies develop. Combination screening tests are now recommended for testing done in labs and are becoming more common in the United States. There is now a rapid combination test available.

Nucleic acid tests (NAT) look for HIV in the blood. The NAT HIV test can give either a positive/negative result or an actual amount of virus present in the blood (known as a viral load test). This test is very expensive and not routinely used for screening individuals unless they recently had a high-risk exposure or a possible exposure with early symptoms of HIV infection.

What influence does specimen type have on HIV testing?

Laboratory-based serum or plasma assays generally offer higher sensitivities but require venipuncture, larger specimen volumes, processing, and skilled technicians. Point-of-care tests are attractive alternatives for many applications, but performance differs substantially depending on the specimen type; tests using oral transudate are significantly less sensitive than those using whole blood, and tests using whole blood are less sensitive than those using serum or plasma 3. This hierarchy is at least partially explained by the relative concentration of detectable target(s) per volume of specimen tested. Forty-five percent of whole blood is made up of cells, so additional processing to yield plasma or serum further concentrates antigens and antibodies per unit volume.

Compared with plasma, oral transudate immunoglobulin concentrations are 300-fold lower 4. Because oral antibodies rise to detectable levels later than those in blood, the window period is prolonged when oral fluid is used for testing. This was demonstrated most clearly in a study of HIV seroconverters in Nigeria, in which antibodies in oral transudate became detectable a median of 29 days after those in plasma 5.

What advantages do point-of-care HIV test have over laboratory-based HIV tests?

The introduction of the first FDA-approved rapid test in 2002 and changes in regulations permitting use of certain tests outside laboratory settings revolutionized the process of getting tested for HIV 6. Point-of-care HIV tests are portable and easy to use, and the ability to perform HIV testing on oral transudate or fingerstick whole blood eliminates the need for venipuncture and the handling, processing, or storage of blood. This can make the entire encounter self-contained, allowing for anonymous testing where permitted by law. Point-of-care HIV tests also greatly increase the likelihood that the patient receives his or her result. These tests have one key disadvantage, however: although the 8 current FDA-approved point-of-care tests have excellent and generally comparable performance characteristics, laboratory-based HIV tests have greater sensitivity, especially early after infection.

Indeed, acute HIV-1 infection remains a critical blind spot for current point-of-care HIV tests. Because acute HIV-1 infection is characterized by the presence of p24 or HIV-1 RNA in the absence of detectable anti–HIV-1 antibodies, antibody-only tests cannot diagnose acute HIV-1 infection. Multiple laboratory-based p24/IgM/IgG platforms are available, but development of a point-of-care version with comparable performance has proved more challenging. The first such test was approved by the FDA in 2013 (Determine HIV-1/2 Ag/Ab Combo; Alere, Stockport, UK). Field evaluations have demonstrated excellent sensitivity for antibody detection but variable, suboptimal sensitivity for p24 7. Studies of a newer version of this same test suggest interim improvements, with antigen sensitivity as high as 88% 8. Using plasma instead of whole blood enhances test performance, suggesting a role for this test in situations when laboratory support is available but an automated platform is not 3.

How should PrEP use influence HIV test selection?

Data are accumulating that users of tenofovir disoproxil fumarate (TDF)–based PrEP who become infected in the context of poor adherence may have delayed seroconversion on blood-based and oral point-of-care HIV tests. In the Partners PrEP Study, participants underwent point-of-care HIV testing on whole blood with both IgM/IgG and p24/IgM/IgG-sensitive tests and had samples sent for multiple laboratory-based assays every 3 months 9. Delayed seroconversion was defined as more than 100 days between the first laboratory-based evidence of infection and the first point-of-care HIV test reactivity for the participant. Compared with those on placebo, participants with any pharmacologic evidence of adherence during the seroconversion period had 7.2 times the odds of delayed seroconversion; plasma RNA levels were lower, as well, but still detectable 9. Among participants randomized to receive single-agent tenofovir disoproxil fumarate (TDF)–based PrEP in the Bangkok Tenofovir Study who subsequently became HIV infected, oral antibody reactivity trailed the first evidence of HIV (antibody or RNA) in blood by a median of 126.5 days 10. Taken together, these findings underscore the importance of using laboratory-based serum or plasma tests whenever possible in the management of PrEP users and having a low threshold for augmenting p24/IgM/IgG-sensitive assays with nucleic acid testing (NAT) among users with known or suspected poor adherence.

Testing after a HIV exposure event

HIV testing is often prompted by a defined exposure, such as a needlestick injury, condom failure, or condomless sex. Because no diagnostic test is capable of detecting infection in the eclipse period, baseline testing is obtained to rule out undiagnosed, preexisting infection in the patient. Blood-based point-of-care HIV testing should be used whenever possible, to facilitate prompt initiation of postexposure prophylaxis (if indicated) 11. Strong preference should be given to an Ag/Ab combination test over antibody-only options, and oral fluid should not be used. Follow-up testing should occur 4 to 6 weeks and 3 months after baseline, with additional testing at 6 months if the exposure event resulted in hepatitis C virus infection 12. These recommended time points reflect expert opinion rather than a strict adherence to window period durations. If the patient tests negative at the end of the window period, one can be very confident that he or she did not acquire HIV from the exposure.

Outreach HIV testing in developed countries

Mobile testing units, syringe exchange programs, and community testing events place a premium on test portability, ease of administration, flexibility in specimen type, and rapid turnaround of results, all of which make point-of-care HIV tests an obvious, frequent choice. However, longer window periods and lower sensitivities with point-of-care HIV assays compared with their laboratory-based counterparts are important trade-offs to consider. Because some outreach testing populations may be more likely to have recent HIV infection, IgM/IgG-sensitive point-of-care HIV tests (including p24/IgM/IgG-sensitive assays) should be prioritized over those capable of detecting IgG only. Whenever logistically feasible, serum or plasma should be tested instead of whole blood, and consideration should be given to sending a specimen for laboratory platform testing in addition to the point-of-care HIV test. Oral transudate should be used as a specimen only when obtaining blood (through venipuncture or fingerstick) is impractical or undesirable 13. Patients and testing clients considering oral HIV self-testing should be counseled about its longer window period compared with either blood-based point-of-care HIV tests or laboratory-based assays.

Over the counter HIV test

Currently there are only two home HIV test kits:

  1. Home Access HIV-1 Test System and
  2. OraQuick In-home HIV test.

If you buy your home test online make sure the HIV test is United States Food and Drug Administration (FDA)-approved 14.

Home Access HIV-1 Test System

The Home Access HIV-1 Test System is a home collection kit, which involves pricking your finger to collect a blood sample, sending the sample to a licensed laboratory, and then calling in for results as early as the next business day. This test is anonymous. If the test is positive, a follow-up test is performed right away, and the results include the follow-up test. The manufacturer provides confidential counseling and referral to treatment. The tests conducted on the blood sample collected at home find infection later after infection than most lab-based tests using blood from a vein, but earlier than tests conducted with oral fluid.

How reliable is the Home Access HIV-1 Test System?

Clinical studies reported to FDA showed that the sensitivity (i.e., the percentage of results that will be positive when HIV is present) was estimated to be greater than 99.9%. The specificity (i.e., the percentage of results that will be negative when HIV is not present) was also estimated to be greater than 99.9%. Results reported as positive have undergone testing using both a screening test and another test to confirm the positive result.

What about counseling?

The Home Access HIV-1 Test System has a built-in mechanism for pre-test and post-test counseling provided by the manufacturer. This counseling is anonymous and confidential. Counseling, which uses both printed material and telephone interaction, provides the user with an interpretation of the test result. Counseling also provides information on how to keep from getting infected if you are negative, and how to prevent further transmission of disease if you are infected. Counseling provides you with information about treatment options if you are infected, and can even provide referrals to doctors who treat HIV-infected individuals in your area.

If the test results are positive, what should I do?

The counselors can provide you with information about treatment options and referrals to doctors who treat HIV-infected individuals in your area.

Do I need a confirmatory test?

No, a positive result from the Home Access HIV-1 Test System means that antibodies to the HIV-1 virus are present in the blood sample submitted to the testing laboratory. The Home Access HIV-1 Test System includes confirmatory testing for HIV-1, and all confirmation testing is completed before the results are released and available to users of the test system.

How quickly will I get the results of the Home Access HIV-1 Test System?

You can anonymously call for the results approximately 7 business days (3 business days for the Express System) after shipping your specimen to the laboratory by using the unique PIN on the tear-off label included with your test kit. This label includes both the unique PIN and the toll-free number for the counseling center.

OraQuick In-Home HIV Test

The OraQuick In-Home HIV Test provides rapid results in the home. The testing procedure involves swabbing your mouth for an oral fluid sample and using a kit to test it. Results are available in 20 minutes. If you test positive, you will need a follow-up test. The manufacturer provides confidential counseling and referral to follow-up testing sites. Because the level of antibody in oral fluid is lower than it is in blood, oral fluid tests find infection later after exposure than do blood tests. Up to 1 in 12 infected people may test false-negative with this test.

The OraQuick In-Home HIV Test is a rapid self-administered over-the-counter (OTC) test. The OraQuick In-Home HIV Test kit consists of a test stick (device) to collect the specimen, a test tube (vial) to insert the test stick (device) and complete the test, testing directions, two information booklets (“HIV, Testing and Me” and “What your results mean to you”), a disposal bag and phone numbers for consumer support.

This approved test uses oral fluid to check for antibodies to HIV Type 1 and HIV Type 2, the viruses that cause AIDS. The kit is designed to allow you to take the HIV test anonymously and in private with the collection of an oral fluid sample by swabbing your upper and lower gums with the test device. After collecting the sample you insert the device into the kit’s vial which contains a developer solution, wait 20-40 minutes, and read the test result. A positive result with this test does not mean that an individual is definitely infected with HIV but rather that additional testing should be done in a medical setting to confirm the test result. Additionally, a negative test result does not mean that an individual is definitely not infected with HIV, particularly when exposure may have been within the previous three months. Again an individual should obtain a confirmatory test in a medical setting.

If the test says I’m HIV positive, what should I do?

A positive test result does not necessarily mean that you are infected with HIV. If you test positive for HIV using the OraQuick In-Home Test, you should see your healthcare provider or call the OraQuick Consumer Support Center, which has support center representatives available 24 hours a day/7 days a week to answer your questions and provide referrals to local healthcare providers for follow-up care. You will be advised to obtain confirmatory testing to confirm a positive result or inform you that the initial result was a false positive result. The test kit also contains an information booklet, “What your results mean to You,” which is designed to instruct individuals on what to do once they have obtained their test results.

Do I need a confirmatory test?

A positive test result on the OraQuick In-Home HIV Test indicates that you may be infected with HIV. Additional testing in a medical setting will either confirm a positive test result or inform you that the initial result was a false positive result.

What is a “false positive” result?

A “false positive” result occurs when an individual not infected with the HIV virus receives a test result that indicates that he or she is infected with HIV.

If the test says I’m HIV negative, what should I do?

A negative result on this test does not necessarily mean that you are not infected with HIV. The OraQuick test kit contains an information booklet, “What your results mean to You,” which is designed to instruct individuals on what to do once they have obtained their test results. The test is relatively reliable if there has been sufficient time for HIV antibodies to develop in the infected person. For the OraQuick In-Home HIV Test, that period of time, called the window period, is about three months. If you have recently been engaging in behavior that puts you at high risk for HIV infection, you should take the test again at a later time. Alternatively, you should see your health care provider who can discuss other options for HIV testing.

What is a “false negative” result?

A “false negative” result occurs when an HIV-infected individual receives a test result that incorrectly indicates that he or she is not infected with HIV.

How quickly will I get the results of the OraQuick Test?

You can read the results of the OraQuick In-Home HIV Test within 20 to 40 minutes.

HIV screening test

HIV testing is the only way for someone to know if he or she has HIV infection. Early detection and treatment of HIV infection and immune system monitoring can greatly improve long-term health. Also, if a person knows his or her HIV status, it may help change behaviors that can put that person and others at risk.

Several organizations recommend routine screening for HIV. The Centers for Disease Control and Prevention (CDC), American College of Physicians and the U.S. Preventive Services Task Force recommend that anyone between the ages of 13 and 64 (or 15 to 65 in the case of the U.S. Preventive Services Task Force) and pregnant women be screened for HIV at least once.

Certain individuals should get tested at least once to learn their status, even if they are not between the ages of 13 and 64. These include:

  • People diagnosed with hepatitis, tuberculosis (TB) or a sexually transmitted disease
  • People who received a blood transfusion between 1978 and 1985 or had a sexual partner who received a transfusion and later tested positive for HIV
  • A healthcare worker with direct exposure to blood on the job
  • Any individual who thinks they may have been exposed

HIV screening at least annually is advised for those at high risk for HIV and is recommended when an individual:

  • Has had unprotected sex with more than one partner since the last HIV test
  • Is a man who has had sex with another man (CDC suggests that gay or bisexual men may benefit from more frequent screening, such as every 3 to 6 months)
  • Has used street drugs by injection, especially when sharing needles and/or other equipment
  • Has exchanged sex for drugs or money
  • Has an HIV-positive sex partner
  • Has had sex with anyone who falls into one of the categories listed above or is uncertain about their sexual partner’s risk behaviors

Types of HIV screening tests

  • Combination HIV antibody and antigen test — this is the recommended screening test for HIV. It is available only as a blood test. Antigen/antibody (Ag/Ab) combination (formerly fourth-generation) tests pair an IgM/IgG-sensitive antibody test with simultaneous, separate p24 antigen detection. Antigen/antibody test detects the HIV antigen called p24 plus antibodies to HIV-1 and HIV-2. (HIV-1 is the most common type found in the United States, while HIV-2 has a higher prevalence in parts of Africa.) The level of p24 antigen and the amount of virus (viral load) increase significantly soon after initial infection. Testing for p24 allows for detection of early infections, before HIV antibody is produced. About 2-8 weeks after exposure, antibodies to HIV are produced in response to the infection and remain detectable in the blood thereafter, making the antibody test useful for detecting infections weeks after exposure. By detecting both antibody and antigen, the combination test increases the likelihood that an infection is detected soon after exposure. In the lab, antigen from the patient specimen is first captured by immobilized, anti-p24 antibody on the solid phase of the assay, and then a separate, labeled anti-p24 antibody is applied, forming an “antibody sandwich.” Some of these p24/IgM/IgG-sensitive tests report a reactive result if any element is detected, whereas others yield separate results for p24, anti–HIV-1 antibodies, and anti–HIV-2 antibodies. Detecting p24 shortens the median window period down to just 18 days after infection 15.
  • HIV antibody testing — all HIV antibody tests used in the U.S. detect HIV-1 and some tests have been developed that can also detect HIV-2. These tests are available as blood tests or tests of oral fluid.
  • p24 antigen testing — this is used alone without the antibody test only in rare cases when there is a question about interference with an HIV antibody test.

How you can get access to HIV screening

  • A blood or oral sample can be collected in a health practitioner’s office or a local clinic and sent to a laboratory for testing. Certain testing centers provide either anonymous (the name is never given) or confidential (the name is given but kept private) HIV testing and counseling. People can also contact their state, county, or city health department to find out where testing may be available.
  • In these same settings, there may be a rapid test available in which results are generated in about 20 minutes.
  • A home collection kit is available that allows a person to take a sample at home and then mail it to a testing center. Results are available over the phone, along with appropriate counseling.
  • There is a home test for HIV test that uses an oral sample and results are available in about 20 minutes. This allows the person tested to remain anonymous and to get confidential results. The home test has two limitations: 1) testing on oral fluid is less sensitive than a blood test so the home test may miss some cases of HIV that a blood test would detect; and 2) the home test is not as accurate when it is performed at home by a lay person compared to when it is performed by a trained health professional. However, the convenience of home testing might encourage some people who might otherwise be reluctant to go to a health practitioner or clinic to learn their HIV status.

HIV testing center

To find a testing site near you, visit the National HIV and STD Testing Resources here (https://gettested.cdc.gov/).

Many testing locations are FREE and confidential. You can also buy a home testing kit at a pharmacy or online. Most HIV tests are covered by health insurance.

What is False-Negative HIV test?

When a person is infected with HIV but receives a negative test result when, in fact, an abnormal condition is actually present.

What is False-Positive HIV test?

When a person is not infected with HIV but receives a positive test result, that result is considered a false positive. Generally, HIV tests have high specificity, meaning that there are few false-positive results and most uninfected individuals are classified as uninfected by the test. If 1,000 uninfected people are tested with an HIV test and 4 have false-positive results, the HIV test’s specificity is 99.6% (996 true negative test results/1,000 HIV uninfected persons tested).

Causes of False-Positive HIV Test Results

False-positive test results can occur due to technical issues associated with the test or biological causes. Technical issues include specimen mix-up, mislabeling, improper handling, and misinterpretation of a visually read rapid test result. Biological causes include participation in an HIV vaccine study, autoimmune disorders and other medical conditions 16.

Additional Testing to Distinguish True Positive from False Positive

When a screening test is positive, additional testing is needed to determine if the positive result was accurate or whether the screening test result was falsely positive. If the screening test was a laboratory test, additional testing will generally occur using the original specimen 17.

If it was a rapid test, additional testing may occur in one of three ways: by submitting a specimen to the laboratory, by conducting a rapid test algorithm (i.e., rapid tests from different test manufacturers in sequence), or by referring the individual to a healthcare provider who can conduct additional testing 18.

If a rapid test algorithm is conducted and the initial test is reactive, but the subsequent test is not, additional testing in a laboratory is needed to rule out an early infection 19.

Impact of HIV Prevalence

HIV prevalence is the proportion of a population living with HIV infection. HIV prevalence within a population tested influences how many false-positive results there are relative to true-positive results.

High prevalence:

If you test 10,000 specimens and HIV prevalence is high (2%), 200 specimens will be from persons who are infected with HIV (true-positive) and 9,800 will be from persons who are not infected with HIV. If test specificity is 99.8%, results for approximately 20 specimens will be false-positive. In this case, of the 220 with
positive results (200 true-positives plus 20 false-positives), 91% are actually infected with HIV. The number of true positives far exceeds the number of false positives.

Low prevalence:

If HIV prevalence is much lower (0.1%), only 10 of 10,000 specimens will be from persons who are infected with HIV (true-positive) and 9,990 will be from persons who are not infected with HIV. If test specificity is 99.8%, results for 20 specimens will be false-positive. In this case, of the 30 with positive results (10 true-positives plus 20 false-positives), only 33% will be actually infected and the number of false-positives will exceed the number of true-positives. A testing program in a low prevalence population that implements routine testing of everyone in the population may be testing more low-risk people, and may expect to see more false-positive than true-positive results.

HIV Diagnosis

If any of the above screening tests is positive, then it must be followed by a second test to establish a diagnosis. This second test is an antibody test that is different than the first test. If the second test does not agree with the first test, then a third test is performed that detects the genetic material (RNA) of the virus.

In 2014, the CDC updated its HIV testing recommendations to include a new testing protocol, which has been accepted by the Clinical Laboratory Standards Institute:

  1. Screen for HIV using a combination HIV antigen/antibody test, then
  2. Verify a positive with a second HIV antibody test that differentiates between HIV-1 and HIV-2.
  3. If results between the first and second test do not agree, then the next test to perform is an HIV-1 RNA test (nucleic acid amplification test, NAAT). If the HIV-1 RNA is positive, then the test is considered positive.

Other HIV tests:

  • HIV viral load testing—measures the amount of HIV in the blood; it is performed when a person is first diagnosed to help determine the status of the disease and is ordered at intervals to monitor the effectiveness of therapy.
  • CD4 count—measures the number of CD4 T-cells in the blood; it is ordered when a person is first diagnosed to get a baseline assessment of the immune system and done at intervals to monitor therapy and the status of the immune system. If a person is doing well on treatment, this test may be done yearly.
  • HIV genotypic resistance testing—ordered when someone is initially diagnosed to determine whether the particular strain(s) of HIV that the person has is resistant to certain antiretroviral drug therapies; also ordered when treatment is changed or when there is evidence of treatment failure.
  • Phenotypic resistance testing–sometimes ordered for those who are resistant to multiple antiretroviral drugs to help guide treatment; this test evaluates whether the person’s strain(s) of HIV can be inhibited by various concentrations of antiretroviral drugs.
  • Individuals who are planning to take the drug abacavir may be tested first for the gene allele, HLA-B*5701. If they are positive for it, they are at an increased risk of having a potentially severe hypersensitivity reaction and another drug should be considered.

Figure 1. HIV blood test – HIV Screening Algorithm

HIV blood test - HIV Screening Algorithm

A number of other laboratory testing may be performed as part of overall care of an HIV-infected individual. Several tests may be done to identify and monitor the treatment of opportunistic infections, complications, and drug toxicities. Testing may also be ordered at intervals to evaluate the person’s health and organ function. Some examples include:

  • Complete blood count
  • Comprehensive metabolic panel
  • Urinalysis
  • Tests for other sexually transmitted diseases, such gonorrhea or syphilis
  • Tests for other infections such as viral hepatitis or tuberculosis

Non-laboratory tests

Testing such as a chest X-ray or an imaging scan may sometimes be performed to help evaluate the person’s health status.

What if my HIV test result is Negative?

You could still have HIV. Ask your doctor about the “window period,” a period of time after a person is infected during which they won’t test positive.

A negative test result from HIV testing may mean one of two things: You don’t have HIV, or it’s too soon yet to tell.

If you were only recently exposed to HIV, you could test negative for HIV antibodies because your body hasn’t had time to create them yet. You may want to be retested for HIV antibodies in a few months or opt for one of the early-detection tests.

To stay negative, take actions to prevent HIV.

What if my HIV test result is Positive?

You may be given a follow-up test to confirm the result.

Finding out you have HIV can be scary, but you can still live a healthy life if you take action.

If you have HIV, start medical care right away. HIV treatment can keep you healthy for many years and reduce your chance of transmitting the virus to others.

Data from a National Institutes of Health sponsored trial 20 indicates there is a clear personal advantage to diagnosis soon after HIV infection and starting therapy early in the course of infection. The study further highlights the importance of routine HIV testing and the potential impact of early treatment on better health outcomes.

How soon can HIV be detected by a blood test

No HIV test can detect HIV immediately after infection. If you think you’ve been exposed to HIV in the last 72 hours, talk to your health care provider about post-exposure prophylaxis (PEP), right away.

The time between when a person may have been exposed to HIV and when a test can tell for sure whether they have HIV is called the window period. The window period varies from person to person and depends on the type of test used to detect HIV.

  • A nucleic acid test (NAT) can usually tell you if you are infected with HIV 10 to 33 days after an exposure.
  • An antigen/antibody test performed by a laboratory on blood from a vein can usually detect HIV infection 18 to 45 days after an exposure. Antigen/ antibody tests done with blood from a finger prick can take longer to detect HIV (18 to 90 days after an exposure). When the goal is to tell for sure that a person does not have HIV, an antigen/antibody test performed by a laboratory on blood from a vein is preferred.
  • Antibody tests can usually take 23 to 90 days to reliably detect HIV infection. Most rapid tests and home tests are antibody tests. In general, antibody tests that use blood from a vein can detect HIV sooner after infection than tests done with blood from a finger prick or with oral fluid.

Ask your health care provider about the window period for the test you’re taking. If you’re using a home test, you can get that information from the materials included in the test’s package. If you get an HIV test after a potential HIV exposure and the result is negative, get tested again after the window period for the test you’re taking to be sure. If your health care provider uses an antigen/antibody test performed by a laboratory on blood from a vein you should get tested again 45 days after your most recent exposure. For other tests, you should test again at least 90 days after your most recent exposure to tell for sure if you have HIV.

If you learned you were HIV-negative the last time you were tested, you can only be sure you’re still negative if you haven’t had a potential HIV exposure since your last test. If you’re sexually active, continue to take actions to prevent HIV, like using condoms the right way every time you have sex and taking medicines to prevent HIV if you’re at high risk.

After an exposure that leads to infection, there is a variable amount of time called the eclipse period in which no existing diagnostic test is capable of detecting HIV (Figure 2). HIV RNA is the first reliable marker of infection; 50% of infected individuals have detectable plasma RNA within 12 days 15, and levels peak between 20 and 30 days 21. By day 15, the HIV-1 capsid protein p24 reaches detectable levels in the plasma 21. Antigenemia with p24 continues to rise through days 25 to 30, at which point early anti-HIV antibodies are able to complex with circulating p24; by day 50, antigen is often cleared from the bloodstream entirely 22. This short-lived detectability of p24 is therefore helpful in determining recency of infection, but it also makes its utility in diagnosis time limited.

As with other infections, the serum antibody response starts with immunoglobulin class M (IgM) molecules, beginning to rise around day 20, peaking within another 10 to 15 days, and then shifting to a more mature immunoglobulin class G (IgG) response beginning between days 30 and 35 23.

The time from infection to the first reactive result on a given test is referred to as the window period, the length of which depends on the target being detected by a particular assay. For example, tests capable of identifying anti-HIV IgM have a shorter window period compared with those detecting only IgG. Variability in the time needed for targets to rise to detectable levels in different persons means that the window period actually reflects a distribution of time rather than a fixed length that is identical for everyone.

The CDC study 24 showed that laboratory testing using antigen/antibody (Ag/Ab) laboratory tests detects HIV infection sooner than other available tests that detect only antibodies. If a person gets a laboratory-based antigen/antibody test on blood plasma less than 45 days after a possible HIV exposure and the result is negative, follow-up testing can begin 45 days after the possible HIV exposure. For all other tests, CDC recommends testing again at least 90 days after exposure to be sure that a negative test result is accurate.

Most, but not all people will have enough HIV in their blood for a NAT (nucleic acid test) test to detect infection 7 to 28 days after infection. This is during the time when someone has acute HIV infection.

It can take 7 to 28 days for a NAT to detect HIV. Nucleic acid testing is usually considered accurate during the early stages of infection. However, it is best to get an antibody or combination test at the same time to help the doctor interpret the negative NAT. This is because a small number of people naturally decrease the amount of virus in their blood over time which can lead to an inaccurate negative NAT result. Taking pre-exposure prophylaxis (PrEP) or post exposure prophylaxis (PEP) may also reduce the accuracy of NAT if you have HIV.

Figure 2. Timeline of virologic and serologic events after HIV infection

Timeline of virologic and serologic events after HIV infection

Footnotes: The length of time between an exposure event (X) and dissemination of HIV systemically depends on the mode of transmission. The eclipse period reflects time from exposure to the first detectable marker of infection: HIV RNA in the blood. Times to reactivity for each type of diagnostic test are depicted below the graph, from the earliest (nucleic acid amplification test) to the latest (IgG-sensitive assay).

[Source 25]

Figure 3. Days between HIV acquisition and Hologic Aptima NAT (nucleic acid test) reactivity. Hologic Aptima is the only nucleic acid test (NAT) currently approved by the FDA for diagnostic use in the US.

days-between-HIV-acquisition-and-Aptima-NAT-reactivity

[Source 24]

What is the Window Period?

The “window period” varies from person to person, and is also different depending upon the type of HIV test. Most HIV tests are antibody tests. It takes time for the body to produce enough antibodies for an HIV test to show that a person has HIV. The soonest an antibody test will detect infection is 3 weeks. Most, but not all people will develop detectable antibodies within 3 to 12 weeks of infection.

Most, but not all people will make enough antigens and antibodies for fourth generation or combination HIV tests to accurately detect infection 13 to 42 days after infection.

Most, but not all people will have enough HIV in their blood for a NAT (nucleic acid test) test to detect infection 7 to 28 days after infection. This is during the time when someone has acute HIV infection.

What you can do

Let your health care provider know if you may have been exposed to HIV. Together, you can figure out the best type of HIV test you should have. Ask your health care provider about the window period for the test you’re taking. If you’re using a home test, you can get that information from the materials included in the test’s package. If you get an HIV test within 3 months after a potential HIV exposure and the result is negative, get tested again in 3 more months to be sure.

If you think you’ve recently been exposed to HIV during sex (e.g., if the condom breaks or comes off) or through sharing needles and works to prepare drugs (e.g., cotton, cookers, water), talk to your health care provider or an emergency room doctor about taking post-exposure prophylaxis (PEP) right away. PEP must begin as soon as possible, and always within 72 hours (3 days) of a recent possible exposure.

What are HIV and AIDS?

HIV (human immunodeficiency virus) is the virus that causes AIDS (acquired immunodeficiency syndrome). HIV progressively destroys the body’s ability to fight infections and certain cancers. It weakens the immune system by infecting lymphocytes, a type of white blood cell, that normally help the body fight infections. Specific lymphocytes known as T-helper cells or CD4 cells are major targets for HIV. The virus binds to CD4 cells, enters them, replicates inside them, and eventually kills them.

Over time, the amount of HIV virus—the viral load—increases while the number of CD4 cells in the blood declines. After several years without treatment, the number of CD4 cells can drop to the point that AIDS-associated conditions and symptoms begin to appear. AIDS treatments can slow disease progression by reducing the amount of HIV in the body. This allows the body’s CD4 cells to increase or stabilize.

Currently, the Centers for Disease Control and Prevention (CDC) estimates that about 50,000 people in the U.S are newly infected with HIV each year, that 1.2 million people in the U.S. are living with HIV infection, and that nearly 13% of those with the infection are not aware of it and can pass the virus on to others. In 2012, the year with the most current statistics, nearly 14,000 people with AIDS died, and almost 660,000 have died since the beginning of the epidemic, according to the CDC.

Worldwide, as many as 2.1 million people in 2013 were newly infected with HIV, 1.5 million died of AIDS-related illnesses, and 35 million people were living with HIV, according to the World Health Organization.

HIV can be spread the following ways:

  • By having unprotected sex with an infected partner; the virus can enter the body through the lining of the vagina, vulva, penis, rectum, or mouth during sex. Having a sexually transmitted disease (STD) such as syphilis, genital herpes, chlamydia, gonorrhea, or bacterial vaginosis appears to make people more susceptible to and at higher risk for acquiring HIV infection during sex with infected partners.
  • By sharing needles or syringes (such as with intravenous injection drug abuse), which can be contaminated with very small quantities of blood from someone infected with the virus.
  • During pregnancy or birth; approximately 25% to 35% of all untreated pregnant women infected with HIV will pass the infection to their babies. HIV also can be spread to babies through the breast milk of mothers infected with the virus. If the mother is treated with antiretroviral therapy (ART) during pregnancy, she can significantly reduce the chances of passing the infection to her baby.
  • Through contact with infected blood; in the U.S. today, because of screening blood for transfusion and heat-treating techniques and other treatments of blood derivatives, the risk of getting HIV from transfusions is extremely small. However, before donated blood was screened for evidence of HIV infection and before treatments were introduced to destroy HIV in some blood products, such as factor VIII and albumin, HIV was transmitted through transfusion of contaminated blood or blood components. In areas of the world where donated blood is not routinely screened or treated for HIV, there is still risk of contracting the disease through this mode of transmission.

Initially, HIV usually causes flu-like symptoms, but some people may not experience any obvious signs or symptoms. The only way to determine whether a person has been infected is through HIV testing.

A person’s HIV status, like other medical conditions and test results, is protected by the Health Insurance Portability and Accountability Act (HIPAA) Privacy Rule and cannot be shared by healthcare providers with friends, family, or employers without written permission. However, if a person tests positive for HIV, it is important that he or she tell their healthcare providers as well as all sex partners and/or anyone with whom they share needles. Counseling services are often available from the clinic or healthcare provider that performed the test and they can help to advise the individual on who needs to know.

HIV status may be shared with healthcare providers who have a “need to know” in order to treat an individual. Also, in order to determine the incidence of HIV and to provide appropriate prevention and care services, all new cases of HIV are reported to state and local health departments. As of April 2008, data from all 50 states, the District of Columbia, and 5 dependent areas (American Samoa, Guam, the Northern Mariana Islands, Puerto Rico, and the U.S. Virgin Islands) are collected using a confidential name-based reporting system.

HIV Prevention

There is currently no cure for HIV infection and no vaccine to protect against HIV, but avoiding high-risk activities such as having unprotected sex and sharing needles for injecting drugs can help to prevent its spread. Routine screening for HIV has been recommended by the Centers for Disease Control and Prevention (CDC) and several other organizations to help identify HIV infections in people who may have no signs or symptoms. The early diagnosis of HIV infection is important to prevent its transmission to others and to allow evaluation, monitoring, and early treatment of the affected person.

Treatment of HIV-infected mothers during pregnancy, precautions at birth, and avoiding breast-feeding can minimize the risk of passing the infection from mother to child. Giving the antiretroviral drug zidovudine intravenously during labor and delivery and also to the newborn twice a day by mouth for 6 weeks reduces the rate of transmission from 25-33% to about 1-2%. A combination of antiretroviral therapies is most effective at reducing the risk of HIV transmission to the baby.

Healthcare workers can protect themselves from HIV infection by following universal precautions, such as wearing gloves and avoiding needle sticks.

While there is no vaccine that prevents HIV, the CDC and the World Health Organization (WHO) recommend that individuals without HIV infection but at high risk for it consider taking pre-exposure prophylaxis (PrEP), a daily pill to help prevent infection. For people taking PrEP consistently, the risk of HIV infection was up to 92% lower compared to those who didn’t take it.

Is abstinence the only 100% effective HIV prevention?

Yes. Abstinence means not having oral, vaginal, or anal sex. An abstinent person is someone who’s never had sex or someone who’s had sex but has decided not to continue having sex for some period of time. Abstinence is the only 100% effective way to prevent HIV, other sexually transmitted diseases (STDs), and pregnancy. The longer you wait to start having oral, vaginal, or anal sex, the fewer sexual partners you are likely to have in your lifetime. Having fewer partners lowers your chances of having sex with someone who has HIV or another STD.

How can I prevent getting HIV from anal or vaginal sex?

Use condoms the right way every time you have sex, take medicines to prevent or treat HIV if appropriate, choose less risky sexual behaviors, get tested for other sexually transmitted diseases (STDs), and limit your number of sex partners. The more of these actions you take, the safer you can be.

Specifically, you can:

  • Use condoms the right way every time you have sex (see How well do condoms prevent HIV?). Learn the right way to use a male condom.
  • Reduce your number of sexual partners. This can lower your chances of having a sex partner who will transmit HIV to you. The more partners you have, the more likely you are to have a partner with HIV whose viral load is not suppressed or to have a sex partner with a sexually transmitted disease. Both of these factors can increase the risk of HIV transmission.
  • Talk to your doctor about pre-exposure prophylaxis (PrEP), taking HIV medicines daily to prevent HIV infection, if you are at very high risk for HIV. PrEP should be considered if you are HIV-negative and in an ongoing sexual relationship with an HIV-positive partner. PrEP also should be considered if you aren’t in a mutually monogamous relationship with a partner who recently tested HIV-negative, and you are a:
    • gay or bisexual man who has had anal sex without a condom or been diagnosed with an STD in the past 6 months;
    • man who has sex with both men and women; or
    • heterosexual man or woman who does not regularly use condoms during sex with partners of unknown HIV status who are at very high risk of HIV infection (for example, people who inject drugs or women who have bisexual male partners).
  • Post-exposure prophylaxis (PEP) means taking HIV medicines after being potentially exposed to HIV to prevent becoming infected. If you’re HIV-negative or don’t know your HIV status and think you have recently been exposed to HIV during sex (for example, if the condom breaks), talk to your health care provider or an emergency room doctor about PEP right away (within 3 days). The sooner you start PEP, the better; every hour counts. If you’re prescribed PEP, you’ll need to take it once or twice daily for 28 days. Keep in mind that your chance of getting HIV is lower if your HIV-positive partner is taking medicine to treat HIV infection (called antiretroviral therapy, or ART) the right way, every day and his or her viral load remains suppressed.
  • Get tested and treated for other STDs and encourage your partners to do the same. If you are sexually active, get tested at least once a year. Having other STDs increases your risk for getting or transmitting HIV. STDs can also have long-term health consequences. Find an STD testing site.
  • If you’re HIV-negative and your partner is HIV-positive, encourage your partner to get and stay on treatment. If taken the right way, every day, the medicine to treat HIV (ART) reduces the amount of HIV (called “viral load”) in the blood and elsewhere in the body to very low levels. This is called “viral suppression.” Being virally suppressed is good for an HIV-positive person’s overall health and greatly reduces the chance of transmitting the virus to a partner.
  • Choose less risky sexual behaviors. HIV is mainly spread by having anal or vaginal sex without a condom or without taking medicines to prevent or treat HIV.

Receptive anal sex is the riskiest type of sex for getting HIV. It’s possible for either partner—the partner inserting the penis in the anus (the top) or the partner receiving the penis (the bottom)—to get HIV, but it is much riskier for an HIV-negative partner to be the receptive partner. That’s because the lining of the rectum is thin and may allow HIV to enter the body during anal sex.

Vaginal sex also carries a risk for getting HIV, though it is less risky than receptive anal sex. Most women who get HIV get it from vaginal sex, but men can also get HIV from vaginal sex.

In general, there is little to no risk of getting or transmitting HIV from oral sex. Theoretically, transmission of HIV is possible if an HIV-positive man ejaculates in his partner’s mouth during oral sex. However, the risk is still very low, and much lower than with anal or vaginal sex. Factors that may increase the risk of transmitting HIV through oral sex are oral ulcers, bleeding gums, genital sores, and the presence of other STDs, which may or may not be visible.

Sexual activities that don’t involve contact with body fluids (semen, vaginal fluid, or blood) carry no risk of HIV transmission but may pose a risk for other STDs.

How can I prevent getting HIV from oral sex?

In general, there is little to no risk of getting or transmitting HIV from oral sex. Theoretically, transmission of HIV is possible if an HIV-positive man ejaculates in his partner’s mouth during oral sex. However, the risk is still very low, and much lower than with anal or vaginal sex.

Oral sex involves putting the mouth on the penis (fellatio), vagina (cunnilingus), or anus (anilingus). There’s little to no risk of getting or transmitting HIV through oral sex. Factors that may increase the risk of transmitting HIV through oral sex are oral ulcers, bleeding gums, genital sores, and the presence of other sexually transmitted diseases (STDs), which may or may not be visible.

While there is little to no risk of getting HIV from oral sex, using a barrier (for example, a condom, dental dam, or cut-open nonlubricated condom) can further reduce your risk of getting or transmitting HIV and protect you and your partner from some other STDs, including gonorrhea of the throat and hepatitis.

The risk is also lower if the HIV-positive partner is taking medicine to treat HIV (called antiretroviral therapy or ART), or if the HIV-negative partner is taking medicine to prevent HIV (called pre-exposure prophylaxis or PrEP). Both PrEP and ART need to be taken the right way every time in order to work.

Because your mouth may come into contact with feces or other body fluids during oral sex, it is important that you talk to a health care provider about your chances of getting hepatitis A and B. If you’ve never had hepatitis A or B, there are vaccines to prevent them. Your provider can help you decide if vaccination is right for you.

How well do condoms prevent HIV?

If you use them the right way every time you have sex, condoms are highly effective in preventing HIV infection. But it’s important to educate yourself about how to use them the right way.

Condoms can also help prevent other sexually transmitted diseases (STDs) you can get through body fluids, like gonorrhea and chlamydia. However, they provide less protection against STDs spread through skin-to-skin contact, like human papillomavirus or HPV (genital warts), genital herpes, and syphilis.

There are two main types of condoms: male and female.

Male Condoms

  • A male condom is a thin layer of latex, polyurethane, polyisoprene, or natural membrane worn over the penis during sex.
  • Latex condoms provide the best protection against HIV. Polyurethane (plastic) or polyisoprene (synthetic rubber) condoms are good options for people with latex allergies, but plastic ones break more often than latex ones. Natural membrane (such as lambskin) condoms have small holes in them, so they don’t block HIV and other STDs.
  • Use water- or silicone-based lubricants to lower the chances that a condom will break or slip during sex. Don’t use oil-based lubricants (for example, Vaseline, shortening, mineral oil, massage oils, body lotions, and cooking oil) with latex condoms because they can weaken the condom and cause it to break. Don’t use lubricants containing nonoxynol-9. It irritates the lining of the vagina and anus and increases the risk of getting HIV.

Female Condoms

  • A female condom is a thin pouch made of a synthetic latex product called nitrile. It’s designed to be worn by a woman in her vagina during sex.
  • When worn in the vagina, female condoms are comparable to male condoms at preventing HIV, other STDs, and pregnancy. Some people use female condoms for anal sex. Scientists don’t currently know how well female condoms prevent HIV and other STDs when used by men or women for anal sex. But they do know that HIV can’t travel through the nitrile barrier.
  • It is safe to use any kind of lubricant with nitrile female condoms.

Even if you use condoms the right way every time you have sex, there’s still a chance of getting HIV. For some individuals at high risk of getting or transmitting HIV, adding other prevention methods, like taking medicines to prevent and treat HIV, can further reduce their risk.

Can I take medicines to prevent getting HIV?

If you are at very high risk for HIV from sex or injecting drugs, taking HIV medicines daily, called pre-exposure prophylaxis (or PrEP), can greatly reduce your risk of HIV infection. You can combine additional strategies with PrEP to reduce your risk even further.

Federal guidelines recommend that PrEP be considered for people who are HIV-negative and at very high risk for HIV. This includes anyone who is in an ongoing sexual relationship with an HIV-positive partner. It also includes anyone who:

  • Is not in a mutually monogamous* relationship with a partner who recently tested HIV-negative, and
  • Is a
    • gay or bisexual man who has had anal sex without a condom or been diagnosed with an STD in the past 6 months;
    • man who has sex with both men and women; or
    • heterosexual man or woman who does not regularly use condoms during sex with partners of unknown HIV status who are at substantial risk of HIV infection (for example, people who inject drugs or women who have bisexual male partners).

PrEP is also recommended for people who’ve injected drugs in the past 6 months and have shared needles or works or been in drug treatment in the past 6 months.

If you have a partner who is HIV-positive and are considering getting pregnant, talk to your doctor about PrEP. It may be an option to help protect you and your baby.

PrEP involves daily medication and regular visits to a health care provider.

Can I take medicines to prevent HIV after exposure?

Yes. Taking medicine after being potentially exposed to HIV, called post-exposure prophylaxis (or PEP), can keep you from becoming infected. But PEP must be started within 72 hours after a possible exposure.

If you think you’ve recently been exposed to HIV during sex (for example, if the condom breaks) or through sharing needles and works to prepare drugs (for example, cotton, cookers, water), talk to your health care provider or an emergency room doctor about PEP right away. The sooner you start PEP, the better; every hour counts. If you’re prescribed PEP, you’ll need to take it once or twice daily for 28 days.

Someone who is on PEP should continue to use condoms with sex partners and safe injection practices while taking PEP.

Development of AIDS

HIV initially causes an acute illness with non-specific, flu-like symptoms. During this time, the virus is present in large numbers and is carried throughout the body. About 2 to 8 weeks after exposure, the person’s immune system responds by producing antibodies against the virus. As HIV infects the immune cells called CD4 T-cells (also called helper T cells), it slowly begins to decrease their numbers. The person may be apparently healthy for a decade or more, but without treatment, HIV continues to replicate and destroy CD4 T-cells. The virus remains in places such as the brain and lymph nodes, where it will persist even during drug treatment.

The term AIDS applies to the most advanced stages of HIV infection. According to the CDC, AIDS is diagnosed when an individual’s CD4 T-cell count drops below 200 cells/mm3. AIDS is also diagnosed when an individual has HIV and an AIDS-related illness, such as tuberculosis or pneumonia caused by the microorganism Pneumocystis jirovecii (carinii). In people with AIDS, opportunistic infections are often severe and sometimes fatal because the immune system is so damaged by HIV that the body cannot fight off certain bacteria, viruses, fungi, or parasites. Those with HIV/AIDS are also at an increased risk of developing certain cancers, neurological disorders, and a variety of other conditions.

HIV and AIDS Treatment

The goals of HIV and AIDS treatment are to suppress the virus to undetectable levels and to preserve the person’s immune function and health. Suppressing viral replication prevents or inhibits HIV mutation and the development of drug resistance. It slows the progression of the disease and allows the number of CD4 T-cells to increase, improving immune function. Treatment of complications and opportunistic infections is also important, as is addressing drug therapy side effects and toxicity.

The U.S. Department of Health and Human Services Panel on Antiretroviral Guidelines for Adults and Adolescents as well as WHO recommend that all individuals diagnosed with HIV receive treatment as soon as possible, including pregnant women. With advances in treatment, individuals with HIV are living longer, healthier lives. Once someone begins treatment, it is important that the person continue it for the rest of their life to help maintain health and prevent spread of HIV. Interruptions in treatment can lead to increases in the amount of virus (viral load) and can increase the risk of developing drug resistance, decrease immune function, and allow disease progression.

Drug selection

A person may be infected with drug-susceptible and/or drug-resistant strains of HIV. Testing for drug resistance is performed when a person is first diagnosed to help guide therapy. There are several classes of antiretroviral drugs used to treat HIV/AIDS. People typically take at least three drugs from two different classes in order to prevent or minimize virus replication and the emergence of drug-resistant strains. Combinations of three or more antiretroviral drugs are referred to as highly active antiretroviral therapy or HAART. There are preferred treatment regimens, but the specific drugs given must be tailored to the individual and to the strain(s) of HIV with which he or she is infected.

Drug therapies may be evaluated and changed as necessary if the person experiences treatment failure, indicating the development of resistance to one or more of the drugs the person is taking. Another reason treatment may be changed is if the individual experiences significant side effects and toxicity. This may be related to the person’s ability to absorb and metabolize the drug(s).

People with HIV/AIDS will need to work closely with their healthcare provider(s) throughout their lifetime to adjust their medications to their changing needs. Treatment of people who have developed resistance to one or more drugs or classes of drugs can become challenging. Those affected may need to consult with health practitioners who specialize in the management of “treatment-experienced” patients. New HIV/AIDS drug treatments are continually being developed and brought into clinical use.

How long does HIV test take

Regardless of the type of screening test used, a positive result will require follow-up testing to establish an HIV diagnosis. If you test positive for HIV on both the initial and follow-up testing, it means you are HIV-positive. It usually takes a few days to a few weeks to get results of an HIV test, although some rapid HIV tests can produce results in about 20 minutes.

  • Nucleic acid tests (NAT) can usually tell you if you are infected with HIV 10 to 33 days after an exposure
  • Antigen/antibody HIV test can usually detect HIV infection 18 to 45 days after an exposure
  • Antibody HIV test can usually take 23 to 90 days to reliably detect HIV infection

Rapid HIV testing

Several rapid tests offer highly accurate information within as little as 20 minutes. These tests look for antibodies to HIV using a sample of your blood, drawn from a vein or a finger prick, or fluids collected on a treated pad that is rubbed on your upper and lower gums. A positive reaction on a rapid test requires a confirming blood test.

Home HIV testing

There are two HIV home test kits approved by the U.S. Food and Drug Administration (FDA) for home use. Both are HIV antibody tests.

The Home Access HIV-1 Test System is a home collection kit, which involves pricking the finger for a blood sample, sending the sample to a lab for testing, and then calling the lab for results as early as the next business day. If the result is positive for HIV, the lab will do a follow-up test on the same blood sample to confirm the initial HIV-positive test result.

The OraQuick In-Home HIV Test comes with a test stick and a tube with a testing solution. The test stick is used to swab the gums to get a sample of oral fluids. To get results, the test stick is inserted into the test tube. Test results are ready in 20 minutes. A positive result on this home HIV test must always be confirmed by additional HIV testing performed in a health care setting.

Home testing involves two options:

  • Mailing a blood sample to a testing center and calling in for your results
  • Collecting an oral fluid sample at home and using a kit to test it yourself

Both methods ensure anonymity and offer confidential counseling and referral to follow-up testing sites if your test results are positive.

Early-detection HIV testing

Some tests can detect HIV infection earlier, before antibodies are detectable in standard HIV testing. These early-detection tests evaluate your blood for genetic material from the virus or for proteins that develop within the first few weeks after infection.

Tests that detect HIV infection before you’ve developed antibodies to the virus may cost more than standard HIV testing and may not be as widely available. You will also still need standard antibody testing later to confirm results because false-positives and false-negatives are possible.

How long does HIV test take

HIV test accuracy

The HIV test may not detect an infection that was contracted very recently. HIV is usually diagnosed by testing your blood or a sample of cells taken with a swab from inside your cheek for the presence of antibodies to the virus.

Some HIV tests aren’t accurate immediately after infection because it takes time for your body to produce antibodies to the virus. It can take up to three to 12 weeks for someone to make enough antibodies for an antibody test to detect HIV infection.

  • Nucleic acid tests (NAT) can usually tell you if you are infected with HIV 10 to 33 days after an exposure
  • Antigen/antibody HIV test can usually detect HIV infection 18 to 45 days after an exposure
  • Antibody HIV test can usually take 23 to 90 days to reliably detect HIV infection

OraQuick In-Home HIV Test

As noted in the package insert, clinical studies have shown that the OraQuick In-Home HIV Test has an expected performance of approximately 92% for test sensitivity (i.e., the percentage of results that will be positive when HIV is present). This means that one false negative result would be expected out of every 12 test results in HIV infected individuals. The clinical studies also showed that the OraQuick In-Home HIV Test has an expected performance of 99.98% for test specificity (i.e., the percentage of results that will be negative when HIV is not present). This means that one false positive result would be expected out of every 5,000 test results in uninfected individuals.

It is extremely important for those who self-test using the OraQuick In-Home HIV Test to carefully read and follow all labeled directions. Even when used according to the labeled directions, there will be some false negative results and a small number of false positive results. The OraQuick test package contains step-by-step instructions, and there is also an OraQuick Consumer Support Center to assist users in the testing process.

HIV test results

What does a negative test result mean?

A negative result doesn’t necessarily mean that you don’t have HIV. That’s because of the window period— the time between when a person may have been exposed to HIV and when a test can tell for sure whether they have HIV. The window period varies from person to person and is also different depending upon the type of HIV test.

Ask your health care provider about the window period for the test you’re taking. If you’re using a home test, you can get that information from the materials included in the test’s package. If you get an HIV test after a potential HIV exposure and the result is negative, get tested again after the window period for the test you’re taking to be sure. For example, if your health care provider uses an antigen/antibody test performed by a laboratory with blood from a vein you should get tested again 45 days after your most recent exposure. For other tests, you should test again at least 90 days after your most recent exposure to tell for sure if you have HIV.

If you learned you were HIV-negative the last time you were tested, you can only be sure you’re still negative if you haven’t had a potential HIV exposure since your last test. If you’re sexually active, continue to take actions to prevent HIV, like using condoms the right way every time you have sex and taking medicines to prevent HIV if you’re at high risk.

If I have a negative result, does that mean that my partner is HIV negative also?

No. Your HIV test result reveals only your HIV status.

HIV is not necessarily transmitted every time you have sex. Therefore, taking an HIV test is not a way to find out if your partner is infected.

It’s important to be open with your partners and ask them to tell you their HIV status. But keep in mind that your partners may not know or may be wrong about their status, and some may not tell you if they have HIV even if they are aware of their status. Consider getting tested together so you can both know your HIV status and take steps to keep yourselves healthy.

What does a positive result mean?

A follow-up test will be conducted. If the follow-up test is also positive, it means you are living with HIV (or HIV-positive).

If you had a rapid screening test, the testing site will arrange a follow-up test to make sure the screening test result was correct. If your blood was tested in a lab, the lab will conduct a follow-up test on the same sample.

It is important that you start medical care and begin HIV treatment as soon as you are diagnosed with HIV. Antiretroviral therapy or ART (taking medicines to treat HIV infection) is recommended for all people with HIV, regardless of how long they’ve had the virus or how healthy they are. ART works by lowering the amount of virus in your body to very low levels, called viral suppression. It slows the progression of HIV and helps protect your immune system. If you are on ART and virally suppressed, you can stay healthy for many years, and greatly reduce your chance of transmitting HIV to sex partners.

If you have health insurance, your insurer is required to cover some medicines used to treat HIV. If you don’t have health insurance, or you’re unable to afford your co-pay or co-insurance amount, you may be eligible for government programs that can help through Medicaid, Medicare, the Ryan White HIV/AIDS Program, and community health centers. Your health care provider or local public health department can tell you where to get HIV treatment.

To lower your risk of transmitting HIV:

  • Take medicines to treat HIV (antiretroviral therapy or ART) the right way every day. Being on ART and getting and staying virally suppressed is the most effective thing you can do to reduce the chance of transmitting HIV.
  • Use condoms the right way every time you have sex.
  • If your partner is HIV-negative, encourage them to talk to their health care provider to see if taking daily medicine to prevent HIV (called pre-exposure prophylaxis, or PrEP) is right for them.
  • If you think your partner might have been recently exposed to HIV—for example, if the condom breaks during sex and you aren’t virally suppressed—they should talk to a health care provider as soon as possible within the next 3 days (72 hours) about taking medicines (called post-exposure prophylaxis, or PEP) to prevent getting HIV.
  • Get tested and treated for STDs and encourage your partner to do the same.

Receiving a diagnosis of HIV can be a life-changing event. People can feel many emotions—sadness, hopelessness, or anger. Allied health care providers and social service providers, often available at your health care provider’s office, will have the tools to help you work through the early stages of your diagnosis and begin to manage your HIV.

Talking to others who have HIV may also be helpful. Find a local HIV support group. Learn about how other people living with HIV have handled their diagnosis.

If I test positive for HIV, does that mean I have AIDS?

No. Being HIV-positive does not mean you have AIDS. AIDS is the most advanced stage of HIV disease. HIV can lead to AIDS if a person does not get treatment or take care of their health.

Should I share my HIV positive test result with others?

It’s important to share your status with your sex partners. Whether you disclose your status to others is your decision.

Partners

It’s important to disclose your HIV status to your sex partners even if you’re uncomfortable doing it. Communicating with each other about your HIV status means you can take steps to keep both of you healthy. The more practice you have disclosing your HIV status, the easier it will become.

Many resources can help you learn ways to disclose your status to your partners. For tips on how to start the conversation with your partners, check out CDC’s Start Talking. Stop HIV (https://www.cdc.gov/actagainstaids/campaigns/starttalking/index.html).

If you’re nervous about disclosing your test result, or you have been threatened or injured by your partner, you can ask your doctor or the local health department to tell them that they might have been exposed to HIV. This is called partner notification services. Health departments do not reveal your name to your partners. They will only tell your partners that they have been exposed to HIV and should get tested.

Many states have laws that require you to tell your sexual partners if you’re HIV-positive before you have sex (anal, vaginal, or oral) or tell your drug-using partners before you share drugs or needles to inject drugs. In some states, you can be charged with a crime if you don’t tell your partner your HIV status, even if your partner doesn’t become infected.

Family and friends

In most cases, your family and friends will not know your test results or HIV status unless you tell them yourself. While telling your family that you have HIV may seem hard, you should know that disclosure has many benefits—studies have shown that people who disclose their HIV status respond better to treatment than those who don’t. And telling friends and family can provide an important source of support in managing your HIV.

If you are under 18, however, some states allow your health care provider to tell your parent(s) that you received services for HIV if they think doing so is in your best interest.

Employers

In most cases, your employer will not know your HIV status unless you tell them. But your employer does have a right to ask if you have any health conditions that would affect your ability to do your job or pose a serious risk to others. (An example might be a health care professional, like a surgeon, who does procedures where there is a risk of blood or other body fluids being exchanged.)

If you have health insurance through your employer, the insurance company cannot legally tell your employer that you have HIV. But it is possible that your employer could find out if the insurance company provides detailed information to your employer about the benefits it pays or the costs of insurance.

All people with HIV are covered under the Americans with Disabilities Act. This means that your employer cannot discriminate against you because of your HIV status as long as you can do your job.

Who will pay for my treatment if I’m HIV positive?

If you have health insurance, your insurer is required to cover some medicines used to treat HIV. If you don’t have health insurance, or you’re unable to afford your co-pay or co-insurance amount, you may be eligible for government programs that can help through Medicaid, Medicare, the Ryan White HIV/AIDS Program, and community health centers. Your health care provider or local public health department can tell you where to get HIV treatment.

References
  1. HIV Testing. https://www.cdc.gov/hiv/basics/testing.html
  2. Kourtis AP, Bulterys M, Nesheim SR, Lee FK. Understanding the Timing of HIV Transmission from Mother to Infant. JAMA 2001;285:(6): 709-12
  3. Masciotra S, Luo W, Westheimer E, et al. Performance evaluation of the FDA-approved Determine HIV-1/2 Ag/Ab Combo assay using plasma and whole blood specimens. J Clin Virol 2017.
  4. Mortimer PP, Parry JV. Detection of antibody to HIV in saliva: A brief review. Clin Diagn Virol 1994; 2:231–243.
  5. Luo W, Masciotra S, Delaney KP, et al. Comparison of HIV oral fluid and plasma antibody results during early infection in a longitudinal Nigerian cohort. J Clin Virol 2013; 58 Suppl 1:e113–e118.
  6. Branson BM. HIV testing updates and challenges: when regulatory caution and public health imperatives collide. Curr HIV/AIDS Rep 2015; 12:117–126.
  7. Conway DP, Holt M, McNulty A, et al. Multi-centre evaluation of the Determine HIV Combo assay when used for point of care testing in a high risk clinic-based population. PLoS One 2014; 9:e94062.
  8. Fitzgerald N, Cross M, O’Shea S, et al. Diagnosing acute HIV infection at point of care: A retrospective analysis of the sensitivity and specificity of a fourth-generation point-of-care test for detection of HIV core protein p24. Sex Transm Infect 2017; 93:100–101.
  9. Donnell D, Ramos E, Celum C, et al. The effect of oral pre-exposure prophylaxis on the progression of HIV-1 seroconversion. AIDS 2017.
  10. Curlin ME, Gvetadze R, Leelawiwat W, et al. Analysis of false-negative HIV rapid tests performed on oral fluid in three international clinical research studies. Clin Infect Dis 2017; 64:1663–1669. https://www.ncbi.nlm.nih.gov/pubmed/28369309
  11. Kuhar DT, Henderson DK, Struble KA, et al. Updated US Public Health Service Guidelines for the management of occupational exposures to human immunodeficiency virus and recommendations for postexposure prophylaxis. Infect Control Hosp Epidemiol 2013; 34:875–892.
  12. Dominguez KL, Smith DK, Thomas V, et al. Updated guidelines for antiretroviral postexposure prophylaxis after sexual, injection drug use, or other nonoccupational exposure to HIV—United States, 2016. https://stacks.cdc.gov/view/cdc/38856
  13. Stekler JD, O’Neal JD, Lane A, et al. Relative accuracy of serum, whole blood, and oral fluid HIV tests among Seattle men who have sex with men. J Clin Virol 2013; 58 Suppl 1:e119–e122.
  14. HIV Home Test Kits. https://www.fda.gov/biologicsbloodvaccines/safetyavailability/hivhometestkits/default.htm
  15. Delaney KP, Hanson DL, Masciotra S, et al. Time until emergence of HIV test reactivity following infection with HIV-1: Implications for interpreting test results and retesting after exposure. Clin Infect Dis 2017; 64:53–59.
  16. Centers for Disease Control and Prevention and Association of Public Health Laboratories. Laboratory Testing for the Diagnosis of HIV Infection: Updated Recommendations. 2014. http://stacks.cdc.gov/view/cdc/23447
  17. Association of Public Health Laboratories. Suggested Reporting Language for the HIV Laboratory Diagnostic Testing Algorithm. 2017; https://www.aphl.org/aboutAPHL/publications/Documents/ID_2017Apr-HIV-Lab-Test-Suggested-Reporting-Language.pdf
  18. Centers for Disease Control and Prevention. Implementing HIV Testing in Nonclinical Settings: A Guide for HIV Testing Providers. 2016; https://www.cdc.gov/hiv/pdf/testing/CDC_HIV_Implementing_HIV_Testing_in_Nonclinical_Settings.pdf
  19. Centers for Disease Control and Prevention. Planning and Implementing HIV Testing Programs and Linkage Programs in Nonclinical Settings: A Guide for Program Managers. 2014; https://stacks.cdc.gov/view/cdc/23551
  20. Starting Antiretroviral Treatment Early Improves Outcomes for HIV-Infected Individuals. https://www.niaid.nih.gov/news-events/starting-antiretroviral-treatment-early-improves-outcomes-hiv-infected-individuals
  21. Busch MP, Satten GA. Time course of viremia and antibody seroconversion following human immunodeficiency virus exposure. Am J Med 1997; 102:117–124; discussion 125–116.
  22. Henrard DR, Daar E, Farzadegan H, et al. Virologic and immunologic characterization of symptomatic and asymptomatic primary HIV-1 infection. J Acquir Immune Defic Syndr Hum Retrovirol 1995; 9:305–310.
  23. Cooper DA, Imrie AA, Penny R. Antibody response to human immunodeficiency virus after primary infection. J Infect Dis 1987; 155:1113–1118.
  24. Time Until Emergence of HIV Test Reactivity Following Infection With HIV-1: Implications for Interpreting Test Results and Retesting After Exposure, Clinical Infectious Diseases, Volume 64, Issue 1, 1 January 2017, Pages 53–59, https://doi.org/10.1093/cid/ciw666 https://academic.oup.com/cid/article/64/1/53/2194435
  25. Busch MP, Satten GA. Time course of viremia and antibody seroconversion following human immunodeficiency virus exposure. Am J Med 1997; 102:117–124; discussion 125–116. https://www.ncbi.nlm.nih.gov/pubmed/9845513
read more
Procedures

Cataract surgery

cataract surgery

What is cataract surgery

Cataract surgery is an eye surgery performed under local anaeshetic to replace the lens inside your eye that has become cloudy with an artificial lens (called an intraocular lens, or IOL) to restore clear vision. Cataract eye surgery typically is performed on an outpatient basis and does not require an overnight stay in a hospital or other care facility. More than 3 million cataract surgeries are performed in the United States every year, with the vast majority of these procedures produce excellent visual outcomes.

Most modern cataract procedures involve the use of a high-frequency ultrasound device that breaks up the cloudy lens into small pieces, which are then gently removed from the eye with suction.

Cataract eye surgery procedure, called phacoemulsification or “phaco,” can be performed with smaller incisions than previous surgical techniques for cataract removal, promoting faster healing and reducing the risk of cataract surgery complications, such as a retinal detachment.

After all remnants of the cloudy lens have been removed from your eye, the cataract surgeon inserts a clear intraocular lens (IOL), positioning it securely behind the iris and pupil, in the same location your natural lens occupied. In special cases, an IOL might be placed in front of the iris and pupil, but this is less common.

The eye surgeon then completes the cataract removal and IOL implantation procedure by closing the incision in your eye (a stitch may or may not be needed), and a protective shield is placed over the eye to keep it safe in the early stages of your cataract surgery recovery.

Recently, a number of femtosecond lasers — similar to the lasers used to create the corneal flap in all-laser LASIK — have been approved by the U.S. Food and Drug Administration (FDA) for use in cataract surgery performed in the United States.

In laser cataract surgery, the surgeon creates a precise surgical plan for the corneal incision with a sophisticated 3-D image of the eye called an OCT (optical coherence tomography). The goal is to create an incision with a specific location, depth and length in all planes, and with the OCT image and a femtosecond laser, it can be performed exactly without the variable of surgeon experience.

This is important not only for accuracy but also for increasing the likelihood that the incision will be self-sealing at the end of the procedure, which reduces the risk of infection.

These lasers have gained approval for the following steps in cataract surgery, reducing the need for surgical blades and other hand-held tools:

  • Creating corneal incisions to allow the surgeon access to the lens
  • Removing the anterior capsule of the lens
  • Fragmenting the cataract (so less phaco energy is required to break it up and remove it)
  • Creating peripheral corneal incisions to reduce astigmatism (when needed)

For the latest information about laser cataract surgery, ask your eye doctor during your preoperative eye exam and cataract surgery consultation.

According to the National Eye Institute, 68.3 percent of Americans 80 and older had cataracts in 2010. And the prevalence of cataracts in the U.S. is expected to grow significantly in the years ahead, due in part to the aging of the population. In 2010, roughly 24.4 million Americans had cataracts, and that number is projected to grow to 50.2 million by the year 2050, according to the National Eye Institute.

A cataract needs to be removed only when vision loss interferes with your everyday activities, such as driving, reading, or watching TV. Sometimes a cataract should be removed even if it does not cause problems with your vision. For example, a cataract should be removed if it prevents examination or treatment of another eye problem, such as age-related macular degeneration (AMD) or diabetic retinopathy.

Talk with your eye care professional about cataract surgery and make sure it’s right for you. Most eye doctors suggest considering cataract surgery when your cataracts begin to affect your quality of life or interfere with your ability to perform normal daily activities, such as reading or driving at night.

It’s up to you and your doctor to decide when cataract surgery is right for you. For most people, there is no rush to remove cataracts because they usually don’t harm the eye. But cataracts can worsen faster in people with diabetes.

Delaying cataract eye surgery generally won’t affect how well your vision recovers if you later decide to have cataract surgery. Take time to consider the benefits and risks of cataract surgery with your doctor.

If you choose not to undergo cataract surgery now, your eye doctor may recommend periodic follow-up exams to see if your cataracts are progressing. How often you’ll see your eye doctor depends on your situation.

What do you want from cataract surgery?

For some people, simply replacing a cloudy lens with a clear implant and wearing glasses for some activities is perfect. For others, achieving the best possible vision without glasses after cataract surgery is the goal. Your vision needs and expectations can help you and your ophthalmologist decide the best surgical option for you.

How long does cataract surgery take?

An uncomplicated cataract surgery typically lasts only about 15 minutes. But expect to be at the surgical center for 90 minutes or longer, because extra time is needed to prepare you for surgery (dilating your pupil; administering preoperative medication) and for a brief post-operative evaluation and instructions about your cataract surgery recovery before you leave.

Is cataract surgery painful?

No. You’ll receive local anesthetics to numb your eye and you may be given a sedative to help you relax. If you’re given a sedative, you may remain awake, but groggy, during surgery.

How much does cataract surgery cost?

Cataract surgery costs are generally covered by Medicare if you are Medicare eligible. Private insurance usually covers cataract surgery as well.

Medicare will cover your costs if your vision tests at a certain level of acuity or clarity. Private insurance plans may have similar vision requirements. If your surgery is covered you may still have some costs. Special types of IOLs will cost more. Choosing to have cataract surgery before your vision has deteriorated enough will cost more.

In certain cases, it might be possible to get coverage before you meet the age or vision requirements. Talk with your ophthalmologist if you are considering having early cataract surgery.

Extra costs associated with laser cataract surgery are unlikely to be covered by Medicare or private health insurance. Fees vary from one cataract surgeon to another, but it is likely you would pay a few hundred dollars extra per eye out-of-pocket for a laser-assisted procedure.

People who do not want to invest out-of-pocket money in laser cataract surgery can still feel confident about the traditional approach.

But if you want the best possible vision, laser cataract surgery is appealing. A more accurate incision, capsulotomy and astigmatic correction may help you achieve your goal of less dependence on glasses after cataract surgery.

To decide if laser cataract surgery is the best choice for you, ask your cataract surgeon for more information about this exciting technology during your preoperative exam and consultation.

What do you do if you don’t have Medicare or private insurance coverage?

You may still be able to reduce and manage the cost of cataract surgery. Ask about payment plans through your doctor’s office. See if your employer offers flexible spending accounts that can help. Your ophthalmologist can help you learn more about costs of cataract surgery. Discuss your options for affording the procedure.

Who can be offered laser-assisted cataract surgery?

Under today’s Medicare guidelines, only certain patients may be offered laser-assisted cataract surgery.

Specifically, your ophthalmologist can offer it if you have astigmatism diagnosed during your cataract consultation and would like to have that refractive error corrected during cataract surgery. In this situation, the laser is used to create specific incisions in the cornea to reshape it, treating the astigmatism.

You may also be offered laser cataract surgery if you choose to have a premium lens implanted, such as an astigmatism-correcting toric intraocular lens (IOL) or a multifocal intraocular lens (IOL). Ophthalmologists who use laser cataract removal technology explain that it allows them to see and map the lens capsule better and place the opening in the capsule more precisely, allowing for better centering of the intraocular lens (IOL).

Can you choose to have laser-assisted cataract surgery if you don’t have either of the conditions above?

Current Medicare guidelines say that a surgeon may not offer and charge for the laser-assisted cataract surgery unless one of the two conditions above is met.

Which type of cataract surgery has a shorter recovery time?

The recovery period for both laser-assisted cataract surgery and traditional cataract surgery is the same. Some people can see clearly almost immediately, while others may find their vision clears within about a week or two. Remember that it takes about 3 months to fully recover from cataract surgery.

What benefits does laser cataract surgery offer that traditional cataract surgery does not?

Using a laser to do cataract surgery allows the surgeon to make very precise incisions in less time. It can improve accuracy and consistency in the surgical steps. And in some cases, laser-assisted cataract surgery can provide a higher degree of correction for a refractive error, such as astigmatism, than traditional cataract surgery.

However, it is important to be aware that studies have not shown that laser-assisted cataract surgery results in fewer complications or better visual outcomes than traditional cataract surgery. With any type of cataract surgery, your outcome depends in large part on the skill and experience of your eye surgeon.

What is cataract?

Cataracts are when the lens, a small transparent disc inside your eye, develops cloudy patches (see Figures 2 and 3). Inside your eyes, you have a natural lens. The lens bends (refracts) light rays that come into your eye to help you see. The lens should be clear, like the top lens in Figure 1 and 2.

Cataracts usually appear in both eyes. They may not necessarily develop at the same time or be the same in each eye.

When you’re young, your lenses are usually like clear glass, allowing you to see through them. As you get older, they start to become frosted, like bathroom glass, and begin to limit your vision.

If you have a cataract, your lens has become cloudy, like the bottom lens in the illustration. It is like looking through a foggy or dusty car windshield. Things look blurry, hazy or less colorful with a cataract. Over time these patches usually become bigger causing blurry, misty vision and eventually blindness.

How quickly the cataract develops varies among individuals and may even be different between the two eyes. Most age-related cataracts progress gradually over a period of years.

Cataracts more common in older adults and can affect your ability to carry out daily activities such as driving.

Cataracts can also affect babies and young children.

  • Cataracts are a very common reason people lose vision, but they can be treated. You and your ophthalmologist should discuss your cataract symptoms. Together you can decide whether you are ready for cataract surgery.

Types of cataracts

Cataract types include:

  • Cataracts affecting the center of the lens (nuclear cataracts). A nuclear cataract may at first cause more nearsightedness or even a temporary improvement in your reading vision. But with time, the lens gradually turns more densely yellow and further clouds your vision.

As the cataract slowly progresses, the lens may even turn brown. Advanced yellowing or browning of the lens can lead to difficulty distinguishing between shades of color.

  • Cataracts that affect the edges of the lens (cortical cataracts). A cortical cataract begins as whitish, wedge-shaped opacities or streaks on the outer edge of the lens cortex. As it slowly progresses, the streaks extend to the center and interfere with light passing through the center of the lens.
  • Cataracts that affect the back of the lens (posterior subcapsular cataracts). A posterior subcapsular cataract starts as a small, opaque area that usually forms near the back of the lens, right in the path of light. A posterior subcapsular cataract often interferes with your reading vision, reduces your vision in bright light, and causes glare or halos around lights at night. These types of cataracts tend to progress faster than other types do.
  • Cataracts you’re born with (congenital cataracts). Some people are born with cataracts or develop them during childhood. These cataracts may be genetic, or associated with an intrauterine infection or trauma. These cataracts also may be due to certain conditions, such as myotonic dystrophy, galactosemia, neurofibromatosis type 2 or rubella. Congenital cataracts don’t always affect vision, but if they do they’re usually removed soon after detection.

There are other types of cataract:

  • Secondary cataract. Cataracts can form after surgery for other eye problems, such as glaucoma. Cataracts also can develop in people who have other health problems, such as diabetes. Cataracts are sometimes linked to steroid use.
  • Traumatic cataract. Cataracts can develop after an eye injury, sometimes years later.
  • Congenital cataract. Some babies are born with cataracts or develop them in childhood, often in both eyes. These cataracts may be so small that they do not affect vision. If they do, the lenses may need to be removed.
  • Radiation cataract. Cataracts can develop after exposure to some types of radiation.

Figure 1. Types of cataracts

cataract subtypes

Footnote: Location of cataract subtypes. Schematic diagrams and slit-lamp photographic images showing the three main types of cataract: (A) cortical, (B) nuclear, and (C) posterior subcapsular.

[Source 1 ]

How a cataract forms

The lens, where cataracts form, is positioned behind the colored part of your eye (iris). The lens focuses light that passes into your eye, producing clear, sharp images on the retina — the light-sensitive membrane in the eye that functions like the film in a camera.

As you age, the lenses in your eyes become less flexible, less transparent and thicker. Age-related and other medical conditions cause tissues within the lens to break down and clump together, clouding small areas within the lens.

As the cataract continues to develop, the clouding becomes denser and involves a bigger part of the lens. A cataract scatters and blocks the light as it passes through the lens, preventing a sharply defined image from reaching your retina. As a result, your vision becomes blurred.

Cataracts generally develop in both eyes, but not evenly. The cataract in one eye may be more advanced than the other, causing a difference in vision between eyes.

Clear-and-Cloudy-Lenses


Figure 2. Normal eye anatomy

human-eye-anatomy

Figure 3. Structure of the human eye

human eye anatomy

Figure 4. Eye cataract

Eye cataract

Cataract Risk Factors

Besides aging, other cataract risk factors include:

  • having parents, brothers, sisters, or other family members who have cataracts
  • having certain medical problems, such as diabetes
  • having had an eye injury, eye surgery, or radiation treatments on your upper body
  • having spent a lot of time in the sun, especially without sunglasses that protect your eyes from damaging ultraviolet (UV) rays
  • smoking
  • obesity
  • high blood pressure
  • previous eye injury or inflammation
  • previous eye surgery
  • prolonged use of corticosteroid medications
  • drinking excessive amounts of alcohol

If you have any of these risk factors for cataract, you should schedule an appointment with your ophthalmologist.

Cataract Prevention

Protecting your eyes from sunlight is the best way to do this. Wear sunglasses that screen out the sun’s ultraviolet (UV) light rays. You may also wear regular eyeglasses that have a clear, anti-UV coating. Ultraviolet light from the sun may contribute to the development of cataracts. Wear sunglasses that block ultraviolet B (UVB) rays when you’re outdoors.Talk with your eye doctor to learn more.

No studies have proved how to prevent cataracts or slow the progression of cataracts. But doctors think several strategies may be helpful, including:

  • Have regular eye examinations. Eye examinations can help detect cataracts and other eye problems at their earliest stages. Ask your doctor how often you should have an eye examination.
  • Quit smoking. Ask your doctor for suggestions about how to stop smoking. Medications, counseling and other strategies are available to help you.
  • Manage other health problems. Follow your treatment plan if you have diabetes or other medical conditions that can increase your risk of cataracts.
  • Choose a healthy diet that includes plenty of fruits and vegetables. Adding a variety of colorful fruits and vegetables to your diet ensures that you’re getting many vitamins and nutrients. Fruits and vegetables have many antioxidants, which help maintain the health of your eyes. Studies haven’t proved that antioxidants in pill form can prevent cataracts. But, a large population study recently showed that a healthy diet rich in vitamins and minerals was associated with a reduced risk of developing cataracts. Fruits and vegetables have many proven health benefits and are a safe way to increase the amount of minerals and vitamins in your diet.
  • Reduce alcohol use. Excessive alcohol use can increase the risk of cataracts.

Types of cataract surgery

You may be offered a choice of two cataract surgical options: traditional cataract surgery or laser-assisted cataract surgery.

Traditional cataract surgery is one of the most common surgeries in the world. It is recognized as being safe and effective. Laser cataract surgery, which is not covered by most insurance plans, costs more than traditional cataract surgery and may provide some advantages in terms of precision and consistency—in the proper situation. So how do you decide which type of cataract surgery to have?

Here are some things you should understand about both kinds of cataract surgery. Talk with your ophthalmologist (and get another ophthalmologist’s opinion as well, if you prefer) to determine the best type of surgery for you.

Traditional cataract surgery

Traditional cataract surgery is one of the most frequently performed surgeries and also one of the most safe and effective, with predictable outcomes. It is highly dependent on surgeon skill, volume and experience. The first step in cataract surgery is making an incision in the cornea. With traditional cataract surgery, called phacoemulsification, the eye surgeon creates a small incision in the side of the cornea in the area where the cornea meets the sclera by hand-held metal or diamond blade. This incision allows the surgeon to gain access to the interior of the eye to break up and remove the cataract, which is a clouding of the eye’s natural lens that is located right behind the pupil. An instrument is inserted through this incision into the area behind the pupil where the eye’s lens sits in a capsule or bag. The surgeon uses the microsurgical instrument to create a circular opening in the lens capsule. Then a special pen-shaped probe is inserted through that opening to apply sound waves (ultrasound) to break up the cloudy center of the lens. Then the broken-up pieces of lens are suctioned out of the eye. An artificial intraocular lens (IOL) is implanted to replace the cloudy natural lens. The side walls of the corneal incision will be filled with a special liquid and self-seal after surgery, so most commonly stitches are not needed.

Laser-assisted cataract surgery

In laser cataract surgery, an advanced femtosecond laser replaces or assists use of a hand-held surgical tool for the following steps in cataract surgery:

  • The corneal incision
  • The anterior capsulotomy
  • Lens and cataract fragmentation

Use of a laser can improve the precision, accuracy and reproducibility of each of these steps, potentially reducing risks and improving visual outcomes of cataract surgery.

With laser-assisted cataract surgery, a camera/ultrasound imaging device is placed over your eye to map its surface and gather information about the lens. The device sends detailed information to a computer that programs the laser for the exact location, size and depth of the incisions. The surgeon uses the laser to make the corneal incision and the opening in the lens capsule. Energy from the laser may also be used to soften the cataract. Then the ultrasound probe used in traditional cataract surgery is used to break the lens into pieces and suction them out of the eye. The IOL is implanted. As with traditional cataract surgery, the corneal incision usually does not require stitches.

Laser cataract surgery systems

A number of medical device companies offer laser systems for performing laser cataract surgery. Systems that have attained FDA approval and are currently available for laser-assisted cataract surgery performed in the United States include:

  • LenSx. The LenSx system (Alcon) was the first femtosecond laser system to gain FDA approval for cataract surgery performed in the U.S. The LenSx system is approved for corneal incisions, capsulotomies and lens (cataract) fragmentation and has been used in more than 400,000 cataract refractive procedures worldwide, according to Alcon.
  • LensAR. The LensAR Laser System (LensAR, Inc.) is approved for corneal incisions, capsulotomies and lens (cataract) fragmentation. The “AR” stand for “Augmented Reality,” which refers to proprietary imaging technology that collects an unprecedented spectrum of biometric data and then reconstructs a sophisticated 3-D model of the anatomy of each patient’s eye, according to the company.
  • Catalys. The Catalys Precision Laser System (Abbott Medical Optics) also is FDA-approved for the three primary steps prior to IOL insertion in laser cataract surgery (corneal incision, capsulotomy and lens fragmentation). The Catalys system also features a liquid optics interface that provides gentle docking of the laser to the eye, reducing risks associated with high eye pressure during laser cataract surgery, according to AMO.
  • Victus. The Victus Femtosecond Laser Platform (Bausch + Lomb) also is FDA-approved for corneal incisions, capsulotomy and lens fragmentation in laser cataract surgery. The Victus system features proprietary Advanced Docking Technology that minimizes the possibility of eye tilt or distortion and enables precise alignment designed to maintain the natural shape of the eye during laser-assisted cataract surgery, according to the company.
  • Femto LDV Z8. This femtosecond laser system, produced by Ziemer Ophthalmics, offers a number of distinct advantages according to the company, including a higher repetition rate of the laser beam for faster procedures, low energy per laser pulse for gentler treatments, and overlapping laser spots for high precision and predictability.

All FDA-approved laser systems for laser cataract surgery have shown excellent outcomes in clinical trials. The laser your surgeon has chosen for his or her practice is a matter of personal preference, based on specific features and other factors. Typically, the skill of your surgeon is more important than the brand of laser used for the laser-assisted steps of your cataract procedure.

Who can be offered laser-assisted cataract surgery?

Under today’s Medicare guidelines, only certain patients may be offered laser-assisted cataract surgery.

Specifically, your ophthalmologist can offer it if you have astigmatism diagnosed during your cataract consultation and would like to have that refractive error corrected during cataract surgery. In this situation, the laser is used to create specific incisions in the cornea to reshape it, treating the astigmatism.

You may also be offered laser cataract surgery if you choose to have a premium lens implanted, such as an astigmatism-correcting toric IOL or a multifocal IOL. Ophthalmologists who use laser cataract removal technology explain that it allows them to see and map the lens capsule better and place the opening in the capsule more precisely, allowing for better centering of the IOL.

Can you choose to have laser-assisted cataract surgery if you don’t have either of the conditions above?

Current Medicare guidelines say that a surgeon may not offer and charge for the laser-assisted cataract surgery unless one of the two conditions above is met.
Which type of cataract surgery has a shorter recovery time?

The recovery period for both laser-assisted cataract surgery and traditional cataract surgery is the same. Some people can see clearly almost immediately, while others may find their vision clears within about a week or two. Remember that it takes about 3 months to fully recover from cataract surgery.

What benefits does laser cataract surgery offer that traditional cataract surgery does not?

Using a laser to do cataract surgery allows the surgeon to make very precise incisions in less time. It can improve accuracy and consistency in the surgical steps. And in some cases, laser-assisted cataract surgery can provide a higher degree of correction for a refractive error, such as astigmatism, than traditional cataract surgery.

However, it is important to be aware that studies have not shown that laser-assisted cataract surgery results in fewer complications or better visual outcomes than traditional cataract surgery. With any type of cataract surgery, your outcome depends in large part on the skill and experience of your eye surgeon.

Cataract surgery procedure

The entire cataract surgery takes about an hour to perform. Before beginning, you may be given a mild sedative to help you relax. Your eye then is dilated with eye drops and the area is numbed with a local anesthetic. It’s possible that you might remain awake during cataract surgery or you may drift off.

Your eye surgeon uses one of two methods to remove your cloudy lens:

  • By removing the lens in one piece after making an incision in your eye
  • By suctioning the lens out in pieces after breaking it up with an ultrasound probe

During cataract surgery, your eye surgeon will remove your eye’s cloudy natural lens. Then he or she will replace it with a clear artificial lens. This new lens is called an intraocular lens (IOL), is positioned in the same place as your natural lens. It remains a permanent part of your eye. When you decide to have cataract surgery, your doctor will talk with you about IOLs and how they work.

An intraocular lens (IOL) is a tiny, artificial lens for the eye. It replaces the eye’s natural lens that is removed during cataract surgery.

Intraocular lenses (IOLs) come in different focusing powers, just like prescription eyeglasses or contact lenses. Your ophthalmologist will measure the length of your eye and the curve of your cornea. These measurements are used to set your IOLs focusing power.

What are IOLs made of?

Most intraocular lenses (IOLs) are made of silicone or acrylic. They are also coated with a special material to help protect your eyes from the sun’s harmful ultraviolet (UV) rays.

Monofocal IOLs

The most common type of lens used with cataract surgery is called a monofocal IOL. It has one focusing distance. It is set to focus for up close, medium range or distance vision. Most people have them set for clear distance vision. Then they wear eyeglasses for reading or close work.

Multifocal IOLs

Some IOLs have different focusing powers within the same lens. These are called multifocal and accommodative lenses. These IOLs reduce your dependence on glasses by giving you clear vision for more than one set distance.

These IOLs provide both distance and near focus at the same time. The lens has different zones set at different powers. It is designed so that your brain learns to select the right focus automatically.

Accommodative IOLs

These lens move or change shape inside your eye, allowing focusing at different distances.

Toric IOLs

For people with astigmatism, there is an IOL called a toric lens. Astigmatism is a refractive error caused by an uneven curve in your cornea or lens. The toric lens is designed to correct that refractive error.

As you plan for your cataract surgery, talk to your ophthalmologist about your vision needs and expectations. He or she will explain IOL options for you in more detail.

However, for some people, other eye problems prohibit the use of an artificial lens. In these situations, once the cataract is removed, vision may be corrected with eyeglasses or contact lenses.

Cataract surgery is generally done on an outpatient basis, which means you won’t need to stay in a hospital after the surgery. During cataract surgery, your eye doctor uses local anesthetic to numb the area around your eye, but you usually stay awake during the procedure.

If you need cataract surgery in both eyes, your doctor will schedule surgery to remove the cataract in the second eye after you’ve healed from the first surgery.

What to expect with cataract surgery

Before cataract eye surgery

Prior to cataract surgery, your optometrist and/or ophthalmologist will perform a comprehensive eye exam to check the overall health of your eyes, evaluate whether there are reasons why you should not have surgery and identify any risk factors you might have.

A refraction also will be performed to accurately determine the amount of nearsightedness, farsightedness and/or astigmatism you have prior to surgery. Additional measurements of your eyes will be taken to determine the curvature of your cornea and the length of your eye.

These measurements are essential to help your cataract surgeon select the proper power of the intraocular lens and give you the best vision possible after surgery.

Today you have many types of IOLs to choose from for your cataract surgery, depending on your specific needs. In addition to IOLs that correct nearsightedness and farsightedness, there are now toric IOLs that correct astigmatism as well.

If you don’t mind wearing glasses after cataract surgery, a monofocal lens implant usually is used. Often, only part-time use of reading glasses is needed after cataract surgery with monofocal IOLs. But if prescription eyeglasses are needed (which often is the case if you only need cataract surgery in one eye), your eye doctor typically will prescribe new glasses for you approximately one month after surgery.

If you like the idea of being less dependent on glasses after cataract surgery, one way to correct presbyopia and reduce your need for reading glasses is to have your cataract surgeon adjust the power of one of your monofocal IOLs (assuming you have cataract surgery performed in both eyes) to give you a monovision correction, similar to monovision with contact lenses.

Another option is to choose one of a variety of advanced presbyopia-correcting IOLs to improve your reading vision without sacrificing your distance vision. Presbyopia-correcting IOLs include accommodating IOLs and multifocal IOLs; both types are designed to provide a greater range of vision after cataract surgery than conventional monofocal IOLs.

Be aware that not everyone is a good candidate for these premium IOLs, and choosing a presbyopia-correcting IOL will increase the out-of-pocket cost of your cataract surgery, since the added cost of these advanced lens implants is not covered by Medicare or other insurance plans.

Prior to cataract surgery, in addition to discussing the different types of IOLs, you will be advised about what to expect before, during and after your procedure. This information — which may be presented orally, in writing, via a video presentation or a combination of all three — is meant to help you make an informed decision about whether to proceed with surgery.

If you have any questions or concerns about cataract surgery, be sure to discuss them with your eye doctor and cataract surgeon prior to signing “informed consent” documents authorizing surgery.

Also, discuss with your eye doctor all medications you are taking, including non-prescription (“over-the-counter”) formulations and nutritional supplements. Some medications and supplements can increase your risk of cataract surgery complications and might need to be discontinued prior to surgery. Ask your doctor for details.

The day of cataract eye surgery

Your ophthalmologist may ask you not to eat any solid food at least 6 hours before your surgery.

Cataract removal surgery may be done in an outpatient surgery center or in a hospital. Here is what will happen:

  • Your eye will be numbed with eye drops or with an injection around the eye. You may also be given a medicine to help you relax.
  • You will be awake during surgery. You may see light and movement during the procedure, but you will not see what the doctor is doing to your eye.
  • Your surgeon will enter into the eye through tiny incisions (cuts, created by laser or a blade) near the edge of your cornea (the clear covering on the front of your eye). The surgeon uses these incisions to reach the lens in your eye. Using very small instruments, he or she will break up the lens with the cataract and remove it. Then your new lens is inserted into place.
  • Usually your surgeon will not need to stitch the incisions closed. These “self sealing” incisions eventually will close by themselves over time. A shield will be placed over your eye to protect it while you heal from surgery.
  • You will rest in a recovery area for about 15–30 minutes for observation to make sure there isn’t any sign of trouble, such as bleeding or a reaction to the anesthesia. Then you will be ready to go home.

Cataract eye surgery process

The Corneal Incision

Traditional cataract surgery is one of the most frequently performed surgeries and also one of the most safe and effective, with predictable outcomes. It is highly dependent on surgeon skill, volume and experience.

The first step in cataract surgery is making an incision in the cornea. In traditional cataract surgery, the eye surgeon uses a hand-held metal or diamond blade to create an incision in the area where the cornea meets the sclera. This incision allows the surgeon to gain access to the interior of the eye to break up and remove the cataract, which is a clouding of the eye’s natural lens that is located right behind the pupil. Next, an intraocular lens (IOL) is inserted and implanted, to replace the cloudy natural lens.

The corneal incision is made in special way so it will self-seal when surgery is complete, without any need for stitches.

In laser cataract surgery, the surgeon creates a precise surgical plan for the corneal incision with a sophisticated 3-D image of the eye called an OCT (optical coherence tomography). The goal is to create an incision with a specific location, depth and length in all planes, and with the OCT image and a femtosecond laser, it can be performed exactly without the variable of surgeon experience.

This is important not only for accuracy but also for increasing the likelihood that the incision will be self-sealing at the end of the procedure, which reduces the risk of infection.

The Capsulotomy

The eye’s natural lens is surrounded by a very thin, clear capsule. In cataract surgery, the front portion of the capsule is removed in a step called an anterior capsulotomy, to gain access to the cataract.

It is very important that the remainder of the lens capsule that remains intact in the eye is not damaged during cataract surgery, because it must hold the artificial lens implant in place for the rest of the patient’s life.

In traditional cataract surgery, the surgeon creates an opening in the capsule with a small needle and then uses that same needle or a forceps to tear the capsule in a circular fashion.

In laser cataract surgery, the anterior capsulotomy is performed with a femtosecond laser. Studies have shown that capsulotomies performed with a laser have greater accuracy and reproducibility.

Studies also have shown that laser capsulotomies enable better centering of the intraocular lens, and IOL positioning is a significant factor in determining final visual outcomes.

Lens And Cataract Fragmentation

After the capsulotomy, the surgeon now has access to the cataract to remove it. In traditional cataract surgery, the ultrasonic device that breaks up the cataract is inserted into the incision. During this phacoemulsification procedure, the ultrasound energy can lead to heat buildup in the incision, which sometimes can burn the incision and negatively affect the visual outcome by actually inducing astigmatism.

An incision burn also has a higher chance of leaking and sometimes needs multiple sutures to close. The smaller the incision we use, the more this issue is important to consider.

The laser, on the other hand, softens the cataract as it breaks it up. By breaking up the cataract into smaller, softer pieces, less energy should be needed to remove the cataract, so there should be less chance of burning and distorting the incision.

Laser cataract surgery may also reduce the risk of capsule breakage. After the calculation of the proper implant power, there is no step more important for visual outcome than preservation of the capsule that the natural lens sat in. This capsule is as thin as cellophane wrap and it’s important that the the portion that is left inside the eye after cataract surgery is undamaged, so it can hold the IOL in the proper position for clear, undistorted vision.

The reduced phacoemulsification energy required in laser cataract surgery may also make the procedure safer to the inner eye, which reduces the chance of certain complications, such as a detached retina.

Astigmatism Correction At The Time Of Cataract Surgery

To reduce the need for prescription eyeglasses or reading glasses after cataract surgery, it is important that little or no astigmatism is present after implantation of presbyopia-correcting multifocal IOLs and accommodating IOLs.

Astigmatism usually is caused by the cornea being more curved in one meridian than others (in other words, it’s shaped somewhat like an American football). To reduce astigmatism, small incisions can be placed in the periphery of this more curved meridian; as the incisions heal, this meridian flattens slightly to give the cornea a rounder, more symmetrical shape (like a baseball).

This procedure is called limbal relaxing incisions (LRI) or astigmatic keratotomy (AK). Surgeons can perform LRI or AK manually with a diamond blade, and it is quite effective in reducing astigmatism.

During refractive laser-assisted cataract surgery, the OCT (optical coherence tomography) image can be used to plan laser LRI or AK incisions in a very precise location, length and depth. This increases the accuracy of the astigmatism-reducing procedure and increased the probability of good vision without glasses after cataract surgery.

Cataract surgery recovery

Post cataract surgery

An uncomplicated cataract surgery typically lasts only about 15 minutes. But expect to be at the surgical center for 90 minutes or longer, because extra time is needed to prepare you for surgery (dilating your pupil; administering preoperative medication) and for a brief post-operative evaluation and instructions about your cataract surgery recovery before you leave.

You must have someone drive you home after cataract surgery; do not attempt to drive until you have visited your eye doctor the day after surgery and he or she tests your vision and confirms that you are safe to drive.

You will be prescribed medicated eye drops to use several times each day for a few weeks after cataract surgery. You also must wear your protective eye shield while sleeping or napping for about a week after surgery. To protect your eyes from sunlight and other bright light as your eye recovers, you will be given a special pair of post-operative sunglasses.

Also, many centers require someone to be with you after cataract surgery if you received anesthesia. Be sure to ask about this requirement prior to your cataract procedure so you are prepared for surgery day.

While your eye heals, you might experience some eye redness and blurred vision during the first few days or even weeks following the procedure.

During at least the first week of your recovery, it is essential that you avoid:

  • Strenuous activity and heavy lifting (nothing over 25 pounds).
  • Bending, exercising and similar activities that might stress your eye while it is healing.
  • Water that might splash into your eye and cause infection. Keep your eye closed while showering or bathing. Also, avoid swimming or hot tubs for at least two weeks.
  • Any activity that would expose your healing eye to dust, grime or other infection-causing contaminants.

Your cataract surgeon may give you other instructions and recommendations for your cataract surgery recovery, depending on your specific needs and the outcome of your procedure. If you have any questions at any time after cataract surgery, call your eye doctor for advice.

If you need cataract surgery in both eyes, your surgeon typically will prefer that you wait one to three weeks between procedures, so your first eye has healed sufficiently and you have good vision in that eye before the second surgery is performed.

Cataract surgery recovery time

  • After the procedure, you’ll have some discomfort for a few days.
  • Healing generally occurs within eight weeks.

Cataract surgery aftercare

Days or weeks after surgery:

  • You will have to use eye drops after surgery. Be sure to follow your doctor’s directions for using these drops.
  • Avoid getting soap or water directly in the eye.
  • Do not rub or press on your eye. Your ophthalmologist may ask you to wear eyeglasses or a shield to protect your eye.
  • You will need to wear a protective eye shield when you sleep.
  • Your ophthalmologist will talk with you about how active you can be soon after surgery. He or she will tell you when you can safely exercise, drive or do other activities again.

Eyeglasses after cataract surgery

Unless you choose presbyopia-correcting IOLs, it’s likely you will need reading glasses after cataract surgery to see near objects clearly. Even people who choose these premium IOLs often find reading glasses are helpful for certain near tasks and seeing very small print.

In the event you have some mild refractive errors present after surgery (this is common), you may want to wear eyeglasses with progressive lenses full-time after your surgery to attain the best possible vision at all distances.

Even people who have an excellent visual outcome and can see well without glasses after cataract surgery often choose to wear eyeglasses full-time after their procedure to protect their eyes and because they feel more like themselves wearing eyeglasses after surgery if they have worn glasses most of their life.

If you choose to wear glasses after cataract surgery, lenses with anti-reflective coating and photochromic lenses are highly recommended for the best vision, comfort and appearance. Ask your eye care professional for details and to demonstrate these lenses

Vision after cataract surgery

According to American Society of Cataract and Refractive Surgery, studies show that 95 percent of patients who choose a standard intraocular lens (IOL) for cataract surgery have their vision fully restored to its pre-cataract state, and if you choose a premium intraocular lens (IOL) your vision may be even better than it was before.

If you have any problem with sensitivity to sunlight after cataract surgery, eyeglasses with photochromic lenses, which darken automatically to UV rays, often can provide relief. Also, for residual refractive error and presbyopia after surgery, progressive lenses with anti-reflective coating often can sharpen your vision for activities like night driving and reading.

People whose vision fails to improve after cataract surgery often have underlying eye disorders, such as age-related macular degeneration (AMD), diabetic retinopathy and other eye conditions. Some of these individuals may benefit from other procedures or from low vision aids.

Cataract surgery side effects

Cataract surgery complications are few, and cataract surgery is among the most common and most successful surgical procedures performed today.

According to the American Society of Cataract and Refractive Surgery, 3 million Americans undergo cataract surgery each year, with an overall success rate of 98 percent or higher.

Also, a study of more than 200,000 Medicare beneficiaries who underwent cataract surgery between 1994 and 2006 found that 99.5 percent of patients had no severe postoperative complications and the risk of severe complications has decreased with advances in surgical tools and techniques.

Cataract surgery complications

Cataract surgery is generally safe, but it carries a risk of infection and bleeding. Cataract surgery increases the risk of retinal detachment.

Some cataract surgery complications occur quite a while later. For example, a detached retina can occur months or years after a perfectly successful cataract procedure.

Most patients with retinal detachment have a good outcome if they see their ophthalmologist when symptoms first begin and treatment is done immediately. However, a small percentage will have substantially and permanently reduced vision.

Be sure to report floaters, flashes of light and a curtain-like vision loss to your ophthalmologist immediately, as these symptoms may indicate a retinal detachment has occurred.

Like any surgery, cataract surgery carries risks of problems or complications. Here are some of those risks:

  • Eye infection
  • Eye inflammation
  • Bleeding in the eye.
  • Droopy eyelid (ptosis)
  • Ongoing swelling of the front of the eye (cornea) or inside of the eye.
  • Swelling of the retina (the nerve layer at the back of your eye).
  • Macular edema (swelling of the central retina)
  • Detached retina (when the retina lifts up from the back of the eye).
  • Damage to other parts of your eye.
  • Pain that does not get better with over-the-counter medicine.
  • Vision loss.
  • Intraocular lens dislocation – the intraocular lens (IOL) implant may become dislocated, moving out of position.
  • Posterior capsule opacity (PCO)
  • Light sensitivity
  • Photopsia (perceived flashes of light)
  • Ocular hypertension (elevated eye pressure)

Your ophthalmologist will talk with you about the risks and benefits of cataract surgery. When cataract surgery complications do occur, most are minor and can be successfully treated medically or with additional surgery.

Posterior capsular opacification

One of the most common cataract surgery complications is a posterior capsule opacity (also called posterior capsule opacification or PCO). Your vision could become cloudy or blurry weeks, months or years after cataract surgery. This is not unusual. Posterior capsular opacification (PCO) is also called “secondary cataract” or “scar tissue.” It’s not like a scar you get on your skin. Posterior capsule opacification occurs because lens epithelial cells remaining after cataract surgery have grown on the capsule. But because it happens after the eye has healed from cataract surgery, some people think of it as a scar. In some cases, if the condition progresses significantly, your vision may be worse than it was before cataract surgery.

During cataract surgery, your surgeon will remove the cloudy natural lens of your eye (cataract) and replace it with an intraocular lens (IOL). Much of the thin clear membrane that surrounds the natural lens (called the lens capsule) is left intact during surgery and the IOL usually is implanted within it.

When the cataract is removed, your surgeon makes every attempt to maintain the integrity of the lens capsule, and normally your vision after cataract surgery should be very clear. However, in about 20 percent of patients, the posterior portion of the capsule becomes hazy some time during cataract surgery recovery or even months later, causing PCO.

Posterior capsular opacification (PCO) happens when a membrane called the posterior capsule becomes cloudy. It might help to think of the posterior capsule as a transparent pocket. It holds your intraocular lens (IOL) in place. It also once held your eye’s natural lens (what became the cataract) in place. If you notice cloudy vision again, you might need to have a laser procedure. The laser creates an opening in the cloudy capsule and is called a posterior capsulotomy (or a YAG laser capsulotomy). This procedure helps restore clear vision.

YAG laser capsulotomy involves just a few simple steps:

  • Usually the eye is dilated before the procedure, with dilating eye drops.
  • A laser removes the hazy posterior capsule from your line of sight without making an incision or “touching” the eye.
  • Many ophthalmologists recommend anti-inflammatory eye drops following the procedure.

The procedure takes only a few minutes and is entirely painless; nor does discomfort occur post-operatively.

You must remain still during the procedure, however. Very uncooperative patients, such as children and mentally disabled people, may require sedation.

Following a YAG laser capsulotomy, you may resume normal activities immediately. You may experience some floaters afterward. These will likely resolve within a few weeks.

Most people can expect their vision to improve within a day. As with any eye procedure, however, call your eye doctor immediately if vision worsens or fails to improve.

Because the YAG laser removes the central zone of the cloudy posterior capsule behind the intraocular lens, the condition cannot return. So only one laser treatment is required to permanently eliminate vision loss caused by posterior capsule opacification after cataract surgery.

YAG Laser capsulotomy risks

Although a YAG laser capsulotomy poses slight additional risk, overall the procedure is extremely safe. The most important risk is that the retina can become detached from the inner back of the eye.

Statistics suggest that the lifetime risk of a detached retina as a cataract surgery complication in the United States is about 1 percent. That number rises to about 2 percent after YAG laser capsulotomy. It is important to be aware of this cataract surgery risk.

Dislocated Intraocular Lenses

Another example of cataract surgery complications is malpositioned or dislocated intraocular lenses (IOLs). You may see the edge of the lens implant, or you may even develop double vision. If the intraocular lens becomes too badly dislocated, your visual acuity could decrease substantially.

How can an IOL become malpositioned or dislocated?

In most cataract surgeries, the intraocular lens is placed inside the “capsular bag,” which contains the cloudy natural lens or cataract of the eye.

Ophthalmologists make every attempt to maintain the integrity of the capsular bag so that the intraocular lens can be positioned correctly within it. But the capsular bag is extremely thin — approximately the thickness of a single red blood cell — and can sometimes rupture or break.

Also, the capsular bag itself may dislocate due to weakness or breakage of the fibers (zonules) that hold it in place, resulting in a condition known as zonular dialysis. This condition places you at risk of malpositioning or dislocation of the lens implant.

Even without underlying complications, intraocular lenses can still dislocate — especially if one of the springy “arms” holding the lens in place is positioned improperly inside the capsular bag or becomes malpositioned later on.

When an intraocular lens implant is malpositioned or dislocated, your cataract surgeon can probably reposition it in a second procedure. In some cases, the lens implant must be sewn in place, or another type of lens must be implanted.

If IOL dislocation occurs following a recent cataract surgery, repositioning the lens should be done soon. This is because lens implants begin to “scar” into place approximately three months after original implantation and can become much more difficult to remove.

If you do experience a malpositioned or dislocated intraocular implant, your chances of a good outcome following a second procedure are very good if you and your surgeon take action promptly.

Also, a recent Mayo Clinic study of more than 14,000 cataract surgeries performed between January 1980 and May 2009 found that the risk of late IOL dislocation after cataract surgery was very low: At 10 years after surgery, the cumulative risk was 0.1 percent; at 20 years, it was 0.7 percent; and at 25 years, it was 1.7 percent.

References
  1. Lim, J. C., Caballero Arredondo, M., Braakhuis, A. J., & Donaldson, P. J. (2020). Vitamin C and the Lens: New Insights into Delaying the Onset of Cataract. Nutrients, 12(10), 3142. https://doi.org/10.3390/nu12103142
read more
Procedures

Penile implant

penile prosthesis implant

What is a penile implant

Penile implants are devices placed inside the penis to allow men with erectile dysfunction to get an erection. Erectile dysfunction has been defined as the inability to achieve or maintain an erection sufficient for sexual performance 1. The term penile implant, penile prosthesis, inflatable penile prosthesis and internal penile prosthesis pump are often used interchangeably and all refer to the multicomponent inflatable penile prosthesis. Penile implants are typically recommended after other treatments such as oral pharmacotherapy, a vacuum erection device, intracavernosal injection, and intraurethral suppositories for erectile dysfunction have failed 2. The first penile implant was introduced by Lash et al. in 1964 as part of a novel surgical reconstruction for Peyronie’s disease 3. Dramatic increase in penile prosthesis implantation occurred in the 1970’s, specifically for men with erectile dysfunction (ED). Scott et al. introduced the world’s first inflatable penile prosthesis in 1973 4. Although prosthetic implants have changed over the years, original design principles remain largely intact with continued improvement to minimize perioperative complications in two or three-piece designs 5.

There are two main types of penile implants, semirigid and inflatable. Each type of penile implant works differently and has various pros and cons.

The placement of penile implants requires surgery. Before choosing penile implants, make sure you understand what surgery involves, including possible risks, complications and follow-up care.

With continuous improvements of penile prostheses and surgical techniques, mechanical failure and postoperative complications, such as prosthesis infection and erosions, have been decreasing since the penile prosthesis was first introduced to the market 6. Several studies reported that mechanical and overall survival rates at 5 years of American Medical Systems 700 CX/CXM range from 85% to 93% and from 77% to 91%, respectively 7.

Why is penile implant surgery done?

For most men, erectile dysfunction can be successfully treated with medications or use of a penis pump (vacuum constriction device). You might consider penile implants if you aren’t a candidate for other treatments or you can’t get an erection sufficient for sexual activity by using other methods.

Penile implants can also be used to treat severe cases of a condition that causes scarring inside the penis, leading to curved, painful erections (Peyronie’s disease).

Although penile implants are the most invasive and least often chosen treatment for erectile dysfunction, most men and their partners report satisfaction with the devices. The 10-year device survival is between 60 and 80 percent.

Penile implants aren’t for everyone. Your doctor might caution against penile implants if you have:

  • Erectile dysfunction that’s situational, the result of a relationship conflict or potentially reversible
  • An infection, such as a pulmonary infection or urinary tract infection
  • Diabetes that isn’t well-controlled

Keep in mind that while penile implants allow men to get an erection, they don’t increase sexual desire or sensation. Most penile implants also won’t make your penis any larger than it naturally is at the time of surgery. In fact, your erect penis might be slightly shorter than it used to be.

How long does penile implant last and do they need to be replaced regularly?

The penile implant can last for a long time and majority of the time 5 years after the penile implant, the patient will have an 85% chance of still having a functional device in their body. Ten years, this number is about 70%. In other words, 70% of people after penile implant will still have a working implant in them 10 years later. There are many of my patients who still have working implants after 20 years, so you don’t need to replace it regularly. Penile implant longevity depends on age. If you get a penile implant when you’re 18, you’re obviously going to have to replace it a couple of times in your life. But with in patients with average ages of about 60–70, when they get a penile implant, they’ll only need it once.

Male penis?

Used for urination and sexual intercourse, the penis is made up of two erectile cylinders (corpora cavernosa) that enlarge with blood during erection. A tough fibrous, partially elastic outer casing surrounds the cavernosa. The corpus spongiosum surrounds the urethra (urinary tube), a tube that runs from the bladder to the end of the penis. The urethra carries urine and semen out of the body.

Figure 1. Male reproductive system

male reproductive systemFigure 2. Penis (cross section)

penispenis cross-section

How does a penile implant work

Semirigid malleable prostheses are the simplest and easiest to implant, but they can be difficult to conceal because the penis is always erect (see Figure 4 below).

Inflatable prostheses typically consist of two tubes that replace the corpora cavernosa, plus a pump in the scrotum and an intra-abdominal reservoir (see Figures 3 and 5 below). The penile implant pump is a soft saline fluid-filled device (the liquid is water and salt) that can expand and contract without losing elasticity. It consists of three small components: very thin penile tubes, the pump, and the reservoir. The reservoir contains fluid, which is transferred by the pump into the tubes, causing the penis to expand and become rigid.

Figure 3. Penile prosthesis implant

penile prosthesis implant

There are two main types of penile implants:

  • Inflatable implants. Inflatable devices, the most common type of penile implant used, can be inflated to create an erection and deflated at other times. Three-piece inflatable implants use a fluid-filled reservoir implanted under the abdominal wall, a pump and a release valve placed inside the scrotum, and two inflatable cylinders inside the penis. To achieve an erection, you pump the fluid from the reservoir into the cylinders. Afterward, you release the valve inside the scrotum to drain the fluid back into the reservoir. The two-piece model works in a similar way, but the fluid reservoir is part of the pump implanted in the scrotum.
  • Semirigid rods. Semirigid devices are always firm. The penis can be bent away from the body for sexual activity and toward the body for concealment. A positionable penile implant is a semirigid device with a central series of segments held together with a spring on each end. It can maintain upward and downward positions better than other semirigid rods can.

Other special designs can fit a shortened penis, or one that’s larger than average. Some inflatable penile implants are also available with antibiotic coatings, which might help reduce the risk of infection.

Comparing implant types

When choosing which type of penile implant is right for you, consider your personal preference and your medical history. Your doctor might suggest one type of design over another based on your age, risk of infection, and health conditions, injuries or medical treatments you’ve had in the past.

Figure 4. Penile implant semi-rigid. The semirigid penile implant is bent upward for sex and toward the body for concealment under clothing.

Penile implant semi-rigid

Figure 5. Penile implant two-piece. The two-piece inflatable penile implant consists of inflatable cylinders inside the shaft of the penis and a combined fluid reservoir and pump unit in the scrotum.

penile implant two-piece

Figure 6. Penile implant three-piece. The three-piece inflatable penile implant consists of inflatable cylinders inside the shaft of the penis, a fluid reservoir under the abdominal wall, and a pump inside the scrotum.

penile implant pump

penile implant three-piece

Table 1. Type of penile implants

Type of penile implantProsCons
Three-piece inflatable
  • Creates the most natural, rigid erection
  • Provides flaccidity when deflated
  • Has more parts that could malfunction than does any other implant
  • Requires a reservoir inside the abdomen
Two-piece inflatable
  • Provides flaccidity when deflated
  • Is mechanically more complicated than is a semirigid implant
  • Provides less firm erections than does a three-piece implant
Semirigid rod
  • Has a low chance of malfunction due to the small number of parts
  • Is easy to use for those with limited mental or manual dexterity
  • Results in a penis that is always slightly rigid
  • Puts constant pressure on the inside of the penis, which can cause injury
  • Can be difficult to conceal under clothing

Prosthetic penis surgery procedure

Initially, you’ll talk to your doctor or a urologist about penile implants. During your visit, your doctor will likely:

  • Review your medical history. Be prepared to answer questions about current and past medical conditions, especially your experience with erectile dysfunction. Talk about any medications you’re taking or have taken recently, as well as any surgeries you’ve had.
  • Do a physical exam. To make sure penile implants are the best options for you, your doctor will do a physical exam, including a complete urologic exam. Your doctor will confirm the presence and nature of erectile dysfunction, and make sure that your erectile dysfunction can’t be treated in another way. He or she will also try to determine whether there’s any reason that penile implant surgery is likely to cause complications. Your doctor will also examine your ability to use your hands, since some penile implants require greater manual dexterity than others.
  • Discuss your expectations. Make sure you understand what the procedure involves and the type of penile implant that suits you best. It’s also important to know that the procedure is considered permanent and irreversible.

Your doctor will also explain the benefits and risks, including potential complications. Ideally, you’ll include your partner in the discussion with your doctor.

Before penile implant surgery you might also need to:

  • Avoid certain medications. Your doctor might recommend that you temporarily stop taking aspirin and anti-inflammatory drugs, which can increase your risk of bleeding.
  • Arrange for a ride home. Ask your doctor when you’ll be able to go home after surgery. Penile implant surgery typically involves an overnight stay.
  • Limit food and liquids. Don’t eat or drink anything after midnight before your surgery, or follow specific instructions from your doctor.

During penile implant surgery

Penile implant surgery is usually done at a surgery center or hospital. Your doctor might give you medication to make you unconscious during the surgery (general anesthesia) or medication that blocks pain in the lower part of your body (spinal anesthesia).

  • Your doctor will give you IV antibiotics to help prevent infection. The surgery site will also be shaved immediately before surgery to reduce the risk of infection.
  • A tube (catheter) might be inserted into your bladder via your penis to collect urine at some point during surgery. Your surgeon will make an incision below the head of the penis, at the base of the penis or in the lower abdomen.
  • Next, your surgeon will stretch the spongy tissue in the penis that would normally fill with blood during an erection. This tissue is inside each of the two hollow chambers called the corpora cavernosa.
  • Your surgeon will choose the correct size implant and place the implant cylinders inside your penis. All sizes are customized to your exact body measurements.

If your doctor is implanting a two-piece inflatable device, a pump and valve are placed inside the scrotum. For a three-piece device, your doctor will also implant a fluid reservoir under the abdominal wall through an internal incision.

Once the device is in place, your surgeon will sew the incisions closed. Penile implant surgery usually takes 45 minutes to an hour.

After penile implant surgery

After penile implant surgery, you’ll likely need to take medications to ease pain. Mild pain might persist for several weeks. You might also need to take antibiotics for one week to prevent infection.

Your doctor might recommend keeping your penis up on your lower abdomen and pointing toward your bellybutton during the healing process to prevent downward curvature.

Your doctor will provide specific instructions about when you can resume normal activities. Most men can resume strenuous physical activity and sexual activity about four to six weeks after surgery. You’ll likely need to return to your doctor to have your stitches removed in about two weeks.

At this point, your doctor might recommend fully inflating and deflating inflatable penile implants twice a day to give you practice using them and stretch the area surrounding the cylinders.

Penile implant side effects

Penile implant complications include:

  • Infection. As with any surgery, infection is possible. You might be at an increased risk of infection if you have a spinal cord injury or diabetes.
  • Implant problems. New penile implant designs are reliable, but in rare cases the implants might malfunction. Surgery is necessary to remove, repair or replace a broken implant.
  • Internal erosion or adhesion. In some cases, an implant might stick to the skin inside the penis or wear away the skin from inside the penis. Rarely, an implant breaks through the skin. These problems are sometimes linked to an infection.

During the operation the most important complications can involve the urethra, the bladder and intestine. Urethral injuries may occur during the dilatation of the corpora cavernosa and can especially affect scarred tissues. Bladder and visceral injuries can happen during the positioning of the reservoir with the penoscrotal incision, due to the blindness of this procedure. The opening of the fascia to have access to the Retzius space is a delicate phase because the peritoneum and the bladder can be perforated 8.

Breakage or mechanical failure of the device are complications which may be checked before the implant procedure. Any kind of injury to the prosthesis can be easily avoided by putting sutures on the corpora before the placement of the cylinders, while correct functioning should be tested before the end of the operation in order to allow substitution at this stage.

Infection (ranges from 1.7% to 15%) 9 is an important complication which could cause the revision or the removal of the device. Infections are generally caused by Staphylococcus epidermidis and S. aureus, followed by Gram-negative bacteria, S. aureus and anaerobic organisms 10. Clinically it is characterized by fever, persistent scrotal pain, erythema and evidence of purulent material from the wound. Systemic antibiotic therapy is not sufficient to treat this complication; the removal of the prosthesis is recommended either with immediate replacement or replacement after some months 8. The importance of this aspect is stressed by the introduction of the InhibiZone™ prostheses by AMS® and Titan™ prostheses by Coloplast Ltd®, conceived to inhibit bacterial adhesion and proliferation with a proven reduction in infection rates from 2% to 1.06% 11.

Mechanical disorders of the prosthesis (ranging from 1.4% to 13.7%) 9 are becoming less common thanks to improvement of the devices. The most common complications are fluid loss, cylinder rupture and mechanical breakage, and require removal of the prostheses 11. Auto-inflation (ranging from 2.4% to 11%) 12 is a mechanical disorder which can happen in the implanted prosthesis. In order to avoid this kind of complication Coloplast Ltd® and AMS® introduced antireflux ‘lock-out’ valves with a consequent reduction of auto-inflation to 1.3% 12.

Treating an infection

Infections after penile implant surgery typically occur in the first few weeks or possibly years later. Early infections can cause swelling of the scrotum, pus buildup and fever. Later infections might involve persistent or recurrent long-term pain.

Surgery to remove the implant is likely necessary to treat an infection. Replacing a penile implant can be complicated and can lead to a buildup of scar tissue and a decrease in penis length.

References
  1. Consensus development conference statement. National Institutes of Health. Impotence. December 7-9, 1992. Int J Impot Res. 1993 Dec; 5(4):181-284. https://www.ncbi.nlm.nih.gov/pubmed/8173631/
  2. Implants, mechanical devices, and vascular surgery for erectile dysfunction. Hellstrom WJ, Montague DK, Moncada I, Carson C, Minhas S, Faria G, Krishnamurti S. J Sex Med. 2010 Jan; 7(1 Pt 2):501-23. https://www.ncbi.nlm.nih.gov/pubmed/20092450/
  3. SILICONE IMPLANTATION: INLAY METHOD. LASH H, ZIMMERMAN DC, LOEFFLER RA. Plast Reconstr Surg. 1964 Jul; 34():75-80. https://www.ncbi.nlm.nih.gov/pubmed/14200523/
  4. Management of erectile impotence. Use of implantable inflatable prosthesis. Scott FB, Bradley WE, Timm GW. Urology. 1973 Jul; 2(1):80-2. https://www.ncbi.nlm.nih.gov/pubmed/4766860/
  5. Penile prostheses. Bettocchi C, Palumbo F, Spilotros M, Palazzo S, Saracino GA, Martino P, Battaglia M, Selvaggi FP, Ditonno P. Ther Adv Urol. 2010 Feb; 2(1):35-40. https://www.ncbi.nlm.nih.gov/pmc/articles/PMC3126066/
  6. Ji YS, Ko YH, Song PH, Moon KH. Long-term survival and patient satisfaction with inflatable penile prosthesis for the treatment of erectile dysfunction. Korean Journal of Urology. 2015;56(6):461-465. doi:10.4111/kju.2015.56.6.461. https://www.ncbi.nlm.nih.gov/pmc/articles/PMC4462637
  7. Long-term mechanical reliability of AMS 700 series inflatable penile prostheses: comparison of CX/CXM and Ultrex cylinders. Daitch JA, Angermeier KW, Lakin MM, Ingleright BJ, Montague DK. J Urol. 1997 Oct; 158(4):1400-2. https://www.ncbi.nlm.nih.gov/pubmed/9302130/
  8. Penile prosthesis: what should we do about complications? Bettocchi C, Ditonno P, Palumbo F, Lucarelli G, Garaffa G, Giammusso B, Battaglia M. Adv Urol. 2008; ():573560. https://www.ncbi.nlm.nih.gov/pmc/articles/PMC2581729/
  9. Outcome of penile prosthesis implantation for treating erectile dysfunction: experience with 504 procedures. Minervini A, Ralph DJ, Pryor JP. BJU Int. 2006 Jan; 97(1):129-33. https://www.ncbi.nlm.nih.gov/pubmed/16336342/
  10. The use of penile prostheses in the treatment of impotence. Evans C. Br J Urol. 1998 Apr; 81(4):591-8. https://www.ncbi.nlm.nih.gov/pubmed/9598633/
  11. Efficacy, safety and patient satisfaction outcomes of the AMS 700CX inflatable penile prosthesis: results of a long-term multicenter study. AMS 700CX Study Group. Carson CC, Mulcahy JJ, Govier FE. J Urol. 2000 Aug; 164(2):376-80. https://www.ncbi.nlm.nih.gov/pubmed/10893589/
  12. The mentor Alpha 1 penile prosthesis with reservoir lock-out valve: effective prevention of auto-inflation with improved capability for ectopic reservoir placement. Wilson SK, Henry GD, Delk JR Jr, Cleves MA. J Urol. 2002 Oct; 168(4 Pt 1):1475-8. https://www.ncbi.nlm.nih.gov/pubmed/12352421/
read more
Procedures

Bone density test

bone density test

What is a bone density test

A bone mineral density (BMD) test measures how much calcium and other types of minerals are in an area of your bone. The main reason to have the bone density test is to find and treat serious bone loss. Bone density test helps your health care provider detect osteoporosis and predict your risk of bone fractures. Bone mineral density uses a dual-energy x-ray absorptiometry (DEXA) scan. A bone-density test gives out a small amount of radiation. Most experts feel that the risk of small amount of X-ray radiation is very low compared with the benefits of finding osteoporosis before you break a bone. But the harmful effects of radiation can add up, so it is best to avoid bone density test when you can unless you have to.

By 2020, approximately 12.3 million Americans older than age 50 years are expected to have osteoporosis 1. Osteoporotic fractures, particularly hip fractures, are associated with limitation of ambulation, chronic pain and disability, loss of independence, and decreased quality of life, and 21% to 30% of patients die within 1 year of a hip fracture 2. Seventy-one percent of osteoporotic fractures occur among women 3 and women have higher rates of osteoporosis than men at any given age; however, men have a higher fracture-related mortality rate than women 4. The prevalence of primary osteoporosis (i.e., osteoporosis without underlying disease) increases with age and differs by race/ethnicity. With the aging of the U.S. population, the potential preventable burden is likely to increase in future years.

The U.S. Preventive Services Task Force Draft Recommendation 5 found convincing evidence that bone density tests are accurate for predicting osteoporotic fractures in women and men. Screening and treating low bone mineral density (BMD) detected through screening can result in increased bone mineral density (BMD) and decrease the risk of subsequent fractures and fracture-related morbidity and mortality. Most evidence supports screening and treatment of osteoporosis in postmenopausal women; the evidence for primary prevention in men is lacking, and future research is needed. One cannot assume that the bones of men and women are biologically the same, especially because bone density is affected by differing levels and effects of testosterone and estrogen in men and women. Moreover, rapid bone loss occurs in women due to the loss of estrogen during menopause. Although women have a higher risk of osteoporosis at an earlier age than men, likely due to loss of estrogen during menopause, it raises the question of whether the benefits of treatment observed in trials in women can be directly extrapolated to men.

The most commonly used test is central dual-energy x-ray absorptiometry (DEXA) of the hip and lumbar spine. While several bone measurement tests similarly predict risk of fracture, DEXA directly measures bone mineral density (BMD), and most treatment guidelines use central DEXA to define osteoporosis and the treatment threshold to prevent osteoporotic fractures. The U.S. Preventive Services Task Force Draft Recommendation 5 found adequate evidence that clinical risk assessment tools are moderately accurate in identifying risk of osteoporosis and osteoporotic fractures. The U.S. Preventive Services Task Force Draft Recommendation 5 found no studies that evaluated the effect of screening for osteoporosis on fracture rates or fracture-related morbidity or mortality.

In 2014, the National Osteoporosis Foundation recommended bone density test in all women age 65 years and older and all men age 70 years and older 6. It also recommended bone density testing in postmenopausal women younger than age 65 years and men ages 50 to 69 years based on their risk factor profile, including if they had a fracture as an adult. The International Society for Clinical Densitometry recommends bone mineral density (BMD) testing in all women age 65 years and older and all men age 70 years and older. It also recommends bone mineral density (BMD) testing in postmenopausal women younger than age 65 years and men younger than age 70 years who have risk factors for low bone mass 7. The American Academy of Family Physicians recommends screening in women age 65 years and older and younger women whose fracture risk is equal to or greater than that of a 65-year-old white woman 8. In 2012 (and reaffirmed in 2014) the American College of Obstetricians and Gynecologists recommended bone density screening with DXA beginning at age 65 years in all women and selective screening in postmenopausal women younger than age 65 years who have osteoporosis risk factors or an adult fracture 9. The American Association of Clinical Endocrinologists also recommends evaluating all women age 50 years and older for osteoporosis risk and consider bone density testing based on clinical fracture risk profile 10. The Endocrine Society recommends screening in men older than age 70 years and adults ages 50 to 69 years with significant risk factors or fracture after age 50 years 11.

Bone mineral density (BMD) tests are used to:

  • Diagnose bone loss and osteoporosis
  • See how well osteoporosis medicine is working
  • Predict your risk of future bone fractures

You should have bone mineral testing or screening if you have an increased risk of osteoporosis.

You are more likely to get osteoporosis if you are:

  • A woman, age 65 or older
  • A man, age 70 or older

Women under age 65 and men ages 50 to 70 are at increased risk of osteoporosis if they:

  • Have a broken bone caused by normal activities, such as a fall from standing height or lower (fragility fracture)
  • Have rheumatoid arthritis, chronic kidney disease, or eating disorders
  • Have early menopause (either from natural causes or surgery)
  • History of hormone treatment for prostate cancer or breast cancer
  • Have had a significant loss of height due to compression fractures of the back
  • Smoke
  • Have a strong family history of osteoporosis
  • Take corticosteroid medicines (prednisone or methylprednisolone) every day for more than 3 months
  • Take thyroid hormone replacement
  • Have three or more drinks of alcohol a day on most days

Regardless of your sex or age, your doctor may recommend a bone density test if you’ve:

  • Lost height. People who have lost at least 1.6 inches (4 centimeters) in height may have compression fractures in their spines, for which osteoporosis is one of the main causes.
  • Fractured a bone. Fragility fractures occur when a bone becomes so fragile that it breaks much more easily than expected. Fragility fractures can sometimes be caused by a strong cough or sneeze.
  • Taken certain drugs. Long-term use of steroid medications, such as prednisone, interferes with the bone-rebuilding process — which can lead to osteoporosis.
  • Received a transplant. People who have received an organ or bone marrow transplant are at higher risk of osteoporosis, partly because anti-rejection drugs also interfere with the bone-rebuilding process.
  • Had a drop in hormone levels. In addition to the natural drop in hormones that occurs after menopause, women’s estrogen may also drop during certain cancer treatments. Some treatments for prostate cancer reduce testosterone levels in men. Lowered sex hormone levels weaken bone.

Current practice recommends bone density retesting every 2 years. However, some women may be able to wait a much longer time between their screening bone density tests. Talk to your provider about how often you should be tested.

How much does a bone density test cost?

A DEXA scan costs about $125. Not all health insurance plans pay for bone density tests, so ask your insurance provider beforehand if you’re covered.

How long does a bone density test take?

The bone density test usually takes about 10 to 30 minutes.

How often should I get bone density scan screening test?

The potential value of rescreening women whose initial screening test did not detect osteoporosis is to improve fracture risk prediction. A lack of evidence exists about optimal intervals for repeated screening and whether repeated screening is necessary in a woman with normal bone mineral density (BMD). Because of limitations in the precision of testing, a minimum of two years may be needed to reliably measure a change in bone mineral density (BMD); however, longer intervals may be necessary to improve fracture risk prediction. A prospective study of 4,124 women 65 years or older found that neither repeated bone mineral density (BMD) measurement nor the change in bone mineral density (BMD) after eight years was more predictive of subsequent fracture risk than the original measurement 12.

Potential harms of bone density scan screening

The U.S. Preventive Services Task Force Draft Recommendation 5 found no studies that directly examined harms of screening in men. Potential harms of screening in men are likely to be similar to those in women. Evidence on treatment harms in men is very limited 4.

Figure 1. Bone density – with bone loss, the outer shell of a bone becomes thinner and the interior becomes more porous. Normal bone (A) is strong and flexible. Osteoporotic bone (B) is weaker and subject to fracture.

Bone density

Low Bone Mass Versus Osteoporosis

The information provided by a bone mineral density (BMD) test can help your doctor decide which prevention or treatment options are right for you.

If you have low bone mass that is not low enough to be diagnosed as osteoporosis, this is sometimes referred to as osteopenia. Low bone mass can be caused by many factors such as:

  • heredity
  • the development of less-than-optimal peak bone mass in your youth
  • a medical condition or medication to treat such a condition that negatively affects bone
  • abnormally accelerated bone loss.

Although not everyone who has low bone mass will develop osteoporosis, everyone with low bone mass is at higher risk for the disease and the resulting fractures.

As a person with low bone mass, you can take steps to help slow down your bone loss and prevent osteoporosis in your future. Your doctor will want you to develop—or keep—healthy habits such as eating foods rich in calcium and vitamin D and doing weight-bearing exercise such as walking, jogging, or dancing. In some cases, your doctor may recommend medication to prevent osteoporosis.

Osteoporosis: If you are diagnosed with osteoporosis, these healthy habits will help, but your doctor will probably also recommend that you take medication. Several effective medications are available to slow—or even reverse—bone loss. If you do take medication to treat osteoporosis, your doctor can advise you concerning the need for future bone mineral density (BMD) tests to check your progress.

Who should get a bone density test ?

The U.S. Preventive Services Task Force Draft Recommendation 5 recommends that all women over age 65 should have a bone density test. Women who are younger than age 65 and at high risk for fractures should also have a bone density test (asymptomatic screening). Men age 70 and up may want to talk with their doctors about the risks and benefits before deciding on bone density test for asymptomatic screening.

You may need a follow-up bone-density test after several years. That depends on the results of your first test. Younger women, and men ages 50 to 69, should consider the bone density test if they have risk factors for serious bone loss.

Risk factors for osteoporosis include:

  • Breaking a bone in a minor accident.
  • Having rheumatoid arthritis.
  • Having a parent who broke a hip.
  • Smoking
  • Drinking heavily.
  • Having a low body weight.
  • Using corticosteroid drugs for three months or more.
  • Having a very low vitamin D level.

The U.S. Preventive Services Task Force Draft Recommendation – Screening Osteoporosis to Prevent Fractures 5

  • Women age 65 years and older: The U.S. Preventive Services Task Force recommends screening for osteoporosis with bone measurement testing to prevent osteoporotic fractures in women age 65 years and older.
  • Postmenopausal women younger than age 65 years at increased risk of osteoporosis: The U.S. Preventive Services Task Force recommends screening for osteoporosis with bone measurement testing in postmenopausal women younger than age 65 years who are at increased risk of osteoporosis, as determined by a formal clinical risk assessment tool.
  • Men: The U.S. Preventive Services Task Force concludes that the current evidence is insufficient to assess the balance of benefits and harms of screening for osteoporosis to prevent osteoporotic fractures in men.

The drugs used to treat bone loss

The most common drugs to treat bone loss are Fosamax (generic alendronate), Boniva (generic ibandronate), and Actonel (generic risendronate).

The U.S. Preventive Services Task Force Draft Recommendation 5 found convincing evidence that drug therapies reduce subsequent fracture rates in postmenopausal women. The benefit of treating screening-detected osteoporosis is at least moderate in women age 65 years and older and younger postmenopausal women who have similar fracture risk. The harms of treatment range from no greater than small for bisphosphonates and parathyroid hormone to small to moderate for raloxifene and estrogen. Therefore, the U.S. Preventive Services Task Force Draft Recommendation 5 concludes with moderate certainty that the net benefit of screening for osteoporosis in these groups of women is at least moderate.

The U.S. Preventive Services Task Force Draft Recommendation 5 concludes that the evidence is inadequate to assess the effectiveness of drug therapies in reducing subsequent fracture rates in men without previous fractures. Treatments that have been proven effective in women cannot necessarily be presumed to have similar effectiveness in men, and the direct evidence is too limited to draw definitive conclusions. Thus, the U.S. Preventive Services Task Force Draft Recommendation 5 could not assess the balance of benefits and harms of screening for osteoporosis in men.

1) Women younger than age 65 years who have additional risk for osteoporosis, based on medical history and other findings. Additional risk factors for osteoporosis include:

  • Estrogen deficiency.
  • A history of maternal hip fracture that occurred after the age of 50 years.
  • Low body mass (less than 127 lbs or 57.6 kg).
  • History of amenorrhea (more than 1 year before age 42 years).

2) Women younger than age 65 years or men younger than age 70 years who have additional risk factors, including:

  • Current use of cigarettes
  • Loss of height, thoracic kyphosis.

3) Individuals of any age with bone mass osteopenia, or fragility fractures on imaging studies such as radiographs, computed tomography (CT), or magnetic resonance imaging (MRI).

4) Individuals age 50 years and older who develop a wrist, hip, spine, or proximal humerus fracture with minimal or no trauma, excluding pathologic fractures.

5) Individuals of any age who develop 1 or more insufficiency fractures.

6) Individuals receiving (or expected to receive) glucocorticoid therapy for more than 3 months.

7) Individuals beginning or receiving long-term therapy with medications known to adversely affect bone mineral density (BMD) (e.g., anticonvulsant drugs, androgen deprivation therapy, aromatase inhibitor therapy, or chronic heparin).

8) Individuals with an endocrine disorder known to adversely affect bone mineral density (BMD) (e.g., hyperparathyroidism, hyperthyroidism, or Cushing’s syndrome).

9) Hypogonadal men older than 18 years and men with surgically or chemotherapeutically induced castration.

10) Individuals with medical conditions that could alter bone mineral density (BMD), such as:

  • Chronic renal failure.
  • Rheumatoid arthritis and other inflammatory arthritis.
  • Eating disorders, including anorexia nervosa and bulimia.
  • Organ transplantation.
  • Prolonged immobilization.
  • Conditions associated with secondary osteoporosis, such as gastrointestinal malabsorption or malnutrition, sprue, osteomalacia, vitamin D deficiency, endometriosis, acromegaly, chronic alcoholism or established cirrhosis, and multiple myeloma.
  • Individuals who have had gastric bypass for obesity. The accuracy of DEXA in these patients might be affected by obesity.

11) Individuals being considered for pharmacologic therapy for osteoporosis.

12) Individuals being monitored to:

  • Assess the effectiveness of osteoporosis drug therapy 13.
  • Follow-up medical conditions associated with abnormal bone mineral density (BMD).

13) Children or adolescents with medical conditions associated with abnormal bone mineral density (BMD) 14 including but not limited to:

  • Individuals receiving (or expected to receive) glucocorticoid therapy for more than 3 months.
  • Individuals receiving radiation or chemotherapy for malignancies.
  • Individuals with an endocrine disorder known to adversely affect bone mineral density (BMD) (e.g., hyperparathyroidism, hyperthyroidism, growth hormone deficiency or Cushing’s syndrome).
  • Individuals with bone dysplasias known to have excessive fracture risk (osteogenesis imperfecta, osteopetrosis) or high bone density.
  • Individuals with medical conditions that could alter bone mineral density (BMD), such as:
    • Chronic renal failure.
    • Rheumatoid arthritis and other inflammatory arthritis.
    • Eating disorders, including anorexia nervosa and bulimia.
    • Organ transplantation.
    • Prolonged immobilization.
    • Conditions associated with secondary osteoporosis, such as gastrointestinal malabsorption, sprue, inflammatory bowel disease, malnutrition, osteomalacia, vitamin D deficiency, acromegaly, cirrhosis, HIV infection, prolonged exposure to fluorides.

14) DEXA scan may be indicated in the diagnosis, staging, and follow-up of individuals with conditions that result in pathologically increased bone mineral density (BMD), such as osteopetrosis or prolonged exposure to fluoride.

15) DEXA scan may be indicated as a tool to measure regional and whole body fat and lean mass (e.g., for patients with malabsorption, cancer, or eating disorders) 15.

Who shouldn’t get a bone density test ?

Most men, and women under age 65, probably don’t need the bone density scan test.

Most people do not have serious bone loss.

Most people have no bone loss or have mild bone loss (called osteopenia). Their risk of breaking a bone is low. They do not need the test. They should exercise regularly and get plenty of calcium and vitamin D. This is the best way to prevent bone loss.

The bone scan has risks.

A bone-density test gives out a small amount of radiation. But the harmful effects of radiation can add up, so it is best to avoid it when you can.

The treatments have limited benefits.

Many people are given drugs because they have mild bone loss. But, there is little evidence that these drugs help them.

And, even if the drugs do help, they may only help for a few years. So, you may want to consider them only if you have serious bone loss. Serious bone loss is called osteoporosis.

Bone density test may be of limited value or require modification of the technique or rescheduling of the examination in some situations, including:

  • Recently administered gastrointestinal contrast or radionuclides.
  • Pregnancy.
  • Severe degenerative changes or fracture deformity in the measurement area.
  • Implants, hardware, devices, or other foreign material in the measurement area.
  • The patient’s inability to attain correct position and/or remain motionless for the measurement.
  • Extremes of high or low body mass index (BMI) which may adversely affect the ability to obtain accurate and precise measurements. Quantitative computed tomography (QCT) may be a desirable alternative in these individuals 16.
  • Any condition that precludes proper positioning of the patient to be able to obtain accurate bone mineral density (BMD) values.

How is a bone density test done

Bone density testing can be done in several ways.

The most common and accurate way uses a dual-energy x-ray absorptiometry (DEXA) scan. DEXA uses low-dose x-rays. (You receive more radiation with a chest x-ray.) The scan is painless. You need to remain still during the test.

Dual-energy x-ray absorptiometry (DEXA) is a clinically proven method of measuring bone mineral density (BMD) in the lumbar spine, proximal femur, forearm, and whole body 17. It is used primarily in the diagnosis and management of osteoporosis and other disease states characterized by abnormal bone mineral density (BMD), as well as to monitor response to therapy for these conditions 18. It may also be used to measure whole-body composition 19.

There are two types of dual-energy x-ray absorptiometry (DEXA) scans:

  • Central DEXA. You lie on a soft table. The scanner passes over your lower spine and hip. In most cases, you do not need to undress. This scan is the best test to predict your risk of fractures, especially of the hip.
  • Peripheral DEXA (p-DEXA). These smaller machines measure the bone density in your wrist, fingers, leg, or heel. These machines are in health care offices, pharmacies, shopping centers, and at health fairs.

Figure 2. Bone density testing

bone density test

Figure 3. Bone density test locations – bone density tests are usually done on bones in the spine (vertebrae), hip, forearm, wrist, fingers and heel.

Bone density test locations

Central dual-energy x-ray absorptiometry (DEXA) for osteoporosis diagnosis

  • The World Health Organization (WHO) international reference standard for osteoporosis diagnosis is a T-score of -2.5 or less at the femoral neck.
    • The reference standard from which the T-score is calculated is the female, white, age 20-29 years, NHANES III database
  • Osteoporosis may be diagnosed in postmenopausal women and in men age 50 and older if the T-score of the lumbar spine, total hip, or femoral neck is -2.5 or less:
    • In certain circumstances the 33% radius (also called 1/3 radius) may be utilized.

The T-Score

Most commonly, your bone mineral density (BMD) test results are compared to the ideal or peak bone mineral density of a healthy 30-year-old adult, and you are given a T-score. A score of 0 means your bone mineral density (BMD) is equal to the norm for a healthy young adult. Differences between your bone mineral density (BMD) and that of the healthy young adult norm are measured in units called standard deviations (SDs). The more standard deviations below 0, indicated as negative numbers, the lower your bone mineral density (BMD) and the higher your risk of fracture.

As shown in the table below, a T-score between +1 and −1 is considered normal or healthy. A T-score between −1 and −2.5 indicates that you have low bone mass, although not low enough to be diagnosed with osteoporosis. A T-score of −2.5 or lower indicates that you have osteoporosis. The greater the negative number, the more severe the osteoporosis.

Table 1. T-score and bone mineral density (BMD) test

LevelDefinition
NormalBone density is within 1 SD (+1 or −1) of the young adult mean.
Low bone massBone density is between 1 and 2.5 SD below the young adult mean (T-score of −1 to −2.5 SD).
OsteoporosisBone density is 2.5 SD or more below the young adult mean (T-score of −2.5 SD or lower).
Severe (established) osteoporosisBone density is more than 2.5 SD below the young adult mean, and there have been one or more osteoporotic fractures.

Bone density test procedure

How you prepare

Bone density tests are easy, fast and painless. Virtually no preparation is needed. In fact, some simple versions of bone density tests can be done at your local pharmacy or drugstore.

  • If you are or could be pregnant, tell your provider before bone density test is done.
  • If you’re having the test done at a medical center or hospital, be sure to tell your doctor beforehand if you’ve recently had a barium exam or had contrast material injected for a CT scan or nuclear medicine test. Contrast materials might interfere with your bone density test.

Food and medications

DO NOT take calcium supplements for at least 24 hours before your bone density test.

Clothing and personal items

Wear loose, comfortable clothing and avoid wearing clothes with zippers, belts or buttons. Remove all metal objects from your pockets, such as keys, money clips or change.

What you can expect during a bone density test

Bone density tests are usually done on bones that are most likely to break because of osteoporosis, including:

  • Lower spine bones (lumbar vertebrae)
  • The narrow neck of your thighbone (femur), next to your hip joint
  • Bones in your forearm

If you have your bone density test done at a hospital, it’ll probably be done on a central device, where you lie on a padded platform while a mechanical arm passes over your body. The amount of radiation you’re exposed to is very low, much less than the amount emitted during a chest X-ray. The test usually takes about 10 to 30 minutes.

A small, portable machine can measure bone density in the bones at the far ends of your skeleton, such as those in your finger, wrist or heel. The instruments used for these tests are called peripheral devices, and are often found in pharmacies. Tests of peripheral bone density are less expensive than are tests done on central devices.

Because bone density can vary from one location in your body to another, a measurement taken at your heel usually isn’t as accurate a predictor of fracture risk as a measurement taken at your spine or hip. Consequently, if your test on a peripheral device is positive, your doctor might recommend a follow-up scan at your spine or hip to confirm your diagnosis.

Bone density test results

Normal bone density test results

The results of your bone density test are usually reported as a T-score and Z-score:

  • T-score compares your bone density with that of a healthy young women.
  • Z-score compares your bone density with that of other people of your age, gender, and race. Z-scores should be population specific where adequate reference data exist. For the purpose of Z-score calculation, the patient’s self-reported ethnicity should be used.

With either score, a negative number means you have thinner bones than average. The more negative the number, the higher your risk of a bone fracture.

A T-score is within the normal range if it is -1.0 or above.

Abnormal bone density test results

Bone mineral density testing does not diagnose fractures. Along with other risk factors you may have, it helps predict your risk of having a bone fracture in the future. Your provider will help you understand the results.

If your T-score is:

  • Between -1 and -2.5, you may have early bone loss (osteopenia).
  • Below -2.5, you likely have osteoporosis.

Treatment recommendation depends on your total fracture risk. This risk can be calculated using the FRAX score. Your provider can tell you more about this.

Potential harms of screening and treatment

Potential harms of screening for osteoporosis include false-positive test results, which can lead to unnecessary treatment; false-negative test results; and patient anxiety about positive test results. The U.S. Preventive Services Task Force Draft Recommendation 5 found no studies that addressed the potential harms of screening. The U.S. Preventive Services Task Force Draft Recommendation 5 did review several studies that reported on harms of various medications. Overall, the U.S. Preventive Services Task Force Draft Recommendation 5 determined the potential harms of pharmacotherapy to be small.

Bisphosphonates

Similar to the evidence on the benefits of pharmacotherapy for the primary prevention of fractures, the most available evidence on the harms of pharmacotherapy is for bisphosphonates. The U.S. Preventive Services Task Force Draft Recommendation 5 identified 16 studies on alendronate, five studies on zoledronic acid, six studies on risedronate, two studies on etidronate, and seven studies on ibandronate that reported on harms. Overall, based on pooled analyses, studies on bisphosphonates showed no increased risk of discontinuation, serious adverse events or upper gastrointestinal events 4. Evidence on bisphosphonates and cardiovascular events is more limited and generally shows no significant difference or nonsignificant increases in atrial fibrillation with bisphosphonate therapy. Concerns have been raised about osteonecrosis of the jaw and atypical fractures of the femur with bisphosphonate therapy. The U.S. Preventive Services Task Force Draft Recommendation 5 found only three studies that reported on osteonecrosis of the jaw, and none of these studies found any cases 4. The previous review noted a case series published by the FDA that reported on osteonecrosis of the jaw with bisphosphonate use in cancer patients. A more recent systematic review that did not meet inclusion criteria (because it included populations with a previous fracture) found higher incidence of osteonecrosis of the jaw with intravenous bisphosphonate use and with greater duration of use. No studies that met inclusion criteria for the current review reported on atypical fractures of the femur, although some studies and systematic reviews that did not meet inclusion criteria (because of wrong study population, study design, or intervention comparator) reported an increase in atypical femur fractures with bisphosphonate use. Three trials that reported on harms of bisphosphonates included men (either combining results for men and women or including men only); results were consistent with those of women for risk of discontinuation, serious adverse events, and upper gastrointestinal events.

Raloxifene

Six trials of raloxifene therapy in women reported on various harms. Pooled analyses showed no increased risk of discontinuation due to adverse events or increased risk of leg cramping 4. However, analyses found a nonsignificant trend for increased risk of deep vein thrombosis, as well as an increased risk of hot flashes 4. The previous review found an increased risk of thromboembolic events with raloxifene 4.

Denosumab

Three studies (n=8,451) reported on harms of denosumab therapy in postmenopausal women. Pooled analyses showed no significant increase in discontinuation  or serious adverse events but found a nonsignificant increase in serious infections 4. All three studies reported higher infection rates in women taking denosumab, and further analysis found a higher rate of cellulitis and erysipelas 4.

Parathyroid Hormone

A single study of parathyroid hormone therapy in women (n=2,532) reported a higher risk of discontinuation and other adverse events, such as nausea and headache 4, while a single, smaller study in men found no increased risk of discontinuation or cancer 4 using the FDA-approved dose of 20 μg per day (n=298) 20.

Estrogen

Similar to the evidence on the benefits of estrogen for the primary prevention of fractures, no studies met inclusion criteria for the current review. However, based on findings from the Women’s Health Initiative trial, the previous review found a higher rate of gallbladder events, stroke, and venous thromboembolism with estrogen therapy, and an increased risk of urinary incontinence during 1 year of followup 4. Women taking combined estrogen and progestin had a higher risk of invasive breast cancer, coronary heart disease, probable dementia, gallbladder events, stroke, and venous thromboembolism compared with women taking placebo, and an increased risk of urinary incontinence during 1 year of followup 4.

Effectiveness of early detection and treatment

No controlled studies have evaluated the effect of screening for osteoporosis on fracture rates or fracture-related morbidity or mortality in either women or men. The U.S. Preventive Services Task Force Draft Recommendation 5 reviewed the evidence on drug therapies for the primary prevention of osteoporotic fractures. The vast majority of studies were conducted in women exclusively; only two studies were conducted in men 4. Overall, the U.S. Preventive Services Task Force Draft Recommendation 5 found that pharmacotherapy is effective in treating osteoporosis and reducing fractures in postmenopausal women.

Bisphosphonates

Bisphosphonates were studied most frequently; the U.S. Preventive Services Task Force Draft Recommendation 5 identified seven studies on alendronate, two trials on zoledronic acid, four trials on risedronate, and two trials on etidronate. All but one study were conducted in postmenopausal women. For women, bisphosphonates were found to significantly reduce vertebral fractures and nonvertebral fractures but not hip fractures 4. In the single study of men (n=1,199), zoledronic acid was found to reduce morphometric vertebral fractures but not nonvertebral fractures 4.

Raloxifene

Only one study (n=7,705) on raloxifene met inclusion criteria for the review. It evaluated raloxifene in postmenopausal women and reported a reduction in vertebral fractures but not nonvertebral fractures 4.

Denosumab

The U.S. Preventive Services Task Force Draft Recommendation 5 identified three studies that evaluated denosumab; however, only one study was adequately powered to assess fractures. This study (n=7,868) evaluated denosumab in women and found a significant reduction in vertebral fractures, nonvertebral fractures and hip fractures 4.

Parathyroid Hormone

The U.S. Preventive Services Task Force Draft Recommendation 5 reviewed evidence from two trials on parathyroid hormone. One trial (n=2,532) was conducted in women and reported a significant reduction in vertebral fractures but not nonvertebral fractures 4. The other trial was conducted in men and reported a nonsignificant reduction in nonvertebral fractures when comparing the FDA-approved dose of 20 μg per day vs. placebo (n=298) 20. However, the number of fractures in the study was small and the study was stopped early due to concerns about osteosarcoma found in animal studies.

Estrogen

Although the U.S. Preventive Services Task Force Draft Recommendation 5 did not identify any studies on estrogen for the primary prevention of fractures that met inclusion criteria, the previous review found that estrogen reduces vertebral fractures based on data from the Women’s Health Initiative trial.

References
  1. Wright NC, Looker AC, Saag KG, et al. The recent prevalence of osteoporosis and low bone mass in the United States based on bone mineral density at the femoral neck or lumbar spine. J Bone Miner Res. 2014;29(11):2520-6.
  2. Brauer CA, Coca-Perraillon M, Cutler DM, Rosen AB. Incidence and mortality of hip fractures in the United States. JAMA. 2009;302(14):1573-9.
  3. Burge R, Dawson-Hughes B, Solomon DH, et al. Incidence and economic burden of osteoporosis-related fractures in the United States, 2005-2025. J Bone Miner Res. 2007;22(3):465-75.
  4. Viswanathan M, Reddy S, Berkman N, et al. Screening to Prevent Osteoporotic Fractures: An Evidence Review for the U.S. Preventive Services Task Force. Evidence Synthesis No. 162. AHRQ Publication No. 15-05226-EF-1. Rockville, MD: Agency for Healthcare Research and Quality; 2017.
  5. Osteoporosis to Prevent Fractures: Screening. https://www.uspreventiveservicestaskforce.org/Page/Document/draft-recommendation-statement/osteoporosis-screening1
  6. Cosman F, de Beur SJ, LeBoff MS, et al; National Osteoporosis Foundation. Clinician’s Guide to Prevention and Treatment of Osteoporosis. Osteoporosis Int. 2014;25(10):2359-81.
  7. The International Society for Clinical Densitometry. 2015 ISCD Official Positions—Adult. 2015. http://www.iscd.org/official-positions/2015-iscd-official-positions-adult/
  8. Screening for Osteoporosis: Recommendation Statement. Am Fam Physician. 2011 May 15;83(10):1197-1200. https://www.aafp.org/afp/2011/0515/p1197.html
  9. Committee on Practice Bulletins-Gynecology, American College of Obstetricians and Gynecologists. ACOG Practice Bulletin No. 129. Osteoporosis. Obstet Gynecol. 2012;120(3):718-34.
  10. Camacho PM, Petak SM, Binkley N, et al. American Association of Clinical Endocrinologists and American College of Endocrinology clinical practice guidelines for the diagnosis and treatment of postmenopausal osteoporosis-2016–executive summary. Endocr Pract. 2016;22(9):1111-8.
  11. Watts NB, Adler RA, Bilezikian JP, et al; Endocrine Society. Osteoporosis in men: an Endocrine Society clinical practice guideline. J Clinc Endocrinol Metab. 2012;97(6):1802-22.
  12. Hillier TA, Stone KL, Bauer DC, et al. Evaluating the value of repeat bone mineral density measurement and prediction of fractures in older women: the study of osteoporotic fractures. Arch Intern Med. 2007;167(2):155–160.
  13. Bonnick SL, Shulman L. Monitoring osteoporosis therapy: bone mineral density, bone turnover markers, or both? Am J Med 2006;119:S25-31.
  14. Bachrach LK. Osteoporosis and measurement of bone mass in children and adolescents. Endocrinol Metab Clin North Am 2005;34:521-535, vii.
  15. Wong WW, Hergenroeder AC, Stuff JE, Butte NF, Smith EO, Ellis KJ. Evaluating body fat in girls and female adolescents: advantages and disadvantages of dual-energy X-ray absorptiometry. Am J Clin Nutr 2002;76:384-389.
  16. Yu DS, Lee DT. Do medically unexplained somatic symptoms predict depression in older Chinese? Int J Geriatr Psychiatry 2012;27:119-126.
  17. Baim S, Binkley N, Bilezikian JP, et al. Official Positions of the International Society for Clinical Densitometry and executive summary of the 2007 ISCD Position Development Conference. J Clin Densitom 2008;11:75-91.
  18. Cummings SR, Bates D, Black DM. Clinical use of bone densitometry: scientific review. JAMA 2002;288:1889-1897.
  19. Wells JC, Haroun D, Williams JE, et al. Evaluation of DXA against the four-component model of body composition in obese children and adolescents aged 5-21 years. Int J Obes (Lond) 2010;34:649-655.
  20. Orwoll ES, Scheele WH, Paul S, et al. The effect of teriparatide [human parathyroid hormone (1-34)] therapy on bone density in men with osteoporosis. J Bone Miner Res. 2003;18(1):9-17.
read more
Procedures

Antinuclear antibody

antinuclear antibody

What is antinuclear antibody

Antinuclear antibodies (ANA) are a group of antibodies produced by your immune system when it fails to adequately distinguish between “self” and “nonself.” These antibodies, known as autoantibodies, attack your own healthy cells and cause signs and symptoms such as tissue and organ inflammation, joint and muscle pain, and fatigue. Antibodies are proteins that your immune system – white blood cells (B cells) – makes to recognize and fight foreign substances like viruses and bacteria. When an antibody recognizes the foreign proteins of an infectious organism, it recruits other proteins and cells to fight off the infection. This cascade of attack is called inflammation. Sometimes these antibodies make a mistake, identifying normal, naturally-occurring proteins in our bodies as being “foreign” and dangerous. When these antibodies make incorrect calls, identifying a naturally-occurring protein (or self protein) as foreign, they are called autoantibodies. But the antinuclear antibodies (ANA) specifically target substances found in the nucleus of a cell, hence the name “antinuclear.” The antinuclear antibody ANA test identifies the presence of these autoantibodies in your blood. Autoantibodies start the cascade of inflammation, causing the body to attack itself.

The presence of large amount of ANA antinuclear antibody may be a marker of an autoimmune process and is associated with several autoimmune disorders but is most commonly seen with the autoimmune disorder systemic lupus erythematosus (SLE). Antinuclear antibodies (ANA) could also mean other autoimmune diseases, including lupus, scleroderma, Sjögren’s syndrome, polymyositis/dermatomyositis, mixed connective tissue disease, drug-induced lupus, and autoimmune hepatitis. A positive antinuclear antibody (ANA) can also be seen in juvenile arthritis. Other conditions, such as cancer, can cause a positive ANA.

Some medications can cause a positive antinuclear antibody (ANA). It is important to talk with your doctor about all the drugs you are taking – prescription, over-the-counter, and street.

The ANA antinuclear antibody test is one of the primary tests for helping to diagnose a suspected autoimmune disorder or ruling out other conditions with similar signs and symptoms. As such, antinuclear antibody test is often followed by other tests for autoantibodies that may help to establish a diagnosis. These may include, for example, an ENA (extractable nuclear antibody) panel, anti-dsDNA, anti-centromere and/or anti-histone test.

The positive antinuclear antibody (ANA) reading simply tells your doctor to keep looking. In fact, you may have a positive ANA without any disease process which means that the evidence is not there to make a diagnosis of lupus or any other autoimmune disease. To make a definite diagnosis, your doctor will need more blood tests along with history of your symptoms and a physical examination.

Antinuclear antibody (ANA) key points

  • Antinuclear antibody (ANA) is a highly sensitive test for the diagnosis of SLE, being positive in >95% of patients. The specificity of ANA is, however, low.
  • Antinuclear antibody (ANA) is also positive in up to 70% of other systemic rheumatic conditions, often at high titer.
  • Antinuclear antibody (ANA) may also be positive, usually in low titer, in other inflammatory and neoplastic diseases and in a proportion of the normal population, with the prevalence increasing with age.
  • Higher antinuclear antibody (ANA) titers usually have greater diagnostic significance, particularly in younger patients.
  • Use of the antinuclear antibody (ANA) by itself as a screening test should be avoided, as interpretation is difficult in the absence of features suggestive of a systemic rheumatic disease.
  • Antinuclear antibody (ANA) titers often remain elevated in remission and do not reflect disease activity.
  • Antinuclear antibody (ANA) patterns have limited correlation with specific syndromes, e.g., anticentromere antibodies are characteristic of the CREST syndrome (limited scleroderma); rim pattern suggests SLE. DFS70 pattern may indicate less likelihood of systemic rheumatic disease.
  • Specificity of the antibody for antigenic determinants is established by other tests, for example, an ENA (extractable nuclear antibody) panel, anti-dsDNA, anti-centromere and/or anti-histone test.

What is antinuclear antibody test

The antinuclear antibody (ANA) test is used as a primary test to help evaluate a person for autoimmune disorders that affect many tissues and organs throughout the body (systemic) and is most often used as one of the tests to help diagnose systemic lupus erythematosus (SLE).

ANA are a group of autoantibodies produced by a person’s immune system when it fails to adequately distinguish between “self” and “nonself.” They target substances found in the nucleus of a cell and cause organ and tissue damage.

Depending on a person’s signs and symptoms and the suspected disorder, ANA testing may be used along with or followed by other autoantibody tests. Some of these tests are considered subsets of the general ANA test and detect the presence of autoantibodies that target specific substances within cell nuclei, including anti-dsDNA, anti-centromere, anti-nucleolar, anti-histone and anti-RNA antibodies. An ENA panel may also be used in follow up to an ANA.

These supplemental tests are used in conjunction with a person’s clinical history to help diagnose or rule out other autoimmune disorders, such as Sjögren syndrome, polymyositis and scleroderma.

Different laboratories may use different test methods to detect ANA. Two common methods include immunoassay and indirect fluorescent antibody (IFA). IFA is considered the gold standard. Some laboratories will use immunoassay to screen for ANA and use IFA to confirm positive or equivocal results.

  • Indirect fluorescent antibody (IFA)—this is a method in which a person’s blood sample is mixed with cells that are affixed to a slide. Autoantibodies that may be present in the blood react with the cells. The slide is treated with a fluorescent antibody reagent and examined under a microscope. The presence (or absence) and pattern of fluorescence is noted. The results of indirect fluorescent antibody (IFA) are reported as a titer. Titers are expressed as ratios. For example, the result 1:320 means that one part blood sample was mixed with 320 parts of a diluting substance and ANA was still detectable.
  • Immunoassays (enzyme linked immunosorbent assay, ELISA, or enzyme immunoassay, EIA) –these methods are usually performed on automated instrumentation but may be less sensitive than IFA in detecting ANA. The results are usually reported as a number with an arbitrary unit of measure (abbreviated as a “U” on the report, for example).

Other laboratory tests associated with the presence of inflammation, such as erythrocyte sedimentation rate (ESR) and/or C-reactive protein (CRP), may also be used to evaluate a person for SLE or other autoimmune disease.

What happens during an antinuclear antibody (ANA) test?

A health care professional will take a blood sample from a vein in your arm, using a small needle. After the needle is inserted, a small amount of blood will be collected into a test tube or vial. You may feel a little sting when the needle goes in or out. This usually takes less than five minutes.

Will I need to do anything to prepare for the antinuclear antibody (ANA) test?

An antinuclear antibody (ANA) test requires a sample of your blood. If your sample is being used only for an antinuclear antibody (ANA) test, you can eat and drink normally before the test. If your blood sample will be used for additional tests, you might need to fast for a time before the test. Your doctor will give you instructions.

Certain drugs affect the accuracy of the test, so bring your doctor a list of the medications you take.

When is antinuclear antibody (ANA) test ordered?

The antinuclear antibody (ANA) test is ordered when someone shows signs and symptoms that are associated with a systemic autoimmune disorder. People with autoimmune disorders can have a variety of symptoms that are vague and non-specific and that change over time, progressively worsen, or alternate between periods of flare ups and remissions.

An antinuclear antibody (ANA)test is used to help diagnose autoimmune disorders, including:

  • Systemic lupus erythematosus (SLE). This is the most common type of lupus, a chronic disease affecting multiple parts of the body, including the joints, blood vessels, kidneys, and brain.
  • Rheumatoid arthritis, a condition that causes pain and swelling of the joints, mostly in the hands and feet
  • Scleroderma, a rare disease affecting the skin, joints, and blood vessels
  • Sjogren’s syndrome, a rare disease affecting the body’s moisture-making glands

Some examples of signs and symptoms of systemic autoimmune disorder include:

  • Low-grade fever
  • Persistent fatigue, weakness
  • Arthritis-like pain in one or more joints
  • Red rash (for lupus, one resembling a butterfly across the nose and cheeks)
  • Skin sensitivity to light
  • Hair loss
  • Muscle pain
  • Numbness or tingling in the hands or feet
  • Inflammation and damage to organs and tissues, including the kidneys, lungs, heart, lining of the heart, central nervous system, and blood vessels.

Normal antinuclear antibody (ANA) results

Some normal people have a low level of antinuclear antibody (ANA). Thus, the presence of a low level of ANA is not always abnormal.

ANA is reported as a “titer”. Low titers are in the range of 1:40 to 1:60. A positive antinuclear antibody (ANA) test is of much more importance if you also have antibodies against the double-stranded form of DNA.

The presence of antinuclear antibody (ANA) does not confirm a diagnosis of systemic lupus erythematosus (SLE). However, a lack of antinuclear antibody (ANA) makes that diagnosis much less likely.

Although antinuclear antibody (ANA) are most often identified with SLE, a positive antinuclear antibody (ANA) test can also be a sign of other autoimmune diseases.

Normal value ranges may vary slightly among different laboratories. Talk to your provider about the meaning of your specific test results.

The examples above show the common measurements for results for these tests. Some laboratories use different measurements or may test different specimens.

Further tests can be run on blood with a positive antinuclear antibody (ANA) test to get more information.

What does positive ANA antinuclear antibody mean?

A positive antinuclear antibody (ANA) test result means that autoantibodies are present. In a person with signs and symptoms, this suggests the presence of an autoimmune disease, but further evaluation is required to assist in making a final diagnosis.

Patterns of cellular fluorescence

In addition to a titer, positive results on indirect fluorescent antibody (IFA) will include a description of the particular type of fluorescent pattern seen. Different patterns have been associated with different autoimmune disorders, although some overlap may occur. Some of the more common patterns include:

  • Homogenous (diffuse) ANA — associated with SLE, mixed connective tissue disease, and drug-induced lupus
  • Speckled ANA — associated with SLE, Sjögren syndrome, scleroderma, polymyositis, rheumatoid arthritis, and mixed connective tissue disease
  • Nucleolar ANA — associated with scleroderma and polymyositis
  • Centromere pattern (peripheral) ANA — associated with scleroderma and CREST (Calcinosis, Raynaud syndrome, Esophogeal dysmotility, Sclerodactyly, Telangiectasia)

A positive result from the enzyme linked immunosorbent assay (ELISA) or enzyme immunoassay (EIA) method will be a number of units that is above the laboratory’s reference number (cutoff) for the lowest possible value that is considered positive.

An example of a positive result using the IFA method would give the dilution titer and a description of the pattern, such as “Positive at 1:320 dilution with a homogenous pattern.”

For either method, the higher the value reported, the more likely the result is a true positive.

Antinuclear antibody (ANA) test results can be positive in people without any known autoimmune disease and thus need to be evaluated carefully in conjunction with an individual’s signs and symptoms.

An antinuclear antibody (ANA) test may become positive before signs and symptoms of an autoimmune disease develop, so it may take time to tell the meaning of a positive ANA in a person who does not have symptoms.

Conditions associated with a positive ANA test

About 3-5% of healthy Caucasians may be positive for antinuclear antibody (ANA), and it may reach as high as 10-37% in healthy individuals over the age of 65 because antinuclear antibody (ANA) frequency increases with age. These would be considered false-positive results because they are not associated with an autoimmune disease. Such instances are more common in women than men.

The most common condition is SLE.

SLE (systemic lupus erythematosus) — antinuclear antibody (ANA) are most commonly seen with SLE. About 95% of those with SLE have a positive ANA test result. If someone also has symptoms of SLE, such as arthritis, a rash, and skin sensitivity to light, then the person probably has SLE. A positive anti-dsDNA and anti-SM (often ordered as part of an ENA panel) help confirm that the condition is SLE.

Other conditions in which a positive ANA test result may be seen include:

Drug-induced lupus — a number of medications may trigger this condition, which is associated with SLE symptoms. When the drugs are stopped, the symptoms usually go away. Although many medications have been reported to cause drug-induced lupus, those most closely associated with this syndrome include hydralazine, isoniazid, procainamide, and several anticonvulsants. Because this condition is associated with the development of autoantibodies to histones, an anti-histone antibody test may be ordered to support the diagnosis.

Sjögren syndrome — 40-70% of those with this condition have a positive ANA test result. While this finding supports the diagnosis, a negative result does not rule it out. A health practitioner may want to test for two subsets of ANA: Anti-SS-A (Ro) and Anti-SS-B (La). About 90% or more of people with Sjögren syndrome have autoantibodies to SSA.

Scleroderma (systemic sclerosis) —About 60-90% of those with scleroderma have a positive ANA. In people who may have this condition, ANA subset tests can help distinguish two forms of the disease, limited versus diffuse. The diffuse form is more severe. The limited form is most closely associated with the anticentromere pattern of ANA staining (and the anticentromere test), while the diffuse form is associated with autoantibodies to Scl-70.

Less commonly, antinuclear antibody (ANA) may occur in people with Raynaud syndrome, arthritis, dermatomyositis or polymyositis, mixed connective tissue disease, and other autoimmune conditions.

The presence of antinuclear antibody (ANA) in the blood may be due to several other disorders besides SLE. These include:

  • Chronic liver disease
  • Collagen vascular disease
  • Drug-induced lupus erythematosus
  • Myositis (inflammatory muscle disease)
  • Rheumatoid arthritis
  • Sjögren syndrome
  • Systemic sclerosis (scleroderma)
  • Thyroid disease

A health practitioner must rely on test results, clinical symptoms, and the person’s history for diagnosis. Because symptoms may come and go, it may take months or years to show a pattern that might suggest SLE or any of the other autoimmune diseases.

A negative ANA result makes SLE an unlikely diagnosis. It usually is not necessary to immediately repeat a negative ANA test; however, due to the episodic nature of autoimmune diseases, it may be worthwhile to repeat the ANA test at a future date if symptoms recur.

Aside from rare cases, further autoantibody (subset) testing is not necessary if a person has a negative antinuclear antibody (ANA) test result.

Antinuclear antibody (ANA) testing is not used to track or monitor the clinical course of SLE, thus serial antinuclear antibody (ANA) tests for diagnosed patients are not commonly ordered.

Use of a number of drugs, some infections, autoimmune hepatitis and primary biliary cirrhosis as well as other conditions mentioned above can give a positive result for the antinuclear antibody (ANA) test.

Is SLE the same thing as lupus?

There are actually several forms of lupus. SLE is the form that is most commonly referred to when someone mentions “lupus.” Systemic lupus means that almost any organ or system in your body can be affected. This is the most severe form. There are other forms of lupus that are primarily limited to skin, such as discoid and subacute cutaneous lupus. Symptoms include rashes that may be found in many shapes and locations on the body. A butterfly-shaped rash is commonly seen on or near the face.

How should I handle a positive antinuclear antibody (ANA) test?

Your doctor or rheumatologist will interpret your antinuclear antibody (ANA) in the context of other laboratory studies and your clinical history, including family history. Remember, a single positive ANA does not imply autoimmune disease, nor does a positive ANA require immediate treatment. Lab levels vary; some autoantibodies are normal and this result may not indicate a problem.

Your rheumatologist will determine what happens next based on additional exploration. By working with your doctor and asking questions you will get the best care for your particular situation. Keep in mind, even if your antinuclear antibody (ANA) reading does lead to an autoimmune diagnosis, there are treatments for autoimmune diseases.

My doctor told me my antinuclear antibody (ANA) test is positive, but he isn’t sure if I have lupus. How can this be?

A positive antinuclear antibody (ANA) result means that you have a higher than normal concentration of these antibodies. This is one of the tools in diagnosing lupus as well as several other autoimmune diseases, so a positive result may be related to lupus or to another disease. Or you may simply have a higher than normal concentration of these autoantibodies that may not have any impact on your health. Even among people with lupus, ANA results can vary widely; one person can be in remission at a certain titer of ANA while another can be extremely ill at the same titer. Autoimmune diseases often have a systemic effect on the body and are very complex by nature. Your healthcare provider will interpret what the test results mean for you and may need to compare your test results as well as the severity of your symptoms over a period of time in order to make a definitive diagnosis. This additional time may also allow your healthcare provider to eliminate other possible causes of your symptoms. Another diagnostic tool is to perform additional testing for the autoantibodies Smith and ds-DNA, which, if positive, would confirm SLE.

read more
Procedures

Cervical cap

cervical_cap_contraceptive

What is a cervical cap

The cervical cap is a birth control (contraceptive) is a small plastic dome that fits tightly over the cervix and stays in place by suction, that prevents sperm from entering the uterus. The cervical cap is a reusable, deep silicone cup that is inserted into the vagina and fits tightly over the cervix. The cervical cap is held in place by suction and has a strap to help with removal. The cervical cap is effective at preventing pregnancy only when used with spermicide. The cervical cap does NOT protect against sexually transmitted infections (STIs), including HIV.

The cervical cap is not a method of birth control that is widely used, and very few health care providers recommend this type of contraception. If you are interested in the cervical cap, be sure to check with your health care provider to see if this method is available. Only one cervical cap — FemCap — has Food and Drug Administration (FDA) approval in the U.S. It must be fitted and prescribed by a doctor, but can be purchased online if you have a current prescription. Your doctor may ask you to come back to make sure you know how to insert the cap and use it correctly.

Refitting may be needed after having a baby or after weight gain or loss. The cervical cap is less effective in women who have given birth. You should wait 6 weeks after giving birth to use the cervical cap, until the uterus and cervix return to normal size.

The cervical cap also needs to be cared for. After each use, the cap must be washed (with mild soap and water), rinsed, and air dried, then stored in its case. Don’t put baby powder or oil-based lubricants (such as mineral oil, petroleum jelly, or baby oil)on the cap. Other vaginal creams, such as medicines for yeast infection, also can damage the cap.

The most common side effect from using a cervical cap is vaginal irritation. Some women also experience an increase in the number of bladder infections they have.

Possible risks and side effects of cervical cap:

  • Because the spermicide used with the cervical cap can increase the risk of getting HIV from an infected partner, you should use the cervical cap only if you have one sexual partner and both of you are at low risk of HIV infection.
  • Use of the cap may cause vaginal irritation or odor.
  • To avoid an increased risk of infection and toxic shock syndrome, the cervical cap should not be used during your menstrual period.

The cervical cap should not be used by women who have:

  • An abnormal shaped cervix
  • A history of pelvic inflammatory disease (PID)
  • Abnormal pap smears
  • Severe cervicitis
  • Allergy to spermicide or silicone
  • Are at high risk of or have HIV/AIDS
  • Are at high risk of pregnancy — you’re younger than age 30; you have sex three or more times a week; you’ve had previous contraceptive failure with vaginal barrier methods; or you’re not likely to consistently use the cervical cap
  • Have vaginal or cervical abnormalities that interfere with the fit, placement or retention of the cervical cap
  • Have vaginal bleeding or have a vaginal, cervical or pelvic infection
  • Have a history of pelvic inflammatory disease, toxic shock syndrome, cervical cancer, third-degree uterine prolapse, uterine tract infections, or vaginal or cervical tissue tears
  • Recently gave birth or had a miscarriage or an abortion
  • Recently had cervical surgery

Who is a cervical cap right for?

The cervical cap is not usually recommended for most young women and teens because it can be very hard to insert correctly. Inserting and removing a cervical cap requires a girl to reach into her vagina to the cervix with her fingers. It can sometimes also be knocked out of place during intercourse, which can lead to pregnancy. The cervical cap cannot be used when a girl has her period. It is not recommended for those with some medical conditions.

Some girls prefer the diaphragm, which works like the cervical cap but is much easier to use.

What else do you need to know about cervical cap?

  • Don’t use cervical cap during your period. Use another method, such as a condom, or don’t have intercourse.
  • Check the cervical cap often. Get a new cervical cap if you see holes, tears, or discoloration.
  • Wash the cervical cap with warm water and hand soap after removing it. Make sure it’s dry before you store it in its container. Do not use talcum or baby powder on the cap. These products may break down the silicone or irritate the vagina.
  • You should be refitted for the cervical cap if you have a baby.
  • The cervical cap doesn’t protect against sexually transmitted infections (STIs), such as herpes or HIV/AIDS. If you’re not sure whether your sex partner might have an STI, use a condom to protect against disease. Using a condom with the cap also protects better against pregnancy.

How much does a cervical cap cost?

There are three fees associated with the use of a cervical cap: health care provider’s visit, the cervical cap, and the spermicidal agent. Office visits to obtain a prescription for a cervical cap range from $50 to $275, the cervical cap costs between $15 and $50 dollars and spermicidal jellies, foams, or creams range from $7 to $18 dollars per package. Many health insurance plans cover these costs, and family planning clinics (such as Planned Parenthood) may charge less.

The cervical cap can last up to two years.

Where are cervical caps available?

A doctor or nurse practitioner must fit a cervical cap for you. The doctor or nurse will find the right size cap and teach you how to insert and remove it.

What about cervical caps and sexually transmitted infections (STIs)?

The cervical cap does NOT provide protection against the transmission of sexually transmitted infections. Couples having sex must always use condoms along with the cervical cap to protect against these infections.

Abstinence (not having sex) is the only method that always prevents pregnancy and sexually transmitted infections (STIs).

How does cervical cap work?

Cervical cap works by blocking most sperm from entering the uterus. Spermicide is added to the cervical cap to kill any sperm that may get outside of the protection of the cap.

The cap can be put in several hours before having sex, and must be left in at least 6 hours after sex. The cap should not stay in longer than 24 hours after sex, or for more than a total of 48 hours. While the cap is in place, its position should be checked and spermicide should be added every time a couple has sex.

The cervical cap comes in different sizes. Your health care provider will fit you for the cervical cap and demonstrate how to insert and remove the cap. He or she may confirm that the cervical cap is in the correct position by doing a pelvic exam.

Make sure you regularly check your cervical cap for wear, holes or discoloration and replace your cervical cap each year. You may need to have your cervical cap refitted after childbirth. Always use the cervical cap with spermicide. Don’t wear the cervical cap during any kind of vaginal bleeding, including your period.

Before you use the cervical cap for the first time, practice inserting the cap and checking its placement. Use a backup method of contraception, such as a male condom, the first few times you use the cervical cap.

Figure 1. Cervix position

cervix

Figure 2. Cervix location

cervix anatomy

Figure 3. Cervical cap contraceptive

Cervical cap contraceptive

Figure 4. How to insert the cervical cap

cervical-cap contraceptive

How to insert the cervical cap

Cervical cap advantages and disadvantages

The advantages of cervical cap:

  • Reusable and relatively inexpensive
  • Small and easy to carry
  • Requires less spermicide than a diaphragm
  • Rarely hinders the sexual experience
  • May be used for repeated intercourse within a 48 hour period
  • Allows prompt return to fertility
  • Can be used while breast-feeding beginning six weeks after delivery
  • It does not affect milk supply if you are breastfeeding
  • Can be inserted hours before sex and remain in place for up to 48 hours
  • Doesn’t require a partner’s cooperation
  • Poses few if any side effects
  • It has no effect on a woman’s natural hormones

The disadvantages of cervical cap:

  • Requires consistent use for each sexual encounter
  • Spermicide may be messy and has been linked with mucosal irritation and increased susceptibility to STIs and HIV
  • A prescription is required
  • May contribute towards urinary tract infections
  • May cause cervical changes, such as cervicitis
  • Must be cleaned and stored
  • May need to be resized following a pregnancy, abortion, pelvic surgery, or weight loss or gain (20lbs or more)
  • May get stuck in the cervix, requiring it to be removed by your healthcare provider
  • Not as reliable as some other contraceptive methods
  • Some women find them difficult to insert and therefore risk incorrect placement
  • Insertion and removal may increase the risk of urinary tract infection

Refitting a cervical cap may be needed after having a baby or after weight gain or loss. The cervical cap is less effective in women who have given birth. You should wait 6 weeks after giving birth to use the cap, until the uterus and cervix return to normal size.

Cervical cap effectiveness

How well the cervical cap works depends on whether the woman uses it correctly every time. Cervical cap work fairly well if they are put in place and used correctly, but not as well as the pill, a contraceptive implant or an IUD. Typical use, which is the average way cervical caps are used, results in a failure rate of approximately 12% to 20%. This means that 12 to 20 women out of every 100 will become pregnant during the first year of use. You should take a pregnancy test if you are experiencing any pregnancy symptoms.

For women who have had a baby, the cervical cap is less effective: about 29 out of 100 of typical couples who use the cervical cap after the woman has had a baby will have an accidental pregnancy.

Table 1. Birth control methods effectiveness and their risks and side effects

MethodHow it is UsedFailure Rate (average use)Risks & Side Effects
AbstinenceNo sexual intercourse and no type of contact between the male and female sexual organs where bodily fluids could be exchanged0%No Side Effects
Cervical CapA soft rubber barrier that covers the cervix in order to prevent sperm from entering the uterus12% (higher after childbirth)No Side Effects (unless allergic)
Condom – FemaleA sheath, often made of latex rubber, inserted into the vaginal canal to block the passage of sperm21%No Side Effects (unless allergic)
Condom – MaleA sheath, often made of latex rubber, covering the erect penis to block the passage of sperm18%No Side Effects (unless allergic)
Depo-Provera InjectionInjection of Progestin that is given every 3 months to prevent ovulation, change cervical mucus to block sperm, and change the lining of the uterus to prevent implantation of a fertilized egg6%Irregular, missed, or heavier than normal menstrual cycle, weight gain, breast tenderness, depression, bloating, abdominal pain, headaches, allergic reaction
DiaphragmA soft rubber dome that covers the cervix to block the passage of sperm.12%No Side Effects (unless allergic)
Fertility AwarenessUsing the menstrual cycle and other tools to predict ovulation and abstaining from intercourse during these expected fertile times25%No Side Effects
Implant – HormonalA small, matchstick-sized implant inserted in the upper arm and lasts for 3 years, releasing a hormone supply. Works in a similar way to Depo-Provera.0.05%No period, spotting, light or heavy and prolonged bleeding; painful menstruation, acne, weight gain, depressed mood; blood clots, movement of implant, ectopic pregnancy, ovarian cysts
Intrauterine Device (IUD) – CopperA device is inserted into a woman’s uterus (by a doctor) to block sperm and change the uterus lining to prevent implantation of a fertilized egg0.8%Ectopic pregnancies, increased bleeding during menstrual cycle, severe menstruation cramps, perforation of the uterus, Pelvic Inflammatory Disease (PID)
Intrauterine Device (IUD) – Progestin0.2%
Nothing/ChanceNo birth control method85%No Side Effects; highest chance of unintended pregnancy
Oral Contraceptive (estrogen/progestin)Taken daily by women to suppress ovulation, change cervical mucus, and change the lining of the uterus to prevent implantation of a fertilized egg9%Nausea, headaches, weight gain, depression, irregular bleeding, acne, blood clots *Women who smoke are advised not to take oral contraceptives
Oral Contraceptive (progestin only)Taken daily by women to change cervical mucus to block sperm and also changes the uterus lining to prevent implantation of a fertilized egg9%Breast tenderness, weight gain, menstrual cycle changes *Women who smoke are advised not to take oral contraceptives
Ortho-Evra PatchA patch containing synthetic hormones placed on your skin; works the same as oral contraceptives9% (greater if over 198 lbs)Similar to oral contraceptives
Spermicide (only)A jelly, foam, or cream containing chemicals that kill sperm28%No Side Effects (unless allergic)
SpongeA soft saucer-shaped polyurethane sponge that blocks the cervix and absorbs semen20% (40% after childbirth)No Side Effects (unless allergic)
Sterilization – FemalePermanent surgical procedure to prevent pregnancy:  fallopian tube is damaged (cut, tied, burnt) to prevent passage of eggs and sperm0.5%If a woman conceives after a sterilization procedure there is a risk of ectopic pregnancies. The earlier the age of the woman at the time of the procedure, the greater risk of pregnancy after 10 years (up to ~5%).
Sterilization – MalePermanent surgical procedure to prevent pregnancy:  vas deferens tube is damaged (cut, tied, burnt) to prevent passage of sperm into ejaculate fluid0.15%No Side Effects
Vaginal Ring – HormonalA flexible ring placed inside the vagina near the cervix. Active for 3 weeks. Has actions similar to oral contraceptives.9%Blood clots, liver or gallbladder problems, TSS, depressed mood, acne, headache, weight gain, nausea/vomiting, movement of the ring
WithdrawalWithdrawal of the penis before ejaculation22%No Side Effects
[Source 1]

How to use cervical cap

The cervical cap comes in different sizes. Your health care provider will fit you for the cervical cap and demonstrate how to insert and remove the cap. He or she may confirm that the cervical cap is in the correct position by doing a pelvic exam.

Make sure you regularly check your cervical cap for wear, holes or discoloration and replace your cervical cap each year. You may need to have your cervical cap refitted after childbirth. Always use the cervical cap with spermicide. Don’t wear the cervical cap during any kind of vaginal bleeding, including your period.

Before you use the cervical cap for the first time, practice inserting the cap and checking its placement. Use a backup method of contraception, such as a male condom, the first few times you use the cervical cap.

How to insert the cervical cap contraceptive

  1. Begin by washing your hands.
  2. Check the position of your cervix before inserting the cervical cap. To find your cervix, insert your finger deep into your vagina. The cervix feels like the tip of your nose. Its position will vary according to the time of the month and your body position.
  3. Apply spermicide. Fill the cervical cap’s bowl with about 1/4 teaspoon (1.25 milliliters) of spermicide. Spread a thin layer of spermicide on the brim of the cervical cap that faces the cervix. Place 1/2 teaspoon (2.5 milliliters) of spermicide in the groove between the rim and the dome of the cervical cap. Some experts suggest using an additional dose of spermicide if you have sex a second time with the cap still in. Don’t remove the cap for at least six hours after the last time you had sex.
  4. Insert the cervical cap. Insert the cervical cap into your vagina before sexual arousal to ensure proper placement. Find a comfortable position, such as squatting. Separate your labia with one hand. With the other hand, hold the cervical cap with the bowl facing upward and squeeze the rim of the cervical cap between your thumb and index finger. Slide the cervical cap into your vagina — making sure the taller brim of the cervical cap enters your vagina first. Push the cervical cap along the rear wall of your vagina as far as it will go. Use your finger to locate your cervix and press the rim of the cervical cap around the cervix until you’ve completely covered it.
  5. Always check the cervical cap’s position before sex. Squat, bear down, insert your finger into your vagina and press upward on the dome to make sure your cervix is covered. If the cervical cap is not covering your cervix completely, either push it onto the cervix or remove it and reinsert it.
  6. After sex, leave the cervical cap in place for at least six hours and up to two days. To remove the cervical cap, squat, bear down and rotate the cap. Relax your muscles and push up on the dome of the cervical cap to break the seal. Grasp the removal strap and gently pull. Be careful not to scratch your vagina. After removal, wash the cervical cap with mild soap and warm water and let it air-dry. Store the cervical cap in its provided container.

If you have sex more than one time when the cap is in place, put a small amount of spermicide on the tip of your finger. Insert your finger into your vagina and check the position of the cap. Don’t remove the cervical cap.

Avoid using any petroleum-based vaginal creams, oils, or ointments, which can damage the silicone. But water-based personal lubricants, such as Astroglide and K-Y Jelly, are safe to use.

What if you think the cap is not placed correctly or not protecting you from pregnancy?

  • Always read the instructions.
  • Call your doctor or nurse call line and use backup birth control, such as a condom, or don’t have intercourse until you know the cervical cap is working.
  • If you had intercourse, you can use emergency contraception, such as the morning-after pill (Plan B). You can use emergency contraception for up to 5 days after having had sex, but it works best if you take it right away.

Cervical cap side effects

The cervical cap doesn’t offer protection from sexually transmitted infections (STIs).

An estimated 16 out of 100 women who’ve never been pregnant or given birth vaginally will become pregnant during the first year of typical use of the cervical cap. An estimated 32 out of 100 women who’ve given birth vaginally will become pregnant during the first year of typical use. This difference is due to the fact that the vagina and cervix are stretched by giving birth vaginally, which means the cervical cap may not fit as well.

Most women who use the cervical cap have no problems. But possible side effects may include:

  • from the spermicide, irritation of the vagina and surrounding skin or an allergic reaction
  • strong odors or vaginal discharge if the cervical cap is left in too long
  • an allergic reaction to the material in the cervical cap (this is rare)
  • changes in the cervix because of irritation
  • toxic shock syndrome if the cervical cap is left in too long (this is rare)

Inconsistent or incorrect use of the cervical cap increases your risk of pregnancy. For example, you may get pregnant when using the cervical cap if:

  • The cervical cap becomes dislodged from the cervix during sex
  • You don’t use spermicide
  • You remove the cervical cap within six hours after having sex

Spermicide applied to the cervical cap may damage the cells lining the vagina, causing:

  • Increased risk of contracting STIs
  • Urinary tract or vaginal infection
  • Vaginal irritation

Contact your health care provider if:

  • The cervical cap slips out of place when you walk, sneeze, cough or strain
  • You have signs or symptoms of toxic shock syndrome, such as a sudden high fever, diarrhea, dizziness, vomiting, fainting or a rash that looks like sunburn
  • You notice blood on the cervical cap after you remove it that isn’t related to your period
  • You notice a foul odor when the cervical cap is in place or after you remove it
  • You or your partner experiences pain during or following use of the cervical cap
  • Your partner has abrasions on his penis following use of the cervical cap during sex
References
  1. Birth Control Failure. http://americanpregnancy.org/preventing-pregnancy/birth-control-failure
read more
Procedures

Oximeter

pulse oximeter

What is pulse oximeter

Pulse oximeter is a noninvasive method for monitoring a person’s oxygen saturation in arterial blood (SaO2) that is frequently used in hospital but are rarely used at home 1. Pulse oximetry is universally used for monitoring respiratory status of patients in the ICU (intensive care unit). Studies have shown that the presence of pulse oximetry may reduce the number of arterial blood gas samples obtained in the ICU and in the emergency department 2. The pulse oximeter has revolutionized modern medicine with its ability to continuously and transcutaneously monitor the functional oxygen saturation of hemoglobin in arterial blood (SaO2). However, the lack of incorporating explicit guidelines for the appropriate use of pulse oximetry may lessen the cost-effectiveness of pulse oximetry in the ICU 3. Though its reading of SpO2 (peripheral oxygen saturation) is not always identical to the more desirable reading of SaO2 (arterial blood oxygen saturation) from arterial blood gas analysis (taken directly via arterial blood), the two are correlated well enough that the safe, convenient, noninvasive, inexpensive pulse oximetry method is valuable for measuring oxygen saturation in clinical use.

Arterial blood gas analysis is a common investigation in emergency departments and intensive care units for monitoring patients with acute respiratory failure. It also has some applications in general practice, such as assessing the need for domiciliary oxygen therapy in patients with chronic obstructive pulmonary disease (COPD). An arterial blood gas result can help in the assessment of a patient’s gas exchange, ventilatory control and acid–base balance. Nurses are usually involved in taking and analyzing the person’s oxygen saturation (SO2) and normally they report these results to the doctors or anesthesiologists. Out of these results the anesthesiologists will then prescribe further treatment for the critically ill patient. Hence, it is important you are familiar with the information obtained to be able to detect the disturbances in ventilation, oxygen delivery and acid–base balance.

The conventional pulse oximeters use transmission sensors in which the light emitter and detector are on opposing surfaces of the tissue bed 1. These sensors are suitable for use on the finger, toe, or earlobe; when tested under conditions of low perfusion, finger probes performed better than other probes 4. Recently, pulse oximeter probes that use reflectance technology have been developed for placement on the forehead 5. The reflectance sensor has emitter and detector components adjacent to one another, so oxygen saturation is estimated from back-scattered light rather than transmitted light. In critically ill patients with low perfusion, the bias and precision between SpO2 and SaO2 were lower for the forehead reflectance probe than for the finger probe 6. The superiority of forehead reflectance probes over conventional digital probes, however, was not observed in patients with acute respiratory distress syndrome (ARDS) during a positive end-expiratory pressure (PEEP) recruitment maneuver 7.

  • Pulse oximetry is based on the principle that oxyhemoglobin (O2Hb) absorbs more near-infrared light than deoxyhemoglobin (HHb), and deoxyhemoglobin (HHb) absorbs more red light than oxyhemoglobin (O2Hb). Under optimal conditions, pulse oximeters do not calculate SpO2 of venous blood (and other stationary tissues) but rather only arterial SpO2 by determining changes in absorbance of the light transmitted over time; i.e., arterial blood volume changes with the cardiac cycle whereas the volumes of light absorbers in non-arterial tissues are relatively constant.

The response time of conventional oximeter probes varies; ear probes respond quicker to a change in O2 saturation than finger probes 8. A recent study compared the response time of the conventional finger probe with the reflectance forehead probe in patients undergoing general anesthesia [see Figure 7 below] 9. The lengths of time it took to detect a decrease in SpO2 to 90 % after apnea was induced (desaturation response time) were 94 seconds for the forehead probe and 100 seconds for the finger probe. After mask ventilation was started, the lengths of time it took to detect an increase in SpO2 to 100 % (re-saturation response time) were 23.2 seconds for the forehead probe and 28.9 seconds for the finger probes. The investigators speculated that the shorter response time with the reflectance forehead probe was most likely due to the location of the probe rather than to the workings of the reflectance technology. The forehead probe monitors O2 saturation from the supraorbital artery in which blood flow is abundant and is less likely to be affected by vasoconstriction than is a peripheral artery 10.

Oxygen saturation is the fraction of oxygen-saturated hemoglobin relative to total hemoglobin (unsaturated + saturated) in the blood. The human body requires and regulates a very precise and specific balance of oxygen in the blood. Normal blood oxygen levels in humans are considered 95–100 percent. If the level is below 90 percent, it is considered low resulting in hypoxemia. Blood oxygen levels below 80 percent may compromise organ function, such as the brain and heart, and should be promptly addressed. Continued low oxygen levels may lead to respiratory or cardiac arrest. Oxygen therapy may be used to assist in raising blood oxygen levels. Oxygenation occurs when oxygen molecules (O2) enter the tissues of the body. For example, blood is oxygenated in the lungs, where oxygen molecules travel from the air and into the blood. Oxygenation is commonly used to refer to medical oxygen saturation.

Your body maintains a stable level of oxygen saturation for the most part by chemical processes of aerobic metabolism associated with breathing. Using the respiratory system, red blood cells, specifically the hemoglobin, gather oxygen in the lungs and distribute it to the rest of the body. The needs of your body’s blood oxygen may fluctuate such as during exercise when more oxygen is required or when living at higher altitudes. A blood cell is said to be “saturated” when carrying a normal amount of oxygen. Both too high and too low arterial oxygen saturation levels can have adverse effects on your body.

Healthy individuals at sea level usually exhibit oxygen saturation values between 96% and 99%, and should be above 94%. At 1,600 meters’ altitude (about one mile high) oxygen saturation should be above 92%.

An SaO2 (arterial oxygen saturation) value below 90% causes hypoxia (which can also be caused by anemia). Hypoxia due to low SaO2 is indicated by cyanosis, but oxygen saturation does not directly reflect tissue oxygenation. The affinity of hemoglobin to oxygen may impair or enhance oxygen release at the tissue level. Oxygen is more readily released to the tissues (i.e., hemoglobin has a lower affinity for oxygen) when pH is decreased, body temperature is increased, arterial partial pressure of carbon dioxide (PaCO2) is increased, and 2,3-DPG levels (a byproduct of glucose metabolism also found in stored blood products) are increased. When the hemoglobin has greater affinity for oxygen, less is available to the tissues. Conditions such as increased pH, decreased temperature, decreased PaCO2, and decreased 2,3-DPG will increase oxygen binding to the hemoglobin and limit its release to the tissue.

Pros and cons of different types of pulse oximeter probes

The reason pulse oximeter probes interrogate the finger, nose, ear lobe, and forehead is because the skin in these areas have a much higher vascular density than, for example, the skin of the chest wall 11. Reusable clip probes (finger, nasal, ear) and single-patient adhesive probes (finger, forehead) are the two main types of pulse oximeter probes. Advantages of the reusable clip probes are the rapidity in which they can be employed, the ease in which different body sites can sampled in the event of low amplitude waves, and cost-effectiveness in outpatient settings where multiple patients can be measured sequentially with one probe because only a single reading of SpO2 is required. Advantages of the single-patient adhesive probes are potentially less transmission of nosocomial infections, more secure placement when there is excessive patient movement, and ability to monitor sites other than the acral regions since the latter areas are more vulnerable to vasoconstriction. Thus, for continuous monitoring of SpO2, one particular type of probe may be more appropriate than others depending on the clinical circumstance; i.e., some “trial-and-error” may be necessary to find the optimal probe. For example, in hypotensive, vasoconstricted patients, ear and forehead probes may be more reliable as these areas are less likely to vasoconstrict than the fingers in response to endogenous and exogenous catecholamines 12. In hypothermia, where there is secondary vasoconstriction, the forehead probe has been shown to be more reliable than the finger probe 13.

Even after optimizing the type of probe, false readings of SpO2 may occur in various settings and medical conditions, summarized in Table 1.

Table 1. Causes and mechanisms of unreliable pulse oximetry SpO2 readings

1. Causes of intermittent drop-outs or inability to read SpO2
 • Poor perfusion due to a number of causes, e.g., hypovolemia, vasoconstriction, etc
2. Causes of falsely normal or elevated SpO2
 • Carbon monoxide poisoning
 • Sickle cell anemia vasoocclusive crises (overestimation of FO2Hb and underestimation of SaO2)
3. Causes of falsely low SpO2
 • Venous pulsations
 • Excessive movement
 • Intravenous pigmented dyes
 • Inherited forms of abnormal hemoglobin
 • Fingernail polish
 • Severe anemia (with concomitant hypoxemia)
4. Causes of falsely low or high SpO2
 • Methemoglobinemia
 • Sulfhemoglobinemia
 • Poor probe positioning
 • Sepsis and septic shock
5. Causes of falsely low FO2Hb as measured by a co-oximeter
 • Severe hyperbilirubinemia
 • Fetal Hb (HbF)
[Source 14]

Causes of intermittent drop-outs or inability to read pulse oximeter SpO2

It is common knowledge that an attenuated and/or inconsistent wave tracing generated by pulse oximeters displayed on intensive care unit monitors is an indication that the SpO2 reading is unreliable or may become so, i.e., increased drop outs or false transient SpO2 changes. The amplitude of such a pulse oximeter waveform reflects the amount of cardiac-induced light modulation, as noted by the near simultaneous onset of the QRS complex on the electrocardiogram with the onset of the positive deflection of the pulse oximetry wave tracing (Figure 4A below). Although portable pulse oximeters do not typically have such wave tracings, they often have a pulse signal bar that shows the level of change in light absorbance (and thus strength of the pulse) to indicate the possibility of a suboptimal reading.

Low-amplitude pulse oximetry wave tracings may be due to poor finger perfusion resulting from vasoconstriction and/or hypotension from a number of causes including distributive or hypovolemic shock, hypothermia, use of vasoconstrictor agents, and poor cardiac output due to pump failure or dysrhythmia. Arterial compression (e.g., pumped-up sphygmomanometer) or arterial blockage proximal to probe placement (e.g., peripheral vascular disease) can also result in poor pulse oximetry wave tracings. Decreased pulse amplitude in the arterial blood signal additionally decreases the pulse oximeter’s signal to noise ratio and potentially result in the inability to post values, intermittent drop-outs and alarms, and unstable SpO2 readings. Knowing that the aforementioned conditions can result in false SpO2 readings is the single best deterrent to accepting falsely low SpO2 readings. While clinical assessment can help differentiate spurious from true SpO2 readings, uncertain cases should be corroborated by arterial blood gas analysis taken directly from arterial blood sample.

Pulse oximetry normal range

Normal pulse oximetry value is generally considered to be in the 95-98%. Values under 90 percent are considered low. However, as you will soon see, 90% or greater can be considered acceptable.

Why is a normal oxygen saturation 98% and not 100%?

After the diffusion of oxygen from the alveoli to the capillary occurs, this oxygenated blood moves to the pulmonary vein to the left atrium. This blood contains a PaO2 of 104 mmHg [partial pressure of arterial blood (PaO2)], on average. This blood constitutes 98% of cardiac output. Another 2% of the cardiac output comes from the bronchial veins, and this blood has a PvO2 of 40 mmHg [partial pressure of capillary venous blood (PvO2)]. This unoxygenated blood is shunted into the pulmonary vein, and mixes with arterial blood. It is because of this natural shunt that a normal saturation is 98% and not 100%.

The saturation of arterial hemoglobin (SaO2), as measured by arterial blood gas, is normally about 98%. The saturation of arterial hemoglobin, as measured by pulse oximeter (SpO2) is also about 98%.

Causes of falsely normal or elevated SpO2 pulse oximetry value

Carbon monoxide poisoning

Carbon monoxide (CO) is an odorless, colorless, tasteless, and non-irritating gas. Since patients with CO poisoning may present with signs and symptoms that are non-specific (e.g., headaches), mimics of other disorders (e.g., food poisoning, alcohol intoxication, acute psychiatric decompensation, or “flu-like symptoms”), or with genuine disorders that are precipitated by CO toxicity (e.g., angina, syncope), the diagnosis is often missed with occult exposure. CO toxicity may be due to exposure from a variety of sources including propane-powered engine, natural gas, automobile exhaust, portable generators, gas log fireplaces, kerosene heaters, fire smoke, and paint strippers and spray paints as dichloromethane in these products gets metabolized to CO. The principal pathogenic mechanism of CO poisoning is the strong avidity of CO for Hb (240× greater than O2), forming carboxy-Hb (COHb), reducing the O2 carrying capacity of Hb and precipitating tissue hypoxemia. CO can also impair myoglobin and mitochondrial function; increase guanylate cyclase activation which can lead to vasodilation and hypotension; and augment lipid peroxidation causing microvascular impairment and reperfusion injury.

While considering the possibility of CO poisoning in the differential diagnosis is a linchpin in recognizing its presence in an ill patient, the diagnosis must be made objectively. Because oxyhemoglobin (O2Hb) and carboxy-Hb (COHb) absorb red light (660 nm) similarly and carboxy-Hb (COHb) absorbs very little near-infrared light (940 nm) (see Figure 5 below), the photodiode of standard pulse oximeters – that only emit red and near-infrared light – cannot differentiate between oxyhemoglobin (O2Hb) and carboxy-Hb (COHb). The similar absorptive property of oxyhemoglobin (O2Hb) and carboxy-Hb (COHb) for red light is consistent with the clinical observation that patients with carboxyhemoglobinemia can appear bright red and not cyanotic.10 In the context of R, because carboxy-Hb (COHb) will decrease both deoxyhemoglobin (HHb) and O2Hb concentrations, the normally greater red light absorption by deoxyhemoglobin (HHb) will be decreased but the red light absorption of the combined oxyhemoglobin (O2Hb) and carboxy-Hb (COHb) species will be maintained or slightly increased. However, because deoxyhemoglobin (HHb) still absorbs red light better than either carboxy-Hb (COHb) or O2Hb, the reduction in deoxyhemoglobin (HHb) in the presence of carboxyhemoglobinemia results in a net effect of decreased red light absorption and R that is reduced more than predicted (see Figure 4C), resulting in SpO2 that overestimates the fractional oxyhemoglobin (O2Hb) content (FO2Hb), which is also measured by co-oximeters but in contrast to SaO2, takes into account COHb concentrations. Thus, in significant carboxyhemoglobinemia, standard pulse oximeters can give a false normal (or elevated) SpO2 when in fact the fractional O2Hb content (FO2Hb) is low. Semantically, it is important to emphasize that it is the fractional O2Hb content (FO2Hb) content and not the SaO2 that is decreased by carboxy-Hb (COHb). For pulse oximeters to be able to detect carboxy-Hb (COHb) as well as oxyhemoglobin (O2Hb) and deoxyhemoglobin (HHb), an instrument with at least three light beams of different wavelengths would have to be employed10; while they exist, they are not widely available.

Sickle cell anemia vasoocclusive crises

Complications of sickle cell disease, such as vasoocclusive crisis and acute chest syndrome, are often precipitated or exacerbated by hypoxemia, and can result in a vicious cycle of additional sickling and vasoocclusive crises 15. Thus, accurate detection of hypoxemia in these patients plays an important role in mitigating further red blood cell sickling. The accuracy of pulse oximetry in monitoring oxygenation in sickle cell disease has been debated. In a study of 17 patients with sickle cell disease, SpO2 was found to overestimate fractional O2Hb content (FO2Hb) content by an average of 3.4% and to underestimate SaO2 by an average of 1.1% 16. However, these minor biases in pulse oximeter readings did not lead to a misdiagnosis of either normoxemia or hypoxemia. Similarly, a study of 24 patients with sickle cell disease determined that SpO2 underestimated SaO2 readings by 1.6%; this difference was clinically insignificant 17. However, the authors note that while SpO2 may be used as an accurate representation of SaO2 in sickle cell disease, the fractional O2Hb content (FO2Hb) may be a more useful measurement, as some individuals with sickle cell disease may have elevated carboxy-Hb (COHb) (due to the metabolism of heme to bilirubin and carbon monoxide); in these instances, SpO2 overestimates the FO2Hb. Other studies additionally suggest that SpO2 overestimation of fractional O2Hb content (FO2Hb) and underestimation of SaO2 become more significant during vasoocclusive crises 18.

Another important caveat with oxygen saturation determination in sickle cell patients is that under normoxic conditions, where there is little HbS (sickle cell Hb) polymerization, HbS affinity for oxygen is similar to the normal HbA. However, in the presence of conditions that precipitates sickling, including hypoxemia, HbS has less affinity for oxygen and the oxygen-Hb dissociation curve is shifted to the right, i.e., for any given PaO2, the SaO2 is lower 19. Teleologically, this shift is advantageous to increase oxygen unloading to tissues.

Hypoxemia

Normal pulse oximeter readings usually range from 95 to 100 percent. Values under 90 percent are considered low. Hypoxemia is a below-normal level of oxygen in your blood, specifically in the arteries. Hypoxemia is a sign of a problem related to breathing or circulation, and may result in various symptoms, such as shortness of breath.

Hypoxemia is determined by measuring the oxygen level in a blood sample taken from an artery (arterial blood gas). It can also be estimated by measuring the oxygen saturation of your blood using a pulse oximeter — a small device that clips to your finger.

Normal arterial oxygen is approximately 75 to 100 millimeters of mercury (mm Hg). Values under 60 mm Hg usually indicate the need for supplemental oxygen.

Causes of hypoxemia

Several factors are needed to continuously supply the cells and tissues in your body with oxygen:

  • There must be enough oxygen in the air you are breathing
  • Your lungs must be able to inhale the oxygen-containing air — and exhale carbon dioxide
  • Your bloodstream must be able to circulate blood to your lungs, take up the oxygen and carry it throughout your body

A problem with any of these factors — for example, high altitude, asthma or heart disease — might result in hypoxemia, particularly under more extreme conditions, such as exercise or illness. When your blood oxygen falls below a certain level, you might experience shortness of breath, headache, and confusion or restlessness.

Common causes of hypoxemia include:

  • Anemia
  • ARDS (Acute respiratory distress syndrome)
  • Asthma
  • Congenital heart defects in children
  • Congenital heart disease in adults
  • COPD (chronic obstructive pulmonary disease)
  • Emphysema
  • Interstitial lung disease
  • Medications, such as certain narcotics and anesthetics, that depress breathing
  • Pneumonia
  • Pneumothorax (collapsed lung)
  • Pulmonary edema (excess fluid in the lungs)
  • Pulmonary embolism (blood clot in an artery in the lung)
  • Pulmonary fibrosis (scarred and damaged lungs)
  • Sleep apnea

When to see a doctor

Seek emergency care if you have:

  • Severe shortness of breath that comes on suddenly and affects your ability to function.
  • Severe shortness of breath with a cough, rapid heartbeat and fluid retention at high elevations (above 8,000 feet, or about 2,400 meters). These are signs and symptoms of fluid leaking from blood vessels into your lungs (high-altitude pulmonary edema), which can be fatal.

See your doctor as soon as possible if you have:

  • Shortness of breath after slight exertion or when you’re at rest
  • Shortness of breath that gets worse when you exercise or are physically active
  • Abrupt awakenings with shortness of breath or a feeling that you’re choking — these may be symptoms of sleep apnea

Self-care

To cope with chronic shortness of breath, try to:

  • Stop smoking. If you’ve been diagnosed with COPD or another lung disease, the single most important thing you can do is to quit smoking.
  • Avoid passive smoke. Avoid places where others smoke. Secondhand smoke can cause further lung damage.
  • Get regular exercise. It may seem difficult to exercise when you have trouble breathing, but regular exercise can improve your overall strength and endurance.

Causes of falsely low pulse oximeter readings

Venous pulsations

Venous pulsations, causing a significant change in venous volume with each cardiac cycle, can contribute to a falsely low SpO2 reading because venous O2Hb saturation (SvO2) is now also measured by the pulse oximeter, artificially lowering the arterial saturation. Venous pulsations can occur when adhesive fingerprobes are placed too tightly around the finger, in severe tricuspid regurgitation, when the location of the probes are in dependent positions (e.g., probe on the forehead with the patient in a Trendelenburg position), and possibly in distributive shock where widespread vasodilation results in physiologic arteriovenous shunting 20. When venous pulsations is considered to be occurring with a forehead sensor in a patient requiring the supine or Trendelenburg position, an elastic-tensioned headband applied to the forehead sensor can significantly reduce the occurrence of falsely low SpO2 readings 21.

Excessive movement

Excessive movement such as tremor or convulsions has been documented to cause spuriously low SpO2, with desaturations below 50% sometimes observed 22, though less commonly SpO2 overestimations can also occur. In theory, motion can cause the normally static tissues in relation to the sensor position to change over the time frame of the arterial pulses. At times, this motion can augment or mimic the cardiac-induced signals as the blood in the veins (and other previously stationary tissues) are now moving, further modulating the red and infrared light attenuation in the probed tissue. However, many newer generation pulse oximeters have improved processing algorithms that reduce the occurrence of false SpO2 readings due to excessive patient movements 22.

Intravenous pigmented dyes

Pigmented dyes are used medically or as agents in various medical diagnostic tests; e.g., the principal medicinal use of methylene blue is in methemoglobinemia where it serves as a reducing agent. Methylene blue has also been used as a dye in endoscopic polypectomy where it is injected into the submucosa around the polyp to be removed, marking the site in the event additional tissues need to be excised. Indigo carmine (FD&C Blue#2)-based dye is infrequently used to detect amniotic fluid leaks as well as to detect leaks in the urinary system during surgery since intravenous indigo carmine is cleared rapidly by the kidneys. Iodocyanine green is used for various medical diagnostic tests such as determination of hepatic function and liver blood flow, and for ophthalmic angiography.

Peak light absorption of methylene blue is 668 nm, very close to the strong red light absorption by deoxyhemoglobin (HHb), resulting in a higher R value and mimicking deoxyhemoglobin (HHb) 23. Hence, administration of methylene blue into the blood stream can falsely reduce SpO2 readings. In human volunteers with normal baseline SpO2 (≥97%), a profound drop in SpO2 occurred following intravenous administration of 5 mL of 1% methylene blue with a median nadir SpO2 of 65% although there was a wide range in SpO2 reduction among the subjects 23. Indocyanine green and indigo carmine do not have as great absorption for red light. This is consistent with the finding that intravenous injection of indocyanine green had only a minor decrease of ∼3–4% in SpO2 using a finger probe and intravenous injection of indigo carmine resulted in little or no change in SpO2 23.

Inherited forms of abnormal hemoglobin

Uncommon Hb variants have been reported to cause spuriously decreased SpO2 readings, including Hb Lansing 24, Hb Bonn 25, Hb Koln 26, Hb Hammersmith 27, and Hb Cheverly 28. Sarikonda et al. 24 reported a father and daughter with SpO2 readings that were more than 10% lower than SaO2 measurements due to an abnormal Hb variant (Hb Lansing) which accounted for ∼11% of their total Hb. Assessment of oxygen affinity was normal, suggesting that interference of absorbance of red and/or near-infrared light by the abnormal Hb accounted for the spurious reduction in SpO2 24. A father and son were reported to have falsely low SpO2 due to mutation of the ALPHA-Hb gene in which resulted in a histidine-to-aspartatic acid substitution (Hb Bonn) 25. Hb Bonn was found to have a peak absorption at 668 nm (same as methylene blue), very close to the red light wavelength of 660 nm 25. Hence, in the context of R, Hb Bonn causes an enhanced red light absorption, resulting in an elevated R value and lower SpO2 measurement; in other words, Hb Bonn behaves like deoxyhemoglobin (HHb) and methylene blue. Similarly, Hb Cheverly spectra showed that the red light absorbance for this abnormal Hb was greater than for HbA 28. Absorption spectra for both O2Hb and HHb for a patient with 5.4% Hb Koln found red light absorbance was greater for Hb Koln than for HbA, indicating that R would be biased positively, falsely lowering SpO2 29.

Fingernail polish

Earlier reports of pulse oximeters noted that fingernail polish, particularly black, blue, and green color, can lower SpO2 by up to 10% 30. More recent studies with newer models of pulse oximeters found that fingernail polish has only a minor effect on SpO2 readings; i.e., black and brown fingernail polish displayed the greatest reduction in the SpO2 reading but by an average decrease of ≤2% 31.

Severe anemia (with concomitant hypoxemia)

Theoretically, anemia should not have much effect on SpO2 readings since both oxyhemoglobin (O2Hb) and deoxyhemoglobin (HHb) would be proportionately affected. However, it has been observed that severe anemia can spuriously affect SpO2 32. Mechanistically, this is because scatter of visible and near-infrared light by human tissues is not accounted for by the simplified Beer–Lambert equation, which assumes a single, well-defined light path 33. This light scatter would be affected by the number of red blood cells; i.e., in anemia, there would be less light scatter whereas calibration curves are derived from healthy individuals without anemia. Thus, with change in Hb content, the pathlength for the transmitted red and near-infrared light would be altered, creating a bias in R and SpO2 readings.

In an experimental study of dogs, SpO2 was found to be an accurate representation of SaO2 readings down to a hematocrit range of 10–14%. When the hematocrit dropped below 10%, the accuracy of the pulse oximeter deteriorated, underestimating co-oximeter readings by an average of 5.4% 34. These findings were corroborated in a human study where in hypoxemic patients, the presence of anemia caused the SpO2 to further underestimate the SaO2 35. In contrast, for normoxic individuals, severe anemia had minimal impact on SpO2 values 35. While the mechanistic explanation for this phenomenon is complicated and beyond the scope of this review, it is important to emphasize that anemia per se does not cause a spuriously low SpO2 but rather causes the SpO2 to underestimate the SaO2 in patients with true hypoxemia, but has little impact on SpO2 measurements in normoxic individuals. Since SpO2 is underestimated in those with bona fide hypoxemia in the presence of severe anemia, this direction of error is fortuitous since earlier warning of hypoxemia by SpO2 measurements will result in more timely administration of supplemental oxygen.

Pulse oximeter uses

Pulse oximetry can provide an early warning of hypoxemia 36. In the largest randomized trial involving more than 20,000 perioperative patients, rates of incidence of hypoxemia (SpO2 of less than 90 %) were 7.9 % in patients who were monitored with pulse oximetry and only 0.4 % in patients without an oximeter 37. The anesthesiologists reported that oximetry led to a change in therapy on at least one occasion in up to 17 % of the patients. Using 95,407 electronically recorded pulse oximetry measurements from patients who underwent non-cardiac surgery at two hospitals, Ehrenfeld and colleagues 38 reported that during the intraoperative period, 6.8 % of patients had a hypoxemic event (SpO2 of less than 90) and 3.5 % of patients had a severe hypoxemic event (SpO2 of not more than 85 %) lasting more than 2 minutes. Hypoxemic events occurred mostly during the induction or emergent phase of anesthesia; these time periods are consistent with the clinical view that anesthesia-transitional states are high-risk periods for hypoxemia 39. In patients undergoing gastric bypass surgery, continuous monitoring of SpO2 revealed that episodic hypoxemia (SpO2 of less than 90 % for at least 30 seconds) occurred in all patients. For each patient, desaturation lasted as long as 21 ± 15 minutes 40.

Pulse oximetry has been shown to be reliable in titrating the fractional inspired oxygen concentration (FIO2) in patients requiring mechanical ventilation; aiming for an SpO2 of 92 % is reasonable for ensuring satisfactory oxygenation in Caucasian patients 41. To determine whether the ratio of SpO2 to FIO2 (S/F) can be used as a surrogate for the ratio of PaO2 to FIO2 (P/F), SpO2 and PaO2 data from 1,074 patients with acute lung injury or acute respiratory distress syndrome (ARDS) who were enrolled in two large clinical trials were compared 42. An SpO2/FIO2 ratio of 235 predicted a PaO2/FIO2 ratio of 200 (oxygenation criterion for ARDS), a sensitivity of 0.85, and a specificity of 0.85. An SpO2/FIO2 ratio of 310 reflected a PaO2/FIO2 ratio of 300 (oxygenation criterion for acute lung injury), a sensitivity of 0.91, and a specificity of 0.56. In patients undergoing surgery, the S/F ratio was shown to be a reliable proxy for the PaO2/FIO2 ratio, especially in those patients requiring positive end-expiratory pressure (PEEP) levels of greater than 9 cm H2O and those patients with a PaO2/FIO2 ratio of 300 or less 43. In the ICU, the SpO2/FIO2 ratio can also be a surrogate measure for the PaO2/FIO2 ratio when calculating the sequential organ failure assessment score, which measures the severity of organ dysfunction in critically ill patients 44.

Causes of falsely low or high pulse oximeter SpO2

Poor probe positioning resulting in decrease absorption of red and/or infrared light

Poor probe positioning can result in light shunting wherein the emitted light bypasses tissues and strikes the photodetector. If both transmitted red and/or infrared light are largely unabsorbed, the R value can approach 1. As a result, similar to that seen with methemoglobinemia, the SpO2 may either overestimate or underestimate the SaO2.

In older models of pulse oximeters, ambient light complicated SpO2 measurements by directly hitting the photodetector and/or by increasing the amount light going through the tissues, making the SpO2 measurements unreliable. However, most modern pulse oximeters are able to “subtract” the ambient light signals. If effects of ambient light remain a concern, shielding the probe with an opaque material is a simple solution.

Methemoglobinemia

Methemoglobinemia should be considered in patients with cyanosis, particularly in the presence of a normal or near normal partial pressure of oxygen (PaO2) 45. Methemoglobin (MetHb) is formed when the iron (Fe) in the heme moiety is oxidized from Fe+2 to Fe+3. MetHb impairs oxygen delivery to tissues by two distinct mechanisms: (i) MetHb itself is less able to bind oxygen and (ii) MetHb causes the oxygen dissociation curve of normal Hb to shift to the left which impairs unloading of oxygen at the tissue level – causing profound tissue hypoxia.

Hereditary MetHb is rare and is due to subjects having abnormal Hb (HbM) or having cytochrome b5 reductase deficiency. Most cases of methemoglobinemia are usually due to oxidizing chemicals or drugs such as nitrites, nitrates, aniline dyes, aniline derivatives (phenacetin, dapsone), sulfonamides, and lidocaine. Only 1.5–2 gm MetHb/dL of blood (a 10–20% of total Hb) can cause cyanosis. In anemic patients, cyanosis is less apparent because the corresponding absolute level of MetHb will be lower. MetHb levels between 20 and 45% can produce headaches, weakness, breathlessness, and altered mental status. Metabolic acidosis, dysrhythmias, and myocardial ischemia due to tissue hypoxia can also occur. MetHb levels between 50 and 60% are often fatal, presenting with hemodynamic instability, generalized seizures, and coma.

MetHb absorbs more infrared than either oxyhemoglobin (O2Hb) or deoxyhemoglobin (HHb) (Figure 5). Since its absorbance of red light is similar to deoxyhemoglobin (HHb) (Figure 5), patients with significant methemoglobinemia can appear cyanotic and their blood very dark in color. Moreover, because MetHb absorbs both red and infrared light equally well (Figure 5), high MetHb levels result in an R value that approaches 1, which happens to be equivalent to a SpO2 of 80–85%.5, 10 Therefore, high MetHb levels will cause the SpO2 to trend toward 85%, resulting in an overestimation or underestimation of the SaO2, depending on whether there is true hypoxemia that is <85% or normoxia, respectively. MetHb level can be directly analyzed by a CO-oximeter. Treatment of methemoglobinemia includes stopping the offending agent, supportive care, and administration of a reducing agent such as methylene blue in severe cases, bearing in mind that methylene blue can cause spuriously low SpO2.

Sulfhemoglobinemia

Sulfhemoglobin (SulfHb) is formed by the irreversible oxidation of Fe+2 in the porphyrin ring of Hb to Fe+3 (similar to MetHb) but additionally has a sulfur atom incorporated into the porphyrin ring. It is most often caused by oxidizing drugs that may or may not contain sulfur; in the latter cases, it is thought that endogenous hydrogen sulfide (H2S) derived from gut bacteria is the source for the sulfur, particularly in severely constipated states 46. Hence, SulfHb may be formed by aniline dyes, acetanilid, phenacetin, phenozapyridine, nitrates, sulfonamides, metoclopramide (structurally similar to aniline dyes), flutamide, dapsone, dimethyl sulfoxide (DMSO) or by exposure to sulfurated chemicals such as hydroxylamine sulfate used in various cleaning solutions 46. Sulfhemoglobin (SulfHb) cannot carry oxygen 47.

The major clinical manifestation of sulfhemoglobinemia is the presence of cyanosis. A mean capillary concentration of only 0.5 gm/dL (5 gm/L) of sulfhemoglobin (SulfHb) is sufficient for detectable cyanosis [compared with 1.5 gm/dL for MetHb and 5 gm/dL for deoxyhemoglobin (HHb)]. While SulfHb markedly reduces oxygen transport, it also shifts the normal Hb oxygen dissociation curve to the right, facilitating oxygen unloading in tissues. Note that this rightward shift of the normal Hb oxygen dissociation curve by SulfHb is opposite to that seen with methemoglobinemia, where O2 unloading is impaired at the tissue level. Hence, sulfhemoglobinemia has fewer adverse clinical consequences than methemoglobinemia for the same level of concentration. Nevertheless, extremely high SulfHb levels will ultimately impair oxygen transport by reducing O2Hb.

SulfHb has greater red light (660 nm) absorbance than HHb or MetHb 48. Although it is not known precisely, SulfHb most likely has a similar degree of absorbance at red and near-infrared light because there have been several reports that the SpO2 of persons with severe sulfhemoglobinemia are ∼85%, a sign that absorbance of red and near-infrared light are similar with SulfHb, resulting in a R value that approaches 1 (as seen with methemoglobinemia) 48. While most co-oximeters have four wavelengths and are able to differentiate O2Hb, HHb, COHb, and MetHb, they cannot specifically identify SulfHb. Moreover, significantly high levels of SulfHb are often falsely reported as MetHb as many spectrophotometers cannot accurately differentiate MetHb from SulfHb. In these instruments, additional biochemical testing is required to differentiate between SulfHb and MetHb; e.g., SulfHb remains intact after addition of cyanide to the blood sample whereas MetHb disappears. However, newer generations of co-oximeters can differentiate between SulfHb and MetHb. In centers where determination of SulfHb levels are not available, unresponsiveness to methylene blue may be the only indication of sulfhemoglobinemia in patients initially presumed to have methemoglobinemia. There is no specific treatment for sulfhemoglobinemia (no known antidote available) other than eliminating exposure to the offending agent and supportive therapy. The concentration of SulfHb will decrease as erythrocytes are destroyed and replaced. For extremely symptomatic cases, exchange transfusion has been performed with success 49.

Sepsis and septic shock

There are conflicting studies on how SpO2 is biased in the setting of sepsis and septic shock. Secker and Spiers18 compared 80 paired SpO2 and SaO2 readings in patients with septic shock and showed that only in those with low systemic vascular resistance (as measured by a pulmonary artery catheter), the SpO2 underestimated the SaO2 by a mean of 1.4%, a level that was statistically significant but unlikely to be clinically important. These results are supported by a human study where induction of hyperemia in one arm of volunteers resulted in lower SpO2 than the control arm 50. A hypothesis to explain this phenomenon is that vasodilation from the sepsis resulted in creation of arteriovenous shunts that culminated in venous pulsations and spurious detection by the pulse oximeter of some venous blood as arterial 50.

By contrast, a retrospective review of 88 patients with severe sepsis and septic shock found that in those with hypoxemia (defined as SaO2 < 90%), SpO2 significantly overestimated SaO2 by nearly 5% 51. In several studies examining critically ill patients with various acute illnesses, some found SpO2 underestimated SaO2 while others found the opposite 51. Even in those studies that examined only septic patients, factors that may account for a difference in the direction in which SpO2 is biased include differences in: (i) the extent of fluid resuscitation and tissue perfusion, (ii) sepsis-induced cardiac dysfunction, (iii) sites interrogated by the pulse oximeter probe, (iv) types of pulse oximeters and probes used, (v) vasoconstrictor use, and (vi) the presence of other co-morbid conditions that may spuriously affect SpO2 values unpredictably. Thus, a number of variables that occur in patients with severe sepsis and septic shock make it difficult to predict which direction SpO2 may be biased. Until more definitive studies are performed, it appears prudent to at least determine how well SpO2 correlates with SaO2 and FO2Hb measurements in any unstable, critically ill, cardiopulmonary patient.

Pulse oximetry effect on clinical outcome

To date, the largest randomized controlled trial that has evaluated the impact of pulse oximetry on outcome was the study by Moller and colleagues 52 in 20,802 surgical patients. Although myocardial ischemia occurred less frequently in the oximetry than the control group, the numbers of post-operative complications and hospital deaths were similar in the two groups 52.

In a more recent randomized study in 1,219 post-operative patients, Ochroch and colleagues 53 assessed the impact of pulse oximetry on the rate of transfer to the ICU from a post-surgical care floor. Upon admission to the study floor, patients were randomly assigned to receive monitoring with a pulse oximeter either continuously (n = 589) (oximeter group) or intermittently (n = 630) according to clinical needs as judged by a nurse or a physician (control group). The percentages of patients transferred to the ICU were similar in the oximeter group and the control group (6.7 % versus 8.5 %). A lower rate of ICU transfers for pulmonary complications was noted in the oximeter group. For those patients who required ICU transfer, the estimated cost from enrollment to completion of the study was less in the oximeter group ($15,481) than in the control group ($18,713) despite the older age and higher comorbidity of the former. The authors speculate that reduction in pulmonary transfers to the ICU may be due to the earlier recognition and treatment of post-operative pulmonary complications.

The lack of demonstrable benefit of pulse oximetry on outcome in clinical trials may be due to the signal-to-noise ratio 54. Because the outcome under evaluation (readmission to the ICU, myocardial infarction, or death) is rare, a huge number of patients are needed to show a reduction in these events 55. To demonstrate a reduction in complications in the study by Moller and colleagues, for example, a 23-fold increase in enrollment would have been required 55.

The fact that randomized trials failed to demonstrate that routine monitoring with pulse oximetry improved patient outcome has not stopped anesthesiologists from using pulse oximeters 56. When surveyed, 94 % of the anesthesiologists in the study by Moller and colleagues 52 considered the pulse oximeters to be helpful in guiding clinical management. They believed that maintaining oxygenation within the physiologic limits with the help of pulse oximetry might help avert irreversible injury. It is this perspective that has made pulse oximetry a crucial part of standard of care despite the absence of proven efficacy 55.

Oxyhemoglobin Dissociation Curve

The Oxyhemoglobin Dissociation curve shows how blood carries oxygen through the body. It also shows the relationship between SpO2 and PaO2 as determined by hemoglobin’s affinity for oxygen.

Here is a simple way of understanding the Oxyhemoglobin Dissociation curve.

Because oxygen does not dissolve easily in water very little of it can actually be carried directly in the plasma, only about 1.5%. The rest of it has to be combined with the hemoglobin in the blood in order to be transported. The oxygen and the hemoglobin have to bind together, and there are four heme groups which can each combine with one molecule of oxygen. When combined it is then known as oxyhemoglobin (O2Hb). When the oxygen binds from the hemoglobin this is known dissociation and there are several factors to take into consideration when considering binding and dissociation.

The partial pressure of oxygen (PO2) is the most important factor when considering how much oxygen combines with hemoglobin. When deoxyhemoglobin (HHb) is completely converted to oxyhemoglobin (O2Hb) it is said to be fully saturated, and when it contains a mixture of the two it is said to be only partially saturated. The relationship between the percentage saturation of hemoglobin and partial pressure of oxygen is illustrated in the Figure 1 below, this is usually known as the oxygen-hemoglobin dissociation curve.

Figure 1. Oxyhemoglobin Dissociation curve

oxyhemoglobin-dissociation-curveOxygen-Haemoglobin_dissociation_curves

Figure 2. Lungs alveoli

lung pleural cavityFigure 3. Pulmonary Alveoli (microscopic view)

lungs alveoli

Note: (a) Clusters of alveoli and their blood supply. (b) Structure of an alveolus. (c) Structure of the respiratory membrane.

You can see from the above that when the partial pressure of oxygen (PO2) is high, hemoglobin binds with large amounts of oxygen (O2) and is almost fully saturated. So the greater the partial pressure of oxygen the more oxygen will combine with hemoglobin.

You can also see from the above figure that the hemoglobin is still 90% or more saturated with oxygen even at partial pressures of between 60 to 100 mmHg. So the blood can still pick up nearly a full load of oxygen even when the alveoli partial pressure of oxygen (PAO2) is low.

As the partial pressure of oxygen becomes even lower, at 40 mmHg you can see that the percentage of hemoglobin saturated with oxygen drops off quite quickly. So large amounts of oxygen are released from hemoglobin at these partial pressures. This is important in some of the more active tissues where the partial pressure of oxygen can decrease well below 40 mmHg. The large amount of oxygen released as a consequence means that the tissues can continue to work.

Whilst the partial pressure of oxygen is the most important factor when considering the binding and dissociation to hemoglobin there are also a number of other factors to take into account;

  1. The pH of an environment is directly related to the number of hydrogen ions. Hydrogen ions alter the structure of hemoglobin decreasing its oxygen carrying capacity. The lowered pH therefore means that more oxygen is available for tissue cells as the pH will be lower here.
  2. Carbon dioxide can also bind to hemoglobin and therefore as the partial pressure of carbon dioxide rises the hemoglobin releases oxygen more readily. Thus an increased partial pressure of carbon dioxide producer a more acid environment that helps to split oxygen from hemoglobin.
  3. A raised temperature also tends to result in an increased amount of oxygen released from hemoglobin. As heat is a by product of cellular activity, and more active cells will generate more heat this will further promote the release of oxygen from the oxyhemoglobin.
  4. 2,3-biphosphoglycerate (2.3 DPG) is formed in red blood cells when they break down glucose. When this combines with hemoglobin the hemoglobin binds oxygen less tightly. So the greater the level, the more oxygen is released from hemoglobin. Some hormones such as epinephrine, and norepinephrine increase the formation of 2,3-biphosphoglycerate (2.3 DPG).

Carbon dioxide is carried by the blood in three main ways. A small amount is dissolved in plasma. This diffuses into the alveoli upon reaching the lungs.

More of it combines with the globin in hemoglobin.

But the greatest percentage of carbon dioxide is transported in plasma is bicarbonate ions. The carbon dioxide in the tissue capillaries reacts with water to form carbonic acid. This carbonic acid then dissociates into hydrogen ions and bicarbonate ions.

The Oxyhemoglobin Dissociation Curve

Venous blood has a PO2 of 40 and is generally referred to as PvO2. As more oxygen molecules enter the capillary bloodstream, this increases the PO2, and therefore increases reduced hemoglobin’s affinity for oxygen. It is here where the capillary system converts from being part of the unoxygenated venous system to the oxygenated arterial system.

As the PO2 of capillary blood increases, more and more oxygen molecules bind with hemoglobin until a majority of hemoglobin becomes completely saturated. A normal SpO2 value here is about 98%, or a range of 95-98%. An acceptable range is 90%. The capillary then becomes part of the arterial system, with its PO2 now being referred to as PaO2.

So, the curve has an s-shape because, at lower PO2s, oxygen binds to hemoglobin at a high rate, and this slows down as hemoglobin become more saturated. At PO2s above 60 the curve is relatively flat, meaning that the oxygen content of the blood will not change much with subsequent increases in PO2. In other words, the only way to get more oxygen to tissues would require adding more hemoglobin molecules to the blood, which would require a blood transfusion. Or, another simpler method would be to add more oxygen to the plasma by increasing the fraction of inspired oxygen (FiO2).

4-5-6-7-8-9 Rule. It is because of the Oxyhemoglobin Dissociation Curve that you can use SpO2 to estimate PaO2.

  • PO2 40 = SpO2 70%
  • PO2 50 = SpO2 80%
  • PO2 60 = SpO2 90%

Because of normal variations in PAO2 (as explained above), the PaO2 may likewise vary. So, that said, the following is generally considered as true of PaO2.

  • Normal: 80-100 mm Hg
  • Hypoxemia: 60-80 mm Hg
  • Severe Hypoxemia: 40-60 mm Hg

Shifting of the Oxyhemoglobin Dissociation Curve

Certain conditions cause hemoglobin to release more oxygen into the bloodstream, shifting the curve to the right; certain conditions cause hemoglobin to pick up more oxygen from the bloodstream, shifting the curve to the left. Both of these conditions will have a direct affect on SpO2 and PaO2

1) Shift to the right

The Oxyhemoglobin Dissociation Curve shifts to the right when hemoglobin has a decreased affinity for oxygen, and has a “harder” time making the bond with oxygen. This decreases hemoglobin’s affinity for oxygen, causing it to un-bond with hemoglobin and enter tissues.

  • Lower SpO2 for a given PO2
  • Requires a higher PO2 to achieve the desired SpO2
  • Hemoglobin more likely to dump oxygen into tissues (active muscles need more oxygen)
  • Heat. Anything that creates heat will move curve to right.
  • Acidosis or low pH
  • High CO2 causes Acidosis
  • Exercise (heats up body)
  • Increased 2,3-biphosphoglycerate (2.3 DPG)

2) Shift to the left

The curve shifts to the left when hemoglobin has an increased affinity for oxygen, and has an “easier” time making the bond with oxygen.

  • Higher SpO2 for a given PO2
  • Hemoglobin is more likely to cling to O2 and not let go (activity is minimal)
  • Think Cold. The colder your body, the slower activity will be.
  • Hypothermia (cold tissues)
  • Rest (minimal exertion)
  • Hypocarbia
  • CO2 poisoning
  • Alkalotic (tissues cold)
  • Decreased 2,3-biphosphoglycerate (2.3 DPG)
  • Fetal Hemoglobin (fetus needs less oxygen and can live off lower PO2s)

What is 2,3-biphosphoglycerate (2.3 DPG)?

It’s a substance in the blood that controls movement of oxygen from the blood to tissues.

Increasing 2.3 DPG: This is your bodies way of responding to lack of oxygen. It lowers hemoglobin’s affinity for oxygen, causing hemoglobin to release oxygen into the bloodstream for tissues to use. This moves the curve to the right. The following conditions cause the body to increase production of 2.3 DPG:

  • Anemia (it may take 24 hours after transfusion to replenish supply, and return curve to normal)
  • Chronic Obstructive Pulmonary Disease (COPD)
  • Cystic Fibrosis
  • Congenital heart diseases
  • Anything that increases metabolism (heat), such as acidosis, exercise, fever, etc.

Decreasing 2.3 DPG: This results from lack of DPG enzymes to make 2.3 DPG. The body responds by increasing red blood cells (RBCs) that are weak and burst easy. This moves the curve to the left. When this happens your body will increase 2.3 DPG production to try to move it back to normal. The following conditions cause this:

  • Erythrocytosis
  • Anemia
  • Large blood transfusion

The science behind Oxyhemoglobin Dissociation curve

Fick’s law: The rate of oxygen diffusion is proportionate to the concentration difference of oxygen and the surface area. In other words, it travels from areas of high pressure to areas of lower pressure. According to this law, a gas travels from areas of high pressure to areas of low pressure.

Since room air has a partial pressure of oxygen (PaO2) of 160, and alveoli have a PaO2 is 104, oxygen easily makes it’s way through the air passages to the alveoli. Similarly, venous capillary blood has a PaO2 of 40, so oxygen easily diffuses across the respiratory membrane to the capillary system. Capillary PaO2 now becomes 104, thus becoming part of the arterial circulation.

Henry’s Law: Gases dissolve in liquids in proportion to their partial pressures, depending also on how soluble they are in specific fluids and on the temperature. This is important because most oxygen inside the body is stored in fluid, such as blood. Inside the nose it is humidified, and the alveoli are saturated with water vapor which has its own partial pressure.

Total Pressure: This is the tension given off by a molecule of a gas if it were to be confined inside a container. The pressure is caused by movement of the molecules, and the pressure or tension they cause by constantly impacting the surface of the container. The total pressure of a gas is summed up by the total pressure of all the molecules contained in it.

Partial Pressure: This is the pressure exerted by a single gas component in a mixture. It is the pressure of an individual gas of a mixture. Partial Pressure of Oxygen is designated as PO2. PO2 after humidified and heated to normal body temperature (37°C): 149 mmHg. Partial Pressure of Alveolar Oxygen is designated as PAO2: 104 mmHg. Partial pressure of capillary venous blood (PvO2) is 40 mmHg.

So oxygen moves from the alveoli, across the respiratory membrane, to the capillary blood because of the pressure difference: 104-40 = 64 mmHg pressure difference.

This pressure difference, or pressure gradient, is perfect for oxygen diffusion to occur from the alveoli to the capillary system. So, oxygen molecules are released from the alveoli (PAO2 104 mmHg) into the venous capillary system (PvO2 O2 40 mmHg).

Dalton’s Law: The total pressure of a mixture of gases equals the sum of the partial pressures of the individual gases in that mixture.

Room Air contains about 79% nitrogen and 21% oxygen (There are other gases in the air, although they will be omitted here for to make this easier to understand). Usually, 21% is generally designated as the Fraction of Inspired Oxygen in Room Air.

Total Pressure of Atmospheric Air as sea level: 760 mmHg

  • Partial Pressure of Nitrogen (PN2) in room air: 600 mmHg
  • Partial Pressure of Oxygen (PO2) in room air: 160 mmHg

These pressures may vary depending on the temperature, humidity, and atmospheric pressure.

Affinity of Hemoglobin

Hemoglobin (Hb) is a protein present in red blood cells (erythrocytes). In the capillary system oxygen comes into contact with a reduced hemoglobin, or a hemoglobin that has no oxygen molecule on it. This makes it so the hemoglobin has a high attraction, or high affinity, for oxygen. Oxygen (O2) then binds with a hemoglobin

The amount of oxygen bound to hemoglobin at any time is based on the partial pressure of oxygen that it is exposed to. Since freshly oxygenated capillary blood has a PaO2 of 104 under normal conditions, reduced hemoglobin (hemoglobin that does not have oxygen) has a high affinity for it.

Some oxygen molecules will remain in the plasma, although a majority is picked up and transported by a hemoglobin molecule. The normal percentage of hemoglobin carrying oxygen is referred to as the oxygen saturation (SpO2), and a normal value is generally considered to be in the 95-98%. However, as you will soon see, 90% or greater can be considered acceptable.

Hemoglobin does not affect the partial pressure of oxygen, and so the PaO2 of arterial blood remains 104. The accepted range of PaO2 is generally considered to be in the 80-100 range. When a cell uses up it’s oxygen molecules, it has a PO2 that ranges somewhere around 22-35. As the hemoglobin approaches this cell with a lower PO2, it releases it’s hemoglobin. The cell on this end is said to have a high affinity for oxygen.


What does a pulse oximeter measure

Pulse oximetry is based on the principle that oxyhemoglobin (O2Hb) and deoxyhemoglobin (HHb) differentially absorb red and near-infrared light. It is fortuitous that oxyhemoglobin (O2Hb) and deoxyhemoglobin (HHb) have significant differences in absorption at red and near-infrared light because these two wavelengths penetrate tissues well whereas blue, green, yellow, and far-infrared light are significantly absorbed by non-vascular tissues and water 12. Oxyhemoglobin (O2Hb) absorbs greater amounts of infrared light and lower amounts of red light than does deoxyhemoglobin (HHb); this is consistent with experience – well-oxygenated blood with its higher concentrations of oxyhemoglobin (O2Hb) appears bright red to the eye because it scatters more red light than does deoxyhemoglobin (HHb). On the other hand, deoxyhemoglobin (HHb) absorb more red light and appears less red. Exploiting this difference in light absorption properties between oxyhemoglobin (O2Hb) and deoxyhemoglobin (HHb), pulse oximeters emit two wavelengths of light, red at 660 nm and near-infrared at 940 nm from a pair of small light-emitting diodes located in one arm of the finger probe. The light that is transmitted through the finger is then detected by a photodiode on the opposite arm of the probe; i.e., the relative amount of red and infrared light absorbed are used by the pulse oximeter to ultimately determine the proportion of hemoglobin (Hb) bound to oxygen.

The ability of pulse oximetry to detect SpO2 (peripheral oxygen saturation) of only arterial blood is based on the principle that the amount of red and infrared light absorbed fluctuates with the cardiac cycle, as the arterial blood volume increases during systole and decreases during diastole; in contrast, the blood volume in the veins and capillaries as well as the volumes of skin, fat, bone, etc, remain relatively constant. A portion of the light that passes through tissues without being absorbed strikes the probe’s photodetector and, accordingly, creates signals with a relatively stable and non-pulsatile “direct current” (DC) component and a pulsatile “alternating current” (AC) component (Figure 4A). A cross-sectional diagram of an artery and a vein during systole and diastole illustrates the non-pulsatile (DC) and pulsatile (AC) compartments of arteries and the relative absence of volume change in veins and capillaries (Figure 4B). Pulse oximeters use amplitude of the absorbances to calculate the Red:IR Modulation Ratio (R) 11; i.e., R = (Ared,AC/Ared,DC)/(AIR,AC/AIR,DC) where A = absorbance; in other words, R is a double-ratio of the pulsatile and non-pulsatile components of red light absorption to infrared light absorption. At low arterial oxygen saturations, where there is increased HHb, the relative change in amplitude of the red light absorbance due to the pulse is greater than the IR absorbance, i.e., Ared,AC > AIR,AC, resulting in a higher R value; conversely, at higher oxygen saturations, AIR,AC > Ared,AC and the R value is lower (Figure 4C). A microprocessor in pulse oximeters uses this ratio (calculated over a series of pulses) to determine the SpO2 based on a calibration curve that was generated empirically by measuring R in healthy volunteers whose saturations were altered from 100% to approximately 70%5 (Figure 4C). Thus, SpO2 readings below 70% should not be considered quantitatively reliable although it is unlikely any clinical decisions would be altered based on any differences in SpO2 measured below 70% 12.

How pulse oximeters exclude the influence of venous and capillary blood and other stationary tissues from the calculation of SpO2 can be conceptually understood by examining the Beer–Lambert Law of absorbance. According to the Beer–Lambert Law as applied to a modeled blood vessel, A = ɛbc where A = absorbance, ɛ = absorption (or extinction) coefficient of hemoglobin at a specified wavelength (a combination of the O2Hb and HHb coefficients), b = pathlength traveled by the emitted light through the blood vessel, and c = concentration of Hb. Simply measuring absolute absorbance would be an inaccurate estimate of arterial SpO2 since elevated levels of HHb in the venous blood would also contribute to the measured value. However, a pulse oximeter is able to determine only arterial SpO2 by measuring changes in absorbance over time. To illustrate this concept mathematically, the total absorbance (At) can be thought of as a linear combination of venous (Av) and arterial (Aa) absorbances (At = Av + Aa = ɛvbvcv + ɛabaca). Since pulse oximeters measure absorbance with respect to time, the derivative of the previous equation becomes dAt/dt = d(ɛvbvcv)/dt + d(ɛabaca)/dt. Since ɛ and c are constants (note that ɛ can vary depending on the wavelength of light, but is a constant for any particular wavelength and Hb species), the previous equation simplifies to dAt/dt = (dbv/dt)(ɛvcv) + (dba/dt)(ɛaca). Since arteries dilate and constrict much more than veins, i.e., the change in ba ≫ the change in bv (dba/dt ≫ dbv/dt), we can assume bv as a constant and dbv/dt = 0; hence, the previous equation simplifies to dAt/dt = (dba/dt)(ɛaca), or equivalently ΔAt = ΔAa; in other words, the change in At measured = change in absorbance due to the arterial blood content with little or no contribution by the venous blood. Therefore, an adequate pulse is necessary for pulse oximeters to work and is the basis for the well-known fact that attempting to measure SpO2 in regions with little or no blood perfusion will result in absent or inaccurate readings 11.

Figure 4. What a pulse oximeter measure

Footnotes:

Schematic diagram of light absorbance by a pulse oximeter. (A) In a person with good cardiac function, the onset of the cardiac systole, as denoted by the onset of the QRS complex coincides with the onset in the increase of the arterial blood volume. The amount of red and IR light absorbed in the arterial compartment also rises and fall with systole and diastole, respectively, due to the increase and decrease in blood volume. The volume that increases with systole is also known as the pulsatile or “alternating current” (AC) compartment and the compartment in which the blood volume does not change with the cardiac cycle is known as the non-pulsatile or “direct current” (DC) compartment. (B) A cross-sectional diagram of an artery and a vein displaying the pulsatile (AC) and non-pulsatile (DC) compartments of the blood vessels. Note that only the artery has a pulsatile (AC) component. (C) A diagram of a calibration (standard) curve of the Red:IR Modulation Ratio in relation to the SpO2. Increased red light absorbance (increased R) is associated with increased deoxyhemoglobin, i.e., lower SpO2.

How does a pulse oximeter work

Pulse oximetry is based on two physical principles:

  1. The presence of a pulsatile signal generated by arterial blood, which is relatively independent of non-pulsatile arterial blood, venous and capillary blood, and other tissues; and
  2. The fact that oxyhemoglobin (O2Hb) and deoxyhemoglobin (HHb) have different absorption spectra 57.

Currently available oximeters measures oxygen saturation by using two light-emitting diodes (LEDs) that emit light at the 660 nm (red) and the 940 nm (infrared) wavelengths by illuminating the skin 58. These two wavelengths are used because oxyhemoglobin (O2Hb) and deoxyhemoglobin (HHb) have different absorption spectra at these particular wavelengths (see Figure 4). In the red region, oxyhemoglobin (O2Hb) absorbs less light than reduced hemoglobin (Hb), while the reverse occurs in the infrared region. The ratio of absorbance at these wavelengths is calibrated empirically against direct measurements of arterial blood oxygen saturation (SaO2) in volunteers, and calibrated against direct measurements of arterial oxygen saturation (SaO2) to establish the pulse oximeter’s measure of arterial saturation (SpO2) and the resulting calibration algorithm is stored in a digital microprocessor within the pulse oximeter. During subsequent use, the calibration curve is used to generate the pulse oximeter’s estimate of arterial saturation SpO2 (peripheral oxygen saturation) 59. In addition to the digital readout of O2 saturation, most pulse oximeters display aplethysmographic waveform which can help clinicians distinguish an artifact from the true signal (Figure 5).

Figure 5.  How pulse oximeter work – transmitted light absorbance spectra of four hemoglobin species: oxyhemoglobin, reduced hemoglobin, carboxyhemoglobin, and methemoglobin

How pulse oximeter work

Figure 6. Common pulsatile signals on a pulse oximeter

common pulsatile signals on a pulse oximeter

Footnotes: (Top panel) Normal signal showing the sharp waveform with a clear dicrotic notch. (Second panel) Pulsatile signal during low perfusion showing a typical sine wave. (Third panel) Pulsatile signal with superimposed noise artifact giving a jagged appearance. (Bottom panel) Pulsatile signal during motion artifact showing an erratic waveform.

Pulse oximeter accuracy

The accuracy of commercially available oximeters differ widely, probably because of the different algorithms employed in signal processing 57. These algorithms are limited by the range of saturations that can be safely obtained in volunteers, and also the accuracy of the measurement standard 60. Comparison of pulse oximetry with direct CO-oximeter measurements should be reported in terms of the mean difference between the two techniques (bias) and the standard deviation of the differences (precision).

In healthy volunteers, oximeters commonly have a mean difference (bias) of < 2% and a standard deviation (precision) of < 3% when SaO2 is 90% or above 61. Comparable results have also been obtained in critically ill patients with good arterial perfusion 62. Accuracy of pulse oximeters deteriorates when SaO2 falls to 80% or less. In healthy volunteers under hypoxic conditions, bias of pulse oximetry varies from -15.0 to 13.1 while the precision ranges from 1.0 to 16.0 63. In a study in critically ill patients, eight out of 13 oximeters had a bias ≥ ± 5% when SaO2 was < 80% 64. In a study of 54 ventilator-dependent patients, the accuracy of oximetry deteriorated significantly at low SaO2 values. Bias ± precision was 1.7 ± 1.2% for SaO2 values > 90%, and it increased to 5.1 ± 2.7% when SaO2 was ≤ 90% 65.

Different probes that are used with a pulse oximeter can also affect the accuracy of SpO2 (peripheral oxygen saturation) measurements. In patients with poor peripheral perfusion as a consequence of cardiopulmonary bypass surgery, finger probes had lower precision and more readings within 3% of the reference (CO-oximeter) than the other probes. Overall rankings were significantly better for the finger probes than probes on other sites 66. The response time of oximeter probes was assessed by Severinghaus and Naifeh 67 who induced 30-60s hypoxic plateaus between an SaO2 of 40 and 70% in healthy volunteers. Oximeter probes placed on the ear generally had a much faster response to a sudden decrease in fractional inspired oxygen concentration (FiO2) than did the finger probes (10-20 versus 24-35s, respectively). Employing hypobaric facility to induce hypoxia in normal volunteers, Young et al. 68 also observed that the response time of the finger probes were slower than the ear probes in response to either a decrease or increase in O2 saturation.

Figure 7. The response time of the conventional finger probe with the reflectance forehead probe in patients undergoing general anesthesia

response time of pulse oximetry

Pulse oximeter limitations

Pulse oximeters have a number of limitations which may lead to inaccurate readings. Pulse oximeters measure SaO2 (arterial blood oxygen saturation) that is physiologically related to arterial oxygen tension (PaO2) according to the oxyhemoglobin (O2Hb) dissociation curve. Because the oxyhemoglobin (O2Hb) dissociation curve has a sigmoid shape, oximetry is relatively insensitive in detecting the development of hypoxemia in patients with high baseline levels of PaO2 69.

Limitations of pulse oximetry:

  • Shape of oxygen dissociation curve
  • Carboxyhemoglobin (COHb)
  • Methemoglobin (MetHb)
  • Anemia
  • Dyes
  • Nail polish
  • Ambient light
  • False alarms
  • Motion artifact
  • Skin pigmentation
  • Low perfusion state
  • Limited knowledge of the technique

Pulse oximeters employ only two wavelengths of light and, thus, can distinguish only two substances, deoxyhemoglobin (HHb) and oxyhemoglobin (O2Hb). When carboxyhemoglobin (COHb) and methemoglobin (MetHb) are also present, four wavelengths are required to determine the ‘fractional SaO2’: i.e., (O2Hb × 100)/(Hb + O2Hb + COHb + MetHb). In the presence of elevated carboxyhemoglobin (COHb) levels, oximetry consistently over- estimated the true SaO2 70 by the amount of COHb present. Elevated methemoglobin (MetHb) levels also may cause inaccurate oximetry readings 71. Accordingly, multiwavelength oximeters that are capable of estimating blood levels of COHb and MetHb have recently been designed 72. In healthy volunteers, the accuracy of a multiwavelength oximeter (Masimo Rainbow-SET Rad-57 Pulse CO-oximeter; Masimo Corporation, Irvine, CA, USA) in measuring dyshemoglobins was evaluated by inducing carboxyhemoglobinemia (levels range from 0 % to 15 %) and methemoglobinemia (levels range from 0 % to 12 %) 72. Bias between COHb levels measured with the pulse CO-oximeter and COHb levels measured with the laboratory CO-oximeter (standard method) was −1.22 %; the corresponding precision was 2.19 %. Bias ± precision of MetHB measured with the pulse CO-oximeter and MetHb measured with the laboratory CO-oximeter was 0.0 % ± 0.45 %. The accuracy of pulse CO-oximeters in measuring COHb levels was also assessed during hypoxia 73. In 12 healthy volunteers, the pulse CO-oximeter was accurate in measuring COHb at an SaO2 of less than 95 % (bias of −0.7 % and precision of 4.0 %); however, when the SaO2 dropped below 85%, the pulse CO-oximeter was unable to measure COHb levels. In patients evaluated in the emergency department with suspected carbon monoxide poisoning, the bias between pulse CO-oximetric measurement of COHb and laboratory CO-oximetric measurement of COHb was less than 3 % 74. The limits of agreement between the measurements, however, were large (−11.6 % to 14.14 %) 75, leading some authors to conclude that these new pulse CO-oximeters may not be used interchangeably with standard laboratory measurements of COHb 76.

Anemia does not appear to affect the accuracy of pulse oximetry: in non-hypoxemic patients with acute anemia (mean Hb, 5.2 ± 0.3 g/dl), pulse oximetry was accurate in measuring O2 saturation with a bias of only 0.53% 77. However, in patients with sickle cell anemia presenting with acute vasoocclusive crisis 78, mean bias of pulse oximetry was 4.5% (in some patients it was as high as 8%), which was significantly greater than in a control group of patients without sickle cell anemia. Severe hyperbilirubinemia (mean bilirubin, 30.6 mg/dl) does not effect the accuracy of pulse oximetry 79.

Intravenous dyes such as methylene blue, indocyaninegreen, and indigocarmine can cause falsely low SpO2 readings 80, an effect that persists for up to 20 min 81. Nail polish, if blue, green or black, causes inaccurate SpO2 readings 82,whereas acrylic nails do not interfere with pulse oximetry readings 83. Falsely low and high SpO2 readings occur with fluorescent and xenon arc surgical lamps 84.

Motion artifact continues to be a significant source of error and false alarms 85. In a recent, prospective study in an intensive care unit (ICU) setting, SpO2 signals accounted for almost 86% of a total 2,942 false alarms 86. In 123 patients recovering from general or spinal-epidural anesthesia, 77% of pulse oximeter alarms were false in nature, which the investigators attributed to sensor displacement,motion artifact, and a decrease in skin perfusion 87. In this study, the alarm threshold was set at an SpO2 of 90% and it is not clear if a minimum duration was specified. A recent study in 647 patients in the recovery room compared the influence of two pulse oximeter lower alarm limit settings (SpO2 90% = group 90 and SpO2 85% = group 85) on the incidence of hypoxemia 88. Although the number of audible alarms wa slower in group 85, hypoxic episodes (defined asSpO2 ≤ 90% lasting > 1 min) were more common in group 90 than in group 85 (11 versus 6%, respectively). The investigators concluded that decreasing the alarm limit to reduce false alarms may lead to increase in more relevant episodes of hypoxemia.

Various methods have been employed to reject motion artifact but have met with little success 57. An innovative technological approach, termed Masimo signal extraction technology (SET™;Masimo Corporation, Mission Viejo, California, USA), was recently introduced to extract the true signal from artifact due to noise and low perfusion 89. This technique incorporates new algorithms for processing the pulse oximeter’s red and infrared light signals that enable the noise component, which is common to the two wavelengths, to be measured and subtracted. When tested in healthy volunteers during standardized motion, Masimo SET™ exhibited much lower error rates (defined as percentage of time that the oximeter error exceeded 5%, 7%, and 10%) and dropout rates (defined as the percentage of time that the oximeter provided no SpO2 data) than did the Nellcor N-200 and Nellcor N-3000 oximeters (Nellcor Puritan Bennett, Pleasanton, California, USA)for all test conditions 90. The lowest performance index (defined as the percentage of time that the oximeter’s value was within 7% of the control SpO2 value) was 97% for Masimo SET™ compared with 47% for the N-3000 and 68% for the N-200. In 50 postoperative patients, Dumas et al 91 observed that a pulse oximeter’s alarm frequency was decreased two fold with a Masimo SET™ system versus a conventional oximeter (Nellcor N-200). Improved performance was particularly striking during conditions of gross (non-rhythmic) motion and tremor, when a 22-fold reduction in signal loss over time was observed.

Inaccurate oximetry readings have been observed in pigmented patients, but not by all investigators 57. In 33 healthy black subjects during normoxia and hypoxia, the correlation between SpO2 and SaO2 was inferior with a Biox IIA oximeter (Ohmeda, Boulder, Colorado, USA) than with the older Hewlett-Packard (Waltham, Massachusetts, USA) (non-pulse) oximeter 92. In critically ill patients 65, bias ± precision was greater in black patients, 3.3 ± 2.7%, than in white patients, 2.2 ±1.8%; also, a bias > 4% occurred more frequently in black patients (27%) than in white patients (11%).

Low perfusion states, such as low cardiac output, vasoconstriction and hypothermia, may impair peripheral perfusion and may make it difficult for a sensor to distinguish a true signal from background noise. In cardiac surgery patients experiencing hypothermia and poor perfusion, only two of 20 oximeters (Criticare CSI 503, Criticare Systems, Inc., Milwaukee, Wisconsin, USA; DatexSatlite, Datex Instrumentarium Corp., Helsinki, Finland) provided measurements within ± 4% of the CO-oximeter value 93. Measurements of SpO2 with a Biox 3700 oximeter had a bias > ± 4% in 37% of patients receiving vasoactive therapy 94.

An under-recognized and worrisome problem with pulse oximetry is that many users have a limited understanding of how it functions and the implications of its measurements. In a recent survey 95, 30% of physicians and 93%of nurses thought that the oximeter measured PaO2. Some clinicians also have a limited knowledge of the Oxyhemoglobin Dissociation curve and they do not recognize that SpO2 values in the high 80s represent seriously low values of PaO2. In the above survey, some doctors and nurses were not especially worried about patients with SpO2 values as low as 80% (equivalent to PaO2 ≤ 45 mmHg).

References
  1. Jubran A. Pulse oximetry. Critical Care. 2015;19(1):272. doi:10.1186/s13054-015-0984-8. https://www.ncbi.nlm.nih.gov/pmc/articles/PMC4504215/
  2. Use of a pulse oximeter in an adult emergency department: impact on the number of arterial blood gas analyses ordered. Le Bourdellès G, Estagnasié P, Lenoir F, Brun P, Dreyfuss D. Chest. 1998 Apr; 113(4):1042-7. https://www.ncbi.nlm.nih.gov/pubmed/9554645/
  3. Jubran A. Pulse oximetry. Critical Care. 1999;3(2):R11-R17. doi:10.1186/cc341 https://www.ncbi.nlm.nih.gov/pmc/articles/PMC137227/
  4. Clayton DG, Webb RK, Ralston AC, Duthie D, Runciman WB. Pulse oximeter probes. A comparison between finger, nose, ear and forehead probes under conditions of poor perfusion. Anaesthesia. 1991;46:260–5. doi: 10.1111/j.1365-2044.1991.tb11492.x. https://www.ncbi.nlm.nih.gov/pubmed/2024741
  5. Branson RD, Mannheimer PD. Forehead oximetry in critically ill patients: the case for a new monitoring site. Respir Care Clin N Am. 2004;10:359–67. doi: 10.1016/j.rcc.2004.04.003 https://www.ncbi.nlm.nih.gov/pubmed/15458733
  6. Fernandez M, Burns K, Calhoun B, George S, Martin B, Weaver C. Evaluation of a new pulse oximeter sensor. Am J Crit Care. 2007;16:146–52. https://www.ncbi.nlm.nih.gov/pubmed/17322015
  7. Hodgson CL, Tuxen DV, Holland AE, Keating JL. Comparison of forehead Max-Fast pulse oximetry sensor with finger sensor at high positive end-expiratory pressure in adult patients with acute respiratory distress syndrome. Anaesth Intensive Care. 2009;37:953–60. https://www.aaic.net.au/document/?D=20090346
  8. Young D, Jewkes C, Spittal M, Blogg C, Weissman J, Gradwell D. Response time of pulse oximeters assessed using acute decompression. Anesth Analg. 1992;74:189–95. doi: 10.1213/00000539-199202000-00003
  9. Choi SJ, Ahn HJ, Yang MK, Kim CS, Sim WS, Kim JA, et al. Comparison of desaturation and resaturation response times between transmission and reflectance pulse oximeters. Acta Anaesthesiol Scand. 2010;54:212–7. doi: 10.1111/j.1399-6576.2009.02101.x https://www.ncbi.nlm.nih.gov/pubmed/19719816
  10. MacLeod DB, Cortinez LI, Keifer JC, Cameron D, Wright DR, White WD, et al. The desaturation response time of finger pulse oximeters during mild hypothermia. Anaesthesia. 2005;60:65–71. doi: 10.1111/j.1365-2044.2004.04033.x https://www.ncbi.nlm.nih.gov/pubmed/15601275
  11. Mannheimer, P.D. The light-tissue interaction of pulse oximetry. Anesth Analg. 2007; 105: S10–S17
  12. Sinex, J.E. Pulse oximetry: principles and limitations. Am J Emerg Med. 1999; 17: 59–67
  13. Berkenbosch, J.W. and Tobias, J.D. Comparison of a new forehead reflectance pulse oximeter sensor with a conventional digit sensor in pediatric patients. Respir Care. 2006; 51: 726–731
  14. Pulse oximetry: Understanding its basic principles facilitates appreciation of its limitations. Chan, Edward D. et al. Respiratory Medicine , Volume 107 , Issue 6 , 789 – 799 https://www.resmedjournal.com/article/S0954-6111(13)00053-X/fulltext
  15. Gladwin, M.T. and Vichinsky, E. Pulmonary complications of sickle cell disease. N Engl J Med. 2008; 359: 2254–2265
  16. Ortiz, F.O., Aldrich, T.K., Nagel, R.L., and Benjamin, L.J. Accuracy of pulse oximetry in sickle cell disease. Am J Respir Crit Care Med. 1999; 159: 447–451
  17. Fitzgerald, R.K. and Johnson, A. Pulse oximetry in sickle cell anemia. Crit Care Med. 2001; 29: 1803–1806
  18. Ahmed, S., Siddiqui, A.K., Sison, C.P., Shahid, R.K., and Mattana, J. Hemoglobin oxygen saturation discrepancy using various methods in patients with sickle cell vaso-occlusive painful crisis. Eur J Haematol. 2005; 74: 309–314
  19. Abdu, A., Gómez-Márquez, J., and Aldrich, T.K. The oxygen affinity of sickle hemoglobin. Respir Physiol Neurobiol. 2008; 161: 92–94
  20. Secker, C. and Spiers, P. Accuracy of pulse oximetry in patients with low systemic vascular resistance. Anaesthesia. 1997; 52: 127–130 https://www.ncbi.nlm.nih.gov/pubmed/9059094
  21. Agashe, G.S., Coakley, J., and Mannheimer, P.D. Forehead pulse oximetry: headband use helps alleviate false low readings likely related to venous pulsation artifact. Anesthesiology. 2006; 105: 1111–1116
  22. Ortega, R., Hansen, C.J., Elterman, K., and Woo, A. Videos in clinical medicine. Pulse oximetry. N Engl J Med. 2011; 364: e33
  23. Scheller, M.S., Unger, R.J., and Kelner, M.J. Effects of intravenously administered dyes on pulse oximetry readings. Anesthesiology. 1986; 65: 550–552
  24. Sarikonda, K.V., Ribeiro, R.S., Herrick, J.L., and Hoyer, J.D. Hemoglobin lansing: a novel hemoglobin variant causing falsely decreased oxygen saturation by pulse oximetry. Am J Hematol. 2009; 84: 541
  25. Zur, B., Hornung, A., Breuer, J., Doll, U., Bernhardt, C., Ludwig, M. et al. A novel hemoglobin, Bonn, causes falsely decreased oxygen saturation measurements in pulse oximetry. Clin Chem. 2008; 54: 594–596
  26. Gottschalk, A. and Silverberg, M. An unexpected finding with pulse oximetry in a patient with hemoglobin Köln. Anesthesiology. 1994; 80: 474–476
  27. Mariette, S., Leteurtre, S., Lambilliotte, A., and Leclerc, F. Pulse oximetry and genetic hemoglobinopathies. Intensive Care Med. 2005; 31: 1597
  28. Hohl, R.J., Sherburne, A.R., Feeley, J.E., Huisman, T.H., and Burns, C.P. Low pulse oximeter-measured hemoglobin oxygen saturations with hemoglobin Cheverly. Am J Hematol. 1998; 59
  29. Katoh, R., Miyake, T., and Arai, T. Unexpectedly low pulse oximeter readings in a boy with unstable hemoglobin Köln. Anesthesiology. 1994; 80: 472–474
  30. Coté, C.J., Goldstein, A., Fuchsman, W.H., and Hoaglin, D.C. The effect of nail polish on pulse oximetry. Anesth Analg. 1988; 67: 683–686
  31. Hinkelbein, J., Genzwuerker, H.V., Sogl, R., and Fiedler, F. Effect of nail polish on oxygen saturation determined by pulse oximetry in critically ill patients. Resuscitation. 2007; 72: 82–91
  32. McGuire, T.J. and Pointer, J.E. Evaluation of a pulse oximeter in the prehospital setting. Ann Emerg Med. 1988; 17: 1058–1062
  33. Schmitt, J.M. Simple photon diffusion analysis of the effects of multiple scattering on pulse oximetry. IEEE Trans Biomed Eng. 1991; 38: 1194–1203
  34. Lee, S., Tremper, K.K., and Barker, S.J. Effects of anemia on pulse oximetry and continuous mixed venous hemoglobin saturation monitoring in dogs. Anesthesiology. 1991; 75: 118–122
  35. Severinghaus, J.W. and Koh, S.O. Effect of anemia on pulse oximeter accuracy at low saturation. J Clin Monit. 1990; 6: 85–88
  36. Pretto JJ, Roebuck T, Beckert L, Hamilton G. Clinical use of pulse oximetry: official guidelines from the Thoracic Society of Australia and New Zealand. Respirology. 2014;19:38–46. doi: 10.1111/resp.12204
  37. Moller JT, Johannessen NW, Espersen K, Ravlo O, Pedersen BD, Jensen PF, et al. Randomized evaluation of pulse oximetry in 20,802 patients: II. Perioperative events and postoperative complications. Anesthesiology. 1993;78:445–53. doi: 10.1097/00000542-199303000-00007 https://www.ncbi.nlm.nih.gov/pubmed/8457045
  38. Ehrenfeld JM, Funk LM, Van Schalkwyk J, Merry AF, Sandberg WS, Gawande A. The incidence of hypoxemia during surgery: evidence from two institutions. Can J Anaesth. 2010;57:888–97. doi: 10.1007/s12630-010-9366-5 https://www.ncbi.nlm.nih.gov/pmc/articles/PMC2991088/
  39. Hare GM, Kavanagh BP. Hypoxemia during surgery: learning from history, science, and current practice. Can J Anaesth. 2010;57:877–81. doi: 10.1007/s12630-010-9367-4
  40. Gallagher SF, Haines KL, Osterlund LG, Mullen M, Downs JB. Postoperative hypoxemia: common, undetected, and unsuspected after bariatric surgery. J Surg Res. 2010;159:622–6. doi: 10.1016/j.jss.2009.09.003
  41. Jubran A, Tobin MJ. Reliability of pulse oximetry in titrating supplemental oxygen therapy in ventilator-dependent patients. Chest. 1990;97:1420–5. doi: 10.1378/chest.97.6.1420
  42. Rice TW, Wheeler AP, Bernard GR, Hayden DL, Schoenfeld DA, Ware LB, et al. Comparison of the SpO2/FIO2 ratio and the PaO2/FIO2 ratio in patients with acute lung injury or ARDS. Chest. 2007;132:410–7. doi: 10.1378/chest.07-0617
  43. Tripathi RS, Blum JM, Rosenberg AL, Tremper KK. Pulse oximetry saturation to fraction inspired oxygen ratio as a measure of hypoxia under general anesthesia and the influence of positive end-expiratory pressure. J Crit Care. 2010;25:542.e9-13. doi: 10.1016/j.jcrc.2010.04.009
  44. Pandharipande PP, Shintani AK, Hagerman HE, St Jacques PJ, Rice TW, Sanders NW, et al. Derivation and validation of Spo2/Fio2 ratio to impute for Pao2/Fio2 ratio in the respiratory component of the Sequential Organ Failure Assessment score. Crit Care Med. 2009;37:1317–21. doi: 10.1097/CCM.0b013e31819cefa9
  45. Janssen, W.J., Dhaliwal, G., Collard, H.R., and Saint, S. Clinical problem-solving. Why “why” matters. N Engl J Med. 2004; 351: 2429–2434
  46. Lu, H.C., Shih, R.D., Marcus, S., Ruck, B., and Jennis, T. Pseudomethemoglobinemia: a case report and review of sulfhemoglobinemia. Arch Pediatr Adolesc Med. 1998; 152: 803–805
  47. Park, C.M. and Nagel, R.L. Sulfhemoglobinemia. Clinical and molecular aspects. N Engl J Med. 1984; 310: 1579–1584
  48. Aravindhan, N. and Chisholm, D.G. Sulfhemoglobinemia presenting as pulse oximetry desaturation. Anesthesiology. 2000; 93: 883–884
  49. Gharahbaghian, L., Massoudian, B., and Dimassa, G. Methemoglobinemia and sulfhemoglobinemia in two pediatric patients after ingestion of hydroxylamine sulfate. West J Emerg Med. 2009; 10: 197–201
  50. Broome, I.J., Mills, G.H., Spiers, P., and Reilly, C.S. An evaluation of the effect of vasodilatation on oxygen saturations measured by pulse oximetry and venous blood gas analysis. Anaesthesia. 1993; 48: 415–416
  51. Wilson, B.J., Cowan, H.J., Lord, J.A., Zuege, D.J., and Zygun, D.A. The accuracy of pulse oximetry in emergency department patients with severe sepsis and septic shock: a retrospective cohort study. BMC Emerg Med. 2010; 10: 9
  52. Moller JT, Johannessen NW, Espersen K, Ravlo O, Pedersen BD, Jensen PF, et al. Randomized evaluation of pulse oximetry in 20,802 patients: II. Perioperative events and postoperative complications. Anesthesiology. 1993;78:445–53. doi: 10.1097/00000542-199303000-00007
  53. Ochroch EA, Russell MW, Hanson WC, 3rd, Devine GA, Cucchiara AJ, Weiner MG, et al. The impact of continuous pulse oximetry monitoring on intensive care unit admissions from a postsurgical care floor. Anesth Analg. 2006;102:868–75. doi: 10.1213/01.ane.0000195583.76486.c4
  54. Shah A, Shelley KH. Is pulse oximetry an essential tool or just another distraction? The role of the pulse oximeter in modern anesthesia care. J Clin Monit Comput. 2013;27:235–42. doi: 10.1007/s10877-013-9428-7
  55. Jubran A, Tobin MJ. Monitoring during mechanical ventilation. In: Tobin MJ, editor. Principles and Practice of Mechanical Ventilation. New York: McGraw-Hill, Inc; 2013. pp. 261–87.
  56. Pedersen T, Nicholson A, Hovhannisyan K, Moller AM, Smith AF, Lewis SR. Pulse oximetry for perioperative monitoring. Cochrane Database Syst Rev. 2014;3
  57. Jubran A. Pulse oximetry. Tobin MJ (ed). Principles and Practice of Intensive Care Monitoring. New York: McGraw Hill, Inc.; 1998:261–287.
  58. Pulse oximetry. Jubran A. Crit Care. 1999; 3(2):R11-R17. https://www.ncbi.nlm.nih.gov/pmc/articles/PMC137227/
  59. Pulse oximetry. Tremper KK, Barker SJ. Anesthesiology. 1989 Jan; 70(1):98-108. http://anesthesiology.pubs.asahq.org/article.aspx?articleid=1953302
  60. Ralston AC, Webb RK, Runciman WB. Potential errors in pulse oximetry. I. Pulse oximeter evaluation. Anaesthesia. 1991;46:202–206. https://www.ncbi.nlm.nih.gov/pubmed/2014898
  61. Nickerson BG, Sarkisian C, Tremper KK. Bias and precision of pulse oximeters and arterial oximeters. Chest. 1988;93:515–517. https://www.ncbi.nlm.nih.gov/pubmed/3342658
  62. Webb RK, Ralston AC, Runciman WB. Potential errors in pulse oximetry. II. Effects of changes in saturation and signal quality. . Anaesthesia. 1991;96:207–212. https://www.ncbi.nlm.nih.gov/pubmed/2014899
  63. Severinghaus JW, Naifeh KH, Koh SO. Errors in 14 pulse oximeters during profound hypoxemia. J Clin Monit. 1989;5:72–81. https://www.ncbi.nlm.nih.gov/pubmed/2723709
  64. Emergency Care Research Institute Pulse oximeters. . Health Devices. 1989;18:185–230. https://www.ncbi.nlm.nih.gov/pubmed/2485835
  65. Jubran A, Tobin MJ. Reliability of pulse oximetry in titrating supplemental oxygen therapy in ventilator-dependent patients. Chest . 1990;97:1420–1425. https://www.ncbi.nlm.nih.gov/pubmed/2347228
  66. Clayton D, Webb RK, Ralston AC, Duthie D, Runciman WB. Pulse oximeter probes: a comparison between finger, nose, ear, and forehead probes under conditions of poor perfusion. Anaesthesia. 1991;46:260–265. https://www.ncbi.nlm.nih.gov/pubmed/2024741
  67. Severinghaus JW, Naifeh KH. Accuracy of response of six pulse oximeters to profound hypoxia. Anesthesiology. 1987;67:551–558. https://www.ncbi.nlm.nih.gov/pubmed/3662082
  68. Young D, Jewkes C, Spittal M, Blogg C, Weissman J, Gradwell D. Response time of pulse oximeters assessed using acute decompression. . Anesth Analg. 1992;74:189–195. https://www.ncbi.nlm.nih.gov/pubmed/1731536
  69. Jubran A, Tobin MJ. Monitoring during mechanical ventilation. . Clin Chest Med. 1996;17:453–473. https://www.ncbi.nlm.nih.gov/pubmed/8875007
  70. Buckley RG, Aks SE, Eshom JL, Rydman R, Schnaider J, Shayne P. The pulse oximeter gap in carbon monoxide intoxication. Ann Emerg Med. 1994;24:252–255. https://www.ncbi.nlm.nih.gov/pubmed/8037391
  71. Barker SJ, Tremper KK, Hyatt J. Effects of methemoglobinemia on pulse oximetry and mixed-venous oximetry. Anesthesiology. 1989;70:112–117. https://www.ncbi.nlm.nih.gov/pubmed/2912291
  72. Measurement of carboxyhemoglobin and methemoglobin by pulse oximetry: a human volunteer study. Barker SJ, Curry J, Redford D, Morgan S. Anesthesiology. 2006 Nov; 105(5):892-7. https://www.ncbi.nlm.nih.gov/pubmed/17065881/
  73. Feiner JR, Rollins MD, Sall JW, Eilers H, Au P, Bickler PE. Accuracy of carboxyhemoglobin detection by pulse CO-oximetry during hypoxemia. Anesth Analg. 2013;117:847–58. doi: 10.1213/ANE.0b013e31828610a0 https://www.ncbi.nlm.nih.gov/pmc/articles/PMC4476500/
  74. Sebbane M, Claret PG, Mercier G, Lefebvre S, Thery R, Dumont R, et al. Emergency department management of suspected carbon monoxide poisoning: role of pulse CO-oximetry. Respir Care. 2013;58:1614–20. doi: 10.4187/respcare.02313
  75. Touger M, Birnbaum A, Wang J, Chou K, Pearson D, Bijur P. Performance of the RAD-57 pulse CO-oximeter compared with standard laboratory carboxyhemoglobin measurement. Ann Emerg Med. 2010;56:382–8. doi: 10.1016/j.annemergmed.2010.03.041
  76. Maisel WH, Lewis RJ. Noninvasive measurement of carboxyhemoglobin: how accurate is accurate enough? Ann Emerg Med. 2010;56:389–91. doi: 10.1016/j.annemergmed.2010.05.025
  77. Jay GD, Hughes L, Renzi FP. Pulse oximetry is accurate in acute anemia from hemorrhage. Ann Emerg Med. 1994;24:32–35. https://www.ncbi.nlm.nih.gov/pubmed/8010546
  78. Comber JT, Lopez BL. Evaluation of pulse oximetry in sickle cell anemia patients presenting to the emergency department in acute vasoocclusive crisis. Am J Emerg Med. 1996;14:16–18. https://www.ncbi.nlm.nih.gov/pubmed/8630147
  79. Chelluri L, Snyder JV, Bird JR. Accuracy of pulse oximetry in patients with hyperbilirubinemia. Respir Care. 1991;36:1383–1386.
  80. Scheller MS, Unger RJ, Kelner MJ. Effects of intravenously administered dyes on pulse oximetry readings. Anesthesiology. 1986;65:550–552. https://www.ncbi.nlm.nih.gov/pubmed/3777490
  81. Saito S, Fukura H, Shimada H, Fujita T. Prolonged interference of blue dye “patent blue” with pulse oximetry readings. Acta Anaesthesiol Scand. 1995;89:268–269. https://www.ncbi.nlm.nih.gov/pubmed/7793197
  82. Cote CJ, Goldstein EA, Fuchsman WH, Hoaglin DC. The effect of nail polish on pulse oximetry. Anesth Analg. 1989;67:683–686. https://www.ncbi.nlm.nih.gov/pubmed/3382042
  83. Edelist G. Acrylic nails and pulse oximetry [letter]. Anesth Analg. 1995;81:882–891.
  84. Amar D, Neidzwski J, Wald A, Finck AD. Fluorescent light interferes with pulse oximetry. J Clin Monit. 1989;5:135–136. https://www.ncbi.nlm.nih.gov/pubmed/2656924
  85. Reich DL, Timcenko A, Bodian CA, et al. Predictors of pulse oximetry data failure. Anesthesiology. 1996;84:859–864. https://www.ncbi.nlm.nih.gov/pubmed/8638840
  86. Tsien CL, Fackler JC. Poor prognosis for existing monitors in the intensive care unit. Crit Care Med. 1997;25:614–619. https://www.ncbi.nlm.nih.gov/pubmed/9142025
  87. Wiklund L, Hok B, Stahl K, Jordeby-Johnson A. Postanthesia monitoring revisited: frequency of true and false alarms from different monitoring devices. J Clin Anesth. 1994;6:182–188. https://www.ncbi.nlm.nih.gov/pubmed/8060626
  88. Rheineck-leyssius AT, Kalkman CJ. Influence of pulse oximeter lower alarm limit on the incidence of hypoxaemia in the recovery room. . Br J Anaesth. 1997;79:460–464. https://bjanaesthesia.org/article/S0007-0912(17)39819-7/pdf
  89. Pollard V, Prough DS. Signal extraction technology: a better mousetrap? [Editorial]. Anesth Analg. 1996;83:213–214. https://www.ncbi.nlm.nih.gov/pubmed/8694294
  90. Barker SJ, Shah NK. Effects of motion on the performance of pulse oximeters in volunteers. Anesthesiology. 1997;86:101–108. https://www.ncbi.nlm.nih.gov/pubmed/9009945
  91. Dumas C, Wahr JA, Tremper KK. Clinical evaluation of a prototype motion artifact resistant pulse oximeter in the recovery room. . Anesth Analg. 1996;83:269–272. https://www.ncbi.nlm.nih.gov/pubmed/8694304
  92. Zeballos RJ, Weisman IM. Reliability of noninvasive oximetry in black subjects during exercise and hypoxia. Am Rev Respir Dis. 1991;144:1240–1244. https://www.ncbi.nlm.nih.gov/pubmed/1741533
  93. Clayton D, Webb RK, Ralston AC, Duthie D, Runciman WB. A comparison of the performance of 20 pulse oximeters under conditions of poor perfusion. Anaesthesia. 1991;46:3–10. https://www.ncbi.nlm.nih.gov/pubmed/1996749
  94. Ibanez J, Velasco J, Raurich JM. The accuracy of the Biox 3700 pulse oximeter in patients receiving vasoactive therapy. Intensive Care Med. 1991;17:484–486. https://www.ncbi.nlm.nih.gov/pubmed/1797894
  95. Stoneham MD, Saville GM, Wilson IH. Knowledge about pulse oximetry among medical and nursing staff. Lancet. 1994;344:1339–1342. https://www.ncbi.nlm.nih.gov/pubmed/7968031
read more
Procedures

Chemical peel

chemical peel

What is a facial chemical peel

A chemical peel also called chemexfoliation or derma peeling, is a skin-resurfacing cosmetic procedure in which a chemical solution is brushed to the skin to remove dead skin cells and stimulate the growth of new skin cells. The skin that grows back after a chemical peel is smoother and younger looking. The aim of chemical peel procedure is to improve the appearance of your facial skin – for example, by reducing age spots and evening out skin tone. A chemical peel can diminish many signs of aging on the face as well as the hands, neck, and chest.

Chemical peels also treat some skin conditions. Dermatologists use chemical peels to treat some types of acne and conditions that discolor the skin.

Dermatologists use chemical peels to treat:

  • Acne (some types).
  • Age spots.
  • Discoloration (blotchy complexion, uneven skin tone).
  • Dull complexion.
  • Fine lines (especially under the eyes and around the mouth).
  • Freckles.
  • Melasma.
  • Rough-feeling skin.
  • Sun-damage skin.

A chemical peel may be performed in the doctor’s surgery or day-care facility. Chemical peels are considered a cosmetic treatment. Insurance does not cover the cost of cosmetic treatments.

Chemical peels are used to treat wrinkles, skin discoloration and scars — typically on the face. A chemical peel can be done alone or in combination with other cosmetic procedures.

Chemical peels can be done at different depths — light, medium or deep — depending on your desired results. Each type of chemical peel uses a different chemical solution. Deeper chemical peels produce more-dramatic results, but also involve longer recovery times.

A chemical peel can be used to treat various skin problems. Depending on the issues you’re addressing with the procedure, you’ll choose a chemical peel in one of three depths:

  • Light chemical peel. A light (superficial) chemical peel removes the outer layer of skin (epidermis). It can be used to treat fine wrinkles, acne, uneven skin tone and dryness. You might have a light chemical peel as often as every two to five weeks — depending on your desired results.
  • Medium chemical peel. This type of chemical peel removes skin cells from the epidermis and from portions of the upper part of your middle layer of skin (dermis). A medium chemical peel can treat wrinkles, acne scars and uneven skin tone. You might repeat a medium chemical peel after three to nine months to maintain results.
  • Deep chemical peel. A deep chemical peel removes skin cells from the epidermis and from portions of the mid to lower layer of your dermis. Your doctor might recommend a deep chemical peel if you have deeper wrinkles, scars or precancerous growths. A deep chemical peel can only be performed once.

Superficial and medium chemical peels are usually safe, provided they’re administered correctly. Deeper chemical peels are more risky. Deep chemical peels are now rarely performed and have been largely replaced by laser ablation.

Chemical peels can be expensive and have their limitations. The effects of a superficial or medium chemical peel aren’t permanent. The effects of a deeper chemical peel are long-lasting, but this is much more expensive, painful and risky.

Take time to find a reputable practitioner who is properly qualified and practices in a clean, safe and appropriate environment. Ask the practitioner what you should do if something were to go wrong.

The practitioner carrying out the procedure should advise how you can reduce your risk of side effects and complications.

A chemical peel is typically done in an office-based procedure room or outpatient surgical facility. Before the procedure, your doctor will clean your face and might cover your eyes with ointment, gauze, tape or goggles. He or she might also protect your hair.

Pain relief isn’t typically needed for a light chemical peel. If you’re having a medium chemical peel, you might have the option of taking a sedative and a painkiller.

If you’re having a deep chemical peel, your doctor will likely numb your skin with a local anesthetic and give you a sedative or use regional anesthesia — which numbs a certain part of your body.

As it heals, your skin would also be more sensitive to the sun, so you need to use sunscreen for at least a month after treatment.

Chemical Peel Warning

The results you see after getting a chemical peel depend largely on the skill of the person performing the peel. To protect your health and get the results you seek, you should see a dermatologist or dermatologic surgeon. These doctors have in-depth knowledge of the skin.

What to do if you have problems

If you’re not happy with the results or are experiencing problems, take up the matter with your practitioner through the clinic where you were treated.

If there are any complications that require medical attention, it is best that you go back to the practitioner who treated you. If this is not possible, you can go to your doctor or local accident and emergency department.

Is there downtime after a chemical peel?

After a medium or deep chemical peel, you will have downtime. A deep chemical peel requires recuperation at home for 2 to 3 weeks.

When will I see the results after a chemical face peel?

Once your skin heals, you will see the results. Healing time ranges from 1 day for a refreshing or lunchtime chemical peel to 14 days or longer for a deep chemical peel. To get the results you seek from a refreshing chemical peel or lunchtime chemical peel, you may need to have 3 to 5 peels.

How long will the chemical peel results last?

Most results are not permanent because your skin continues to age. If you have lots of sun-damaged skin or precancerous skin growths called actinic keratosis, you will likely continue to see new spots and growths on your skin.

How many treatments are needed?

Superficial peels are typically performed between 3 to 6 times, spaced every two weeks or so apart.

Most people are pleased with the result from a single medium-depth peel.

When is it safe to have another chemical peel?

To maintain results, you can repeat mild and medium chemical peels. Your dermatologist can tell you how often you can have a repeat treatment. A person can have only one deep chemical peel.

What is the safety record for chemical peels?

Dermatologists have been performing chemical peels for more than 50 years, with an excellent safety record.

Even people who have skin of color can safely have a chemical peel — but they should see a dermatologist who has expertise using chemical peels to treat darker skin tones. Without this knowledge, people who have skin of color (i.e., African American, Asian, Latino) can develop permanent pigment problems.

Can a chemical peel be combined with other procedures?

A chemical peel may be combined with other procedures to improve contour and texture of skin. Procedures such as laser treatment, injectable filling agents and muscle relaxants are often combined with chemical peels. Laser ablation may be performed to treat more heavily wrinkled areas or for pitted scarring. Filling agent injections may be required to touch up wrinkles and scars.

Chemical peel benefits

Chemical peels can improve and smooth the texture of facial skin by removing damaged outer layers and can be helpful in treating dull facial texture and color, fine wrinkles around the eyes and mouth, uneven pigmentation (solar lentigines, or “sun spots”), melasma, mild acne, and even precancerous lesions (i.e., actinic keratoses).

Whether you receive a chemical peel to diminish signs of aging or treat a skin condition, you can see:

  • Fewer lines and wrinkles.
  • More even skin color.
  • Brighter complexion.
  • Smoother skin.

A light chemical peel can improve skin texture and tone, as well as decrease the appearance of fine wrinkles. The results will be subtle at first, but will increase with repeated treatments. After a light chemical peel, avoid sun exposure until new skin completely covers the treated area.

If you have a medium chemical peel, treated skin will be noticeably smoother after the procedure. Your doctor will recommend avoiding sun exposure for several months.

After a deep chemical peel, you’ll see a dramatic improvement in the look and feel of treated areas. You’ll need to protect your skin from the sun permanently to prevent changes in skin color.

Keep in mind that chemical peel results might not be permanent. As you age you’ll continue to acquire lines by squinting and smiling. New sun damage also can reverse your results and cause changes in your skin color.

What chemical peels cannot do

  • Chemical peels cannot tighten loose skin; such change may require a surgical procedure e.g. a face-lift.
  • Chemical peels cannot improve deep scarring. Laser treatment and other procedures are more effective.
  • Chemical peels cannot always totally remove hyperpigmentation in dark-skinned people of Caucasian or Asian background and may not be indicated.
  • Chemical peels cannot remove broken blood vessels on the face.

The Skin

The skin (integument) is the body’s largest and heaviest organ. In adults, the skin covers an area of 1.5 to 2.0 m2 and accounts for about 15% of the body weight.

The skin consists of two layers:

  1. a stratified squamous epithelium called the Epidermis and
  2. a deeper connective tissue layer called the Dermis (Figure 1).

Figure 1. Skin structure

skin structure and layers

Below the dermis is another connective tissue layer, the hypodermis, which is not part of the skin but is customarily studied in conjunction with it. Most of the skin is 1 to 2 mm thick, but it ranges from less than 0.5 mm on the eyelids to 6 mm between the shoulder blades. The difference is due mainly to variation in thickness of the dermis, although skin is classified as thick or thin based on the relative thickness of the epidermis alone.

Thick skin covers the palms, soles, and corresponding surfaces of the fingers and toes. Its epidermis alone is about 0.5 mm thick, due to a very thick surface layer of dead cells called the stratum corneum (see Figure 2). Thick skin has sweat glands but no hair follicles or sebaceous (oil) glands. The rest of the body is covered with thin skin, which has an epidermis about 0.1 mm thick, with a thin stratum corneum. It possesses hair follicles, sebaceous glands, and sweat glands.

The accessory structures include hair, nails, and a variety of multicellular exocrine glands. These structures are located in the dermis and protrude through the epidermis to the surface.

Figure 2. Structure and skin cells of the Epidermis

structure of epidermis

Functions of the skin

The skin is much more than a container for the body. It has a variety of very important functions that go well beyond appearance, as you shall see here.

  1. Resistance to trauma and infection. The skin suffers the most physical injuries to the body, but it resists and recovers from trauma better than other organs do. The epidermal cells are packed with the tough protein keratin and linked by strong desmosomes that give this epithelium its durability. Few infectious organisms can penetrate the intact skin. Bacteria and fungi colonize the surface, but their numbers are kept in check by its relative dryness, its slight acidity (pH 4–6), and defensive antimicrobial peptides called dermcidin and defensins. The protective acidic film is called the acid mantle.
  2. Other barrier functions. The skin is important as a barrier to water. It prevents the body from absorbing excess water when you are swimming or bathing, but even more importantly, it prevents the body from losing excess water. The epidermis is also a barrier to ultraviolet (UV) rays, blocking much of this cancer causing radiation from reaching deeper tissue layers; and it is a barrier to many potentially harmful chemicals. It is, however, permeable to several drugs and poisons.
  3. Vitamin D synthesis. The skin carries out the first step in the synthesis of vitamin D, which is needed for bone development and maintenance. The liver and kidneys complete the process.
  4. Sensation. The skin is our most extensive sense organ. It is equipped with a variety of nerve endings that react to heat, cold, touch, texture, pressure, vibration, and tissue injury. These sensory receptors are especially abundant on the face, palms, fingers, soles, nipples, and genitals. There are relatively few on the back and in skin overlying joints such as the knees and elbows.
  5. Thermoregulation. The skin receives 10 times as much blood flow as it needs for its own maintenance, and is richly supplied with nerve endings called thermoreceptors, which monitor the body surface temperature. All of this relates to its great importance in regulating body temperature. In response to chilling, the body retains heat by constricting blood vessels of the dermis (cutaneous vasoconstriction), keeping warm blood deeper in the body. In response to overheating, it loses excess heat by dilating those vessels (cutaneous vasodilation), allowing more blood to flow close to the surface and lose heat through the skin. If this is insufficient to restore normal temperature, sweat glands secrete perspiration. The evaporation of sweat can have a powerful cooling effect. Thus, the skin plays roles in both warming and cooling the body.
  6. Nonverbal communication. The skin is an important means of nonverbal communication. Humans, like most other primates, have much more expressive faces than other mammals. Complex skeletal muscles insert in the dermis and pull on the skin to create subtle and varied facial expressions. The general appearance of the skin, hair, and nails is also important to social acceptance and to a person’s self-image and emotional state—whether the ravages of adolescent acne, the presence of a birthmark or scar, or just a “bad hair day.”

Who is the ideal candidate for chemical peel

Before you have a chemical peel, your doctor will likely:

  • Review your medical history. Be prepared to answer questions about current and past medical conditions — especially any heart, kidney or liver conditions if you’re considering a deep chemical peel. Tell your doctor about any medications you’re taking or have taken recently — particularly those that might make your skin sensitive to the sun — as well as any cosmetic procedures you’ve had in the past. Be sure to tell your doctor if you’ve been using a retinoid cream such as tretinoin (Renova, Retin-A, others), which can enhance the penetration of some chemical peels.
  • Do a physical exam. Your doctor will inspect your skin and the area to be treated. This will help him or her determine what type of chemical peel you might benefit from most and how your physical features — for example, the tone and thickness of your skin — might affect your results.
  • Discuss your expectations. Talk with your doctor about your motivations and expectations, as well as the potential risks. Make sure you understand how many treatments you might need, how long it will take to heal and what your results might be.
  • Before getting a chemical peel, some patients need to follow a pre-peel skin care plan for 2 to 4 weeks. This plan can improve results and reduce potential side effects. Your dermatologist will tell you whether this is necessary.

Precautionary medications

If you decide to proceed with the chemical peel, you might also need to:

  • Take antiviral medication. If you have a history of herpes infections around your mouth, your doctor will likely prescribe an antiviral medication before and after treatment to help prevent a viral infection.
  • Use a retinoid cream. If you’re having a light or medium chemical peel, your doctor might recommend using a retinoid cream, such as tretinoin (Renova, Retin-A, others), beforehand to shorten your treatment time and speed the healing process.
  • Use a bleaching agent. Your doctor might recommend using a bleaching agent (hydroquinone) and a retinoid cream before or after the procedure to prevent skin darkening.

Safety measures

  • Avoid unprotected sun exposure. It’s important to consistently use sunscreen at least four weeks before the procedure to help prevent irregular pigmentation in treated areas. Discuss sun protection and acceptable sun exposure with your doctor.
  • Avoid certain cosmetic treatments and certain types of hair removal. About a week before the peel, stop waxing or using depilatory hair-removal products. Also, avoid bleaching, massages or facial scrubs in the week before your peel.
  • Arrange for a ride home. If you’ll be sedated during a medium or deep chemical peel, you’ll need help getting home after the procedure.

What does a chemical peel do

A facial chemical peel causes the even, controlled shedding of sev­eral layers of damaged skin cells to leave a new fresh layer of skin which has a more even texture and color.

Superficial peels are usually well tolerated without the need for any pain medication. Discomfort may be decreased by using a fan during the peel or by taking two aspirin an hour beforehand. Medium-depth peels will require stronger pain relief, often in the form of a short general anaesthetic.

Initially the skin is cleaned with a liquid soap and then further prepared with alcohol or acetone to remove all oils and grease from the skin surface. Make-up should not be worn on the day of a chemical peel.

The chemical solution is applied in either a single layer or sometimes several layers. Immediately after application, a stinging sensation may be experienced, which subsides within 5 to 10 minutes. The solution stays on the skin for a variable period of time, as determined by the practitioner, after which it is removed either with water or a neutralizer. It can be removed earlier if excessive discomfort is experienced.

Chemical peel solutions

The mildest form of chemical peel uses alpha-hydroxy acids (AHA) and improves the texture of rough or sun-damaged skin. Examples of alpha-hydroxy acids (AHA) chemical peels include glycolic, lactic, citric, tartaric, and malic acid. These mild acids remove only the outermost layers of the skin and can be useful in treating acne.

Most popular over-the-counter chemical peels use 3–5% glycolic acids, but medical-grade glycolic acid peels generally use 50–70% glycolic acid. The most common anticipated effects with these treatments are a temporary stinging sensation, mild irritation or redness that usually subsides quickly, and peeling and redness that last for several days after the procedure.

Beta-hydroxy acid (BHA) chemical peels that use salicylic acid (the major component of aspirin) penetrate deeply into the oil gland and so are equally or slightly more effective than alpha-hydroxy acids (AHA) for acne. Further, beta-hydroxy acid (BHA) peels generally cause slightly less peeling and redness than AHA peels. Another type of superficial peel is the Jessner’s peel, which is a combination of salicylic acid (a BHA), lactic acid (an AHA), and resorcinol.

Medium-strength chemical peels use trichloroacetic acid (TCA) at 35% or above to smooth and soften fine surface wrinkles, restore a healthy complexion, and treat superficial blemishes and pigment problems. A very common practice is to combine a Jessner’s peel with trichloroacetic acid (TCA). A medium peel is the preferred treatment for more severe cases of melasma (the dark, blotchy lesions on cheeks due to pregnancy or oral contraceptive pills) and sun damage. However, as trichloroacetic acid (TCA) chemical peels affect the deeper skin structures and are more penetrating than superficial peels, trichloroacetic acid (TCA) should be selected for only certain skin types, as trichloroacetic acid (TCA) chemical peels may produce unintended color changes (unnatural lightening or darkening) in the skin and involve significant prolonged redness and some crusting or peeling, sometimes for up to several weeks.

Stronger chemical peels use phenol acid and generally take more recovery time than other chemical peels. Peeling and crusting can be more pronounced. Deep chemical peels are recommended for coarse wrinkles; severely blotchy, sun-damaged skin; and precancerous growths. They can cause permanent darkening or lightening of the skin, and they are not recommended for darker skin tones. Deep chemical peels can pose a pronounced risk for those with a family history of heart disease and usually involve anesthesia, which may have complications.

The vast majority of those who have chemical peels suffer no serious side effects and enjoy a gratifying outcome. So, putting first things first – including your fears – you need to be clear about the benefit and overall effect that you are looking for. Then, work with your dermatologist to learn everything you can about the best peel for you and what to expect afterward. Finally, assess your “fear level” from an informed viewpoint to make the best decision for you.

Superficial chemical peels

  • skin cells removed from the top layer of skin (epidermis)
  • left on the skin for a few minutes
  • skin may feel tight for a couple of hours afterwards
  • regular treatment needed to maintain the effects

Medium chemical peels

  • skin cells removed from the top and middle layers of skin
  • left on the skin for a few minutes
  • a burning or stinging sensation may be felt when the peel is applied
  • skin may go brown or red in the days afterwards
  • it can take up to six weeks for the skin to return to normal
  • treatment is needed every 6 to 12 months to maintain the effects

Deep chemical peels

  • affect deeper layers of skin
  • a local anaesthetic and sedative may be needed
  • a freezing sensation may be felt when the peel is applied
  • can be left on the face for 30 minutes or more, depending on the desired effect
  • your heart and blood pressure need to be monitored as phenol, the chemical used, can cause dangerous effects on the heart and kidneys
  • expect some peeling, redness and discomfort for a few days
  • swelling can last up to two weeks
  • skin redness can last up to three months
  • often results in lightening of the skin, so it’s not really suitable for darker skin
  • it’s a one-off treatment with lasting effects, so doesn’t usually need to be repeated

Chemical peel process

On the day of your peel, you will first be prepped for the treatment. This includes cleansing your skin thoroughly. If you will have a deep chemical peel, you will receive general anesthesia, which will put you to sleep. A deep chemical peel must be performed in a surgical setting.

After you are prepped, your dermatologist will apply the chemical peel quickly and evenly. Your dermatologist will watch your skin carefully to remove the peel at just the right time. With a deep chemical peel, the skin is treated one small section at a time. This limits the effects on your heart and lungs.

After the chemical peel comes off, your skin will be treated as needed. Patients who get a medium chemical peel may need cool compresses followed by a lotion or cream to soothe their skin. If you have a deep chemical peel, you will have a wound that requires a surgical dressing.

During a light chemical peel:

  • Your doctor will use a brush, cotton ball, gauze or sponge to apply a chemical solution typically containing glycolic acid or salicylic acid. The treated skin will begin to whiten.
  • You might feel mild stinging while the chemical solution is on your skin.
  • Your doctor will apply a neutralizing solution or wash to remove the chemical solution from the treated skin.

During a medium chemical peel:

  • Your doctor will use a cotton-tipped applicator or gauze to apply a chemical solution containing trichloroacetic acid, sometimes in combination with glycolic acid. The treated skin will begin to whiten.
  • After a few minutes, your doctor will apply cool compresses to soothe treated skin. You might also be given a hand-held fan to cool your skin. No neutralizing solution is needed, however.
  • You might feel stinging and burning for up to 20 minutes.

During a deep chemical peel:

  • You’ll be given intravenous (IV) fluids, and your heart rate will be closely monitored.
  • Your doctor will use a cotton-tipped applicator to apply carbolic acid (phenol) to your skin. Treated skin will begin to turn white or gray.
  • To limit your exposure to phenol, your doctor will do the procedure in portions at about 15-minute intervals. A full-facial procedure might take about 90 minutes.

What to expect after a chemical peel

After a chemical peel of any depth, follow your doctor’s directions for cleansing, moisturizing and applying protective ointments to your skin.

All peels that a dermatologist performs require some at-home care. The following table shows you what you can expect.

Table 1. What to expect after a chemical peel

Type of Peel Healing timeAt-home care When to wear makeup Follow-up visit 
Refreshing or lunchtime peel1 to 7 days.

Skin will be red. After the redness disappears, scaling may develop, which lasts 3 to 7 days.

Lotion or cream applied until the skin heals, followed by daily use of sunscreen.Usually immediately after the peel, but sometimes the next day.No. However, 3 to 5 peels may be necessary to give you the desired results. These peels may be repeated every 2 to 5 weeks.
Medium 7 to 14 days

Skin will be red and swollen. Swelling worsens for 48 hours. Eyelids may swell. Blisters can form and break open. Skin crusts and peels off in 7 to 14 days.

Daily soaks for a specified period.

Apply ointment after each soak.

Take an antiviral medication for 10 to 14 days.

Apply lotion or cream.

Total avoidance of the sun until skin heals.

After 5 to 7 days, you can wear camouflaging makeup.Yes. Follow-up visit required after the procedure.
Deep14 to 21 days.

Area will be bandaged.

4 to 6 daily soaks while healing.

For 14 days, apply ointment after each soak.

After 14 days, apply thick moisturizer as directed

Take an antiviral medication for 10 to 14 days.

Total sun avoidance for 3 to 6 months.

At least 14 days before you can apply makeup.Yes. The next day, the dermatologist will want to see you. Several follow-up visits are required during the first week.

After a light chemical peel, treated skin will be red, dry and mildly irritated — although these effects might be less noticeable with each repeat treatment. Your doctor might apply a protective ointment, such as petroleum jelly, to soothe the area.

Treated areas take about one to seven days to heal after a light chemical peel. New skin might temporarily be lighter or darker than normal.

After a medium chemical peel, treated skin will be red, tight and swollen. You’ll feel stinging. Your doctor might apply a protective ointment, such as petroleum jelly, to soothe the area.

Use ice packs or the breeze from a fan for comfort. Over-the-counter pain-relieving medication, such as ibuprofen (Advil, Motrin IB, others) and naproxen sodium (Aleve, others), may help reduce any discomfort. You’ll likely schedule a checkup soon after your treatment so that your doctor can monitor your healing.

As swelling decreases, treated skin will begin to form a crust and might darken or develop brown blotches. Treated areas take about seven to 14 days to heal after a medium chemical peel, but redness might last for months.

After a deep chemical peel, you’ll experience severe redness and swelling. You’ll also feel burning and throbbing, and your eyelids might swell shut.

Your doctor will apply a watertight dressing to treated skin. He or she might also prescribe painkillers. Sleeping in a semireclined position may help reduce swelling.

Treated areas will develop new skin within about two weeks after a deep chemical peel, although cysts or white spots might appear for several weeks and redness might last for months. Treated skin might become darker or lighter than normal or lose the ability to tan.

You might prefer to remain at home while you’re healing from a chemical peel. Once new skin completely covers the treated area in about two weeks, you can use cosmetics to conceal any redness.

Chemical peel tips after chemical peel

  • Use the moisturizer as directed to keep your skin moist and supple. If your skin dries and cracks, it can scar.
  • If your skin burns, itches, or swells, contact your dermatologist. Rubbing or scratching skin treated with a chemical peel can cause an infection.
  • Do not use a tanning bed or other type of indoor tanning. Your skin will not heal properly.
  • After your skin heals, apply sunscreen every day. This will help you maintain results.

Chemical peel recovery time

Recovery time after a chemical peel will depend on its depth.

In the first few days after most chemical peels, the skin turns darker, will feel somewhat tight and then peels or flakes to leave a new fresh layer of skin. There are no scabs, bandages or bleeding.

The recovery period and side-effects of a superficial chemical peel is much less than with a medium-depth chemical peel. It usually takes 3 to 5 days after a superficial peel for the skin to return to normal. It usually takes up to 7 to 10 days after a medium-depth peel for the skin to settle.

How much time off work is needed after a chemical peel?

Super­ficial peels may warrant a day or two off work, although many people are able to cover up with make-up and continue working the next day.

A medium-depth chemical peel may require one week for the skin to heal and it may be beneficial to arrange two weeks off work. At this time the face will be somewhat reddened with an appearance like sunburn but otherwise should appear unaffected. The redness can be camouflaged by a tinted moisturizer or make-up.

Chemical peel side effects

While chemical peels offer a far less invasive option to smoother skin than plastic surgery or ablative laser procedures (like the carbon dioxide laser), they are not without some side effects – mostly minor – and a few serious risks. The extent and risk of adverse effects depends on the strength of the chemical peel. The higher the strength, the deeper the chemical peel, and a higher risk for numbness, scarring, and infection. And after any chemical peel, you need to be diligent about using sunscreen and moisturizing to protect and nourish the new layers of skin.

In the hands of a doctor who has experience with chemical peels, side effects tend to be mild. Some patients develop:

  • Redness. Normal healing from a chemical peel involves redness of the treated skin. After a medium or deep chemical peel, redness might last for several months.
  • Scarring. Rarely, a chemical peel can cause scarring — typically on the lower part of the face. Antibiotics and steroid medications can be used to soften the appearance of these scars.
  • Changes in skin color. A chemical peel can cause treated skin to become darker than normal (hyperpigmentation) or lighter than normal (hypopigmentation). Hyperpigmentation is more common after superficial peels, while hypopigmentation is more common after a deep peel. Changes in skin color are more common in people who have darker skin and can be permanent.
  • Infection. A chemical peel can cause a flare-up of the herpes virus — the virus that causes cold sores. Rarely, a chemical peel can lead to a bacterial or fungal infection.
  • Heart, kidney or liver damage. A deep chemical peel uses carbolic acid (phenol), which can damage the heart muscle and cause the heart to beat irregularly. Phenol can also harm the kidneys and liver. To limit exposure to phenol, a deep chemical peel is done in portions at 10- to 20-minute intervals.

Chemical peels can’t decrease pore size or eliminate deep scars or wrinkles.

A chemical peel isn’t for everyone. Your doctor might caution against a chemical peel or certain types of chemical peels if you:

  • Have taken the acne medication isotretinoin (Amnesteem, Claravis, others) in the past six months
  • Have a dark complexion
  • Have a personal history of ridged areas caused by an overgrowth of scar tissue (keloids)
  • Have abnormal skin pigmentation
  • Have a history of frequent or severe outbreaks of cold sores

If serious side effects occur, it is often because the patient did not follow the dermatologist’s instructions. Your risk for developing an infection or scarring increase dramatically if you:

  • Fail to protect your skin from the sun.
  • Fail to care for your wound as instructed.
  • Scratch the treated skin or pick off a scab.
  • Apply makeup before your skin heals.
  • Don’t heed your dermatologist’s advice and use a tanning bed or other type of indoor tanning.

Microdermabrasion vs Chemical peel

Microdermabrasion is a nonsurgical, office‐based cosmetic procedure that uses fine crystals (usually aluminium oxide Al2O3 sodium chloride or salt) and a closed‐loop vacuum to remove dead skin cells on the face. The aim of microdermabrasion is to reduce the effect of fine lines and minor skin blemishes. Microdermabrasion works on all skin types and shouldn’t cause any skin color changes or scarring. Microdermabrasion has the advantages of low risk and rapid recovery compared with other techniques such as standard dermabrasion, chemical peeling and laser resurfacing. However, be aware that microdermabrasion can be expensive and has its limitations. Take time to find a reputable practitioner who is properly qualified and practices in a clean, safe and appropriate environment. Ask the practitioner what you should do if something were to go wrong.

Microdermabrasion is an U.S. Food and Drug Administration approved process first introduced in Italy in 1985 and is a popular method used to treat superficial scars, acne, to reduce the appearance of large pores, fine lines, wrinkles, tattoos, severe sun damage, pigmentation disorders and other cosmetic-dermatologic conditions 1.

Microdermabrasion works for:

  • Dull complexion.
  • Uneven skin tone or texture.
  • Fine lines and wrinkles.
  • Age spots.
  • Dark spots that can appear when acne starts to clear.
  • Melasma.

The disadvantages of microdermabrasion are that multiple treatments are needed and there may be minimal improvement in appearance.

Microdermabrasion advantages include:

  • Anaesthesia is not required
  • It is almost painless
  • Facial redness is minimized
  • Simple and quick to perform
  • Can be repeated at short intervals
  • Does not disrupt the patient’s life greatly

Microdermabrasion is now possible using home kits that use virbating foam applicator to massage a moisturizing cream containing aluminium oxide crystals on the surface of the skin. However, the microdermabrasion that a dermatologist performs differs from the one that you can do at home with a kit. A dermatologist treatment goes a bit deeper into the skin. Still, the procedure is safe for all skin colors.

Dermatologists also use microdermabrasion to improve the results gained from using anti-aging products and skin-bleaching products. Microdermabrasion allows these products to penetrate the skin more easily. Because stratum corneum is the skin’s main permeability barrier, controlled microdermabrasion offers a novel approach to increasing rates of transdermal drug delivery. By using microdermabrasion on the skin, topical therapeutics can be applied at the conclusion of the treatment, which will reach levels much deeper than when typically applied to the surface of the skin, as the skin barrier function of the stratum corneum is temporarily compromised 2. Therefore, slightly greater improvements in the histological features of photoaging can be achieved with the combination of microdermabrasion followed by a 5% retinoic acid chemical peel versus a 5% retinoic acid chemical peel administered alone 3. The established clinical safety record and the non-invasive nature of microdermabrasion suggest that this approach should be safe, painless, cosmetically acceptable and effective to deliver a broad range of pharmaceutical compounds.

This study 4 showed that controlled microdermabrasion can be used to selectively remove stratum corneum (outermost layer of the skin) in a targeted fashion without removing viable epidermis. Crystal flow rate and exposure time were the most important parameters in controlling stratum corneum removal, whereas suction pressure and handpiece movement had lesser effects. Notably, this study 4 added the use of a mask (see Figure 3 C below) to limit tissue removal to an array of micron-scale pores rather than one large region of stratum corneum removal. The study authors found that the mask also influenced the depth of tissue removal; the 125 μm-hole mask limited tissue removal to the stratum corneum in a self-limiting manner independent of exposure time to microdermabrasion.

Microdermabrasion benefits

Microdermabrasion is similar to dermabrasion but as its name suggests, it uses tiny crystals to remove the surface skin layers. It is promoted for correcting fine lines and more superficial scars.

What happens during microdermabrasion?

The dermatologist uses a handheld device that gently removes the top layer of skin. You may feel a sanding sensation, but this is not painful. It takes about 30 to 40 minutes to treat the entire face and about 20 minutes to treat the neck.

After the treatment, a moisturizer is applied.

What will I need to do after microdermabrasion?

You may need to apply a moisturizer or other skin care product at home.

You will be given a skin-care plan that includes sun protection. Protecting your skin form the sun helps ensure the best possible results and reduces the risk of side effects.

Is there downtime with microdermabrasion?

You will not have downtime or a recovery period. Some patients’ skin turns pink or red. The skin can swell a bit. These side effects are similar to having a sunburn or windburn for a day or two. During this time, some patients feel uncomfortable returning to work or being in public.

When will I see results from microdermabrasion?

Most patients need a series of treatments to see results. To treat signs of aging, a dermatologist may treat a patient weekly, every two weeks, or monthly. Most patients receive between 5 and 16 treatments.

After a series of treatments, patients usually say they have smoother skin and a more-radiant complexion.

How long will the microdermabrasion results last?

The microdermabrasion results tend to be temporary. Patients who protect their skin from the sun and follow the recommended skin-care plan will maintain their results for a longer time. Yet, no matter what you do, your skin continues to age. Follow-up treatments are usually necessary to help retain smoother skin and a more radiant complexion.

How often can I safely get another microdermabrasion treatment?

Microdermabrasion treats only the top layer of the skin, so the skin recovers quickly. Most people can safely have another treatment a week later. Some patients, however, need several weeks to recover.

What is the safety record for microdermabrasion?

When performed by a dermatologist, microdermabrasion has an excellent safety record.

Microdermabrasion also is performed in salons and non-medical spas. You can reduce your risk for side effects by having microdermabrasion performed by a dermatologist.

Microdermabrasion side effects

The side effects of microdermabrasion, such as redness and swelling, tend to be short-lived.

Your skin may be dry and flaky for a few days after the procedure, and the suction may temporarily bruise your skin.

Your face would be more sensitive to the sun afterwards, so you should avoid sun exposure for a few days and use broad-spectrum SPF30+ sunscreen.

If you’re not happy with the results or are experiencing problems, take up the matter with your practitioner through the clinic where you were treated.

If there are any complications that require medical attention, it is best that you go back to the practitioner who treated you. If this is not possible, you can go to your doctor or local accident and emergency department.

References
  1. Microdermabrasion: Reappraisal and brief review of literature. Bhalla M, Thami GP. Dermatol Surg. 2006 Jun; 32(6):809-14. https://onlinelibrary.wiley.com/doi/pdf/10.1111/j.1524-4725.2006.32165.x
  2. Microdermabrasion: an evidence-based review. Karimipour DJ, Karimipour G, Orringer JS. Plast Reconstr Surg. 2010 Jan; 125(1):372-7. https://www.ncbi.nlm.nih.gov/pubmed/20048628/
  3. Microdermabrasion followed by a 5% retinoid acid chemical peel vs. a 5% retinoid acid chemical peel for the treatment of photoaging – a pilot study. Hexsel D, Mazzuco R, Dal’Forno T, Zechmeister D. J Cosmet Dermatol. 2005 Jun; 4(2):111-6. https://www.ncbi.nlm.nih.gov/pubmed/17166209/
  4. Andrews SN, Zarnitsyn V, Brian B, Prausnitz MR. Optimization of Microdermabrasion for Controlled Removal of Stratum Corneum. International journal of pharmaceutics. 2011;407(1-2):95-104. doi:10.1016/j.ijpharm.2011.01.034. https://www.ncbi.nlm.nih.gov/pmc/articles/PMC3050026/
read more
Procedures

Cholecystectomy

cholecystectomy

What is cholecystectomy

Cholecystectomy is a surgery to remove the gallbladder due to gallstones causing pain or infection and is one of the most common operations performed on adults in the United States. Gallstones that cause biliary colic (acute pain in the abdomen caused by spasm or blockage of the cystic or bile duct) are the most common reason for a cholecystectomy. Gallstones are one of the major causes of morbidity in western society. It is estimated that the incidence of symptomatic cholecystolithiasis is up to 2.17 per thousand inhabitants 1 with an annual performance rate of cholecystectomies of more than 500,000 in the USA 2.

The gallbladder is not an essential organ, which means a person can live normally without a gallbladder. Once the gallbladder is removed, bile flows out of the liver through the hepatic and common bile ducts and directly into the duodenum, instead of being stored in the gallbladder.

Surgeons perform two types of cholecystectomy:

  1. Laparoscopic cholecystectomy. The gallbladder is removed with laparoscopic instruments (a long, thin telescope with a light and camera at the end) placed into the abdomen through several small incisions. Almost all surgeons perform cholecystectomies with laparoscopy. The laparoscopic cholecystectomy procedure takes about 1 to 2 hours. Surgeons perform many laparoscopic cholecystectomies on an outpatient basis, meaning you may be able to go home the same day. You will probably be able to return to normal physical activity in about a week.
  2. Open cholecystectomy. The surgeon makes an incision approximately 6 inches long in the upper right side of the abdomen under the rib cage and cuts through the fat and muscle to the gallbladder. A surgeon performs an open cholecystectomy when your gallbladder is severely inflamed, infected, or scarred from other operations. Your doctor may perform an open cholecystectomy if problems occur during a laparoscopic cholecystectomy. The gallbladder is removed, and any ducts are clamped off. The site is stapled or sutured closed. A small drain may be placed going from the inside to the outside of the abdomen. The drain is usually removed in the hospital. The procedure takes about 1 to 2 hours.  After the surgery, you may need to stay in the hospital for up to a week. You will probably be able to return to normal physical activity after about a month.

Both techniques are performed under general anaesthetic, which means you’ll be asleep during the operation and won’t feel any pain while it’s carried out.

Until the end of the 1980s, open cholecystectomy was the gold standard for treatment of stones in the gallbladder 3. Laparoscopic cholecystectomy was introduced in 1985 4 and rapidly became the method of choice for surgical removal of the gallbladder 2.

Laparoscopic (keyhole) cholecystectomy surgery is used most often because you can leave hospital sooner, recover faster and are left with smaller scars than with an open procedure.

Gallstones are hardened digestive fluid that can form in your gallbladder. The medical term for gallstone formation is cholelithiasis. Gallstones can leave the gallbladder and block the flow of bile to the ducts and cause pain and swelling of the gallbladder. A gallstone in the common bile duct is called choledocholithiasis. Cholecystitis is inflammation of the gallbladder, which can happen suddenly (acute) or over a longer period of time (chronic). Gallstone Pancreatitis is caused by stones moving into and blocking the common bile duct, the pancreatic duct, or both. A cholecystectomy may be recommended 5.

The most common symptoms of cholecystitis are 5:

  • Sharp pain in the right abdomen
  • Low grade fever
  • Nausea and bloating
  • Jaundice (yellowing of the skin) may occur if gallstones are in the common bile duct

Benefits of gallbladder removal are pain relieve, treat infection and, in most cases, stop gallstones from coming back.

Possible risks of cholecystectomy include — Bile leak, bile duct injury, bleeding, infection of the abdominal cavity (peritonitis), fever, liver injury, infection, numbness, raised scars, hernia at the incision, anesthesia complications, puncture of the intestine, and death 5.

Risks of not having cholecystectomy operation — The possibility of continued pain, worsening symptoms, infection or bursting of the gallbladder, serious illness, and possibly death 6.

The day of your gallbladder removal surgery — You will not eat for 4 hours but may drink clear liquids up to 2 hours before the operation. Most often, you will take your normal medication with a sip of water. You will need someone to drive you home.

Gallbladder removal recovery — If you do not have complications, you usually will go home the same day after a laparoscopic procedure or in 1 to 2 days after an open procedure.

Figure 1. Cholecystectomy

cholecystectomy

Why does your gallbladder need to be removed?

Surgery to remove the gallbladder is usually carried out if you have painful gallstones. These are small stones that can form in the gallbladder as a result of an imbalance in the substances that make up bile.

A cholecystectomy is most commonly performed to treat gallstones and the complications they cause. Your doctor may recommend a cholecystectomy if you have:

  • Gallstones in the gallbladder (cholelithiasis)
  • Gallstones in the bile duct (choledocholithiasis)
  • Gallbladder inflammation (cholecystitis)
  • Pancreas inflammation (pancreatitis) due to gallstones

Gallstones often cause no symptoms and you may not realize you have them, but occasionally they can block the flow of bile and irritate the gallbladder (acute cholecystitis) or pancreas (acute pancreatitis).

This can cause symptoms such as:

  • sudden and intense tummy pain
  • feeling and being sick
  • yellowing of the skin and the whites of the eyes (jaundice)

Very occasionally it may be possible to take tablets to dissolve gallstones, but surgery to remove the gallbladder is the most effective treatment in the vast majority of cases.

You’ll need to have a pre-operative assessment in hospital during the weeks leading up to your gallbladder removal surgery (cholecystectomy).

Gallbladder removal surgery preparation

How you prepare

You’ll need to have a pre-operative assessment in hospital during the weeks leading up to your gallbladder removal surgery (cholecystectomy).

During this appointment:

  • you may have some blood tests and a general health check to make sure that you’re fit for surgery and determine whether a keyhole or open procedure (see below) is most suitable for you
  • you can discuss any concerns or ask any questions about your operation
  • you’ll be advised about things you can do to reduce your risk of problems after surgery, such as stopping smoking
  • you’ll be told about when you need to stop eating and drinking before your operation – this will usually be from the night before.

To prepare for a cholecystectomy, your surgeon may ask you to:

  • Eat nothing the night before your surgery. You may drink a sip of water with your medications, but avoid eating and drinking at least four hours before your surgery.
  • Stop taking certain medications and supplements. Tell your doctor about all the medications and supplements you take. Continue taking most medications as prescribed. Your doctor may ask you to stop taking certain medications and supplements because they may increase your risk of bleeding.

Prepare for your recovery

Plan ahead for your recovery after surgery. For instance:

  • Plan for a hospital stay. Most people go home the same day of their cholecystectomy, but complications can occur that require one or more nights in the hospital. If the surgeon needs to make a long incision in your abdomen to remove your gallbladder, you may need to stay in the hospital longer. It’s not always possible to know ahead of time what procedure will be used. Plan ahead in case you need to stay in the hospital by bringing personal items, such as your toothbrush, comfortable clothing, and books or magazines to pass the time.
  • Find someone to drive you home and stay with you. Ask a friend or family member to drive you home and stay close the first night after surgery.

Gallbladder removal side effects

You can live perfectly normally without a gallbladder, so there aren’t usually any long-term effects from gallbladder removal surgery.

However, it’s common to experience some temporary side effects while you recover, including:

  • swollen, bruised and painful wounds – this should start to improve within a few days; regular painkillers such as paracetamol may help reduce the discomfort
  • feeling sick – you may feel sick as a result of the anaesthetic or painkillers you’ve been given, but this should pass quickly
  • pain in your tummy and shoulders – this is a result of the gas used to inflate your tummy and should pass after a couple of days; painkillers can be taken to relieve the discomfort
  • bloating, flatulence and diarrhea – this can last a few weeks; eating high-fibre food such as fruit, vegetables, brown rice and wholemeal bread can help to firm up your stools, and your doctor may also be able to prescribe medication to help
  • fatigue, mood swings and irritability – these feelings should improve as you recover

These side effects are completely normal and not usually a cause for concern. You only need to contact your GP, the hospital or NHS 111 for advice if they’re particularly severe or persistent.

A cholecystectomy carries a small risk of complications including:

  • Bile leak
  • Bleeding
  • Blood clots
  • Heart problems
  • Infection
  • Injury to nearby structures, such as the bile duct, liver and small intestine
  • Pancreatitis
  • Pneumonia

Your risk of complications depends on your overall health and the reason for your cholecystectomy.

Gallbladder removal complications

Removal of the gallbladder (cholecystectomy) is considered a relatively safe procedure, but like all operations there is a small risk of complications.

Infection

Some people develop a wound or internal infection after a gallbladder removal.

Signs of a possible infection include increasing pain, swelling or redness, and pus leaking from a wound. See your doctor if you develop these symptoms, as you may need a short course of antibiotics.

Bleeding

Bleeding can occur after your operation, although this is rare. If it does occur, it may require a further operation to stop it.

Bile leakage

When the gallbladder is removed, special clips are used to seal the tube that connects the gallbladder to the main bile duct. However, bile fluid can occasionally leak out into the tummy (abdomen) after the gallbladder is removed.

Symptoms of a bile leak include tummy pain, feeling sick, a fever and a swollen tummy.

Sometimes this fluid can be drained off. Occasionally, an operation is required to drain the bile and wash out the inside of your tummy.

Bile leakage occurs in around 1% of cases.

Injury to the bile duct

In around 1 in 500 cases, the bile duct is damaged during a gallbladder removal.

If this happens during surgery, it may be possible to repair it straight away. In some cases, further surgery is needed after your original operation.

Injury to the intestine, bowel and blood vessels

The surgical instruments used to remove the gallbladder can also injure surrounding structures, such as the intestine, bowel and blood vessels.

This type of injury is rare, occurring in around 1 in 1,000 cases, and can usually be repaired at the time of the operation. Sometimes injuries are noticed afterwards and a further operation is needed.

Deep vein thrombosis

Some people are at a higher risk of blood clots developing after surgery. This is known as deep vein thrombosis (DVT) and usually occurs in a leg vein.

This can be serious because the clot can travel around the body and could block the flow of blood into the lungs (pulmonary embolism).

You may be given special compression stockings to wear after the operation to prevent this happening.

Risks from general anaesthetic

There are several serious complications associated with having a general anaesthetic, but these are very rare.

Complications include allergic reaction and death. Being fit and healthy before your operation reduces the risk of any complications occurring.

Post-cholecystectomy syndrome

Some people experience symptoms similar to those caused by gallstones after surgery, including :

  • tummy pain
  • indigestion
  • diarrhea
  • yellowing of the eyes and skin (jaundice)
  • a high temperature (fever) of 38 °C (100.4 °F) or above

This is known as post-cholecystectomy syndrome and it’s thought to be caused by bile leaking into areas such as the stomach or by gallstones being left in the bile ducts.

In most cases symptoms are mild and short-lived, but they can persist for many months. If you do have persistent symptoms, you should contact your doctor for advice.

You may benefit from a procedure to remove any remaining gallstones, or medication to relieve your symptoms.

Table 1. Open Cholecystectomy and Laparoscopic Cholecystectomy Risks and Complications

RisksPercent for Average PatientComment
Pneumonia: Infection in the lungsOpen 1.7%

Laparoscopic 0.2%

You can decrease your risk by rinsing with mouthwash the morning of your operation (to decrease mouth bacteria), quitting smoking before your operation, and getting up often to walk post-operatively.
Heart complication: Heart attack or sudden stopping of the heartOpen 0.7%

Laparoscopic 0.1%

Problems with your heart or lungs can be affected by general anesthesia. Your anesthesia provider will take your history and suggest the best option for you.
Wound infectionOpen 7.6%

Laparoscopic 1%

Antibiotics are not routinely given except for high-risk patients. You should wash your abdomen with an antimicrobial soap such as dial the night before the operation.
Urinary tract infection: Infection of the bladder or kidneysOpen 1.5%

Laparoscopic 0.5%

A Foley catheter is placed during surgery to drain the urine. Let your surgical team know if you have trouble urinating after the tube is removed—this is more common in older men or if an epidural is used for pain.
Blood clot: A blood clot in the legs can travel to the lungOpen 1%

Laparoscopic 0.2%

Longer surgery and bed rest increase the risk. Walking 5 times/day and wearing support stockings reduce the risk.
Renal (kidney) failure: Kidneys no longer function in making urine and/or cleaning the blood of toxinsOpen 0.9%

Laparoscopic 0.1%

Pre-existing renal problems, Type 1 diabetes, being over 65 years old, and other medications may increase the risk.
Return to surgeryOpen 3.3 %

Laparoscopic 0.8%

Bile leakage or a retained stone may cause a return to surgery. Your surgical team is prepared to reduce all risks of return to surgery.
DeathOpen 0.8%

Laparoscopic 0.1%

Your surgical team will review for possible complications and be prepared to decrease all risks.
Discharge to nursing or rehabilitation facilityOpen 5.4%

Laparoscopic 0.6%

Pre-existing health conditions can increase this risk.
Bile Duct Injury/Leakage0.50%Injury can happen between 1 week to 6 months after the operation from fever, pain, jaundice, or bile leakage from the incision. Further testing and surgery may be needed.
Retained common bile duct stone4% to 40%A gallstone may pass after surgery and block the bile from draining. The stone should be removed because of an increased risk of biliary obstruction or inflammation of the pancreas or bile duct.
Pregnancy Complications, premature labor and fetal lossFetal loss 4% (uncomplicated removal) up to 60% if pancreatitisMost pregnant women with gallstones will have no symptoms during pregnancy. If you have biliary disease or pancreatitis, gallbladder removal will be offered to reduce maternal complications.

The Gallbladder

The gallbladder is a pear-shaped sac in a depression on the liver’s under surface. The gallbladder is lined with epithelial cells and has a strong layer of smooth muscle in its wall. The gallbladder stores bile between meals, reabsorbs water to concentrate bile, and contracts to release bile into the small intestine. It connects to the cystic duct, which in turn joins the common hepatic duct (Figure 3).

The common hepatic duct and cystic duct join to form the bile duct (common bile duct). It leads to the duodenum where the hepatopancreatic sphincter guards its exit (Figure 4). Because this sphincter normally remains contracted, bile collects in the bile duct. It backs up into the cystic duct and flows into the gallbladder, where it is stored.

Cholesterol in bile may precipitate under certain conditions and form crystals called gallstones. Gallstones in the bile duct may block bile flow into the small intestine and cause considerable pain. A surgical procedure called a cholecystectomy can remove the gallbladder when gallstones are obstructive. The surgery can often be done with a laparoscope (small, lit probe) on an outpatient basis.

Figure 2. Gallbladder location

gallbladder location

Figure 3. Gallbladder anatomy

gallbladder anatomy

Figure 4. The common bile duct is closely associated with the pancreatic duct and the duodenum

bile duct and pancreatic duct opening into the duodenum

Gallbladder function

Following a meal, the mixing movements of the stomach wall aid in producing a semifluid paste of food particles and gastric juice called chyme.

As chyme enters the duodenum (the proximal portion of the small intestine), accessory organs—the pancreas, liver, and gallbladder—add their secretions.

Bile is a yellowish-green liquid continuously secreted from hepatic (liver) cells. In addition to water, bile contains bile salts, bile pigments (bilirubin and biliverdin), cholesterol, and electrolytes. Of these, bile salts are the most abundant and are the only bile components that have a digestive function.

Bile pigments are breakdown products of hemoglobin from red blood cells and are normally secreted in the bile.

Normally bile does not enter the duodenum until cholecystokinin stimulates the gallbladder to contract. Proteins and fats in chyme in the duodenum stimulate
the intestinal wall to release cholecystokinin. Cholecystokinin travels via the bloodstream to the pancreas also, where it stimulate the pancreas to release its pancreatic juice that has a high concentration of digestive enzymes.

The hepatopancreatic sphincter usually remains contracted until a peristaltic wave in the duodenal wall approaches it. Then the sphincter relaxes, and bile is squirted into the duodenum (see Figure 5).

Note: Cholecystokinin produced by the intestinal wall cells, in response to proteins and fats in the small intestine, decreases secretory activity of gastric glands and inhibits gastric motility; stimulates pancreas to secrete fluid with a high digestive enzyme concentration and stimulates gallbladder to contract and release bile.

Figure 5. Fatty chyme entering the duodenum stimulates the gallbladder to release bile

cholecystokinin stimulate release of bile

Gallbladder removal recovery time

How long it takes to recover from gallbladder removal surgery (cholecystectomy) depends on whether you had a laparoscopic (keyhole) or open procedure.

Most people who have keyhole surgery are able to leave hospital on the same day as the operation. It will usually take around two weeks to return to your normal activities.

After open surgery, you’ll usually have to stay in hospital for three to five days and your recovery time will be longer. It can take around six to eight weeks to return to your normal activities.

In either case, you’ll need to arrange for someone to take you home from hospital. Someone should also stay with you for at least 24 hours if you go home the same day as your operation, as you may still be feeling the effects of the anaesthetic.

Diet after gallbladder removal

Most people don’t need to follow a special diet after having surgery to remove their gallbladder, as the gallbladder isn’t essential for digestion.

You can usually start eating normally a few hours after your operation, although you’ll probably prefer to eat small meals to start with.

Most people won’t experience digestive problems after a cholecystectomy. Your gallbladder isn’t essential to healthy digestion. Some people may experience occasional loose stool after the procedure, which generally resolves over time. Discuss with your doctor any changes in your bowel habits or new symptoms following your procedure.

You may have been advised to follow a low-fat diet for several weeks before surgery, but this doesn’t need to be continued afterwards. Instead, you should aim to have a generally healthy, balanced diet (including some fats).

If you experience side effects from surgery – including indigestion, bloating, flatulence or diarrhea – it may help to make some small adjustments to your diet, such as:

  • avoid drinks containing caffeine – such as coffee and tea
  • avoid foods that make the problems worse – such as spicy or fatty foods
  • gradually increase your intake of fiber – good sources of fiber include fresh fruit and vegetables, wholegrain rice, wholewheat pasta and bread, seeds, nuts and oats

Your doctor can also recommend medication if you have diarrhea.

Side effects of gallbladder surgery usually only last a few weeks, although diarrhea can be a more persistent problem for a small number of people.

If you’ve had other organs removed as well as your gallbladder, such as your pancreas, you may have problems digesting food. You’ll be advised about any changes you need to make to your diet after surgery in these cases.

Life after gallbladder removal

Your surgeon can give you specific advice about when you can return to your normal activities. Generally speaking, after keyhole surgery you can:

  • eat a normal diet straight away – you can return to a normal diet even if you were advised to avoid certain foods before your operation, although you should try to have a generally healthy and balanced diet (read more about diet after gallbladder surgery)
  • do gentle exercises, such as walking – but be careful not to push yourself too hard too soon and ask your surgeon or doctor for advice about returning to more strenuous exercise
  • drive again after a week or so – but first make sure you can wear a seat belt and practice an emergency stop without feeling any discomfort
  • have sex as soon as you feel up to it – but try not to place weight on your wounds until they’ve healed
  • return to work after 10-14 days, depending on what your job involves

It can take a bit longer to return to these activities after open gallbladder removal surgery. For example, you may not be able to drive or return to work for around four to eight weeks.

Laparoscopic cholecystectomy

Laparoscopic gallbladder removal is surgery to remove the gallbladder using a medical device called a laparoscope (a long, thin telescope with a light and camera at the end). This technique is the most common for simple cholecystectomy. When you’re having a laparoscopic cholecystectomy, your doctor made 1 to 3 small incisions in your belly and used a special instrument called a laparoscope to take out your gallbladder. During keyhole gallbladder removal surgery a small incision (about 2-3cm) is made by your belly button and two or three smaller incisions (about 1cm or less) or made on the right side of your tummy. Ports (hollow tubes) are inserted into the openings. Surgical tools and a lighted camera are placed into the ports. The abdomen is inflated with carbon dioxide gas to make it easier to see the internal organs. The gallbladder is removed, the gas is released from your tummy and the port openings are closed with sutures, surgical clips, or glue. Your surgeon may start with a laparoscopic technique and need to change (convert) to an open laparotomy technique. The procedure takes about 1 to 2 hours. You can usually go home later the same day.

Laparoscopic gallbladder removal recovery time

Recovering from laparoscopic cholecystectomy will take about 1 to 3 weeks for most people. You may have some of these symptoms as you recover:

  • Pain in your belly. You may also feel pain in one or both shoulders. This pain comes from the gas still left in your belly after the surgery. The pain should ease over several days to a week.
  • A sore throat from the breathing tube. Sucking on ice chips or gargling may be soothing.
  • Nausea, and maybe throwing up. Your surgeon can provide you with nausea medicine if needed.
  • Loose stools after eating. This may last 4 to 8 weeks. However, in some cases it can last longer.
  • Bruising around your wounds. This will go away on its own.
  • Skin redness around your wounds. This is normal.

Preventing pneumonia and blood clots

Movement and deep breathing after your operation can help prevent postoperative complications such as blood clots, fluid in your lungs, and pneumonia. Every hour, take 5 to 10 deep breaths and hold each breath for 3 to 5 seconds.

When you have an operation, you are at risk of getting blood clots because of not moving during anesthesia. The longer and more complicated your surgery, the greater the risk. This risk is decreased by getting up and walking 5 to 6 times per day, wearing special support stockings or compression boots on your legs, and, for high-risk patients, taking a medication that thins your blood.

Activity

Start walking after surgery. Begin your everyday activities as soon as you feel up to it. Move around the house and shower, and use the stairs during your first week home. If it hurts when you do something, stop doing that activity.

You may be able to drive after 2 or 3 days if you are not taking strong pain drugs (narcotics). You may lift 15 pounds (7 kilograms) or less. DO NOT do any heavy lifting or straining for the first 1 to 2 weeks.

You may be able to go back to a desk job within a week. Talk to your health care provider if your work is physical.

  • Slowly increase your activity. Be sure to get up and walk every hour or so to prevent blood clot formation.
  • Patients usually take 1 to 3 weeks to return comfortably to normal activity 7.
  • You may go home the same day after a laparoscopic repair. If you have other health conditions or complications such as nausea, vomiting, bleeding, or difficulty passing urine, you may stay longer.
  • Persons sexually active before the operation reported being able to return to sexual activity in 14 days (average).

Work and return to school

You may usually return to work 1 week after laparoscopic or open repair, as long as you don’t do any heavy lifting. Discuss the timing with your surgeon.

Do not lift items heavier than 10 pounds or participate in strenuous activity for at least 4 to 6 weeks.

Wound Care

If sutures, staples, or glue were used to close your skin, you may take off the wound dressings and take a shower the day after surgery.

If tape strips (Steri-strips) were used to close your skin, cover the wounds with plastic wrap before showering for the first week after surgery. DO NOT try to wash the Steri-strips off. Let them fall off on their own.

DO NOT soak in a bathtub or hot tub, or go swimming, until your doctor tells you it is OK.

In many cases, dissolvable stitches will be used to close your wounds. These should start to disappear by themselves within a week or two.

If non-dissolvable stitches were used, you’ll usually need to have them removed by a nurse at your doctor surgery after 7-10 days. You’ll be given an appointment for this before you leave hospital.

You’ll be told about how to look after your wound and stitches, including how long any dressings need to stay on, when they should be replaced and when you can start having showers or baths.

There will be scars where the cuts were made in your tummy. These will probably be red and obvious at first, but should fade over time.

Gallbladder removal diet

Eat a normal diet. You may want to avoid greasy or spicy foods for a while.

  • When you wake up from the anesthesia, you will be able to drink small amounts of liquid. If you do not feel sick, you can begin eating regular foods.
  • Continue to drink about 8 to 10 glasses of water per day.
  • Eat a high-fiber diet so you don’t strain while having a bowel movement.

High-Fiber Foods

Foods high in fiber include beans, bran cereals and whole-grain breads, peas, dried fruit (figs, apricots, and dates), raspberries, blackberries, strawberries, sweet corn, broccoli, baked potatoes with skin, plums, pears, apples, greens, and nuts.

Bowel Movements

Anesthesia, decreased activity, and pain medication (narcotics) can contribute to constipation. Avoid straining with bowel movements by increasing the fiber in your diet with high-fiber foods or over-the-counter medicines (like Metamucil® and FiberCon®). Be sure you are drinking 8 to 10 glasses of fluid each day. Your surgeon may prescribe a stool softener if necessary.

When to call your doctor

Call your healthcare provider if:

  • You have a fever above 101°F (38.3°C).
  • Your surgical wound is bleeding, red, or warm to the touch.
  • Your surgical wound has thick, yellow or green, or milky drainage or bad-smelling drainage from your wound site
  • You have pain that is not helped with your pain medicines.
  • It is hard to breathe.
  • You have a cough that does not go away.
  • You cannot drink or eat.
  • Your skin or the white part of your eyes turns yellow.
  • Your stools are a gray color.
  • Continuous vomiting
  • Strong or continuous abdominal pain or swelling of your abdomen
  • No bowel movement 2 to 3 days after the operation

Open cholecystectomy

Open gallbladder removal is surgery to remove the gallbladder through a large cut in your abdomen. The surgeon made a 5 to 7 inch (13 to 20 centimeters) incision (cut) in your belly. The surgeon then removed your gallbladder by reaching in through the incision, separating it from its attachments, and gently lifting it out.

An open procedure may be recommended if you can’t have keyhole surgery – for example, because you have a lot of scar tissue from previous surgery on your tummy.

It’s also sometimes necessary to turn a keyhole procedure into an open one during the operation if your surgeon is unable to see your gallbladder clearly or remove it safely.

Your surgeon can explain why they feel an open procedure is best for you and if you’re due to have keyhole surgery, the risk of it becoming an open procedure should be discussed beforehand.

During open gallbladder removal surgery:

  • a larger incision (about 10-20 cm) is made in your tummy, underneath your ribs
  • surgical instruments are used to remove your gallbladder
  • the incision is closed with stitches and is covered with a dressing

You’ll usually need to stay in hospital for a few days afterwards. Recovery typically takes six to eight weeks.

Open gallbladder removal recovery time

Recovering from open gallbladder removal surgery takes 4 to 8 weeks. You may have some of these symptoms as you recover:

  • Pain in your belly. You may also have pain in one or both shoulders for several days after surgery. This comes from the gas still in your belly after your surgery.
  • Incision pain for 1 to 2 weeks. This pain should get better each day.
  • Sore throat from the breathing tube. Sucking on ice chips or gargling may be soothing.
  • Nausea, and maybe throwing up (vomiting). Your surgeon can provide you with nausea medicine, if needed.
  • Loose stools after eating. This may last 4 to 8 weeks. Rarely, the diarrhea can continue. Your health care provider can discuss treatment options with you.
  • Bruising around your wound. This will go away on its own.
  • Skin redness around your wound. This is normal.
  • A small amount of watery or dark bloody fluid from the incision. This is normal for several days after surgery.

The surgeon may have left 1 or 2 drainage tubes in your belly:

  • One will help remove any fluid or blood that is left in your belly.
  • The second tube will drain bile while you recover. This tube will be removed by your surgeon in 2 to 4 weeks. Before the tube is removed, you will have a special x-ray called a cholangiogram.
  • You will receive instructions for caring for these drains before leaving the hospital.

Preventing pneumonia and blood clots

Movement and deep breathing after your operation can help prevent postoperative complications such as blood clots, fluid in your lungs, and pneumonia. Every hour, take 5 to 10 deep breaths and hold each breath for 3 to 5 seconds.

When you have an operation, you are at risk of getting blood clots because of not moving during anesthesia. The longer and more complicated your surgery, the greater the risk. This risk is decreased by getting up and walking 5 to 6 times per day, wearing special support stockings or compression boots on your legs, and, for high-risk patients, taking a medication that thins your blood.

Activity

Plan to have someone drive you home from the hospital. DO NOT drive yourself home.

You should be able to do most of your regular activities in 4 to 8 weeks. Before that:

  • DO NOT lift anything heavier than 10 to 15 pounds (5 to 7 kilograms) until you see your provider.
  • Avoid all strenuous activity. This includes heavy exercising, weightlifting, and other activities that make you breathe hard or strain.
  • Taking short walks and using stairs are OK.
  • Light housework is OK.
  • DO NOT push yourself too hard. Slowly increase how much you exercise.

Managing pain:

  • Your provider will prescribe pain medicines to use at home.
  • If you are taking pain pills 3 or 4 times a day, try taking them at the same times each day for 3 to 4 days. They may be more effective this way.
  • Try getting up and moving around if you are having some pain in your belly. This may ease your pain.

Press a pillow over your incision when you cough or sneeze to ease discomfort and protect your incision.

Make sure your home is safe as you are recovering.

Wound Care

Change the dressing over your surgical wound once a day, or sooner if it becomes dirty. Your provider will tell you when you no longer need to keep your wound covered. Keep the wound area clean by washing it with mild soap and water.

You may remove the wound dressings and take showers if sutures, staples, or glue were used to close your skin.

  • Always wash your hands before and after touching near your incision site.
  • Do not soak in a bathtub until your stitches, Steri-Strips®, or staples are removed. You may take a shower after the second postoperative day unless you are told not to.
  • Follow your surgeon’s instructions on when to change your bandages.
  • A small amount of drainage from the incision is normal. If the dressing is soaked with blood, call your surgeon.
  • If you have Steri-Strips in place, they will fall off in 7 to 10 days.
  • If you have a glue-like covering over the incision, just let the glue to flake off on its own.
  • Avoid wearing tight or rough clothing. It may rub your incisions and make it harder for them to heal.
  • Your scars will heal in about 4 to 6 weeks and will become softer and continue to fade over the next year.

If tape strips (Steri-strips) were used to close your incision:

  • Cover the incision with plastic wrap before showering for the first week.
  • DO NOT try to wash off the Steri-strips or glue. Let them fall off on their own.

DO NOT soak in a bathtub, hot tub, or go swimming until your provider tells you it is OK.

Self-care

Eat a normal diet, but you may want to avoid greasy or spicy foods for a while.

If you have hard stools:

  • Try to walk and be more active, but do not overdo it.
  • If you can, take less of some of the pain medicines your provider gave you. Some can cause constipation.
  • Try a stool softener. You can get these at any pharmacy without a prescription.
  • Ask your provider whether you can take milk of magnesia or magnesium citrate. DO NOT take any laxatives without first asking your provider.
  • Ask your provider about foods that are high in fiber, or try using psyllium (Metamucil).

High-Fiber Foods

Foods high in fiber include beans, bran cereals and whole-grain breads, peas, dried fruit (figs, apricots, and dates), raspberries, blackberries, strawberries, sweet corn, broccoli, baked potatoes with skin, plums, pears, apples, greens, and nuts.

Follow-up:

You will see your provider for a follow-up appointment in the weeks after your gallbladder removal surgery.

When to call the doctor

Call your provider if:

  • You have a fever above 101°F (38.3°C).
  • Your surgical wound is bleeding, red, or warm to the touch.
  • Your surgical wound has thick, yellow or green, or milky drainage or bad-smelling drainage from your wound site
  • You have pain that is not helped with your pain medicines.
  • It is hard to breathe.
  • You have a cough that does not go away.
  • You cannot drink or eat.
  • Your skin or the white part of your eyes turns yellow.
  • Your stools are a gray color.
  • Continuous vomiting
  • Strong or continuous abdominal pain or swelling of your abdomen
  • No bowel movement 2 to 3 days after the operation.
References
  1. Steiner CA, Bass EB, Talamini MA, Pitt HA, Steinberg EP. Surgical rates and operative mortality for open and laparoscopic cholecystectomy in Maryland. New England Journal of Medicine 1994;330(6):403-8.
  2. NIH Consensus Development Panel on Gallstones and Laparoscopic Cholecystectomy. Journal of the American Medical Association 1993;269(8):1018-24.
  3. Keus F, de Jong J, Gooszen HG, Laarhoven CJHM. Small-incision versus open cholecystectomy for patients with symptomatic cholecystolithiasis. Cochrane Database of Systematic Reviews 2006, Issue 4. Art. No.: CD004788. DOI: 10.1002/14651858.CD004788.pub2. http://cochranelibrary-wiley.com/doi/10.1002/14651858.CD004788.pub2/full
  4. Mühe E. The first cholecystectomy through the laparoscope [Die erste Cholecystektomie durch das Laparoskop]. Langenbecks Archiv für Chirurgie 1986;369:804.
  5. Jackson PG, Evans S. Biliary System. In: Townsend CM Jr, Beauchamp RD, Evers BM, Mattox KL, eds. Sabiston Textbook of Surgery. 19th ed. Philadelphia, PA: Saunders Elsevier; 2012:chap 55.
  6. Gurusamy KS, Davidson BR. Surgical treatment of gallstones. Gastroenterol Clin N Am. 2010 Jun;39(2):229-44, viii.
  7. Nawaz H, Papachristou GI. Endoscopic treatment of post- cholecystectomy bile leaks: updates and recent advances. Ann Gastroenterol. 2011;24(3):161-163
read more
1 3 4 5 6 7 12
Page 5 of 12
Health Jade