
What is Western blot test
Western blot test is a laboratory technique used to detect a specific protein in a blood or tissue sample. Western blot method involves using gel electrophoresis to separate the sample’s proteins. The separated proteins are transferred out of the gel to the surface of a membrane. The membrane is exposed to an antibody specific to the target protein. Binding of the antibody is detected using a radioactive or chemical tag. A western blot is sometimes used to diagnose Lyme disease and HIV.
In this technique a mixture of proteins is separated based on molecular weight, and thus by type, through gel electrophoresis. These results are then transferred to a membrane producing a band for each protein. The membrane is then incubated with labels antibodies specific to the protein of interest.
The unbound antibody is washed off leaving only the bound antibody to the protein of interest. The bound antibodies are then detected by developing the film. As the antibodies only bind to the protein of interest, only one band should be visible. The thickness of the band corresponds to the amount of protein present; thus doing a standard can indicate the amount of protein present. The paper will first describe the protocol for western blot, accompanied by pictures to help the reader and theory to rationalize the protocol. This will be followed by the theoretical explanation of the procedure, and in the later section, troubleshooting tips for common problems.
Western blot procedure
The western blot technique uses three elements to accomplish this task: (1) separation by size, (2) transfer to a solid support, and (3) marking target protein using a proper primary and secondary antibody to visualize 1.
Buffers and reagents
Lysis Buffer
- NP-40
- 150 mM NaCl
- 1% NP-40 or Triton X-100
- 50 mM Tris pH 8.0
RIPA
- 150 mM NaCl
- 1% NP-40 or Triton X-100
- 0.5% sodium deoxycholate
- 0.1% SDS
- 50 mM Tris, pH 8.0
- Tris-HCl
- 20 mM Tris-Hcl, pH 7.5
Loading Buffer
- 2X Laemmli buffer
- 4% SDS
- 5 % 2-mercaptoethanol
- 20% glycerol
- 0.004% bromophenol blue
- 0.125 M Tris HCl, pH 6.8
Running Buffer
- 1X running buffer
- 25 mM Tris base
- 192 mM glycine
- 0.1% SDS
- Adjust to pH 8.3
Transfer Buffer
- 1X transfer buffer (wet)
- 25 mM Tris base
- 192 mM glycine
- 20 % methanol
- Adjust to pH to 8.3
- 1X transfer buffer (semi-dry)
- 48 mM Tris base
- 39 mM glycine
- 20 % methanol
- Adjust pH to 8.3
Blocking Buffer
- Blocking solution
- 1X TBST (Tris-Buffered Saline Tween-20)
- 5% non-fat dry milk OR 5% BSA
Cell lysis to extract protein
Protein can be extracted from different kind of samples, such as tissue or cells. Below is the protocol to extract proteins from adherent cells.
Western blot protocol
Lysate preparation
- Aspirate phosphate buffered saline (PBS) and add ice-cold lysis buffer (1 mL per confluent 107 cells/100mm dish/150 cm2 flask). See the table below for lysis buffer recommendations based on the subcellular location of the protein of interest.
- Wash cell culture dish on ice with ice-cold phosphate buffered saline (PBS).
- Aspirate phosphate buffered saline (PBS) and add ice-cold lysis buffer (1 mL per confluent 107 cells/100mm dish/150 cm2 flask). See the table below for lysis buffer recommendations based on the subcellular location of the protein of interest.
- Using a cell scraper, scrape adherent cells off the dish and transfer the cell suspension into a microcentrifuge tube. If required, the cells can be trypsinized and washed with phosphate buffered saline (PBS) prior to resuspension in lysis buffer.
- Agitate cells for 30 minutes at 4˚C.
- Centrifuge cell lysate mixture at 4˚C. The time and centrifugation force vary for each cell type, but a general guideline is 20 minutes at 12,000 rpm.
- Transfer the supernatant (lysate) to a fresh tube on ice.
| Subcellular Location | Recommended Buffer |
| Whole Cell Lysate | NP-40 |
| Nucleus | RIPA |
| Mitochondria | RIPA |
| Cytoplasm | Tris-HCl |
| Membrane-bound Protein | RIPA |
Adherent cells
- Wash cells in the tissue culture flask or dish by adding cold phosphate buffered saline (PBS) and rocking gently. Discard PBS. (Tip: Keep tissue culture dish on ice throughout).
- Add PBS and use a cell scraper to dislodge the cells. Pipette the mixture into microcentrifuge tubes.
- Centrifuge at 1500 RPM for 5 minutes and discard the supernatant.
- Add 180 μL of ice cold cell lysis buffer with 20 μL fresh protease inhibitor cocktail. (Tip: If protein concentration is not high enough at the end, it is advised to repeat the procedure with a higher proportion of protease inhibitor cocktail).
- Incubate for 30 minutes on ice, and then clarify the lysate by spinning for 10 minutes at 12,000 RPM, at 4°C.
- Transfer supernatant (or protein mix) to a fresh tube and store on ice or frozen at -20°C or -80°C.
- Measure the concentration of protein using a spectrophotometer.
Sample preparation
- Determine the volume of protein extract to ensure 50 μg in each well.
- Add 5 μL sample buffer to the sample, and make the volume in each lane equalized using double distilled H2O (dd H2O). Mix well. (Tip: Total volume of 15 μL per lane is suggested).
- Heat the samples with dry plate for 5 minutes at 100°C.
Gel preparation
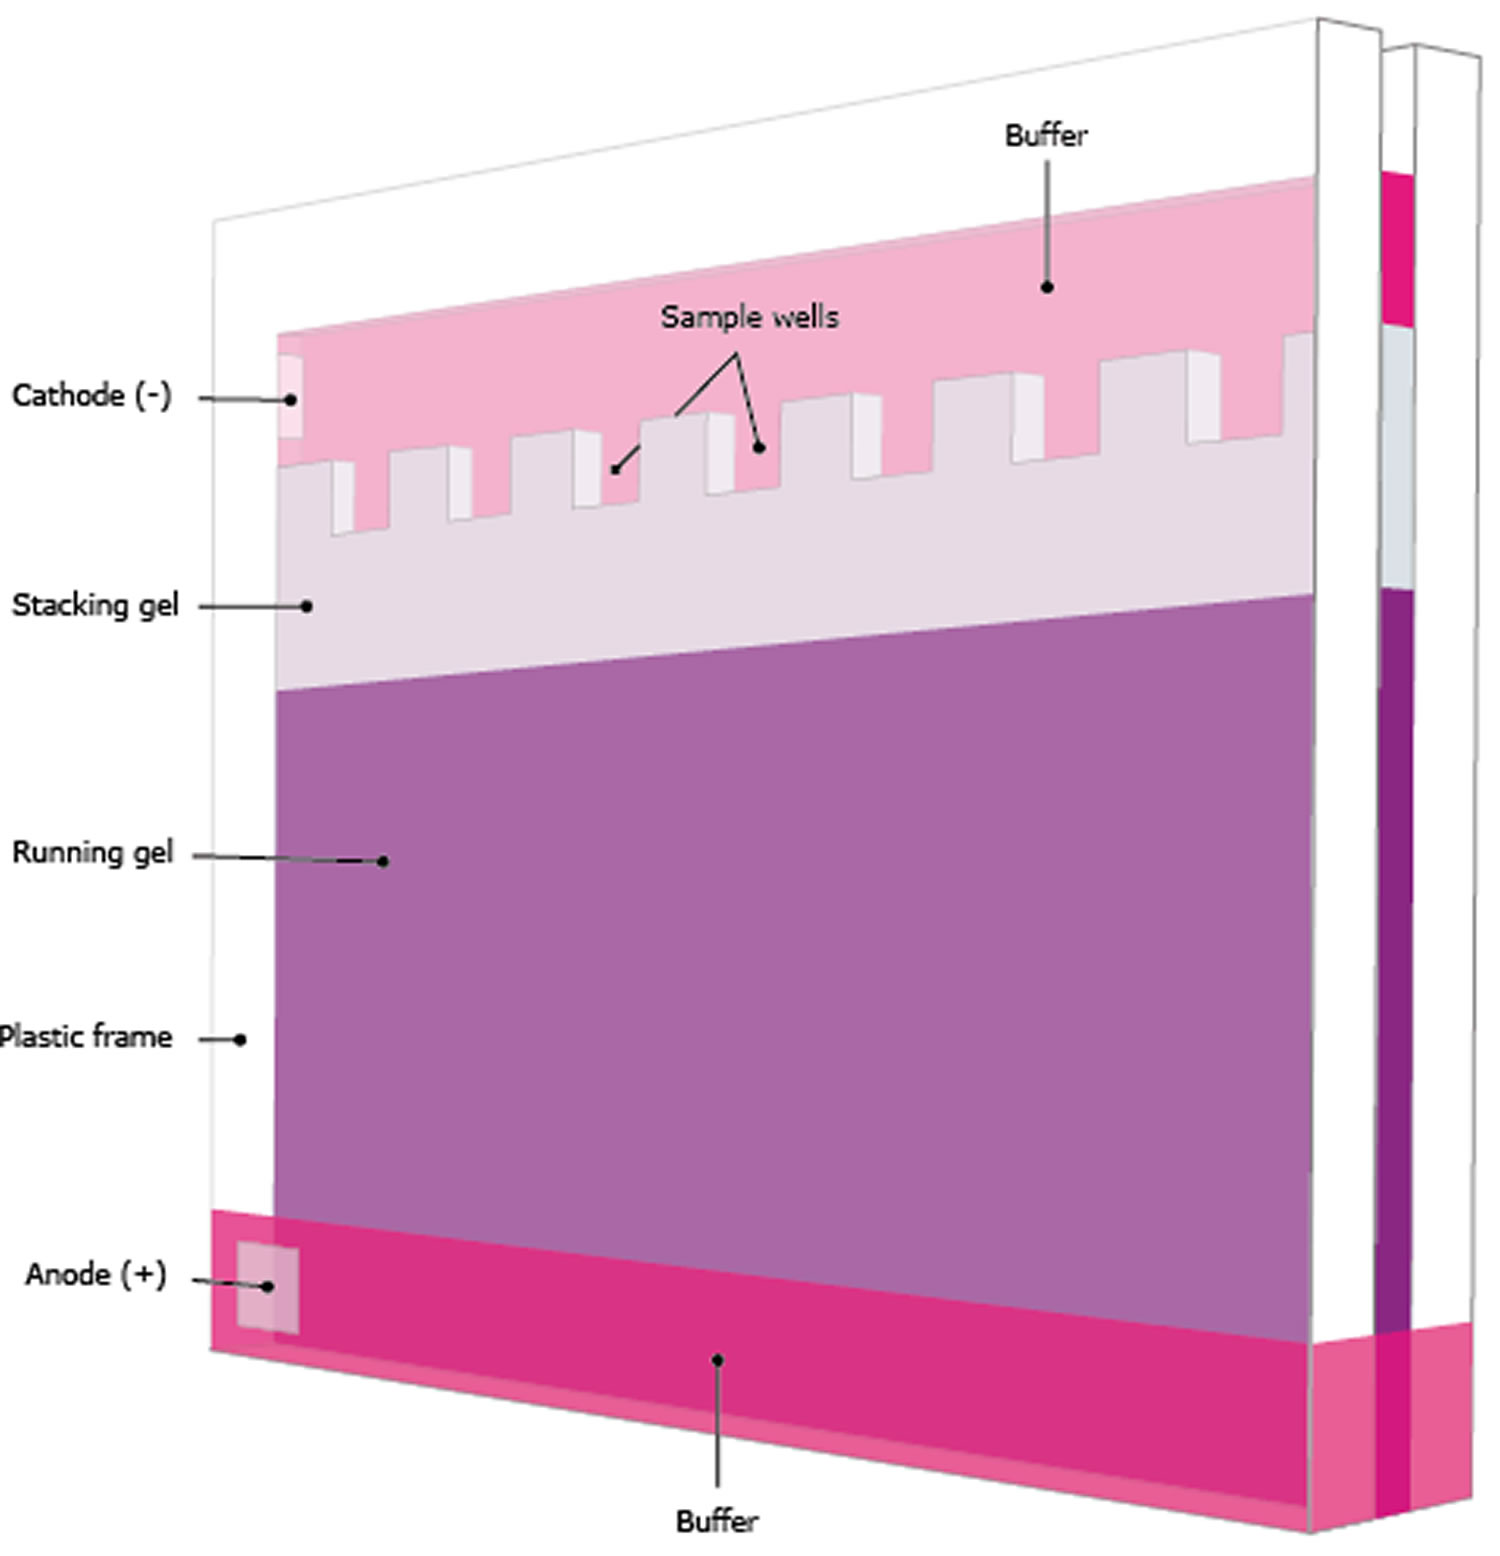
- Prepare or purchase a pre-made gel of appropriate polyacrylamide percentage to best resolve your protein of interest based on molecular weight.
- Load samples containing equal amounts of protein (10-50 μg/lane protein from cell lysate or 10-100 ng/lane purified protein) prepared in sample buffer into SDS-PAGE wells. Include a molecular weight marker in one of the lanes.
- Fill the electrophoresis apparatus with 1X running buffer as instructed by the manufacturer.
- Run the gel as recommended by the manufacturer; 1-2 hours at 100 V is standard, but time and voltage may require optimization.
| Protein size | Gel percentage |
| 4–40 kDa | 20% |
| 12–45 kDa | 15% |
| 10–70 kDa | 12.5% |
| 15–100 kDa | 10% |
| 25–100 kDa | 8% |
Figure 1. Gel electrophoresis
Protein transfer
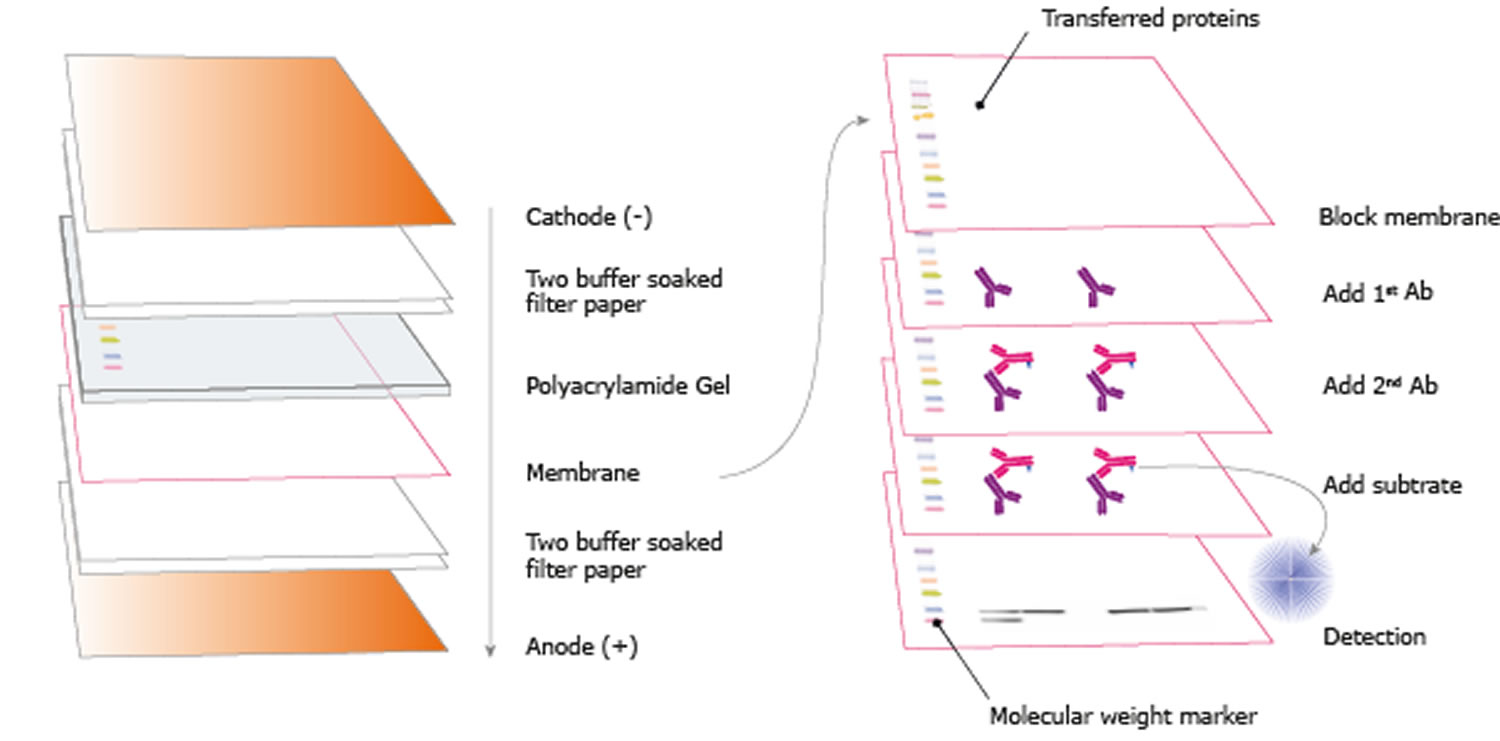
- Prepare polyvinylidene fluoride (PDVF) membrane by wetting it in methanol for 30 seconds and then soaking it briefly in distilled water followed by 1X transfer buffer. Handle the membrane carefully, ideally with rounded tweezers to avoid scratching or puncturing the surface.
- Soak filter papers and sponges in the transfer buffer for 10 minutes prior to assembly of the transfer “sandwich”.
- After electrophoresis, remove the gel from the electrophoresis apparatus and equilibrate it by soaking in transfer buffer for 10 minutes.
- Prepare the sandwich. Sequentially assemble the layers of the sandwich. Gently remove any air bubbles with a roller or pipette. Bubbles between the gel and the membrane will inhibit the transfer of proteins to the membrane.
- Place the sandwich into a transfer cassette and perform semi-dry or wet transfer according to the manufacturer’s instructions of the blotting apparatus.
Immunoblotting
Tip: Increase the number of washes to 5-6 if high background occurs.
- After transfer, rinse the membrane briefly in distilled water or 1X TBST (Tris-Buffered Saline Tween-20).
- Gently mark molecular weight ladder bands with a pencil for size detection. If all blue molecular weight markers were used, this step can be omitted as the bands of all blue markers will be visible after detection when used in conjugation with the Blue Marker Antibody.
- If desired, stain the membrane with Ponceau red for 30 seconds to visualize protein bands to confirm that protein transfer was successful. Rinsing the membrane briefly with distilled water after Ponceau staining will reveal protein bands. Wash away Ponceau red with several washes in 1x TBST until membrane is clear. Additionally, coomassie staining of the gel after transfer can help assure that proteins were completely transferred from the gel to the membrane.
- Incubate membrane in blocking solution for 1 hour at room temperature or overnight at 4˚C with constant rocking.
- Optional step: Rinse the membrane for 5 minutes in 1X TBST.
- Dilute the primary antibody to working concentration in 1X TBST with 1% milk or BSA (use whatever was chosen for blocking).
- Optional: To visualize the molecular weight markers in addition to the protein of interest, add 1 μg/mL Blue Marker Antibody to the primary antibody solution.
- Incubate the membrane in primary antibody solution for 1 hour at room temperature or overnight at 4˚C with gentle rocking. This time may require optimization. In most cases, overnight incubation at 4˚C increases signal strength and reduces background signal relative to 1 hour incubation at room temperature.
- Wash the membrane with 1X TBST three times for 10 minutes each with gentle rocking.
- Incubate the membrane in the appropriate diluted secondary antibody (in 1X TBST and may include 1% milk or BSA) for 1 hour at room temperature with gentle rocking. HRP conjugated secondary antibodies are most common for western blot analysis.
- Wash the membrane in 1X TBST three times for 10 minutes each with gentle rocking.
Tip: Do not let the membrane dry at any point during the blotting process.
Figure 2. Immunoblotting (the proteins in the gel are blotted to a membrane and the sample is visualized through blocking, adding antibodies, and washing according to a certain schedule)
Detection
Tip: More sensitive substrates may require shorter incubation times or even dilution to achieve optimal signal and avoid overexposure.
Tip: Clip the top right corner of your film as a guide for film orientation in a dark room.
Tip: Use multiple exposure lengths to identify the most optimal exposure time. An initial 10 second exposure will indicate the necessary exposure time
Prepare the ECL substrate just prior to use according to the manufacturer’s instructions.
- Incubate the membrane in the substrate according to manufacturer’s directions. Typical incubation times are 1-5 minutes.
- Carefully remove the membrane from the detection reagent and sandwich it between layers of plastic (i.e. a sheet protector or plastic wrap).
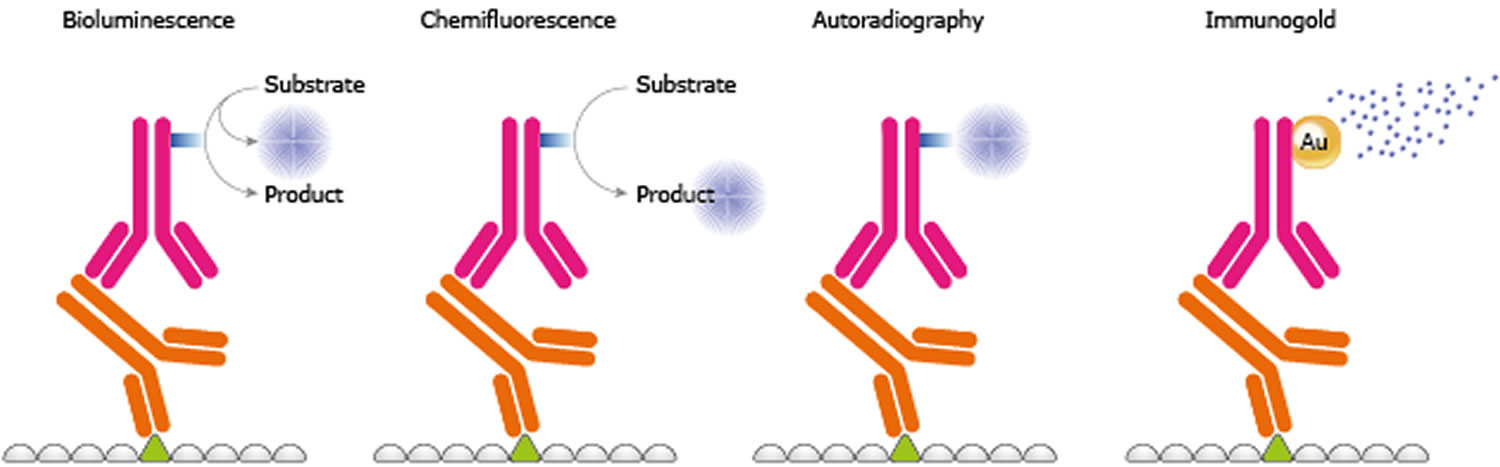
- Expose the membrane to autoradiography film in a dark room or image with a chemiluminescent imaging system, such as a ChemiDoc.
- To mark the molecular weight in cases where the Blue Marker Antibody is not used, lineup the developed film over the blot to visualize the ladder.
NOTE: Following target protein detection, a second antibody can be used to reprobe the same blot for a second protein. This second antibody is often specific for a loading control protein.
Figure 3. Protein-antibody-antibody complex detection
Imaging
Imaging is the sixth step of western blot and the capturing can be analogue using a film, or digitally preformed with a CCD camera or scanner capturing the different kinds of emitted signals. The CCD imaging device enables quantitation with high detection sensitivity and a broad linear range with no chemical waste or need for a dark room. It may be used to detect membranes, stained gels, or for ultraviolet light applications.
Analysis
The last step of a western blot is to analyze the results. In a typical qualitative application, the presence of a protein of interest is confirmed, the amount is approximated by visual inspection, and the size is determined by comparison with a marker. Improvements and developments, especially towards highly sensitive detection reagents and advanced imaging techniques, make western blot a potential tool for quantitative analysis. The quantitative applications entail a definition of the amount of protein in relative or absolute terms. Some factors are to take under consideration like sensitivity, signal stability, linear dynamic range, normalization, and the signal-to-noise ratio. The minimum of protein that can be seen in a given assay gives the limits of detection (LOD), and the limit of signal intensity that can be reliably used for precise quantification is the limit of quantification (LOQ). Factors that affect these terms are antibody quality and concentrations as well as exposure times when considering the minimum amount of protein detected. A stable signal system expands the time window for reaching high sensitivity, multiple exposures, and possibility to detect weak bands. The range that allows an even and precise quantitation where the signal intensity still is proportional to the amount of protein is called the linear dynamic range. It is important to avoid signal saturation due to excessive amounts of protein or high concentrations of antibodies. A low limits of detection (LOD) and quantitation of both weak and strong signals gives a broad linear dynamic range. The protein of interest should be normalized to an internal reference that allows fluctuations in amount of protein loaded onto each well or different concentrations. This can be achieved with housekeeping or spiked protein. The ratio between the signal and noise is important in order to properly quantitate the protein. This is of outmost importance when detecting weak bands where a higher background is expected.
Troubleshooting
Even though the procedure for western blot is simple, many problems can arise, leading to unexpected results. The problem can be grouped into five categories: (1) unusual or unexpected bands, (2) no bands, (3) faint bands or weak signal, (4) high background on the blot, and (5) patchy or uneven spots on the blot.
Unusual or unexpected bands can be due to protease degradation, which produces bands at unexpected positions. In this case it is advisable to use a fresh sample which had been kept on ice or alter the antibody. If the protein seems to be in too high of a position, then reheating the sample can help to break the quaternary protein structure. Similarly, blurry bands are often caused by high voltage or air bubbles present during transfer. In this case, it should be ensured that the gel is run at a lower voltage, and that the transfer sandwich is prepared properly. In addition, changing the running buffer can also help the problem. Nonflat bands can be the result of too fast of a travel through the gel, due to low resistance. To fix this the gel should be optimized to fit the sample. Finally, white (negative) bands on the film are due to too much protein or antibody.
Another problem: no bands can also arise due to many reasons related to antibody, antigen, or buffer used. If an improper antibody is used, either primary or secondary, the band will not show. In addition, the concentration of the antibody should be appropriate as well; if the concentration is too low, the signal may not be visible. It is important to remember that some antibodies are not to be used for western blot. Another reason for no visible bands is the lowest concentration or absence of the antigen. In this case, antigen from another source can be used to confirm whether the problem lies with the sample or with other elements, such as the antibody. Moreover, prolonged washing can also decrease the signal. Buffers can also contribute to the problem. It should be ensured that buffers like the transfer buffer, TBST, running buffer and ECL are all new and noncontaminated. If the buffers are contaminated with sodium azide, it can inactivate HRP.
Similarly, weak signals can be caused by low concentration of antibody or antigen. Increasing exposure time can also help to make the band clearer. Another reason could be nonfat dry milk masking the antigen. In this case use BSA or decrease the amount of milk used.
High background is often caused by too high concentration of the antibody, which can bind to PVDF membranes. Another problem could be the buffers, which may be too old. Increasing the washing time can also help to decrease the background. Additionally, too high of an exposure can also lead to this problem. Therefore, it is advisable to check different exposure times to achieve an optimum time.
Patchy and uneven spots on the blot are usually caused by improper transfer. If there are air bubbles trapped between the gel and the membrane, it will appear darker on the film. It is also important to use a shaker for all incubation, so that there is no uneven agitation during the incubation. Once again, washing is of utmost importance as well to wash the background. This problem can also be caused by antibodies binding to the blocking agents; in this case another blocking agent should be tried. Filtering the blocking agent can also help to remove some contaminants. Finally, this problem can also be caused by aggregation of the secondary antibody; in this case, the secondary antibody should be centrifuged and filtered to remove the aggregated.
- Mahmood T, Yang PC. Western blot: technique, theory, and trouble shooting. N Am J Med Sci. 2012;4(9):429–434. doi:10.4103/1947-2714.100998 https://www.ncbi.nlm.nih.gov/pmc/articles/PMC3456489[↩]

