What is choking
Choking occurs when a foreign body (e.g., a mouthful of food) partly or completely blocks a person’s airway making breathing difficult. Choking is a medical emergency. If the object causing the blockage cannot be easily removed call your local emergency services number immediately.
The respiratory tract begins at the nose, nasal passages and mouth, joining at the throat to form an air pipe (called the trachea) which is held open by C-shaped pieces of cartilage. When a foreign body partly or completely blocks a person’s airway, the passage of air into and out of the lungs may be compromised. Depending on how much the airway is blocked will determine how severe this compromise may be. In extreme cases, no air at all may be able to pass into the lungs, signalling a medical emergency as the brain can only be deprived of oxygen for a few minutes before damage begins. In less severe cases, air entry may not be reduced, although discomfort or pain may be experienced.
Choking is more common in infants and the elderly.
Young children are particularly at risk of choking due to their smaller airways, reduced ability to bite and chew their food and their tendency to explore their surroundings by placing objects in their mouth.
Common causes of choking:
- eating or drinking too quickly
- swallowing food before it has been sufficiently chewed
- swallowing small bones or objects
- inhaling small objects
Signs and symptoms of choking
The signs and symptoms of choking may vary according to the severity of the obstruction and the object itself:
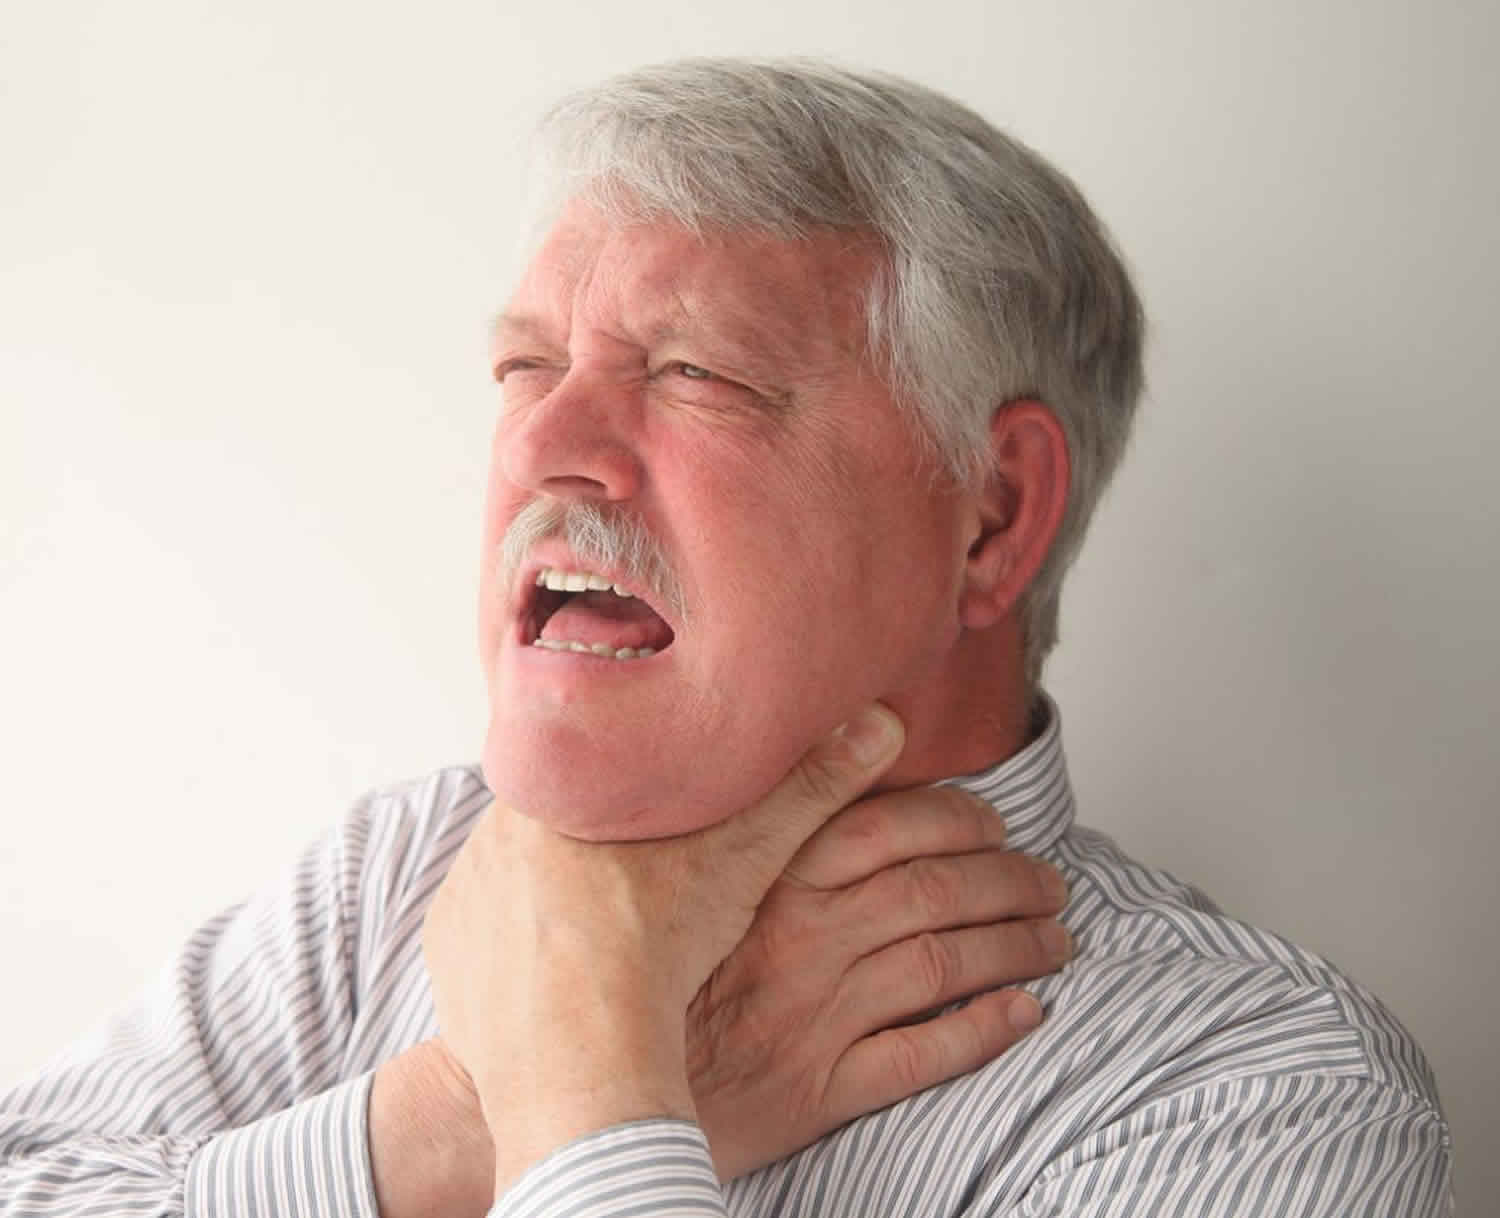
- clutching at the throat
- neck or throat pain
- inability to speak, breathe or swallow
- coughing
- wheezing or other unususal breathing sounds
- gagging
- a change in color (e.g.. blue lips or red face)
- chest pain
- collapse
Figure 1. Site of choking in the oropharynx
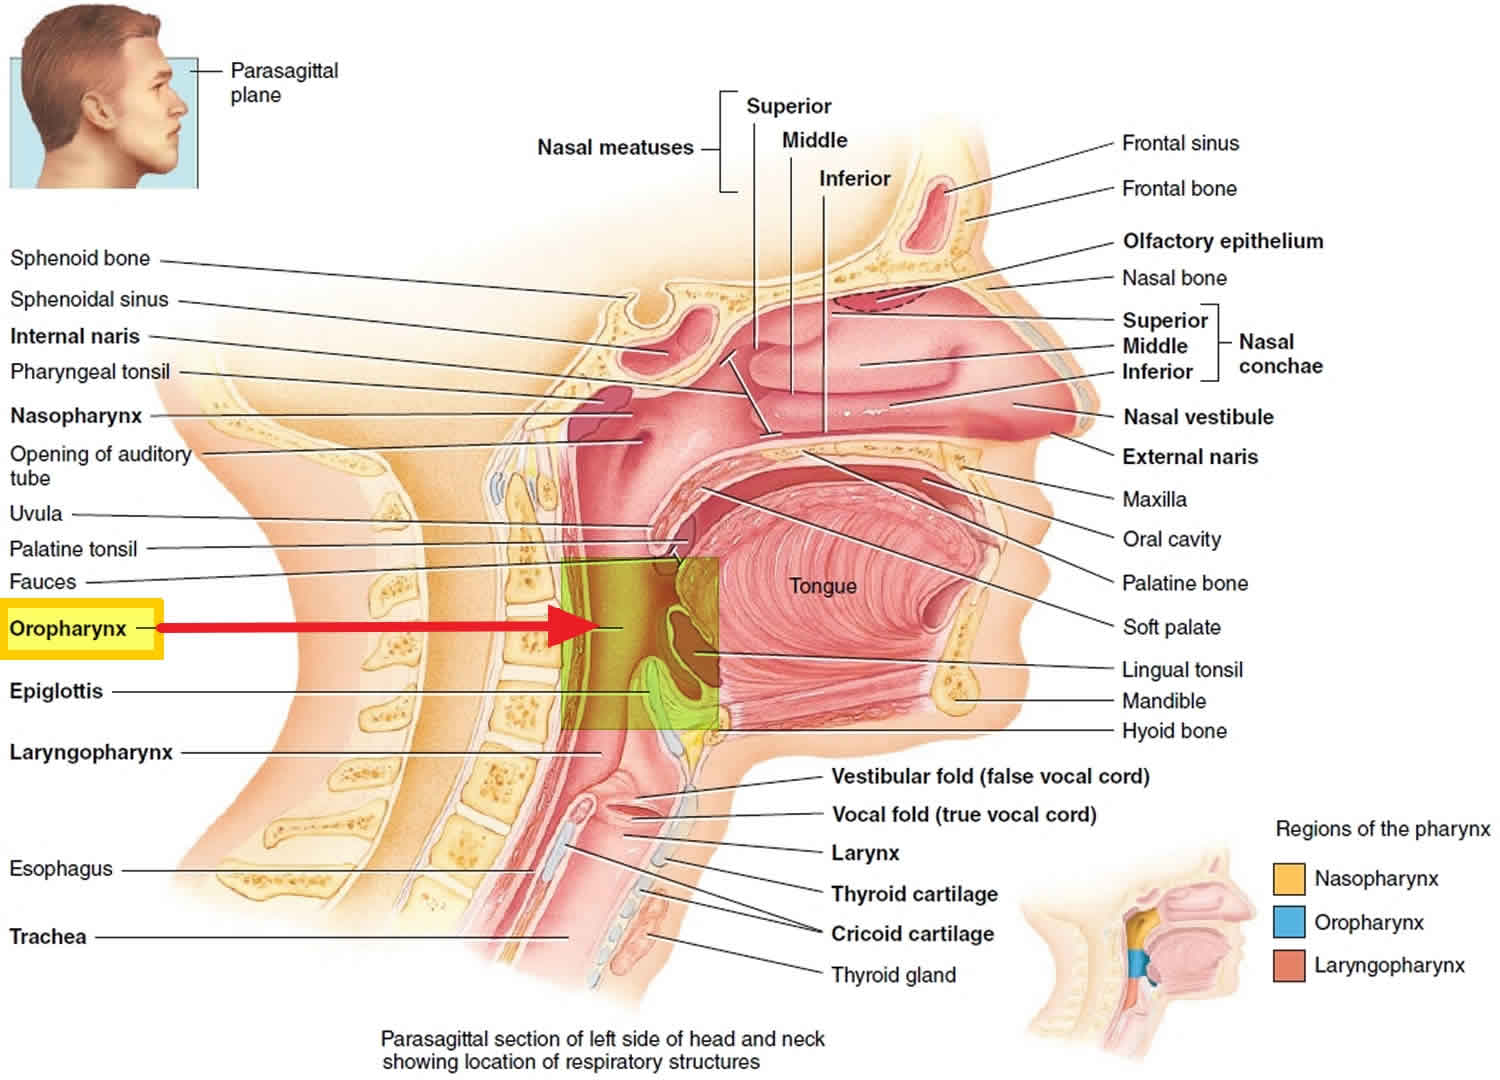 Figure 2. Universal sign for choking
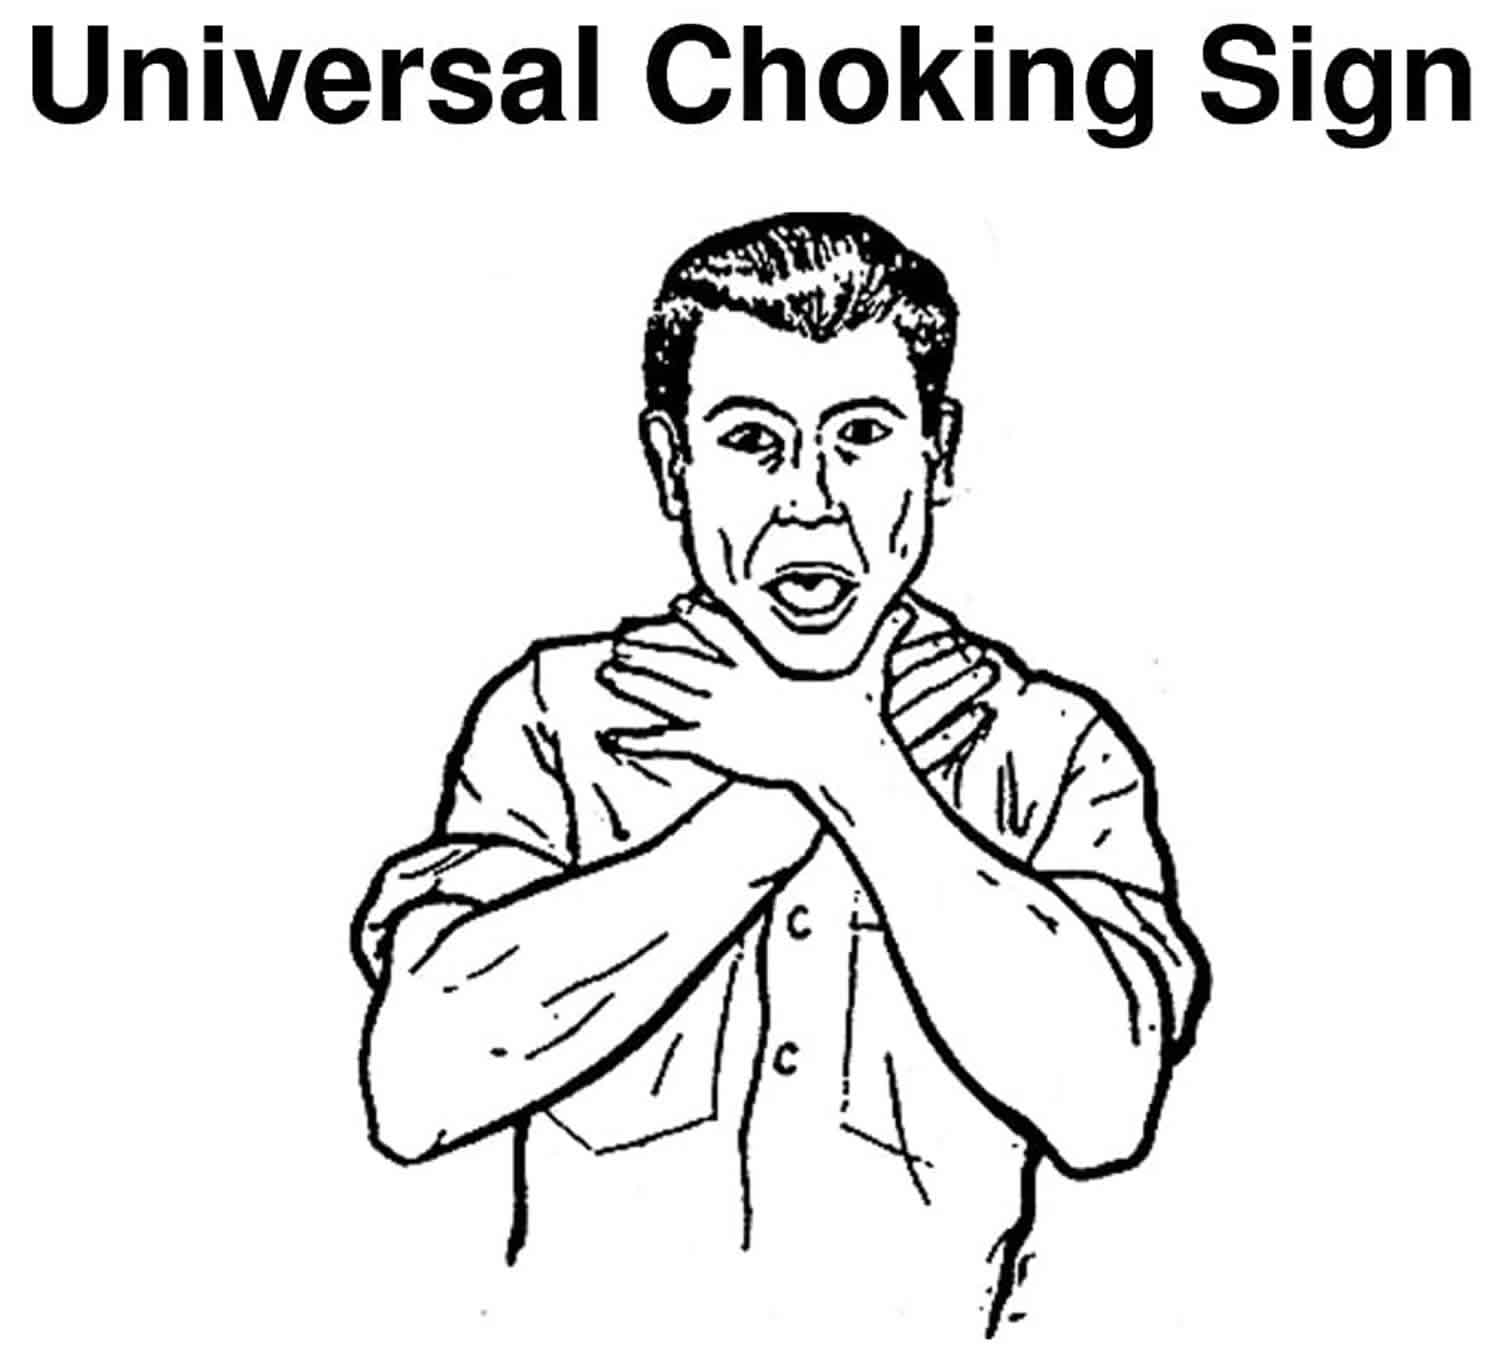
Mild choking
If the airway is only partly blocked, the person will usually be able to speak, cry, cough or breathe. In situations like this, a person will usually be able to clear the blockage themselves.
If choking is mild:
- encourage the person to cough to try to clear the blockage
- ask them to try to spit out the object if it’s in their mouth
- don’t put your fingers in their mouth to help them because they may accidentally bite you
If coughing doesn’t work, start back blows (see below).
Severe choking
If choking is severe, the person won’t be able to speak, cry, cough or breathe, and without help they’ll eventually become unconscious.
To help an adult or child over one year old:
- Stand behind the person and slightly to one side. Support their chest with one hand. Lean the person forward so that the object blocking their airway will come out of their mouth, rather than moving further down.
- Give up to five sharp blows between the person’s shoulder blades with the heel of your hand (the heel is between the palm of your hand and your wrist).
- Check if the blockage has cleared.
- If not, give up to five abdominal thrusts (see below).
Don’t give abdominal thrusts to babies under one year old or to pregnant women.
To perform abdominal thrusts on a person who is severely choking and isn’t in one of the above groups:
- Stand behind the person who is choking.
- Place your arms around their waist and bend them well forward.
- Clench one fist and place it just above the person’s belly button.
- Place your other hand on top of your fist and pull sharply inwards and upwards.
- Repeat this up to five times.
The aim is to get the obstruction out with each chest thrust, rather than necessarily doing all five.
If the person’s airway is still blocked after trying back blows and abdominal thrusts:
- Call your local emergency services number and ask for an ambulance. Tell the emergency services operator that the person is choking.
- Continue with the cycles of five back blows and five abdominal thrusts until help arrives.
The person choking should always be seen by a healthcare professional afterwards to check for any injuries or small pieces of the obstruction that remain.
Airway blockages and choking
Choking happens when a child’s airway gets blocked. Many different things can cause partial or complete airway blockage and choking, including:
- asthma
- seizures
- pneumonia
- trauma
- anaphylactic reaction
- inhaled object.
If a child is unconscious and the muscles in his airway relax for some reason, this can also lead to an airway blockage and choking.
Children at higher risk
Children with a disability or chronic illness might be at higher risk of choking than other children.
Children are more likely to choke if they have a disability like cerebral palsy, epilepsy, intellectual disability, chronic asthma or gastro-esophageal reflux disease (GERD). If your child has one of these conditions, talk to your doctor about how best to avoid choking.
How to help a choking baby
Babies and young children can choke on anything smaller than a D-size battery. To prevent choking, keep small objects out of reach, cut up food into small pieces, and supervise children while they’re eating, especially if they’re under five years.
Infants choking signs and symptoms:
- coughing, wheezing, gagging
- difficulty breathing
- making a whistling or ‘crowing’ noise or no sound at all
- face, neck lips, ears, fingernails turning blue.
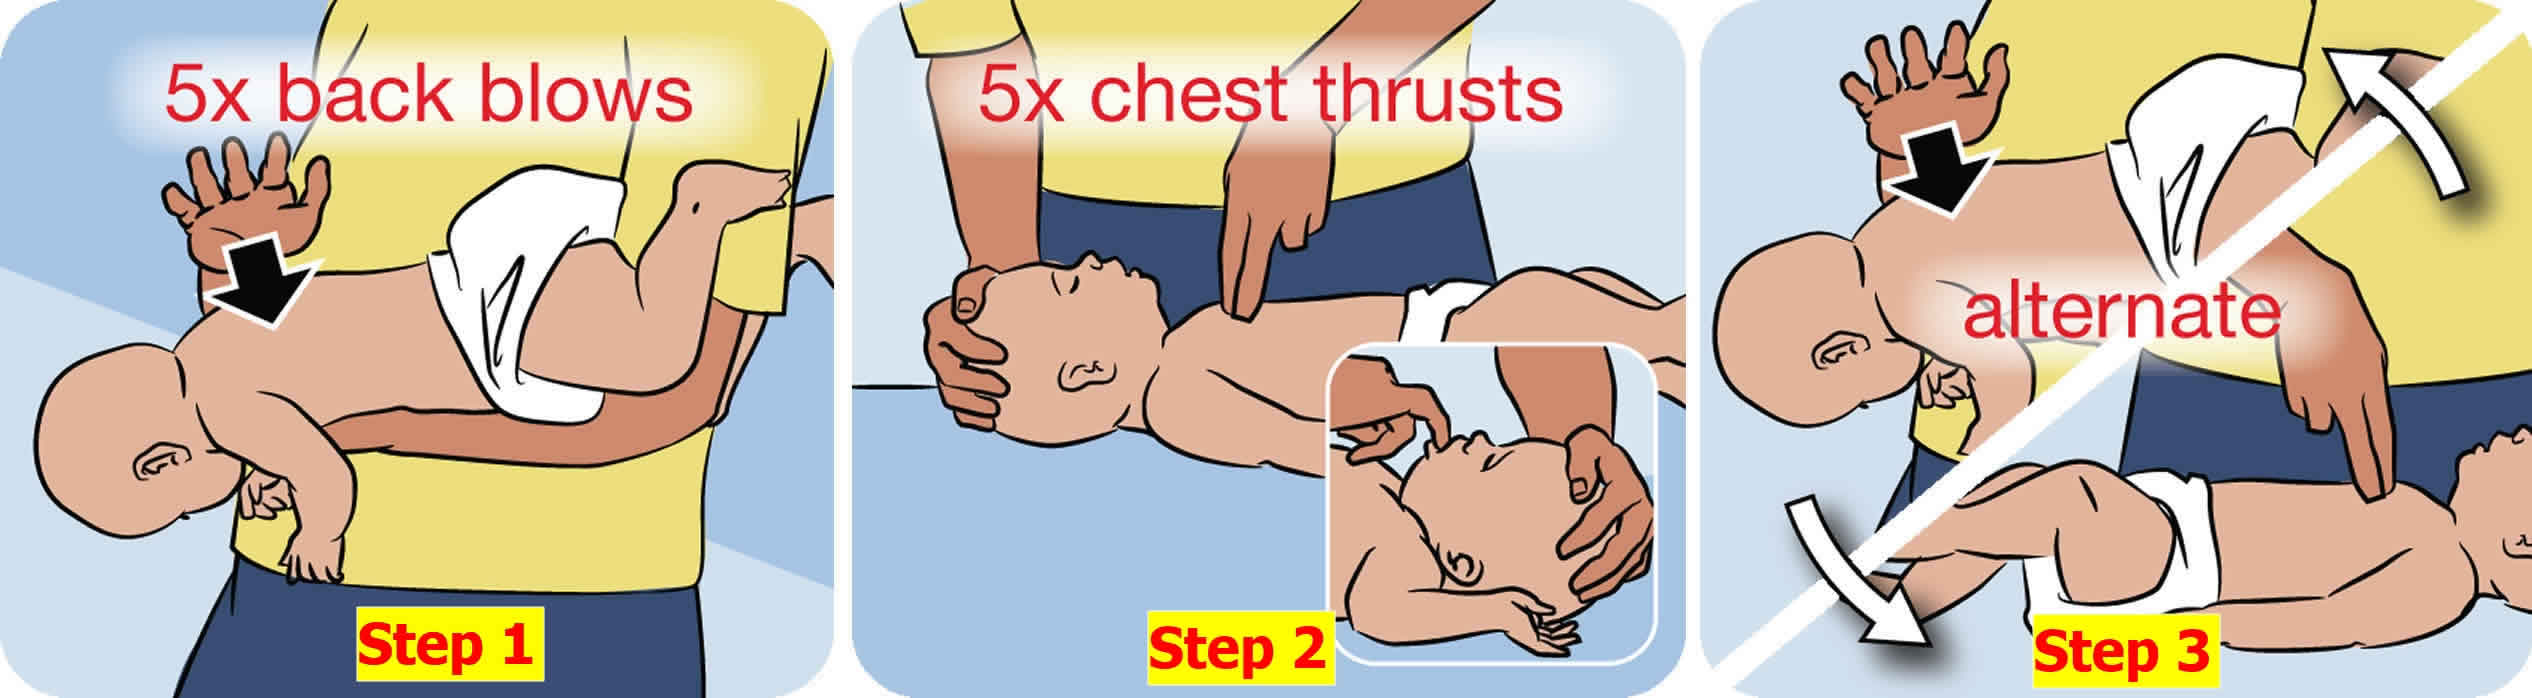
If a baby show signs of choking, phone your local emergency services number immediately and follow the steps shown below to clear a blockage (also watch the first aid Youtube videos above). The emergency services operator will stay on the line to assist you.
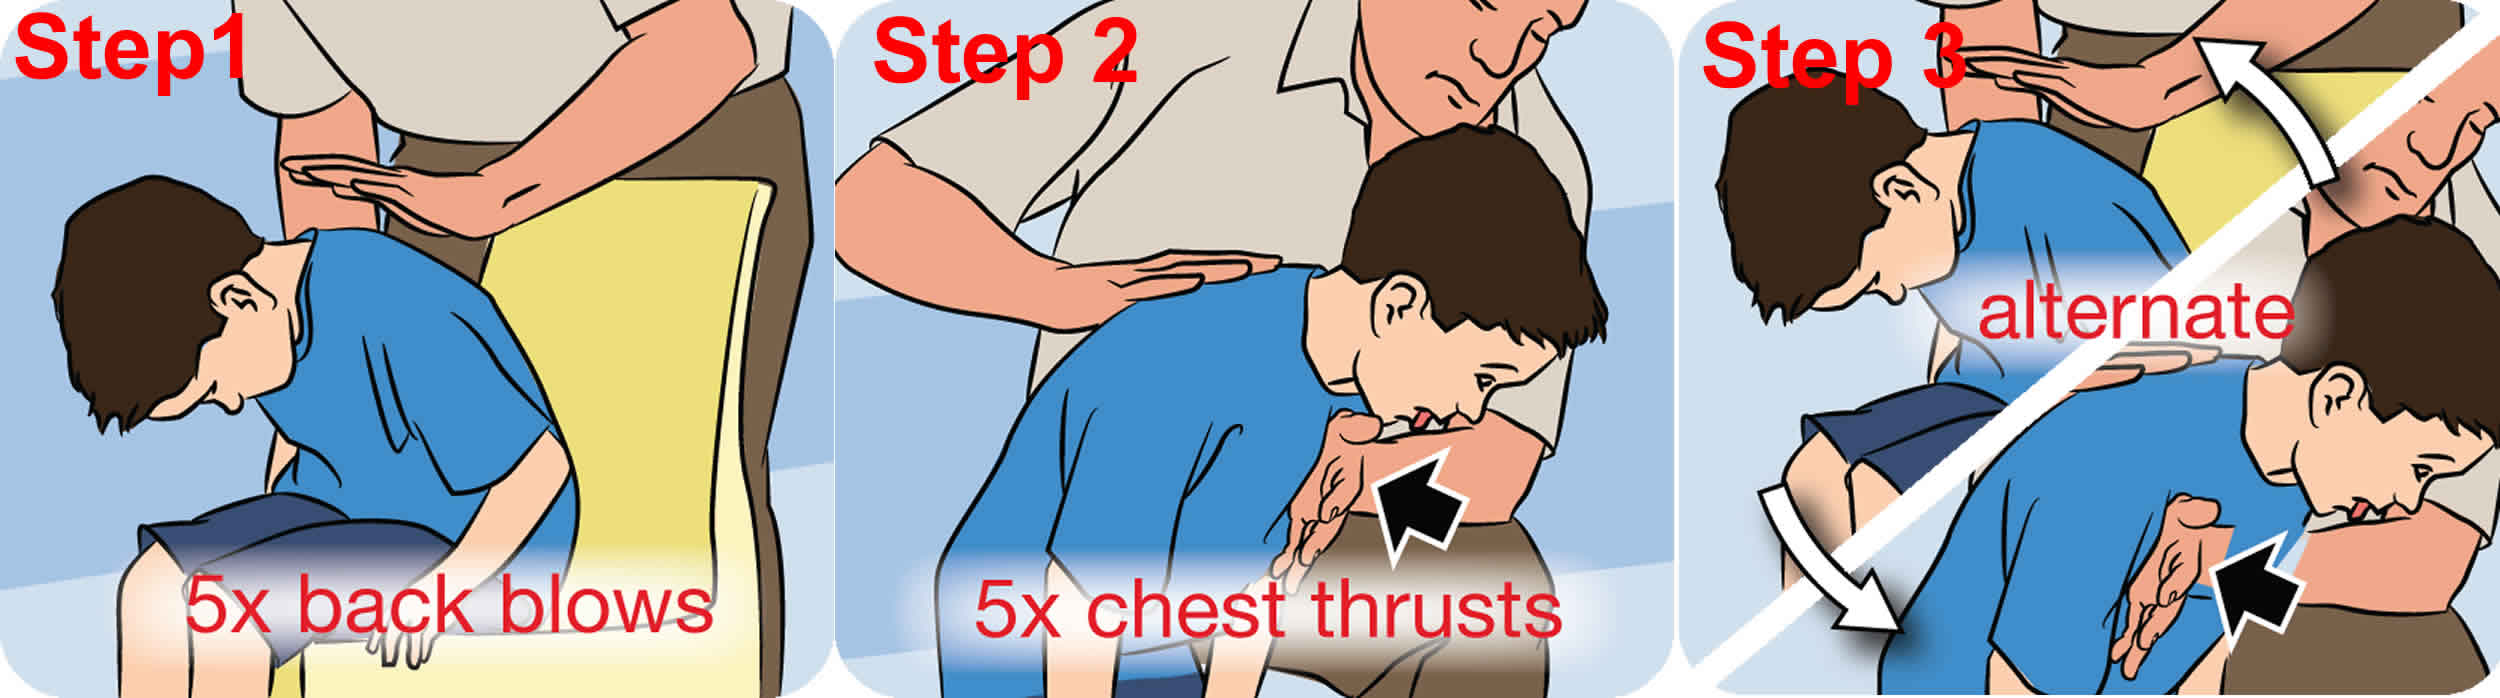
- Step 1: Lay baby face downwards on your forearm. Support head and shoulders on your hand and hold infant’s mouth open with your fingers. Using the heel of your hand, give her a firm back blow between the shoulder blades. Give up to five back blows, and check between each blow to see if the blockage has cleared.
- Step 2: If the blockage hasn’t cleared, lay baby on her back, place two fingers in the center of her chest, and give her up to five chest thrusts – like cardiopulmonary resuscitation (CPR) compressions but slower and sharper. Check to see if the blockage has cleared between each thrust.
- Step 3: If baby is still choking, check that someone has called your local emergency services number and alternate five back blows and five chest thrusts until emergency help arrives. If at any point baby becomes unconscious, start baby cardiopulmonary resuscitation (CPR).
Figure 3. Choking first aid – clearing a blockage for babies under one year
CPR for babies under 12 months
- Step 1: If a baby is unconscious, check her mouth for airway blockages – for example, tongue, food, vomit or blood. If there’s a blockage, use your little finger to clear it. Place baby on her back to open her airway.
- Step 2: Check for breathing. Listen for the sound of the breath, look for movements of the chest or feel for the breath on your cheek.
- Step 3: If baby is breathing, place him in the recovery position by lying him face down on your forearm. Phone your local emergency services number. Check baby regularly for breaths and responses until the ambulance arrives.
- Step 4: Position two fingers in the center of baby’s chest and give 30 compressions at a rate of about 100 compressions per minute. Each compression should depress the chest by about one third.
- Step 5: Tilt the baby’s head back very slightly with the chin lifted to bring the tongue away from the back of the throat, opening her airway. Take a breath and seal her mouth and nose with your mouth. Blow gently and steadily for about one second. Watch for the rise and fall of the chest. Take another breath and repeat the sequence.
- Step 6: Continue giving 30 compressions followed by 2 breaths until medical help arrives. If the child starts breathing and responding, turn her into the recovery position. Keep watching her breathing and be ready to start CPR again at any time.
Figure 4. CPR for babies under 12 months

What to do if a child is choking
Children can choke if their airways become partially or completely blocked.
Children, particularly those aged from 1 to 5, often put objects in their mouth. This is a normal part of how they explore the world. Some small objects, such as marbles, beads and button batteries, are just the right size to get stuck in a child’s airway and cause choking.
The best way to avoid this is to make sure that small objects like these are kept out of your child’s reach. No matter how careful you are, your child may choke on something. In most cases, you or someone else will see your child swallow the object that causes choking.
There can be other reasons why your child starts coughing. But if your child suddenly starts coughing, isn’t ill and has a habit of putting small objects in their mouth, there’s a good chance that they’re choking.
If a child shows signs of choking, ask the child to cough. If this doesn’t clear the blockage, phone your local emergency services number and follow the first aid steps below.
Choking sign and symptoms may include:
- clutching the throat
- coughing, wheezing, gagging
- difficulty breathing, speaking and swallowing
- making a whistling or ‘crowing’ noise or no sound at all
- face, neck lips, ears, fingernails turning blue.
Partial airway blockage: choking signs
The following signs can tell you that a child’s airway is partially blocked:
- loss of voice
- choking noises
- coughing that keeps getting worse
- gagging
- wheezing
- anxiety and agitation
- stridor (a shrill rattling sound)
- sudden chest pain.
Complete airway blockage: choking signs
The following signs can tell you that a child’s airway is completely blocked:
- The child can’t breathe.
- The child can’t make any sounds.
- No air is getting out of the child’s nose and/or mouth.
- The child’s skin goes pale or blue in color.
- The child starts to lose consciousness quickly.
Choking first aid for airway blockage
If a child is choking and you think she has a blocked airway, phone your local emergency services number immediately.
For a baby under one year do the following:
- Lay the baby facing downwards on your forearm or over your thigh – remember to always support baby’s head and neck.
- If the baby is old enough to understand, encourage him to cough.
For a child aged over one year do the following:
- If you can see the object, try to remove it. Don’t poke blindly or repeatedly with your fingers. You could make things worse by pushing the object further in and making it harder to remove.
- If your child’s coughing loudly, encourage them to carry on coughing to bring up what they’re choking on and don’t leave them.
- If a child shows signs of choking, stay calm and encourage the child to lean forward and to cough to help remove the object while you’re waiting for the ambulance to arrive. If this doesn’t work, follow the steps to clear a blockage (shown below).
- If your child’s coughing isn’t effective (it’s silent or they can’t breathe in properly), shout for help immediately and decide whether they’re still conscious.
- If your child’s still conscious, but they’re either not coughing or their coughing isn’t effective, use back blows shown below.
Choking first aid: clearing a blockage for children and teens
- Step 1: Bend the child forward and use the heel of your hand to give a sharp back blow between the shoulder blades. Check to see if the blockage has cleared before giving another blow. If the blockage hasn’t cleared after five blows, try chest thrusts.
- Step 2: Place one hand in the middle of the child’s back and the other hand in the center of his chest. Using the heel of the hand on the chest, do five chest thrusts – like cardiopulmonary resuscitation (CPR) compressions but slower and sharper. Check to see if the blockage has cleared between each thrust.
- Step 3: If the child is still choking, call your local emergency services number and alternate five back blows and five chest thrusts until emergency help arrives. If at any point the child becomes unconscious, start child CPR.
- Even if the object has come out, get medical help. Part of the object might have been left behind, or your child might have been hurt by the procedure.
Figure 5. Choking first aid – clearing a blockage for children and teens
CPR for for children over 1 year
- Step 1: If a child is unconscious, the first step is to check his mouth for anything blocking the airway. This could include his tongue, food, vomit or blood.
- Step 2: If you find a blockage, roll him onto his side, keeping his top leg bent. This is the recovery position. Clear blockages with your fingers, then check for breathing.
- Step 3: If you find no blockages, check for breathing and look for chest movements. Listen for breathing sounds, or feel for breath on your cheek.
- Step 4: If the child is breathing, gently roll him onto his side and into the recovery position. Phone your local emergency services number and check regularly for breathing and response until the ambulance arrives. If the child is not breathing and responding, send for help. Phone local emergency services number and start CPR: 30 chest compressions, 2 breaths.
- Step 5: Put the heels of your hands in the center of the child’s chest. Using the heel of your hand, give 30 compressions. Each compression should depress the chest by about one third.
- Step 6: After 30 compressions, take a deep breath, seal your mouth over the child’s mouth, pinch his nose and give two steady breaths. Make sure the child’s head is tilted back to open his airway.
- Step 7: Keep giving 30 compressions then 2 breaths until medical help arrives. If the child starts breathing and responding, turn him into the recovery position. Keep watching his breathing and be ready to start CPR again at any time.
Figure 6. CPR for for children over 1 year

What to do if an adult is choking
The universal sign for choking is hands clutched to the throat. If the person doesn’t give the signal, look for these indications:
- Inability to talk
- Difficulty breathing or noisy breathing
- Squeaky sounds when trying to breathe
- Cough, which may either be weak or forceful
- Skin, lips and nails turning blue or dusky
- Skin that is flushed, then turns pale or bluish in color
- Loss of consciousness
If the person is able to cough forcefully, the person should keep coughing. If the person is choking and can’t talk, cry or laugh forcefully, the American Red Cross recommends a “five-and-five” approach to delivering first aid:
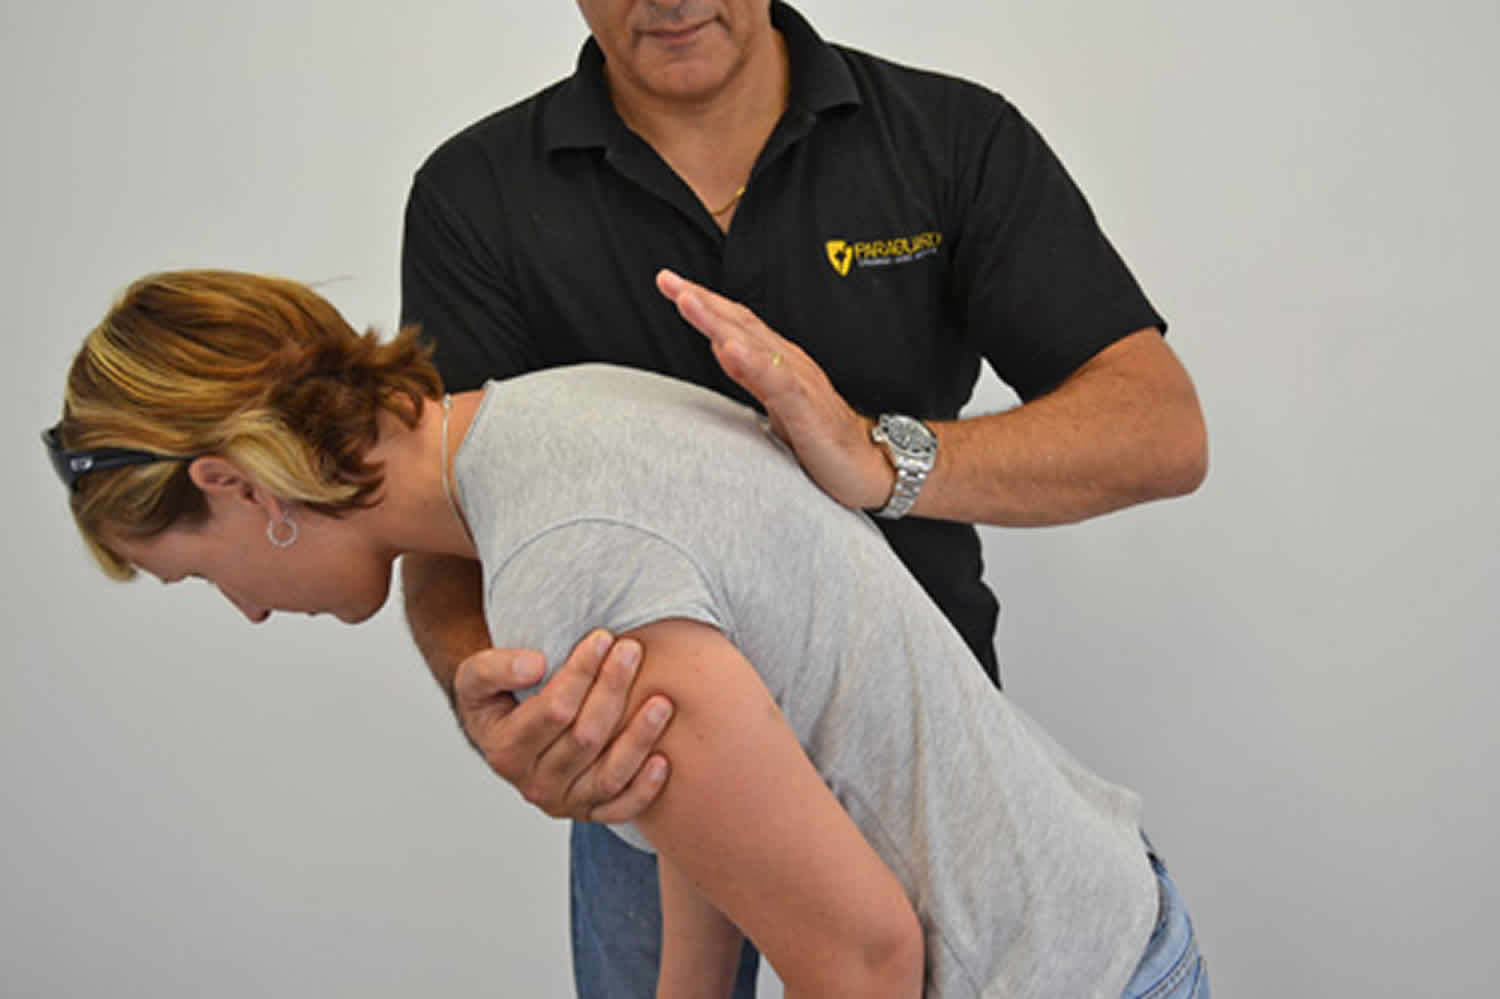
- Give 5 back blows. Stand to the side and just behind a choking adult. Place one arm across the person’s chest for support. Bend the person over at the waist so that the upper body is parallel with the ground. Deliver five separate back blows between the person’s shoulder blades with the heel of your hand.
- Give 5 abdominal thrusts. Perform five abdominal thrusts (also known as the Heimlich maneuver).
- Alternate between 5 blows and 5 thrusts until the blockage is dislodged.
The American Heart Association doesn’t teach the back blow technique, only the abdominal thrust procedures. It’s OK not to use back blows if you haven’t learned the technique. Both approaches are acceptable.
Figure 7. Adult choking first aid – 5 back blows
To perform abdominal thrusts (Heimlich maneuver) on someone else:
- Stand behind the person. Place one foot slightly in front of the other for balance. Wrap your arms around the waist. Tip the person forward slightly. If a child is choking, kneel down behind the child.
- Make a fist with one hand. Position it slightly above the person’s navel.
- Grasp the fist with the other hand. Press hard into the abdomen with a quick, upward thrust — as if trying to lift the person up.
- Perform between six and 10 abdominal thrusts until the blockage is dislodged.
If you’re the only rescuer, perform back blows and abdominal thrusts before calling your local emergency services number for help. If another person is available, have that person call for help while you perform first aid.
If the person becomes unconscious, perform standard cardiopulmonary resuscitation (CPR) with chest compressions and rescue breaths.
Figure 8. Adult choking first aid – abdominal thrusts (Heimlich maneuver)

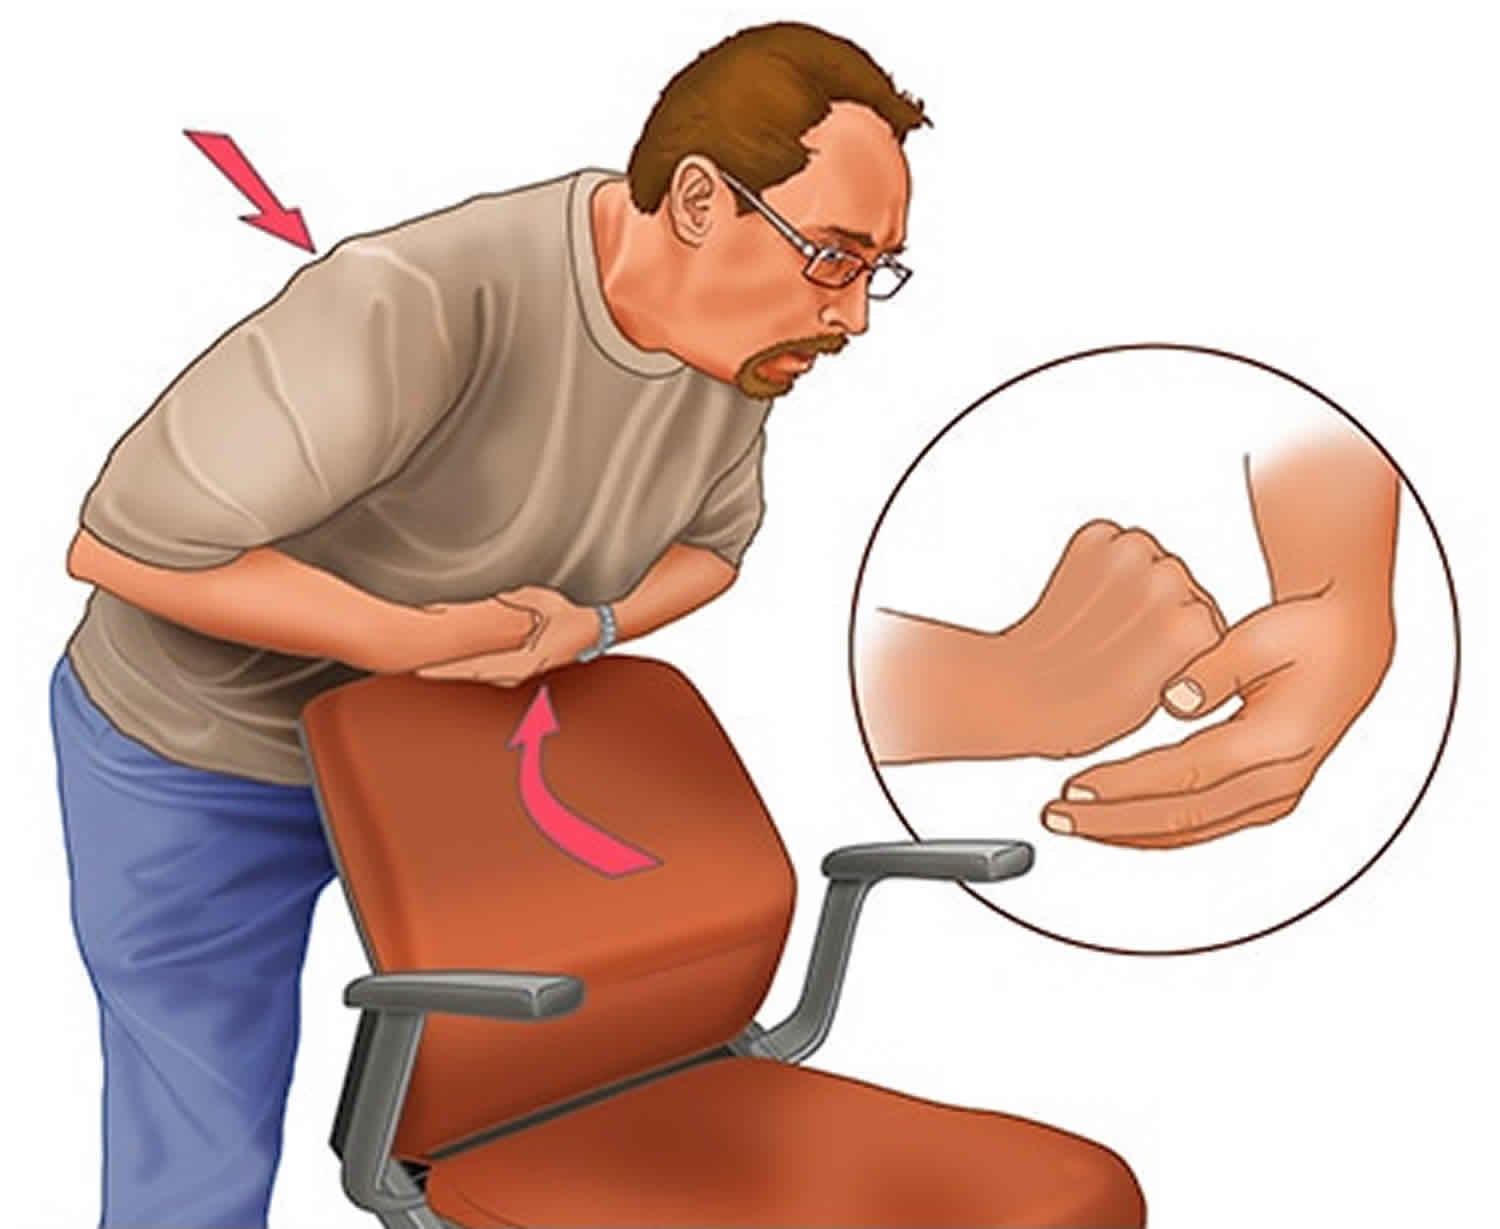
To perform abdominal thrusts (Heimlich maneuver) on yourself:
First, if you’re alone and choking, call your local emergency services number immediately. Then, although you’ll be unable to effectively deliver back blows to yourself, you can still perform abdominal thrusts to dislodge the item.
- Place a fist slightly above your navel.
- Grasp your fist with the other hand and bend over a hard surface — a countertop or chair will do.
- Shove your fist inward and upward.
Figure 9. Abdominal thrusts (Heimlich maneuver) – self administered
To clear the airway of a pregnant woman or obese person:
- Position your hands a little bit higher than with a normal Heimlich maneuver, at the base of the breastbone, just above the joining of the lowest ribs.
- Proceed as with the Heimlich maneuver, pressing hard into the chest, with a quick thrust.
- Repeat until the food or other blockage is dislodged. If the person becomes unconscious, follow the next steps.
To clear the airway of an unconscious person:
- Lower the person on his or her back onto the floor, arms to the side.
- Clear the airway. If a blockage is visible at the back of the throat or high in the throat, reach a finger into the mouth and sweep out the cause of the blockage.
- Don’t try a finger sweep if you can’t see the object. Be careful not to push the food or object deeper into the airway, which can happen easily in young children.
- Begin CPR if the object remains lodged and the person doesn’t respond after you take the above measures. The chest compressions used in CPR may dislodge the object. Remember to recheck the mouth periodically.
To prepare yourself for these situations, learn the Heimlich maneuver and CPR in a certified first-aid training course.
How to perform a Cardiopulmonary Resuscitation (CPR)
Hands-only CPR
To carry out a chest compression:
- Place the heel of your hand on the breastbone at the centre of the person’s chest. Place your other hand on top of your first hand and interlock your fingers.
- Position yourself with your shoulders above your hands.
- Using your body weight (not just your arms), press straight down by 5-6cm (2-2.5 inches) on their chest.
- Keeping your hands on their chest, release the compression and allow the chest to return to its original position.
- Repeat these compressions at a rate of 100 to 120 times per minute until an ambulance arrives or you become exhausted.
When you call for an ambulance, telephone systems now exist that can give basic life-saving instructions, including advice about CPR. These are now common and are easily accessible with mobile phones.
Cardiopulmonary Resuscitation (CPR) with rescue breaths
If you’ve been trained in CPR, including rescue breaths, and feel confident using your skills, you should give chest compressions with rescue breaths. If you’re not completely confident, attempt hands-only CPR instead (see above).
Adults
- Place the heel of your hand on the center of the person’s chest, then place the other hand on top and press down by 5-6cm (2-2.5 inches) at a steady rate of 100 to 120 compressions per minute.
- After every 30 chest compressions, give two rescue breaths.
- Tilt the casualty’s head gently and lift the chin up with two fingers. Pinch the person’s nose. Seal your mouth over their mouth and blow steadily and firmly into their mouth for about one second. Check that their chest rises. Give two rescue breaths.
- Continue with cycles of 30 chest compressions and two rescue breaths until they begin to recover or emergency help arrives.
What is swallowing
Swallowing, or deglutition, is a complex action involving over 22 muscles in the mouth, pharynx, and esophagus, coordinated by the swallowing center, a pair of nuclei in the medulla oblongata. This center communicates with muscles of the pharynx and esophagus by way of the trigeminal, facial, glossopharyngeal, and hypoglossal nerves (cranial nerves V, VII, IX, and XII). Swallowing occurs in three phases.
- The oral phase is under voluntary control. During chewing, the tongue collects food, presses it against the palate to form a bolus, and pushes it posteriorly. Food thus accumulates in the oropharynx in front of the blade of the epiglottis. When the bolus reaches a critical size, the epiglottis tips posteriorly and the bolus slides around it, through a space on each side, into the laryngopharynx.
- The pharyngeal phase is involuntary. The soft palate and root of the tongue block food and drink from entering the nasal cavity or reentering the mouth. To prevent choking, breathing is automatically suspended, the infrahyoid muscles pull the larynx up to meet the epiglottis and cover the laryngeal opening, and the vocal cords adduct to close the airway. These actions also widen the upper esophagus to receive the food. The pharyngeal constrictors contract in order from superior to middle to inferior, driving the bolus downward into the esophagus.
- The esophageal phase is a wave of involuntary contractions called peristalsis, controlled jointly by the brainstem swallowing center and the myenteric plexus in the esophageal wall. The bolus stimulates stretch receptors that feed into the plexus, which transmits signals to the muscularis externa above and below the bolus. The circular muscle layer above the bolus constricts and pushes the food downward. Below the bolus, the circular muscle relaxes while the longitudinal muscle contracts. The latter action pulls the wall of the esophagus slightly upward, making it a little shorter and dilating it to receive the descending food. When a person is standing or sitting upright, most food andliquid drop through the esophagus by gravity faster than theperistaltic wave can keep up with it. Peristalsis, however, propels more solid food pieces and ensures that you can swallow regardless of the body’s position—even standing on your head! Liquid normally reaches the stomach in 1 to 2 seconds and a food bolus in 4 to 8 seconds. Asa bolus reaches the lower end of the esophagus, the lower esophagealsphincter relaxes to let it pass into the stomach.
The pharyngeal (gag) reflex is a rapid and intense contraction of the pharyngeal muscles. Except for normal swallowing, the pharyngeal reflex is designed to prevent choking by not allowing objects to enter the throat. The reflex is initiated by contact of an object with the roof of the mouth, back of the tongue, area around the tonsils, and back of the throat. People with a hyperactive pharyngeal reflex have difficulty swallowing pills and are very sensitive to various medical and dental procedures.
Figure 10. Swallowing stages

Choking prevention and choking risks in children
Key points
- Choking hazards for babies and toddlers include anything smaller than a D-size battery.
- To reduce choking risks, make sure your child sits while eating, cut food into pieces smaller than a pea, and keep small objects out of your child’s reach.
Food
Young children may not chew food properly before swallowing, increasing the risk of choking. According to the American Academy of Pediatrics (AAP), children younger than 4 years old should not be fed any round, firm food unless the food is cut into small, non-round pieces. The following safety recommendations can help prevent choking in young children:
- Always supervise your child while he/she is eating
- Have your child sit down while eating
- Cut food into small, non-round pieces
- Avoid round and/or hard food, such as: hot dogs, nuts, meat chunks, grapes, cheese cubes, hard candy, popcorn, chunks of peanut butter, raisins and raw carrots
Non-food objects
Small, round or similar objects can be choking hazards and should be kept away from young children. You may want to purchase a small parts tester to help determine which items are small enough to cause choking hazards. You can also use a toilet paper roll, keeping in mind that it is wider than the official tester.
Examples of objects that can obstruct the airway include:
- Coins
- Small balls
- Balloons (inflated and deflated)
- Marbles
- Small game and toy parts
- Safety pins
- Jewelry
- Buttons
- Pen caps
- Coin lithium button batteries*
*Special note to parents and caregivers
Coin-sized lithium button batteries are potential hazards to young children. When swallowed, these batteries can get stuck in the throat, resulting in serious burns and possible death. There are many everyday electronic devices that contain coin-sized lithium button batteries, including singing greeting cards, key fobs, thermometers and calculators. Parents should keep all products containing lithium batteries out of children’s reach. If your child swallows a lithium button battery seek emergency care immediately.
Choking risks
Anything smaller than a D-size battery is a choking risk for babies and toddlers. This includes:
- food items like lollies, raw apples, pieces of meat (including chicken and fish), nuts, raw carrots, uncooked peas, seeds (including popcorn kernels), grapes, fruit pips and stones, hot dogs and sausages
- household items like coins, small batteries, the tops off pens and markers, and jewellery
- toys and toy parts like plastic shapes, marbles, the eyes of stuffed toys and balloons (uninflated or popped)
- garden objects like pebbles
- any other small items.
Tips for preventing choking
There are steps you can take to help prevent your child from choking or suffocating:
- Sit while eating. Your child is more likely to choke if he eats while running around or playing, so sitting at a table or even on the floor will reduce the risk. If you sit with your child while he eats, and talk or entertain him, he’ll be less tempted to get up and run around.
- Keep food pieces small. Until your child can chew well, give her food in pieces smaller than a pea. Anything bigger than this is hard for little children to eat safely. This is because their airways are small, and they’re still learning to chew and swallow properly.
- Cook, grate or mash hard foods, particularly hard fruit and vegetables like carrots and apples.
- Don’t force your child to eat anything they don’t want.
- Avoid nuts. Children can usually eat these safely at around three years of age, unless they have an allergy. Corn chips, lollies, apple, raw carrot and grapes can also be choking risks.
- Try to keep small objects out of reach. Curiosity leads children to put unusual things into their mouths. Check the floor for small objects by getting down to child height and looking around.
- Check there are no small objects or coins left lying around.
- Keep small batteries from things like cameras and toys away from toddlers – button batteries can cause very serious injuries if swallowed.
- Use toys that are solid and sturdy, and avoid toys with small parts, breakable parts or brittle surfaces. Check toys for exposed stuffing and loose screws and buttons.
- Keep toys for small children and older siblings in separate boxes. Encourage older siblings to keep their little toys out of reach. This might include Lego, doll clothes, beads, car parts and so on.
- Tie a knot in the middle of empty plastic bags so your child can’t pull them over their head.
- Replace dummies before they become worn.
- Some old or antique cots and high chairs are not safe for young children – use a cot or port-a-cot that meets American Safety Standards.
- Keep cords or ribbons on toys, dummies and clothing short – less than 10cm – so they can’t choke your child.
- Cords on curtains and blinds need to be short or secured up high and out of reach.


