
Golfers elbow
Golfer’s elbow also called medial epicondylitis, wrist flexor tendonitis or elbow tendonitis, is a painful inflammation of the tendons that attach your forearm muscles to the inside of the bone at your elbow. Golfer’s elbow is caused by overuse of the muscles that bend your fingers and wrist. When these muscles are overused, the tendons are repeatedly pulled where they attach to the bone. As a result, the tendons get inflamed and this leads to pain and tenderness on the inside of your elbow.
The elbow joint is made up of the three bones
- humerus – upper arm bone
- ulna – forearm bone
- radius – forearm bone
The bony bumps at the bottom of the humerus are called the epicondyles. The bump on the side closest to the body is called the medial epicondyle (see Figures 1 to 3). The tendons of the muscles that work to bend your wrist attach at the medial epicondyle.
Elbow anatomy
The elbow is a complex synovial joint which allows for significant motion and function primarily in the form of extension and flexion, however, the elbow joint also facilitates motion in the hand in the form of supination and pronation of the forearm. The main stability of the elbow joint results from the osseous articulations of the trochlea of the humerus and the ulnar olecranon. The olecranon resembles a scoop or a wrench in which a landmark referred to as the trochlear notch, fits around the trochlea of the humerus and serves as the primary pivot point during flexion and extension of the elbow joint. The trochlear notch wraps around the humerus almost 180 degrees, while the trochlea of the humerus is wide with a central groove, this allows for a tight conforming of the two structures, adding to the stability. After the osseous articulations of the humerus and ulna (ulnohumeral articulation), the rest of the major stability components of the elbow joint comes from two strong ligaments in the form of the medial collateral ligament and the lateral collateral ligament. Both the lateral collateral ligament and the medial collateral ligament form into the joint capsule to provide further stability 1.
The medial collateral ligament is a triangular-shaped ligament made up of three smaller ligaments named the anterior oblique ligament, posterior oblique ligament, and the transverse ligament, also sometimes called Cooper’s ligament. The anterior oblique ligament originates from the anterior inferior surface of the medial epicondyle of the humerus and inserts onto the coronoid process of the ulna. The anterior oblique ligament is the strongest and most important medial stabilizer of the elbow joint and protects against excessive valgus forces. The posterior oblique ligament also originates from the medial epicondyle but as its name suggests, runs posteriorly to insert onto the olecranon of the ulna. The transverse ligament passes between the previous two, running from the coronoid process and the tip of the olecranon 1.
The lateral collateral ligament is also composed of three parts; the annular ligament, the lateral radial collateral ligament, and the lateral ulnar collateral ligament. The three components of the lateral collateral ligament provide stability during varus stresses applied on the elbow and posterolateral rotational stability. The lateral ulnar collateral ligament is the predominant stabilizer in posterolateral rotational structure as it crosses over the inferior aspect of the radial head, originating from the lateral epicondyle of the humerus and inserting at the supinator crest of the ulna. The annular ligament stabilizes the proximal radioulnar joint and originates and inserts at the sigmoid notch of the ulna as it wraps around the neck of the radius 1.
The cubital tunnel is a clinically significant space allowing the passage of the ulnar nerve. The roof of the cubital tunnel is created by the arcuate (Osborne’s) ligament running from the medial epicondyle to the olecranon of the ulna. The floor of the cubital tunnel is made up of the medial collateral ligament , while the anterior, posterior, and lateral borders are comprised of the medial epicondyle, medial head of the triceps brachii, and the olecranon respectively.
As a synovial joint, the elbow has a synovial membrane as well as a joint capsule which are separated from each other by fat pads. These fat pads are located superficial to areas of stress. These areas include the olecranon, coronoid and radial fossas. During flexion and extension, these fat pads are pulled away by attachments to the brachialis and the triceps brachii to allow space for bony processes. A lubricating bursa, namely the olecranon bursa, facilitates triceps action. This bursa serves as a lubricating component between the olecranon process of the ulna and the triceps tendon of insertion 1.
Figure 1. Elbow anatomy

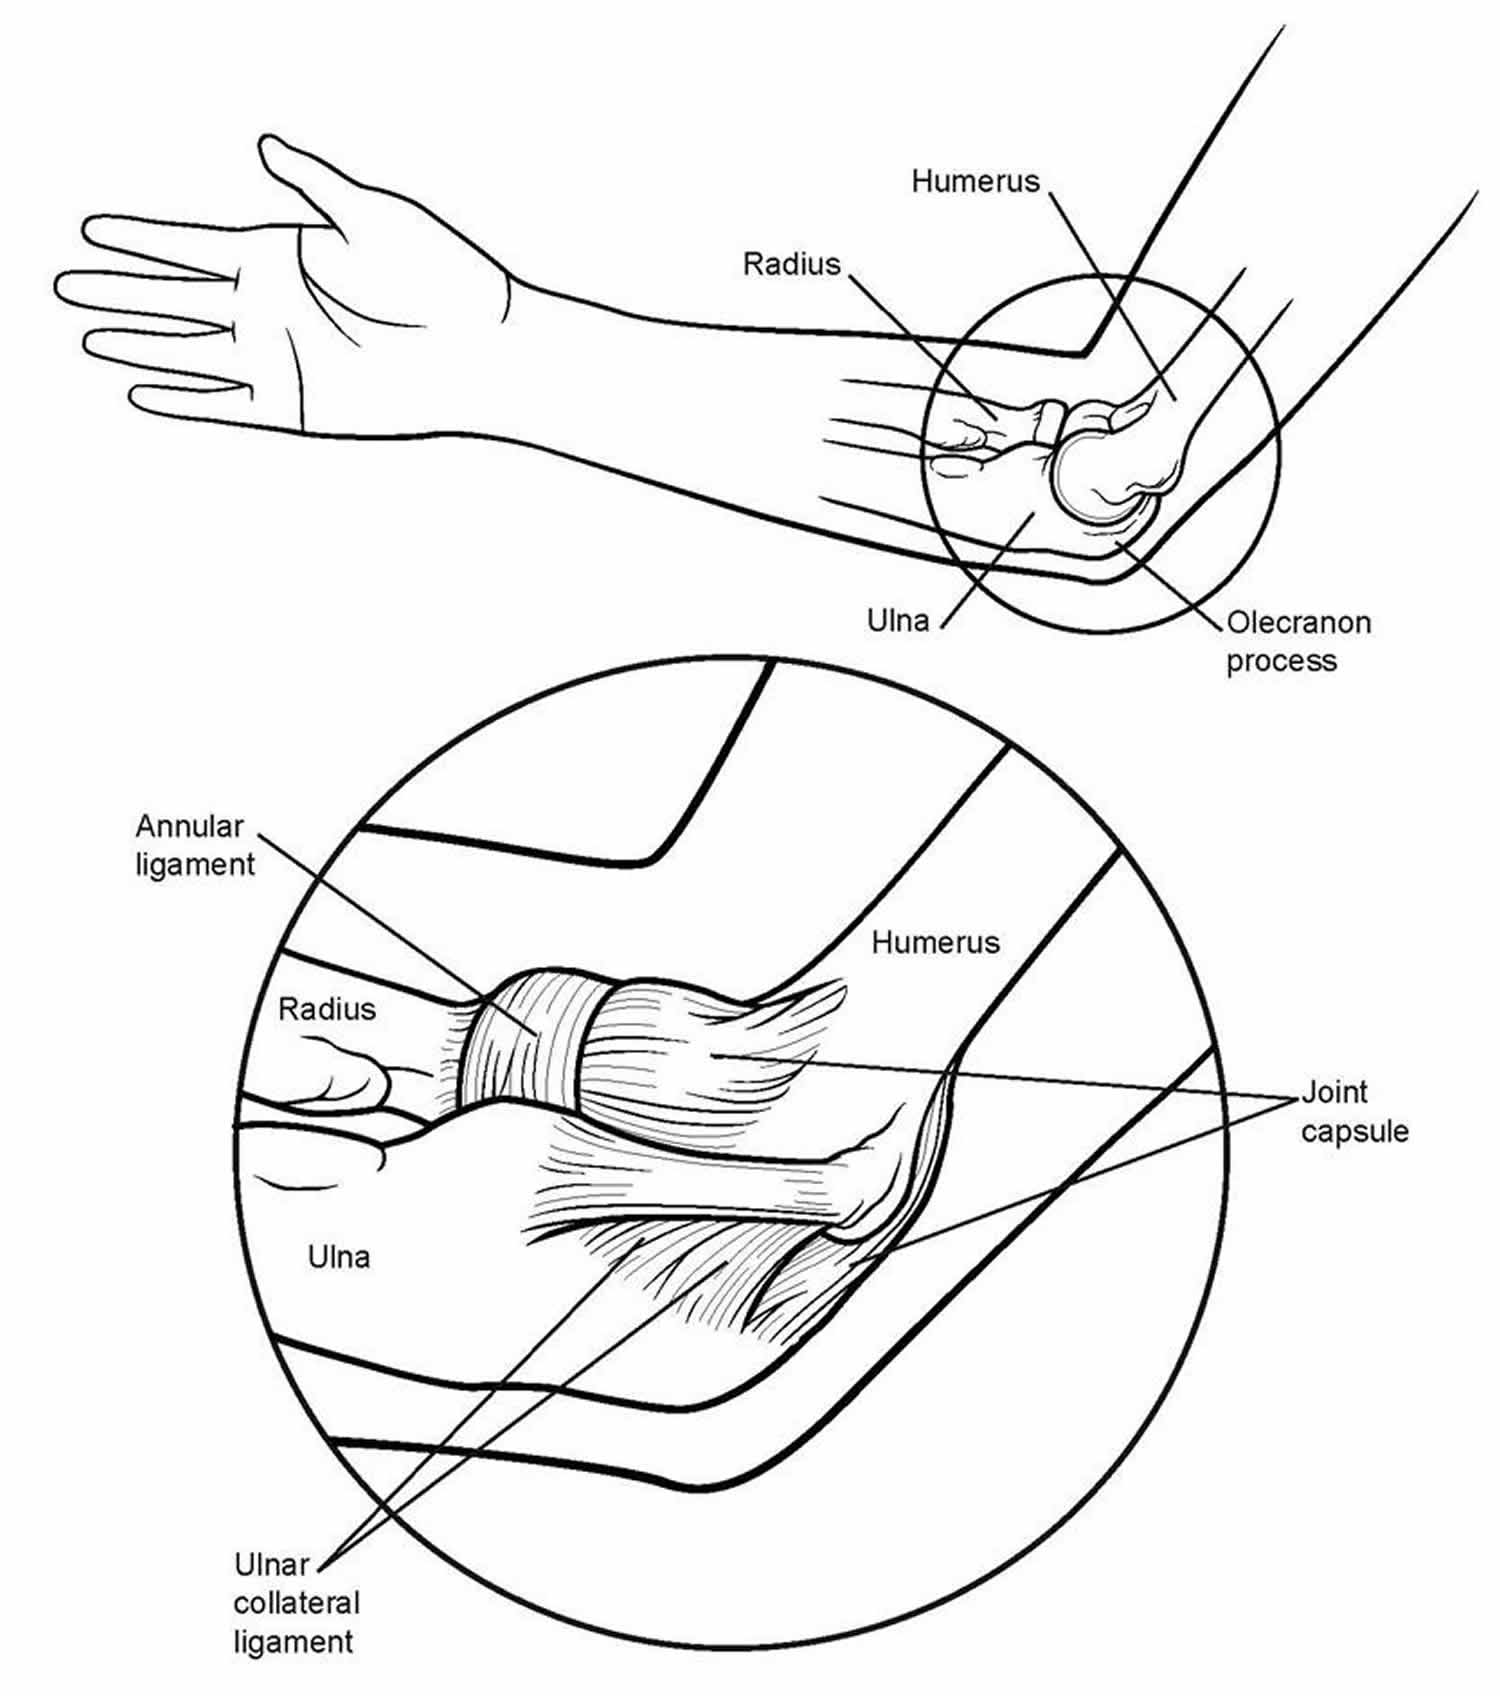
Figure 2. Forearm anatomy
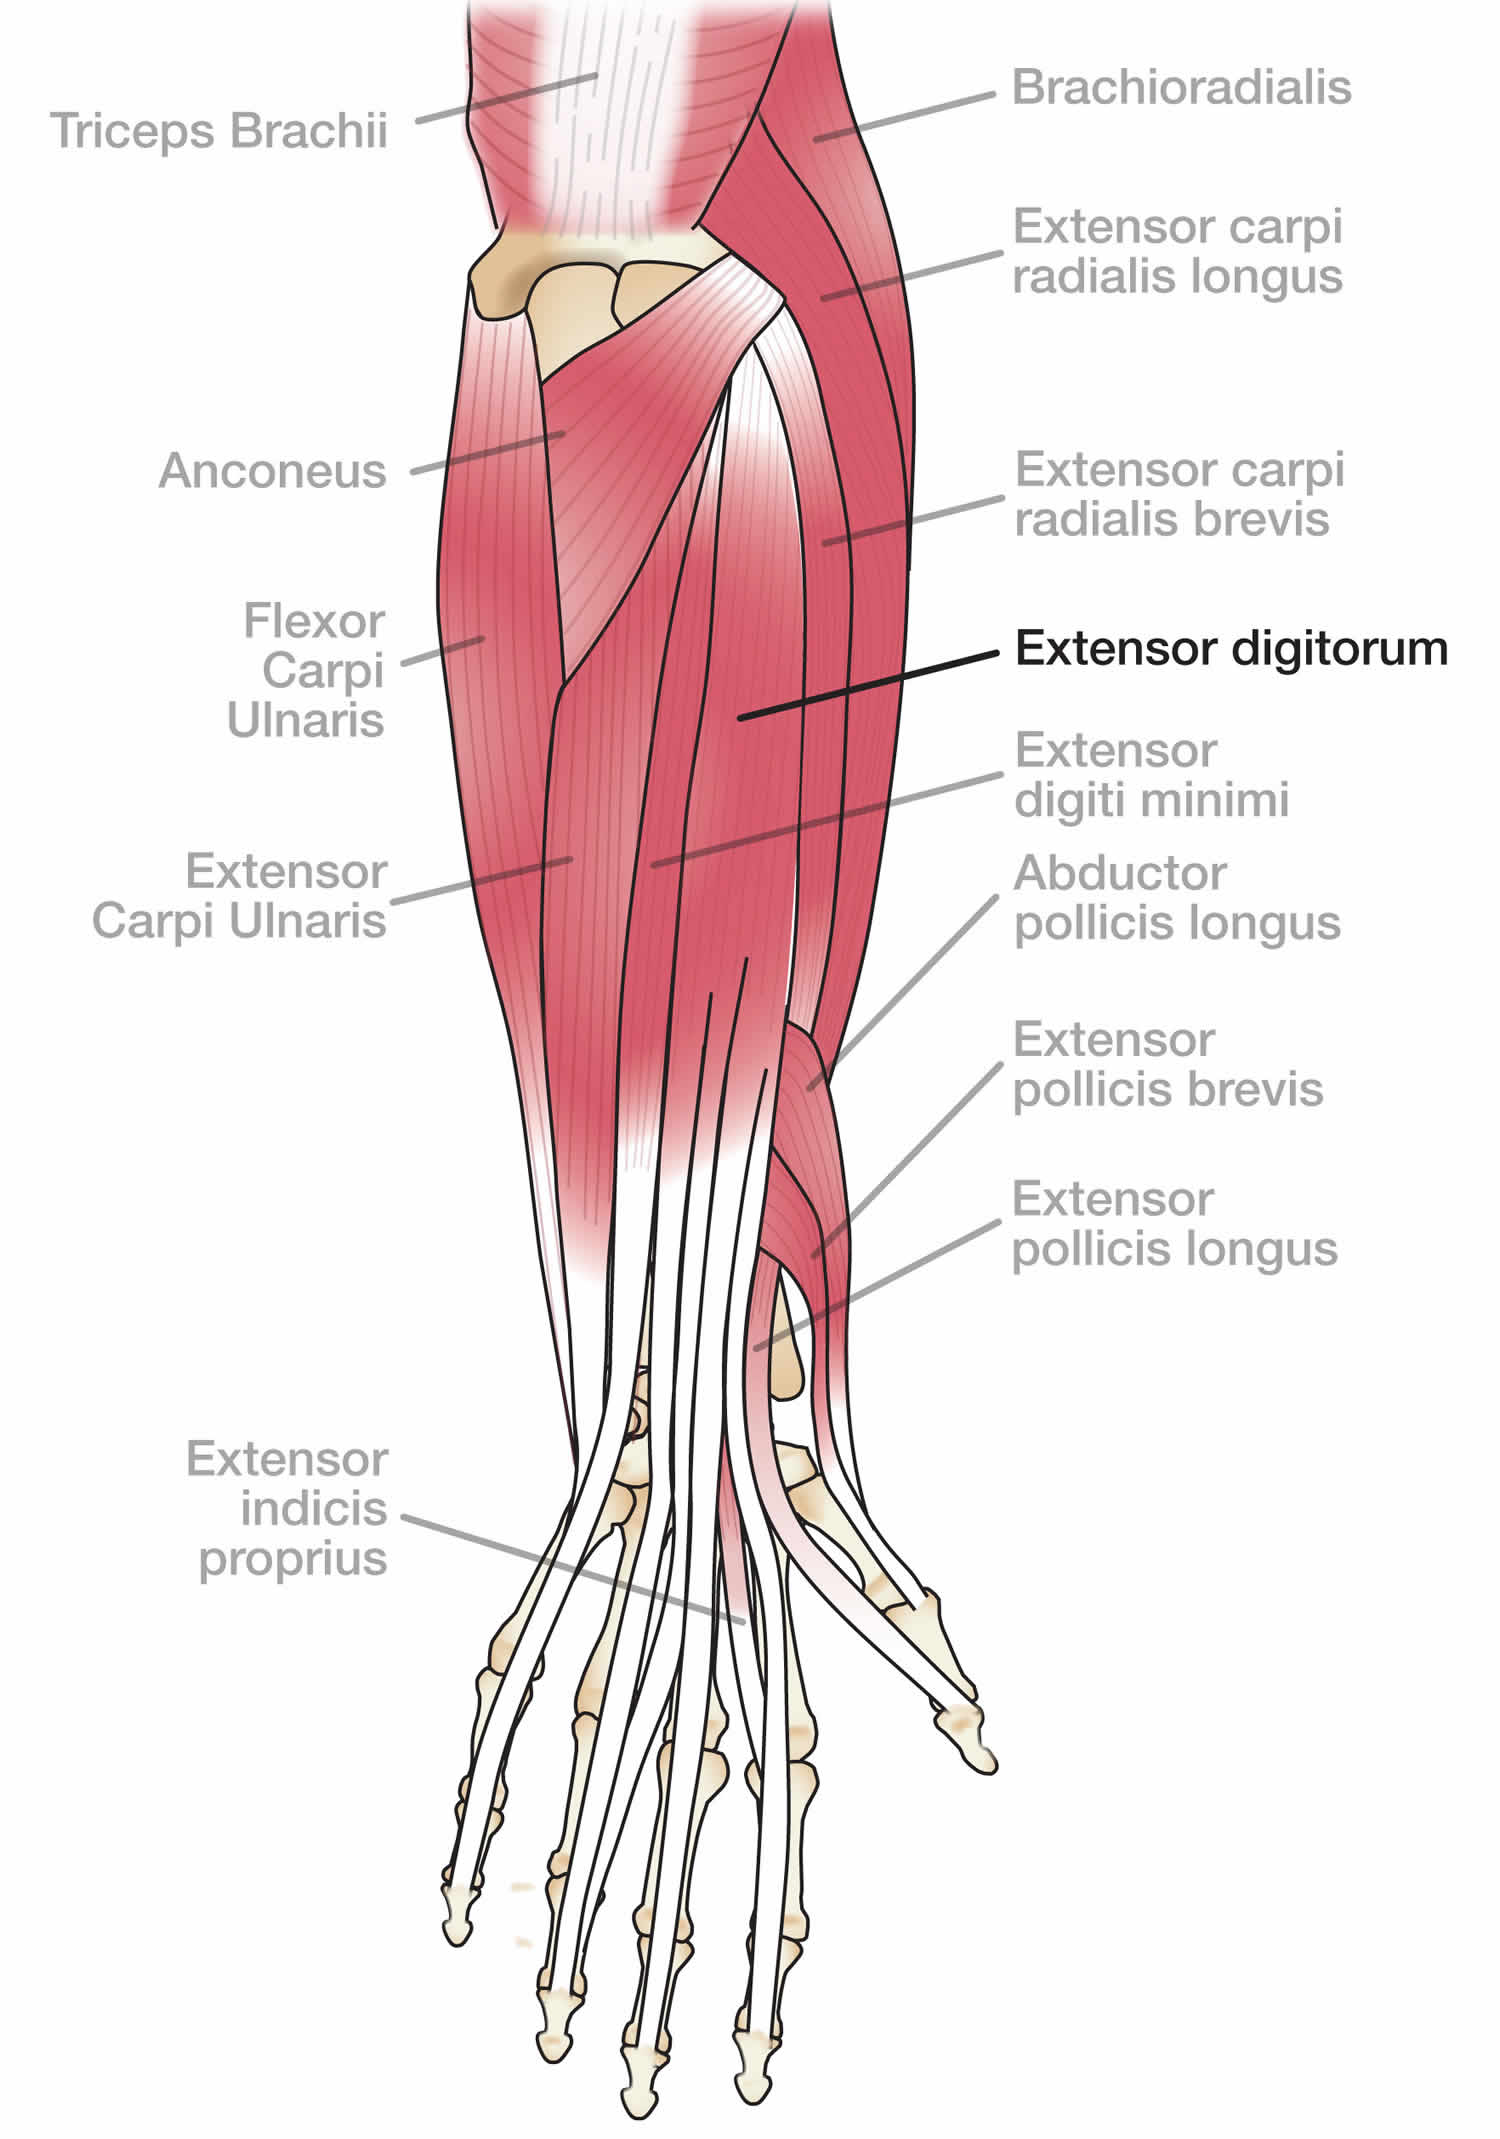
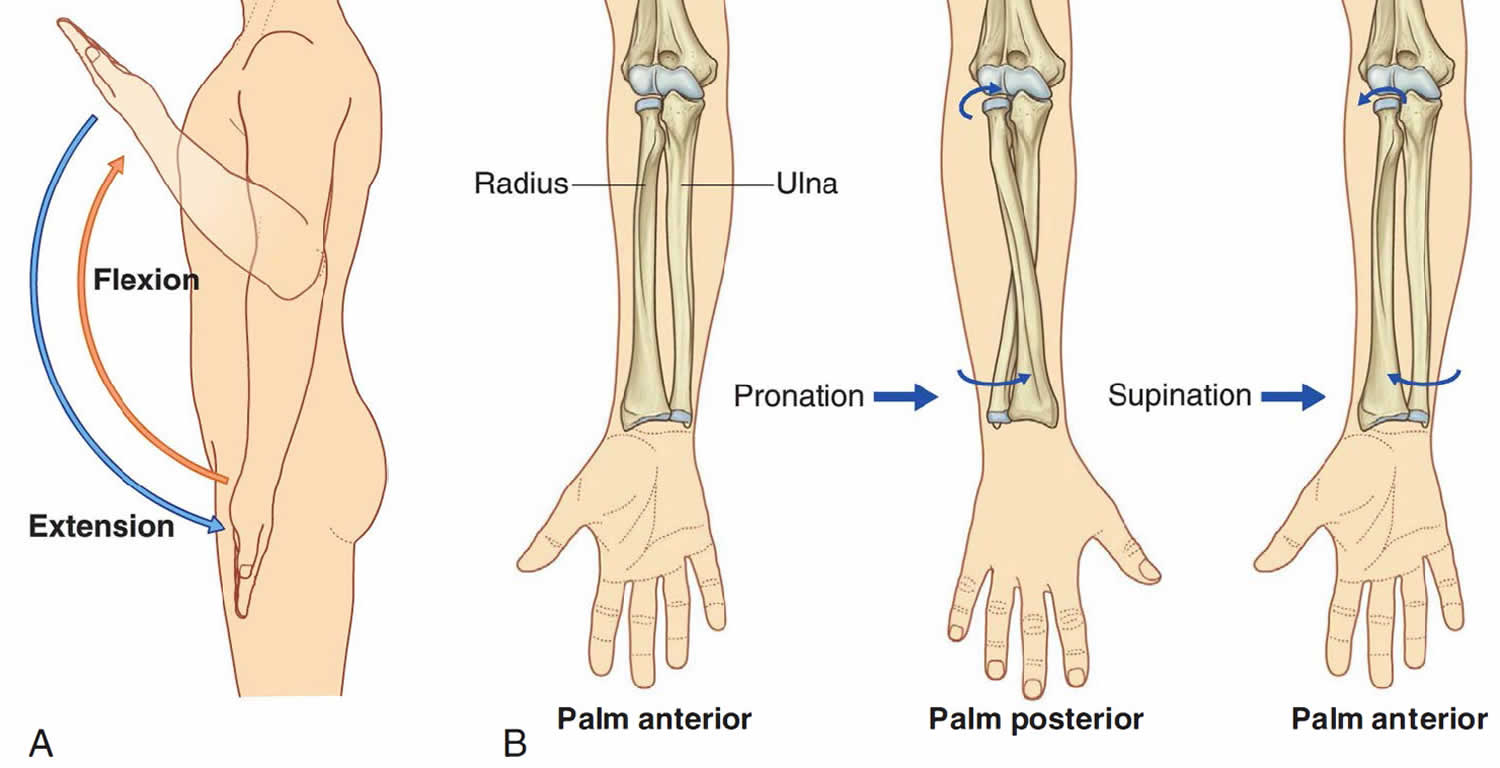
Figure 3. Forearm movement

Golfers elbow causes
Golfer’s elbow is caused by overuse of the muscles that bend your fingers and wrist. When these muscles are overused, the tendons are repeatedly pulled where they attach to the bone. As a result, the tendons get inflamed. This commonly happens in sports such as golf, in throwing sports, and in racquet sports. It may also happen in work activities like carpentry or typing. If you have had tendonitis for a long time, scar tissue may develop in the tendon. This is called tendinosis.
Risk factors for golfers elbow
The following may contribute to the development of Golfer’s elbow:
- Inadequate warming up prior to sporting activities
- Improper technique during sporting activities. This is one of the major causes of medial epicondylitis. Tennis players with excessive top spin, poor serves and forehand strokes are at greater risk of developing golfer’s elbow or medial epicondylitis 2
- Incorrectly sized sporting equipment. The use of an incorrectly sized tennis racquet grip, overly tightened racquet strings, older tennis balls, and wet tennis balls may increase elbow stress. The use of graphite racquets and larger headed racquets can decrease elbow stress 3
- Poor forearm flexibility
- Training errors: These errors may increase the risk of developing medial epicondylitis. Athletes usually have a history of increased intensity or duration of activity, and they may not warm up adequately.
- Functional risk factors: Weakness, poor endurance, and poor flexibility of the forearm may increase the risk of developing golfer’s elbow or medial epicondylitis
Golfers elbow prevention
One of the best ways to avoid golfer’s elbow problems is to strengthen your forearm muscles and slow your golf swing so that there will be less shock in the arm when the ball is hit.
The following simple exercises can help build up your forearm muscles and help you avoid golfer’s elbow. For best results, do these exercises during the off-season as well.
Squeeze a tennis ball
Squeezing an old tennis ball for 5 minutes at a time is a simple, effective exercise that will strengthen your forearm muscles.
Wrist curls
Use a lightweight dumbbell. Lower the weight to the end of your fingers, and then curl the weight back into your palm. Follow this by curling up your wrist to lift the weight an inch or two higher. Perform 10 repetitions with one arm, and then repeat with the other arm.
Reverse wrist curls
Use a lightweight dumbbell. Place your hands in front of you, palm side down. Using your wrist, lift the weight up and down. Hold the arm that you are exercising above your elbow with your other hand in order to limit the motion to your forearm. Perform 10 repetitions with one arm, and then repeat with the other arm.
Golfers elbow symptoms
Aching over the inner bony bump of the elbow. This may especially occur when the golf club misses the ball and hits the ground instead!
Weakness when gripping objects 4
Tingling, pain or numbness in part of the hand. Ulnar nerve symptoms are associated in up to 20% of athletes with golfer’s elbow 5.
Golfers elbow complications
Occasionally, Golfer’s elbow may result in:
Persistent pain or weakness
Rupture of muscles at the elbow (this is very rare).
Golfers elbow diagnosis
Diagnosis of golfer’s elbow is generally made on the basis of a clinical examination.
Occasionally, imaging of the elbow is required, especially to look for other conditions that may mimic Golfer’s elbow. This may include:
X-ray – this gives a picture of bony structures in the elbow
Bone scan – this can show up stress fractures if they are suspected to be present
Golfers elbow treatment
Common ways to treat golfer’s elbow are:
- Ice is the first-line anti-inflammatory treatment for golfer’s elbow or medial epicondylitis. Icing should be done after completing exercise, stretching, and strengthening. Care should be taken to avoid over-icing as there is a possibility of ulnar nerve injury (usually a temporary neuropraxia), which may occur if the ice is left on too long.
- Put ice packs on the elbow for 20 to 30 minutes every 3 to 4 hours for 2 or 3 days, or until the pain goes away.
- Do ice massage by freezing water in a Styrofoam cup, peeling the top of the cup away to expose the ice and holding onto the bottom of the cup while you rub the ice over your elbow for 5 to 10 minutes.
- Elevate the elbow when you are sitting or lying down.
- Wrap an elastic bandage around the elbow to help keep it from swelling.
- Wear a tennis elbow strap just below the tender spot on the elbow. This allows the forearm muscles to pull against the strap instead of against the bone.
- Take an anti-inflammatory medicine or get a shot of a steroid medicine in the elbow to reduce the inflammation. The use of nonsteroidal anti-inflammatory drugs (NSAIDs) is somewhat controversial 6. Some physicians argue that the anti-inflammatory effects of NSAIDs are helpful in decreasing swelling, thereby increasing the speed of an individual’s recovery 7. Other authors believe that NSAID use during the acute injury phase may increase swelling by increasing the potential for bleeding via platelet inhibition 8. However, if NSAIDs are not used, acetaminophen may be required for pain control in some athletes.
- While you recover from your injury, you will need to change your sport or activity to one that does not make your condition worse. For example, walk instead of playing golf, or write things out by hand instead of typing.
- Do elbow exercises as recommended by your provider. In severe cases, you may need surgery.
- You can return to sporting activities as pain allows
Physical therapy for golfers elbow
To ensure that this exercise program is safe and effective for you, it should be performed under your doctor’s supervision. Talk to your doctor or physical therapist about which exercises will best help you meet your rehabilitation goals.
Golfer’s elbow (medial epicondylitis) are painful conditions caused by overuse. Over time, the forearm muscles and tendons become damaged from repeating the same motions again and again. This leads to pain and tenderness around the elbow.
Specific exercises to stretch and strengthen the muscles attached to the injured tendon will help with the healing process. The early goal of a therapeutic exercise program is to promote muscle endurance and improve resistance to repetitive stress. Following a well-structured program will help you return to daily activities, as well as sports and other recreational pastimes.
Ask questions
If you are not sure how to do an exercise, or how often to do it, contact your doctor or physical therapist.
Length of exercise program
This exercise program for epicondylitis should be continued for 6 to 12 weeks, unless otherwise specified by your doctor or physical therapist. After your recovery, your doctor or physical therapist can instruct you in how these exercises can be continued as a maintenance program for lifelong protection and health of your elbows.
Do not ignore pain
You should not feel pain during an exercise, however, some degree of discomfort is normal. Talk to your doctor or physical therapist if you have any pain while completing this program.
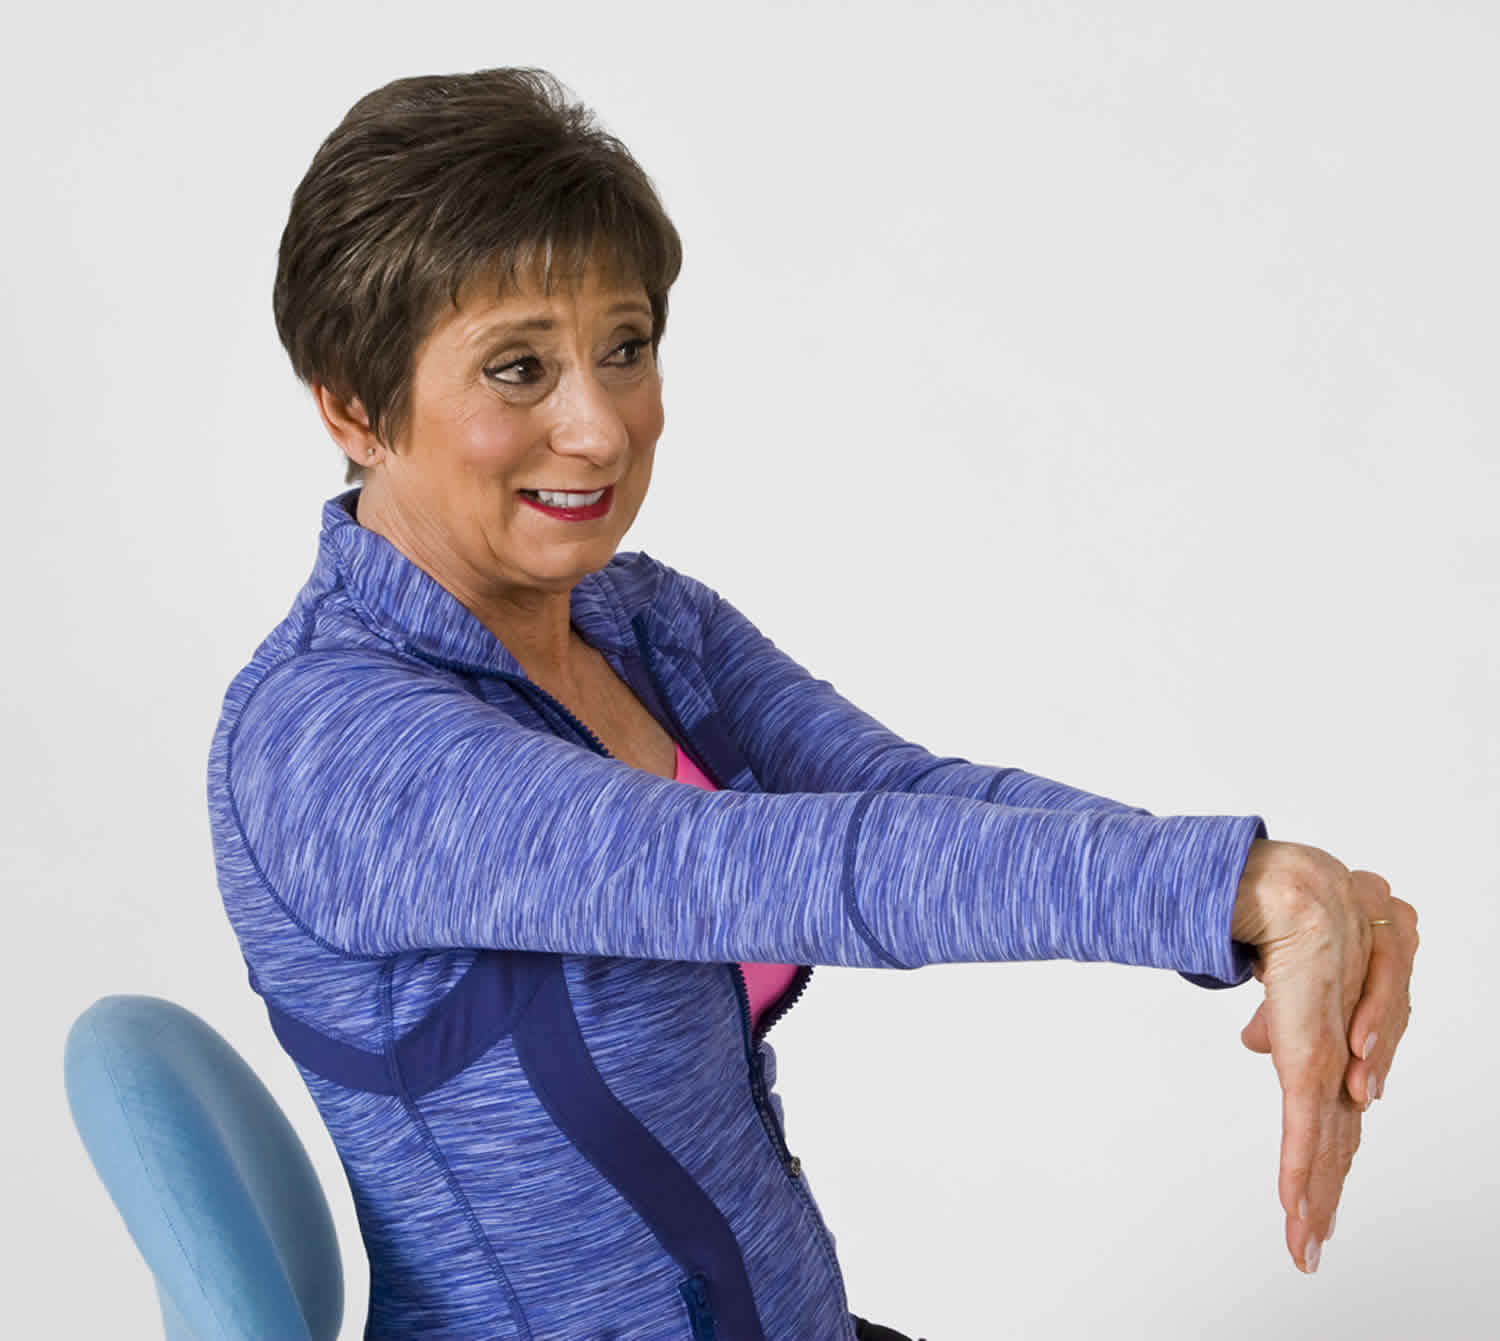
Wrist extension stretch
Step-by-step directions:
- Straighten your arm and bend your wrist back as if signaling someone to “stop.”
- Use your opposite hand to apply gentle pressure across the palm and pull it toward you until you feel a stretch on the inside of your forearm.
- Hold the stretch for 15 seconds.
- Repeat 5 times, then perform this stretch on the other arm.
- Tip: Do not lock your elbow.
This stretch should be done throughout the day (5 reps, 4x a day), especially before activity (5 to 7 days per week). After recovery, this stretch should be included as part of a warm-up to activities that involve gripping, such as gardening, tennis, and golf.
Figure 4. Wrist extension stretch

Wrist flexion stretch
Step-by-step directions:
- Straighten your arm with your palm facing down and bend your wrist so that your fingers point down.
- Gently pull your hand toward your body until you feel a stretch on the outside of your forearm.
- Hold the stretch for 15 seconds.
- Repeat 5 times, then perform this stretch on the other arm.
- Tip: Do not lock your elbow.
This stretch should be done throughout the day (5 reps, 4x a day), especially before activity (5 to 7 days per week). After recovery, this stretch should be included as part of a warm-up to activities that involve gripping, such as gardening, tennis, and golf.
Figure 5. Wrist flexion stretch
Wrist extension strengthening
- Stage 1: Bend your elbow to 90 degrees and support your forearm on a table with your wrist placed at the edge.
- Stage 2: Straighten your elbow slightly. Continue to support your arm on the table.
- Stage 3: Fully straighten your elbow and lift your arm so that it is no longer supported by the table.
Step-by-step directions to be followed for each stage
- With palm down, bend your wrist up as far as possible.
- Hold up for 1 count, then slowly lower 3 counts.
- Begin without using a weight and increase the repetitions until you can complete 30.
- When you can perform 30 repetitions on 2 consecutive days without increasing pain, begin performing the exercise using a 1 lb. weight.
- Follow the same steps above to continue to increase repetitions and weight until you are using a 3 lb. weight and can perform 30 repetitions on 2 consecutive days without increasing pain.
- Tip: Do not let the weight pull your hand down too quickly.
This exercise should be performed in stages. Begin each stage with no weight. When you are able to complete 30 repetitions on 2 consecutive days with no increase in pain, move forward in the program by increasing weight (begin with 1lb., advance to 2 lbs., end with 3 lbs.).
Figure 6. Wrist extension strengthening
Wrist flexion strengthening
- Stage 1: Bend your elbow to 90 degrees and support your forearm on a table with your wrist placed at the edge.
- Stage 2: Straighten your elbow slightly. Continue to support your arm on the table.
- Stage 3: Fully straighten your elbow and lift your arm so that it is no longer supported by the table.
Step-by-step directions to be followed for each stage
- With palm up, bend your wrist up as far as possible.
- Hold up for 1 count, then slowly lower 3 counts.
- Begin without using a weight and increase the repetitions until you can complete 30.
- When you can perform 30 repetitions on 2 consecutive days without increasing pain, begin performing the exercise using a 1 lb. weight.
- Follow the same steps above to continue to increase repetitions and weight until you are using a 3 lb. weight and can perform 30 repetitions on 2 consecutive days without increasing pain.
- Tip: Do not let the weight pull your hand down too quickly.
This exercise should be performed in stages. Begin each stage with no weight. When you are able to complete 30 repetitions on 2 consecutive days with no increase in pain, move forward in the program by increasing weight (begin with 1lb., advance to 2 lbs., end with 3 lbs.).
Figure 7. Wrist flexion strengthening

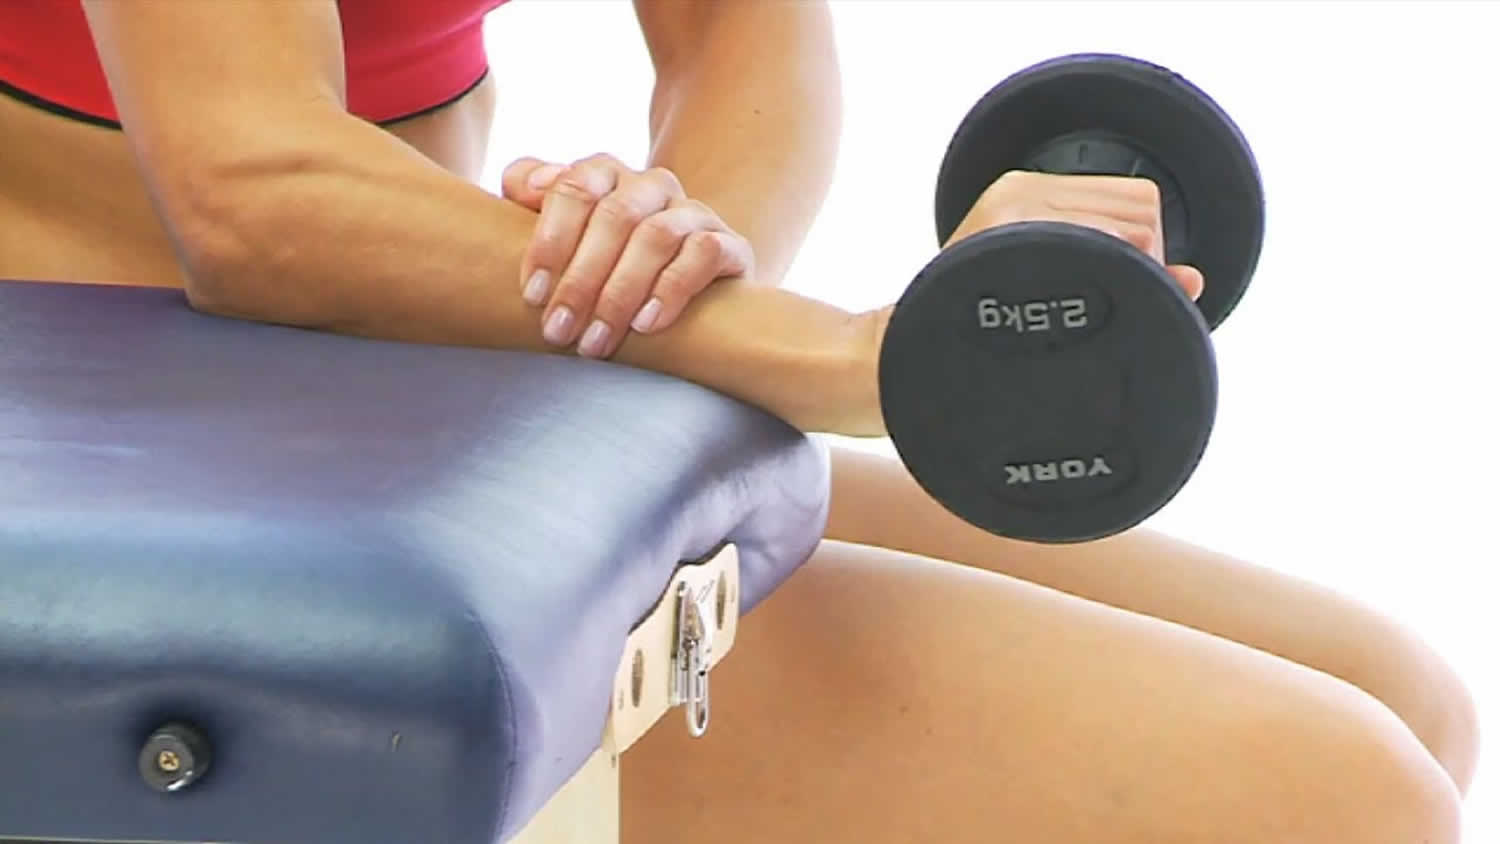
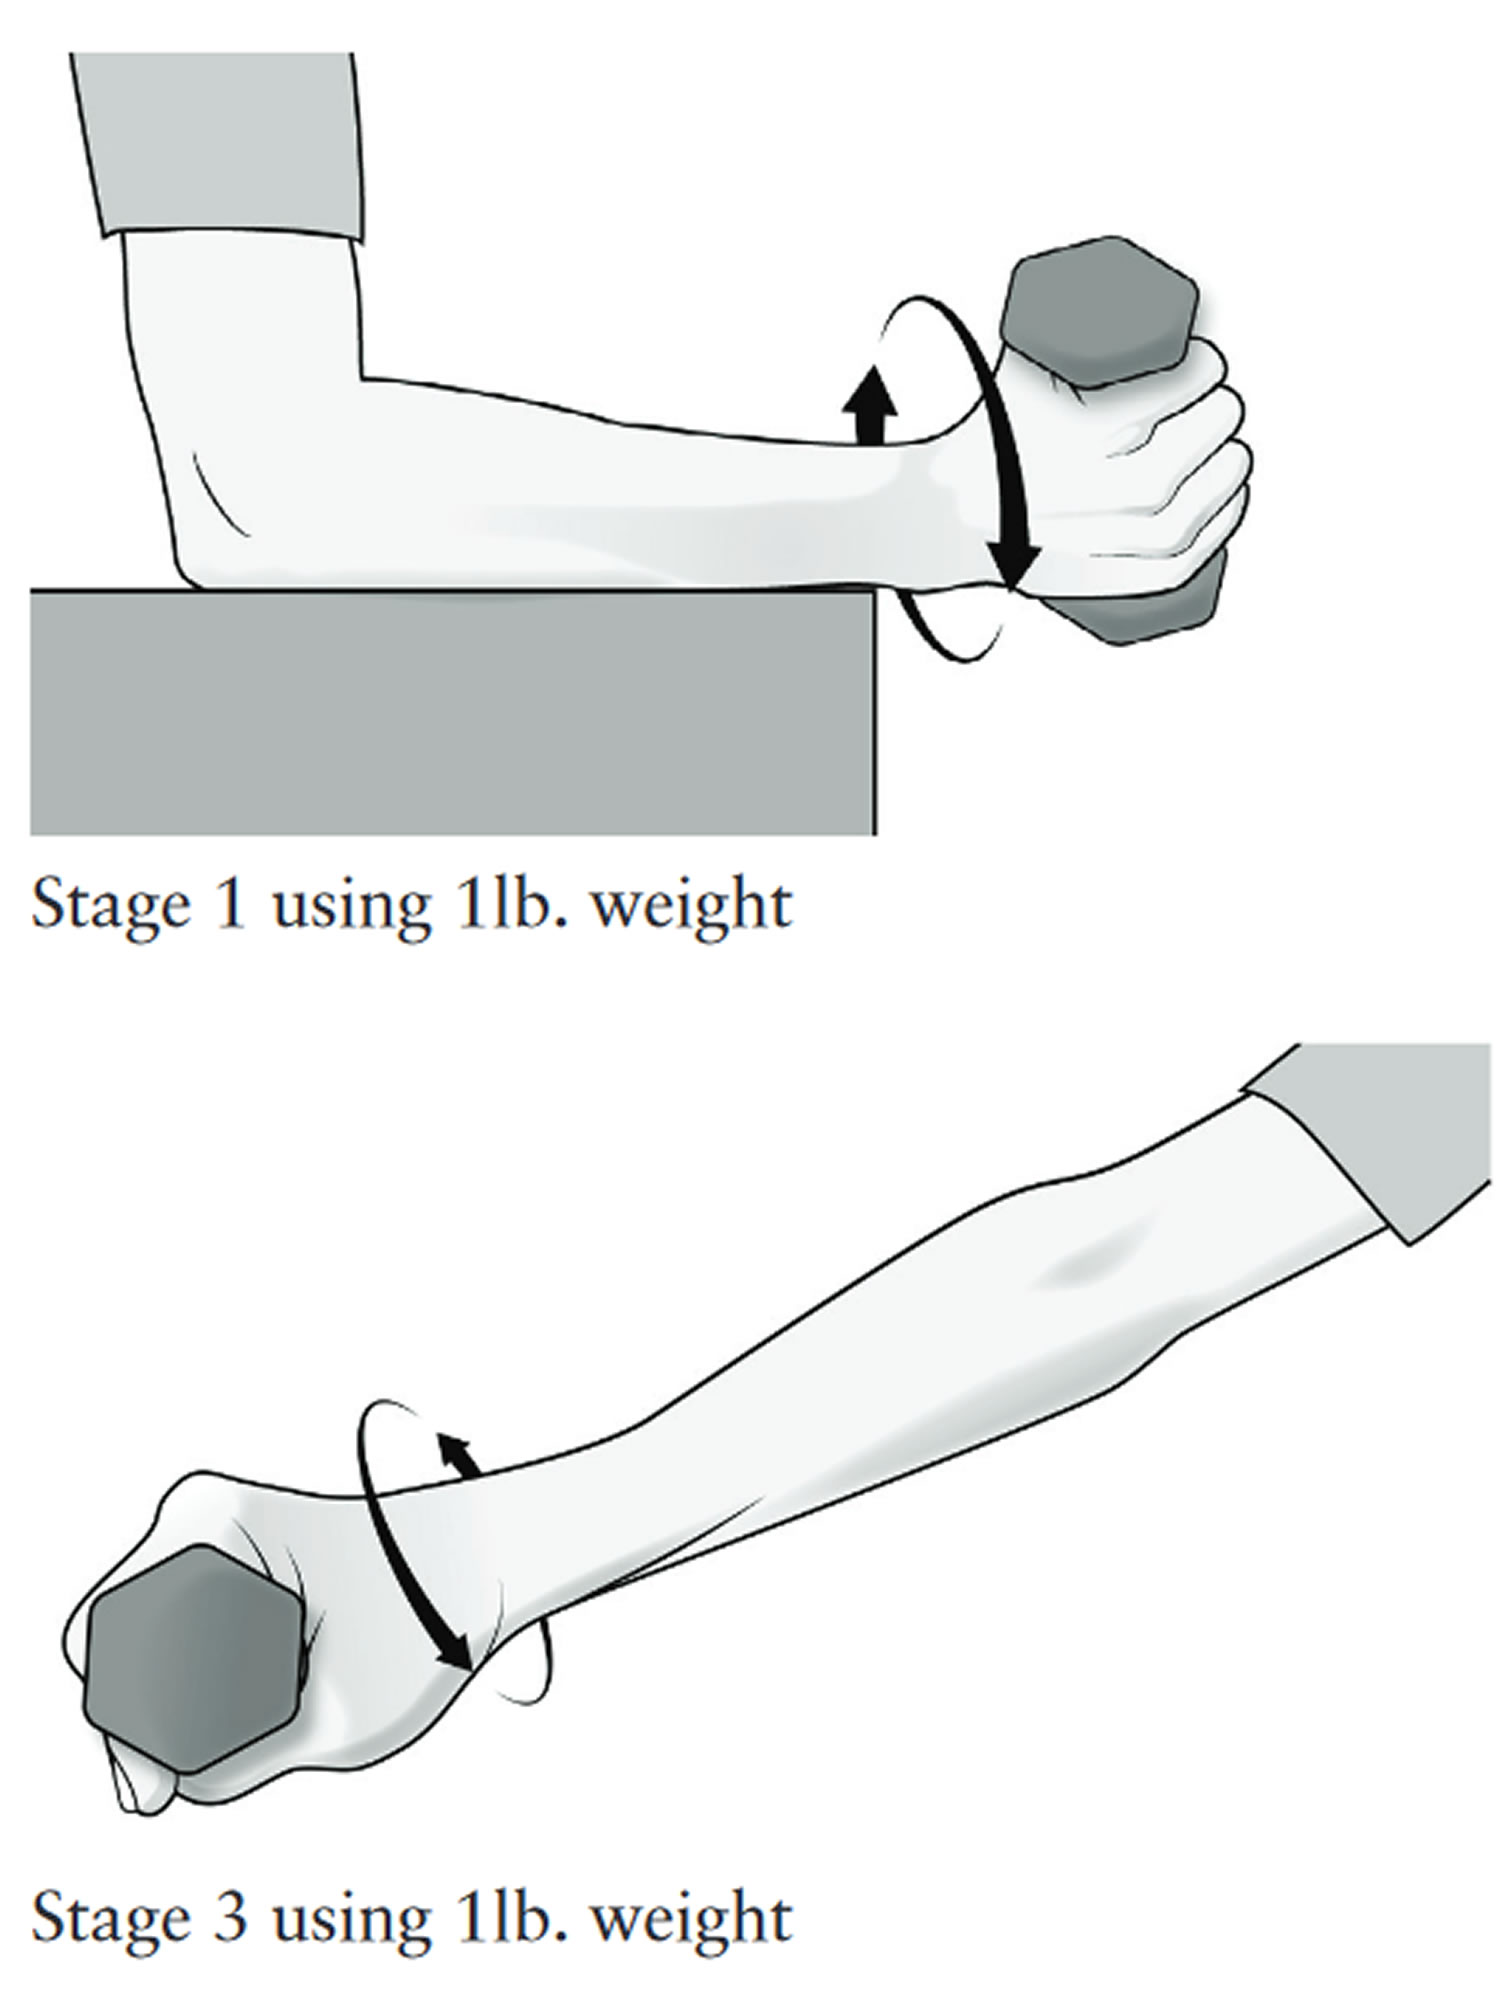
Forearm supination and pronation strengthening
- Stage 1: Bend your elbow to 90 degrees and support your forearm on a table with your wrist placed at the edge.
- Stage 2: Straighten your elbow slightly. Continue to support your arm on the table.
- Stage 3: Fully straighten your elbow and lift your arm so that it is no longer supported by the table.
Step-by-step directions to be followed for each stage
- Begin with palm facing the side. Slowly turn the palm facing up.
- Slowly return to the start position, then slowly turn the palm down.
- Slowly return to start position. This completes one repetition.
- Begin without using a weight and increase the repetitions until you can complete 30.
- When you can perform 30 repetitions on 2 consecutive days without increasing pain, begin performing the exercise using a 1 lb. weight.
- Follow the same steps above to continue to increase repetitions and weight until you are using a 3 lb. weight and can perform 30 repetitions on 2 consecutive days without increasing pain.
- Tip: When using a dumbbell, try to let the weight pull your forearm in either direction as far as possible.
This exercise should be performed in stages. Begin each stage with no weight. When you are able to complete 30 repetitions on 2 consecutive days with no increase in pain, move forward in the program by increasing weight (begin with 1lb., advance to 2 lbs., end with 3 lbs.).
Figure 8. Forearm supination and pronation strengthening
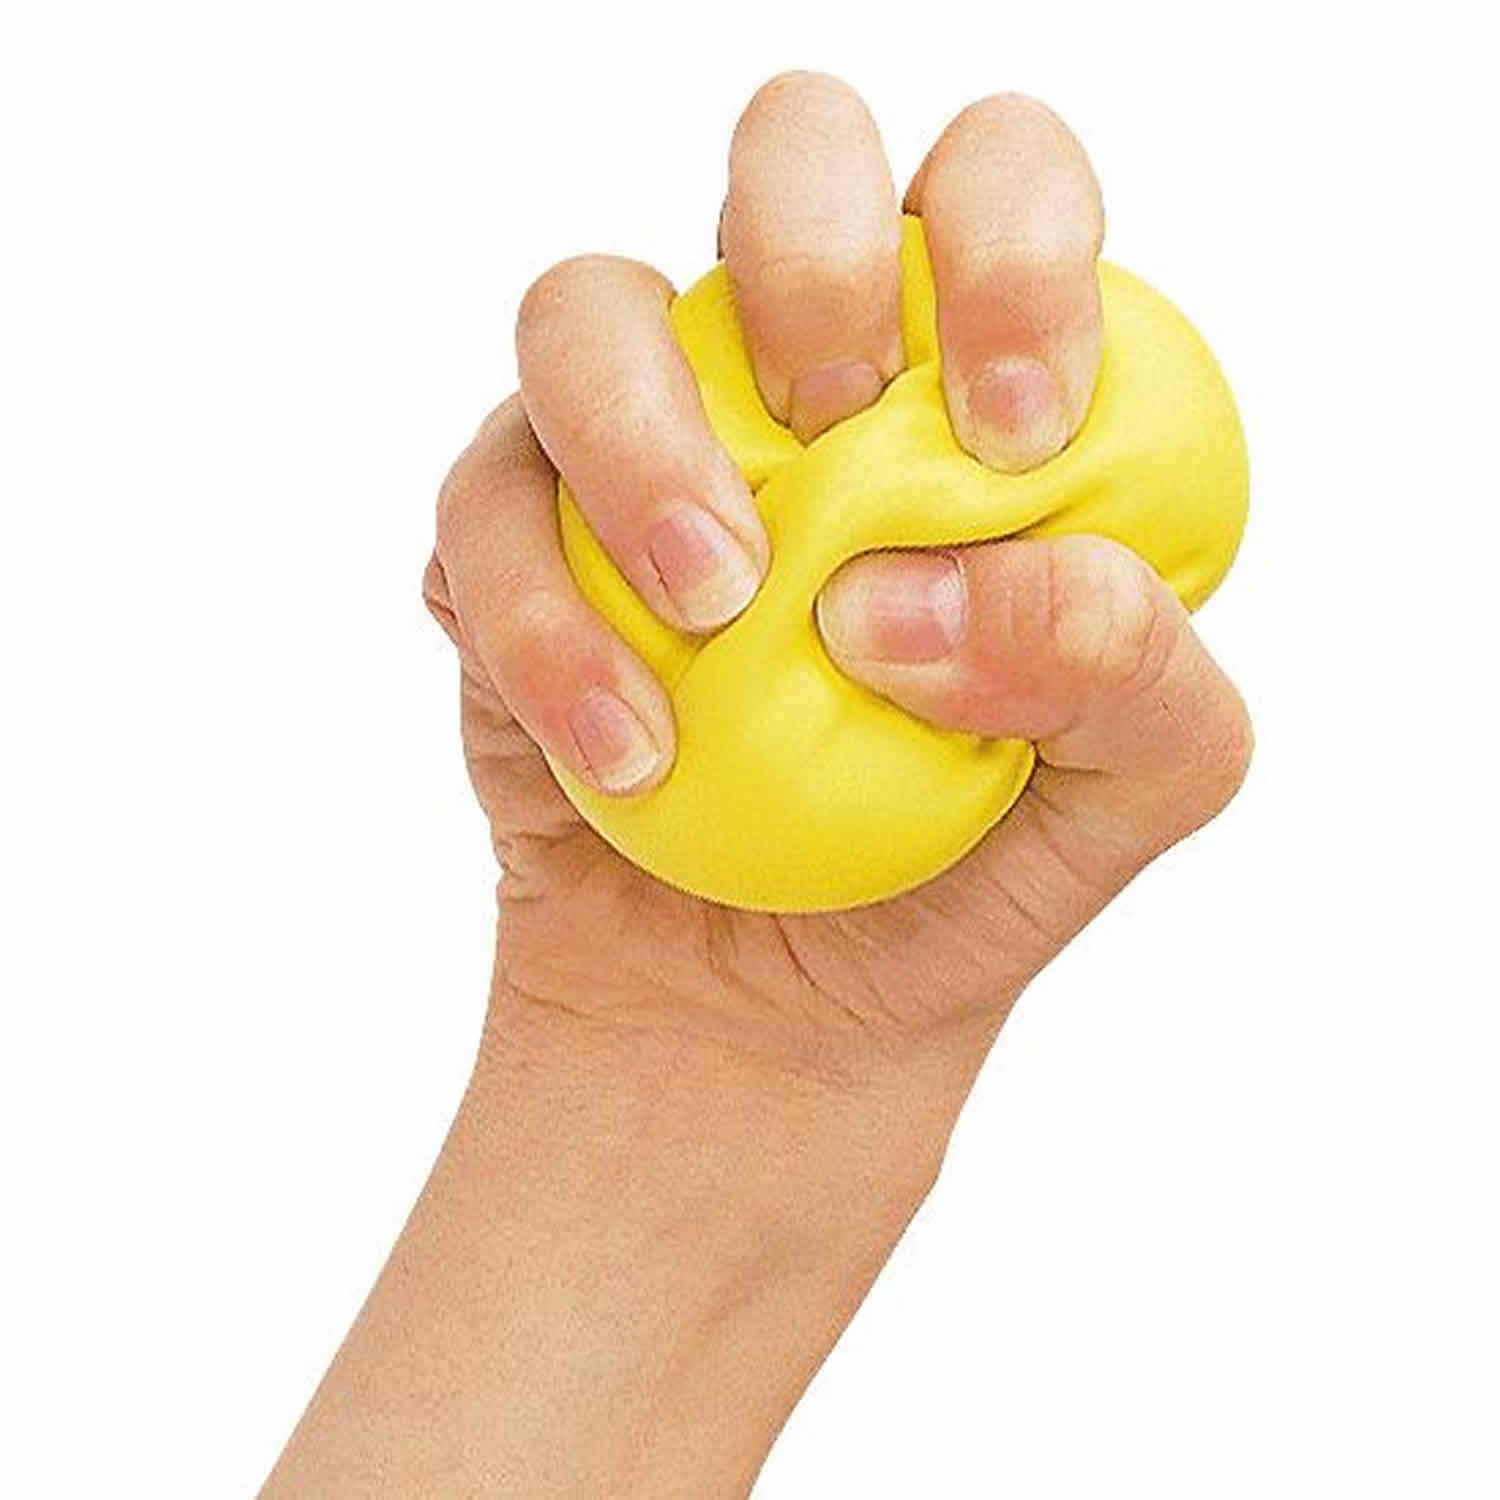
 Stress ball squeeze
Stress ball squeeze exercise should be performed after completing the above staged strengthening exercises. Your arm and elbow position for stress ball squeeze exercise should match the stage you are completing.
- Repetitions: 10 reps, 1x a day
- Days per week: 5 to 7 days
Figure 9. Stress ball squeeze
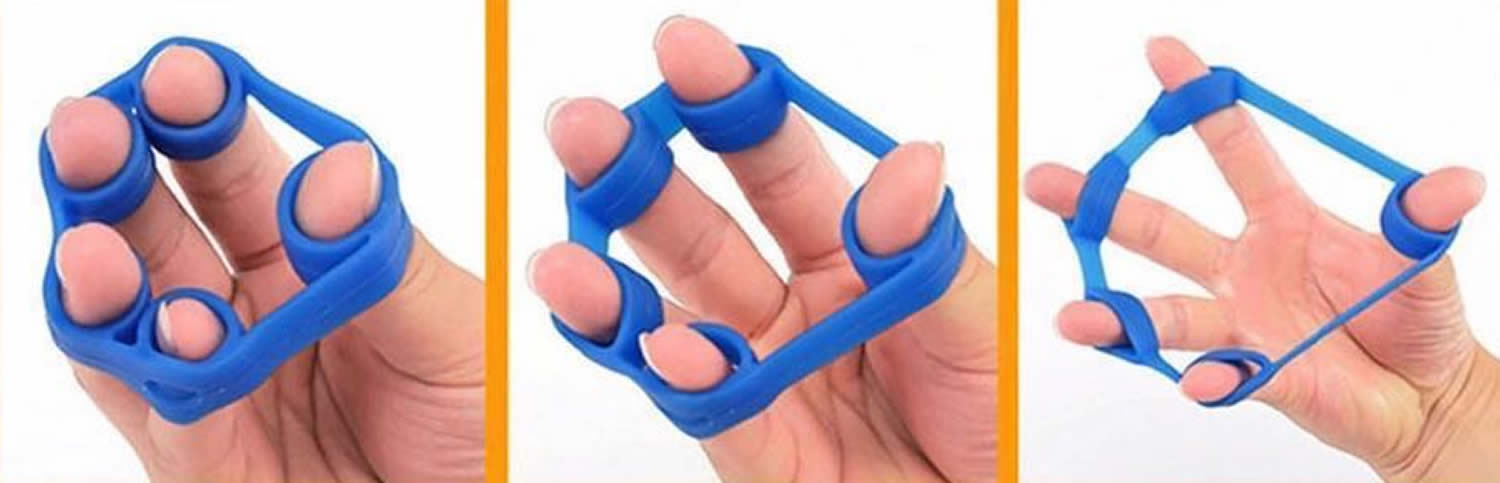
Finger stretch with elastic band
Finger stretch with elastic band exercise should be performed after completing the above staged strengthening exercises. Your arm and elbow position for finger stretch with elastic band exercise should match the stage you are completing.
- Repetitions: 10 reps, 1x a day
- Days per week: 5 to 7 days
Figure 10. Finger stretch with elastic band
Golfers elbow prognosis
The duration of the patient’s symptoms is related to the length of time before the athlete receives treatment. Those athletes who delay treatment tend to have a slower recovery course 2.
References- Aquilina AL, Grazette AJ. Clinical Anatomy and Assessment of the Elbow. Open Orthop J. 2017;11:1347-1352.
- Plancher KD, Halbrecht J, Lourie GM. Medial and lateral epicondylitis in the athlete. Clin Sports Med. 1996 Apr. 15(2):283-305.
- Jayanthi N, Esser S. Racket sports. Curr Sports Med Rep. 2013 Sep-Oct. 12(5):329-36.
- Vicenzino B, Brooksbank J, Minto J, Offord S, Paungmali A. Initial effects of elbow taping on pain-free grip strength and pressure pain threshold. J Orthop Sports Phys Ther. 2003 Jul. 33(7):400-7.
- Kohn HS. Prevention and treatment of elbow injuries in golf. Clin Sports Med. 1996 Jan. 15(1):65-83.
- Burnham R, Gregg R, Healy P, Steadward R. The effectiveness of topical diclofenac for lateral epicondylitis. Clin J Sport Med. 1998 Apr. 8(2):78-81.
- Baskurt F, Ozcan A, Algun C. Comparison of effects of phonophoresis and iontophoresis of naproxen in the treatment of lateral epicondylitis. Clin Rehabil. 2003 Feb. 17(1):96-100.
- Stanley KL, Weaver JE. Pharmacologic management of pain and inflammation in athletes. Clin Sports Med. 1998 Apr. 17(2):375-92.


