Ponseti method
Ponseti method also known as stretching and casting, is a manipulative technique that corrects congenital clubfoot (congenital talipes equinovarus) without invasive surgery 1. Ponseti method is most widely used technique in North America and throughout the world, uses gentle stretching and casting to gradually correct the deformity. Clubfoot is a common congenital orthopedic foot deformity in children characterized by four components of foot deformities: hindfoot equinus, hindfoot varus, midfoot cavus, and forefoot adduction 2.
Clubfoot is one of the most common pediatric foot deformity occurs at 1 in 1000 live births 3. Congenital clubfoot is a developmental deformation and will be seen right from the baby’s birth. Clubfoot can involve one foot or both feet. During the development in the mother’s womb a normal foot turns into Clubfoot. Tendons and ligaments in the back and inner side of the foot get thick and tight. Muscles develop shorter and smaller than normal. As a result, the back and inner parts of the foot are pulled together causing the foot to point downwards and twist inwards. The bones of the feet are therefore held in that abnormal position. The foot is turned, stiff and cannot be brought to a normal position by the child in a normal manner.
Treatment should ideally begin shortly after birth, but older babies have also been treated successfully with the Ponseti method. Elements of the method include:
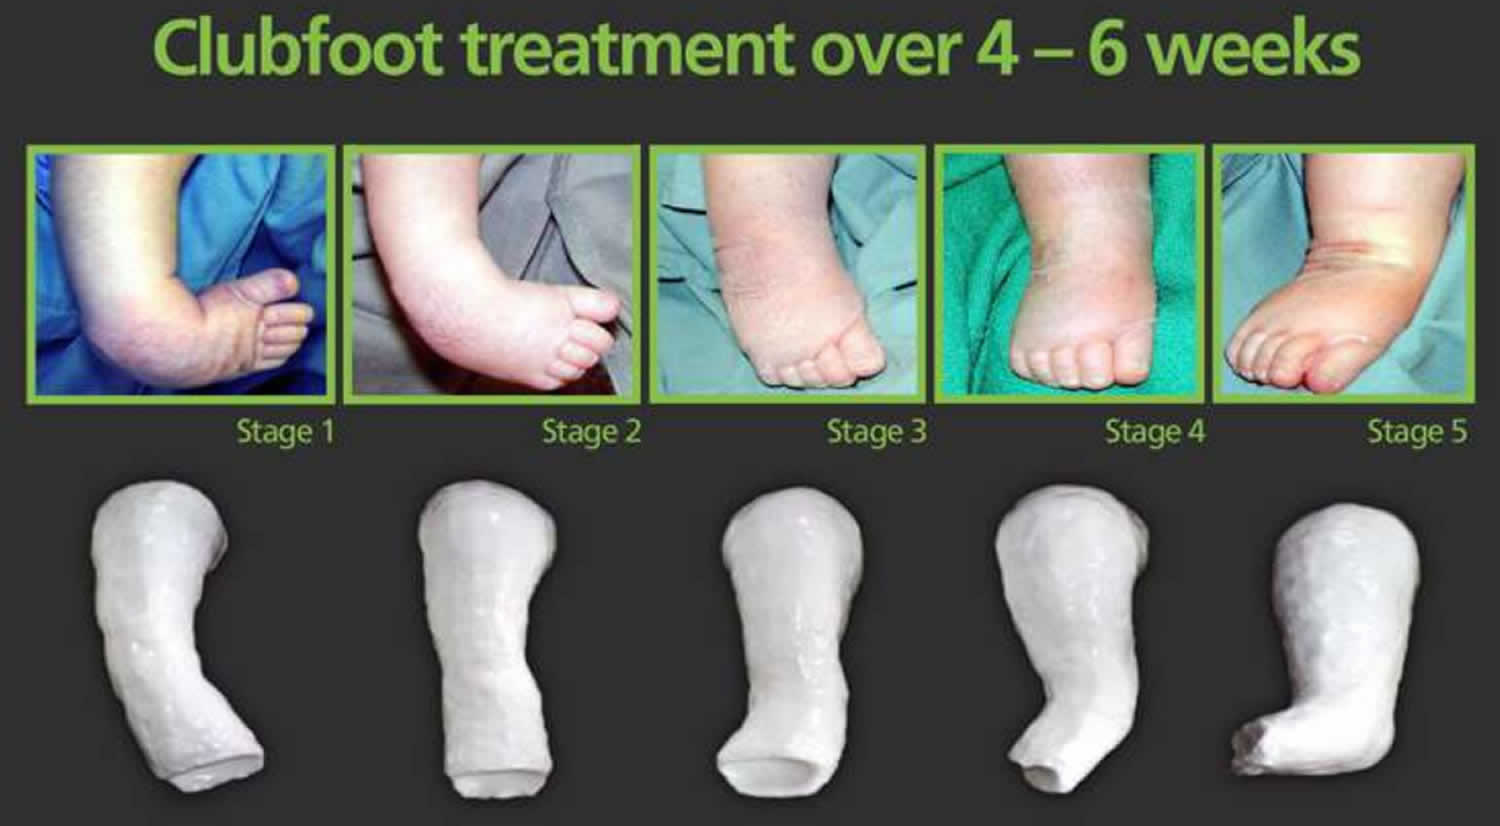
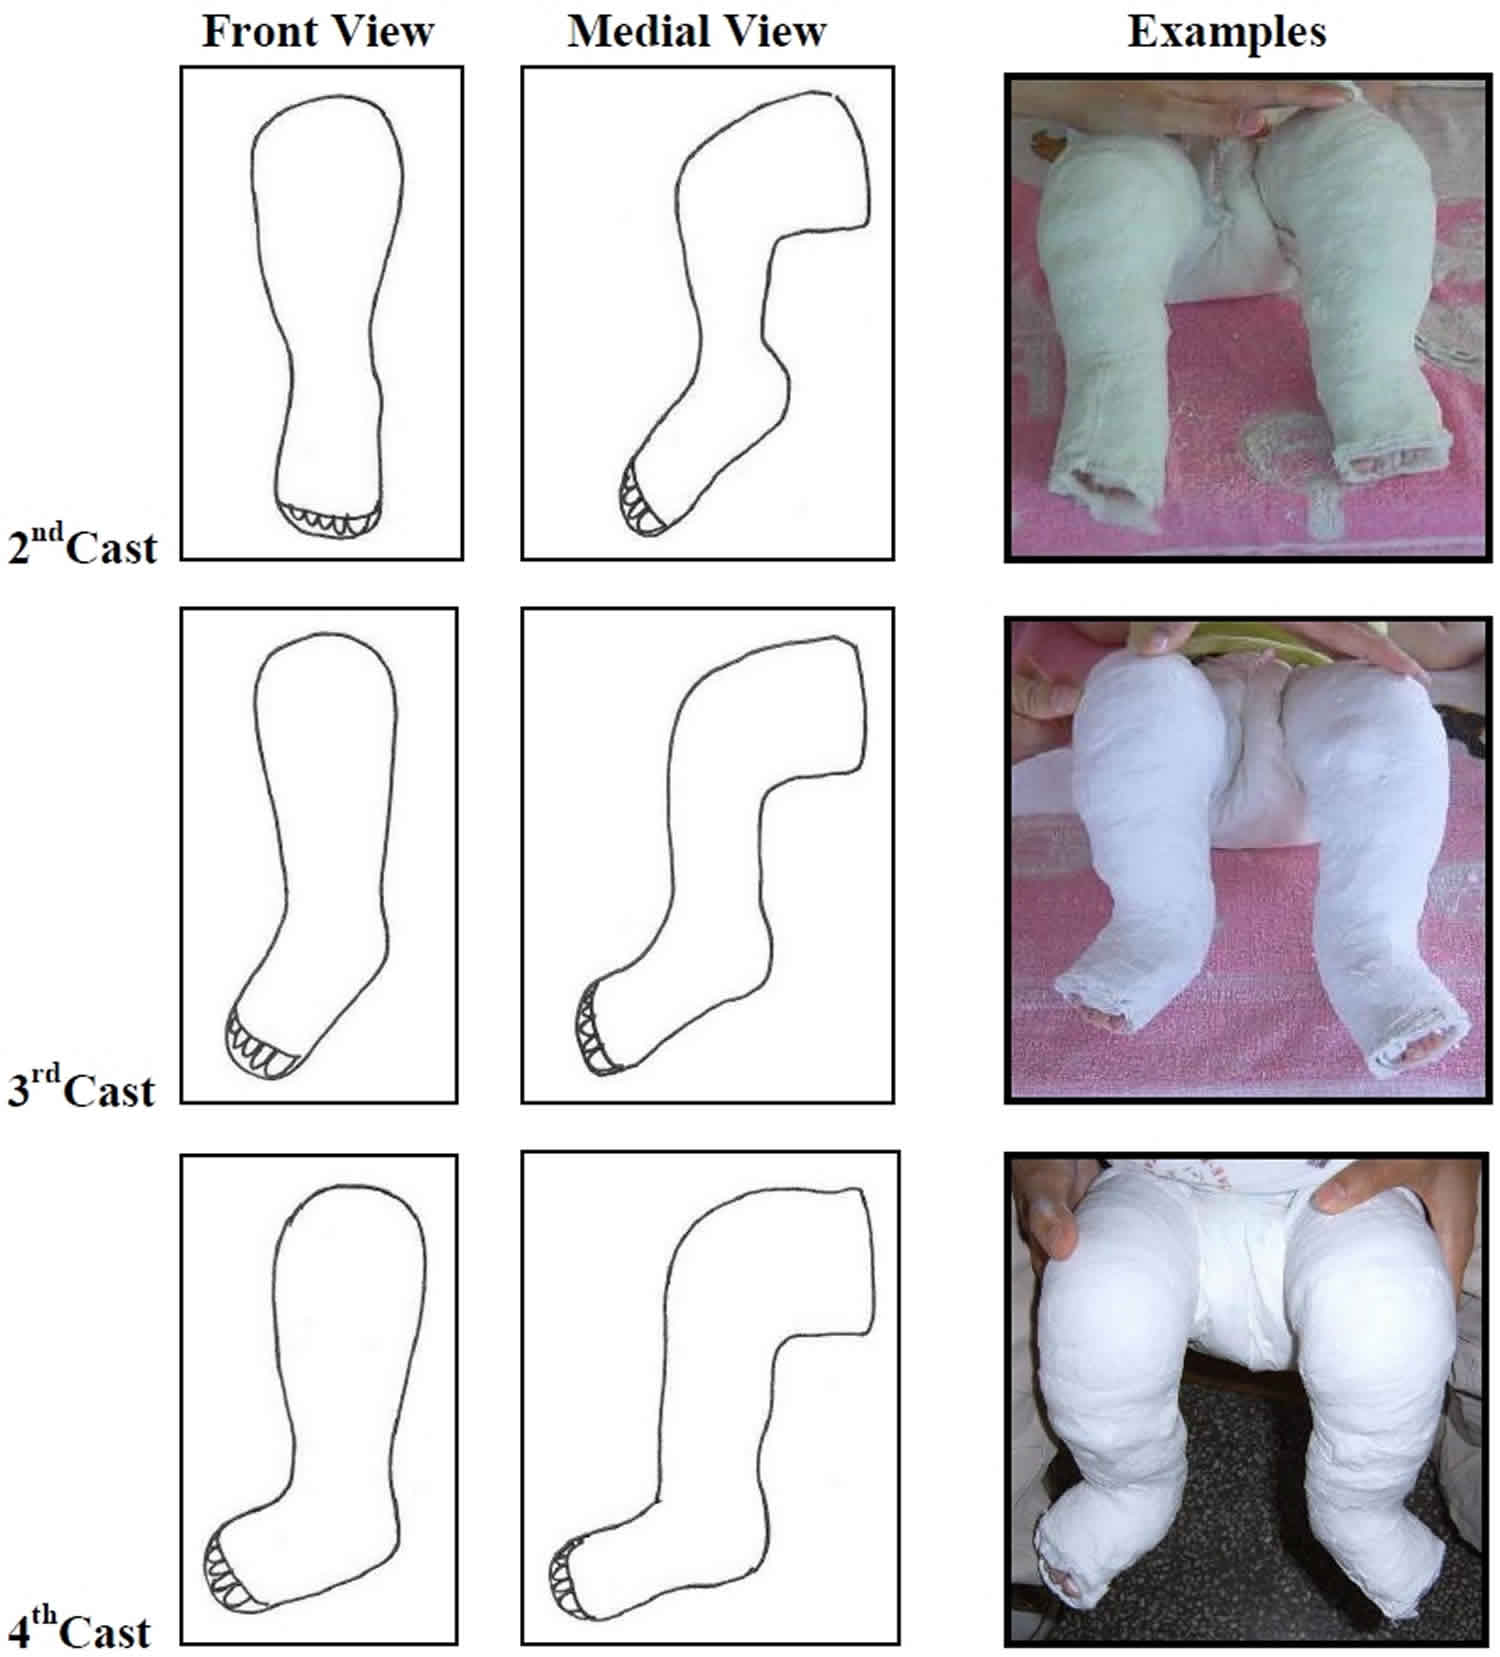
- Manipulation and casting. Your baby’s foot is gently stretched and manipulated into a corrected position and held in place with a long-leg cast (toes to thigh). Each week this process of stretching, re-positioning, and casting is repeated until the foot is largely improved. For most infants, this improvement takes about 6 to 8 weeks.
- Achilles tenotomy. After the manipulation and casting period, approximately 90 percent of babies will require a minor procedure to release continued tightness in the Achilles tendon (heel cord). During this quick procedure (called a tenotomy), your doctor will use a very thin instrument to cut the tendon. The cut is very small and does not require stitches. A new cast will be applied to the leg to protect the tendon as it heals. This usually takes about 3 weeks. By the time the cast is removed, the Achilles tendon has regrown to a proper, longer length, and the clubfoot has been fully corrected.
- Bracing. Even after successful correction with casting, clubfeet have a natural tendency to recur. To ensure that the foot will permanently stay in the correct position, your baby will need to wear a brace (commonly called “boots and bar”) for a few years. The brace keeps the foot at the proper angle to maintain the correction. This bracing program can be demanding for parents and families, but is essential to prevent relapses.
For the first 3 months, your baby will wear the brace essentially full-time (23 hours a day). Your doctor will gradually decrease the time in the brace to just overnight and nap time (about 12 to 14 hours per day). Most children will follow this bracing regimen for 3 to 4 years.
There are several different types of braces — all of which consist of shoes, sandals, or custom-made footwear attached to the ends of a bar. The bar can be solid (both legs move together) or dynamic (each leg moves independently). Your doctor will talk with you about the type of brace that would best meet your baby’s needs.
Babies might be fussy during the first few days of wearing a brace and will need time to adjust.
Considerations of the Ponseti method
The Ponseti method has proven extremely effective for many children. It does, however, require the family to be highly committed to applying the braces properly every day. If the brace is not worn as prescribed, there is a high likelihood that the clubfoot will recur.
A small percentage of children develop relapses despite proper bracing. If the child’s foot slips out of the boot on a regular basis, it may be the first sign of a mild recurrence of the deformity. If addressed promptly, this can usually be corrected with a few serial casts and possibly a minor surgery.
In addition, applying the Ponseti method correctly requires training, experience, and practice. Be sure to ask your pediatrician for a referral to an orthopaedic surgeon with expertise in the nonsurgical correction of clubfoot.
Ponseti method steps
The treatment starts with gradual correction of the deformity: cavus, mid foot inversion, heel varus and the rigid equinus need to be corrected. The tenotomy of the Achilles tendon is strongly suggested in most cases to correct the equinus. After full correction a relapse needs to be prevented.
Your doctor will:
- Move your baby’s foot into a correct position and then place it in a cast to hold it there
- Reposition and recast your baby’s foot once a week for several months
- Perform a minor surgical procedure to lengthen the Achilles tendon (percutaneous Achilles tenotomy) toward the end of this process
After the shape of your baby’s foot is realigned, you’ll need to maintain it with one or more of the following:
- Doing stretching exercises with your baby
- Putting your child in special shoes and braces
- Making sure your child wears the shoes and braces as long as needed — usually full time for three months, and then at night and during naps for up to three years
For the Ponseti method to be successful, you’ll need to apply the braces according to your doctor’s directions so that the foot doesn’t return to its original position. The main reason the Ponseti method sometimes doesn’t work is because the braces are not used as directed.
Figure 1. Ponseti method for clubfoot
Ponseti Method for later clubfoot treatment start
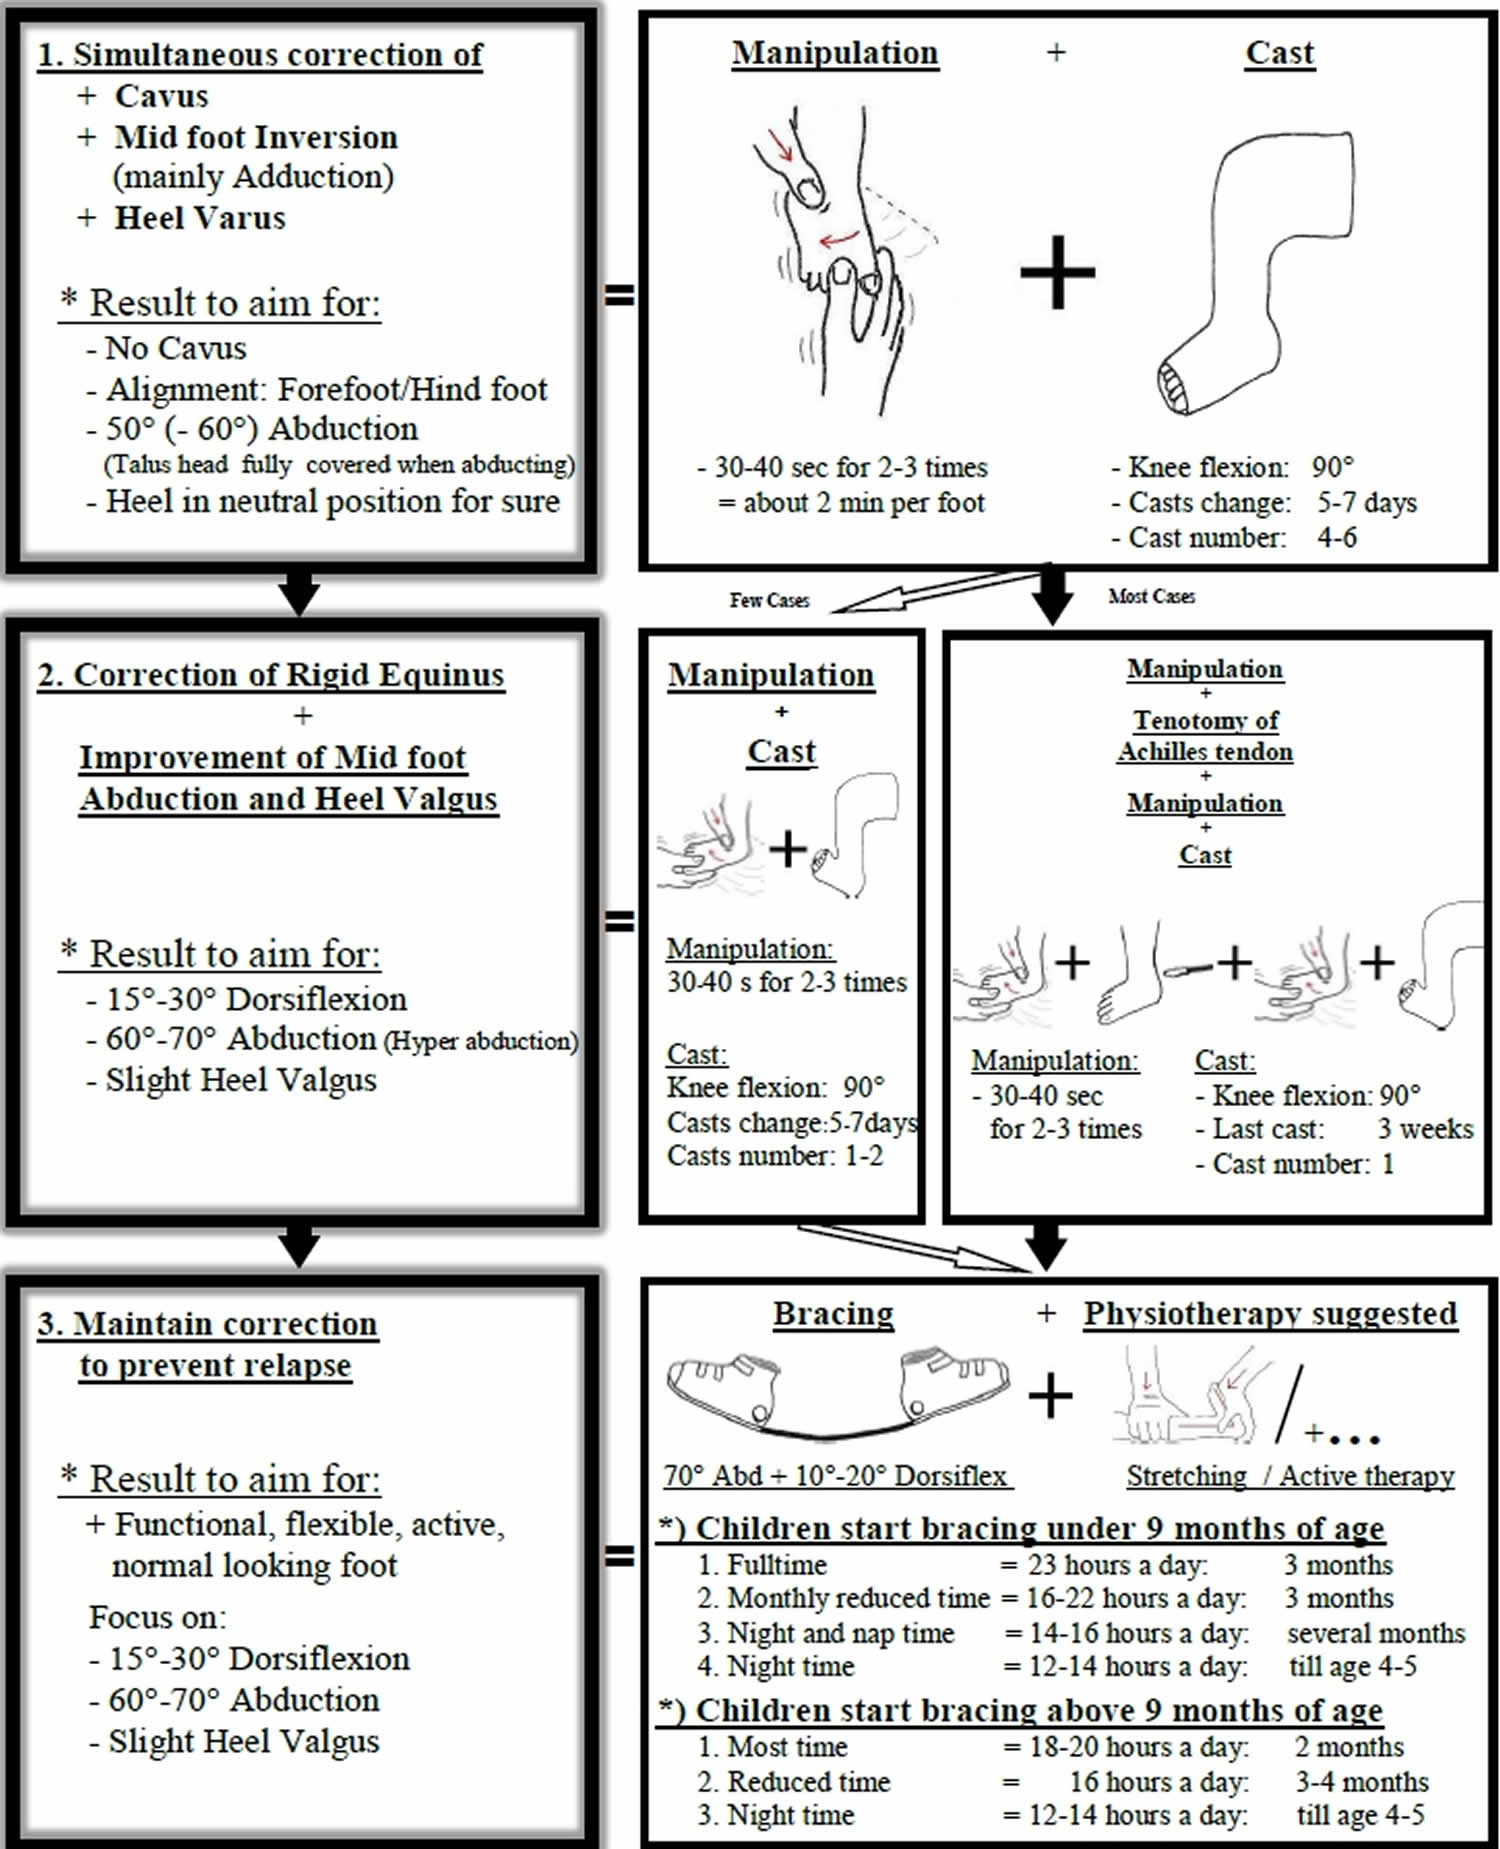
Later clubfoot treatment for “older child” = already walking child – not atypical clubfoot or associated defect.
Depending on the child’s age and severity of the clubfoot, gradual correction is done as much as possible. Cavus, mid foot inversion, heel varus and the rigid equinus need to be addressed for correction. Especially in older children experts strongly suggest physiotherapy to accompany the following bracing phase. Some older children may require further surgery.
Figure 2. Ponseti method for clubfoot in older child
Ponseti technique
Manipulation
The technique of the manipulation is based on the understanding of the described coupling of movements = the foot follows the track. In practice this means to correct the hind foot we need to manipulate the mid foot. The initiator for the correction of the whole foot is the abduction of the mid foot.
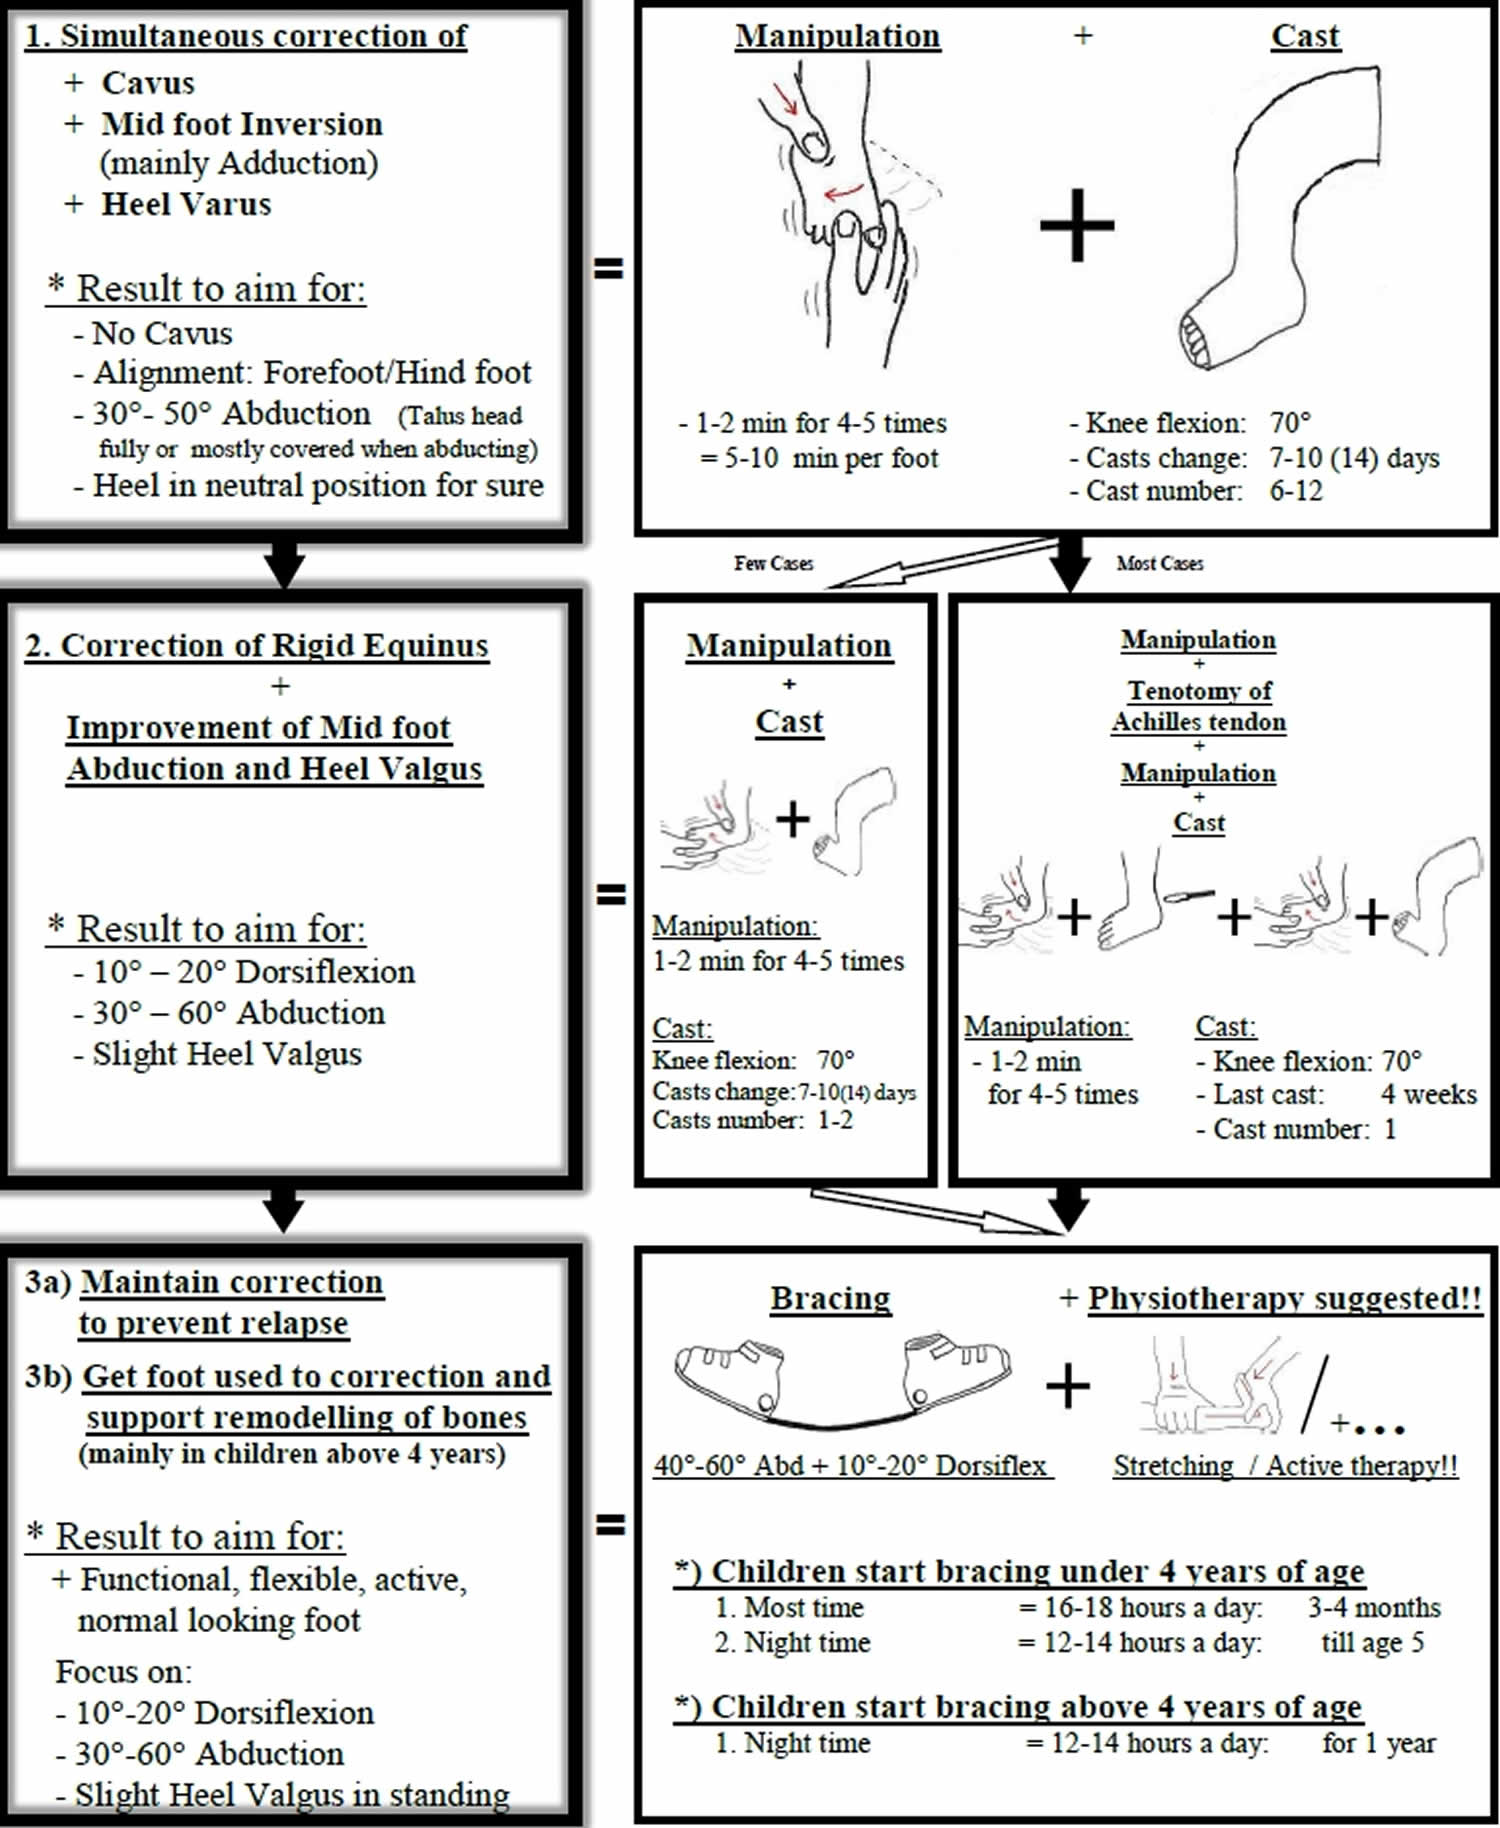
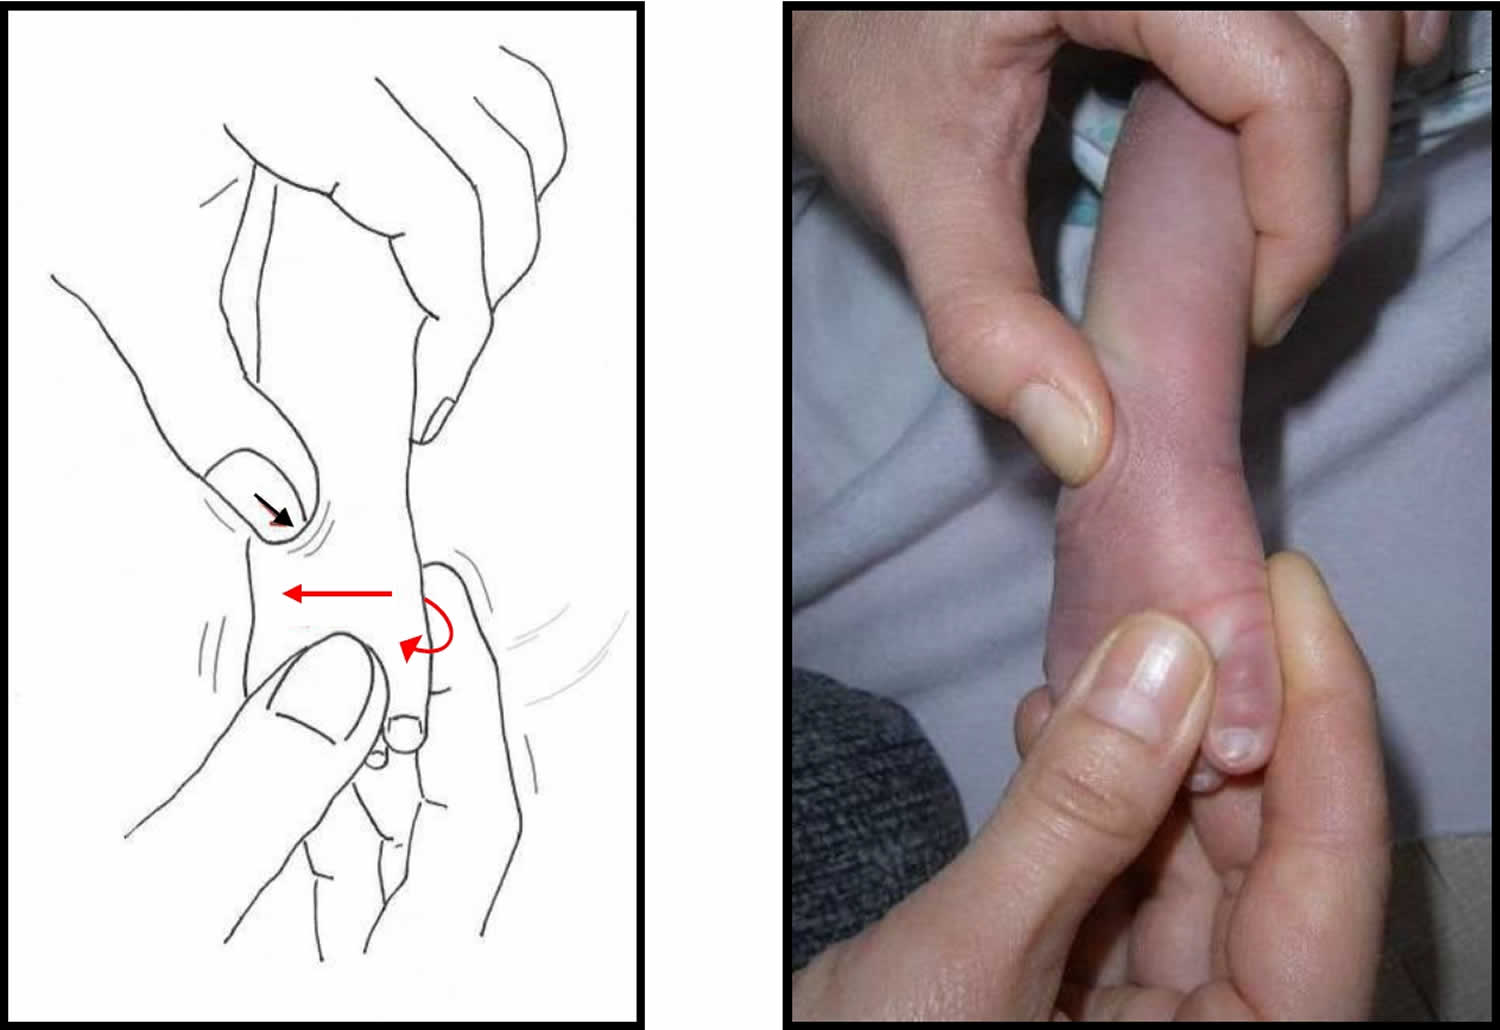
1. Precise identification of the head of the Talus and Talo-calcaneo-navicular joint (Figure 3)
It is very important to localize the head of the talus very well to prevent a wrong manipulation and failure of the treatment.
- A.
- 1) Grasp the (right) forefoot with the (right) hand.
- 2) With (left) thumb and index finger feel the Malleoli from the front.
then
- B.
- 1) Move the (left) thumb and index finger forward to clasp the head of the Talus.
In this position:- a) Feel the Navicular with the tip of your index finger.
- b) Feel the anterior tuberosity of Calcaneus with the tip of your thumb
- 2) Abduct the forefoot slowly and feel the motion in the Talo-calcaneo-navicular joint:
- a) Navicular moves in front of the head of the Talus.
- b) Anterior tuberosity of the Calcaneus moves laterally under the head of the Talus.
- 1) Move the (left) thumb and index finger forward to clasp the head of the Talus.
Figure 3. Precise identification of the head of the Talus and Talo-calcaneo-navicular joint
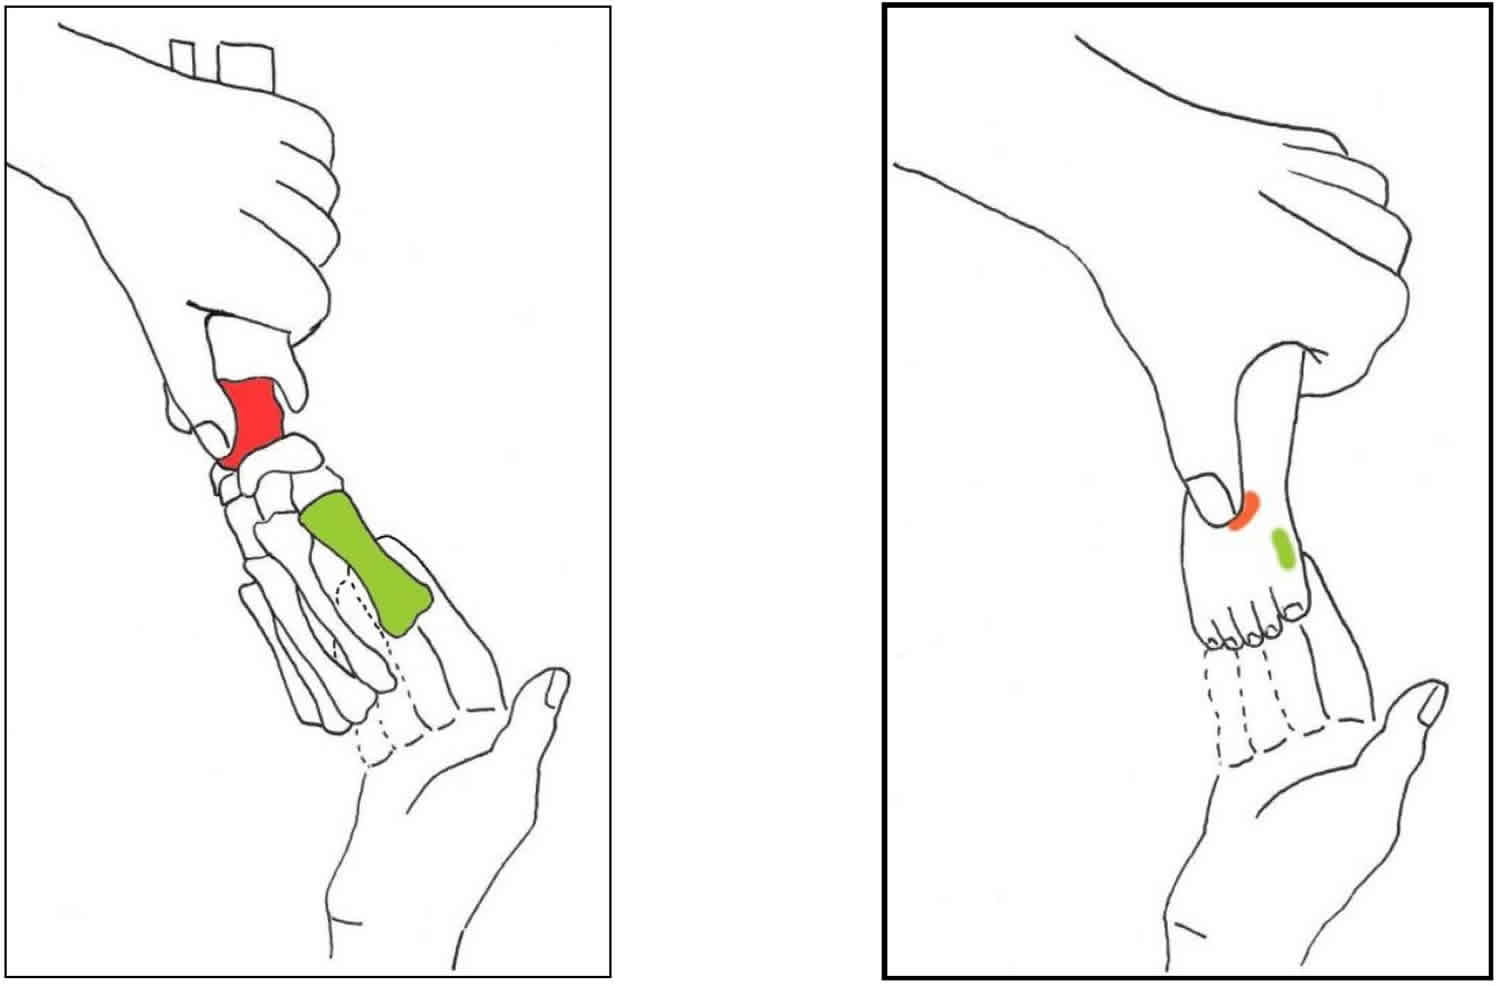
2. Manipulation technique (Figure 4)
The manipulation can be done on the mother’s lap and should not cause pain for the child. It should be done gently, so that the ligaments get stretched according to their natural capacity.
- Stabilize the Talus by placing the thumb over the head of the Talus. This provides a pivot point around which the foot is abducted.
- Manipulate the foot with Supination followed by Abduction with the other hand. This should not cause any discomfort to the child. In the beginning much Supination is required, but Supination will automatically decrease with more achieved Abduction.
- Hold the correction with gentle pressure, then release and repeat. Use the following guidelines for children without other defect associated:
- a) “Younger child” (= not walked at treatment start): – Hold the correction for 30-40 seconds, then release and repeat 1-2 times. It will take around 2 minutes per Clubfoot.
- b) “Older child” (= already walked at treatment start): – Hold the correction for 1-2 minutes, then release and repeat 3-4 times. It will take 5-10 minutes per Clubfoot.
- Never pronate!!!
- Never touch the heel!!!
- Never use more force!!!
Figure 4. Ponseti method manipulation technique
Hand positions for manipulation
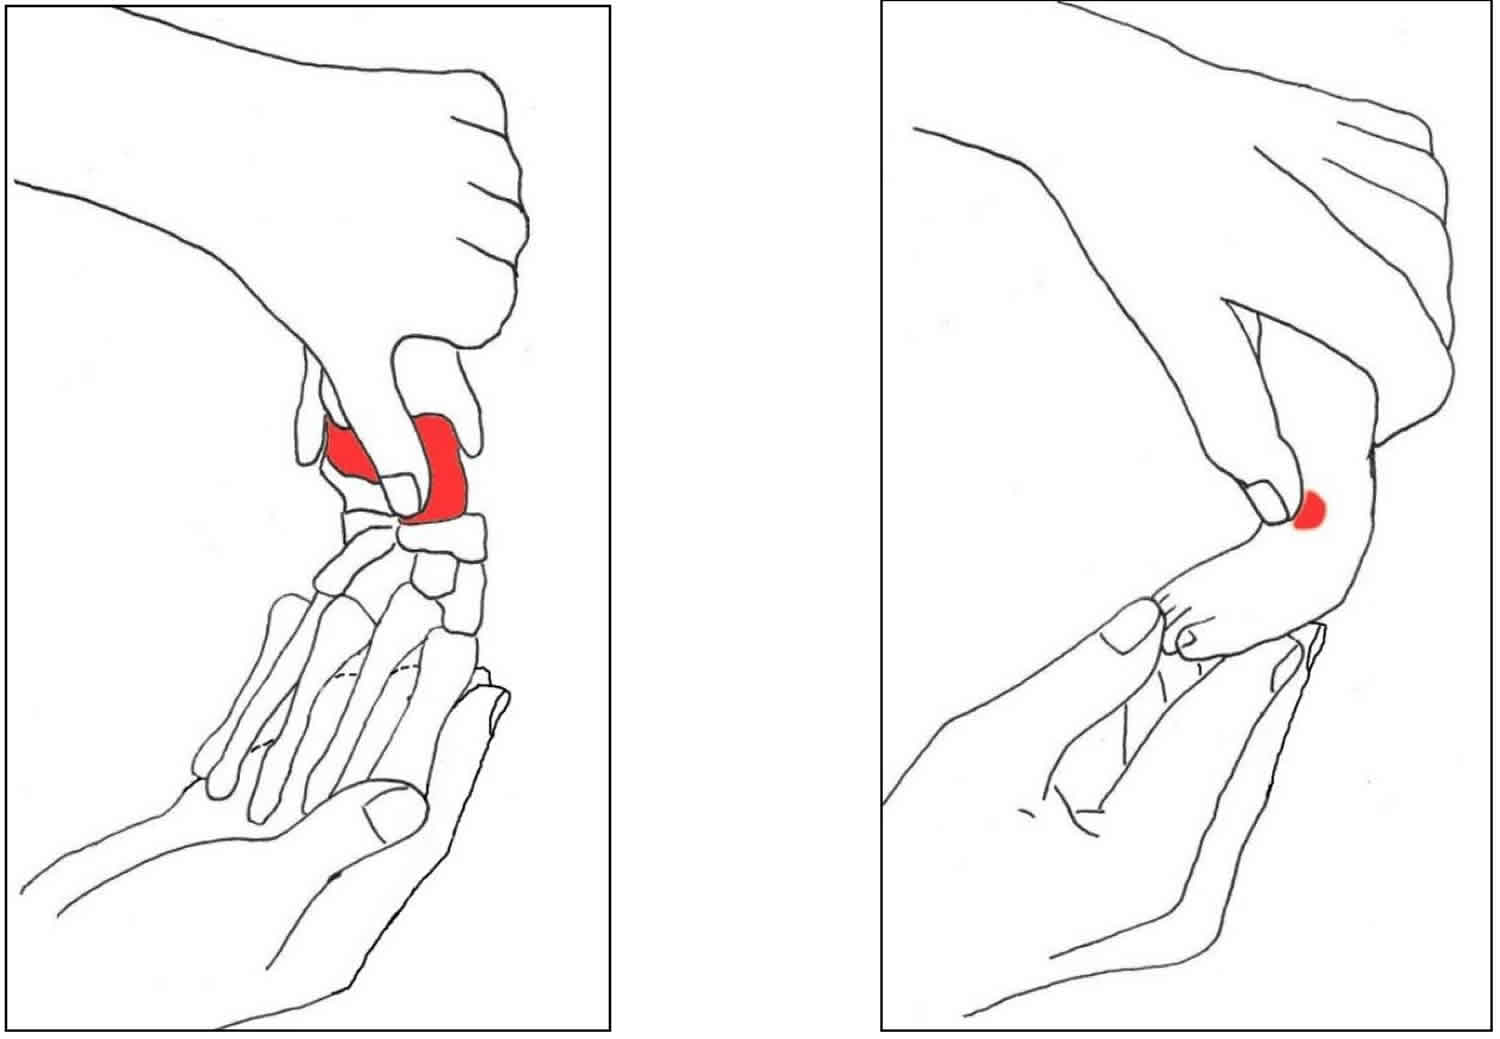
A) Two-hands-position 1
Step 1:
- With the hand coming from up front: Stabilize the Talus by placing the thumb on the head of the Talus.
- With the other hand: Raise the first ray (= Metatarsal I and the Phalanges of the first toe). Do this by placing index and middle finger under the plantar-medial part of the 1st Metatarsal.
Result: More Supination of the forefoot.
Goal: Get the forefoot in line with the mid foot in terms of Supination.
Figure 5. Hand positions for ponseti method manipulation (Step 1)
Step 2:
Move the forefoot into Abduction and the mid foot will follow. Supination decreases with the increase of Abduction. Around 50° Abduction, no Supination needs to be kept anymore, but never move the foot actively in the direction of Pronation.
Goal: Gradual correction of Mid foot Inversion and Heel Varus.
Figure 5. Hand positions for ponseti method manipulation (Step 2)
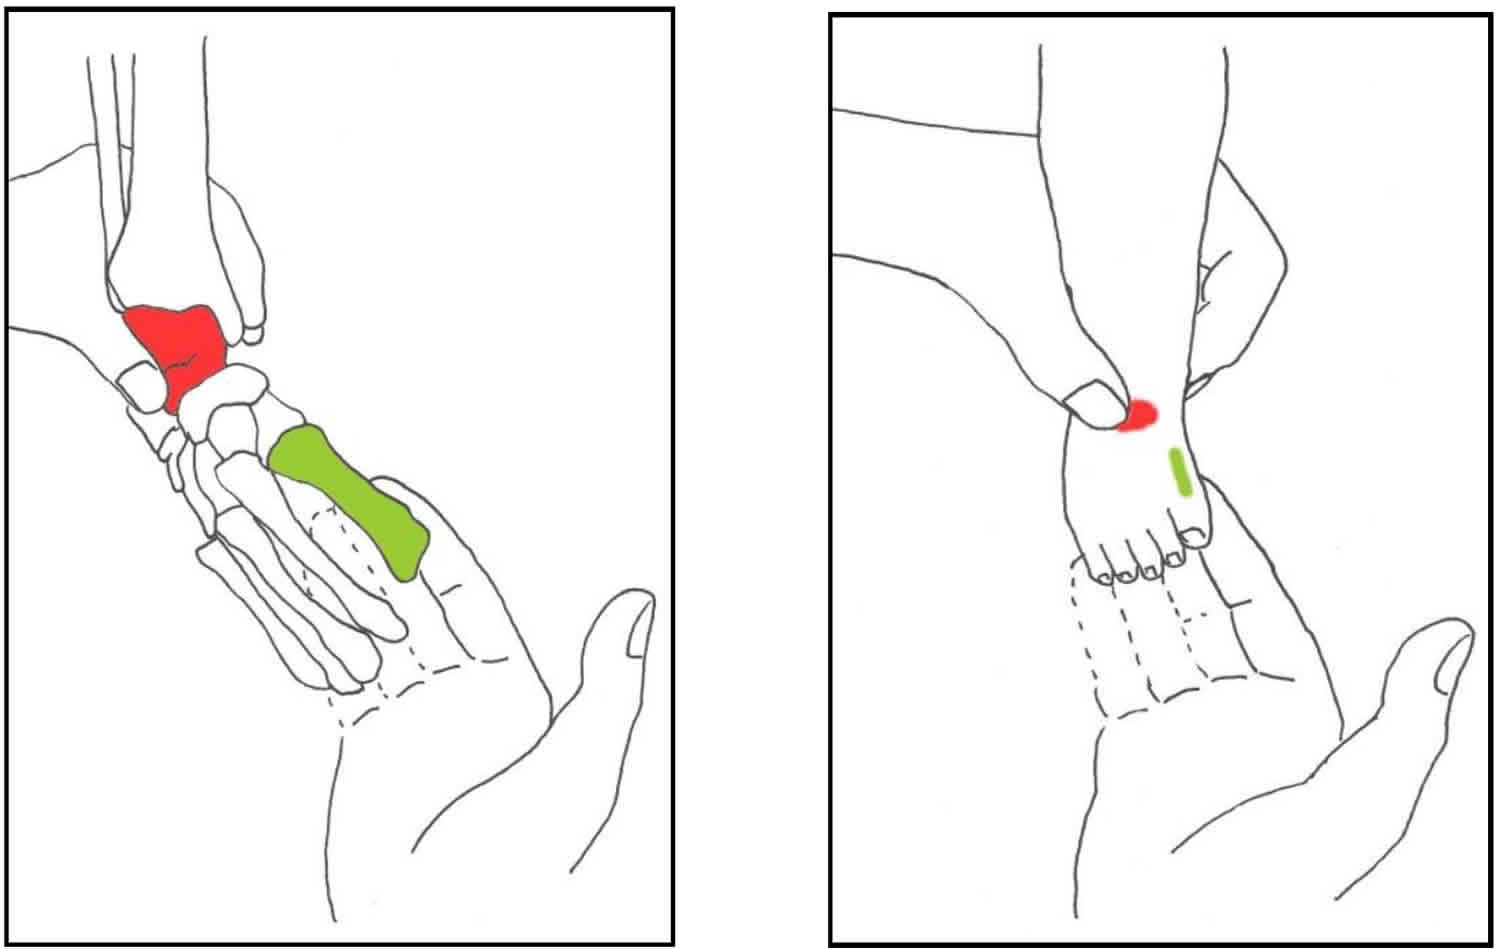
B) Two-hands-position 2
Step 1:
- With the hand coming from back: Stabilize the Talus with placing the thumb on the head of the Talus. Don’t touch the heel by accident!!!
- With the other hand: Raise the first ray (= 1st Metatarsal and the Phalanges of the first toe). Do this by placing the index and middle finger under the plantar-medial part of the 1st Metatarsal.
Result: More Supination of the forefoot. Goal: Get the forefoot in line with the mid foot in terms of Supination.
Figure 6. Hand positions for ponseti method manipulation (alternate step)
Step 2:
Move the forefoot into Abduction and the mid foot will follow. Supination decreases with the increase of Abduction. Around 50° Abduction, no Supination needs to be kept anymore, but never move the foot actively in the direction of Pronation. Goal: Gradual correction of Mid foot Inversion and Heel Varus.
Figure 7. Hand positions for ponseti method manipulation alternate step 2
 Casts after manipulations
The cast is applied after the manipulation and immobilizes the foot in order to stretch the tight ligaments, joint capsules and tendons. Always use long leg casts up to the groin in order to keep the foot under the Talus in Abduction and prevent Rotation in the ankle mortise. In the “younger child” (= not walked before treatment start) cast the knees in 90° Flexion and change the cast every 5-7 days. In the “older child” (walked before treatment start) cast the knees in 70° Flexion, so that they can stand up and change the casts every 7-10 (14) days. The last cast, if tenotomy of the Achilles tendon is done, will stay for 3 weeks in the “younger child” and 4 weeks in “older child”.
While casting change hand positions to avoid long pressure over the Talus and other spots to prevent pressure sores. Always mould well at the heel, Malleoli and sole of the foot.
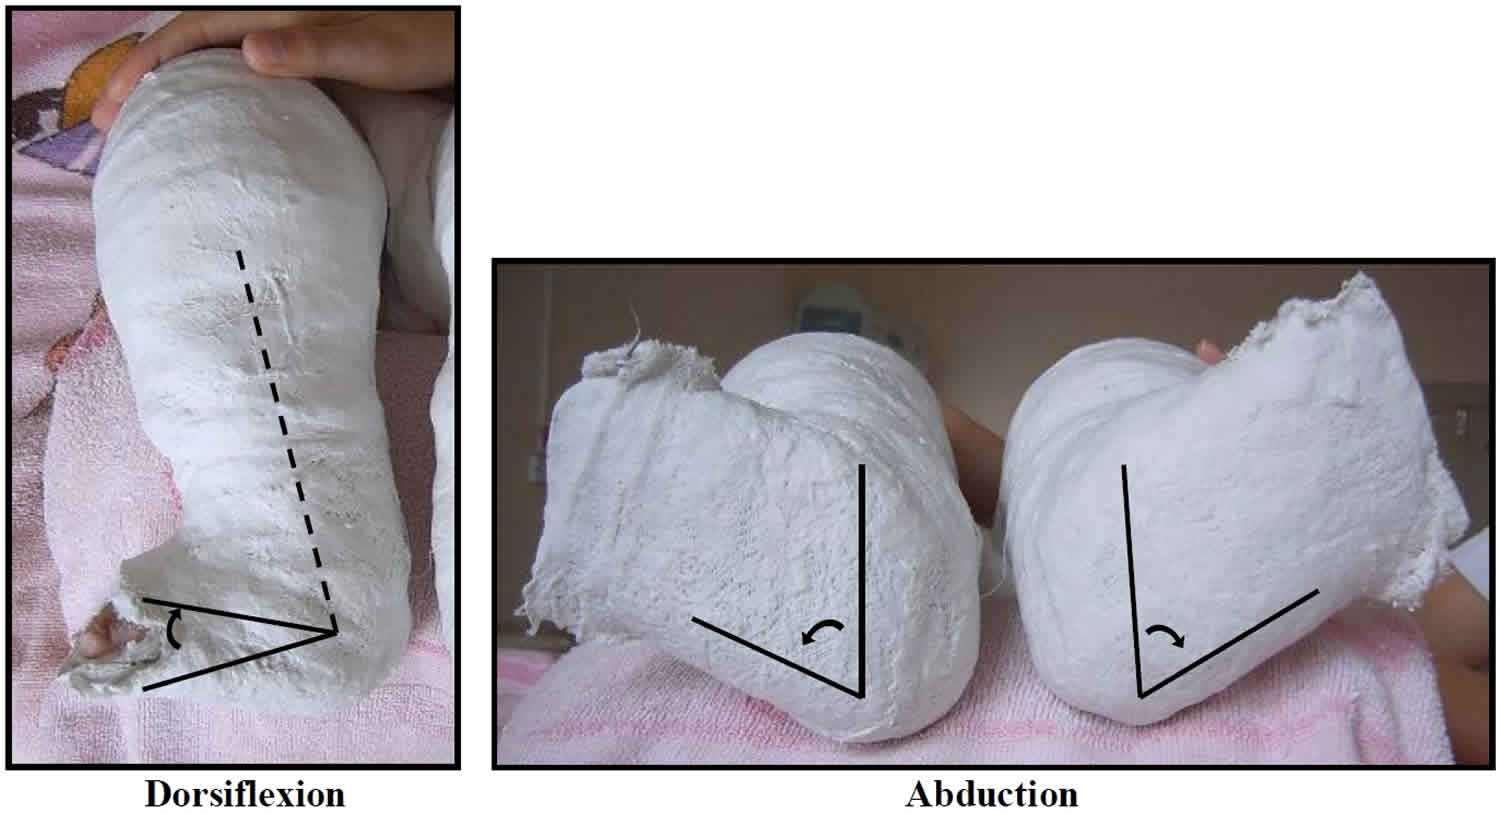
The main focus in the first cast is the correction of the Cavus by supinating the fore foot, but Mid foot Inversion and Heel Varus are addressed as well by gentle Abduction. When the Cavus is eliminated, Mid foot Inversion and Heel Varus have to be corrected in the following casts. Aim to achieve the neutral position of the heel for sure and in the “younger child” 50° (-60°) Abduction, in the “older child” 30°- 50° Abduction. Finally (in most cases after tenotomy of the Achilles tendon) correct the Equinus, but simultaneously improve Mid foot Abduction and Heel Valgus. The last cast should have 60° – 70° Abduction + 15° – 30° Dorsiflexion in the “younger child” and 30° – 60° Abduction and 10° – 20° Dorsiflexion in the “older child”.
Never hold the heel when casting! Never cast the foot in a pronated position!
Avoid External rotation of the knee!
1. First cast: Correction of the Cavus (main focus) + Correction of Mid foot Inversion and Heel Varus
Aim for the alignment of forefoot and mid foot by supinating the fore foot and some Abduction.
- Stabilize the Talus by placing the thumb over the lateral part of the head of the Talus.
- Elevate the first ray and achieve a homogeny Supination of the forefoot in line with the mid foot. Then abduct the foot gently.
- Hold the corrected position while an assistant applies padding and plaster. Change hand positions and mould well at the heel, Malleoli and sole of the foot. In small babies correction of the Cavus usually occurs with the first cast. A severe Cavus in a stiff foot will need 2 or 3 cast changes for correction.
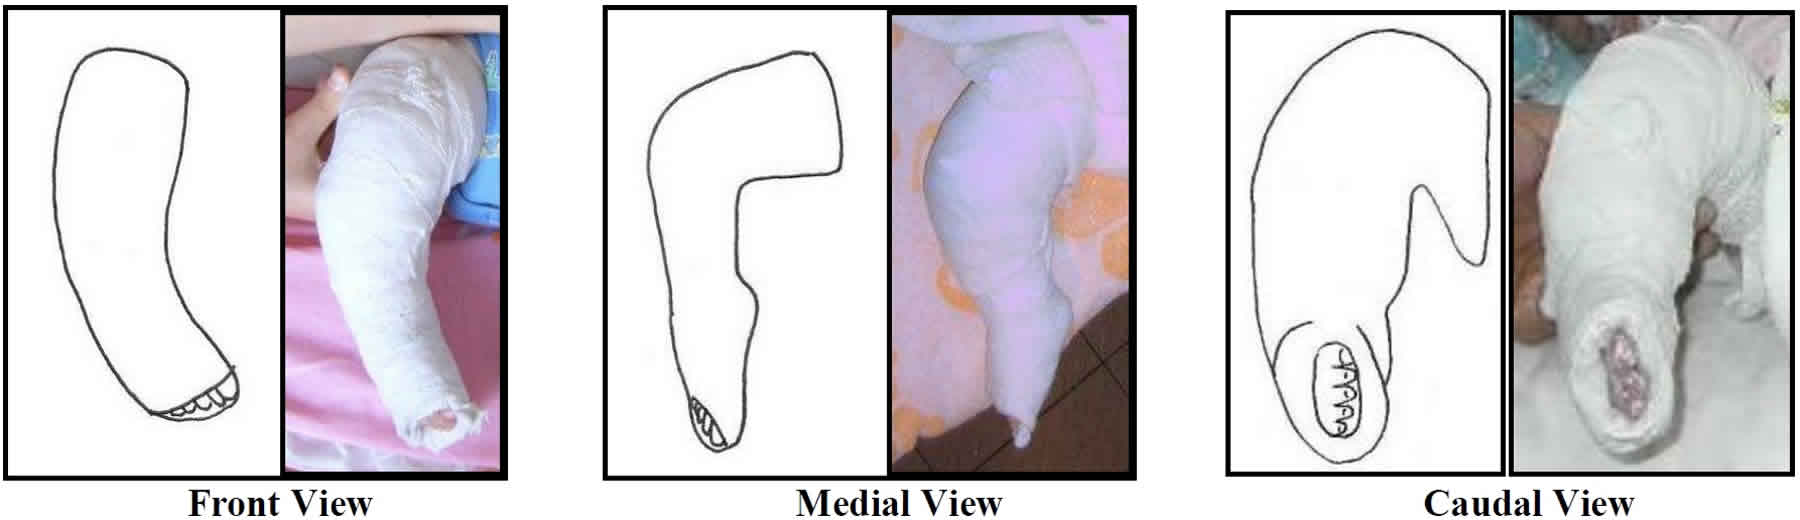
Figure 8. Ponseti method for clubfoot first cast
2. Following casts: Correction of Mid foot Inversion and Heel Varus + Continue Correction of Cavus (if needed)
In each cast aim for more Abduction while Supination automatically decreases. In a severe Clubfoot with still strong Cavus after the first cast, make the correction of the Cavus your priority.
In the “younger child” (= not walked before treatment) aim for 50° (- 60°) Abduction and the heel in neutral position for sure. In the “older child” (= already walked before treatment) aim for 30°-50° Abduction and the heel in neutral position for sure as well.
- Stabilize the Talus by placing the thumb over the lateral part of the head of the Talus.
- Hold the foot in Abduction with the appropriate degree of Supination while applying the cast. Remember that Supination decreases with the increase of Abduction. At about 50° Abduction, no Supination needs to be kept anymore, but never hold the foot in Pronation. The correction of the Calcaneus will be achieved because of coupling. Plaster as often as you need to get enough Abduction.
- Hold the corrected position while an assistant applies padding and plaster. Mould well by changing hand positions.
Figure 9. Ponseti method for clubfoot following casts
3. Last cast(s): Correction of Rigid Equinus in the ankle (after Achilles tendon tenotomy in most cases) + Improvement of Mid foot Abduction and Heel Valgus
However with performed tenotomy of the Achilles tendon right before (most cases) or without (less cases), focus on the maximal possible Dorsiflexion and Abduction in the last cast. The position to aim for is 15°- 30° Dorsiflexion with 60°- 70° Abduction in the “younger child” and 10°- 20° Dorsiflexion with 30°- 60° Abduction in the “older child”. In Atypical Clubfoot or Clubfoot associated with other defects, less Abduction and Dorsiflexion may be possible. In general only one cast is needed after performed tenotomy, but in difficult cases (e.g.: Atypical Clubfoot/syndromes/teenager) with severe Equinus you may decide for a second cast to achieve at least neutral position to 5° Dorsiflexion. If you decide for a second cast after tenotomy, apply the second cast after 4-5 days; but the last cast after the tenotomy needs to stay prolonged for 3 weeks in the “younger child” and 4 weeks in the “older child”. Make sure to apply pressure from behind (not forefoot) to get the Dorsiflexion in the ankle joint and to prevent a rocker bottom deformity. While casting keep the Dorsiflexion firm, because moving the foot in Plantar flexion and back to Dorsiflexion may cause pressure sores in the front by plaster pressing in.
- Stabilize the Talus by placing the thumb over the lateral part of the head of the Talus.
- Move the foot in maximal possible Abduction without any Pronation and then into Dorsiflexion in the ankle with the lower hand. By abducting, the Navicular should now fully cover the head of the Talus, so that the thumb will lose the ability to palpate the lateral head of the Talus. Therefore remove your thumb which stabilized the Talus in the beginning and then move the foot in Dorsiflexion. To achieve a better Dorsiflexion, grab the heel, pull it down and give gentle pressure under the entire sole into Dorsiflexion. Never use mere force or give pressure in the forefoot area trying to achieve more Dorsiflexion – it can cause a rocker bottom deformity. After maximal Abduction and Dorsiflexion has been achieved, move the lower hand to the toes of the child.
- Hold the corrected position while an assistant applies padding and plaster. Change hand positions and mould well at the heel, Malleoli and sole of the foot.
After the cast is removed, the foot may appear overcorrected, but “Hyper abduction” of 70° in babies is a helpful measure to prevent a recurrence.
Figure 10. Ponseti method for clubfoot last casts
Casts removal
The removal of the casts needs to be done in the clinic just before the next step of the treatment. Do not allow the parents to remove the casts at home, because correction can be lost if the child’s feet are out of the corrected position for an extended time.
Find the end of the plaster role which makes it easier to unwrap the softened plaster. Always leave a lump at the end of every plaster role, when the casts are applied so that the end is easy to locate.
Avoid using a plaster saw because it frightens the child and can injure sensitive skin.
1. Soak the casts
- a) Put the child into a warm bath for some minutes to soften the cast. In addition press the cast carefully with your hands. This should be done at the clinic after you checked the condition of the casts.
- b) If the weather is very cold put only the plastered legs in warm water or wrap them in damp towels and press the cast carefully with your hands.
2. Remove the casts
- a) Unwrap the softened plaster roles while the child is still in the bath tub or sitting on the mother’s lap. This is a safe method, but takes extra time.
- b) When using a plaster knife, cut obliquely to avoid cutting the skin. First remove the cast above the knee and then below the knee.
Allow the parents to give the child a quick bath after the plaster has been removed.
Percutaneous tenotomy of the Achilles tendon
Reason: Correction of the rigid ankle foot Equinus. After Cavus, Mid foot Inversion and Heel Varus are corrected, the Equinus needs to be addressed for correction. In most cases the Achilles tendon is quite tight and holds the posterior part of the Calcaneus up. By cutting the tendon this strong force keeping the Calcaneus in strong Equinus will be eliminated.
Result: After performed tenotomy an improvement of 10° Dorsiflexion or more should be achieved.
It is a minor surgical procedure, so does not require the operating theatre. It should be done by an orthopaedic surgeon and an assistant.
Equipment:
- Some antiseptic and equipment to apply the antiseptic
- Gloves
- Local anaesthetic in a small syringe with small gauge needle (lignocaine 0.5cc)
- Scalpel blade #11(sharp) and handle
- Gauze
- For older children mild sedative to calm them. (You can use Lumina: 1mg per kg of the child’s weight. Injection 30min before tenotomy.)
Position of the child:
- Lay the child on their back, with their legs externally rotated.
Procedure:
- Skin preparation with antiseptic.
- Infiltration of local anaesthesia near the tendon.
- Cut the tendon completely: The assistant needs to hold the knee straight and the ankle in Dorsiflexion, so the tendon is under stress. About 1 cm above the Calcaneus, the scalpel blade with the sharp side in proximal direction, is inserted from the medial side parallel to the Achilles tendon. The blade is to rotate gently to cut the tendon completely. Take care not to cut the skin above. A “pop” is felt and the foot immediately dorsiflex more and may become white. Place clean gauze over the incision and hold it for about 5 minutes and make sure the wound is not bleeding anymore.
- 4. Manipulate and then cast the foot in maximal Dorsiflexion and Abduction as described above.
Which child requires a tenotomy?
It is suggested to perform a tenotomy of the Achilles tendon in most cases and even in older children. The attempt to correct a Rigid Equinus gradually by casting runs the risk of too much pressure on the Talus with the result of flattening the Talus. Some milder cases, meaning mild limitation of Dorsiflexion, don’t require a tenotomy. If 20° Dorsiflexion can be achieved easily after the casts corrected the other parts of the deformity, a tenotomy is not necessary.
Guideline for timing
The Pirani Severity Scoring Method indicates when sufficient correction has been obtained:
- Mid foot Contracture Score under 1
- Hind foot Contracture Score over 1
- Lateral head of the talus (LHT) = 0 (in older children or children with associated defects, the Talus head may not be fully covered)
Heel in neutral position for sure (no Heel Varus!) Never perform a tenotomy, if the heel is still in Varus, because not enough correction has been achieved.
Exception: In a child with Atypical Clubfoot or Clubfoot associated with another defect slipping out of the cast regularly, a tenotomy can be performed earlier.
Bracing
1. The bracing is a very important and a critical part of the Ponseti treatment
- After the clubfoot is corrected it has to be held in a corrected position for some times to prevent recurrence. The brace is not a tool for correction.
- Failure to use the brace in the correct way and for the required time is the most common cause of recurrence! You need to emphasize this to the parents.
- The brace needs to be put on immediately after the last casts are removed.
- Length of the bar:
- Distance from one shoe heel to the other should be about the width of the child’s shoulders.
2. Bracing time frame
The following management is a recommendation for children with corrected Congenital Clubfoot and no signs of relapse. Every child’s condition should be checked well for the decision of the suitable bracing time.
Bracing time for the “younger child”(= not free walking before treatment start)
- Start bracing under 9 months of age:
- Fulltime (except bath) = 23 hours a day for 3 months
- Monthly reduced time
- 20-22 hours a day for 1st month
- 18-20 hours a day for 2nd month
- 16-18 hours a day for 3rd month
- Night and nap time = 14-16 hours a day: several months until free walking
- Night time = 12-14 hours a day: till age 4-5 years of age
- Start bracing over 9 months of age:
- Most time = 18-20 hours a day for 2 months
- Reduced time = 16 hours a day for 3-4 months
- 3. Night time = 12-14 hours a day till age 4-5 years of age
Bracing time for the “older child”(= free walking before treatment start)
- Start bracing under 4 years of age:
- Most time = 16-18 hours a day for 3-4 months
- Night time = 12-14 hours a day till age 5
- Start bracing above 4 years of age:
- Night time = 12-14 hours a day 1 year
3. The Abduction Brace
The brace needs to have both shoes attached to a bar in order to prevent a recurrence. An AFO (Ankle Foot Orthotic) is not enough – please don’t try! There are many different types of braces available.
Children should not be encouraged to stand or “walk” in this brace. The brace is not designed for this purpose.
Abduction (or External rotation) and Dorsiflexion
- Bilateral Clubfoot:
- For the “younger child” (= not free walking before treatment start): Both feet in 70°Abduction and 10°- 20°Dorsiflexion
- For the “older child” (= free walking before treatment start): Both feet in 40°-60° Abduction and 10°-20° Dorsiflexion
- Unilateral Clubfoot:
- For the “younger child” (= not free walking before treatment start): Clubfoot in 70°Abduction and 10°- 20°Dorsiflexion. Normal foot in about 40°Abduction and 10-20°Dorsiflexion.
- For the “older child” (= free walking before treatment start): Clubfoot in 40°-60°Abduction and 10°- 20°Dorsiflexion. Normal foot in about 40°Abduction and 10- 20°Dorsiflexion.
- For children with Clubfoot having hypermobile joints, low muscle tone and developed excessive Heel Valgus and External tibial torsion after correction: Both feet (Clubfoot and/or normal foot) in 30°-40°Abduction and 10°-15°Dorsiflexion.
- Atypical Clubfoot:
- Clubfoot in 20°-30°Abduction and 0°-15°Dorsiflexion in the beginning. Later when the foot looks more normal, Abduction may be possible to change to 40°-50°.
- Clubfoot associated with other defects (e.g.: Arthrogryposis, Myelomeningocele):
- The position needs to be individually arranged according to the situation. Children with neurological defects may need an additional AFO (Ankle Foot Orthotic).
4. How to put the brace on
- Make sure the skin is clean and very dry before putting the brace on.
- Put the brace on by first fitting the most difficult foot (Clubfoot if unilateral). Gently push the foot in Dorsiflexion and then push the heel into the brace first. Keep the foot in a good position. First close the inside strap and then close the outside straps of the shoe. Then fit the other foot.
- Make sure that the heel is properly placed in the brace. Use the inspection holes to ensure that this happens.
- Show the parents how to put the brace on and encourage them to help their child to get used to the brace (singing, playing and kicking the feet simultaneously).
5. Ordering of the brace
- Measure the length of the soles of the child’s feet and order the brace on the day you perform the tenotomy. If a tenotomy is not required, order the brace about 3 weeks before it is needed.
- A bigger size needs to be ordered, when the toes are curled over the edge of the shoes.
- Be very exact when you order the brace. The following information should be provided:
- a) Whether bilateral or unilateral clubfoot.
- b) The exact length of the soles of both feet.
- c) Specify for every foot how much Abduction and Dorsiflexion is required.
6. Problems with the bracing
- The child’s heel cannot be placed properly in the brace and/or the foot easily slips out of the brace (even though the shoe is closed tight):
- The Dorsiflexion may not be sufficient: Correct it with a series of casts and then consider another tenotomy of the Achilles tendon if sufficient Dorsiflexion has not been obtained.
- Some Atypical Clubfeet (this is very rare) are not easy to hold in a brace: Try to adjust the brace by applying soft pads at the upper rim of the heel counter or make a special brace.
- The child’s foot has a sore or blister.
- The brace may be too big or too small: Try to adjust the brace by applying a soft pad in the brace or order a suitable size.
- The child fights the brace and cries without any apparent reason.
- This may be caused by the parents removing the brace in response to the child’s crying. Emphasize that they have to use the brace consistently to make the child compliant. Don’t tolerate intermittent usage of the brace.
- If the behavioural problems start after 2 years or more of sleeping time bracing and the feet look fine you can consider stopping the bracing but regular check ups are required every 3 months.
- The bar of the brace is bent wrongly.
- Tell the parents the child should never stand with the brace on. Bend the brace back to the right position.
7. Check up timetable since the bracing phase
- Make sure to organize the check ups according to the suitable bracing schedule and individual situation (e.g.: problem with brace compliance, pressure sores).
- Always tell the parents, that they should return immediately if a foot turns back, if they discover a pressure sore or if the brace gets too small or is broken.
- Timetable guideline:
- 1st check up: 1 week after the bracing started. Check especially on brace compliance.
- 2nd check up: 1 month later. The child should be adjusted to the brace.
- 3rd check up: 1-3 months later depending on when bracing time should be reduced.
- Checks in the 1st bracing year: At least every 3 months if no brace time change. Organize check ups according to the expected brace time changes.
- Following checks in the bracing phase: Every 3-6 months.
- Checks after bracing phase finished: Once a year until skeletal maturity.
Clubfoot recurrences and their management
After clubfeet are fully corrected and the child is in the bracing phase it is possible that feet will relapse. In general the younger the age of the child the higher the risk for relapse. A relapse after the age of 6 in an early treated child is rare if there is no other defect associated with congenital clubfoot. The early recognition of a recurrence followed by correction of the relapse is important to continue to obtain a good result.
1. Cause of recurrences
- The pathology that initiated congenital clubfoot is also responsible for recurrences. As mentioned earlier, etiological factors for the development of the deformity seem to be active for several years.
2. Reasons for recurrences
- a) Failure to wear the brace:
- Failure to wear the brace properly: more than 80% of recurrences.
- Proper wearing the brace: low percentage of recurrences.
- b) Failure in the treatment
- Not enough Abduction has been achieved, so the Navicular displacement was not fully corrected.
- Not enough Dorsiflexion has been achieved.
- c) Possibly a few cases of “too” severe fibrosis in muscles, fasciae, ligaments and tendons in the posterior and medial aspects of the foot?
- d) Associated defects Arthrogryposis, Myelomeningocele or other neurological defects may have a strong impact being an extra force supporting a relapse.
3. Prevention of recurrences
- a) Correction of 70°”Hyper abduction” in the “younger child”.
- b) Strict bracing according to the bracing protocol.
- c) Stretching of the Gastrocnemius muscle.
- Recommendation: Stretching for 2 minutes before putting the brace on (done by parents).
- d) Squatting with heels on the floor stretches the Tibialis posterior muscle.
- Recommendation: Squatting 2 minutes a day (done by parents).
- e) Physiotherapy: Different therapy methods and techniques on neurophysiological basis can be used to facilitate active movements of the feet and help to integrate the feet in physiological movement patterns of the whole body.
4. Kinds of recurrences and their treatment
- a) Varus recurrence
- Heel in Varus. It can be clearly seen in the standing child while watching from the back.
- Treatment: Manipulation + Casts – Followed by Bracing + Stretching + Physiotherapy
- 1. Manipulation and about 1-3 plaster casts for 1-2 weeks.
- 2. After correction back to bracing:
- a) For a child who is not walking: Start again with 3 months fulltime bracing.
- b) For a child who is walking: Start with 2 months16-18 hours per day bracing.
- 3. Daily stretching of the Gastrocnemius muscle and squatting done by the parents. Physiotherapy in addition.
- Treatment: Manipulation + Casts – Followed by Bracing + Stretching + Physiotherapy
- Heel in Varus. It can be clearly seen in the standing child while watching from the back.
- b) Equinus recurrence
- Less Dorsiflexion. Later it may develop Heel Varus, often some Adduction; Cavus rarely recurs.
- Child walking away: early heel rise.
- Child walking toward: maybe weight bearing outside of the foot with Heel Varus.
- X-ray (not necessary) from lateral in most possible
- Dorsiflexion shows: – Not 90° of Tibia to Calcaneus.
- Treatment: Manipulation + Casts – Possibly Tenotomy + Manipulation + Cast – Followed by Bracing + Stretching + Physiotherapy
- Manipulation and about 1-3 plaster casts for 1-2 weeks.
- Possibly repeat of the tenotomy of the Achilles tendon followed by casting for 3-4 weeks.
- After correction back to bracing:
- a) For a child who is not walking: Start again with 3 months fulltime bracing.
- b) For a child who is walking: Start with 2 months16-18 hours per day bracing.
- Daily stretching of the Gastrocnemius muscle and squatting done by the parents.
Physiotherapy in addition.
- If another relapse appears the procedure should be repeated.
- If a third relapse occurs a Tibialis anterior transfer may be required (see next page). Earliest to perform about the age of 2 ½ years: X-ray must show the ossification of the Cuneiforme laterale.
c) Dynamic Supination (= Tibialis anterior muscle very active)
- Noticeable Supination. Typically occurs between 2-4 years of age. The foot can still be passively positioned with the heel in Valgus.
- Child walking toward: Supination of the foot in the swing phase and bearing weight on the outside border of the foot in the stance phase.
- Variable amounts of Dorsiflexion and Plantar flexion are possible.
Treatment: Possibly Manipulation + Casts – Possibly Tenotomy – Tibialis anterior transfer (TAT) + Cast – Followed by Bracing + Physiotherapy
- Possibly 2-3 times manipulation followed by plaster casts for 1-2 weeks to gain a better position of the foot for the Tibialis anterior transfer (TAT).
- Possibly repeat the tenotomy of the Achilles tendon on the same day as the Tibialis anterior transfer (TAT) is performed (if less than 10°Dorsiflexion).
- Tibialis anterior transfer (TAT) followed by 6 weeks long leg cast.
- After correction night time bracing. Physiotherapy in addition.
Tibialis anterior transfer (TAT)
The Tibialis anterior muscle is a strong supinator. This is so, because the insertion of the muscle is at the medial part of the foot (Cuneiforme mediale and 1st Metatarsal). By transferring the tendon to the Cuneiforme laterale the muscle will not work as a supinator any more.
The age of the child to perform the tibialis anterior transfer (TAT) should be about 3-5 years. The earliest age is about 2 ½ years. The X-ray must show an ossification of the Cuneiforme laterale.
References- Ganesan B, Luximon A, Al-Jumaily A, Balasankar SK, Naik GR. Ponseti method in the management of clubfoot under 2 years of age: A systematic review. PLoS One. 2017;12(6):e0178299. Published 2017 Jun 20. doi:10.1371/journal.pone.0178299 https://www.ncbi.nlm.nih.gov/pmc/articles/PMC5478104
- Ponseti IV. Congenital clubfoot: fundamentals of treatment: Oxford University Press, USA; 1996.
- Dobbs MB, Gurnett CA. Update on clubfoot: etiology and treatment. Clinical orthopaedics and related research. 2009;467(5):1146 doi: 10.1007/s11999-009-0734-9
- Treatment Of Congenital Clubfoot Using The Ponseti Method. Workshop Manual 2nd Edition. Iris Lohan. https://storage.googleapis.com/global-help-publications/books/help_clubfoottreatmentmanual.pdf


